AirCom SealAir2K User manual

SealAir2K
SealAir2K
PREMIUM TIRE
REPAIR PRODUCTS

HEALTH & SAFETY CAUTION:
• Avoiding Contact:
Avoid inhaling fumes and dust while using the product.
Wear eye protection during tire repair.
Avoid direct contact with skin, hair, eyes, and clothes.
Wash hands after any contact with the product.
• Chemical Exposure:
The chemical products in the adhesive and sealing systems might cause
health eects.
Avoid contact with skin, hair, or eyes as it may lead to allergic skin
reactions.
If accidentally ingested, rinse the mouth thoroughly and drink plenty of
water. Seek medical advice if necessary.
• Workplace Ventilation:
Ensure proper workplace ventilation while using the SealAir2K Products.
Avoid running the engine in poorly ventilated areas.
Use appropriate respiratory protection if ventilation is insucient.
• First Aid Measures:
If someone inhales the product, move them to fresh air immediately.
In case of accidental ingestion and discomfort, seek medical attention or
contact a poison control center.
• Sealant Leaks:
If the sealant leaks, allow it to dry before removal.
These health and safety cautions aim to prevent any potential health
hazards or accidents while using the SealAir2K Products. Always prioritize
safety measures and follow recommended guidelines during the tire
repair process.
WARNING: If you want to use unusual tires (such as those with sound-
proofing foam or special cord), determine their compatibility with the
service department.
Be careful not to overinflate items with soft inflatables, such as rafts,
balls, and other similar items, that do not have recommended pressure
markings beyond their capacity.
• Do not eat, drink or smoke while using the SealAir2K Products.
• Only use the SealAir2K Products with tubeless tires.
• Avoid breathing dust/fume/gas/mist/vapors/spray and contact with
skin, hair, eyes, and clothes. Protect your eyes when repairing tires.
• Ensure good workplace ventilation and wear appropriate respiratory
protection if ventilation is insucient.
• Do not use CO2 to inflate your tubeless tire.
• Always check tire pressure before driving.
• After use, put the filling hose in a plastic bag to avoid prevent excess tire
sealant from leaking.
• Before driving, ensure the tire is adjusted to the recommended inflation
pressure and monitor tire pressure until the sealed tire is replaced.
• Always use a tire gauge to check the actual pressure in tires. Do not
over-inflate the tire.
• Do not run the vehicle while the compressor is operating. Place the
vehicle in the "accessory" or "on" position, set the emergency brake, and
ensure the car is in a park mode.
• Park your vehicle at the roadside so that you do not obstruct the flow of
trac and you are able to use the SealAir2K Products without being in
danger.
• Set the parking brake, even if you have parked on a level road, to ensure
that the vehicle will not move.
• Do not use the SealAir2K Products if the ambient temperature is below
-30°C (-22°F) or if the tire and rim are damaged.
• Get all passengers to exit the car and take them away from the dange-
rous area. If necessary, place a warning triangle and put on a high-visibility
vest.
• Do not block the compressor input or output while operating.
• Do not attempt to remove foreign objects like nails or screws that have
penetrated the tire. Leave them in the same place where they were
located.
• Never leave the SealAir2K Products unattended while in use.
• Do not keep the compressor operating longer than 15 min. otherwise
there is a risk of it overheating. Allow compressor to cool down between
use. (Compressor can work between 5-20 min depending on outside
temperature )
• Replace the sealant bottle with a new one before the expiration date is
reached (see bottle label). If the sealant has expired, the functionality
cannot be fully guaranteed.
• Before using the SealAir2K Products, observe the warning and danger
information provided on the device and on the sealant bottle.
• The SealAir2K Products should be used only to seal/pump tires recom-
mended for cars and light vehicles for commercial purposes up to 3.5 t
(PC/Me, PC/H, SUV, VAN).
• Always ensure the air hose chuck touches the core of the valve stem for
proper inflation.
• For use with 12 volt DC power outlets rated 15 amps or higher. Do not
use with older 8 amp cigarette lighter receptacles.
• Dispose of contents and containers are in accordance with all local,
regional, national, and international regulations. An empty bottle can be
thrown into a plastic container.
WARNING: Do not insert any parts of The SealAir2K Products into
any holes of your or other people's body. Do not ingest, swallow, or
consume any parts or contents of The SealAir2K Products. This can
cause serious injury or harm. The set is intended for its specified
use only and misuse can result in severe consequences. Please
read the instructions carefully and use the set as directed.
WARNING: Please do not use the SealAir2K Products if your tire has
been damaged due to driving with insucient inflation. The kit is
designed to seal punctures located within the visible tread of the tire
only. Do not attempt to seal damage to the tire's sidewall or any other
type of damage. Do not use The SealAir2K Products if the tire and rim are
damaged.
Using The SealAir2K Products for any other purpose, than its intended
use, can lead to severe accidents or injuries as compressed air can act as
an explosive or propellant. It is essential to follow the instructions in the
manual and use the kit only for temporary repairs of tire punctures
located in the visible tread of the tire. Failure to follow these instructions
can result in serious injury or death.
Read before use: The SealAir2K Products are designed to temporarily
restore car mobility by sealing most tire punctures caused, for example, by
nails or similar foreign objects with a diameter of up to 6 mm. However, note
that some types and extents of tire damage may not be sealable or can only
be partially sealed.
The bottle of sealant with an adapter can be used with compressors from
other manufacturers.
Loss of tire pressure can significantly aect vehicle handling and may lead to
loss of vehicle control, which could result in serious injury or even death.
Observing Rules: When using the SealAir2K Products by Aircom, adhere to the
following guidelines:
• The bottle with an adapter can be used with a compressor with a pressure
range of 5 to 6 bar.
• Drive cautiously, avoiding sudden steering or driving maneuvers, particularly
when the vehicle is heavily loaded or towing a trailer.
• These products are a temporary solution, allowing you to drive a maximum
of 1000 km or to the nearest vehicle or tire dealer for proper repair or replace-
ment.
• Do not exceed a maximum speed of 80 km/h.
• Store the SealAir2K Products securely in the vehicle's trunk, avoiding
placement in the passenger compartment to prevent injury during sudden
stops or collisions.
These instructions provide a step-by-step explanation of how to use the
SealAir2K Products to temporarily repair a tire puncture. Please read the
section on “How to proceed in the event of a tire puncture”.
SAFETY WARNING: Before using the Tire Repair Products by Aircom,
carefully read and understand these instructions and warnings.
Complying with these instructions is crucial for ensuring vehicle safety.
Failure to comply may result in tire damage, aecting vehicle handling,
potentially leading to a loss of control and serious injury or death. If the
standard items for dealing with a puncture have been replaced by the Tire
Repair Products by Aircom, inform all other vehicle users.
ATTENTION! READ ALL INSTRUCTIONS CAREFULLY.
USER GUIDE - Tire Repair Products
ENG
USER MANUAL
HOW TO USE TIRE REPAIR KIT SAFELY:
• Read all instructions and warnings carefully before using The SealAir2K
Products.
• Use The SealAir2K Products only with original vehicle tires.
• Ensure that standard items for dealing with a puncture, such as a spare
tire, have been replaced by the SealAir2K Products.
• Do not attempt to seal damage other than that located within the
visible tread of the tire or on the tire's sidewall.
• Do not use the SealAir2K Products for any other purpose other than its
intended use.

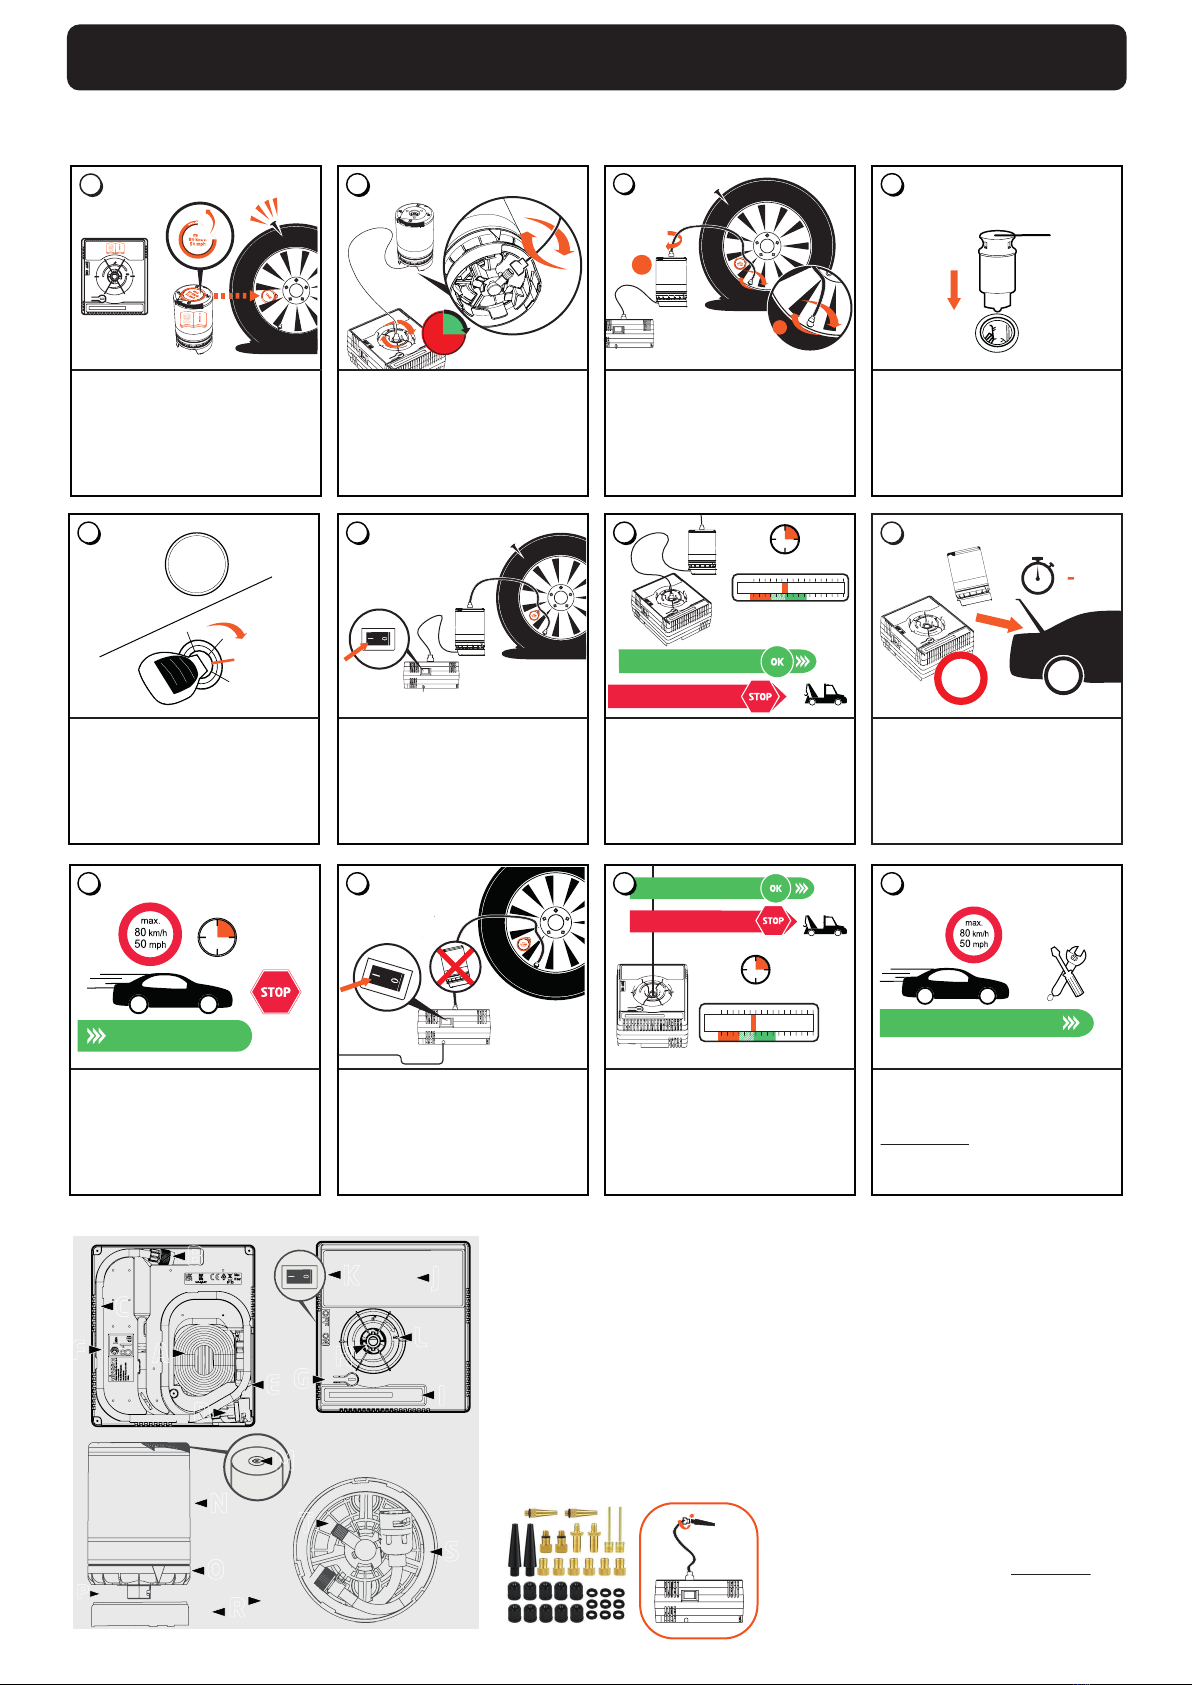
SCENARIO 1: SEAL PUNCTURED TIRE
1
!
Part 1: Pumping Tire Sealant into the Tire with
SealAir2K Bottle Attached
Peel o the warning sticker with the maximum
permissible speed (80 km/h | 50 mph) info from the
compressor and attach it to the steering wheel.
Ax the TMK decal from the SealAir2K bottle to the
wheel for quick reference.
Extract the hose and power plug with cable from the
SealAir2K compressor.
Securely attach the SealAir2K bottle to the compressor by
gently screwing it (90 degrees clockwise) onto the output
valve (matching lock indicators).
NOTE: Lock indicators (arrows, that you will find on the
bottle [ O ] and compressor [ L ] ) position should be
matched.
90°
2
Rotate the hose valve 90 degrees clockwise and attach it
to the SealAir2K bottle's output valve. Then, connect the
hose cable to the tire valve.
WARNING: Ensure that the bottle and hose are properly
connected to prevent pressure loss.
1!
3
2
Plug in the 12V power cable into the car's power outlet.
Confirm a secure connection.
NOTE: Ensure that the power cable is plugged in correctly
and securely.
12 V
4
Turn on the car's ignition.
NOTE: Remember to engage the handbrake and shift the
gear into neutral or park.
0
1
2
3
ENGINE
START
5
Activate the power button on the compressor. This
initiates the sealant pumping into the tire.
NOTE: Initially, the pressure gauge may display a higher
value; do not turn o the compressor as the pressure will
decrease naturally.
6
Inflate the tire until the recommended pressure, typically
exceeding 1.8 bar/26psi/180kPa, is achieved. This process
should take no longer than 15 minutes.
WARNING: If the tire pressure does not reach 1.8 bar (26
psi/180 kPa) within 10 minutes, the tire may have
sustained excessive damage that makes a temporary
repair impossible. In this case, do not continue to use the
tire. Call for a towing service.
max 15 min.
>1.8 bar/26 psi/180 kpa
7
<1.8 bar/26 psi/180 kpa
Pack TMK back to your car and start driving.
WARNING: This step shouldn’t take any longer than
1 minute.
GO!
MAX
60 SEC.
7a
If desired pressure in the tire is reached quickly start
driving 10km (6 mi.) or 15 minutes with a maximum speed
of 80 km/h (50mph).
NOTE: The tire isn't sealed yet and tire pressure is still
dropping, sealing process happens while driving.
8
15 min.
> 10 km (6 mi.)
Part 2: Check Tire Pressure and Inflate Tire
without the SealAir2K Bottle.
Stop the car and connect the compressor (instruction on
the compressor B.2) to the tire valve without the bottle.
Inflate the tire to the pressure specified in the car's
manual.
9
Briefly switch o the compressor to check the actual tire
pressure using the pressure gauge.
If the specified pressure isn't reached within 15 minutes,
consider contacting a towing service for assistance.
max 15 min.
>2.5 bar/36 psi/250 kpa
<2.5 bar/36 psi/250 kpa
10
If desired pressure in tire is reached, you can proceed to
drive cautiously within the limitations of a maximum
distance of 1000 km (620 miles) and at a maximum speed
of 80 km/h (50 mph). (Distance can vary by tire model,
weather condition, size of puncture).
Inform all other users of the vehicle that the tire has been
temporarily sealed with the SealAir2K Products and make
them aware of the special driving limitations to be
observed.
max 1000 km (620 mi.)
11
WARNING: If the tire's air pressure does not reach 1.8 bar (26
psi / 180 kPa) within 15 minutes, it's likely that the tire has
suered extensive damage, making temporary repair impossi-
ble. In this scenario, do not continue using the tire; instead,
contact a towing service.
ATTENTION: If the tire is completely deflated, there is a
possibility of the tire separating from the rim, causing air leakage
when attempting to inflate it. If this occurs, jack up the vehicle to
aid inflation. If unsuccessful, contact a towing service.
ATTENTION: DO NOT CARRY THE COMPRESSOR IN YOUR
HANDS WHILE OPERATING, INSTEAD PLACE IT ON A HARD,
CLEAN SURFACE.
WARNING! SealAir2K Products are intended solely for
emergency tire repairs, allowing vehicles to be driven to a service
center for proper tire repair. They are not intended for use in
cases of severe tire damage. Radial ply passenger car tires may
only be repaired in the tread area. No repairs are allowed on the
bead, sidewall, or shoulder area of the tire. Exercise extreme
caution while using tools to prevent injury. Improperly connec-
ted products can cause the sealant to spray.
Parts kit
A- Power cable
B- Tire valve nut
C- Air hose
D - Bayonet
E - Car lighter plug
F- Nameplate
G- Air release valve
H- Bayonet connector
I - Manometer
J - Instruction Label
K - ON/OFF switch
L- Lock indicator
M- Bayonet
N- Instruction label
O- Lock indicator
P - Bayonet connector
R- Adapter
S- Air Hose
T- Air Hose thread
AB
C
DE
F
GH
I
J
K
L
M
N
R
S
T
O
P
This scenario details the steps involved in temporarily repairing a punctured tire using the SealAir2K Products, ensuring
proper and safe usage for an eective temporary fix.

SCENARIO 2: JUST INFLATE TIRE
Verify if the tire is not punctured. In case of a puncture,
refer to Scenario 1: Seal Punctured Tire for appropriate
steps.
Extract the compressor hose and power plug with the
cable from the SealAir2K compressor.
i
Carefully remove the warning sticker indicating the
maximum permissible speed (80 km/h | 50 mph) from
the compressor.
1
Securely attach the hose bayonet into the bayonet
connector of the compressor, rotating it 90 degrees
clockwise. Subsequently, attach the hose cable to the
tire valve.
WARNING: Ensure a proper connection between the
hose and the compressor to avoid pressure loss.
90° !
1
2
Plug in the 12V power cable into the car's power outlet.
NOTE: Make sure that the power cable plugin is
connected properly.
12 V
3
Turn on the car's ignition.
NOTE: Remember to engage the handbrake and shift
the gear into neutral or park.
0
1
2
3
ENGINE
START
4
Turn on the power button on the compressor.
The compressor will start pumping air into the tire
5
Briefly turn o the compressor to read the actual tire
pressure from the pressure gauge. Refer to the Tire
and Loading Information label on the car to identify the
desired air pressure.
2.0 bar
29 psi
200 kPa
TIRE TIRE PRESSURE
FRONT xxx kPa xx psi
REAR xxx kPa xx psi
TIRE AND LOADING INFORMATION
6
Most common FAQ's are listed here (more to be found on www.sealair2k.com):
Compressor does not turn on:
1. Check the vehicle’s power outlet fuse; it should be a minimum of 15 amps.
2. Check receptacle and plug terminals for dirt. Use a non-conductive probe (not fingers or metal) to dislodge and remove
debris.
3. Voltage may be too low. Check the condition of the vehicle’s battery or turn on the car ignition.
4. Check if the 12V plugin is pushed in properly.
REMEMBER:
1. DO NOT run the vehicle while the inflator is operating. Please make sure the emergency brake is set and the car is in
the parking mode.
2. ALWAYS use a pressure gauge to check tire pressure. DO NOT overinflate.
3. Soft inflatables (i.e. rafts, balls, etc.) may not have recommended pressure markings. Be careful not to inflate items
beyond their capacity.
4. While operating, never block the inflator input or output.
5. Keep compressor out of reach of children.
6. Only for use with 12 volt DC power outlets rated 15 amps or higher. Do not use older 8 amp cigarette lighter receptac-
les.
SEALANT REMOVAL INSTRUCTIONS: FOR TIRE REPAIR PROFESSIONALS
The SealAir2K bottle tire sealant is non-flammable and water-based, ensuring straightforward cleanup. Before conduc-
ting a permanent repair, it's essential to rinse or wipe the sealant out of the tire. In the event of any sealant spilling onto
the shop floor, promptly wipe it with a rag and rinse the aected area with water. When a Tire Pressure Monitoring
System (TPMS) sensor is present, ensure the sensor is wiped with a damp rag before reinstallation.
Rest assured, this sealant will not cause corrosion or have adverse eects on the rim or tire.
QUESTIONS OR COMMENTS: Call (+48 605 501 177) or visit www.SEALAIR2K.com
This scenario guides users through the steps for inflating a tire that doesn't require sealant, emphasizing safety precau-
tions and correct operational procedures when using the SealAir2K compressor.
SCENARIO 3: TIRE REPAIR WITH A BOTTLE SEALAIR2K AND ANOTHER COMPRESSOR
1
Part 1: Pumping tire sealant with
another compressor
Peel o the warning sticker from the SealAir2K bottle
and attach it to the wheel.
Disasamble the air hose from the SealAir2K bottle
adapter.
Connect the hose from the alternate compressor to the
SealAir2K bottle adapter.
2
Connect the sealant bottle with the valve of the tire by
using the hose removed from the Adapter in step 2.
Gently screw the hose bayonet into the outlet valve of
the SealAir2k bootle by clockwise rotating for 90°.
Than screw the hose line to the tire valve.
WARNING: Confirm proper connections to avoid
pressure loss.
3
Plug in the 12V power cable to the car's cigarette
lighter socket.
NOTE: Verify the secure connection of the power
cable.
12 V
4
Turn on the car's ignition.
NOTE: Remember to have the handbrake engaged and
gear set to neutral or park.
0
1
2
3
ENGINE
START
5
Activate the power button on the compressor. This
initiates the sealant pumping into the tire.
NOTE: Initially, the pressure gauge may display a higher
value; do not turn o the compressor as the pressure will
decrease naturally.
6
Inflate the tire until the recommended pressure, typically
exceeding 1.8 bar/26psi/180kPa, is achieved. This process
should take no longer than 15 minutes.
WARNING: If the tire pressure does not reach 1.8 bar (26
psi/180 kPa) within 10 minutes, the tire may have
sustained excessive damage that makes a temporary
repair impossible. In this case, do not continue to use the
tire. Call for a towing service.
>1.8 bar/26 psi/180 kpa
<1.8 bar/26 psi/180 kpa
max 15 min.
bar
psi
7
Pack TMK back to your car and start driving.
WARNING: This step shouldn’t take any longer than
1 minute.
7a
If desired pressure in the tire is reached quickly start
driving 10km (6 mi.) or 15 minutes with a maximum speed
of 80 km/h (50mph).
NOTE: The tire isn't sealed yet and tire pressure is still
dropping, sealing process happens while driving.
8
15 min.
> 10 km (6 mi.)
Briefly switch o the compressor to check the actual tire
pressure using the pressure gauge.
If the specified pressure isn't reached within 15 minutes,
consider contacting a towing service for assistance.
max 15 min.
>2.5 bar/36 psi/250 kpa
<2.5 bar/36 psi/250 kpa
10
If desired pressure in tire is reached, you can proceed to
drive cautiously within the limitations of a maximum
distance of 1000 km (620 miles) and at a maximum speed
of 80 km/h (50 mph). (Distance can vary by tire model,
weather condition, size of puncture).
Inform all other users of the vehicle that the tire has been
temporarily sealed with the SealAir2K Products and make
them aware of the special driving limitations to be
observed.
max 1000 km (620 mi.)
11
!
90°
2
1!
GO!
MAX
60 SEC.
Part 2: Check Tire Pressure and Inflate Tire
without the SealAir2K Bottle.
Stop the car and connect the compressor (instruction on
the compressor B.2) to the tire valve without the bottle.
Inflate the tire to the pressure specified in the car's
manual.
9
A- Power cable
B- Tire valve nut
C- Air hose
D - Bayonet
E - Car lighter plug
F- Nameplate
G- Air release valve
H- Bayonet connector
I - Manometer
J - Instruction Label
K - ON/OFF switch
L- Lock indicator
M- Bayonet
N- Instruction label
O- Lock indicator
P - Bayonet connector
R- Adapter
S- Air Hose
T- Air Hose thread
Additional inserts/adapters to be used with
Aircom compressor.
WARNING: Be careful not to overinflate items
with soft inflatables, such as rafts, balls, and
other similar items, that do not have recommen-
ded pressure markings beyond their capacity.
A
B
C
D
E
F
GH
I
J
K
L
M
N
R
S
T
O
P
bar
psi
This scenario guides users through the steps for inflating a tire that requires sealant, emphasizing safety precautions and
correct operational procedures when using the SealAir2K compressor or alternate compressor.

QUESTIONS OR COMMENTS:
Call (+48 605 501 177) or visit
www.SEALAIR2K.com
Aircom Automotive
50-080 Pietrzykowice
ul. Fabryczna 20b
Poland
Popular Air Compressor manuals by other brands


Parkside
Parkside 89564 Operation and safety notes

Hitachi
Hitachi HISCREW V PLUS NEXT Series instruction manual

Powermate
Powermate 200-2649 Operator's & parts manual

Clarke
Clarke Air SP15ND Operating & maintenance instructions

Danfoss
Danfoss SC Series Wiring diagram

Campbell Hausfeld
Campbell Hausfeld FP2090 Series operating instructions