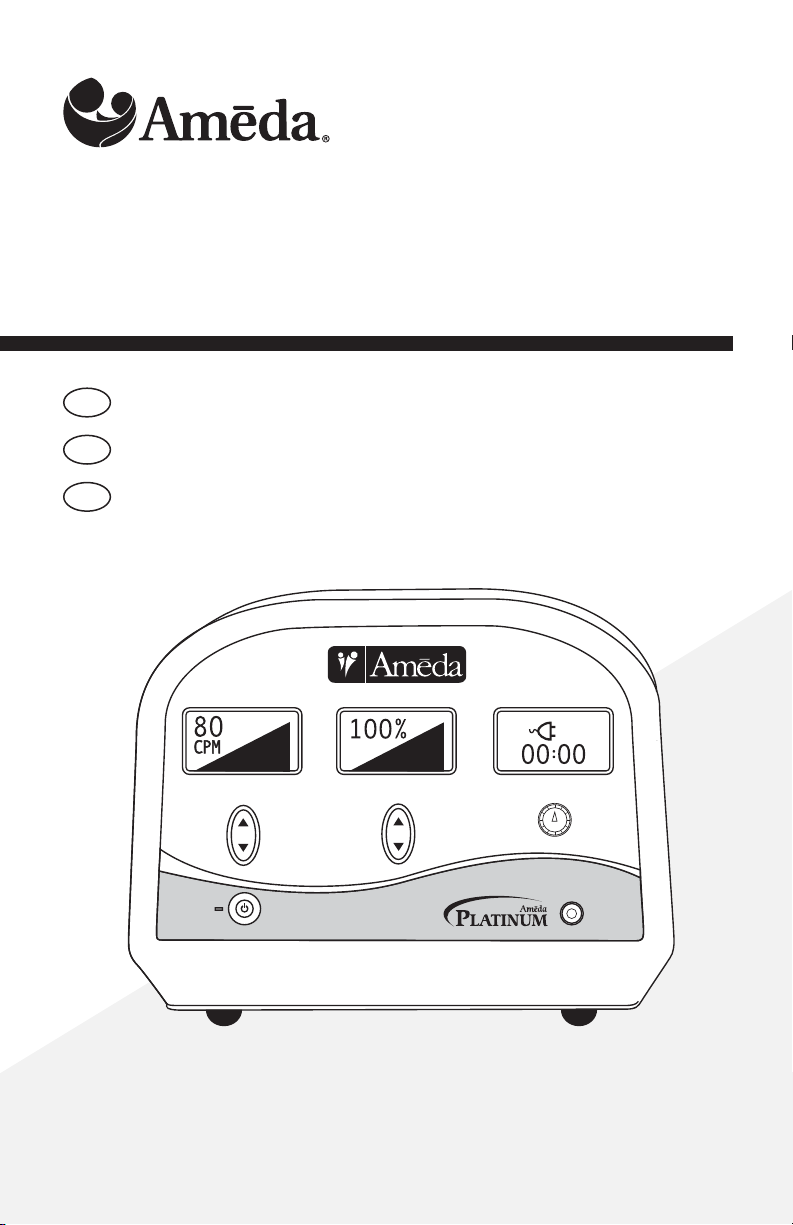
Ameda Platinum 17803 User manual
English | Page 2
Français | Page 13
Español | Página 24
Ameda Platinum®Breast Pump Instructions
Mode d’emploi du Tire-lait Ameda Platinum®
Instrucciones de la Bomba de extracción Ameda Platinum®
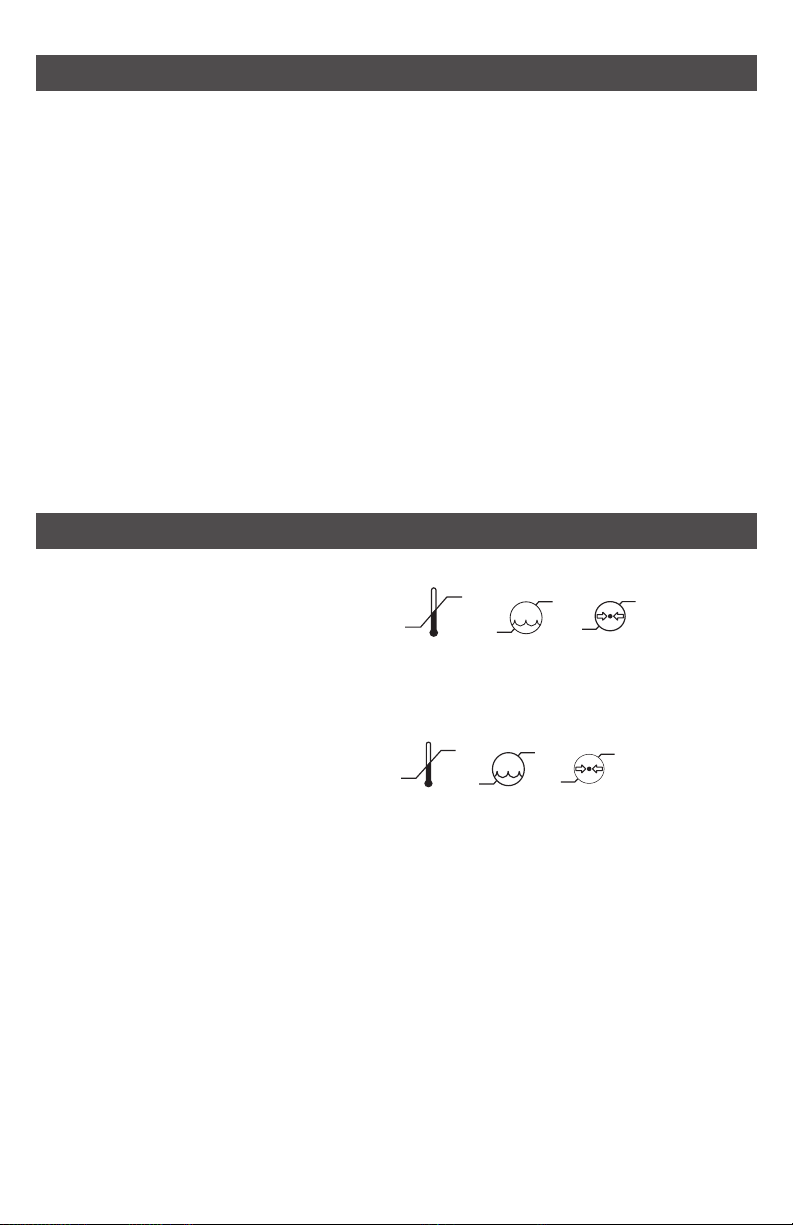
suction timer
speed
EN
FR
ES
2 | ENGLISH
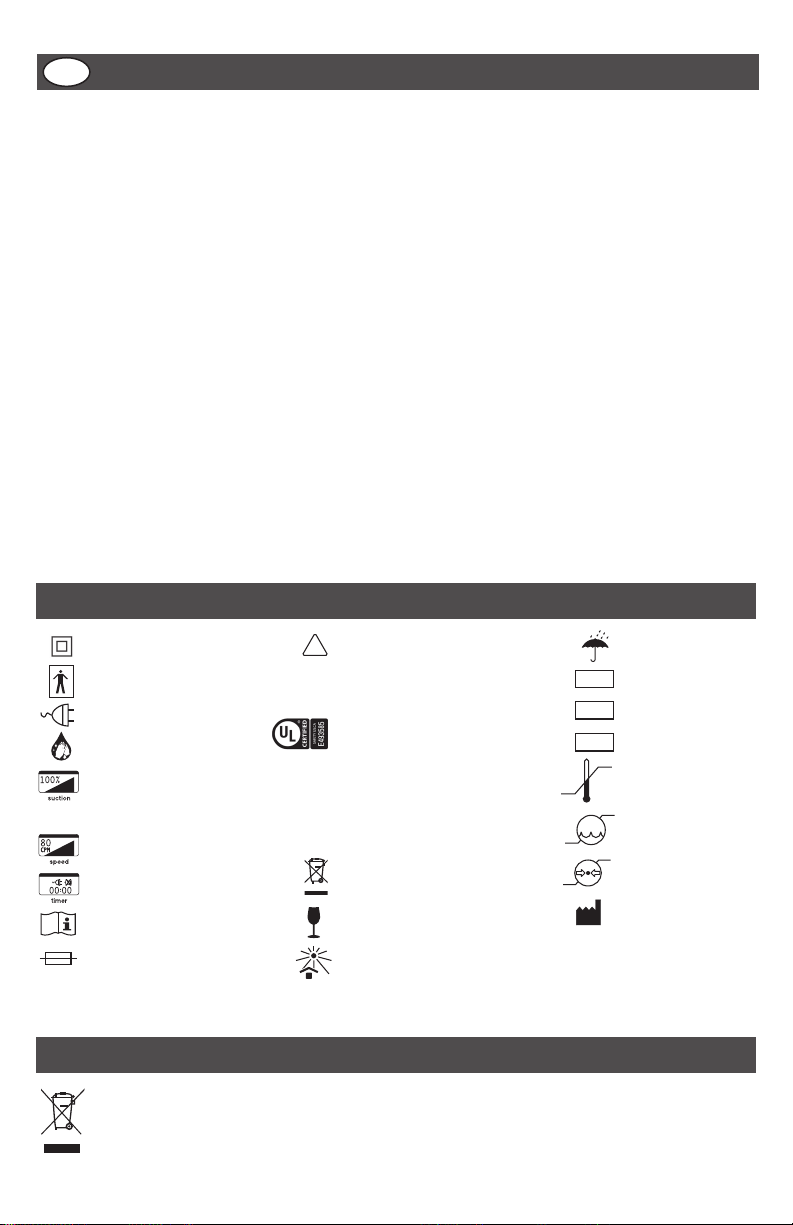
Icon Glossary ............................................................................................2
Product Disposal .........................................................................................2
Important Safeguards .....................................................................................3
Intended Use ............................................................................................3
Ameda Planum Breast Pump Diagram .....................................................................4
Ameda Planum Breast Pump Trolley .......................................................................5
Set Up and Assembly......................................................................................6
Before Every Use ......................................................................................6
Ameda®HygieniKit® Milk Collecon System ..............................................................6
Ameda Planum Breast Pump .........................................................................6
Single and Dual Pumping ...............................................................................6
Controls and Displays .....................................................................................6
Using “Up/Down” Buons ..............................................................................6
Operang the Pump ...................................................................................6
Seng Sucon ........................................................................................6
Seng Speed .........................................................................................6
Using Timer ...........................................................................................7
Turning Pump Funcon O .............................................................................7
Removing Ameda HygieniKit Milk Collecon System from Breast(s) ..........................................7
Cleaning .................................................................................................8
Storing and Transporting .................................................................................8
Troubleshoong ..........................................................................................8
Maintenance .............................................................................................9
Technical Informaon . . . . . . . . . . . . . . . . . . . . . . . . . . . . . . . . . . . . . . . . . . . . . . . . . . . . . . . . . . . . . . . . . . . . . . . . . . . . . . . . . . . . .9
Guidance and Manufacturer’s Declaration ............................................................... 10
Warranty Informaon ....................................................................................12
CONTENTS
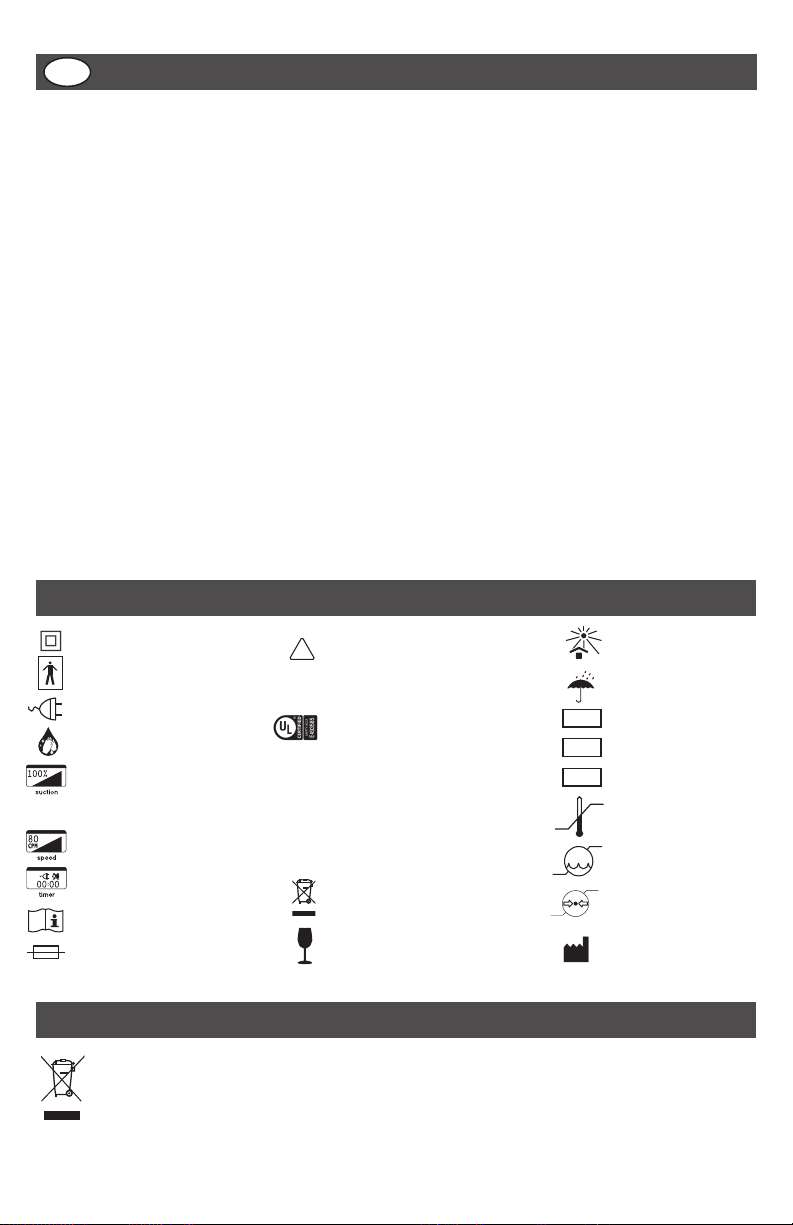
Double Insulated/Class II
Type BF Applied Part
Connected to Wall Outlet
Washing Instrucon
% of Full Scale Sucon
1% -100%; (approximately
30mmHg to 250mmHg/4.0kPa
to 33.3kPa)
Cycles Per Minute (30-80 cpm)
Timer Display
Consult Instrucons For Use
Fuse
Cauon Consult Documents
Solid Parcle/Liquid
Ingress Classicaon
UL Cered E493585 MEDICAL -
GENERAL MEDICAL EQUIPMENT AS
TO ELECTRICAL SHOCK, FIRE AND
MECHANICAL HAZARDS ONLY IN
ACCORDANCE WITH ANSI/AAMI
ES 60601-1 (2005) + AMD1 (2012)
and CAN/CSA-C22.2 No. 60601-1
(2008) + (2014) and IEC 60601-1-6
(2010) + AMD1 (2013) and IEC 62366
(2007) + AMD1 (2014)
Waste Electrical and Electronic
Equipment
Fragile
Protect from sunlight
!
REF
LOT
SN
Keep Dry
Serial Number
Lot Number
Catalogue Number
Temperature Limitaon
Humidity Limitaon
Pressure Limitaon
For Operaon/Transport/
Storage
Manufacturer
kPa
%
ICON GLOSSARY
IP21
EN
1. The internal components of this product may contain hazardous materials. Dispose of this product
according to local or regional waste administraon systems and regulaons.
2. Do not dispose of as unsorted municipal waste.
3. For further informaon regarding the environmental performance of this product please visit our
website www.ameda.com.
minimum
size
PRODUCT DISPOSAL This product contains electrical and electronic equipment.

ENGLISH | 3
When using electrical products, especially if children are present, the following basic safety precauons should
always be maintained.
READ ALL INSTRUCTIONS BEFORE USING
Danger: To reduce the risk of electrocuon:
• Always unplug electrical devices immediately aer use.
• Do not use while bathing, showering or swimming.
• Do not place or store where product can fall or be pulled into bathtub, sink or pool.
• Do not place or drop product into water or other liquid.
• Do not reach for electrical product that has fallen into water. Unplug from wall outlet immediately.
Warning: To reduce the risk of burns, electrocuon, re, or injury to persons:
• To avoid the risk of electric shock, this equipment must only be connected to an electrical outlet with proper
grounding. Use only the Ameda supplied 3-prong cord.
• Never leave product unaended when plugged into electrical outlet.
• Close supervision is necessary when product is used near children or invalids.
• Use product only for intended use as described in this manual.
• Do not use aachments or other milk collecon kits other than those recommended by manufacturer.
• Never operate if product has damaged cord or plug, is not working properly, or has been dropped, damaged,
or becomes wet.
• Keep cord and all aachments away from heated surfaces.
• Never use while sleeping or drowsy.
• Do not use outdoors with cord.
• Do not operate where aerosol spray products are being used or oxygen is being administered.
• Do not disassemble the Ameda Planum Breast Pump.
• Always place pump on a horizontal at surface when using product.
• Do not remove the breast ange from your breast while pumping. See Instrucons for removing HygieniKit.
• Pumping can induce labor, do not use while pregnant unless approved by your breaseeding specialist or
healthcare professional.
• Strangulaon Hazard: Keep tubing and cords out of reach of children.
• Choking Hazard: Small parts, NOT for children under 3 years.
Contradicons for Use
There are no known contraindicaons for use with this product.
SAVE THESE INSTRUCTIONS
IMPORTANT SAFEGUARDS
INTENDED USE
The Ameda Planum Breast Pump is intended to express and collect milk from the mother’s breast, to alleviate
engorgement of the breast, maintain the ability of lactaon, and provide mother’s milk for future feedings when
separaon of mother and baby occurs.
The Ameda Planum Breast Pump is an electrically-powered vacuum device intended to express milk from
the breast of a nursing woman using the Ameda HygieniKit Milk Collecon System. The vacuum prole of the
Ameda Planum Breast Pump is paerned aer the sinusoidal waveform of the Ameda SMB™ Breast Pump, and
implemented using a motor-driven, piston pump mechanism that is under microprocessor-based control. The
electrical hardware/soware architecture enables the end-user to set cycle speed, labeled “speed”, and vacuum
level, labeled “sucon”, from independent front panel controls, in order to produce the necessary changes in
vacuum output. Incorporang a vacuum sensor and proporonal valve inside a closed-loop control scheme
improves pump performance over previous pump designs in both single and double pumping modes under varying
ambient barometric condions. Graphical displays help the user to visualize pumping parameters and make
repeatable adjustments. The dierenang feature of an elapsed session mer display and its control are intended
to facilitate a mother following a pumping protocol.

4 | ENGLISH
Front View
1. Sucon Display (Maximum Shown
in Percentage)
2. Speed Display (Maximum Cycles
per minute shown)
3. Speed Control
4. Power Buon
(Turn Pump ON/OFF)
5. AC Power Indicator
6. Timer Display
7. Timer Reset Buon
8. Sucon Control
9. Tubing Adapter Port
10. Milk Bole/Breast Flange Holders
11. Handle
12. AC Power Inlet
13. Pump Feet
14. Trolley Mounng Hole
15. Service Port Door
16. Pump Rear Foot Locaon
17. Pump Front Foot Locaon
18. Pump Mounng Holes
Top View
suctiontimer
speed
11
12
suction timer
speed
1
2
3
4
5
6
7
8
9
suctiontimer
speed
10
Boom View
15
13
14
AMEDA PLATINUM BREAST PUMP DIAGRAM
Rear View

ENGLISH | 5
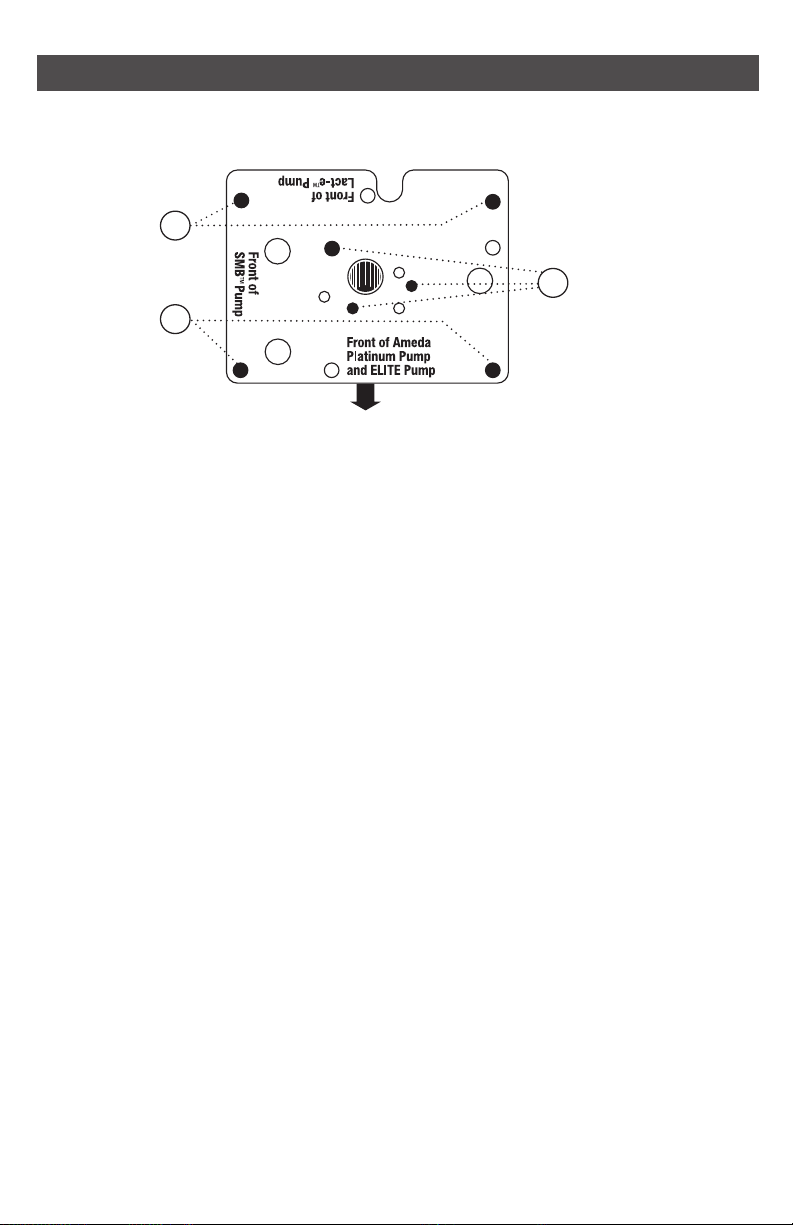
Trolley Plate Top View (oponal accessory)
FRONT OF AMEDA PLATINUM PUMP
16
18
17
Aaching the Ameda Planum Breast Pump to Trolley (if applicable)
Trolley is available as an accessory item.
• Aach pump to trolley prior to plugging cord into wall outlet.
• Align front of the Ameda Planum Breast Pump with wording, “Front of Ameda Planum and Elite™ Pump”
found on top of trolley mounng plate.
• Lower pump onto plate, inserng pump’s four feet into holes, one in each corner of trolley mounng plate.
• Locate mounng holes with wording, “Ameda Planum Pump and Elite Pump Mounng” found on underside of
trolley mounng plate.
• Use mounng screws for the Ameda Planum Breast Pump supplied with trolley to secure pump to trolley base.
Trolley Operang Instrucons
• Once pump is aached to trolley, ensure all wheels are unlocked to move the trolley-pump assembly. Wheels are
unlocked by liing the locking tab on each wheel.
• Move the trolley-pump assembly by gently pushing horizontally on the pump.
• When trolley-pump assembly is in the desired posion, lock all wheels by pushing down on the locking tab on
each wheel.
AMEDA PLATINUM BREAST PUMP TROLLEY
6 | ENGLISH
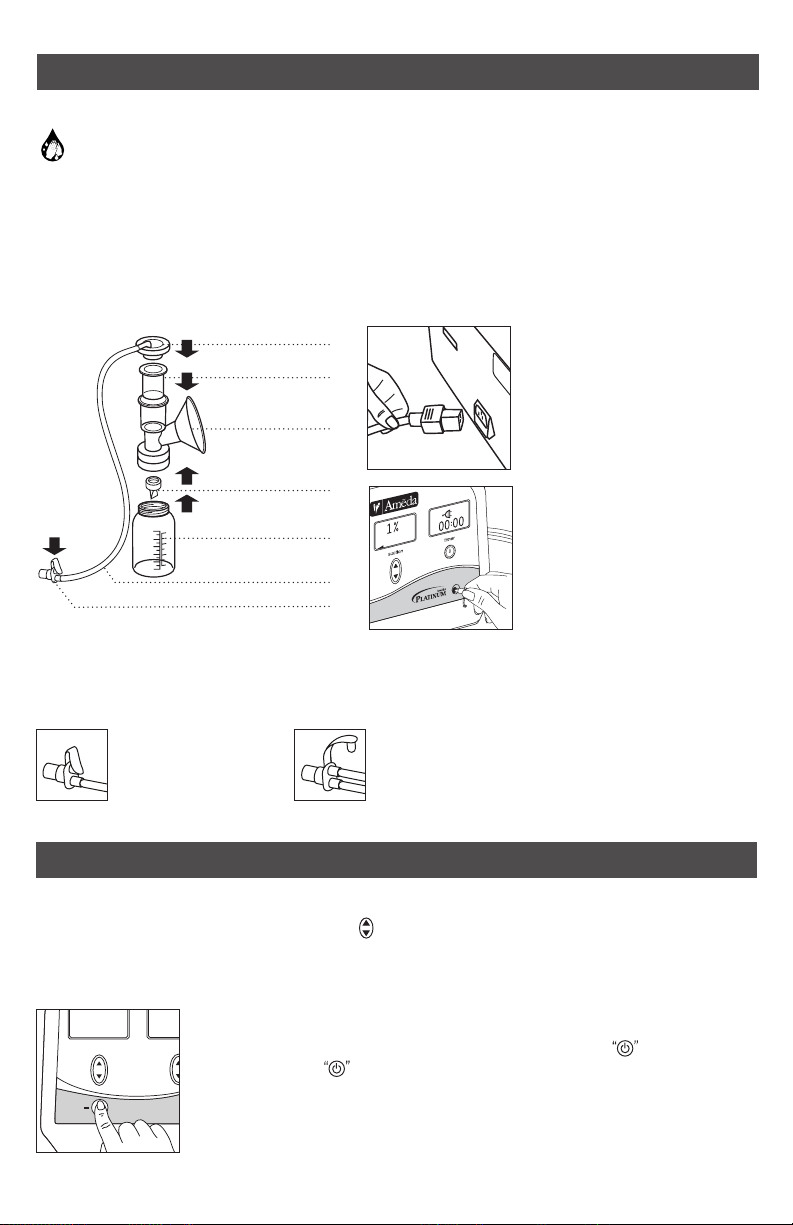
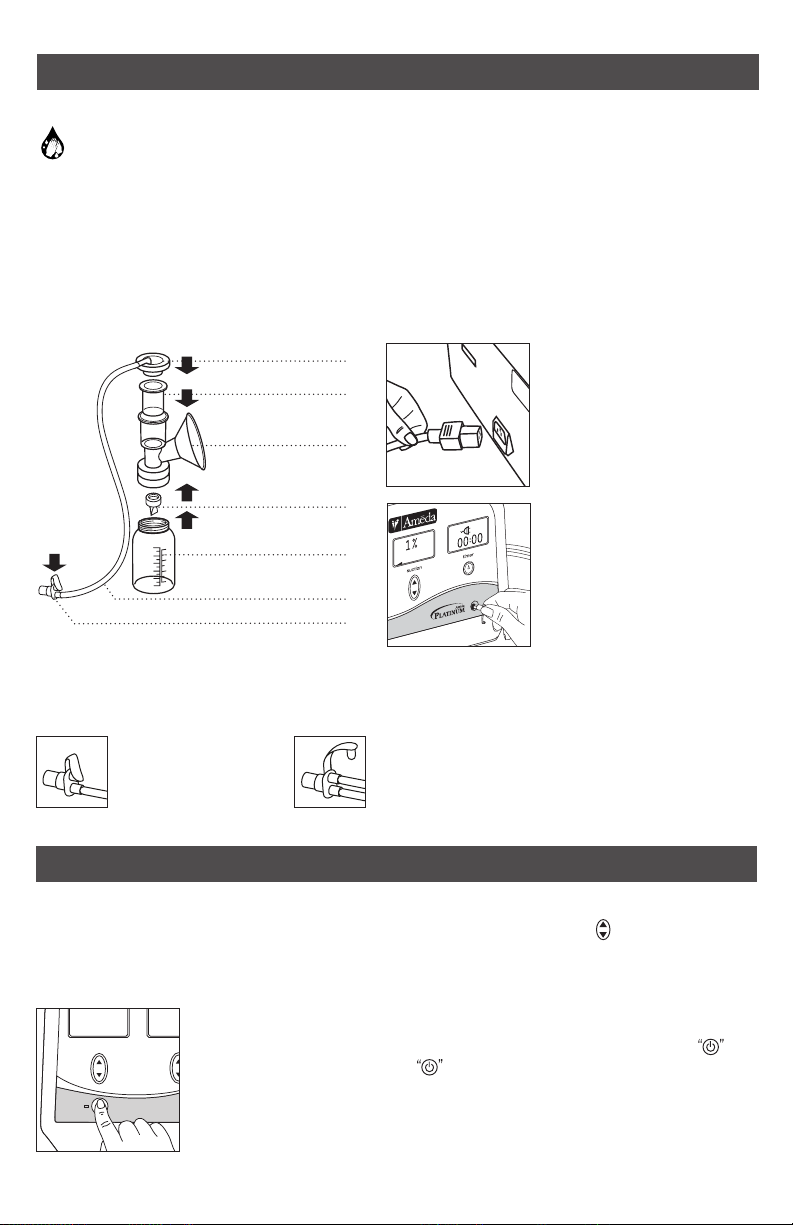
Before Every Use
Always wash hands well with soap and water before handling the Ameda Planum Breast Pump and
Ameda HygieniKit Milk Collecon System.
IMPORTANT NOTE: ONLY USE THE AMEDA HYGIENIKIT MILK COLLECTION SYSTEM ON AMEDA ELECTRIC
BREAST PUMPS.
Prior to starng pump, assemble and connect the Ameda HygieniKit Milk Collecon System, per included instruc-
ons. If the Ameda HygieniKit Milk Collecon System is sterile, use as is. If not sterile, see the Ameda HygieniKit
Milk Collecon System cleaning instrucons.
Ameda HygieniKit Milk Collecon System Ameda Planum Breast Pump
suction
speed
Single and Dual Pumping
The Ameda HygieniKit Milk Collecon System can be used to single or dual pump.
To dual pump:
Both tubes should be
aached to tubing adapter.
To single pump:
Remove one tube and
close tubing adapter.
Tubing
Silicone Diaphragm
Adapter Cap
Valve
Breast Flange
Tubing Adapter
1
2
3
4
5
SET UP AND ASSEMBLY
CONTROLS AND DISPLAYS
Using “Up/Down” Buons
Before starng pump, please note how the controls work.
• Press and release controls to increase/decrease sengs by increments of 1.
• Press and hold controls to increase/decrease sengs by increments of 10.
• Place pump on a horizontal at
surface before use.
• Aach Ameda supplied grounded
power cord to AC power inlet on
rear of pump.
• Connect grounded plug to wall
outlet.
• Ensure pump is posioned so that
the power cord from the rear is
accessible for removal.
• Insert tubing adapter into
tubing adapter port.
Operang the Pump
• When pump is plugged in, a light will appear next to the Power buon.
• Press the Power buon. The displays light up. Pump is now ON.
• Pump starts at lowest sucon seng (1% or approximately 30mmHg/ 4.0kPa) and
maximum speed (80 cpm).
ENGLISH | 7
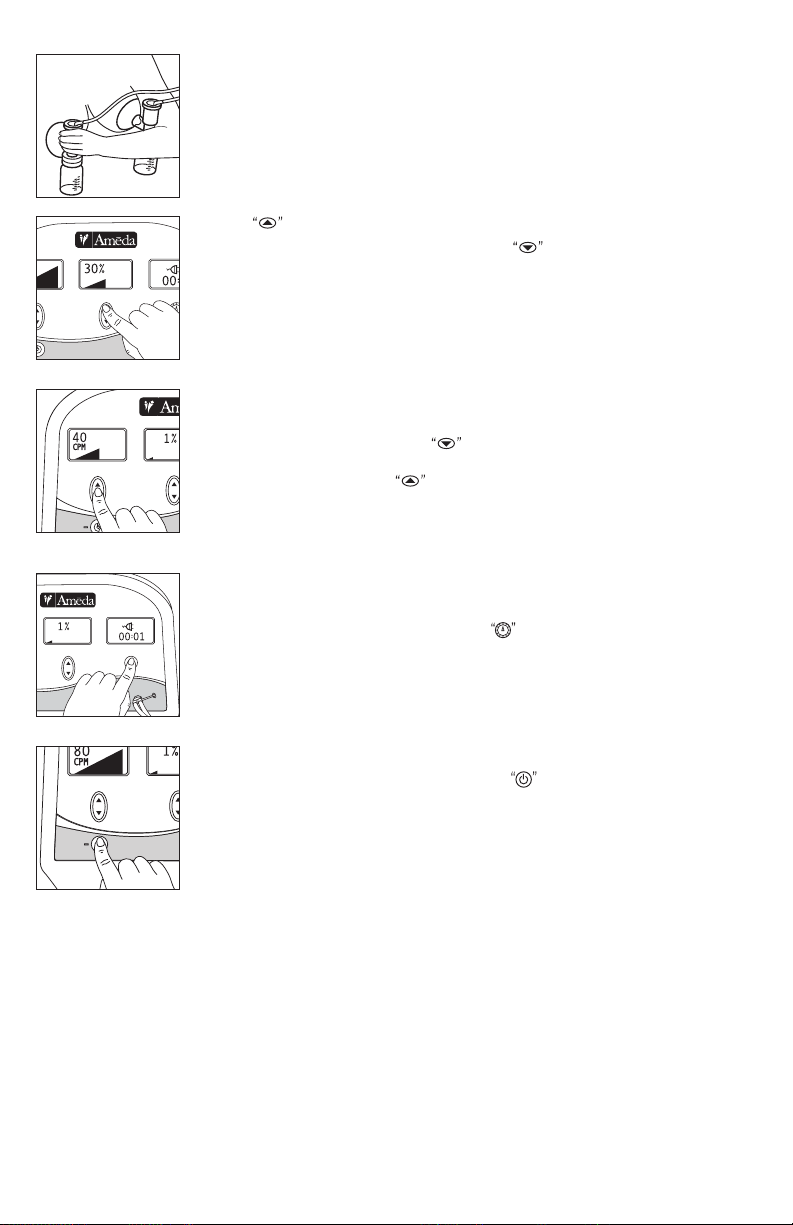
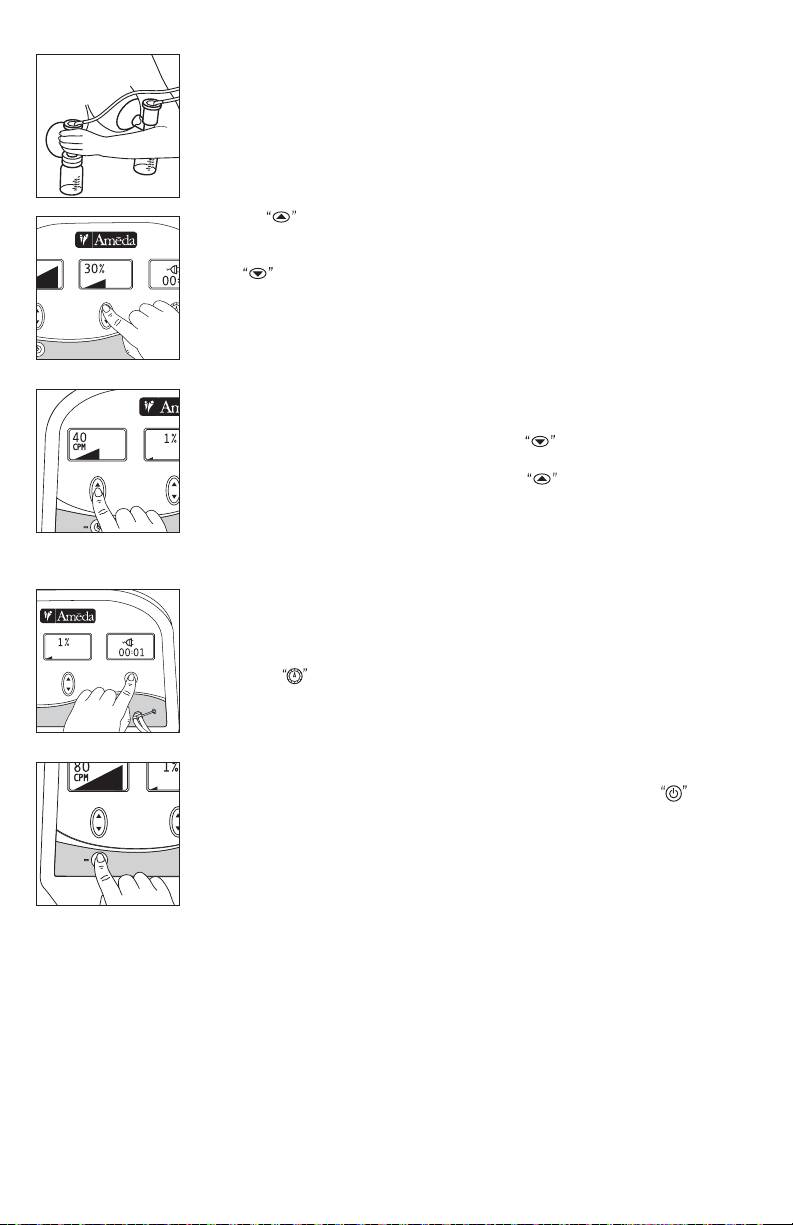
Seng Sucon
• Pump starts at lowest sucon seng (1% or approximately 30mmHg/4.0kPa).
• Center nipple(s) in breast ange(s) and ll breast ange(s) with the breast(s) to create
an air seal. Keep upper body and boles/anges upright while pumping.
• Press to increase sucon unl reaching maximum comfort level.
•
If discomfort is felt in nipple(s)
or breast(s), press to decrease sucon. If discomfort
is felt at all sucon sengs, turn pump o, insert a nger between breast(s) and breast
ange(s) to break sucon, remove breast ange(s) from breast(s). Disconnue
pumping and contact a healthcare provider.
Seng Speed
• Pump starts at fastest speed (80 cpm).
• When milk ows (let-down), press to decrease speed to help drain the breast
faster.
• When milk ow slows, press to increase speed to 60-80 cpm to help start
another let-down.
• Repeat as milk ow changes to pump more milk.
NOTE: If “Check Kit” appears in sucon window, see Troubleshoong secon, on page 8.
Using Timer
• Timer starts when pump is on. Timer displays pumping duraon in minutes : seconds.
• Timer can be reset by pressing Timer Reset buon.
• Timer and pump automacally turn OFF aer 60 minutes.
Turning Pump OFF
• When nished pumping, press and hold Power buon to turn pump and mer
funcons OFF.
suction
speed
suction
timer
eed
suction timer
suctio
speed
Removing Ameda HygieniKit Milk Collecon System from Breast(s)
• Aer pump is OFF, if necessary, insert a nger between breast(s) and breast anges(s) to break sucon.
• Remove breast anges(s) from breast(s).
• Place boles with milk in bole holders.

8 | ENGLISH
CLEANING
Cleaning the Ameda Planum Breast Pump
For Personal Use
Aer each pumping, turn OFF the pump. Unplug cord from from wall outlet. Wipe the Ameda Planum Breast
Pump with clean, damp cloth.
Turn OFF the pump. Unplug cord from wall outlet. Clean between users. Wearing disposable gloves, wipe the
Ameda Planum Breast Pump with a hospital approved anbacterial cleaner, such as CaviCide®, CaviWipes®,
or PDI®Sani-Cloth®AF3.
STORING AND TRANSPORTING
Disconnect HygieniKit and power cord from pump before transporng or storing the product.
When storing product, store in condions as described in these instrucons.
Handle with care when transporng or handling product.
TROUBLESHOOTING
Pump does not turn ON
• Ensure proper power cord connecon to pump.
• Ensure grounded plug connecon to electrical outlet.
• Ensure outlet has power.
Unable to adjust speed
• Ensure pump funcon is ON.
• Ensure “Check Kit” is not shown in sucon display window.
Unable to adjust sucon
• Ensure pump funcon is ON.
• Ensure “Check Kit” is not shown in sucon display window.
Low or no sucon
• Ensure “Check Kit” is not shown in sucon display window.
• Check breast ange for adequate seal against breast.
• Check that the Ameda HygieniKit Milk Collecon System is properly assembled.
• Check that the adapter cap is rmly snapped (aached) onto top of breast ange.
• Ensure silicone diaphragm is in place inside top of breast ange.
• Ensure tubing adapter is properly ed into tubing adapter port on pump.
• Inspect valve for stretching or tears. If seen, replace valve.
• Ensure valve is pushed rmly into place in lower poron of breast ange.
• Ensure one side of tubing adapter is closed when single pumping.
“Check Kit” error message appears
• Ensure tubing adapter is properly ed into tubing adapter port on pump.
• Ensure one side of tubing adapter is closed when single pumping.
• Check that adapter cap is rmly snapped onto top of breast ange.
• Ensure silicone diaphragm is in place inside top of breast ange.
• Check tubing and silicone diaphragm to ensure that parts are free of defects.
• Check tubing is rmly aached to adapter cap.
“Service Required” error message appears
• Call your local distributor. For lisng of distributors worldwide, visit www.ameda.com.
The Ameda Planum Breast Pump should be serviced only by Ameda, Inc. or authorized Service Centers
approved by Ameda, Inc.
ENGLISH | 9
MAINTENANCE
It is recommended the Ameda Planum Breast Pump be inspected at least once every year to include the following:
• Visually check pump housing for cracks, breakage, or damage and ensure Pump Feet are present.
• Visually check for power cord damage.
• Check for proper operaon of controls and buons.
• Check there are no missing screws.
• Check cover is present on Service Port Door.
• Check Tubing Adapter Port is free from obstrucon.
Quick Funconal Check
The following checks/tests should be performed prior to use by a new user:
• Visual checks for power cord damage.
• Check for abnormal noise.
• Check for proper operaon of controls and buons.
Service Port
• Do not open Service Port Door on boom of the Pump.
• Do not connect any equipment to the service port when operang the pump.
• Service port is to be accessed only by authorized Service Centers approved by Ameda, Inc.
Replacing Detachable Power Cord:
• Power cord is detachable from power inlet.
• If power cord condion is in doubt, only replace with Ameda supplied 3-conductor cord equipped with protecve
ground conductor.
TECHNICAL INFORMATION
Protecon Class II (Double Insulated), Type BF
Applied Parts
Power Supply:
Operang Input Voltage 100 VAC to 240 VAC
Operang Frequency 50/60Hz
Input Power 80VA
Fuse Rang Quick Acng (F), 2.5A, 250V, 5 x 20m
Power Cord: Use only Ameda supplied power cord
For North America, use Ameda 24502059
Minimum Voltage Rang: 125V
Minimum Current Rang: 10A
Plug Type: IEC 60320 C13 (Hospital Grade)
Maximum Length: 10 feet (3.05m)
Cord Type: 3x18AWG, rated VW-1, 105C
Jacket Type: SJT or SJTW
Cercaon: UL Listed (ELBZ)
Detachable power cord provides mains isolaon via
appliance coupler.
Operaon: Connuous
ISO 10079-1, Intermient Sucon, Medium Vacuum
Sucon: Shown in percentage of full scale sucon
1%-100%; (approximately 30mmHg to 250mmHg/
4.0kPa to 33.3kPa)
Speed: 30 to 80 cycles per minute (cpm)
Operaonal Condions: Pump
Temperature +41°F (+5°C) to +90°F (+32°C)
Relave Humidity 15% to 90%
Atmospheric Pressure 0.69atm (70kPa) to
1.05atm (106kPa)
Transport and Storage Condions: Pump
Temperature -20°F (-29°C) to +158°F (+70°C)
Relave Humidity 10% to 90%
Atmospheric Pressure 0.69atm (70kPa) to
1.05atm (106kPa)
Weight: Approximately 9.75 lbs. (approximately 4.42 kg)
Dimensions: Length 9.75 in. (24.7 cm) /Width 10.5 in.
(26.7 cm) / Height 8.0 in. (20.3 cm)
Standards:
UL Cered E493585 MEDICAL - GENERAL MEDICAL
EQUIPMENT AS TO ELECTRICAL SHOCK, FIRE AND
MECHANICAL HAZARDS ONLY IN ACCORDANCE
WITH ANSI/AAMI ES 60601-1 (2005) + AMD1 (2012)
and CAN/CSA-C22.2 No. 60601-1 (2008) + (2014) and
IEC 60601-1-6 (2010) + AMD1 (2013) and IEC 62366
(2007) + AMD1 (2014)
-20°F
-29°C
158°F
70°C
41°F
5°C
90°F
32°C
70
106
kPa
10
90
%
15
90
%
70
106
kPa

10 | ENGLISH
The Ameda Planum Breast Pump is intended for use in the electromagnec environment specied below. The
customer or the user of the Ameda Planum Breast Pump should assure that it is used in such an environment.
Emissions test Compliance
RF emissions CISPR 11 Group 1 The Ameda Planum Breast Pump uses RF energy only for
its internal funcon. Therefore, its RF emissions are very
low and are not likely to cause any interference in nearby
electronic equipment.
RF emissions CISPR 11 Class B The Ameda Planum Breast Pump is suitable for use in all
establishments, including domesc establishments and
those directly connected to the public low-voltage power
supply network that supplies buildings used for domesc
purposes.
Harmonic emissions IEC
61000-3-2 Class A
Voltage uctuaons/icker
emissions IEC 61000-3-3 Complies
The Ameda Planum Breast Pump is intended for use in an electromagnec environment in which radiated RF
disturbances are controlled. The customer or the user of the Ameda Planum Breast Pump can help prevent
electromagnec interference by maintaining a minimum distance between portable and mobile RF communica-
ons equipment (transmiers) and the Ameda Planum Breast Pump as recommended below, according to the
maximum output power of the communicaons equipment.
Rated maximum
(W)
150 kHz to 80 MHz
d = 1,2√P
80 MHz to 800 MHz
d = 1,2√P
800 MHz to 2.7 GHz
d = 2,3√P
0,01 0,12 0,12 0,23
0,1 0,38 0,38 0,73
11,2 1,2 2,3
10 3,8 3,8 7,3
100 12 12 23
For transmiers rated at a maximum output power not
listed above, the recommended separaon distance d
in meters (m) can be esmated using the equaon
applicable to the frequency of the transmier, where P
is the maximum output power rang of the transmier
in was (W) according to the transmier manufacturer.
NOTE 1 At 80 MHz and 800 MHz, the separaon
distance for the higher frequency range applies.
NOTE 2 These guidelines may not apply in all situaons.
Electromagnec propagaon is aected by
absorpon and reecon from structures,
objects and people.
GUIDANCE AND MANUFACTURER’S DECLARATION
MEDICAL ELECTRICAL EQUIPMENT needs special precauons regarding EMC and needs to be installed and put
into service according to the EMC provided in these Instrucons for use. Portable and mobile RF communicaons
equipment can aect MEDICAL ELECTRICAL EQUIPMENT.
Warning: Portable RF communicaons equipment (including peripherals such as antenna cables and external anten-
nas) should be used no closer than 30 cm (12 inches) to any part of the Ameda Planum Breast Pump, including
cables specied by the manufacturer. Otherwise, degradaon of the performance of this equipment could result.
Warning: Use of accessories, transducers and cables other than those specied or provided by the manufacturer of
this equipment could result in increased electromagnec emissions or decreased electromagnec immunity of this
equipment and result in improper operaon.
Warning: Use of this equipment adjacent to or stacked with other equipment should be avoided because it could
result in improper operaon. If such use is necessary, this equipment and the other equipment should be observed
to verify that they are operang normally.

ENGLISH | 11
The Ameda Planum Breast Pump is intended for use in an electromagnec environment in which radiated RF
disturbances are controlled. The customer or the user of the Ameda Planum Breast Pump can help prevent
electromagnec interference by maintaining a minimum distance between portable and mobile RF communica-
ons equipment (transmiers) and the Ameda Planum Breast Pump as recommended below, according to the
maximum output power of the communicaons equipment.
Rated maximum
(W)
150 kHz to 80 MHz
d = 1,2√P
80 MHz to 800 MHz
d = 1,2√P
800 MHz to 2.7 GHz
d = 2,3√P
0,01 0,12 0,12 0,23
0,1 0,38 0,38 0,73
11,2 1,2 2,3
10 3,8 3,8 7,3
100 12 12 23
For transmiers rated at a maximum output power not
listed above, the recommended separaon distance d
in meters (m) can be esmated using the equaon
applicable to the frequency of the transmier, where P
is the maximum output power rang of the transmier
in was (W) according to the transmier manufacturer.
NOTE 1 At 80 MHz and 800 MHz, the separaon
distance for the higher frequency range applies.
NOTE 2 These guidelines may not apply in all situaons.
Electromagnec propagaon is aected by
absorpon and reecon from structures,
objects and people.
The Ameda Planum Breast Pump is intended for use in the electromagnec environment specied below. The
customer or the user of the Ameda Planum Breast Pump should assure that it is used in such an environment.
IEC 60601 test level Compliance level
Electrostac
discharge (ESD)
IEC 61000-4-2
± 8 kV contact
± 2 kV, ± 4 kV, ± 8 kV,
± 15 kV air
± 8 kV contact
± 2 kV, ± 4 kV, ± 8 kV,
± 15 kV air
Floors should be wood, concrete or
ceramic le. If oors are covered with
synthec material, the relave humidity
should be at least 30%.
Electrical fast
transient/burst
IEC 61000-4-4
± 2 kV for AC line;
100 kHz repeon
frequency
± 2 kV for AC line;
100 kHz repeon
frequency
Mains power quality should be that of a
typical commercial or hospital environ-
ment.
Surge IEC 61000-
4-5 ± 0,5 kV,
± 1kV line-to-line;
± 0,5 kV, ± 1kV,
± 2kV line-to-ground
± 0,5 kV,
± 1kV line-to-line;
± 0,5 kV, ± 1kV,
± 2kV line-to-ground
Mains power quality should be that of a
typical commercial or hospital environ-
ment.
Voltage dips, short
interrupons and
voltage variaons
on power
supply input lines
IEC 61000-4-11
• 0% UT; 0,5 cycle At
0°, 45°, 90°, 135°,
180°, 225°, 270° and
315°
• 0% UT; 1 cycle and
70% UT; 25/30
cycles Single phase:
at 0°
• 0% UT; 250/300
cycles
• 0% UT; 0,5 cycle At
0°, 45°, 90°, 135°,
180°, 225°, 270°
and 315°
• 0% UT; 1 cycle and
70% UT; 25 cycles
At 0°
• 0% UT; 250 cycles
Mains power quality should be that of a
typical commercial or hospital environ-
ment. If the user of the Ameda Planum
Breast Pump requires connued operaon
during power mains interrupons, it is
recommended that the Ameda Planum
Breast Pump be powered from an uninter-
rupble power supply.
Power frequency
(50/60Hz)
magnec eld IEC
61000-4-8
30 A/m
50 Hz or 60 Hz 30 A/m
50 Hz and 60 Hz Power frequency magnec elds should
be at levels characterisc of a typical
locaon in a typical commercial or hospital
environment.
Conducted RF IEC
61000-4-6
Radiated RF IEC
61000-4-3
3 V
0,15 MHz – 80 MHz
80% AM at 1 kHz
6V in ISM and amateur
radio bands between
0,15 MHz and 80 MHz
80% AM at 1 kHz
10 V/m
80 MHz – 2,7 GHz
80% AM at 1 kHz
9 – 28 V/m
At IEC 60601-1-2:
2014
Table 9 frequencies
3 V
0,15 MHz – 80 MHz
80% AM at 1 kHz
6V in ISM and
amateur radio bands
between 0,15 MHz
and 80 MHz
80% AM at 1 kHz
10 V/m
80 MHz – 2,7 GHz
80% AM at 1 kHz
9 – 28 V/m
At IEC 60601-1-2:
2014
Table 9 frequencies
Portable and mobile RF communicaons
equipment should be used no closer to any
part of the Ameda Planum Breast Pump.
including cables, than the recommended
separaon distance calculated from the
equaon applicable to the frequency of
the transmier.
d = 1,2√P
d = 1,2√P 80 MHz to 800 MHz
d = 2,3√P 800 MHz to 2,7 GHz
Where P is the maximum output power
rang of the transmier in was (W)
according to the transmier manufacturer
and d is the recommended separaon
distance in meters (m). Field strengths
from xed RF transmiers, as determined
by an electromagnec site survey,ashould
be less than the compliance level in each
frequency range.b
Interference may occur in the
vicinity of equipment marked
with the following symbol:
NOTE 1 UT is the a.c. mains voltage prior to applicaon of the test level.
NOTE 2 At 80 MHz and 800 MHz, the higher frequency range applies.
NOTE 3 These guidelines may not apply in all situaons. Electromagnec propagaon is aected by absorpon and reecon from structures, objects and
people.
a Field strength from xed transmiers, such as base staons for radio (cellular/cordless) telephones and land mobile radios, amateur radio, AM and FM radio broadcast and TV broadcast cannot be
predicted theorecally with accuracy. To assess the electromagnec environment due to xed RF transmiers, an electromagnec site survey should be considered. If the measured eld strength in the
locaon in which the Ameda Planum Breast Pump is used exceeds the applicable RF compliance level above, the Ameda Planum Breast Pump should be observed to verify normal operaon.
If abnormal performance is observed, addional measures may be necessary, such as re-orienng or relocang the Ameda Planum Breast Pump.
b Over the frequency range 150 kHz to 80 MHz, eld strengths should be less than 10 V/m.

12 | ENGLISH
LIMITED WARRANTY
The Ameda Planum Electric Breast Pump (“Product”) is warranted to the original user-whether instuonal or
individual (“First User”)-only.
From the date of First User’s purchase of this Product, Ameda, Inc. (“Ameda”) warrants the Product to the First User
against defects in material or workmanship for three years on the pump mechanism. Ameda’s sole obligaon under
this limited warranty shall be to repair or replace, at Ameda’s opon, any Product that is determined to be defecve
by Ameda and determined to be covered by this express limited warranty. Repair or replacement under this limited
warranty is the sole and exclusive remedy of the First User. Proof of purchase in the form of a receipted invoice or
bill of sale evidencing that the Product is within the warranty period must be presented to obtain warranty service.
This limited warranty is extended by Ameda ONLY to the First User and is not assignable or transferable. For
warranty service contact Ameda at 1.866.99 AMEDA(26332).
EXCEPT TO THE EXTENT PROHIBITED BY APPLICABLE LAW, ANY IMPLIED WARRANTY OF
MERCHANTABILITY OR FITNESS FOR A PARTICULAR PURPOSE ON THE PRODUCT IS HEREBY DISCLAIMED.
AMEDA SHALL NOT BE LIABLE FOR ANY INCIDENTAL, CONSEQUENTIAL, SPECIAL OR PUNITIVE DAMAGES
OF ANY KIND FOR BREACH OF THE EXPRESS LIMITED WARRANTY ON THE PRODUCT OR ANY WARRANTY
IMPLIED BY OPERATION OF LAW, OTHER THAN THE EXPRESS LIMITED WARRANTY SET FORTH ABOVE,
THERE ARE NO OTHER WARRANTIES THAT ACCOMPANY THIS PRODUCT AND ANY ORAL, WRITTEN OR
ANY OTHER EXPRESS REPRESENTATION OF ANY KIND IS HEREBY DISCLAIMED.
Non-Applicability of Warranty
The above warranty shall not apply to consumable materials and aachment to the Product. These include:
(i) the power cord; and
(ii) the Ameda HygieniKit Milk Collecon System (sold separately).
In addion to any other limitaons on the warranty discussed above, the warranty shall expire and be of no force
or eect upon the occurrence of any of the following:
(i) the cause of damage to the Product is due to improper handling or use
(ii) the Product is not properly maintained by the First User, as determined by Ameda
(iii) non-Ameda approved accessories or spare parts are used with the Product, as determined by Ameda
(iv) the Product is repaired by a non-approved Ameda service provider.
If any of the above occurs, Ameda shall not be responsible for damage to the Product, parts thereof or injuries
arising therefrom, either directly or indirectly. The warranty set forth above replaces all prior warranes with
respect to the purchased Product, whether in wring or otherwise.
Outside the United States: Call your local distributor or locaon where you purchased the Product. For a lisng
of distributors in your country, please visit www.ameda.com.
Changes or modicaons to this device that are not expressly approved by Ameda may void the user’s
authority to use the device.
This device complies with part 15 of the FCC Rules. Operaon is subject to the following two condions: (1) This
device may not cause harmful interference, and (2) this device must accept any interference received, including
interference that may cause undesired operaon.
Note: This equipment has been tested and found to comply with the limits for a Class B digital device, pursuant to
part 15 of the FCC Rules. These limits are designed to provide reasonable protecon against harmful interference in
a residenal installaon. This equipment generates, uses and can radiate radio frequency energy and, if not installed
and used in accordance with the instrucons, may cause harmful interference to radio communicaons. However,
there is no guarantee that interference will not occur in a parcular installaon. If this equipment does cause harm-
ful interference to radio or television recepon, which can be determined by turning the equipment o and on, the
user is encouraged to try to correct the interference by one or more of the following measures:
• Reorient or relocate the receiving antenna.
• Increase the separaon between the equipment and receiver.
• Connect the equipment into an outlet on a circuit dierent from that to which the receiver is connected.
• Consult the dealer or an experienced radio/TV technician for help.
FRANÇAIS | 13
GLOSSAIRE DES ICÔNES
Glossaire des icônes ...................................................................................13
Éliminaon du produit .................................................................................13
Mesures importantes de protecon .....................................................................14
Usage prévu .........................................................................................14
Diagramme du Tire-lait Ameda Planum .................................................................15
Chariot pour le re-lait Ameda Planum .................................................................16
Conguraon et assemblage............................................................................17
Avant chaque ulisaon ............................................................................17
Système de collecte de lait HygieniKit®d’Ameda®.....................................................17
Tire-lait Ameda Planum ............................................................................17
Pompage simple et double ..........................................................................17
Contrôles et achages ................................................................................17
Uliser les touches « Up/Down » (vers le haut/vers le bas) ..............................................17
Fonconnement du re-lait .........................................................................17
Régler l’aspiraon ..................................................................................18
Régler les vitesses ..................................................................................18
Ulisaon de la minuterie ...........................................................................18
Éteindre le re-lait .................................................................................18
Rerer le système de collecte de lait HygieniKit d’Ameda du(des) sein(s) ..................................18
Neoyage ...........................................................................................19
Rangement et transport................................................................................19
Dépannage ..........................................................................................19
Entreen ............................................................................................20
Renseignements techniques ............................................................................20
Directives et déclaration du fabricant ....................................................................21
Renseignements sur la garane .........................................................................23
CONTENU
1. Les composants internes de ce produit peuvent contenir des matériaux dangereux. Meez
ce produit au rebut conformément aux règlements et systèmes d’administraon des déchets
locaux ou régionaux.
2. Ne meez pas au rebut comme déchet municipal non trié.
3. Pour obtenir d’autres renseignements au sujet des performances environnementales de ce
produit, veuillez visiter notre site www.ameda.com.
minimum
size
Double isolaon/classe II
Pare appliquée de type BF
Branché à une prise
de courant murale
Instrucons de lavage
% de l’aspiraon pleine plage
1%-100%; (approximavement
30mmHg à 250mmHg/4.0kPa
à 33.3kPa)
Cycles par minute (30-80 cpm)
Achage de la minuterie
Consulter les Instrucons
d’ulisaon
Fusible
Mise en garde : consulter
les documents
Classicaon de l’entrée de parcules
solides/liquides
ÉQUIPEMENT MÉDICAL conforme
à la norme UL E493585 POUR LES
CHOCS ÉLECTRIQUES, LES RISQUES
D’INCENDIE ET LES DANGERS
MÉCANIQUES UNIQUEMENT
CONFORMÉMENT À LA NORME
ANSI/AAMI ES 60601-1 (2005) +
AMD1 (2012) et CAN/CSA-C22.2
No 60601-1 (2008) + (2014) et CEI
60601-1-6 (2010) + AMD1 (2013) et
CEI 62366 (2007) + AMD1 (2014)
Déchet d’équipements électrique
et électronique
Fragile
!
REF
LOT
SN
Protéger des rayons
du soleil
Maintenir au sec
Numéro de série
Numéro de lot
Numéro de catalogue
Limites de température
Limites d’humidité
Limites de pression pour
le fonconnement/le
transport/la conservaon
Fabricant
kPa
%
IP21
FR
ÉLIMINATION DU PRODUIT Ce produit conent de l’équipement électrique et électronique.

14 | FRANÇAIS
En ulisant des produits électriques, tout parculièrement en présence d’enfants, il faut toujours suivre les
mesures de sécurité de base.
LISEZ TOUTES LES INSTRUCTIONS AVANT D’UTILISER LE PRODUIT
Danger : Pour réduire les risques d’électrocuon :
• Débranchez toujours les appareils électriques immédiatement après leur ulisaon.
• N’ulisez pas dans la baignoire, sous la douche ou en nageant.
• Ne placez et ne rangez pas où le produit pourrait tomber ou être ré dans la baignoire, l’évier ou la piscine.
• Ne placez et ne laissez pas tomber le produit dans l’eau ou dans tout autre liquide.
• N’essayez pas de rerer le produit électrique tombé dans l’eau. Débranchez immédiatement de la prise de
courant.
Averssement : Pour réduire les risques de brûlures, d’électrocuon, d’incendie ou de blessures :
• Pour éviter les risques de décharge électrique, cet appareil doit uniquement être branché à une prise électrique
dont la mise à la terre est appropriée. Ulisez uniquement le cordon à 3 broches fourni par Ameda.
• Ne laissez jamais un produit sans surveillance lorsqu’il est branché à une prise électrique.
• Lorsque le produit est ulisé près des enfants ou des personnes handicapées, il faut une supervision étroite.
• Ulisez le produit seulement aux ns prévues selon la descripon dans ce manuel.
• N’ulisez pas d’accessoires ou autres trousses de collecte de lait que ceux recommandés par le fabricant.
• N’ulisez jamais si le produit a un cordon ou une che endommagé(e), s’il ne fonconne pas correctement ou s’il
a été échappé, endommagé ou s’il est humide.
• Gardez le cordon et tous les accessoires loin de surfaces chaudes.
• N’ulisez jamais en dormant ou somnolant.
• N’ulisez pas à l’extérieur avec un cordon.
• Ne faites pas fonconner où l’on ulise des produits en aérosol ou administre de l’oxygène.
• Ne pas démonter le re-lait Ameda Planum.
• Placez toujours le re-lait sur une surface plane et horizontale lorsque vous l’ulisez.
• N’enlevez pas la bride de poitrine pendant que vous rez votre lait. Voir les instrucons pour le retrait du
HygieniKit.
• L’expression de lait peut provoquer des contracons, n’ulisez donc pas le re-lait pendant la grossesse à moins
d’avoir l’accord de votre spécialiste en allaitement ou de votre professionnel de la santé.
• Risque d’étranglement : Gardez les tubes et les cordons hors de portée des enfants.
• Risque de suocaon : Petes pièces, ne conviennent PAS aux enfants de moins de 3 ans.
Contre-indicaons à l’ulisaon
Il n’y a aucune contre-indicaon connue à l’ulisaon de ce produit.
CONSERVEZ CES INSTRUCTIONS
MESURES IMPORTANTES DE PROTECTION
USAGE PRÉVU
Le re-lait Ameda Planum est un appareil pour extraire et recueillir le lait du sein de la mère, pour réduire
l’engorgement du sein, pour maintenir la capacité de lactaon et pour fournir du lait maternel pour l’alimentaon
subséquente du bébé lorsqu’il y a séparaon de la mère et du bébé.
Le re-lait Ameda Planum est un disposif électrique d’aspiraon conçu pour extraire le lait du sein d’une mère
allaitante au moyen du système de collecte de lait Ameda HygieniKit. Le prol d’aspiraon du re-lait Ameda
Planum est conçu d’après la forme d’onde sinusoïdale du re-lait SMBMC d’Ameda, et implanté à l’aide d’un
mécanisme motorisé de pompe à piston qui est contrôlé par microprocesseur. L’architecture matérielle/logicielle
permet à l’ulisatrice de régler la vitesse du cycle, dénommée « speed », et le niveau d’aspiraon, dénommée
« sucon », à parr des commandes indépendantes du panneau avant, an de produire les changements nécessaires
en maère de sore d’aspiraon. L’intégraon d’un capteur d’aspiraon et d’une valve proporonnelle à l’intérieur
d’un système de contrôle en circuit fermé améliorele rendement de la pompe par rapport aux concepons
de pompe antérieures, en mode de pompage simple et double, en foncon de la variaon des condions
barométriques ambiantes. Les achages graphiques aident l’ulisatrice à visualiser les paramètre de pompage et
à procéder à des ajustements répétés. La caractérisque disncte de l’achage de la minuterie de séance et son
contrôle sont conçus pour faciliter le suivi d’un protocole de pompage par la mère.
FRANÇAIS | 15
Vue avant
1. Achage de l’aspiraon (Maximum illustré en pourcentage)
2. Achage de la vitesse (Maximum des cycles par minute illustré)
3. Contrôle de la vitesse
4. Bouton “Power” (Met le re-lait en marche/arrêt)
5. Indicateur de l’alimentaon CA
6. Achage de la minuterie
7. Bouton de réinialisaon de la minuterie
8. Contrôle de l’aspiraon
9. Pièce d’adaptateur de tube
10. Supports de manchon de sein/bouteille de lait
11. Poignée
12. Prise d’alimentaon secteur
13. Pied du re-lait
14. Trou de montage du chariot
15. Porte de port de service
16. Emplacement du pied arrière du re-lait
17. Emplacement du pied avant du re-lait
18. Trou de montage du re-lait
Vue supérieure
Vue du bas
Vue arrière
suctiontimer
speed
11
12
suction timer
speed
1
2
3
4
5
6
7
8
9
suctiontimer
speed
10
15
13
14
16 | FRANÇAIS
Vue supérieure de la plaque de chariot
(accessoire en opon)
Aacher le re-lait Ameda Planum au chariot (le cas échéant)
Chariot
Le chariot est disponible comme arcle d’accessoire.
• Aachez le re-lait au chariot avant de brancher le cordon dans la prise murale.
• Alignez l’avant du re-lait Ameda Planum avec les mots « Front of Ameda Planum and Elite™ Pump » sur le
dessus de la plaque de montage du chariot.
• Abaissez le re-lait sur la plaque en insérant les quatre pieds du re-lait dans les trous, un dans chaque coin de
la plaque de montage du chariot.
• Repérez les trous de montage portant l’inscripon « Ameda Planum Pump and Elite Pump Mounng » qui se
trouvent sur la face inférieure de la plaque de montage du chariot.
• Ulisez la vis de montage pour le re-lait Ameda Planum fournie avec le chariot pour installer le re-lait à la
base du chariot.
Instrucons d’ulisaon du chariot
• Une fois le re-lait xé au chariot, assurez-vous que toutes les roues sont déverrouillées pour déplacer l’ensemble
chariot-pompe. Pour déverrouiller les roues, il sut de soulever la languee de verrouillage sur chaque roue.
• Déplacez l’ensemble chariot-pompe en poussant doucement le re-lait à l’horizontale.
• Lorsque l’ensemble chariot-pompe est dans la posion souhaitée, verrouillez toutes les roues en appuyant sur la
languee de verrouillage de chaque roue.
AVANT DU TIRE-LAIT AMEDA PLATINUM
16
18
17
FRANÇAIS | 17
Avant chaque ulisaon
Lavez-vous toujours bien les mains avec de l’eau et du savon avant de manipuler le re-lait Ameda Planum et
le système de collecte de lait Ameda HygieniKit.
NOTE IMPORTANTE : UTILISEZ LE SYSTÈME DE COLLECTE DE LAIT HYGIENIKIT D’AMEDA SEULEMENT POUR
LES TIRELAIT ÉLECTRIQUES AMEDA.
Avant de démarrer le re-lait, assemblez et branchez le système de collecte de lait HygieniKit d’Ameda, selon les
instrucons incluses. Si le système de collecte de lait HygieniKit d’Ameda est stérile, ulisez-le tel quel. S’il n’est pas
stérile, reportez-vous aux instrucons de neoyage du système de collecte de lait HygineniKit d’Ameda.
Système de collecte de lait Tire-lait Ameda Planum
HygieniKit d’Ameda
suction
speed
Pompage simple et double
Le système de collecte de lait Ameda HygieniKit peut être ulisé en pompage simple ou double.
To dual pump:
Les deux tubes devraient
être aachés à l’adaptateur
de tube.
En pompage simple :
Rerez un tube et
fermez l’adaptateur
de tube.
Tube
Diaphragme de silicone
Embout d’adaptateur
Bouteille de lait
Valve
Manchon de sein
Adaptateur de tube
1
2
3
4
5
CONFIGURATION ET ASSEMBLAGE
CONTRÔLES ET AFFICHAGES
Uliser les touches « Up/Down » (vers le haut/vers le bas)
Avant d’enclencher le re-lait, veuillez vous informer sur le fonconnement des contrôles.
• Pressez et relâchez les contrôles pour augmenter/diminuer les réglages par incrémentaon de 1.
• Pressez et maintenez les contrôles pour augmenter/diminuer les réglages par incrémentaon de 10.
• Placez le re-lait sur une surface
plane et horizontale avant de
l’uliser.
• Reliez le cordon d’alimentaon
mis à la terre Ameda fourni à
la prise d’alimentaon CA à
l’arrière du re-lait.
• Branchez la che de terre dans
la prise de courant murale.
• S’assurer que le re-lait est
placé de sorte que le cordon
d’alimentaon à l’arrière soit
accessible pour être reré.
• Insérez l’adaptateur de tube
dans le port d’adaptateur de
tube.
Fonconnement du re-lait
• Lorsque le re-lait est branché, une lumière apparaît près du bouton “Power”
• Appuyez sur le bouton “Power” . Les achages s’allument. Le re-lait est mainte-
nant en marche.
• Le re-lait s’enclenche au réglage d’aspiraon le plus faible (1% ou approximavement
30mmHg/ 4.0kPa) et à la vitesse maximale (80 cpm).
18 | FRANÇAIS
Régler l’aspiraon
• Le re-lait s’enclenche au réglage d’aspiraon le plus faible (1% ou approximavement
30mmHg/ 4.0kPa).
• Centrer le(s) mamelon(s) dans le(s) manchon(s) de sein et remplissez le(s) manchon(s) de
sein avec le(s) sein(s) pour créer une étanchéité à l’air. Maintenez le haut du corps et
les biberons/acons en posion vercale pendant le pompage.
• Pressez pour augmentez l’aspiraon jusqu’à aeindre un niveau de confort maxi-
mum.
•
Si vous ressentez une gêne au niveau du ou des mamelons ou du ou des seins, appuyez
sur
pour diminuer l’aspiraon. Si un inconfort se fait senr quel que soit le
réglage d’aspiraon, éteignez le re-lait, insérez un doigt entre le(s) sein(s) et le(s)
manchon(s) de sein pour couper l’aspiraon, rerez le(s) manchon(s) de sein du/des
sein(s). Cessez de pomper et contactez votre fournisseur de soins de santé.
Régler les vitesses
• Le re-lait démarre à la vitesse la plus rapide (80 cpm).
• Lorsque le lait s’écoule (évacuaon), appuyez sur pour réduire la vitesse et per-
mere de drainer plus rapidement le lait du sein.
• Lorsque l’écoulement du lait ralent, appuyez sur pour augmenter la vitesse à
60-80 cpm an de lancer une autre évacuaon.
• Répéter autant de fois que le débit de lait varie pour pomper plus de lait.
REMARQUE : Si « Check Kit » (Vériez la trousse) apparaît dans la fenêtre d’aspiraon,
voir la secon Dépannage, page 19.
Ulisaon de la minuterie
• La minuterie s’enclenche lorsque le re-lait est en marche. La minuterie ache la
durée du pompage
• La minuterie peut être réinialisée en appuyant sur le bouton de réinialisaon de la
minuterie .
• La minuterie et le re-lait s’éteignent automaquement après 60 minutes.
Pour éteindre le re-lait
• Une fois le pompage terminé, appuyez et maintenez le bouton “Power” pour
éteindre le re-lait et les foncons de la minuterie.
suction
speed
suction
timer
eed
suction timer
suctio
speed
Rerer le système de collecte de lait HygieniKit d’Ameda du(des) sein(s)
• Après avoir éteint le re-lait, si nécessaire, insérer un doigt entre le(s) sein(s) et le(s) manchon(s) de sein pour
couper l’aspiraon.
• Rerez le(s) manchon(s) de sein du/des sein(s).
• Placez les biberons contenant du lait dans les porte-biberons.

FRANÇAIS | 19
NETTOYAGE
Neoyer le re-lait Ameda Planum
Pour usage personnel
Éteindre le re-lait après chaque pompage. Débranchez le cordon de la prise murale. Essuyer le re-lait Ameda
Planum avec un chion propre et humide.
Éteindre le re-lait. Débranchez le cordon de la prise murale. Neoyer entre chaque ulisatrice. Portez des gants
jetables, essuyez le re-lait Ameda Planum avec un neoyant anbactérien approuvé par les hôpitaux, tel que
CaviCide®, CaviWipes®ou PDI®Sani-Cloth®AF3.
RANGEMENT ET TRANSPORT
Débranchez le HygieniKit et le cordon d’alimentaon du re-lait avant de transporter ou de ranger l’appareil.
Lorsque vous rangez l’appareil, conservez-le dans les condions décrites dans les présentes instrucons.
Manipulez l’appareil avec précauon lors du transport ou de la manipulaon.
DÉPANNAGE
Le re-lait ne s’enclenche pas.
• Assurez-vous que le cordon d’alimentaon est bien branché au re-lait.
• Assurez-vous que la connexion de la che de terre est dans la prise de courant.
• Assurez-vous que la prise a du courant.
Incapable d’ajuster la vitesse
• Assurez-vous que la foncon du re-lait est à « ON » (marche).
• Assurez-vous que « Check Kit » (Vérier la trousse) n’apparaît pas dans la fenêtre d’achage d’aspiraon.
Incapable d’ajuster l’aspiraon
• Assurez-vous que la foncon du re-lait est à « ON » (marche).
• Assurez-vous que « Check Kit » (Vérier la trousse) n’apparaît pas dans la fenêtre d’achage d’aspiraon.
Faible ou aucune aspiraon
• Assurez-vous que « Check Kit » (Vérier la trousse) n’apparaît pas dans la fenêtre d’achage d’aspiraon.
• Vériez le manchon du sein pour assurer qu’il y a un vide susant contre le sein.
• Vériez que le système de collecte de lait HygieniKitd’Ameda est assemblé correctement.
• Vériez que le capuchon de l’adaptateur est bien enclenché (xé) sur le dessus de la bride de poitrine.
• Assurez-vous que le diaphragme de silicone est en place à l’intérieur du dessus du manchon de sein.
• Assurez-vous que l’adaptateur de tube est bien ajusté dans le port de l’adaptateur de tube.
• Inspectez la valve pour déceler tout signe de déchirures ou d’érements. S’il y en a, remplacez la soupape.
• Assurez-vous que la valve est fermement enfoncée en place dans la secon inférieure du manchon de sein.
• Assurez-vous qu’un côté de l’adaptateur de tube est fermé durant un pompage simple.
Le message d’erreur « Check Kit » (vérier la trousse) apparaît
• Assurez-vous que l’adaptateur de tube est bien ajusté dans le port de l’adaptateur de tube.
• Assurez-vous qu’un côté de l’adaptateur de tube est fermé durant un pompage simple.
• Vériez que l’embout d’adaptateur est bien inséré sur le dessus du manchon de sein.
• Assurez-vous que le diaphragme de silicone est en place à l’intérieur du dessus du manchon de sein.
• Vériez le tube et le diaphragme de silicone pour vous assurer que les pièces sont libres de défauts.
• Vériez que le tube est bien relié à l’embout d’adaptateur.
Le message d’erreur « Service Required » (service requis) apparaît
• Appelez votre distributeur local. Pour une liste de distributeurs du monde ener, veuillez visiter www.ameda.com.
Le re-lait Ameda Planum ne devrait être réparé que par Ameda, Inc. ou des centres de service autorisés
approuvés par Ameda, Inc.
20 | FRANÇAIS
ENTRETIEN
Il est recommandé d’inspecter le re-lait Ameda Planum au moins une fois par année :
• Contrôlez visuellement le corps du re-lait pour déceler toutes ssures, bris ou dommages et assurez-vous que
les pieds du re-lait sont présents.
• Contrôlez visuellement pour déceler tout dommage du cordon d’alimentaon.
• Vériez le fonconnement correct des contrôles et boutons.
• Vériez qu’il n’y a aucune vis qui manque.
• Vériez que le couvercle est sur la porte du port de service.
• Vériez que le port d’adaptateur de tube n’est pas obstrué.
Véricaon fonconnelle rapide
Les tests/véricaons suivants devraient être exécutés avant toute ulisaon par un nouvel ulisateur :
• Véricaons visuelles pour tout signe de dommages du cordon.
• Vériez tout bruit anormal.
• Vériez le fonconnement correct des contrôles et boutons.
Port de service
• N’ouvrez pas la porte du port de service au bas du re-lait.
• Ne branchez pas d’équipement au port de service lorsque le re-lait fonconne.
• Seuls les centres de service autorisés, approuvés par Ameda, Inc devraient avoir accès au port de service.
Remplacer le cordon d’alimentaon amovible
• Le cordon d’alimentaon se rere de l’entrée de l’alimentaon.
• Si l’état du cordon est douteux, remplacez seulement par un cordon Ameda à 3 conducteurs fourni doté d’un
conducteur de masse protecteur.
RENSEIGNEMENTS TECHNIQUES
Protecon de classe II (à double isolaon),
de type BF Pares appliquées
Source d’alimentaon :
Tension d’entrée de fonconnement :
100 v c.a. à 240 v c.a.
Fréquence de fonconnement 50/60 Hz
Puissance d’entrée 80 VA
Valeur de fusible QuickAcng (F), 2,5 A, 250 V,
5 x 20 mm
Cordon d’alimentaon : Ulisez uniquement un
cordon d’alimentaon Ameda fourni
Pour l’Amérique du Nord, ulisez l’Ameda 24502059
Tension nominale minimum : 125V
Intensité nominale minimum : 10A
Type de prise : IEC 60320 C13 (Qualité hospitalière)
Longueur maximale : 10 pieds (3.05m)
Type de cordon : 3x18AWG, nominal VW-1, 105C
Type de câble : SJT ou SJTW
Cercaon : Listé UL (ELBZ)
Cordon d’alimentaon amovible qui se détache de
l’appareil au moyen d’un coupleur.
Fonconnement : Connu
ISO 10079-1, aspiraon intermiente, vide moyen
FRANÇAIS 15
Aspiraon : Achée en pourcentage de l’aspiraon
pleine plage 1 % à 1,00 %; (approximavement 30mmHg
à 250mmHg/4.0kPa à 33.3kPa)
Vitesse : 30 à 80 cycles par minute (cpm)
Condions opéraonnelles : Tire-lait
Température +41°F (+5°C) à +90°F (+32°C)
Humidité relave de 15% à 90%
Pression atmosphérique O,69 atm (70 kPa) à
1,05 atm (106 kPa)
Condions de transport et de rangement : Tire-lait
Température -20 °F (-29 °C) à + 158 °F (+70 °C)
Humidité relave de 10% à 90%
Pression atmosphérique O,69 atm (70 kPa) à
1,05 atm (106kPa)
Poids : Approximavement 9,75 lbs. (approximavement
4,42 kg)
Dimensions : Longueur 9,75 po. (24,7 cm) / Largeur
10,5 po. (26,7 cm) / Hauteur 8,0 po. (20,3 cm)
Normes :
ÉQUIPEMENT MÉDICAL conforme à la norme UL
E493585 POUR LES CHOCS ÉLECTRIQUES, LES
RISQUES D’INCENDIE ET LES DANGERS MÉCANIQUES
UNIQUEMENT CONFORMÉMENT À LA NORME ANSI/
AAMI ES 60601-1 (2005) + AMD1 (2012) et CAN/CSA-
C22.2 No 60601-1 (2008) + (2014) et CEI 60601-1-6
(2010) + AMD1 (2013) et CEI 62366 (2007) + AMD1
(2014)
41°F
5°C
90°F
32°C
70
106
kPa
15
90
%
-20°F
-29°C
158°F
70°C
10
90
%
70
106
kPa
Table of contents
Languages:
Other Ameda Breast Pump manuals

Ameda
Ameda Lactaline Personal User manual

Ameda
Ameda Finesse User manual

Ameda
Ameda Purely Yours User manual

Ameda
Ameda Elite User manual

Ameda
Ameda Platinum User manual

Ameda
Ameda Pearl User manual

Ameda
Ameda Elite User manual

Ameda
Ameda Purely Yours User manual

Ameda
Ameda Platinum User manual

Ameda
Ameda Elite User manual

Ameda
Ameda HygieniKit User manual

Ameda
Ameda MyaJoyPlus User manual

Ameda
Ameda Mya Breast Pump User manual

Ameda
Ameda Mya Joy User manual

Ameda
Ameda MyaJoyPlus User manual

Ameda
Ameda Elite Series Configuration guide

Ameda
Ameda Pearl User manual

Ameda
Ameda HygieniKit User manual

Ameda
Ameda MyaJoy User manual

Ameda
Ameda Elite User manual


