amphis LUNA User manual

LUNA
3 BLADE CEILING FAN
INSTALLATION MANUAL
109001BB, 109001WW, 109001BW,
109001BB-24, 109001WW-24, 109001BW-24

LUNA – INSTALLATION MANUAL
2
Thank you for purchasing this quality Amphis product.
Please read carefully before installation.
WARRANTY
This Amphis product is covered by a 3-year residential warranty. The warranty period starts
from date of purchase. Proof of purchase will be required.
Warranty will be void if the product is not assembled and installed by a licensed electrician,
is used with a non-compatible dimmer, or if there is any damage due to improper usage or
modification to the luminaire.
SAFETY INSTRUCTIONS
1 The installation MUST be carried out by a qualied electrician.
2 Turn o the main electrical switch at the circuit breaker fuse box before performing any
installation or electrical works.
3 The ceiling fan must be grounded/earthed; electrical supply of 230V AC 50Hz.
4 The live and neutral supply wires must be connected to the wall switch (double poles) having a
contact separation at least 3mm in all poles.
5 The ceiling fan must be mounted with the blades at least 2.3m from the oor to minimise the
possibility of accidental contact with the fan blades.
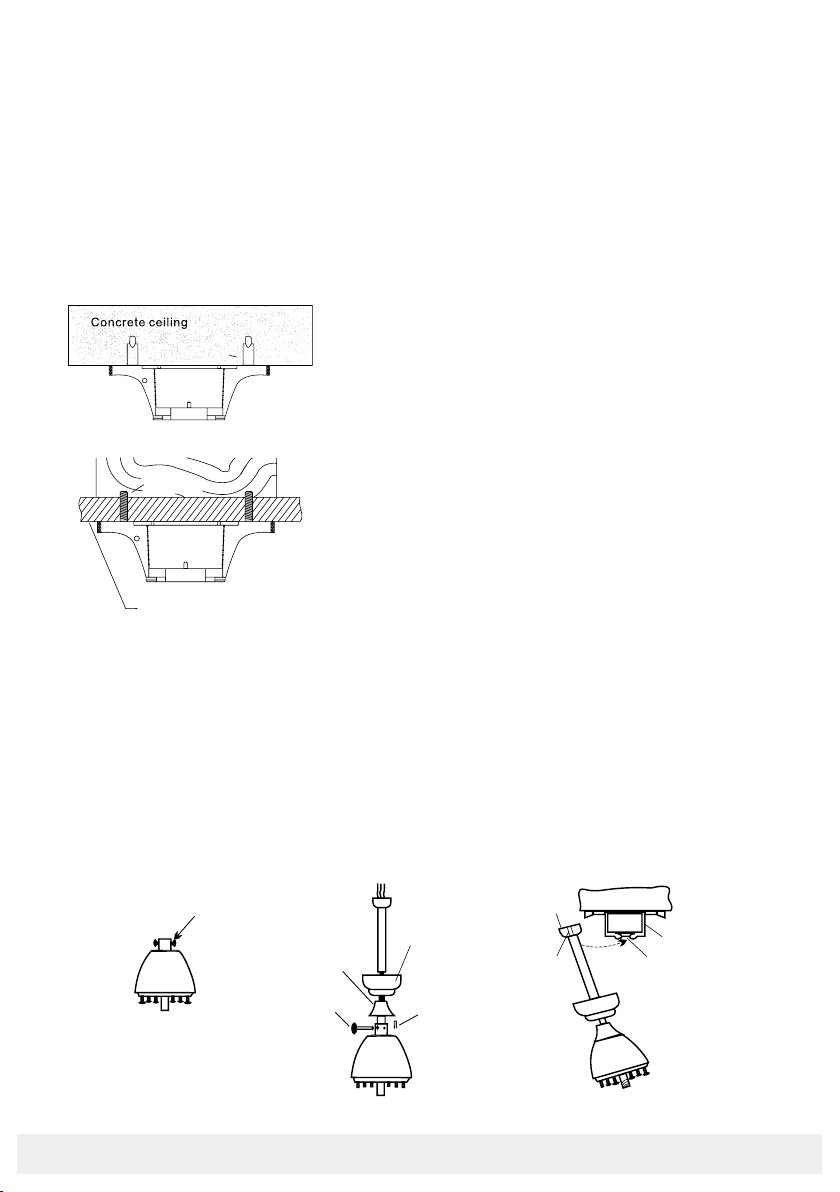
6 When assembling the ceiling fan, ensure that the down rod is threaded rmly to the fan body.
Make sure that the down rod screw is set tightly against the down rod after the ceiling fan is
assembled to avoid unthreading.
7 Never install the ceiling fan in any area where ceiling fan could possibly get wet.
8 Never insert anything into the fan blades when the ceiling fan is in operation.
9 When installing, ensure that the rotating fan blades will not come into contact with any objects.
10 After ceiling fan is properly installed, ensure that all connections are secure to prevent ceiling
fan from dropping.
11 It is recommended to examine the suspension system twice a year.
WARNING
1 To reduce the risk of fire or electric shock, never use the ceiling fan with any solidstate speed
control device.

LUNA – INSTALLATION MANUAL
3
2 To reduce the risk of personal injury, do not bend the ceiling blades when installing,
balancing the blades or cleaning the ceiling fan.
3 Use this unit ONLY in the manner intended by the manufacturer to avoid any hazards.
4 Ensure the fan switch is off before carrying out any maintenance or servicing job to avoid
any hazards.
COMPONENTS
Remote Control Receiver
Mounting Bracket
Down Rod
Short Spare Down Rod
Canopy
Connector
Fan Blade
Fan Lamp Body
Lower Cover
Remote Control
Screw Pack
Figure 1

LUNA – INSTALLATION MANUAL
4
MOUNTING BRACKET INSTALLATION
NOTE Do not install mounting bracket if ceiling is leaking or damp. The ceiling must be able to
withstand the weight of at least 40kg.
1 Concrete Ceiling Drill two holes with an appropriate
depth using an 8mm diameter drill bit and insert one
expansion screw (not supplied) to each hole. Fix the
mounting bracket into the expansion screws, and tighten
it with the nuts of expansion screws. (Fig. 2)
2 Wooden Ceiling Fix the mounting bracket to the wooden
ceiling with four wooden screws. The thickness of wooden
ceiling must be at least 7cm. (Fig. 3)
CEILING FAN INSTALLATION
1 Loosen the two screws of the fan body. (Fig. 4)
2 Take o the plug from the down rod by removing the R pin. Slide the down rod through the
canopy and connector. Slide the fan body electrical wire through the down rod. Sit the down rod
into the fan body and rotate the down rod until the holes on the down rod align with the holes
of the fan body. Slide the plug through the holes and secure it with the R pin on the other side.
Finally, tighten the other two screws. (Fig. 5)
3 Place the down rod with hanger ball into the mounting bracket. Rotate the hanger ball (or fan
Expansion Screw
Wooden Screws
Wooden Ceiling
Loose Screws
Connector
Canopy
Card Slot
Hanger
Ball
Card Point
M
ounting
Bracket
R Pin
Plug
Fa
n Body
Figure 2
Figure 3

LUNA – INSTALLATION MANUAL
5
6 Raise up the canopy to the ceiling to cover the mounting bracket, making sure the canopy will
sit into the two screws on the mounting bracket. Then rotate the canopy to ensure the screw
heads are at the narrow end of the holes. (Fig. 9)
7 To attach fan blades, loosen and remove the six screws on the motor and set aside. Align the
two holes on the blade with the holes on the motor and secure the blade with two screws.
Repeat for the remaining blades. (Fig. 10)
8 Secure the lower cover to the thread at the bottom of the fan by twisting the nut clockwise
until firmly tight. (Fig.11)
body) until the “Card Point” on the mounting bracket has dropped into the “Card Slot” on the
hanger ball and is firmly secure. (Fig. 6)
4 Connect electrical wires accurately according to the diagram. (Fig. 7)
5 After wires are connected, put the remote control receiver into the mounting bracket.(Fig. 8)
Remote Control Receiver
Signal Reception Line
Input Wire L/Black
Input Wire N/White
Ground Wire /
Yellow & Green Wire
Ground Wire /
Yellow & Green Wire
Red Wire
Brown Wire
Grey Wire
Brown Wire
Grey Wire
Red Wire
Ground Wire /
Yellow & Green Wire
Remote Control Wiring Diagram
Figure 7 Figure 8
Screws
Fan Blade
Fan Body
Figure 9 Figure 10

LUNA – INSTALLATION MANUAL
6
Thread
Nut
Figure 11
Thread
Nut
FAN RECEIVER PAIRING
1 Turn off the fan power supply and wait for 60 seconds.
2 Turn on the power supply again, have the transmitter pointed towards to the receiver
(please ensure the batteries of the transmitter are installed correctly - indicator light is on)
3 Press and hold the “FAN ON/OFF” button at least 5 seconds, until hearing the long beep
sound (1 second) of the receiver,
4 Pairing is now finished.

LUNA – INSTALLATION MANUAL
7
CEILING FAN MAINTENANCE
1 Ceiling fan is a rotating product. Make regular inspections on the hanging system,
blade holders, blades and various parts of this product to prevent them getting loose.
Recommendation is inspection twice a year to ensure safety.
2 Regularly clean the ceiling fan, wipe lightly with a soft brush or cleaning cloth.Avoid using a
damp cloth or destructive cleaning detergents.
3 Do not use lubricating oil on any parts of the ceiling fan.
WARNING
If unusual oscillating movement is observed, immediately stop using the ceiling fan and contact
the manufacturer, its service agent or suitably qualified persons.
The replacement of parts of the safety suspension system device shall be performed by the
manufacturer, its service agent or suitably qualified persons.
If it is necessary to replace the live or neutral brushes to ensure operation of the
motor then both brushes and the earth brush need to be replaced at the same time. The
brushes shall only be replaced by a suitably qualified person.
MAINTENANCE TIPS
• Always switch off the main electric supply at the circuit breaker fuse box before carrying out
any maintenance job to avoid any hazards.
• Do not use any detergent or corrosive acidic solution to clean the ceiling fan.
• Never oil the ceiling fan motor. The motor is created with a lubricated sealed ball bearing.
• If you are unsure of any steps, you can reach us at the email address and contact number
listed on the last page of this manual.

Telephone 1300 LIGHTS
Email [email protected]
amphis.com.au
To the best of our knowledge, the information
contained herein is accurate and reliable as of
the date of publication; however, Amphis Pty Ltd
does not assume any liability whatsoever for the
accuracy and completeness of the information.
Amphis Pty Ltd makes no warranties which extend
beyond the description contained herein.
Any information given in this statement does not
constitute any warranty of merchantability or tness
for a particular use. It is the customer’s responsibility
to inspect and to test our products in order to satisfy
themselves as to the suitability of the products to
their particular purpose.
V3 03-23
This manual suits for next models
6
Table of contents