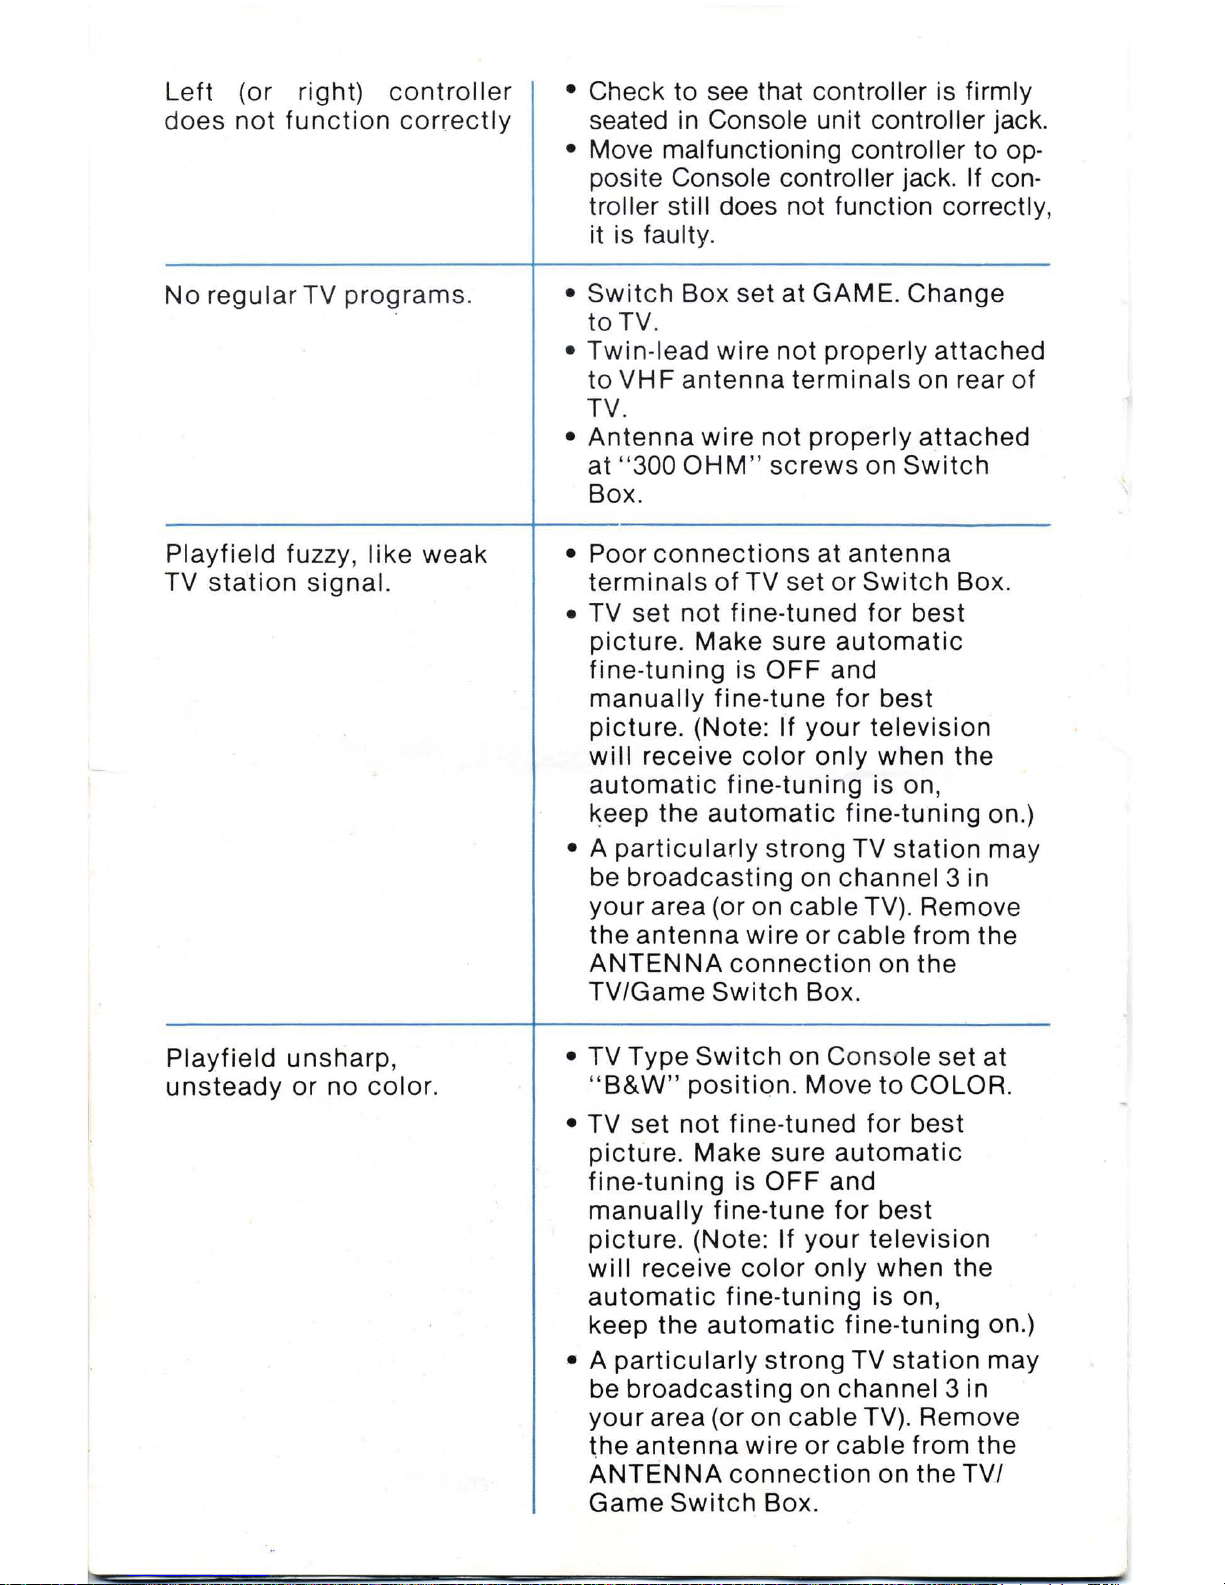
Atari CX2600 User manual


r
Your
Atari
video
game
is
engineered
not
to
show
a
phosphor
memory
of
the
playfield
or
score
digits
. We
suggest,
however
,
to
protec
t your
television
: .
1.
When
playing
the
games, turn
down
the
contrast
of
your
television.
2. Turn
the
At
a
ri
Vi
deo
game
OFF
when
not
in use.
1 UNPACK GAME
Console Unit
\
,\
~
paddle
Controllers
(Set
of
2)
Joystick Controllers
/ TV/Game Switch Box
AC
Power Supply
When
you remove
your
Atari Video Computer System
from
the
box,
you
should
have:
• Atari Video Computer System
Console
Unit
•
Combat
Game
Program
Packet
(with
Game
Instruction
Booklet)
• 2
Joystick
Controllers
• Paddle
Controller
(Set
of
2)
•
• AC Power
Supply
• TV/Game
Switch
Box
(with
twin-lead
wires)

2
Your
TV/Game
Switch
Box
attaches
easily
to
your
TV's
VHF
an-
tenna
screws
.
Find
the
picture
that
looks
the
most
like
the
back
of
your
TV
set
and
follow
those
instructions.
A
flat
screwdriver
is
required.
If
your
TV
has
four
screws
only:
A.
Disconnect
the
twin-lead
wire
from
your
TV and
attach
it
to
the
"Antenna"
screw
terminals
on
the
TV/Game
Switch
Box.
B.
Connect
the
twin-lead
wire
from
the
TV/Game
Switch
Box
to
the
VHF
antenna
terminals
on
your
TV set.
In
each
of
these
two
cases, you
may
need
to
buy
an
"im·
pedance
matching
transformer"
(also
called
a
"balun
coil").
The
transformer
is
necessary
only
if
you
do
NOT have a
flat
twin·
lead
antenna
wire.
It
is
available
at
a
nominal
cost
from
your
local
TV
and
hifi
stores.
If
your
TV
has
a "u"
shaped
slider
or
a
slide
switch:
A.
Move
the
"u" shaped
slider
to
make
connection
between
the
two
screws.
OR
Push
the
slide
switch
to
the
side
marked
"300
ohm"
or
"300
n
".

B.
If
you have a round
antenna
cable:
•
Disconnect
the
cable
from
your
TV.
•
Screw
the
cable
into
the
impedance-matching
transformer.
•
Attach
the
impedance-matching
transformer
to
the
"An-
tenna"
screw
terminals
on the TV/Game
Switch
box.
OR
If
you have
flat
twin-lead
antenna
wire:
•
Disconnect
it
from
the
TV and
attach
it
to
the
"Antsnna"
screw
terminals
on the TV/Game
Switch
Box.
C.
Connect
the
short
twin-lead
wire
from
the TV/Game
Switch
Box
to
the
VHF
antenna
terminals
on
your
TV set.
If your TV has a short round cable:
A.
If
you have a round
antenna
cable,
•
Disconnect
the
cable
from
your
TV.
•
Screw
the
cable
into
the
impedance-matching
transformer.
•
Attach
the
impedance-matching
transformer
to
the
"Antenna"
screw
terminals
on the TV/Game
Switch
Box.
OR
If you have
flat
twin-lead
antenna
wire:
•
Disconnect
it
from
the
TV and
attach
it
to
the
"Antenna"
screw
terminals
on the TV/Game
Switch
Box.
B.
Attach
the
TV's
short.loose.hanging
cable
to
the
connector
next
to
it
on
your
TV set.
C.
Connect
the twin-lead
wire
from
the TV/Game
Switch
Box
to
the
VHF
antenna
terminals
on
your
TV set.
D.
Plug the
Game
Cable
from
your
Atari Video
Computer
System
Console
into
the
TV/Game
Switch
Box
at
the
"Game"
connector.
The TV/Game
Switch
Box can be
left
on your TV set
permanently
without
bothering
your
TV program reception.
The TV/Game
Switch
Box can be
attached
permanently
to
the
back
of
your
TV set.
• Peel
off
the
protective
paper on the
back
of
the
TV/GameSwitch
Box.
• Press
the
exposed
sticky
surface
onto
any
clear
area on the
back
of
your
TV near the
antenna
terminals.
By
attaching
a TV/Game
Switch
Box
to
each TV in your home, you
can
easily
move
your
Atari
Video
Computer
System
from room
to
room. Extra TV/Game
Switch
Boxes,
part
number
CA010325, are
available
from
Atari, Inc. See paragraph 9
for
ordering
information.
(

I
For best
performance
,
we
suggest
the
following:
Avoid using
any
more
twin-lead
wires
from
Switch
Box
to
television
set
than is
supplied
with
Switch
Bo
x.
Avoid
connecting
the
twin-lead
wire
coming
out
of
the
Switch
Bo
x to
any
telev
ision
antenna
or
cable
television
outlet. Avoid
attaching
loose
wires
to
your
television
antenna
terminals
when
using.
ASSEMBLE CONSOLE 3
Right Controller Left Controller
TV/Game Switch Box
AC
Power Supply
•
Attach
the
controllers
by
plugging
them
into
the
terminals
on the
back
of
the
console.
The
controller
jacks
are
designed
to
fit
only
one way,
so
do
not
try
to
force
them
into
the
terminals.
NOTE: The Combat Game Program supplied with your Atari Video
ComputerSystem uses the Joystick Controllers.
•
Insert
the
jack
of
the
AC Power
Supply
into
the
back
of
your
Atari
Video
Computer
System
Console
unit.
•
Check
to
see
that
the
Power
Switch
on
the
Console
is
OFF
.
• Plug
the
AC Power
Supply
into
any
convenient
120·volt
electrical
outlet.

NOTE:
Using
any
AC
Power
Supply
other
than
that
designed
for
your
Video
Computer
System
can
damage
the
unit.
POWER REQUIREMENT:
9·volts
DC, 500ma.
• On
the
TV/Game
Switch
Box
that
you have
attached
to
your
TV
set
's
antenna
terminals,
push
the
TV/Game
switch
to
GAME
.
•
Turn
on
your
TV.
• Set
the
volume
control
of
your
TV
at
minimum.
• If
your
TV has an
automatic
fine·tuning
control,
turn
it
OFF
,
and
manually
fine-tune
for
the
best
picture.
(Note
: If
your
television
will
receive
color
only
when
the
automatic
fine-
tuning
is on, keep
the
automatic
fine-tuning
on.)
• Set
the
channel
selector
of
your
TV
to
channel
3.
The
Video
Computer
System
is
factory-set
to
operate
on
Channel
3.
However
,
if
Channel
3 is
broadcast
ing in
your
area, you may
receive
interference.
In
that
case,
change
your
television
and
Channe
l
Switch
to
Channel
2.
To
set
your
game
at
Channel
2
(Position
A)
:
1 -
Find
the
Channel
Switch
on
the
bottom
edge
of
the
console
.
2 - Push
the
switch
to
the
Channel
2
po
s
ition
(A)
with
a
pencil
or
similar
instrument.
INSERT GAME PROGRAM
•
Check
to
see
that
the
Power
switch
on
the
Video
Computer
Console
unit
is
OFF
.
IMPORTANT:
To
prolong
the
life
of
your
Atari
Video
Computer
System
and
protect
the
electronic
components,
the
Console
unit
should
be
OFF
when
inserting
or
removing
a
Game
Program.

Game Program Slot
•
Hold
the
Game
Program so
the
name
on the end is
towards
you and
reads
right
side
up.
•
Insert
the
Game
Program CAREFULLY
into
the
slot
in
the
center
of
the
Console
unit
switch
panel. Be sure
the
Game
Program is
firmly
seated
,
but
do
NOT TRY TO FORCE
IT.
When
removing
the
Game
Program,
pull
it
straight
out
of
the
Console
.
Check
to
see
that
the Power
Switch
on the
Console
is
OFF
.
5
Power Switch Game Program Slot Game Reset Switch
Game Select Switch
Left and Right Difficulty Switches

•
If
your
Atari
Video
Computer
System
is
attached
to
a
color
TV,
slide
the TV Type
Switch
to
the
COlOR
position.
This
will
allow
you
to
play
the
games
in vivid
co
lor.
If
yo
ur
TV is
blac
k and
white
, slide the TV Type
Switch
to
B &
W.
The Vi
deo
C
omputer
System
will
automatically
adjust
the
contrast
of
yo
ur
TV
so
you can
get
full enj
oyment
of
the
games
on
your
B & W
TV.
•
Slide
the
Power Sw
it
ch to ON. A
game
playfield
will
appear on your
TV screen.
IMPORTANT:
If
no
playfield
appears,
which
can happen
if
you have
inserted
the
Game
Program
while
the
Console
unit
is
turned
ON,
slide
the
Power
Switch
to
OFF
and
then
back
to
ON.
To
prolong
the
life
of
your
Atari
Video
Computer
System
and
protect
the
electronic
components,
the
Console
unit
should
be OFF
when
inserting
a
Game
Program.
•
Adjust
the
volume
control
of
your
TV
set
to
a
comfortable
level. The
game
sounds
will
be
coming
from
yourTV
speaker.
• Depress
the
Game
Select
Switch.
A
number
will
appear on the
upper
left
corner
of
your
TV screen.
This
number
corresponds
with
the
Game
number
in
the
Game I
nstruction
booklet
supplied
with your
Game Program. When
the
number
of
the
game
you
wish
to
play
appears, release
the
Game
Select
Switch
.
• Depress
the
RESET
Switch
.
Game
action
will
begin. By depressing
the RESET
Switch
any
time
during
the
game
, the
score
will
reset
to
0·0.
• The
difficulty
Switches
(left
and Right)
change
the
game
action
.
Position
"A" is
generally
more
difficult
than
Position
" B
".
As a
handicap
for
more
experienced
players, one
side
can be played in
"A"
and
the
other
in " B
".
Details
of
the
action
is
explained
in the
Game
Instructions
supplied
with
your
Game Program.
6 TO
CHANGE
YOUR TV BACK
TO REGULAR PROGRAMS
L--
______
_
•
Slide
the Power
Switch
on the
Console
unit
to
OFF.
• On the TV/Game
Switch
Box
attached
to
the
back
of
your
TV set,
slide
the TV/Game
switch
to
"TV".
•
If
your
TV
has
an
automatic
fine·tuning
control
,
turn
it
off.

MAINTENANCE
Your
Atari Video Computer System
should
bring
many
years
of
enjoyment.
In order
to
keep
your
System in
good
working
condition,
please
remember
the
following
points;
•
Always
turn the Power
Switch
on the
Console
unit
OFF
before
inserting
the
Game
Program.
• Don't
try
to
force
the Game Program
into
the Console.
• Your Game Programs are
protected
from
normal wear and
tear
as
they
are
fully
enclosed
. However, care
should
be
taken
not
to
spill
liquids
on them.
•
Don't
pour
liquids
into
the
Game Program
Slot
of
the Console.
•
Lifting
the
Console
unit
or
the
Controllers
by the
connecting
wires
can bend
or
crimp
them, breaking the
internal
insulation
of
the
wire.
• Care
should
be taken
not
to
drop
the
Console,
Controllers,
or
Game
Programs on any hard surface.
• Do
not
expose
the Console,
Controllers,
or
Game Programs
to
excessive
or
extreme
heat.
• Remember to turn the
Video
Computer
System
OFF
when
not
in use.
• Use
of
any AC Power
Supply
other
than
that
designed
for
use
with
your
Video
Computer
System can
damage
the
electronic
parts
of
the
system.
• Clean the
exterior
parts
with
a
soft,
slightly
damp
cloth.
SYMPTOM
No
playfield
image
O
u..g~
.;::;.
screen
or
whitish-grey
screen.
8
PROBABLE CAUSE AND REMEDY
•
Switch
Box
set
at
"TV",
change
to
"GAME".
• Game Cable
not
properly
plugged
into
Switch
Box.
• Twin-lead
wire
not
properly
attached
to
VHF
antenna
terminals
on rear
of
TV.
•
Console
unit
Power
Switch
not
turned
ON.
•
Game
Program
inserted
into
Console
while
Power
Switch
was
ON.
Slide
Switch
to
OFF
and
back
toON.
• A
particularly
strong
TV
station
may
be
broadcasting
on
channel
3 in
your
area (or on
cable
TV). Remove
the
antenna
wire
or
cable
from
the
ANTENNA
connection
on the
TV/Game
Switch
Box.

left
(or right)
controller
does
not
function
correctly
No
regular
TV
programs
.
Playfield
fuzzy,
like
weak
TV
station
signal.
Playfield
unsharp,
unsteady
or
no
color.
• Check to see that controller is firmly
seated
in
Console unit controller jack.
• Move malfunctioning controller to op-
posite Console controller jack. If con-
troller still does not function correctly,
it is faulty.
•
Switch
Box set
at
GAME.
Change
to
TV.
•
Twin-lead
wire
not
properly
attached
to
VHF
antenna
terminals
on rear
of
TV.
•
Antenna
wire
not
properly
attached
at
"300
OHM
"
screws
on
Switch
Box.
• Poor
connections
at
antenna
terminals
of
TV
set
or
Switch
Box.
• TV
set
not
fine-tuned
for
best
picture
. Make
sure
automatic
fine-tuning
is
OFF
and
manually
fine-tune
for
best
picture
. (Note: If
your
television
will
receive
color
only
when
the
automatic
fine-tuning
is on,
keep
the
automatic
fine-tuning
on.)
• A
particularly
strong
TV
station
may
be
broadcasting
on
channel
3 in
your
area (or on
cable
TV). Remove
the
antenna
wire
or
cable
from
the
ANTENNA
connection
on
the
TV/Game
Switch
Box.
• TV Type
Switch
on
Console
set
at
"B&W"
position.
Move
to
COlOR.
• TV
set
not
fine-tuned
for
best
picture.
Make
sure
automatic
fine-tuning
is
OFF
and
manually
fine
-
tune
for
best
picture.
(Note: If
your
television
will
receive
color
only
when
the
automatic
fine-tuning
is on,
keep
the
automatic
fine-tuning
on.)
• A
particularly
strong
TV
station
may
be
broadcasting
on
channel3
in
your
area (or on
cable
TV). Remove
the
antenna
wire
or
cable
from
the
ANTENNA
connection
on
the
TV/
Game
Switch
Box.

SYMPTOM
Playfield unsharp,
unsteady
, or un
able
to
t
ell
di
ffe
r
ence
s between
playing
pi
eces
an
d/o
r
playfie
ld. (
B&W
TV)
Sound
buzzes
or
is
distorted
No
game
sounds
PROBABLE CAUSE AND REMEDY
• TV Type
Switch
on
Console
set
at
COlOR
position.
Move
to
"B&W"
.
• A
particularly
strong
TV
station
may
be
broadcasting
on
channel
3 in
your
area (or on
cable
TV). Remove
the
antenna
wire
or
cable
from
the
ANTENNA
connection
on
the
TV/
Game
Switch
Box.
• TV
set
not
fine·tuned.
Adjust
TV
set
fine·tuning
controls
until
both
picture
and
sound
are clear.
• A
particularly
strong
TV
station
may
be
broadcasting
on
channel
3 in
your
area (or on
cable
TV). Remove
the
antenna
wire
or
cable
from
the
ANTENNA
connection
on
the
TV/
Game
Switch
Box.
• TV
set
volume
not
turned
up.
Adjust
TV
set
volume
to
desi
red level.
As a rule
of
thumb,
if
no
playfield
appears
when
you
turn
ON
your
Video
Computer
Console
,
turn
the
unit
OFF
,
wait
10
seconds
, and
then
turn
the
unit
ON. 9
The
replacement
parts
listed
below
should
be ordered
directly
from
Atari,
Inc
.,
Consumer
Division, Parts
Departmen
t, 1346
Bordeaux
Drive, Sunnyvale, CA 94086.
When
ordering
repair
parts,
always
include
the
following
information:
• Part
Number
•
Name
of
Game
•
Model
Number
• Part
Name
The
Model
Number
of
your
Atari
Video
Computer
System
is
located
on
the
bottom
of
the
Console
unit.
AlwayS
mention
the
Model
Number
when
requesting
service
or
repair
parts.
Joystick
Controller
Paddle
Controller
(set
of
2)
TV/Game
Switch
Box
AC
Power
Supply
Rubber
Foot
Owner
's Manual
PAINTED
IN
HONG
KONG
CA012994·03
CA012760·06
CA014120
CA014034
88·1004
C012250

Other manuals for CX2600
4
Table of contents
Other Atari Video Game manuals
Popular Video Game manuals by other brands

GAMES MICROSOFT XBOX
GAMES MICROSOFT XBOX MIDTOWN-MADNESS 3 manual

THQ
THQ TETRIS WORLDS manual

Disney
Disney Spectrobes: Origins None user manual

Nintendo
Nintendo NTRRIPKE Instruction booklet

Tiger Electronics
Tiger Electronics 64-006 instructions

Tiger Electronics
Tiger Electronics All Pro Basketball 7-717 instructions

Sega
Sega Crazy Taxi 2 user guide

Sega
Sega Floigan Brothers user guide

GAMES MICROSOFT XBOX
GAMES MICROSOFT XBOX NBA LIVE 2003 manual

Microsoft game studios
Microsoft game studios WHACKED manual

Screenlife
Screenlife Scene It? Movies 2 instructions

Kutoka Interactive
Kutoka Interactive Video Games user manual