BACKSAVER VERSION 1.5 User manual

User Manual
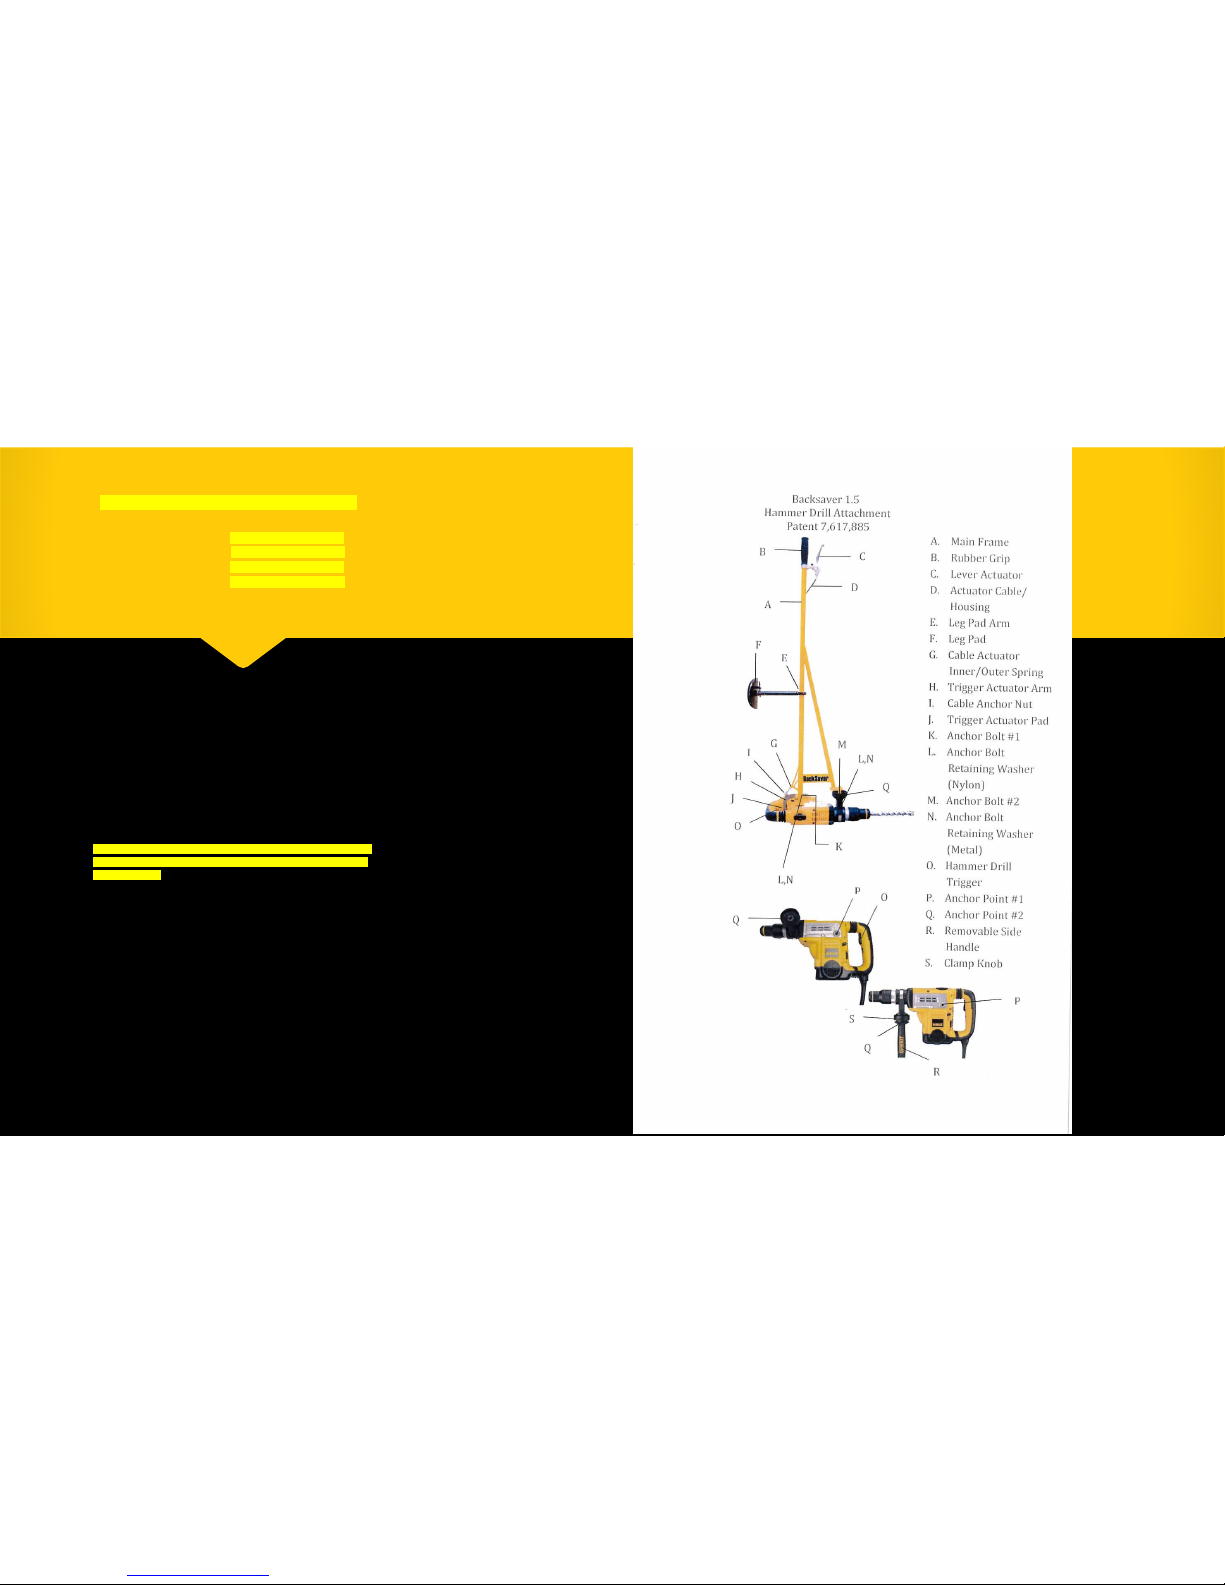
BACKSAVER VERSION 1.5
Hammer Drill Attachment

Table of Contents
Product Display…………………………………………..1
Instructions………………………………………......2-7
Product Use………………………………………………..8
Disclaimer and Warranty…………………………….9

1

Attaching Backsaver Version 1.5 to
Dewalt Hammer Drills
(Check Model #’s for coordinating instructions)
Spline Rotary Hammer: Model# D25553K – 1 9/16”
SDS Max Rotary Hammer: Model# D25501K – 1 9/16”
Getting started:
1. Lay hammer drill with left side up and loosen Clamp Knob (S)
2. Move Removable Side Handle (R) to a 90⁰ angle
3. Unscrew Side Handle (R) and remove. Be sure to leave Clamp Knob (S) loose
until drill attachment is in place
4. Place Backsaver over hammer drill and align holes over Anchoring Points (P &
Q).
5. Manually begin to screw in Anchor Bolts (K & M) making sure not to cross
thread –start bolt next to Anchor Point #1 (P) first. Tighten with Allen Wrench
stored on Leg Pad (F)
6. IMPORTANT –Re-secure the Clamp Knob (S) so it does not spin
7. Using Allen Wrench, attach the Leg Pad Arm (E) and tighten bolts
8. Attach Leg Pad (F) to the Leg Pad Arm (E)
9. Adjust the height of the Leg Pad Arm (E) to desired height on the leg. Works
best if on the thigh
10. The Trigger Actuator Arm (H) is pre-set and should be ready to use
11. Hold the attachment by the Rubber Grip (B) and pull the Lever Actuator (C) to
make sure it engages and releases the Hammer Drill Trigger (O)
a. If it does not actuate the Hammer Drill Trigger (O), or the Trigger
stays engaged, the Cable (G) will need to be adjusted
12. To adjust the Cable (G):
a. Loosen the Cable Anchor Nut (I) on the Trigger Actuator Arm (H)
b. Pull the Cable (G) so the Trigger Actuator Pad (J) is ¼” from Hammer
Drill Trigger (O)
c. Re-secure Cable (G) by tightening Cable Anchor Nut (I) on Trigger
Actuator Arm (H)
13. Before plugging in, make sure bolts (K,M) are tightened the Clamp Knob (S) is
secured and the Tigger Actuator Arm (H) is working properly
a. When the Trigger Actuator Arm (H) is engaged, there will be a clicking
sound the hammer drill makes when the Lever Actuator (C) is pulled
and released
Relax. . . Save your back!!
23
&
Attaching Backsaver Version 1.5 to Dewalt Hammer Drills
(Check Model #’s for coordinating instructions)
Spline Rotary Hammer: Model# D25651K –1 3/4"
SDS Max Rotary Hammer: Model# D25601K – 1 3/4”
Mode # D25602K –1 3/4"
Model# D25603K –1 3/4"
Getting started:
1. Lay hammer drill with left side up and loosen Clamp Knob (S)
2. Move Removable Side Handle (R) to a 90⁰ angle
3. Unscrew Side Handle (R) and remove. Be sure to leave Clamp Knob (S) loose
until drill attachment is in place
4. Place Backsaver over hammer drill and align holes over Anchoring Points (P &
Q).
5. Manually begin to screw in Anchor Bolts (K & M) making sure not to cross
thread –start bolt next to Anchor Point #1 (P) first. Tighten with Allen Wrench
stored on Leg Pad (F)
6. IMPORTANT –Re-secure the Clamp Knob (S) so it does not spin
7. Using Allen Wrench, attach the Leg Pad Arm (E) and tighten bolts
8. Attach Leg Pad (F) to the Leg Pad Arm (E)
9. Adjust the height of the Leg Pad Arm (E) to desired height on the leg. Works
best if on the thigh
10. Loosen the nut that secures the Trigger Actuator Pad (J); turn the Trigger
Actuator Pad 90⁰ and secure Trigger Actuator Pad (J) in new position by
tightening the nut
11. The Trigger Actuator Arm (H) is pre-set and should be ready to use
12. Hold the attachment by the Rubber Grip (B) and pull the Lever Actuator (C) to
make sure it engages and releases the Hammer Drill Trigger (O)
a. If it does not actuate the Hammer Drill Trigger (O), or the Trigger stays
engaged, the Cable (G) will need to be adjusted
13. To adjust the Cable (G):
a. Loosen the Cable Anchor Nut (I) on the Trigger Actuator Arm (H)
b. Pull the Cable (G) so the Trigger Actuator Pad (J) is ¼” from Hammer Drill
Trigger (O)
c. Re-secure Cable (G) by tightening Cable Anchor Nut (I) on Trigger
Actuator Arm (H)
14. Before plugging in, make sure bolts (K,M) are tightened, the Clamp Knob (S) is
secured and the Trigger Actuator Arm (H) is working properly
a. When the Trigger Actuator Arm (H) is engaged, there will be a clicking
sound the hammer drill makes when the Lever Actuator (C) is pulled and
released
Relax. . . Save your back!! 54
&

Attaching Backsaver Version 1.5 to Dewalt Hammer Drills
(Check Model #’s for coordinating instructions)
SDS Max Rotary Hammer: Model# D25701K – 1 7/8” Model# D25761K – 2”
Model# D25721K – 1 7/8” Model# D25762K – 2”
Model# D25723K – 1 7/8” Model# D25763K – 2”
(Adapter sold separately, required for all above listed models)
(Two 9/16” wrenches required for adapter assembly)
Getting started:
1. Secure adapter (purchase separately) to the attachment at the Anchor Bolt #2 (M) location
with the two nuts and two bolts supplied with the separately purchased adapter. The bolts
should be torqued to 37 ft. lbs. Lay hammer drill with left side up and loosen Clamp Knob (S)
2. Move Removable Side Handle (R) to a 90⁰ angle
3. Unscrew Side Handle (R) and remove. Be sure to leave Clamp Knob (S) loose until drill
attachment is in place
4. Place Backsaver over hammer drill and align holes over Anchoring Points (P & Q).
5. Manually begin to screw in Anchor Bolts (K & M) making sure not to cross thread –start bolt
next to Anchor Point #1 (P) first. Tighten with Allen Wrench stored on Leg Pad (F)
6. IMPORTANT –Re-secure the Clamp Knob (S) so it does not spin
7. Using Allen Wrench, attach the Leg Pad Arm (E) and tighten bolts
8. Attach Leg Pad (F) to the Leg Pad Arm (E)
9. Adjust the height of the Leg Pad Arm (E) to desired height on the leg. Works best if on the
thigh
10. Loosen the nut that secures the Trigger Actuator Pad (J); turn the Trigger Actuator Pad 90⁰
and secure Trigger Actuator Pad (J) in new position by tightening the nut
11. The Trigger Actuator (H) is pre-set and should be ready to use
12. Hold the attachment by the Rubber Grip (B) and pull the Lever Actuator (C) to make sure it
engages and releases the Hammer Drill Trigger (O)
a. If it does not actuate the Hammer Drill Trigger (O), or the Trigger stays engaged, the
Cable (G) will need to be adjusted
14. To adjust the Cable (G):
a. Loosen the Cable Anchor Nut (I) on the Trigger Actuator Arm (H)
b. Pull the Cable (G) so the Trigger Actuator Pad (J) is ¼” from Hammer Drill Trigger (O)
c. Re-secure Cable (G) by tightening Cable Anchor Nut (I) on Trigger Actuator Arm (H)
15. Before plugging in, make sure bolts (K,M) are tightened, the Clamp Knob (S) is secured and
the Trigger Actuator Arm (H) is working properly
a. When the Trigger Actuator Arm (H) is engaged, there will be a clicking sound the
hammer drill makes when the Lever Actuator (C) is pulled and released
Relax. . . Save your back!!
67
&

Now you are ready to use the
Backsaver!
1. Face the concrete pad you are drilling into, lift the hammer drill to the height you want to drill
2. Apply pressure to Backsaver Leg Pad (F) pushing drill bit into concrete
3. Squeeze the Lever (C) while holding the Rubber Grip (B) of the Backsaver to actuate the Trigger
(O) and start drilling!
4. Drill to your desired depth, then remove drill and start new hole
Revolutionize the way you work!
8

Backsaver
Disclaimer and Warranty
DISCLAIMER:
Caution: This product is to be used for stand-up drilling ONLY. Any other use could result in serious
injury.
Please follow instructions carefully; failure to comply with instructions could result in serious injury.
Be sure ON/OFF switch is OFF before plugging in drill.
Maintain Backsaver with care.
Stay Alert –Watch what you are doing and be aware of your surroundings when operating any power
tool.
The Backsaver should be used in compliance with Dewalt Drill Manufacturers’ instructions.
When Backsaver is not in use and/or is unattended, lay flat on ground.
90 DAY LIMITED WARRANTY:
If inspection shows a problem with the Backsaver that is caused by manufacturers’ defect or material,
we will repair or (at our discretion) replace without charge.
Warranty does not apply where:
Backsaver has been abused; misused or improperly maintained
Alterations have been made to the Backsaver
Repairs are required because of normal wear and tear
Thank you for purchasing Backsaver
&
(Your back thanks you!)
9

Revolutionize the way you work!
There isn’t another tool like this available. Our revolutionary, patented hammer drill attachment will change the way you use a hammer drill forever.
Backsaver highlights:
•Requires less energy while drilling
•Permits application of more pressure while drilling
•Allows for easier, faster and more consistent level drilling
•Increases productivity
•Helps absorb harmful vibration from hammer drill
•Assists in prevention of back injuries
Contact Us
4401 Highway 162
Granite City, IL 62040
Phone: (618) 797-6078
Email: [email protected]
Web: www.hammerdrillattachment.com
Table of contents


