Beacon Athletics TUFFScreen Pitcher's L User manual

ASSEMBLY GUIDE
Pitcher’s L
8x 8 Fungo

Congratulations on the purchase of your professional grade TUFFScreen™
ineld screen. Some basic assembly is required. Assembly of the frame and wheel
kit will only take a few minutes. Lacing the net to the frame will take approximately
60 minutes. Your satisfaction is our ultimate goal. Contact us online at
beaconathletics.com/contact or call 800-747-5985 if you have questions.
nOrder of Assembly:
1. Assemble frame
2. Attach axle tube & wheel kit
3. Add pillowcase net
4. Attach padding to frame
5. Cover padding with vinyl cover
nTools You’ll Need:
1. Two 9/16" Box End Wrenches
2. Shears
3. Tape Measure or Ruler
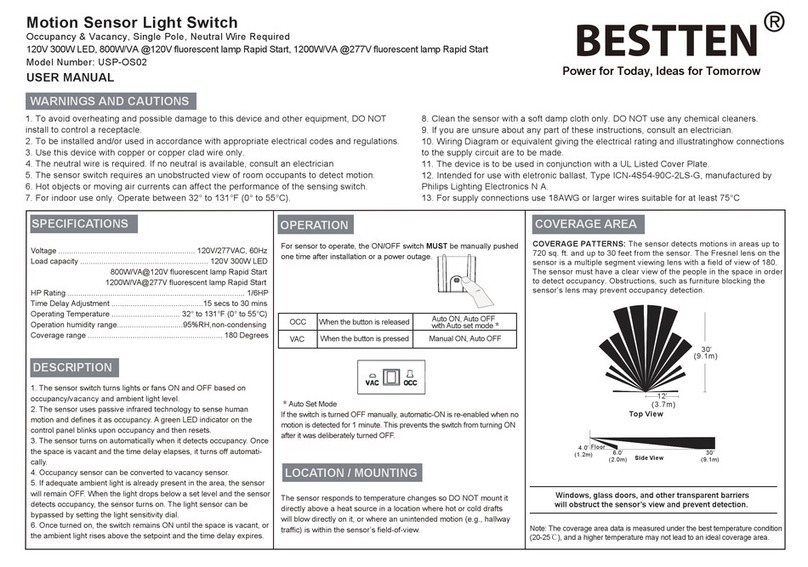
8x8 FUNGO &PITCHER’S L
Straight Spacer
Pitcher’s L only [2]
QUANTITY listed in [brackets] for each part for the 8x8 Fungo and the Pitcher’s L.
U-Connector
Pitcher’s L only [2]
45°-Connector
Pitcher’s L only [1]
Elbow Connector
Pitcher’s L [1]
8x8 [4]
Straight Connector
8x8 only [4]
BASIC FRAME PARTS
COCOA MOP
TUFFSCREEN™INFIELD SCREENS
@beaconathletics
|
/beaconathletics1948
|
BeaconAthletics.com
3
2
BeaconAthletics.com
|
8 0 0-747- 5985
|
fax 608-836-0724
2
B
C
D E
A

NOT…: Heavy-duty UV-treated #72 knotted nylon net and a vinyl cover roll with cable ties also included.
Corner Pad
Pitcher’s L [4]
8x8 [3]
Short Pad Pitcher’s L [1]; 8x8 [1]
Long Pad Pitcher’s L [3]; 8x8 [4]
Square Axle Tube
Pitcher’s L [1]
8x8 [1]
Bolt & Split-lock Washer
(3/8"- 16 x ¾")
Pitcher’s L [4]
8x8 [4]
Bolt w/Nylock Nut
(3/8"- 16 x 3")
Pitcher’s L [1]
8x8 [1]
Bolt w/Nylock Nut
(3/8"- 16 x 2½")
Pitcher’s L [5]
8x8 [7]
Bolt w/Nylock Nut
(1/2"- 13 x 7")
Pitcher’s L [2]
8x8 [2]
Axle Tube Brace
Pitcher’s L [2]
8x8 [2]
AXLE TUBE & WHEEL KIT PARTS
BASIC HARDWARE
PADDING & NET PARTS
TUFFSCREEN™INFIELD SCREENS
@beaconathletics
|
/beaconathletics1948
|
BeaconAthletics.com
3
33
1 2
3
F
N
P
O
Q
“No-Flat” Tire
Pitcher’s L [2]
8x8 [2]
HAxle Mounting Plate
Pitcher’s L [1]
8x8 [1]
I
Wheel Bracket
Pitcher’s L [2]
8x8 [2]
JRound U-Bolt
Pitcher’s L [2]
8x8 [2]
K
Square U-Bolt
Pitcher’s L [2]
8x8 [2]
LBolt Caps
Pitcher’s L [8]
8x8 [8]
M
G

FRAME ASSEMBLY
Assemble frame as shown, referencing the parts list on the previous page.
You’ll need two 9/16" box end wrenches to complete frame assembly.
For the Pitcher’s L you will use the Straight Spacer (B), U-Connector (C),
45°-Connector (D), and the Elbow Connector (E) with 2½" Bolts with
Nylock Nut (O) .
Detailed instructions for axle tube and wheel kit assembly (circled) are on pages 6-8.
COCOA MOP
TUFFSCREEN™INFIELD SCREENS
@beaconathletics
|
/beaconathletics1948
|
BeaconAthletics.com
5
4
BeaconAthletics.com
|
8 0 0-747- 5985
|
fax 608-836-0724
4
C
OO
OO
O
C
B
B
D
E

For the 8 x 8 Fungo you will use the Straight Connector (A) and the Elbow
Connector (E) with the 2½" Bolts with Nylock Nut (O).
Detailed instructions for axle tube and wheel kit assembly (circled) are on pages 6-8.
TUFFSCREEN™INFIELD SCREENS
@beaconathletics
|
/beaconathletics1948
|
BeaconAthletics.com
5
55
O
O
O
O
O O
O
E
EE
E
A
A
A A

ATTACH SQUARE AXLE TUBE & BRACES
SIDE VIEW
NOT…: Hand tighten all bolts until wheels are attached (page 8).
➊Using the Round-U Bolts (K) attach the Axle Mounting Plate (I)
to frame as shown below.
➋Attach the Square Axle Tube (F) to the Axle Mounting Plate (I)
using the Square U-Bolts (L).
➌Attach the two Axle Tube Braces (G) to the Net Frame using 3/8"
Bolt with Nylock Washer (P). The opposite ends of the Axle Tube
Braces will be secured when the wheels are attached (page 8).
➍After wheels are attached, tighten all bolts, trim Bolt Caps (M) and
cover exposed bolt ends on the backside of Axle Mounting Plate (I).
Assembly is the same for both the Pitcher’s L and the 8 x 8 Fungo.
(Also see parts list on page 3)
COCOA MOP
TUFFSCREEN™INFIELD SCREENS
@beaconathletics
|
/beaconathletics1948
|
BeaconAthletics.com
7
6
BeaconAthletics.com
|
8 0 0-747- 5985
|
fax 608-836-0724
6
N
P
G
L
F
KK
M M M M

BACK VIEW
TUFFSCREEN™INFIELD SCREENS
@beaconathletics
|
/beaconathletics1948
|
BeaconAthletics.com
7
77
N
P
N
G G
F
L L
L
F
IK
G

ATTACH WHEELS
With your frame assembled and axle tube in place, attach the wheels as shown
below. First, attach the Wheel Bracket (J) to the Tire (H). Position the Wheel
Bracket, then run the 7" Bolt (Q) through the Tire and both ends of the Wheel
Bracket and secure with Nylock Nut. With Wheel Bracket attached to the Tire,
insert the Bracket into the Square Axle Tube (F) and secure with 3/4" Bolts and
Washers (N). With wheels attached, tighten all bolts.
Assembly is the same for both the Pitcher’s L and the 8 x 8 Fungo.
COCOA MOP
TUFFSCREEN™INFIELD SCREENS
@beaconathletics
|
/beaconathletics1948
|
BeaconAthletics.com
9
8
BeaconAthletics.com
|
8 0 0-747- 5985
|
fax 608-836-0724
8
N N
Q
G
FJ
H

ADD PILLOWCASE NET
You’ll need the included cable ties to add the net. Assembly is the same for both
the Pitcher’s L and the 8 x 8 Fungo.
➊Align net with the frame. Be sure to align net for your model —
for example, align the Pitcher's L net to match shape of the frame.
➋Slide pillowcase net over the top of frame, pulling the net
downward over the entire frame until you reach the bottom.
➌Secure the bottom edge of the net to the bottom of the frame
using cable ties.
Add cable ties to secure pillowcase net.
TUFFSCREEN™INFIELD SCREENS
@beaconathletics
|
/beaconathletics1948
|
BeaconAthletics.com
9
99

ATTACH PADDING TO FRAME
Pitcher’s L
➊Attach the four corner pads (1)(notch placed at 90° corner of frame).
➋Attach the one short pad (2)(see lower right corner of illustrations).
➌Attach the three long pads (3).
COCOA MOP
TUFFSCREEN™INFIELD SCREENS
@beaconathletics
|
/beaconathletics1948
|
BeaconAthletics.com
11
10
BeaconAthletics.com
|
8 0 0-747- 5985
|
fax 608-836-0724
10
1
1
11
2
3
3
3

See back page
for notes
about adding
vinyl pad cover.
ATTACH PADDING TO FRAME
8' x 8' Fungo
➊Attach the three corner pads (1)(notch placed at 90° corner of frame).
➋Attach the one short pad (2)(see lower right corner of illustrations).
➌Attach the four long pads (3).
TUFFSCREEN™INFIELD SCREENS
@beaconathletics
|
/beaconathletics1948
|
BeaconAthletics.com
11
1111
23
3
3 3
1 1
1

BeaconAthletics.com |8 0 0-747- 59 85 |fax 608-836-0724
8233 FORSYTHIA STREET, SUITE 120, MIDDLETON, WI 53562
© Copyright 2017, Beacon Athletics, A division of Rainbow Group, LLC. All Rights reserved. This material may not be republished,
rewritten or redistributed including electronically cached without the prior written consent of Beacon Athletics.
Version 2 rev_2017-02
COVER PADDING WITH VINYL COVER
To cover the padding you will need to use shears.
b Layout Vinyl Cover and wrap over padding, securing with 8" cable ties.
b Tuck in as needed on corners.
b Trim cable tie ends ush with capture end.
b Trim excess vinyl as needed.
Other manuals for TUFFScreen Pitcher's L
1
This manual suits for next models
1
Table of contents
Popular Accessories manuals by other brands
Choetech
Choetech PD18W user manual
REV Ritter
REV Ritter DB400 operating instructions

UFESA
UFESA AL5522 operating instructions
Extron electronics
Extron electronics PVT SW HDMI RGB D installation guide

Newell Rubbermaid
Newell Rubbermaid baby jogger City Select Assembly instructions
Roland
Roland GFC-50 owner's manual
