Betterbee Lyson 12 User manual
Questions? 1-800-632-3379
Last Updated February 2018 Page 1 of 17 LYSON W229E
Betterbee
Beekeepers Serving Beekeepers
Lyson 12 Frame Motorized Extractor Instructions
(W229E)
®

Questions? 1-800-632-3379
Last Updated February 2018 Page 2 of 17 LYSON W229E
Before using your extractor please read these instructions. The manufacturer is not responsible for
any damage caused by using the device contrary to its intended purpose or inappropriate handling.
SECTION 1: PREPARE EXTRACTOR FOR USE
1. Assemble the extractor, if required, by following the included instructions.
2. Rinse the honey extractor thoroughly with hot water and a small amount of dish detergent.
To avoid flooding the bearings, open the honey gate prior to washing to allow wash water
to drain. On models where the lower bearings are not covered by the extractor basket,
cover the bearings with plastic wrap before washing to prevent water from entering the
bearings.
3. Place extractor in desired location for extracting.
Assembly Instructions
Electrical Safety
1. Electric installation needs to be equipped with residual current device (GFCI) and needs to be
designed to trip on a leakage current of 30 mA. Overcurrent protection needs to be checked
periodically.
2. If the power cord is damaged and needs to be exchanged, contact your Lyson distributor for
assistance. The honey extractor cannot be used if the power cord is damaged.
3. Before switching on the device to the network, make sure that the control is switched off. Circuit-
breaker on the control panel should be in a “0” position.
4. Make sure that the nominal voltage of honey extractor and of power source are compatible.
5. Take extra care while plugging in the power cord. Hands must be dry. Place on a dry surface.
6. Keep the honey extractor lid closed during rotation. Opening the lid while spinning will cause the
extractor to stop and display an error message. If rotation does not stop with lid lifted, the safety
switch of the lid has failed and must be repaired before proceeding.
7. Honey extractor must not be moved during the spinning process.
8. Protect the motor and controller against moisture during use and storage.
9. Do not pull on the power cord. Keep the power cord in good condition and away from heat and
sharp edges. Do not run over with a vehicle.
10. If using an extension cord, be sure to select a durable, grounded cord designed to withstand the
working conditions, and rated to handle the electrical load (at least 10 amps). Be sure to route the
extension cable carefully to protect it from damage and/or liquids.

Questions? 1-800-632-3379
Last Updated February 2018 Page 3 of 17 LYSON W229E
Safety Precautions
1. This device is not designed to be used by persons (including children) with limited physical, sensual
or psychological abilities or by persons who do not have experience or knowledge of the device unless
it is done under supervision and according to the user manual. Keep away from children.
2. In case of device damage, contact your distributor for information on repair. Do not attempt
unauthorized repairs.
3. Do not perform any maintenance while extractor is in use. Unplug the extractor before performing
any repairs.
4. All guards when the appliance is operating must be permanently attached to the honey extractor.
5. Do not turn on or store the device at a temperature below 0º C. You should not turn on the honey
extractor when the ambient temperature is lower than 5ºC.
6. Before starting the honey extractor, in the case where it was moved from the room of a lower
temperature to room with a higher temperature, you should wait until it reaches the ambient
temperature.
7. Working area should be kept clean and tidy, and proper lighting should be provided
SECTION 2. INSTRUCTIONS FOR HONEY EXTRACTOR USE
General guidelines
1. Place the honey extractor in the desired location. Rotate extractor so
that loading area and honey discharge are in ideal location.
2. Fix the honey extractor to the floor surface to avoid excessive
movement. A sheet of plywood may be used as a temporary “floor” if
needed.
3. Before using, honey extractor should be washed carefully. See
Maintenance section.
4. Frame arrangement: Place the honey frames (uncapped) in the basket
of the honey extractor paying special attention to their orientation. Top
bars of frames should rest against the round upper and lower support
cages of the basket (see Fig. 1). The side bar on the bottom end sits in
the groove as shown in Fig. 1. Frames must be arranged with the top bar
facing out toward the drum as shown in Fig. 2.
5. Make sure that frames are correctly arranged in the basket of the
honey extractor to avoid damage. To the extent possible, balance the load
by placing frames of equal weight in exactly opposing basket positions.
Twelve medium frames (6-¼”) may be extracted simultaneously. If
extracting fewer than the maximum, balance the load by placing frames in
opposite positions across the basket.
Improper frame arrangement may cause damages not covered by warranty!
Figure 2
Figure 1

Questions? 1-800-632-3379
Last Updated February 2018 Page 4 of 17 LYSON W229E
6. Before starting the extractor:
•Make certain the 1-1/4” honey drain valve is open, so honey can drain to a container below the
open valve. Pooling honey in the bottom of the extractor can impede the rotation and
damage the extractor!
•Only load one size of frame in each extracting load. Processing mixed frame sizes leads to
poor balance and extraction.
•Make sure that frames are correctly arranged and well balanced.
•Insert the power plug into the socket and press the power toggle switch (from “0” to “1”).
•The controller will at this time perform a self-diagnosis signaled by the “0” digit flickering. If any
faults are detected, the controller will not respond until the fault is removed. (See CDD-2
controller manual for help).
7. Start the extractor by pressing the + button. Press the + or –buttons as needed to adjust the motor
speed to your required level. Extract at low speed initially, and then gradually increase the speed as
the frames empty of honey. If the extractor begins to vibrate, decrease the speed until the vibration
stops. Extract until the frames are mostly empty of honey. Please note that the time required to extract
your honey will depend on the type of honey, the size (depth) of the frame, and the temperature of the
honey. Accelerating too quickly can result in poor extraction, comb damage and excess wear of the
extractor.
8. Once extraction is complete, press the –button until the display reads “0” and press the power
switch off (from “1” to “0”).
Warning!!! Frames can only be rearranged when the basket has fully stopped!
SECTION 3: Assembly Instructions
W229E Motorized Model
Tools Required: Metric wrenches and/or sockets (various sizes, 6 to 17mm)
6mm Allen wrench (other sizes needed are included with extractor)
Scissors or knife
1. Unpack all components carefully and ensure all components are present as shown below. Do not
set extractor directly on floor; place a few pieces of packing material underneath each side to prevent
the center shaft from resting on the floor. Now is a good time to remove the white plastic film from the
extractor.

Questions? 1-800-632-3379
Last Updated February 2018 Page 5 of 17 LYSON W229E
2. Lay extractor on its side on several pieces of cardboard packing material, ensuring that it is not
resting on the honey gate or hand crank.
Questions? 1-800-632-3379
Last Updated February 2018 Page 6 of 17 LYSON W229E
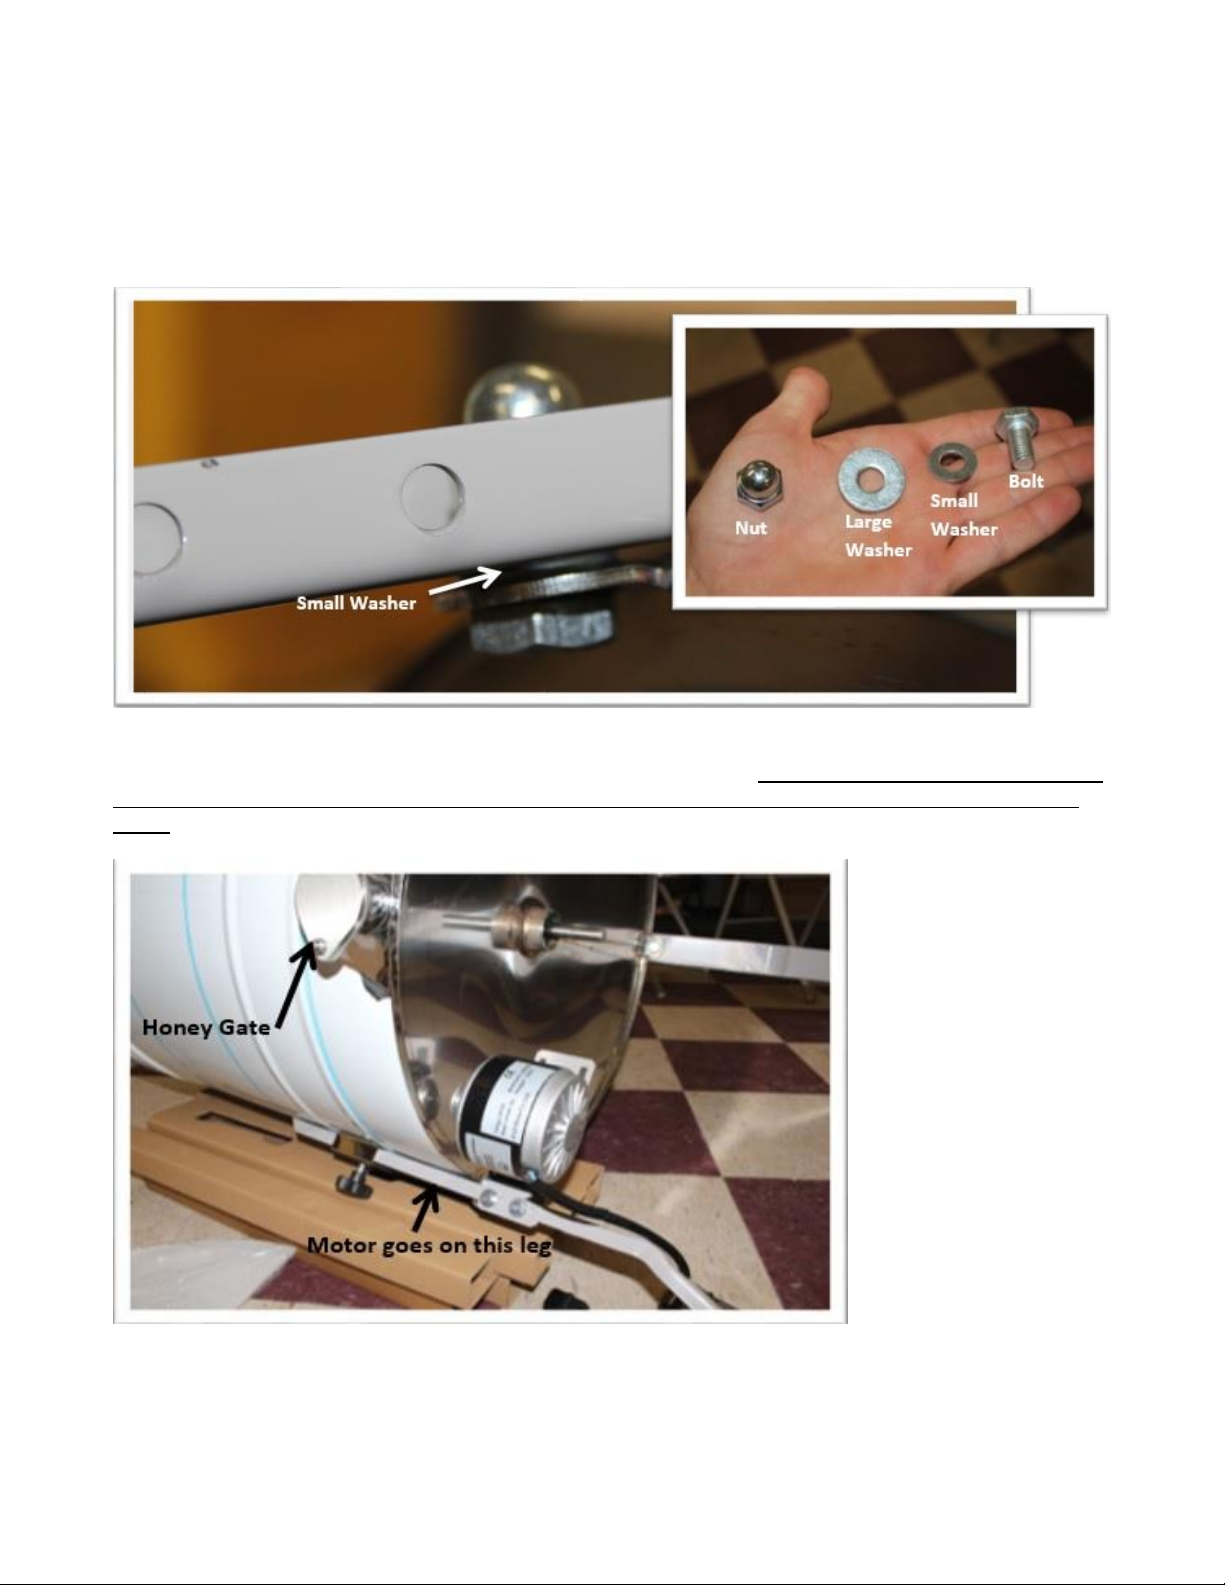
3. Bolt on the legs. You will need a large washer, small washer, cap nut, and bolt for each leg (see
inset below). Place the small washer in between the leg and the extractor. Place the large washer
between the nut and the outside of the leg. After installing the bolts, install the hand knobs to clamp
the legs in place.
4. Install the motor with the pulley end facing up as shown below. Be sure to install on the correct leg
as shown relative to the honey gate (looking from below, motor is counterclockwise from the honey
gate). Do not tighten the screws yet.

Questions? 1-800-632-3379
Last Updated February 2018 Page 7 of 17 LYSON W229E
5. Place the belt over the motor pulley, and then slide the motor up the leg until the pulley is almost
touching the bottom of the extractor. This adjustment is used to align the motor pulley with the
extractor pulley.
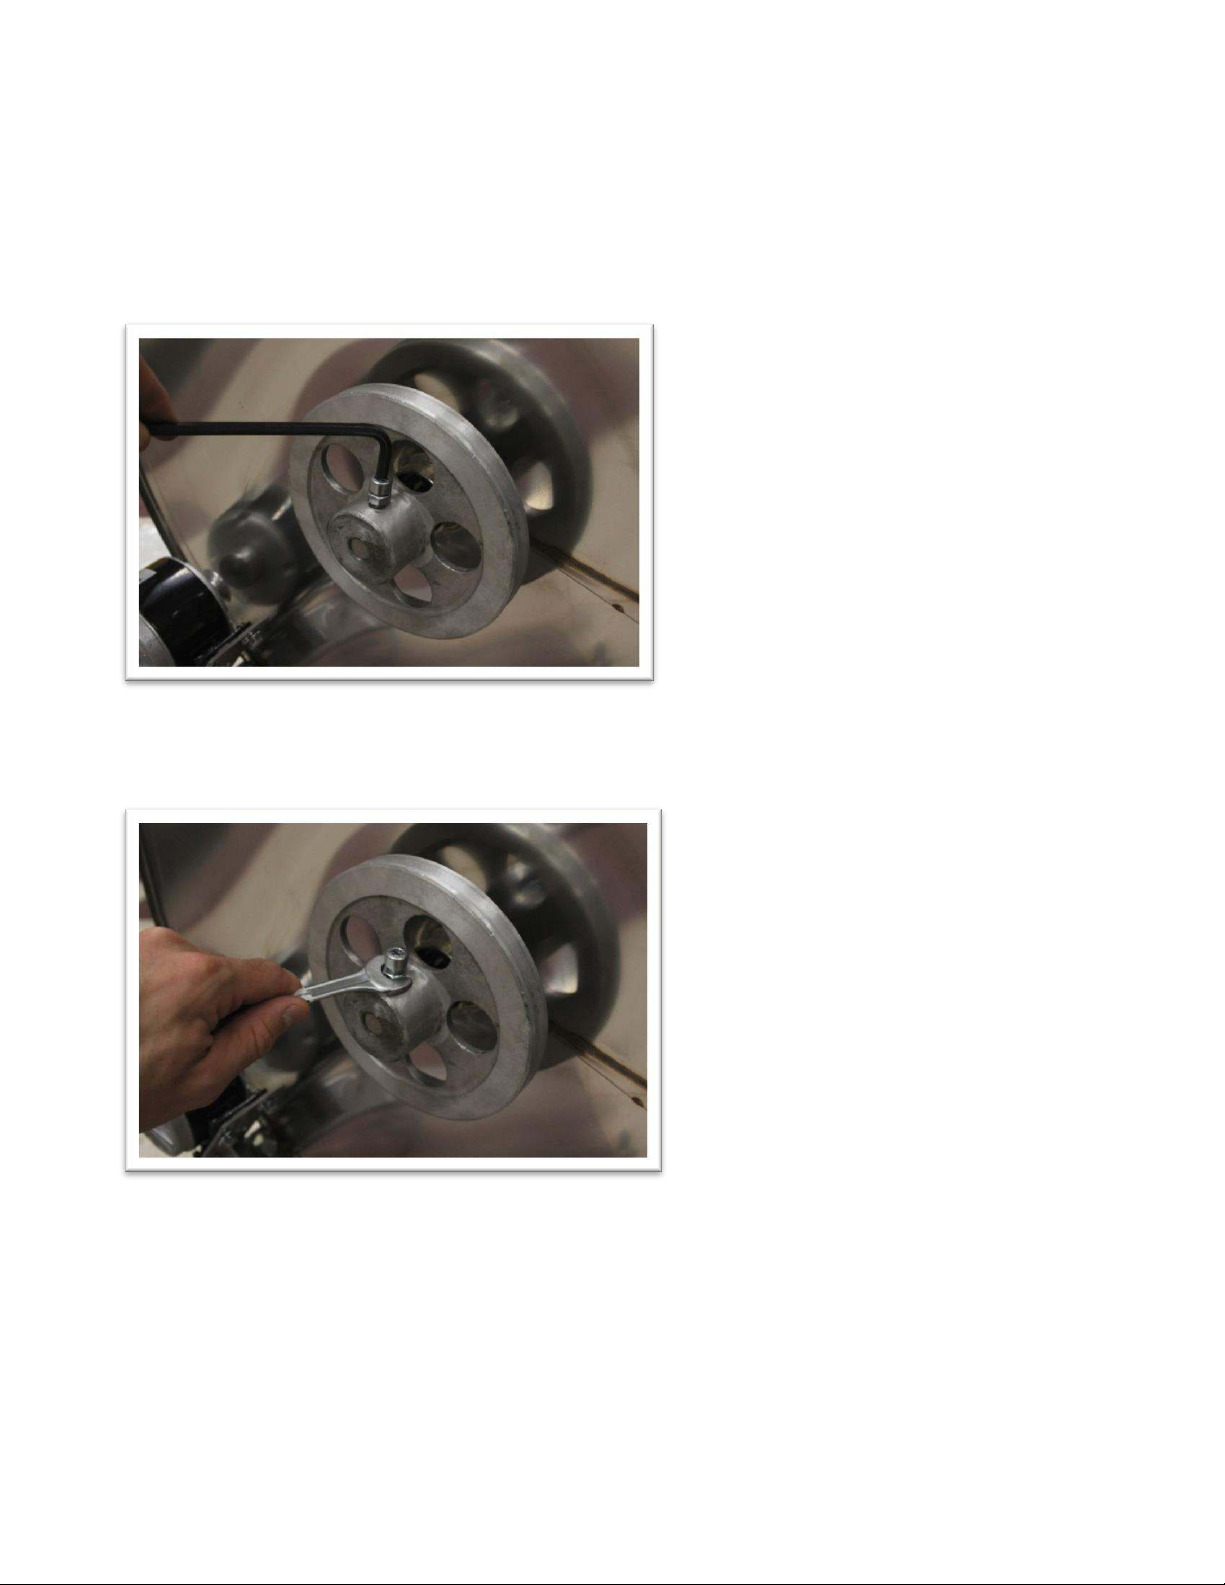
6. Align the large pulley with the center shaft. The hex cap screw must be aligned with the hole drilled
in the extractor shaft (see below). Slide onto the shaft.
Questions? 1-800-632-3379
Last Updated February 2018 Page 8 of 17 LYSON W229E
7. Tighten hex cap screw with hex key. Be sure the locking nut is not touching the pulley.
Approximately 5 ft-lb torque is sufficient (do not overtighten).
8. After hex cap screw is tightened, lock it in place by tightening the nut onto the pulley with an open-
end wrench.

Questions? 1-800-632-3379
Last Updated February 2018 Page 9 of 17 LYSON W229E
9. Slide the motor approximately 2/3 of the way out towards the leg and tighten the four screws.

Questions? 1-800-632-3379
Last Updated February 2018 Page 10 of 17 LYSON W229E
10. Install the belt on the motor pulley and force the belt onto the large pulley by rotating the large
pulley by hand. There should be no slack in the belt once installed. If there is, remove belt, slide motor
outward, and reinstall belt.

Questions? 1-800-632-3379
Last Updated February 2018 Page 11 of 17 LYSON W229E
11. Set extractor upright on the legs. Install the lid switch on the top bar as shown below.
12. Loosen the top bar nut on the lid switch side (but do not remove), lift the bar ~1/8”, and slide the lid
switch cord underneath the top bar. Re-tighten the nut.
Questions? 1-800-632-3379
Last Updated February 2018 Page 12 of 17 LYSON W229E
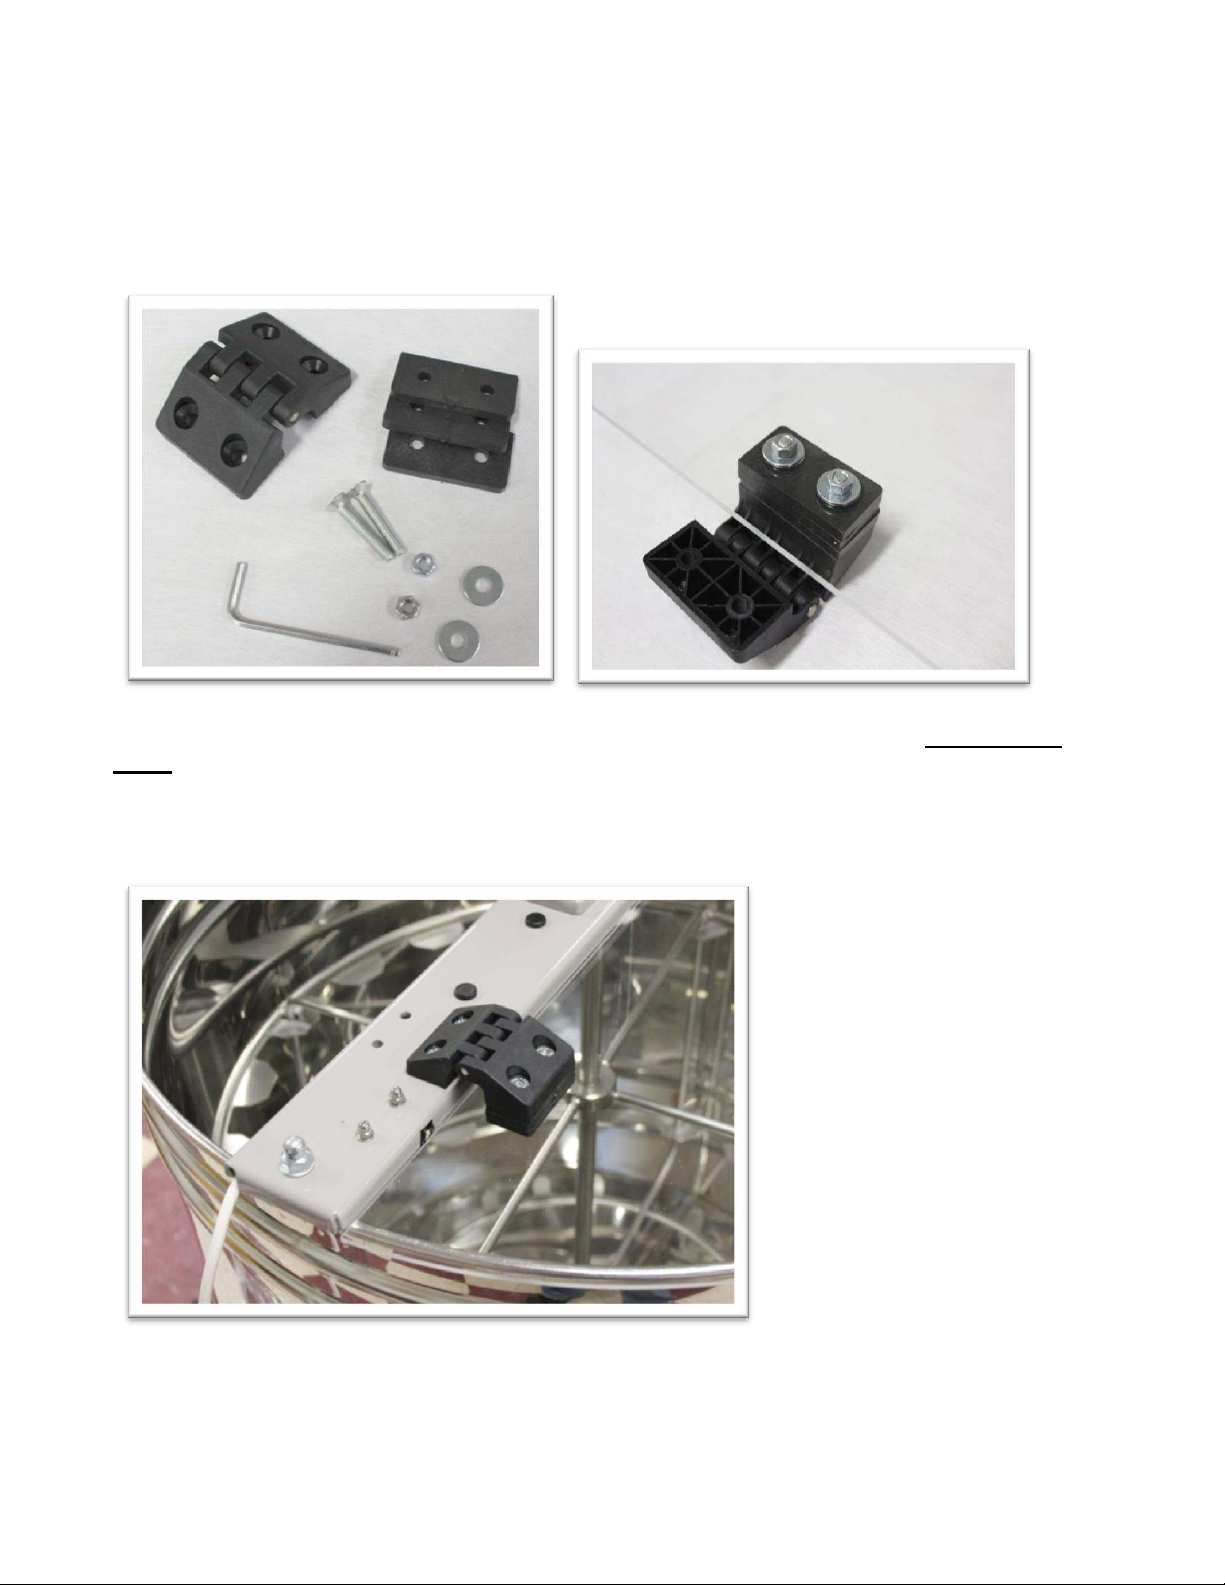
13. Identify the correct screws and washers to install the hinges on the plexiglass covers. Use the
long screws and the large washers. You will need three plastic shims per hinge. Install the hinges
on plexiglass with three shims between the hinge and the plastic. Do not fully tighten the nuts yet.
Mount the handle on the cover with an extra hole.
14. Install the covers on the top-bar. The cover with the handle goes on the side opposite the
crank. This is the side you will load and unload frames. Use short screws and small washers to
mount the hinges on the steel top bar. Align the cover and adjust hinge positions before tightening all
nuts. Do not overtighten as this may strip the screws. Be sure that the lid presses on the lid switch
when the lid is closed.
Questions? 1-800-632-3379
Last Updated February 2018 Page 13 of 17 LYSON W229E
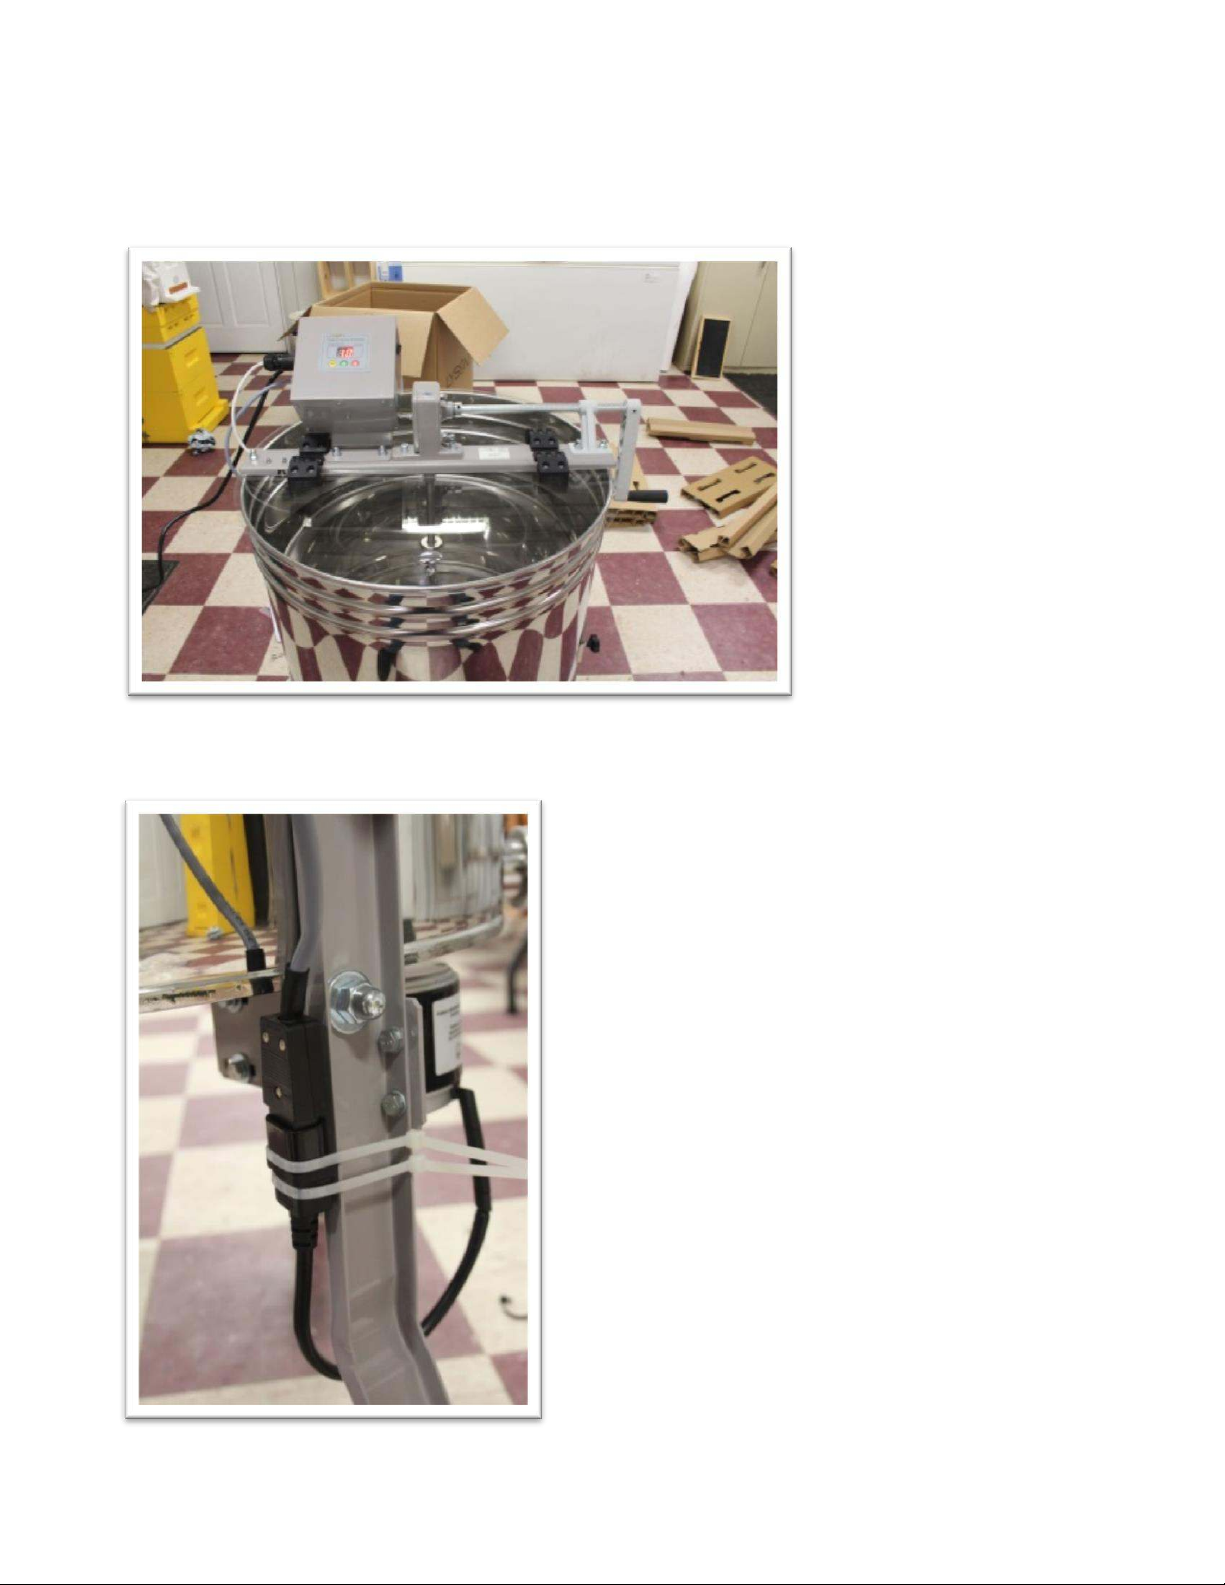
15. Install the motor controller on the top bar. You will need to remove the two small plastic plugs from
the top bar. The digital screen will face you on the left side of the extractor. See below for orientation.
16. Connect the motor cable and mount the connector on the leg with two zip ties as shown.
Questions? 1-800-632-3379
Last Updated February 2018 Page 14 of 17 LYSON W229E
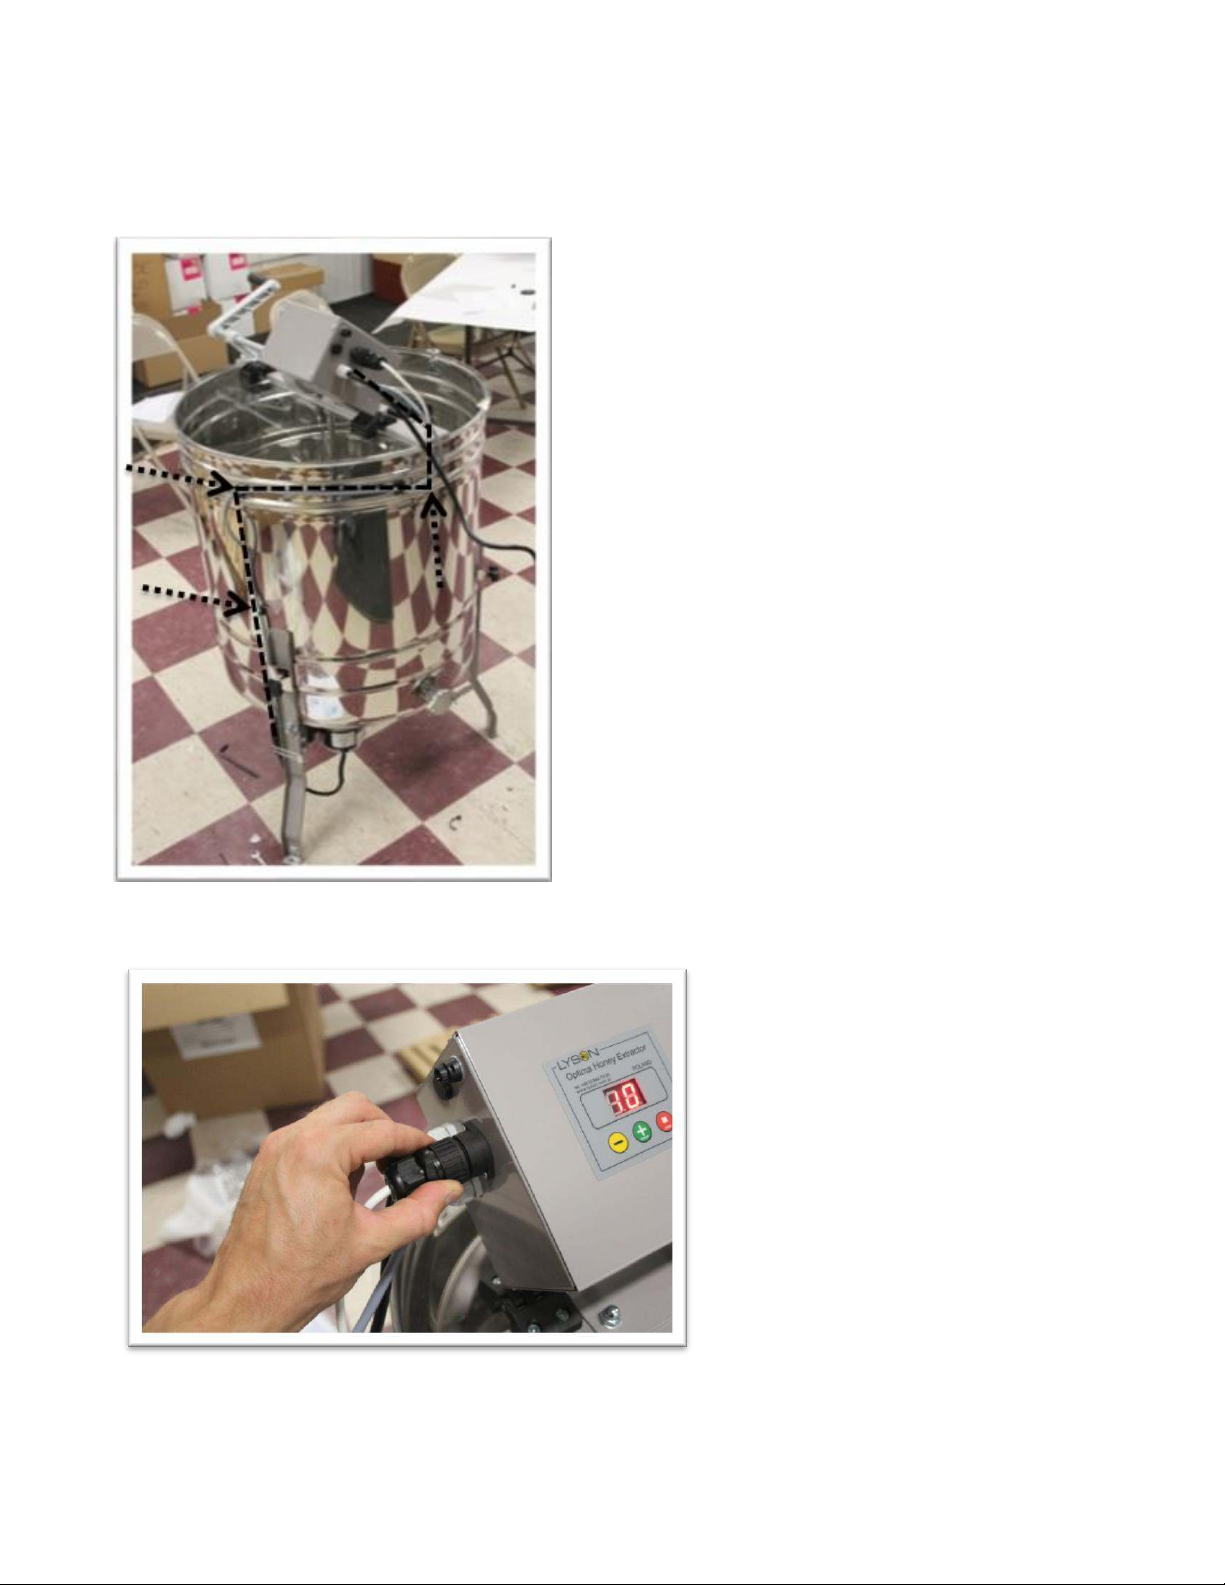
17. Route the motor wire as shown and mount on the extractor drum with adhesive mounts and zip
ties. Place the adhesive mounts in the locations shown by arrows, below.
18. Connect lid switch to controller.

Questions? 1-800-632-3379
Last Updated February 2018 Page 15 of 17 LYSON W229E
19. Turn extractor by hand. The extractor will not spin freely with the belt installed but should not be
difficult to turn.
20. Double check that all fasteners have been tightened properly, and that all pieces have been
installed. Turn hand crank to the “down” position and plug in the extractor. Press + button and
gradually increase speed. Adjust belt tension or motor height if needed.
21. Clean extractor before use. Be sure to unplug the extractor first and do not get the electronic
components wet. Regular dish soap and warm water is sufficient.

Questions? 1-800-632-3379
Last Updated February 2018 Page 16 of 17 LYSON W229E
Operation:
Distribute frames evenly around the extractor to ensure a balanced load. Close lid and open honey
gate before starting extractor. Turn unit on with switch on right side of control box. Slowly increase
speed by pressing the “+” button. Allow to extract at low speeds before gradually increasing the speed
as the honey extracts. Vary the speed as needed. If load becomes imbalanced, reduce the speed
and/or rearrange the frames. For quickest extraction, extract in a warm room (80-90+ degrees) with
warm honey supers.
Do not extract with the honey gate closed. The honey level will rise and interfere with the
rotation of the basket.
When finished, clean the extractor with soap and water. Be sure to unplug the extractor first and
do not get the electronic components wet. Do not fill the extractor with water as this can damage
the bearings. Rinse clean and allow to dry before placing extractor in storage.
SECTION 4: Construction of the 12 Frame Extractors
Honey extractors are made of acid-resistant, stainless steel. The side of drum is made of steel with a
thickness of 0.6mm, the cone-shaped bottom is made of steel with a thickness of 0.6mm. Legs are
made of steel coated with paint embossed using electrostatic painting. The machine is stable and
easy to dismantle.
Construction of basket
Radial basket made of acid-resistant stainless-steel rods with thickness of 2mm and 5mm. Basket is
embedded in mounted bearings
Electric drive
Power supply in this honey extractor is 120V
Cover
Transparent made of acrylic glass. It protects from the dangers of contact with a rotating basket and
helps to stay clean
Drain Valve
Metal 1¼
Drum height (without drive)- 610 mm
Height of honey extractor with electric drive - 950mm (+220mm drive)
Weight (dia.500mm) –21 kg
Weight (dia.600mm) –25 kg

Questions? 1-800-632-3379
Last Updated February 2018 Page 17 of 17 LYSON W229E
SECTION 5: Storage of honey extractors
After completion of the honey harvest, the device must be thoroughly cleaned and dried.
Before starting the honey extractor, in the case when it has been moved from a room with a lower
temperature to spaces of higher temperature, you should wait until it reaches the ambient
temperature. Store in dry rooms at a temperature above 0º C.
Before each new season, one should make an additional technical review, and in the event of
fault detection, please contact your Lyson distributor or see the CDD-2 controller for assistance.
SECTION 6: Maintenance and cleaning honey extractor
IMPORTANT!
After completion of the honey harvest, you must thoroughly wash the honey extractor with hot water
with a small amount of preparations (authorized for use in the food industry) or using a pressure
washer. When washing, you must take special care, to prevent moisture of the engine and control of
honey extractor (at the time of washing can be covered by waterproof material).
When washing, one should also take care to prevent flooding the bearings located under the drum; for
that purpose, one should shield the hole inside the drum through which passes the axis of the basket.
After washing, thoroughly rinse and dry the honey extractor.
Before each season, one should make an additional review and in the event of fault detection, please
contact the service center.
This manual suits for next models
1
Table of contents
Other Betterbee Farm Equipment manuals


Popular Farm Equipment manuals by other brands

Sipma
Sipma PK 4000 KOSTKA user manual

horsch
horsch Tiger MT Operation manual

Vivo
Vivo BEE-V004E instruction manual

Grouser Products
Grouser Products Ag Pro 12-20 Owner's manual & parts list

AGROFROST
AGROFROST Frostbuster F252 Operating & maintenance instructions

Textron
Textron RANSOMES JACOBSEN HIGHWAY 2130 Safety and operation manual


