Boxx Meridian User manual
MERIDIAN
User Guide 2.5
October 2012

1. Before Using the Meridian System
2. Safety Instructions
3. Using the System
4. Quick Set Up
5. Touchpad Controls
6. Receiver Menu
• HomePage
• HeadphoneLevel
• ChannelFrequency
• HDDownConverter
• Region
• MenuLevel
• AdminPassword
• CustomFrequency
• UnitName
• TXPower
• Permissions
INDEX
7. Receiver Antenna Conguration
8. Transmitter Menu
• HomePage
• InputSelect
• ChannelFrequency
• TXPower
• Region
• MenuLevel
• AdminPassword
• AnalogAudioLevel
• ComponentGain
• UnitName
• Permissions
9. Warranty

BeforeusingtheMeridiansystemforthersttime,pleasecheckthefollowingtoensuretheunithasn’tbeendamagedduring
shipping.
1.Visuallyinspectoutercasing,plugs,screenandcablestoensurethereisnodamage.
2.Slowlyrotatetheunittoensureallcomponentsareinplaceandnothingislooseinsidethecasing.
3.Turnontheunitsandcheckifallbuttonsareworkingne.
IfyourequireassistanceorareconcernedabouttheworkingconditionoftheMeridiansystem,pleaseemailourServiceteam
[email protected]orcall+44(0)8456432874.
PleasevisitourYouTubepage,whichhasvariousinstructionsvideos,tipsandtrickswhensettingupaMeridiansystem.
http://www.youtube.com/user/MrScottboxxtv
BEFORE USING THE MERIDIAN SYSTEM

SAFETY INSTRUCTIONS
WhenregionissettoUSonthesystem,itcomplieswithPart15,oftheFCCRules,whichdeclares:
Operationissubjecttothefollowingtwoconditions:(1)thisdevicemaynotcauseharmfulinterference,and(2)thisdevicemust
acceptanyinterferencereceived,includinginterferencethatmaycauseundesiredoperation.
TheMeridensystemhasbeenengineeredtoensureasafeworkingenvironmentfortheoperatoratalltimes.Withsafetyinmind,
wehavetestedandwillcontinueretestingtheMeridiansystemtoensureweprovidethesafestsystemonthemarket.
FollowthesesafetyprecautionswhenusingtheMeridiansystem:
• Keepallventilationholesclearandunblocked.Ensurethatproperventilationisprovidedatalltimeswheninuse.
• Do NOTinsertobjectsofanykindintotheventilationholesasthismayresultindamagetotheunit
• Do NOTusewhenwetandprovideadequatecoverwhenusingintherain.
• Do NOTuseliquidcleanersoraerosolcleanersontheunit.Useadampclothforcleaning.
• Do NOTdisassemblethisproduct.
Ifserviceorrepairisrequired,contactourServiceteambye-mailat[email protected]orcall+44(0)8456432874.

USING THE SYSTEM
TheMeridiansystemhasbeendesignedsothatitisascompactandlightaspossiblefortheoperatortouse.Thecasingofthe
Meridiansystemisdurableandconstructedtolast,butcareshouldbetakentoavoiddamagingthesensitivecircuitboardinside.
Donotattempttoopenorservicetheunityourself.
Theinternalcircuitandantennasarehighlytunedandtamperingwiththemwilldamagetheunit.
Keepingasmuchaspossiblein‘lineofsight’betweenthecameramanandthereceiverwillalsoincreaseyourrange.
The Meridian unique transmission system is specically designed to transmit broadcast quality video through walls and
oorsfromamovingcamera.However,allmicrowavetransmissionsystemswillhavetheirrangedramaticallyreducedwhen
attemptingtotransmitthroughobjectssuchasconcrete,steel,glass,waterandthehumanbody.

QUICK SET UP FOR STANDARD OPERATION
Transmitter setup
1. Ifusingatransmitterwithabatteryplate,placethetransmitteronthebackofthecamera.Clipthecamerabatteryontheback
ofthetransmitter.Thiswillpowerboththecameraandtransmitter.
Ifusingatransmitterwithoutabatteryplateusethepowercableprovided.
2. Connectthevideofromthecameratothetransmitter.NotetherearedifferentinputsforHDSDI/SDI,compositeandcompo-
nentvideo.
4. IfusingSDIorHDSDIvideotheSDIembeddedaudiowillbesentoverthelink.
3. Ifusingcompositeorcomponentvideo,selectwhataudiocableyouaregoingtouse.
Usual cables for Meridian transmitter
CBL104–3.5mmheadphoneoutput.
Onthekeypadpressthe‘E’ button.Thiswilldisplaytheinputpage.Selecttestpatternifitisnotalreadyselected.

QUICK SET UP FOR STANDARD OPERATION
Receiver setup
1. Ifusingareceiverwithaportablebatteryplate,placethereceiveronthebackofthemonitor.Clipthebatteryonthebackofthereceiver.Thiswillpowerboth
thereceiverandmonitor.
2. Connectthevideo-outfromthereceivertothemonitor.Note,therearedifferentoutputsforHDSDI/SDI,compositeandcomponentvideo.
3. IfusingSDIorHDSDIvideo-out,theSDIembeddedaudiocanbeusedformonitoring.
4. Ifusingcompositeorcomponentvideo,selectwhataudiocableyouaregoingtouse.
Usual Meridian receiver cables
CBL111: 5pinXLRto4pinHirose
CBL114:2x3pinXLRto5pinminiXLR
PS1205: 12V5Apowersupplyunit
TheMini5pinXLRwillplugintothereceiver.Theotherendwillplugintomonitor.
Youcanalsomonitortheaudioviathetwoheadphonesocketsonthereceiver.Werecommendusingaheadphonewithanin-lineaudiovolumecontrol.
Turnthemonitoronandselectthecorrectinput.
5. Turnonthecamera.
6. Onthetransmitter,pressthe*button.Thiswilldisplaytheinputpage.Selectwhichvideoinputyouareusing,(SDI,componentorcomposite).Afterabout5
seconds,thepicturefromthecamerawillbedisplayedonthemonitor.
Iflossisdisplayedinthescreen,thetransmitterisnotdetectingavideosource.ChecktheBNCcableandthatyouhavetherightoutputonthecameraplugged
intothecorrectinput.OncethetransmitterdetectsavideoinputOKwillbedisplayed.

QUICK SET UP FOR STANDARD OPERATION
OB / Receiver’s Setup
• Positioningthereceiver
• Antennaline-up
• Poweringuptheunit&menus
• Outputs(Signal)
• Signalstrenghtmeters
• Downconverting
Easiestwaytolearn,howtooperateBoxxHDvideotransmissionsystem,istowatchourinstructionvideosonwww.boxx.tvoronourFacebookpage.
Youwillndanumberofpracticalvideos,whereMeridiansystemisbeingusedindifferentenvironment.
1. Positioning the Receiver
Ingeneral,youwanttopositionthereceiver,ashighaspossible,tocreatealineofsightenvironmenttothetransmitter,withanymicrowavesystem.Obsticleslike
trees,crowds,movingvehicles,willalllimitthereliabilityofthesignalstrenght.
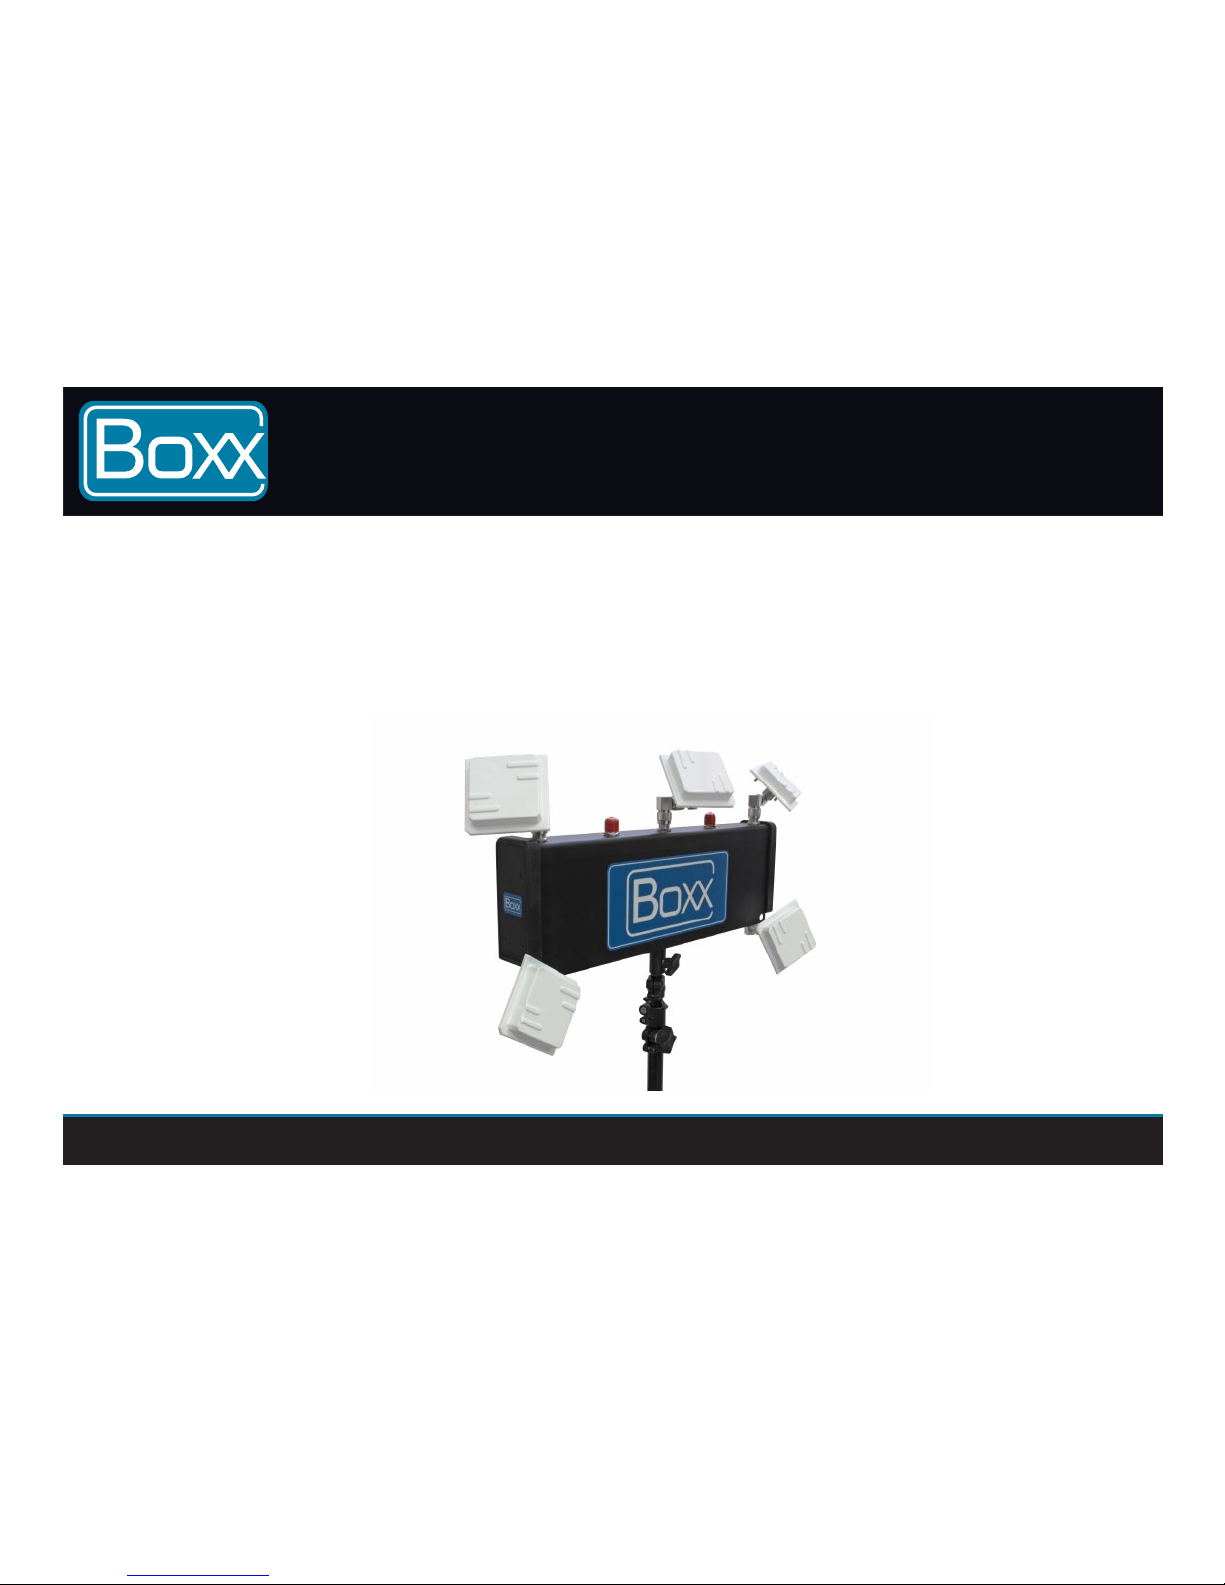
2. Antenna Line Up
Asyoucanseeinthephotobelow,5receiver’santennashasbeensetupwheredirectionsandpolarisations*arealldifferent,theideabehindtheMeridian
technologyis,thatyouwanteachantennatoreceiveadifferentsignal.Pointingtheantennasonthesamedirection,willreduceperformanceofthesignal.
3. Powering Up & Menu Settings
TheMeridianreceiversworkonavoltagebetween10-18VDC,using4PinXLRcable.

QUICK SET UP FOR STANDARD OPERATION
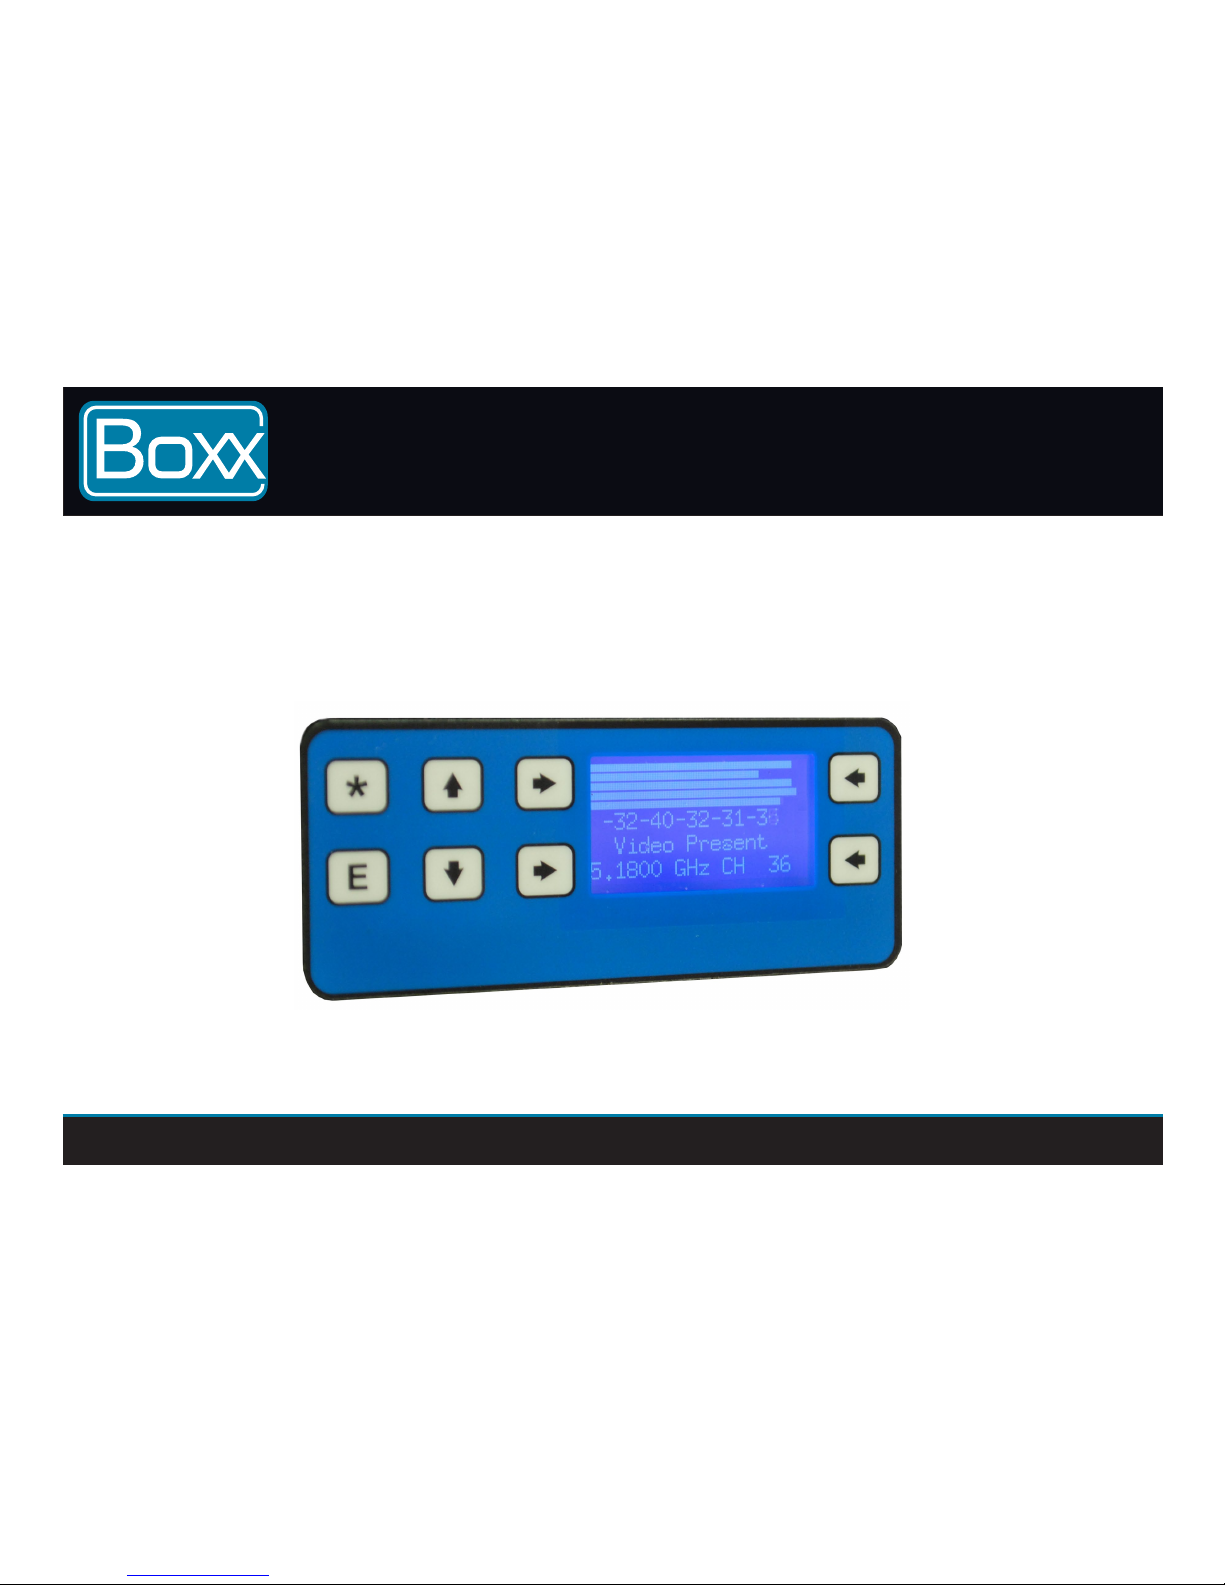
Onceunitispoweredup,youwillseetheLCDscreenlightup,andafterapprox.10seconds,youwillbeabletonavigatethe
Menu.Homescreenwillshowyouthefrequencyyouarecurrentlyworkingonandantennasignalstrenghtlevel.
BeforeconguringyourReceiver,youneedtoanalyzetheareatoseeifthereisnoonerunningatransmitteronyourselected
frequency.Yousimplyneedtopowerupthereceiver(Transmitterneedstobeturnedoff)andyoushouldseeantennabarsempty
andnotactive,ifthereisanyantennabarsmovement,trychaningthefrequencytillyoundanemptychannel.
QUICK SET UP FOR STANDARD OPERATION
5. Signal Strenght Meters
Oncethetransmitteristurnedon,andscreenisshowing“VideoPresent”,5barswillshowyouthesignalstrenghtofeachan-
tenna,thismethodcanbeusedtoindicateifoneoftheantennasisbrokenornotperformingaswellasitshould,youwillseethat
oneofthebarsisdramaticallylowerthentherest.Generallytheyshouldbenomorethan10dBfromeachother.Ifyoususpect
afaultyantennatryplacingtheReceivernexttotheTransmittertoseeifsignalbarsincreasing,

QUICK SET UP FOR STANDARD OPERATION
Transmitter Setup
Note: Please refer to the Receiver setup, prior to conguring the Transmitter
• Mountingonthecamera
• Antennasmounting
• Poweringuptheunit
• Inputs(Signal)
• Menusettings
1. Mounting on camera
TransmittercanbemountedusingV-LokorAntonBauerbatteryplates,oryoucanalsohaveanoplatetransmitter,whichyoucanpowerupusing4Pinhirose
cable.
2. Antennas mounting
Forstandardoperation,only4antennas(ANT104)areneededontheTransmitter.
3. Inputs (signal and audio)
PleaseusetheBNCcablestoconnectcameratothetransmitter,ifusingSD-SDIorHD-SDIsignal,theaudiofromcamerawillbeembedded,whenusingCompos-
iteorComponentinput,youneedtoplugtheaudiocableintoyourtransmitter.
4. Menu settings
YouturnonorofftheTransmitterbyholding*buttononthekeypad.Press“E” toenterthemenu,andselecttheinputyouwanttouse.Thetransmitteralsohas
atestpatternsignalwhichisat720p.Afterselectingtheinputmethod,youcanpress*buttontogobacktothemainscreen,whereyoucanselectfrequnecy,by
pressingUpandDownbuttonsontherightsideofthescreen.

UK Head Office: +44 (0)845 643 2874 Fax: +44 (0)207 900 6350 www.boxx.tv [email protected] UK Head Office: +44 (0)845 643 2874 Fax: +44 (0)207 900 6350 www.boxx.tv [email protected]
TOUCHPAD CONTROLS
A.
C.
B.
C.
D.
D.
E.
E.
A. Pressandholdtopowertheunitoffandon.Pressoncetoreturntothe“HomePage”.
B. Presstoenterdisplayedmenusandsub-menus.
C.Presstoscrollthroughthemenupages.
D.Presstoselecttheoptionsdisplayedonthescreen.
E.Presstoselecttheoptionsdisplayedonthescreen.Allowsforchannelselection,upanddown,onthe“HomePage”.
A.
B.
RECEIVER MENU
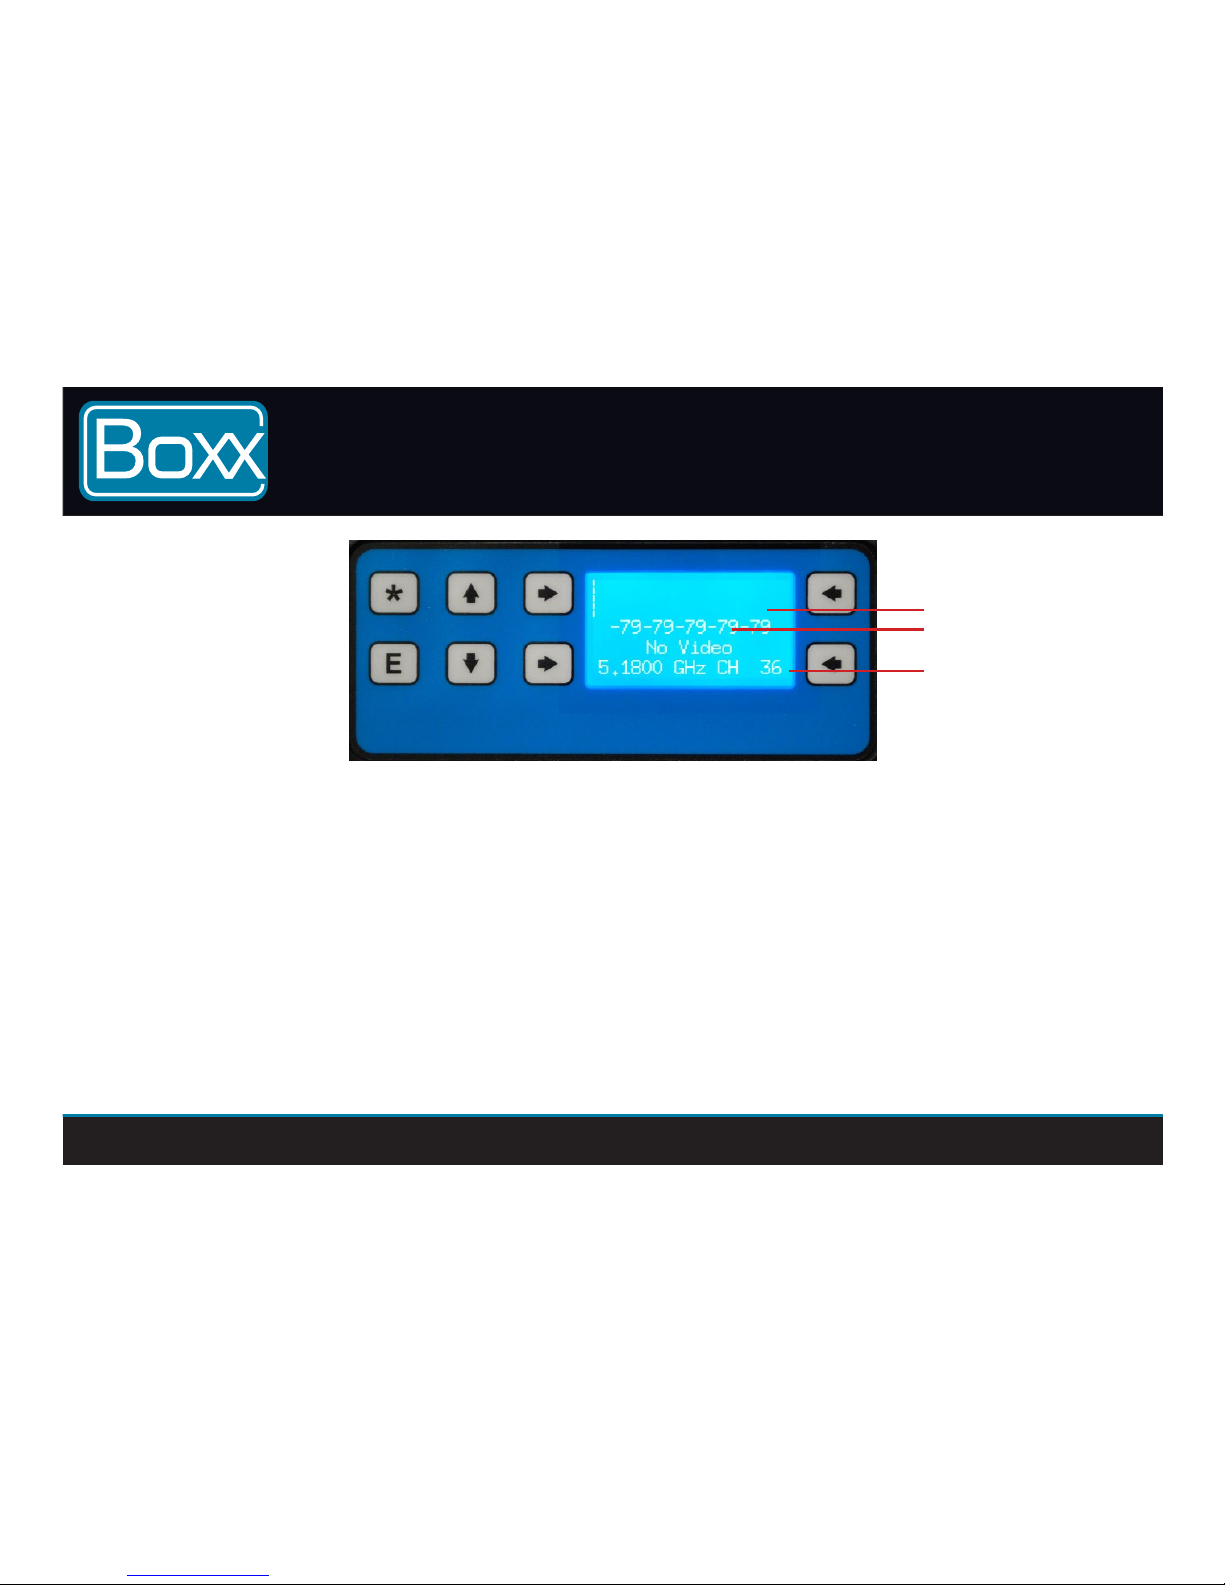
Receiver Home Page
A.Signal Bar:Showsthesignalstrengthofthesignalbeingreceived.
B. Video Signal Indicator: Indicatesifthereceiverisreceivingvideo.Ifthereceiverisreceivingasignal“VideoPresent”will
bedisplayed.Ifnosignalisbeingreceived“NoVideo”willbedisplayed.
Note:BoththetransmitterandthereceiverMUSTbeonthesamesettingortheywillnotwork.
Note:UsethearrowstotherightoftheLCDscreentomanuallychangethechannels.
C.

RECEIVER MENU
Headphone Level
UsethearrowstothesideoftheLCDscreentocontroltheleftandrightaudiochannels.
Werecommendusingheadphonewithain-linevolumecontrolsforeasyadjustmentofvolume.Somerecommended
headphonesare:
• SonyMDR-V250V
• PanasonicRP-HT227
• PhilipsSHP2500/37
• SonyMDRNC11

RECEIVER MENU
Channel Frequency
UsethearrowstoselecteitherAutoScanoramanualchannel.
Note: Ifyouareonthesamechannelsasthetransmitterandyouarenotreceivingapicture,checkyouareonthesame
countrydomainasthetransmitter.
Note:Forthefastestreconnectiontimeuseamanualchannel.SelectingAutochannel,willdelaytheconnectiontime.
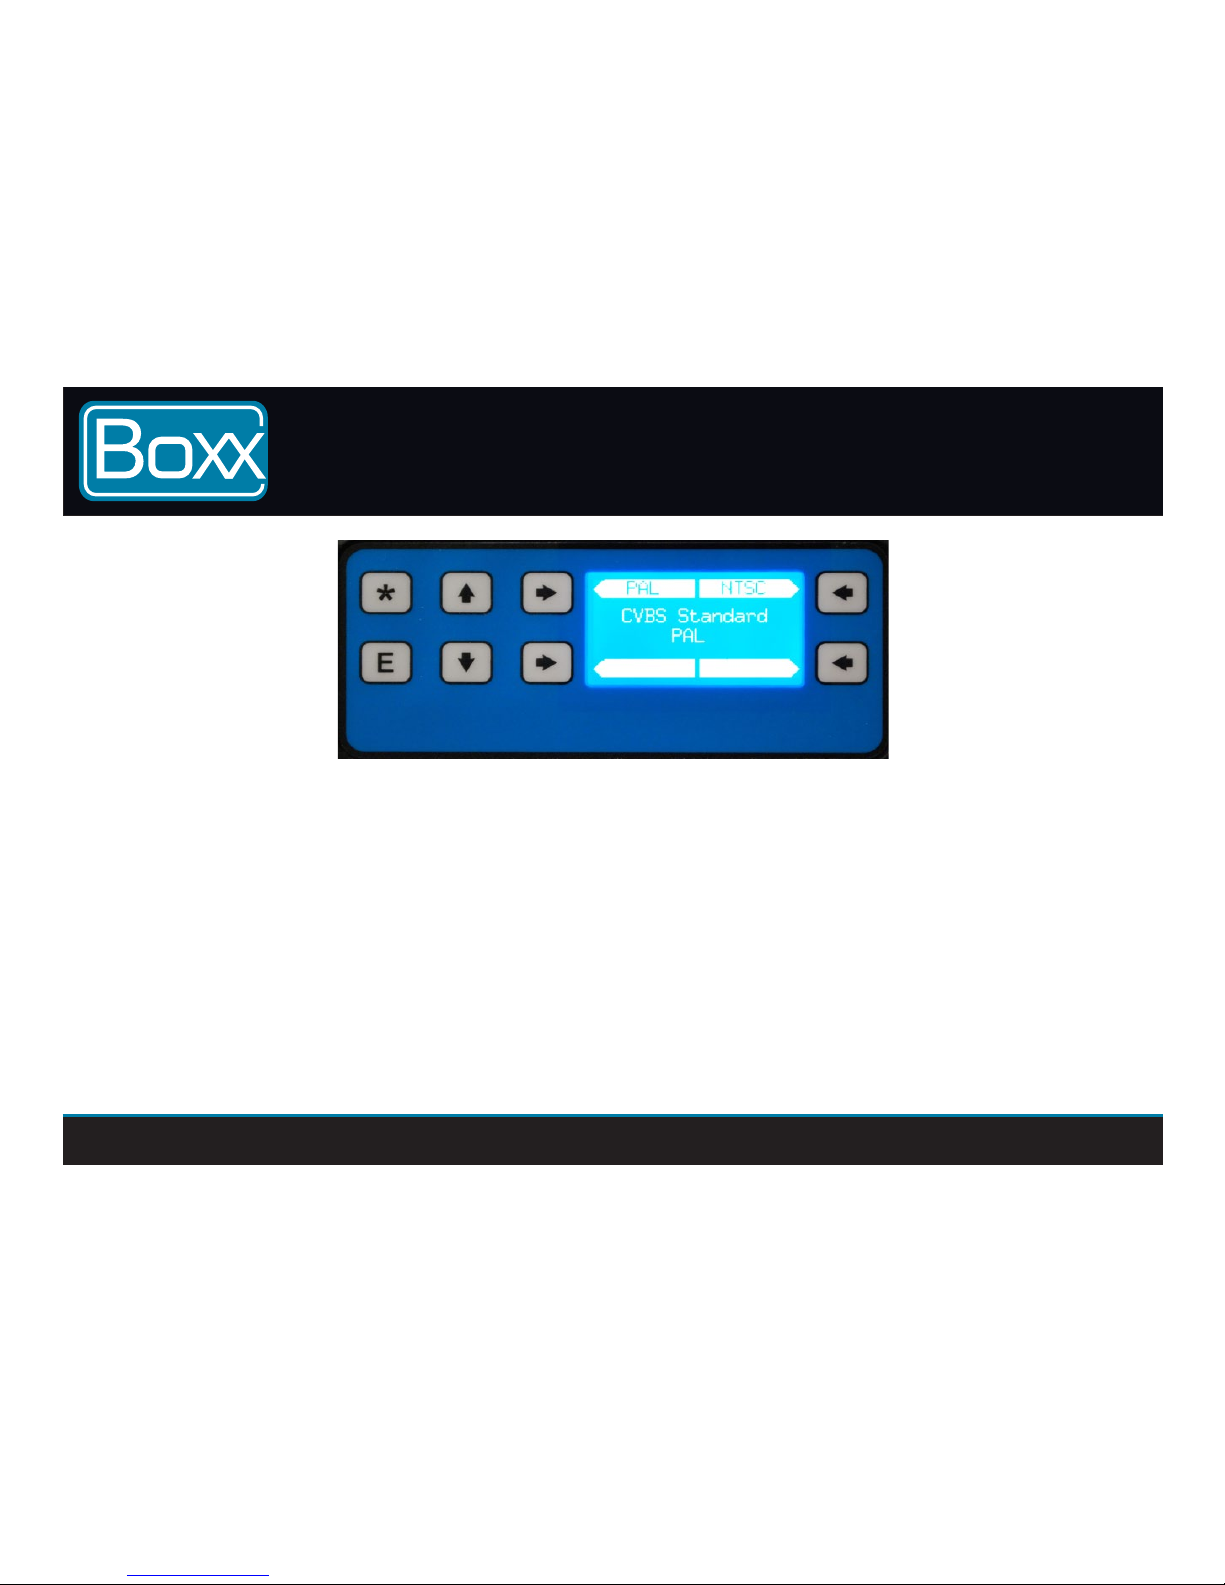
HD Down Converter
AtthesametimeasoutputtingtheHDsignal,anyHDformatwillbedownconvertedtocomposite.UsethearrowkeystoselecteitherPALorNTSC.
Note: DifferentframerateswillconvertbettertoeitherPALorNTSC.Ifthedownconversionlooksjumpyormissingframes,trytheother
standard.
59.98i: DownconverttoNTSC
50i: DownconverttoPAL
23.98p: DownconverttoPAL
24p: DownconverttoPAL
25p: DownconverttoPAL
YoucanplugaModulusor2.4GhzanaloguetransmitterintotheMeridianreceiver.Thisallowsyoutorebroadcastthesignalfromthecamerato
inexpensiveanaloguereceivers.AstheModulusisnotmovinginspaceyouwillndthepicturequalityverystable.
RECEIVER MENU

RECEIVER MENU
Region
You must select same region on both the Transmitter and Receiver, or the system will not work.
Thereare3presetfrequencytablesandonecustomtable.Thepresetregionsare:
•Europe
•USA
•Custom
•Custom2
Usethearrowstoselectthecountryyouareoperatingtheunitin.
Note: Byselectingthewrongcountrycodeyoumaybeinbreachoflocalregulations.
RECEIVER MENU
RECEIVER MENU
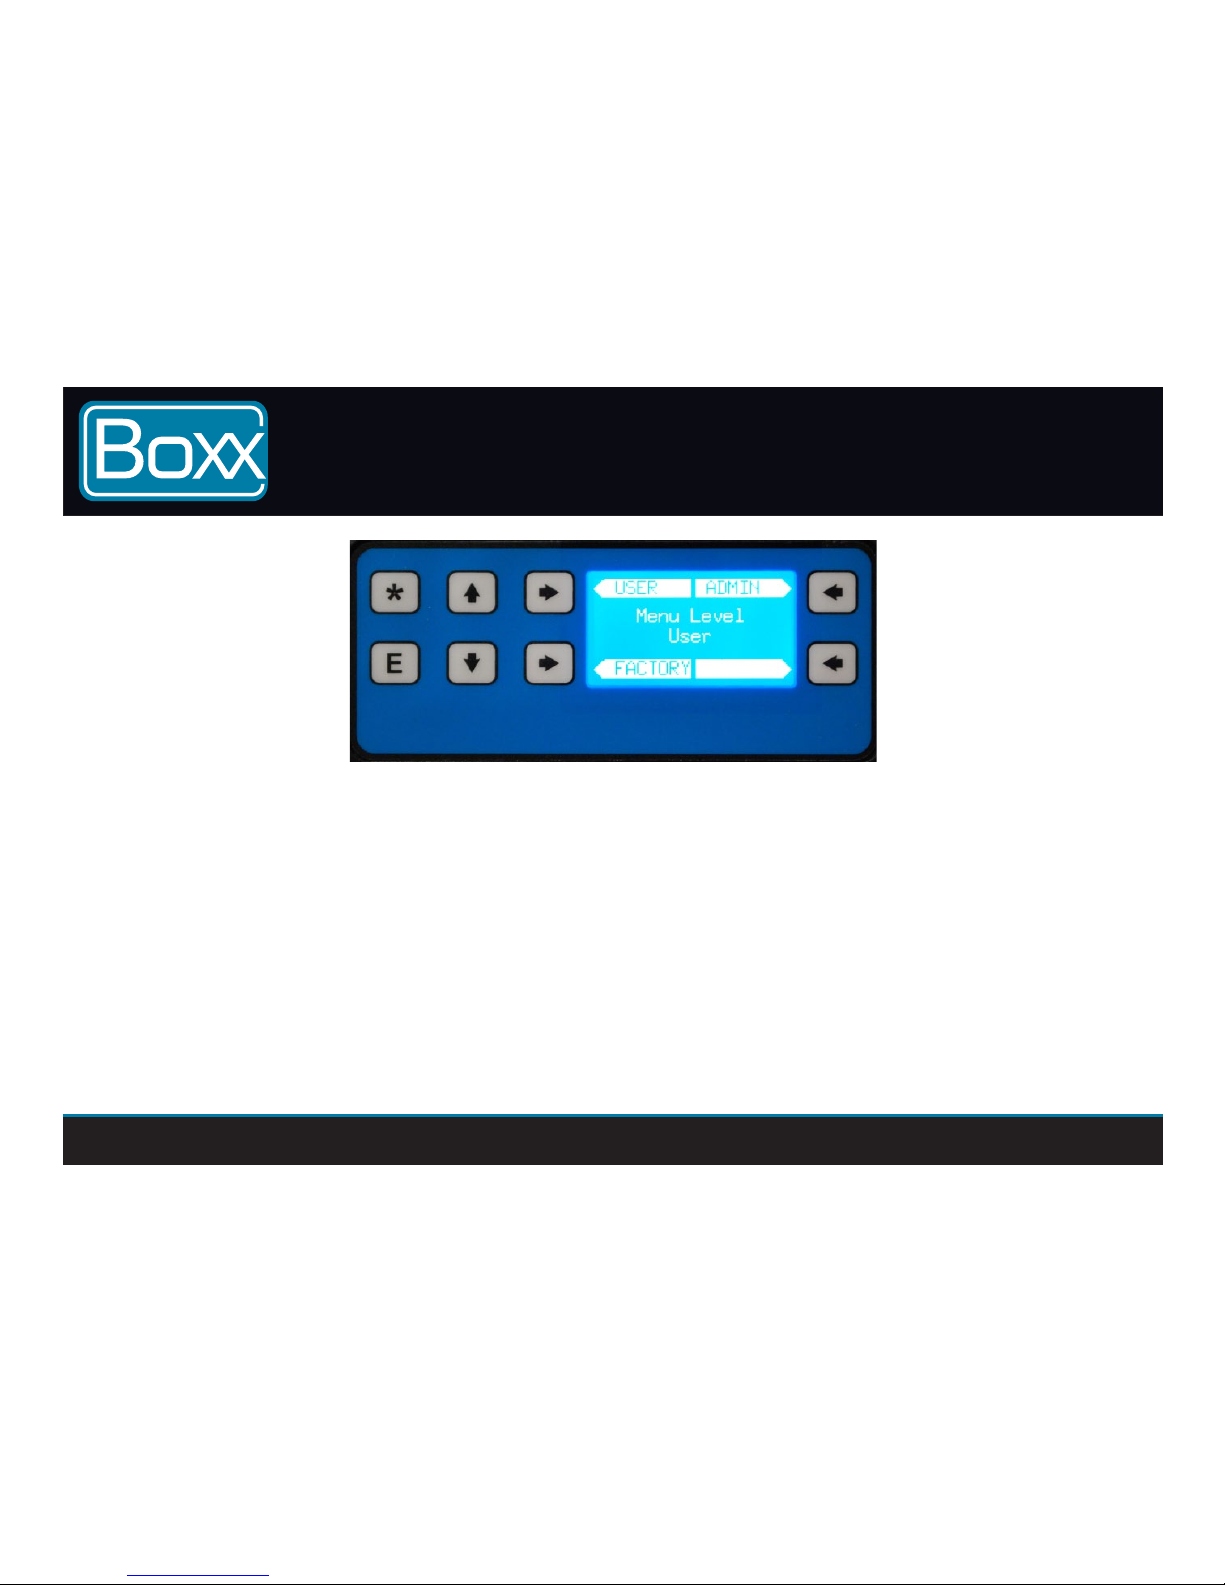
Menu Level
Themenusallowtheusertocontrolthefeaturesofthesystem.Allthesystem’sfunctionsareheldinoneofthreedifferentfolders:
Userfolder: Formenufunctionsthatareusedregularly;designedtobetheusersmainoperatingfolder.
ThisfolderisNOTpasswordprotected.
Adminfolder: Forfunctionsthatrarelychanged,andneedminimaltonoadjustmentonaregularbasis.Thismenuispassword
protected,allowingthemainusertolockdownfunctions.Thedefaultpasswordforthismenuis:
123456
Note: Itispossibletomoveanyofthefunctionsfromthe“Admin”foldertothe“User”foldereliminatingtheneedforpasswords.Howtodothis
willbecoveredlaterinthemanual.
RECEIVER MENU
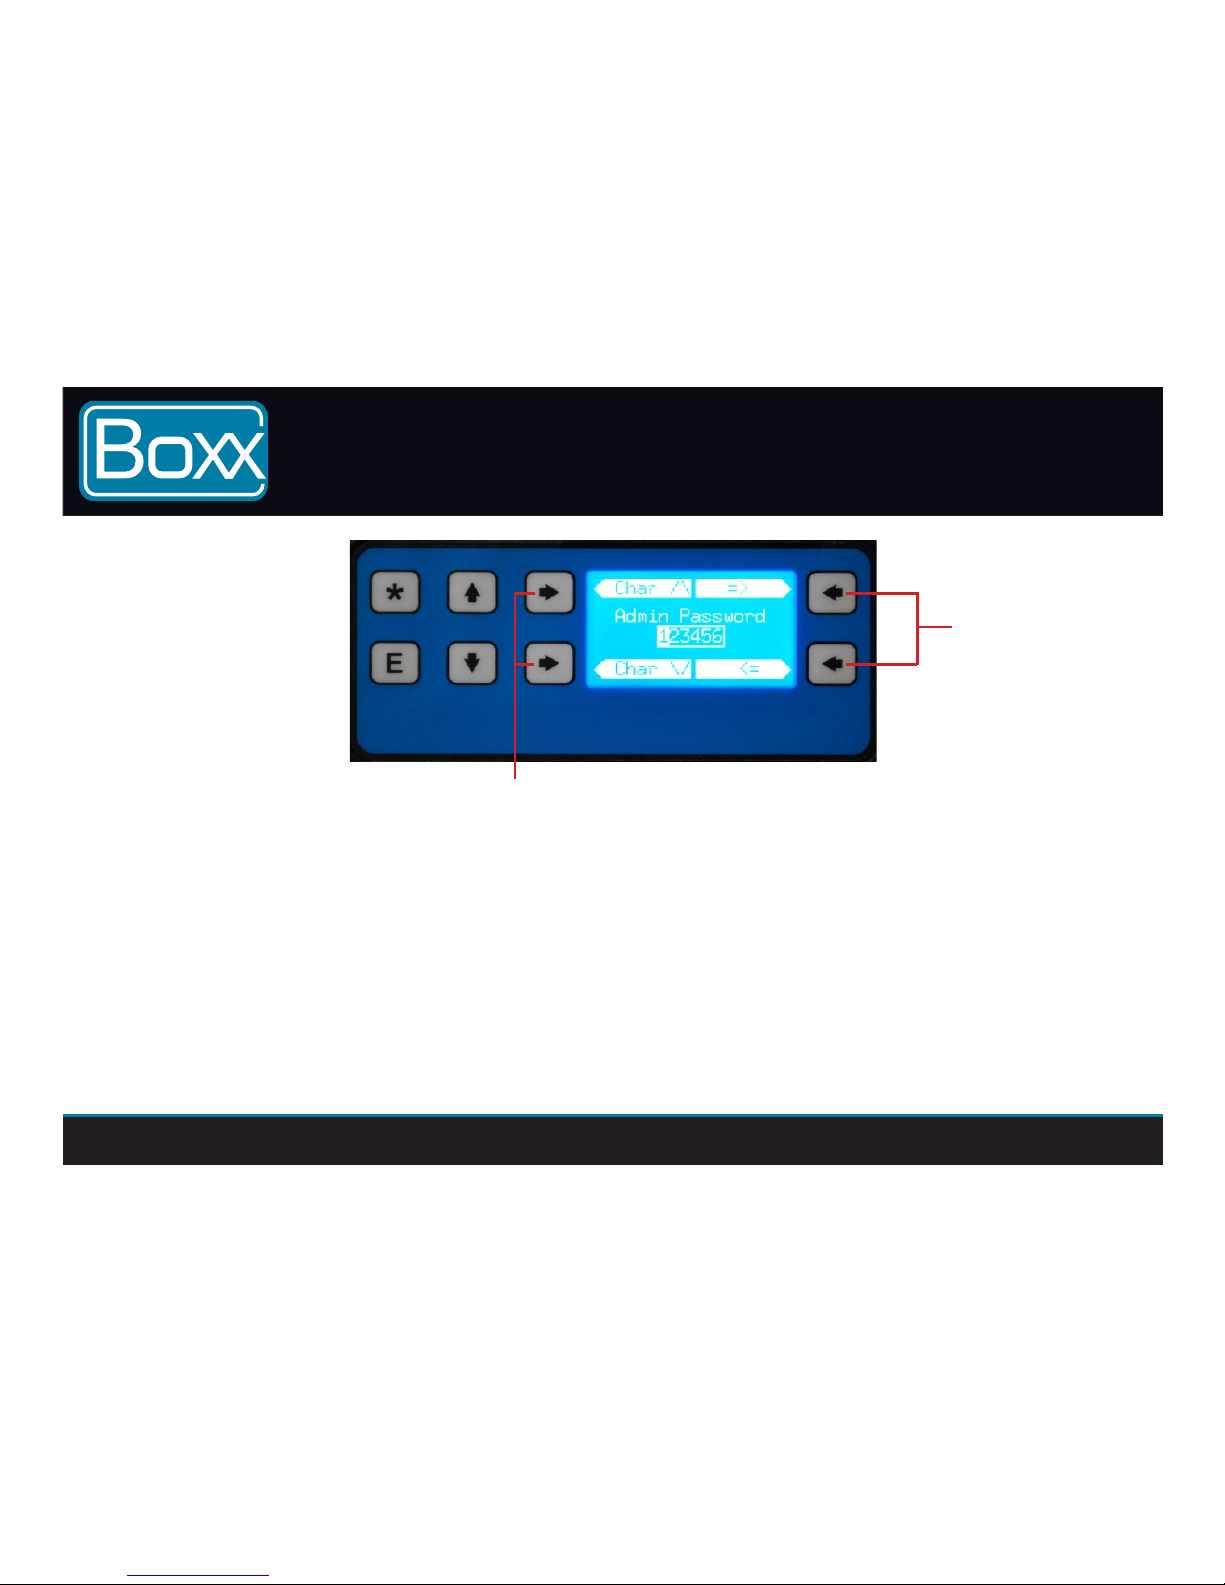
Entering Passwords
The“Admin”folderispasswordprotected.Toaccessthe“Admin”folderenterthedefaultpassword.
A.UsethearrowstotheleftoftheLCDscreentoscrollthroughthecharactors.
B.UsethearrowstotherightoftheLCDscreentomovethecursorrightorleft.
Press“E”oncethepasswordhasbeenentered.
A.
B.

RECEIVER MENU
Customising the “Admin” Password
Oncethedefaultpasswordhasbeenentered,andwithinthe“Admin”folder,thepasswordcanbechangedtoonethatisclient
specic.Onthe“AdminPassword”page,usethearrowstotheleftoftheLCDscreentoselectnewdigits,andthearrowstoright
oftheLCDscreentomovethecursor.Oncethenewpasswordhasbeenchosenexitoutofthepage.
Note: Ifyouforgetthepasswordtheunitwillhavetobereturnedtoustobereset.Ifyouchangethepasswordwesuggest
youwriteitdownhere
Table of contents