Bush-whacker RDF 48 User manual

2
2014 RDF 60, 72
Welcome
Thank you for selecting the Bush-Whacker RDF 48, 60, or 70 Finishing
Mower. Your machine has been carefully inspected by both the factory and
the dealership prior to being received by you to ensure that it is ready for
operation.
This manual explains the proper operation of your machine. It is very im-
portant that you read and understand these instructions before operating
or maintaining the machine. Failure to do so could result in personal injury
or even death to you or passersby. Consult your Bush-Whacker dealership
if you do not understand the instructions in this manual or need additional
information.
Hall Manufacturing, Inc. reserves the right to make changes at any time
without notice or obligation. Additional copies of the manuals are available
from your local Bush-Whacker dealer.
Hall Manufacturing, Inc.
3706 E. WashingtonAve., P.O. Box Drawer 5638
North Little Rock, AR 72119

3
2014. RDF 60, 72
Table of Contents
Introductory Page................................................................................................... 2
Mower Safety ......................................................................................................... 4-11
Safety Information........................................................................................ 4-6
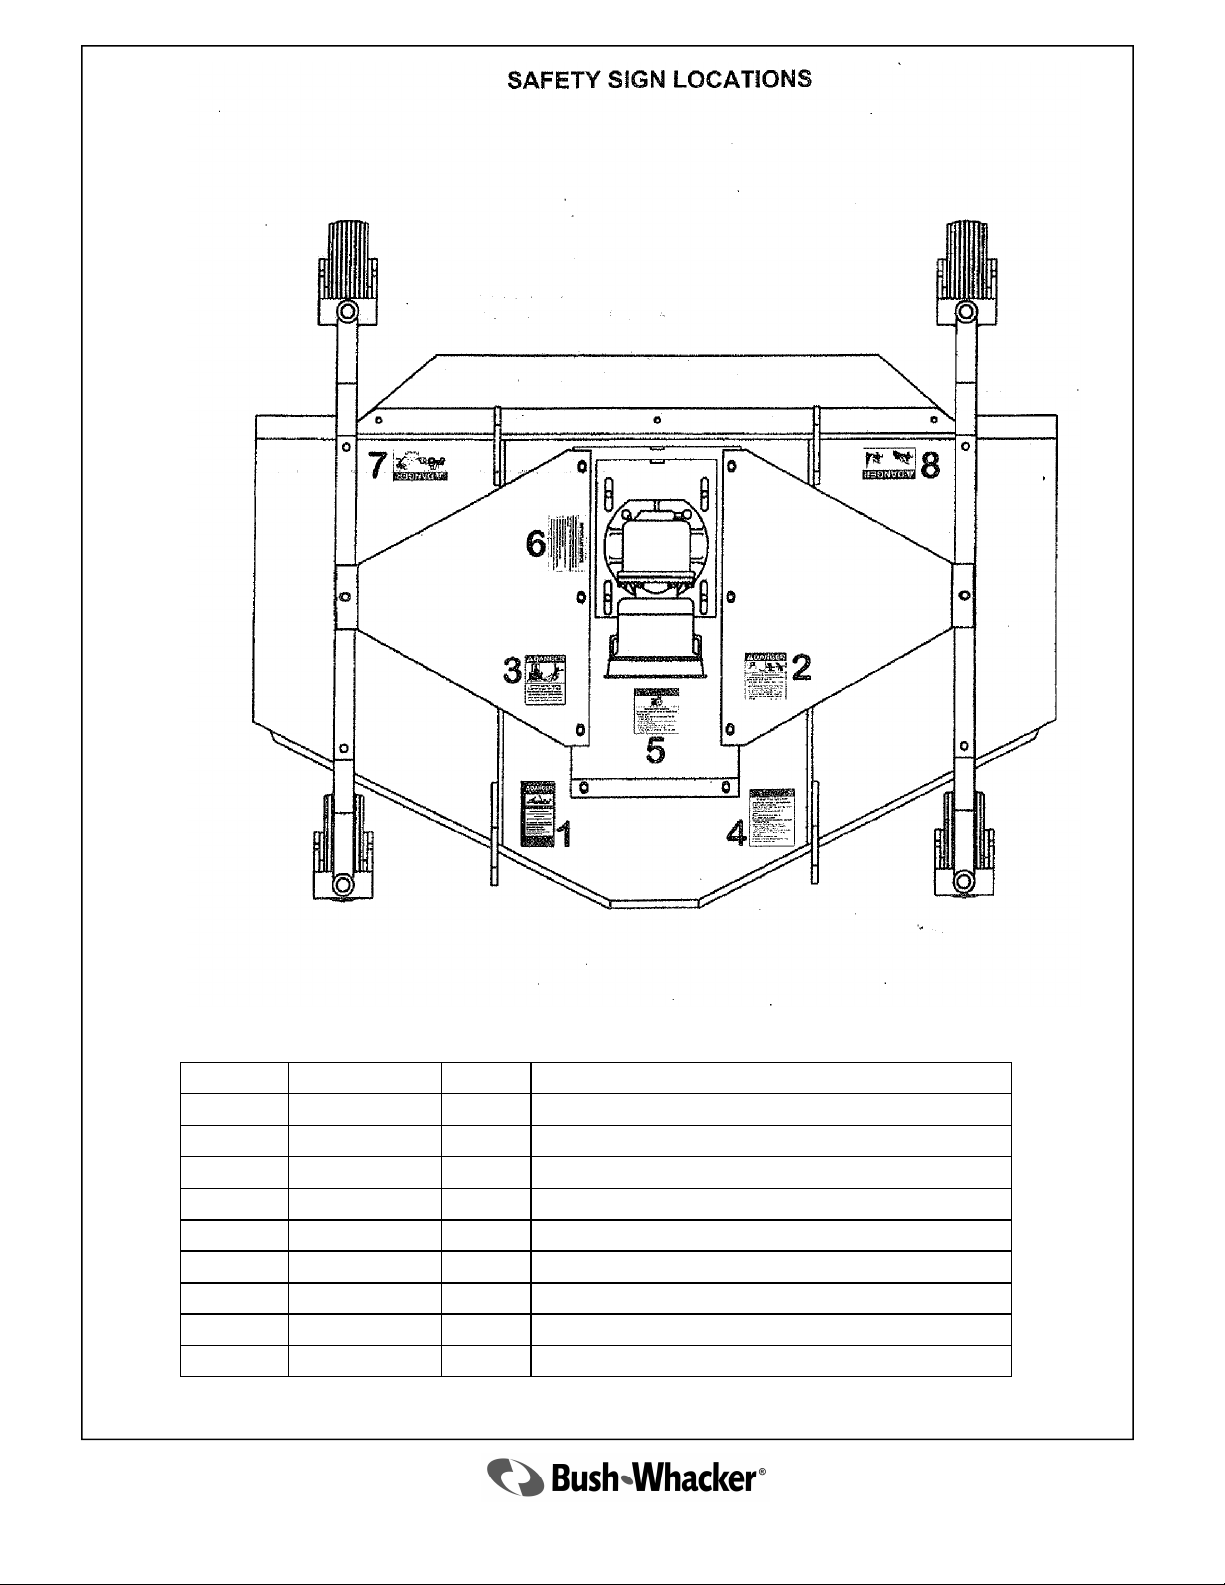
Safety Decal Location.................................................................................. 7
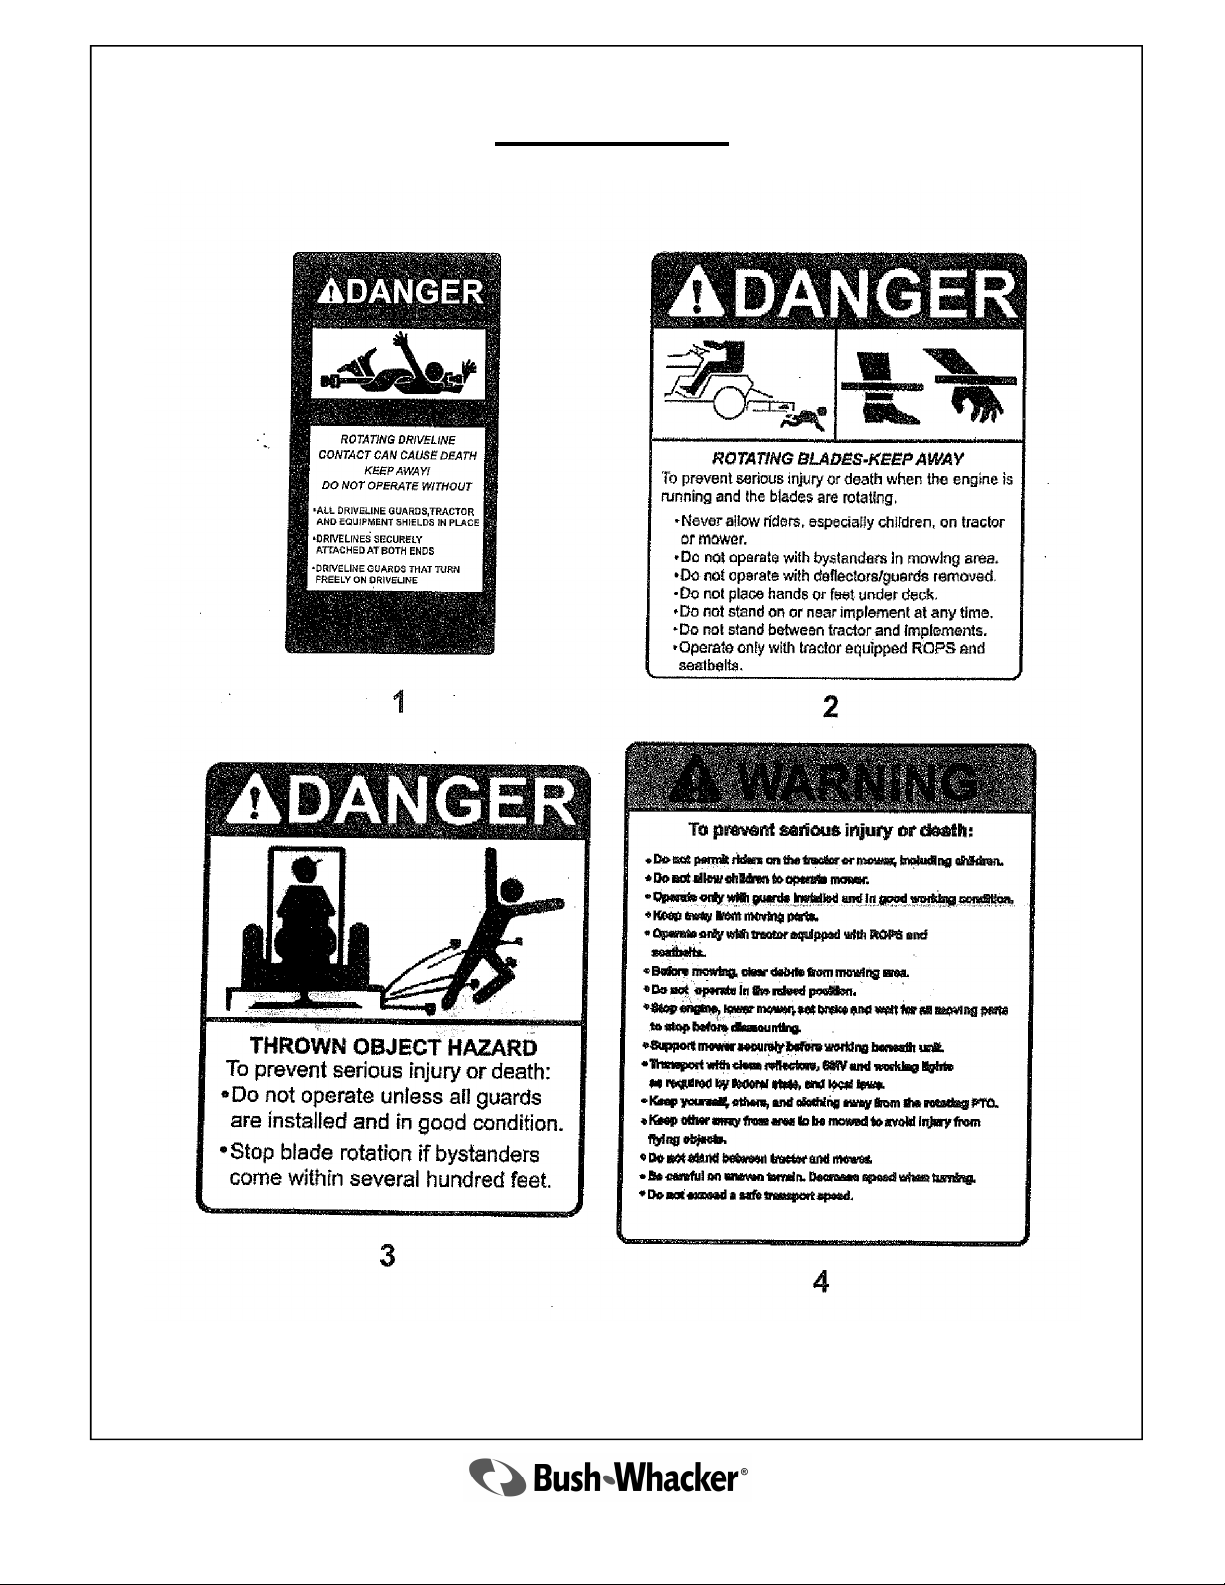
Safety Decals............................................................................................... 8-11
Mower Introduction................................................................................................. 12-13
Mower Assembly.................................................................................................... 14-15
A-Frame Attachment.................................................................................... 14
Three-point Attachment................................................................................ 15
Caster Wheel Attachment............................................................................ 15
Driveline Attachment.................................................................................... 15
Mower Operation.................................................................................................... 16-23
Tractor Preparation...................................................................................... 16
Attaching Mower to Tractor.......................................................................... 16-17
Driveline Attachment to Tractor.................................................................... 17
Cutting Height Adjustment ........................................................................... 17
Starting and Stopping Cutter........................................................................ 17
Cutting Speeds ............................................................................................ 18
Cutting Tips.................................................................................................. 18
Detaching and Storing ................................................................................. 19
Front Gauge Wheel Interference Check ...................................................... 20
Driveline Length Check Procedure .............................................................. 20
Adjusting Driveline Length ........................................................................... 21
Troubleshooting........................................................................................... 22-23
Mower Maintenance............................................................................................... 24-30
Lubrication Information ................................................................................ 24
Gearbox....................................................................................................... 25
Gauge Wheel Assemblies............................................................................ 25
Driveline Lubrication .................................................................................... 26
Blade Spindle Lubrication............................................................................ 26-27
Blade Servicing............................................................................................ 27
Blade Sharpening ........................................................................................ 27
Blade Removal and Installation.................................................................... 27
Drivebelt Adjustment Procedure .................................................................. 28
Drivebelt Removal and Installation............................................................... 28
Storage ........................................................................................................ 29
Blade Spindle Service Instructions............................................................... 30
Replacement Parts................................................................................................. 31-45
Warranty Information.............................................................................................. 47-48

4
2014 RDF 60, 72
Mower Safety
There are obvious and hidden potential hazards in the operation of this mower.
Remember, the blades of this mower can throw objects at very high speeds.
Serious injury or death may occur unless care is taken to insure the safety of the
operator, bystanders or passer by in the area. Equipment should only be operated by
those who are responsible and have been instructed how to do so.
Never operate the tractor and mower until you have read and completely understand
this manual, the tractor operator’s manual and each of the safety messages found
on the tractor and mower.
Read this manual carefully to acquaint yourself with the finishing mower. Working with
unfamiliar equipment can lead to accidents. Never allow children to operate or
ride on tractor or mower.
Finishing rotary mowers are capable under some conditions of throwing objects for
great distances (100 yards or more) and can cause objects to inflict serious injury or
death. Follow safety messages carefully. Stop mowing if passersby are within 100
yards unless:
-Mower is running close to and parallel to the ground without exposed blades.
-Passersby are outside the existing thrown-object zone.
-All areas have been thoroughly inspected and all foreign material such as rocks, cans,
glass and other debris has been removed.
Note: Where there are grass and weeds tall enough to hide debris that could be struck
by the blades, the area should be inspected and large debris removed before cutting.
First mow at an intermediate height, inspect area closely and remove any remaining
debris. Mow again at the desired final height. This method will reduce the likelihood
of thrown objects, reduce the power required and wear on the mower’s power train,
spread the cut material better, and eliminate streaking.
The mower discharge deflectors, belt guards, driveline and gearbox shields should be
used and maintained in good working conditions. They should be inspected carefully
at least daily. Missing, broken or worn items must be replaced at once and before
operating mower to reduce the possibility of injury from thrown objects or
entanglement.
Extreme care should be taken when operating near loose objects such as gravel,
rocks, wire and other debris. Foreign objects should be removed from the site or
avoided to prevent damage to the mower and/or bodily injury or death.
Do not allow the blades to turn when the mower deck is raised for turning. This
exposes the cutting blades which creates a potentially serious hazard and could cause
serious injury or even death by objects thrown from the blades.
DANGER!
DANGER!
DANGER!
DANGER!
DANGER!
WARNING!
WARNING!

5
2014. RDF 60, 72
Do not modify or alter, or permit anyone to modify or alter, this equipment or any of its
components or any equipment function without first consulting your equipment dealer.
The operator and all support personnel should wear hard hats, safety shoes and safety
glasses at all times for protection from injury and items thrown by the machine.
Before leaving the tractor seat, always engage the brake and/or set the tractor
transmission in parking gear. Disengage the PTO, stop the engine, remove the key
and wait for all moving parts to stop. Place the tractor shift lever into a low range or
parking gear to prevent the tractor from rolling. Never mount or dismount a moving
tractor. Operate the tractor controls from the tractor seat only.
Many other objects, such as wire, cable, rope or chains can become entangled in the
operating parts of the mower. These items in turn could swing outside the deck at
greater speeds than the blades. Such a situation is extremely hazardous. Inspect the
cutting area and remove any such objects before mowing. Never allow the cutting
blades to contact such items.
Be particularly careful while transporting the mower. Turn curves or go up hills at a low
speed and at a gradual steering angle. Make certain that at least 20% of the tractor’s
weight is on the front wheels to maintain safe steerage. Slow down on rough or
uneven surfaces.
Be certain that the “Slow Moving Vehicle”(SMV) sign is installed in such a way as to
be clearly visible and legible. Use flashing warning lights and follow all local traffic
regulations.
Periodically inspect all moving parts for wear and replace with authorized service parts
if an excessive amount of wear is present.
Look for loose fasteners, worn or broken parts, and leaky or loose fittings. Make sure
all pins have cotter pins and washers. Serious injury may occur from not maintaining
this machine in good working order.
Do not mount or dismount the tractor while the tractor is mowing. Mount or dismount
the tractor only when it is completely stopped.
Mower Safety continued
WARNING!
WARNING!
WARNING!
WARNING!
WARNING!
WARNING!
WARNING!
DANGER!
DANGER!

6
2014 RDF 60, 72
Never leave the mower in the raised transport position. Mower could fall causing injury
to anyone who might inadvertently be under mower.
Never clean or adjust PTO driven equipment with the tractor engine running.
Never allow riders on either tractor or mower. Falling off either one can cause injury or
death. These are not toys. Do not carry children or play games with the mower or
tractor.
Operate the mower only with a tractor equipped with an approved “roll-over-
protective system”(ROPS). Always wear seat belts. Serious injury or even death
can occur from falling off the tractor, particularly during a turnover when the operator
could be pinned under the ROPS of the tractor.
Never allow children to operate, ride or come close to the mower or tractor while
in operation. Usually children 15-16 years old who are mature and responsible can
operate the mower with reasonable safety if they have read the operator’s manual, if
they have been trained in safe operation of the equipment and if they are physically
large and sufficiently strong to reach and operate controls with ease.
Never work under the mower deck, the framework or any lifted component unless the
mower is securely supported or blocked up to prevent sudden or inadvertent falling
which can cause serious injury or death.
Always maintain the safety decals in good readable condition. If a decal becomes torn,
painted over or otherwise illegible, order replacement decals immediately.
Make sure the PTO shield is installed when using PTO driven equipment and always
replace the PTO shields and safety decals if damaged.
Mower Safety continued
WARNING!
WARNING!
DANGER!
DANGER!
DANGER!
DANGER!
DANGER!
DANGER!

7
2014. RDF 60, 72
ITEM PART NO. QTY. DESCRIPTION
1 1 DANGER—Rotating driveline
2 1 DANGER—Rotating blades
3 1 DANGER—Thrown object hazard
4 1 WARNING—To prevent serious injury
5 1 WARNING—Moving part hazard
6 1 IMPORTANT NOTICE
7 1 DANGER—Stay away minimum 160 ft
8 1 DANGER—Hand and foot injury
9 1 BUSH—WHACKER label

8
2014 RDF 60, 72
Safety Decals

9
2014. RDF 60, 72
Safety Decals

10
2014 RDF 60, 72
Mower Introduction
The purpose of this manual is to familiarize and instruct the operator for the correct operating
procedures and safe procedures of the BUSHWHACKER finishing mowers. The assembly chapter
instructs the owner/operator in the correct assembly of the mower using standard and optional
equipment. The parts listing section is designed to familiarize the owner/operator with replaceable
parts on the mower. This chapter provides exploded assembly drawings of each mower component
illustrating each piece and the corresponding part number.
Safety is of primary importance to the owner/operator and to the manufacturer. The first chapter of this
manual includes a list of safety messages, that, if followed, will help protect the operator and
bystanders from injury or death. Many of the safety messages shown in chapter one, will be repeated
throughout this manual. The owner/operator should know these safety messages before assembly and
be aware of the hazards associated with operating this mower during assembly, use and maintenance.
The safety alert symbol combined with a signal word, as shown below, is intended to warn the owner/
operator of impending hazards and the degree of possible injury faced when operating this mower.
CAUTION! The lowest level of safety message. It warns the owner/operator of possible minor
injury. Decals located on the mower with this signal word are black and yellow.`
WARNING! Serious injury or possible death! These decals are black and orange.
DANGER! This message indicates imminent death or critical injury. Decals are red and white.
Your BUSHWHACKER finishing mower has been designed for light-duty cutting such as lawn mainte-
nance and weed and grass control. With reasonable preventive maintenance your mower will provide
years of dependable service.
DANGER! Never allow children to operate, ride or come close to the mower or tractor. Usually,
15-16 year old children who are mature and responsible can operate the mower wih
reasonable safety if they have read the operator’s manual, been trained in safe operation
of the machine and are physically large and strong enough to reach and operate the
controls easily.
DANGER! At least 20% of tractor’s weight must be on the front tires when the mower is lifted,
in order to provide adequate traction for safe steering under ideal conditions. Slow down
on hills, rough terrain and curves.

11
2014. RDF 60, 72
DANGER! For non-agricultural applications, OSHA, ASAE SAE and ANSI standards require the
use of chain guards, deflectors or solid skirts at all times. The mower manufacturer
strongly recommends the use of chain guards or solid skirts for agricultural
applications as well, to reduce the risk of property damage, serious bodily injury
or even death from objects thrown or from contact with the cutting blades.
Front, rear, left and right are determined by the normal direction of travel, the same as when
driving an automobile.
Introduction continued

12
2014 RDF 60, 72
Mower Operation
The safe operation of this mower is the responsibility of the operator. The operator should be
familiar with the machine, tractor and all safety practices before starting operation. This mower is
designed for lawn and grass mowing. It is not designed for rough conditions or heavy weed mowing.
The mower is equipped with suction type blades, which are best suited for lawn mowing.
Always operate tractor at 540RPM.
This chapter provides information for attaching mower to tractor and preparing it for field operation.
Review this data prior to tractor hookup and operation.
Tractor preparation
Do not install mower on a tractor over 40 horsepower.
WARNING! Do not operate tractor with less than 20% of it’s gross unballasted mass on the front
wheels with the mower in the transport position.
Wheel treads
Tractor wheel tread spacing should be increased when working on inclines or rough ground to reduce
the possibility of tipping.
Stabilizer bars and sway blocks
Use stabilizer bars or sway blocks to prevent side sway of the mower.
Drawbar
Shorten or remove the tractor drawbar so it will not interfere with the up and down movement of the
mower.
WARNING! Do not get between tractor and mower when the engine is running.
Attaching the mower to tractor (lift type only)
This mower is designed for tractors with 540 RPM and category I hitch. Back the tractor up to the
mower so that the lower draft arms are in alignment with the mower lift pins. Stop the engine, lock the
brakes or place the tractor in park. Connect the tractor and stabilizer bars to the lower lift pins. Adjust

13
2014. RDF 60, 72
the top link so it will pin to the hole in the A-Frame floating top link.
DANGER! Never allow children to operate, ride or come close to the mower or tractor. Usually,
15-16 year old children who are mature and responsible can operate the mower with
reasonable safety if they have read the operator’s manual, been trained in safe
operation of the machine, and are physically large and strong enough to reach and
operate the controls easily.
Driveline attachment to tractor
1 Grab and turn the black twist collar on the end of the attaching yoke.
2 Slide yoke with the collar turned onto the tractor PTO shaft.
3 Move yoke back and forth until its locking balls have engaged on the PTO shaft groove.
WARNING! When attaching the driveline yoke to the tractor PTO shaft, it is important that the
spring activated locking collar turns freely and that it seats properly in the tractor PTO
shaft groove.
Cutting height adjustment
WARNING! Avoid personal injury! Be sure tractor engine is off, that key is removed from ignition
and allow blades to completely stop turning before dismounting to make adjustments.
Important: Avoid very low cutting heights. Striking the ground with the blades gives the most damaging
shock loads a mower can encounter and will cause damage to it and the driveline.
1 Using the tractor, raise the mower off the ground and place supports underneath of it, so that it will
not drift downwards while making adjustments or maintenance.
2 While supporting the wheel and yoke assembly off the ground, remove the snapper pin from the top
of the gauge wheel spindle. Position the supplied spacers as required for achieving the desired
cutting height.
Starting and stopping the mower
The power required for operating the mower is supplied via the tractor PTO. Refer to your tractor’s
manual for instructions on engaging and disengaging the PTO.
1 Always engage the PTO at low engine RPM.
2 Operate the mower at 540 RPM PTO speed. Do not exceed 540 RPM PTO speed.
3 In case of emergency, you must learn how to stop the tractor and mower quickly.
Important: Stop cutter and tractor immediately upon striking an obstruction. Inspect the mower and
repair any damage before resuming operation. Do not disengage PTO when the engine is at full
PTO RPM. Always bring the tractor engine to idle speed before disengaging the PTO.
WARNING! Avoid personal injury !. When attempting to stop a tractor which does not have a live
PTO, the momentum created by the blades of a mower can cause the tractor to be
pushed forward. Do not operate this mower unless the tractor has a live or
independent PTO.
Mower operation continued

14
2014 RDF 60, 72
To start operation, reduce engine speed and engage the tractor PTO. Before starting to cut, gradually
increase the engine speed to develop full PTO speed.
Enter the area to be cut with the cutter operating at PTO speed and, if it becomes necessary to
temporarily regulate engine speed during operation, increase or decrease the speed gradually.
To transport the mower, disengage the PTO and raise to full transport height.
Cutting speed
Proper ground speed for cutting will depend upon the height, type, and density of the grass to be cut.
Normally, ground speed will range from 1.5 to 3 MPH. Tall dense grass should be cut at low speeds,
while thin medium height grass can be cut at faster ground speeds.
Cutting tips
Always operate the PTO at the recommended RPM when cutting. This is necessary for correct blade
speed, which creates a clean and even grass cut.
Under certain conditions the tractor tires may roll some grass blades down and prevent them from
being cut at the same height as the surrounding area. If this occurs, reduce the tractor ground speed,
but maintain 540 RPM PTO speed. The lower ground speed will allow grasses to be at least partially
rebound and cut. Taking a partial cut and /or reversing the direction of travel may also produce a
cleaner cut.
When people are passing by the area you are cutting, stop the cutting until the area has been cleared.
Although the mower is shielded to prevent objects from being thrown by the blades, no shielding device
is 100% effective. The mower operator has greater knowledge of the hazards created by the machine
than people on the street. Therefore, he must take every precaution possible when other people are
around.
WARNING! Avoid personal injury ! Pick up all rocks and other debris before cutting. Enter new
cutting areas carefully. Cut material higher the first time to allow the mower to clear
unseen or hidden objects. Never assume that a cutting area is clear. Always check
carefully before entering it.
Extremely tall grass should be cut in two stages. First, raise the mower above the desired cutting
height and cut the grass in one direction. Second, adjust the mower to the desired cutting height and
cut in a perpendicular (90 degree) direction from the first cut.
Remember, sharp blades produce cleaner cuts and require less power.
Before cutting analyze the area to determine the best cutting procedure. One must consider the grass
height, its type and the terrain relief.
Grass is best cut when it is dry. Mowing wet grass can cause plugging, which results in grass clumps
behind the mower.
Mower operation continued

15
2014. RDF 60, 72
Detaching and storing
Lower the mower to the ground. Park the tractor with transmission in the correct gear (Automatic
transmissions should be set on Park; Standard transmissions should be set on Neutral). Set the
parking brake, turn off the engine and remove the keys from the ignition. Wait until the PTO stops
rotating completely before dismounting the tractor.
Disconnect the driveline from the tractor PTO and store it to prevent contact from the ground and away
from excessive moisture.
Always reinstall or lower into position the tractor PTO master shield. This shield should always remain
in place except when connecting or disconnecting the driveline.
Before operating or transporting the mower
Always display the SMV (slow moving vehicle) symbol on the rear of the tractor that transports the
mower. The SMV symbol should be clearly visible to vehicles overtaking the tractor transporting the
mower. Prominent display of this symbol will help the operator avoid accidents which could cause
injury or possibly death. See figure 4.
Figure 4
Mower operation continued

16
2014 RDF 60, 72
Front gauge wheel interference check.
Do not operate the mower until this interference check has been performed. If you use the mower
with a different tractor, you must perform the check for that particular mounting again.
1. Raise the mower with the tractor hydraulic system to the maximum height of lift.
2. Pivot both of the mower front gauge wheels forward and check that there is clearance between
the gauge wheels and the tractor’s rear tires.
3. If there is interference, lower the mower to the ground and move hitch to the extended position
(see assembly chapter).
4. Move the tractor tires inward to obtain clearance or lower the mower until clearance exists.
5. Set the 3-point quadrant stop so the mower cannot be raised beyond the set point. See figure 5.
Figure 5
Driveline length check procedure
WARNING! A loose shaft could slip off and result in personal injury or damage to the mower.
When attaching the driveline yoke to the tractor PTO shaft, it is important that the
spring activated twist collar turns freely and that the locking balls are seated on the
PTO shaft groove.
WARNING! Before operating the mower check to make sure the driveline will not bottom out or
become disengaged. See figure 6.
Figure 6
Driveline in maximum compressed position
Mower operation continued

17
2014. RDF 60, 72
Adjusting driveline length
1. Slide the driveline together until it “bottoms out”.
2. Apply colored tape to the inner plastic shield tube 1/8”from the end of the outer shield tube.
3. Reconnect the driveline to the tractor PTO shaft.
4. Raise the mower to full transport position or until the driveline just touches the deck at front.
5. If the distance between colored tape and outer shield tube is 1-9/16”or less, the metal drive tubes
should be shortened per figure A.
6. Shorten the male and female plastic shield tubes equally. See figure B.
7. The metal drive tubes also have to be shortened in the same length as the plastic shield tubes. See
figure C.
8. Round off all sharp edges and remove burrs. See figure D.
9. Apply grease to the metal drive tubes.
10. There should always be a minimum of 1-9/16”clearance between the male and female drive and
shield tubes when the driveline is operated in its shortest working position.
11. Lower the mower to the lowest position possible and check the distance of the colored tape to the
end of the outer shield tube.
12. Driveline tube engagement or overlapping must always exceed 12”
13. If tubes do not overlap by 12”or more, consult with your dealer to obtain a longer driveline.
Figure A Figure B
Figure C Figure D
Mower operation continued

18
2014 RDF 60, 72
Troubleshooting
Problem Possible cause Solution
Streaking Slow blade tip speed Operate PTO at 540 RPM
Worn blade tips Replace with genuine
BUSHWHACKER blades
Dull blades Sharpen blades uniformly
Blades unable to cut that part of grass Slow tractor’s ground speed but
pressed down by tractor’s tire path or maintain 540 RPM PTO speed
mower’s casters
Mowing too fast Slow down until cured
Drive belt loose Tighten per instructions on
maintenance chapter
Belt glazed/slipping Apply belt dressing or replace it with a
genuine BUSHWHACKER belt
Blade loose on spindle Tighten blade bolt securely (Note:
these are left-hand threads, tighten
to 85 ft.lb. torque)
Conditions too wet for mowing Allow grass to dry before mowing
Grass discharges from Grass is too high and too coarse Slow tractor’s ground speed but
mower unevenly or maintain 540 RPM PTO speed.
bunches along a swath Raise the mower for the first pass and
lower to the desired cutting height
for the second, and cut at 90 degrees
to the first pass. Raise the rear of
mower high enough to allow the grass
to discharge, but not too high for
streaking to occur
Belt slipping Tighten belt or replace with a genuine
BUSHWHACKER belt.
Grass is wet Allow grass to dry before mowing
Slow tractor’s ground speed but
maintain 540RPM PTO speed
Cut grass at a lower height
Heavy vibration Blade speed is too fast Do not exceed 540 RPM PTO speed
Broken/bent blade Replace with genuine
BUSHWHACKER blade
Worn/unbalanced blade Grind blade uniformly or replace
bent/broken sheave Replace with genuine
BUSHWHACKER part
Debris caught on blade Clean off blade
Belt slipping Belt loose Tighten or replace with genuine
BUSHWHACKER belt
Belt glazed Use belt dressing or replace it
Oil on belt Clean or replace

19
2014. RDF 60, 72
Problem Possible cause Solution
Belt slippage Mower is overloading, grass is too Slow tractor’s ground speed but
tall or heavy maintain 540 RPM PTO speed.
Cut grass twice. Raise the mower for
the first pass and lower to the desired
cutting height for the second and cut
at 90 degrees to the first pass.
Cut a partial swath only.
Oil on belt from over lubrication Clean lubricant from belt and sheaves
with a clean rag. Replace oil soaked
belts.
Be sure to follow operator’s manual
recommendations.
Belt hung or rubbing Check belt for free travel in sheaves.
Check under mower deck and
spindles for debris or other foreign
material and remove if any is present.
Belt rollover Sheave misalignment Consult with BUSHWHACKER
authorized dealer.
Damaged belt Replace it with genuine
BUSHWHACKER belt*.
Foreign object in sheave groove Inspect all sheave grooves for rust,
paint or other foreign material.
Remove these if present.
Worn sheave groove Replace with genuine
BUSHWHACKER sheave.
Damaged belt Rollover, high shock loads or Replace it with genuine
installation damage BUSHWHACKER belt*.
Belt breakage High shock loads Avoid abusive mowing.
Avoid hitting ground with the mower
and large obstructions.
Belt came off sheave Check sheave for proper alignment
and foreign material.
Ensure proper belt tension.
Avoid hitting the ground with mower
and large obstructions.
Troubleshooting continued
* Check damaged belt for cause of damage by laying it flat on the floor. If the belt does not lie flat
(check for humps, kinks, twists or other damage), this is an indication that it has broken or stretched
cords. Do not re-install this belt, replace it with a genuine BUSHWHACKER part.

20
2014 RDF 60, 72
Mower maintenance
Before operating the mower, make sure that it is properly lubricated and thoroughly inspected. Only a
minimum of time and effort is required to regularly lubricate and maintain it. Following a regular
program will provide long life and trouble free operation.
WARNING! Always disengage the tractor PTO before raising the mower for transport or making
adjustments.
Lubrication
Do not let excess grease collect on or around parts, particularly when operating in sandy areas. The
illustration below and on the next pages, show the location of all the lubrication fittings.
Use an SAE multi-purpose, lithium type grease for all the locations shown on figure 7. Be sure to clean
the grease fittings before applying any grease. Daily lubrication of the driveline U-joints is necessary.
Failure to maintain proper lubrication will result in premature wear and damage to the U-joints, gearbox
and/or driveline.
Figure 7
Lubrication fitting location
* Lubrication intervals shown are for mowers operating under normal conditions. Severe or unusual
conditions may require more frequent lubrication.
Item Description Frequency*
1 Gauge wheel pivots Every 8 hours or daily
2 Wheel hubs Every 8 hours or daily
3 Blade spindle Every 8 hours or daily
4 U-joints Every 8 hours or daily

21
2014. RDF 60, 72
Gearbox lubrication
The gearbox must be filled with COTTON PICKER SPINDLE GREASE oil before operating.
To fill gearbox to the correct operating level:
Place the mower on an even and leveled surface.
Remove filler and test level plug (see figure 8 for location of plugs).
Add oil through the filler plug until it starts running out of the test plug. (Pour oil slowly to make sure that
the lower portion of the gearbox housing has been filled)
Screw the test and filler plugs back in their corresponding places.
It is recommended that the oil level plug be removed after every 8-10 hours of operation and oil added
until it runs out of the test plug hole. The filler plug hole and test plug hole are both located on the back
of side of the gearbox.
Figure 8
Note:
It is recommended that the test plug be removed after every 8-10 hours of operation, and oil added to
the proper fill level if required.
Do not overfill the gearbox with oil. This will result in pressure build up inside the unit, which can cause
the oil seals to leak.
If the gearbox suddenly starts making an unusual noise, stop at once, check for oil leaks and refill it as
required.
Gauge wheel assemblies
The gauge wheels are equipped with
bearings which require grease regularly.
Grease fittings are provided in the wheel
hub and gauge wheel pivot. It is
recommended that these be lubricated
after every 8 hours of operation.
See figure 9.
Figure 9
Mower maintenance continued
This manual suits for next models
2
Table of contents
Other Bush-whacker Lawn Mower manuals
Popular Lawn Mower manuals by other brands

Robomow
Robomow RC304 Original operating instructions

Spearhead
Spearhead RHD OPEN Series Handbook & Parts Manual

AS MOTOR
AS MOTOR Allmaher AS 28 2T ES Operator's manual

Craftsman
Craftsman 247.203710 Operator's manual

Etesia
Etesia H124DN user manual

Progressive Turf Equipment
Progressive Turf Equipment Pro-Flex 120 Troubleshooting