Chef-Master HEB643 User manual

Chefmaster 1800watt Microwave
Instruction Manual
Models
HEB643 –1800watt Microwave oven

Thank you for purchasing your Chefmaster Microwave. To
make full use of the product please read this manual
carefully before using the product and keep it safe for
future reference.
Safety Tips
If you find any damage when the product is unpacked,
contact your Chefmaster supplier within 24 hours of
receipt of goods.
Always position on a flat stable surface.
Repairs should always be carried out by a qualified
technician.
Do not use this product outside.
Do not carry when hot.
Always switch off and unplug the unit before cleaning.
Move by holding the product by the base.
Always store flat and do not store products on top of it.
If the power cord becomes damaged it must be replaced
by a qualified technician.
This product is not designed to be used by persons with
reduced physical or mental capabilities, lack of
experience or knowledge, unless they are given
suitable supervision, this includes children.
2

Pack Contents
1 x Chefmaster Microwave
Before Use
Remove all packaging including all protective plastic,
from your Chefmaster Microwave
Position on a flat, stable surface
Clean with warm water and a soft cloth
Plug your Chefmaster Microwave into the mains
The microwave will now be ready to turn on
Cookware
Heat resistant glass –Yes
Heat resistant ceramics –Yes
Microwave safe cookware –Yes
Kitchen paper –Yes
Metal tray/rack –No
Aluminum foil/foil containers –No
Non heat resistant glass –No
3
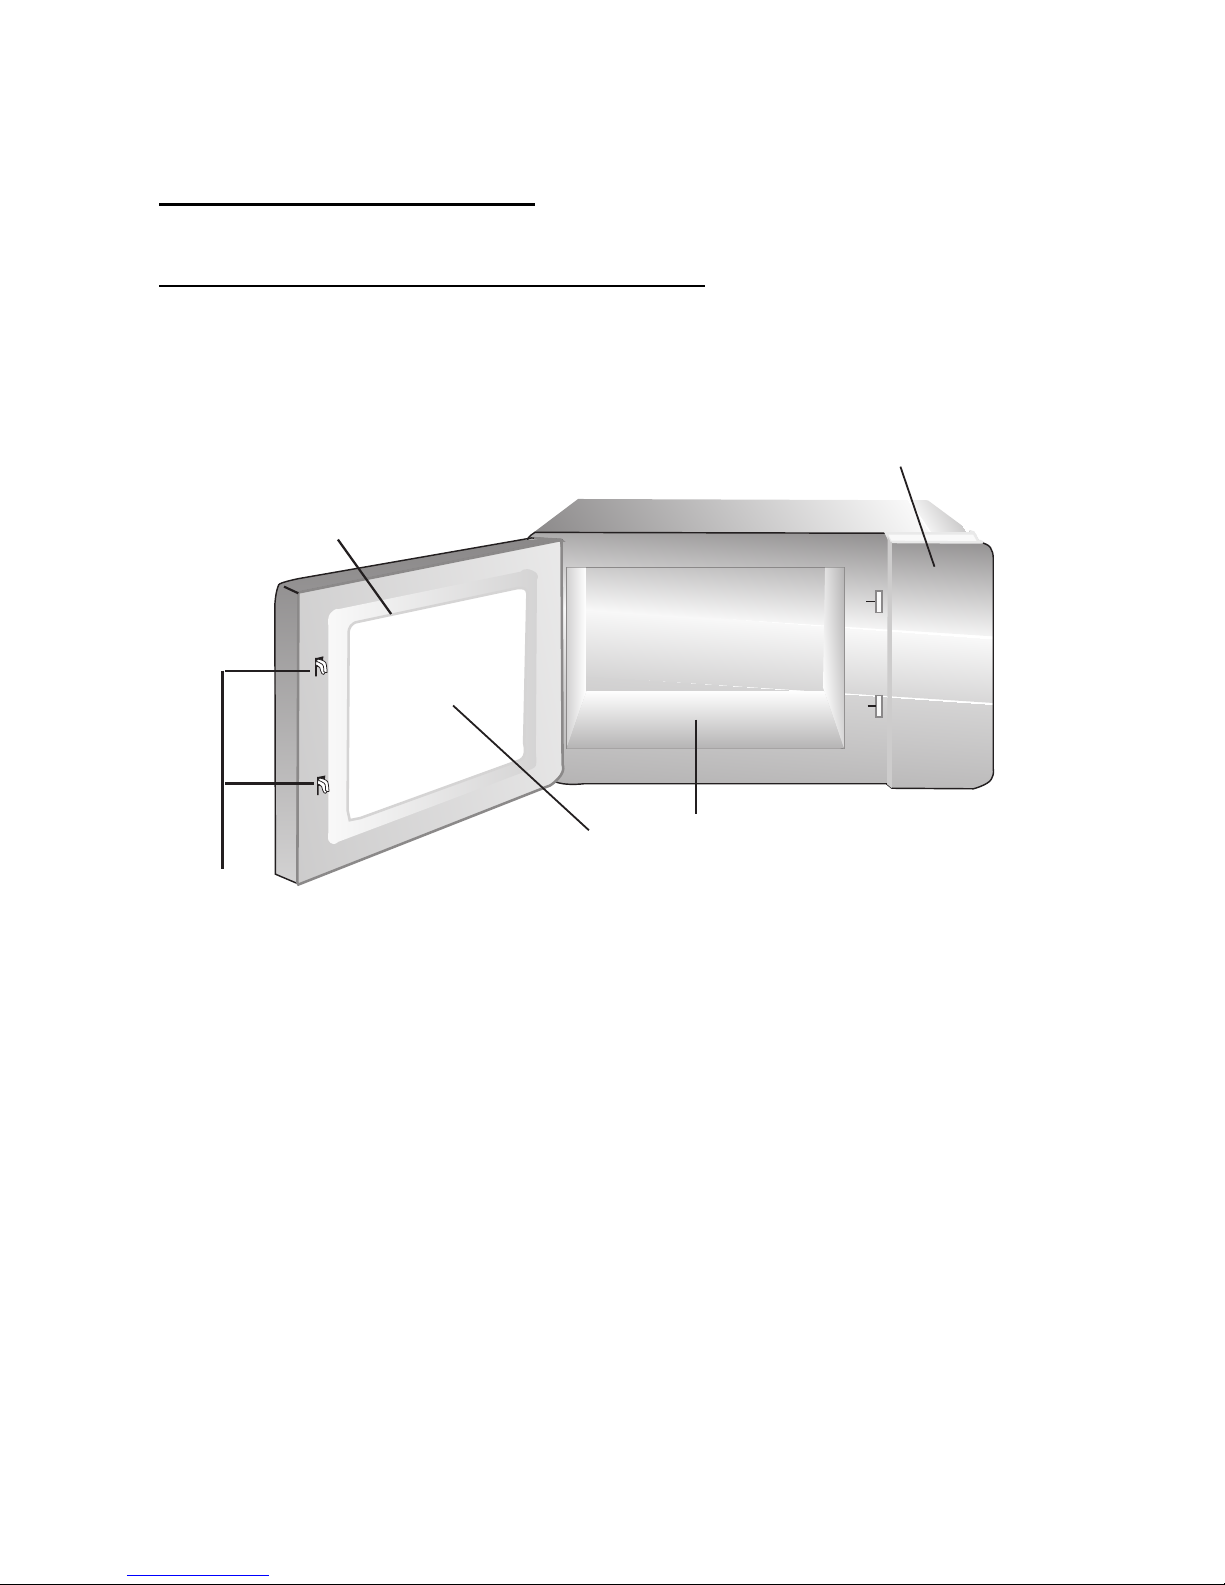
Oven Parts and Controls
Names of Oven Parts and Accessories
Remove the oven and all materials from the carton and oven
cavity. Your oven comes with the following accessories:
(A) Control panel
(B) Observation window
(C) Door assembly
(D) Safety interlock system
(E) Ceramic board
C
A
B
D
E
4
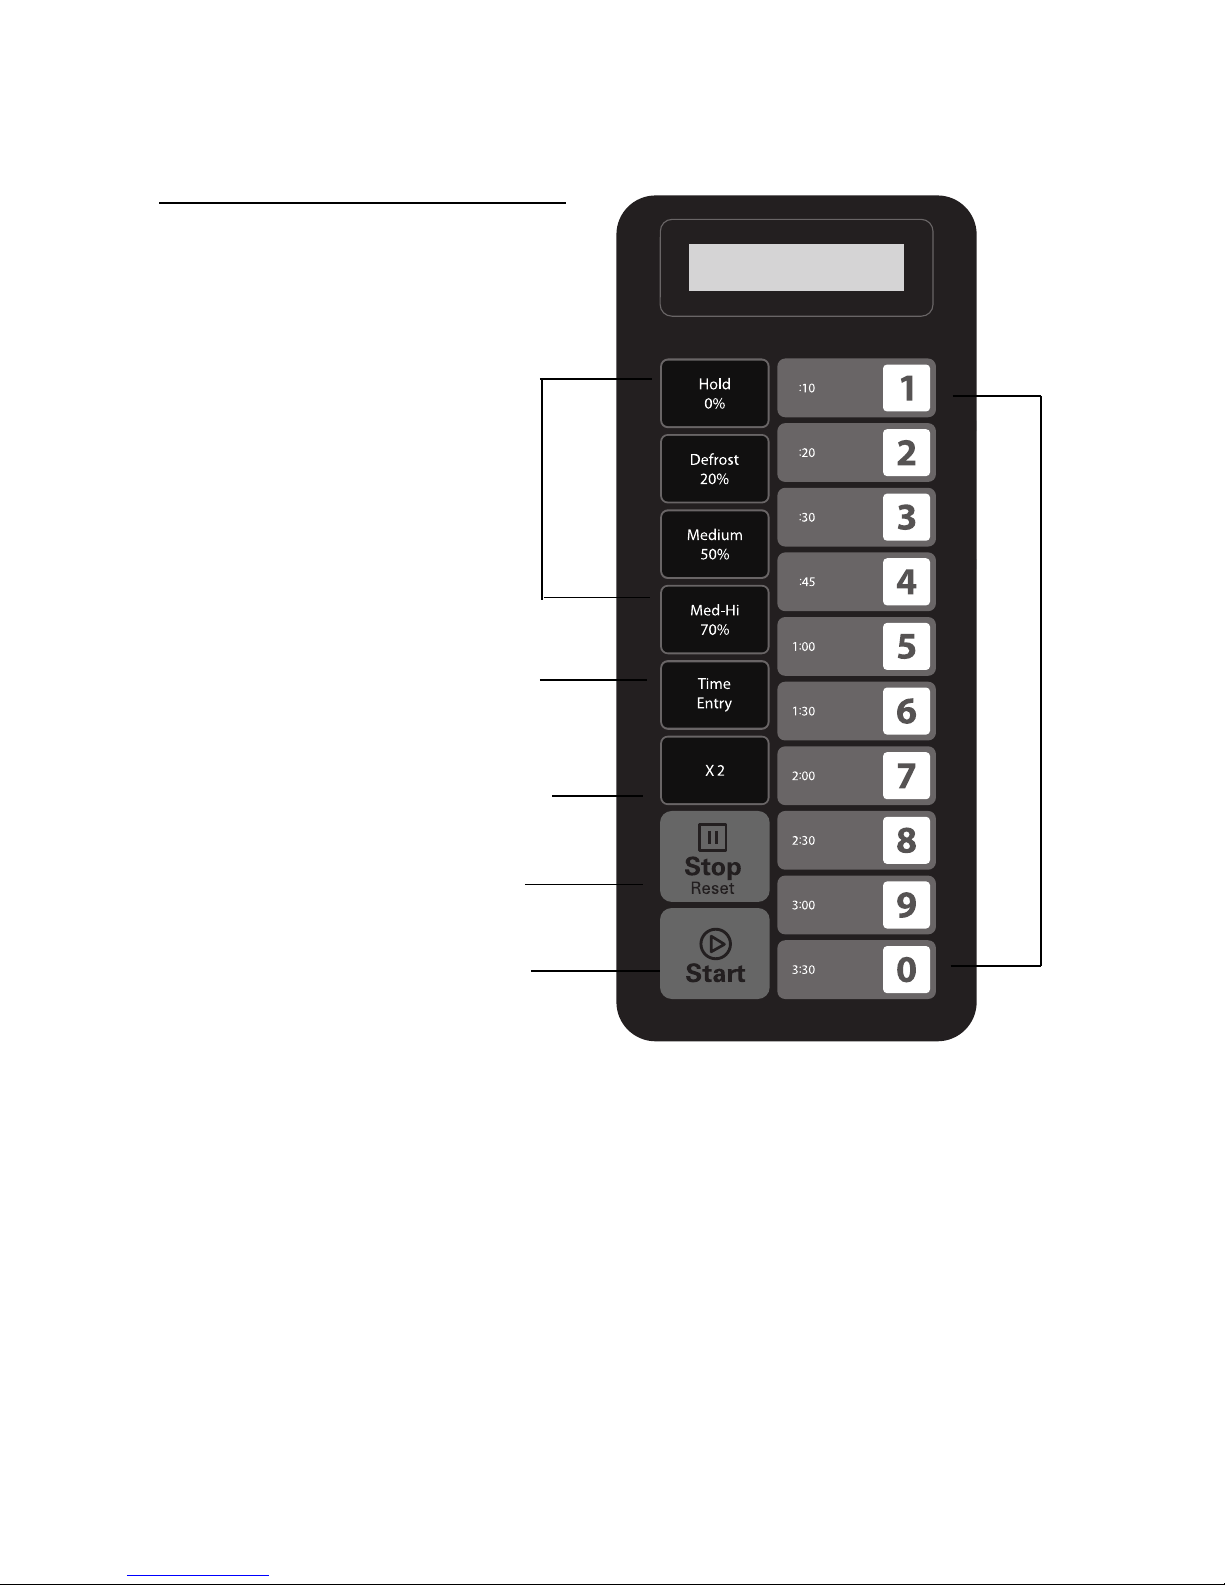
Control Panel and Features
(1) Power Buttons
(2) Time cook Button
(3) X2 Button
(4)Stop/Cancel
Button
(5) Start Button
(6) Number Button
(1)
(2)
(3)
(4)
(5)
(6)
5
Countertop Installation
Remove all packing material and accessories. Examine the
oven for any damage such as dents or broken door. Do not
install if oven is damaged.
Cabinet: Remove any protective film found on the microwave
oven cabinet surface.
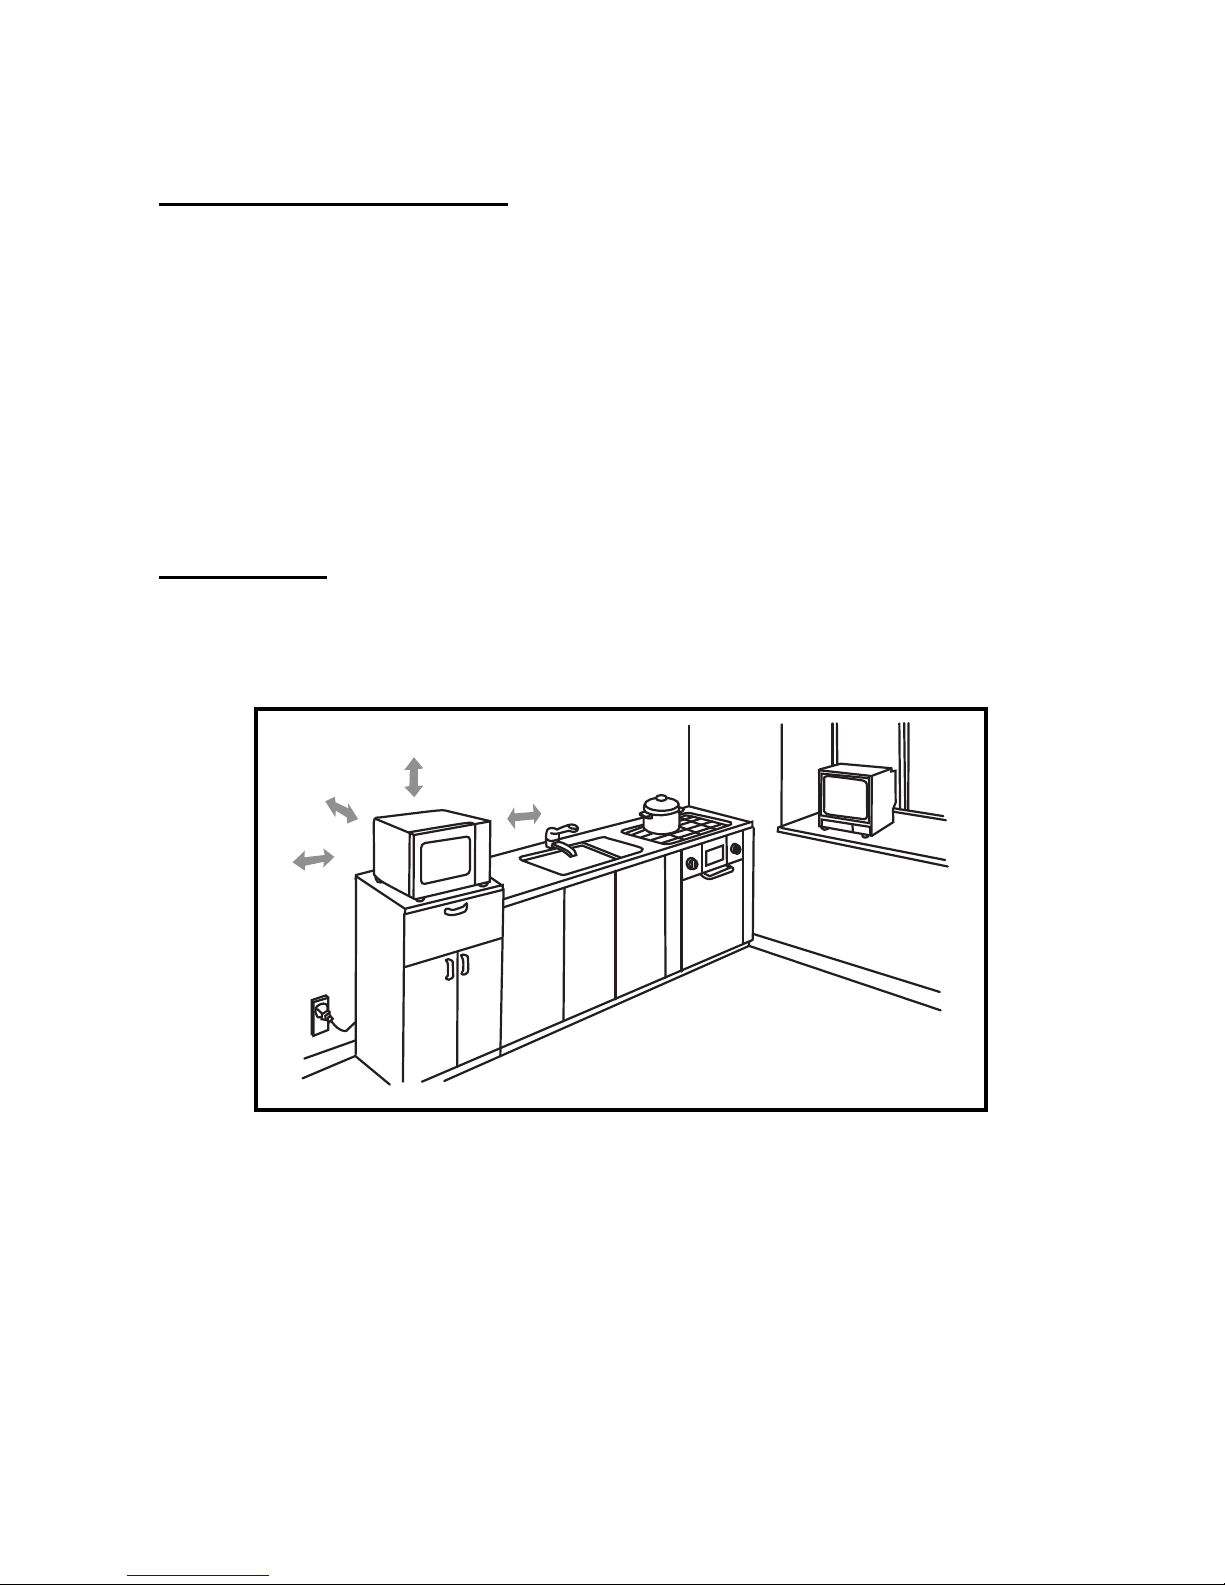
Installation
Select a level surface that provides enough open
space for the intake and/or outlet vents (Figure1).
A 10-cm spacing should be kept between the appliance
and right and back walls, and a 30-cm spacing kept on
the top. Never dismantle the appliance’s feet, nor block
the air intake and exhaust opening. The left side must be
open.
Fig 1 30cm
OPEN
12
inch( )
4.0 inch(10cm) 4.0 inch(10cm)
6
Blocking the intake and/or outlet openings can damage
the oven.
Place the oven as far away from radios and TV as
possible. Operation of microwave oven may cause
interference to your radio or TV reception.
Plug your oven into a standard household outlet. Be
sure the voltage and the frequency is the same as the
voltage and the frequency on the rating label.
Warning: The plugs socket, electric appliances or the
appliance which are liable effected by heat and
moisture should be kept away from any vents on the
oven.
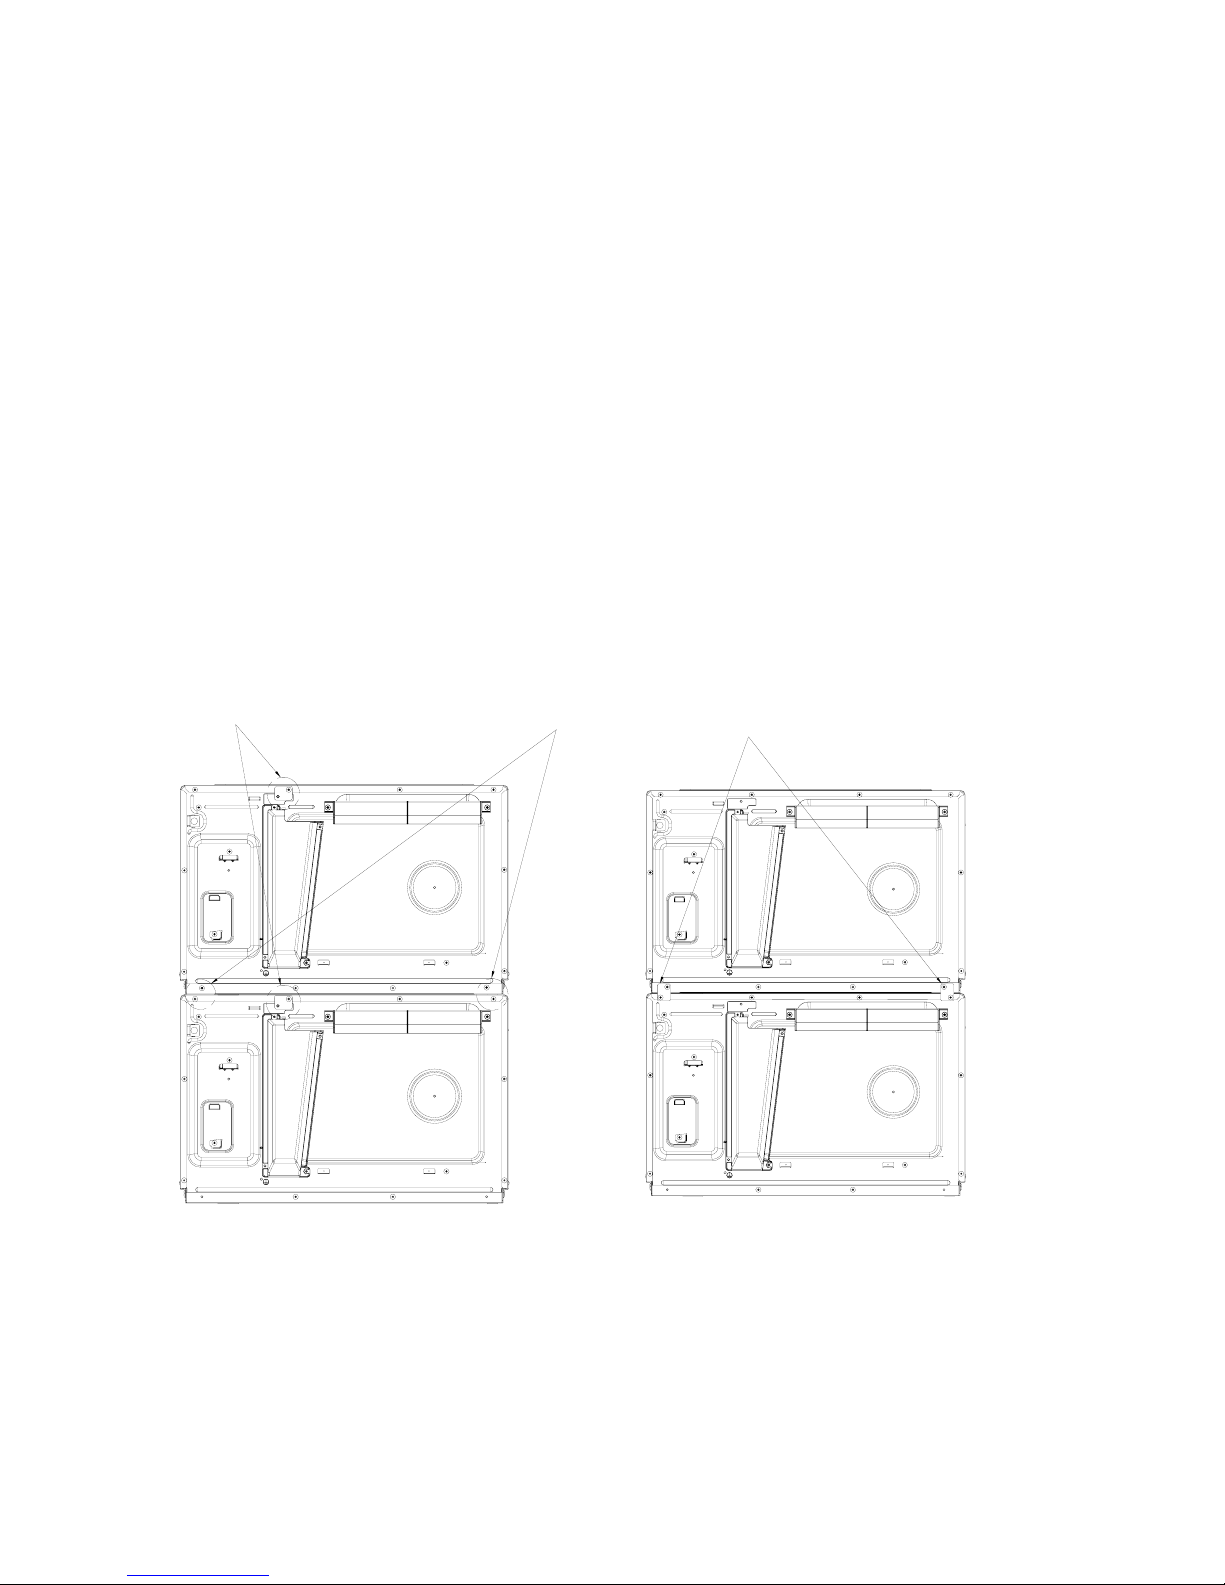
The appliance can be installed with a degree of stacked (figure
The maximum stacking height is two units.
2).
AB
Fig 2
C
A- loosen the screws & take off the installation boards on
both machines. Fix the screws back to the original
place tightly
B- take off four screws as shown
C- put installation boards to the locations as indicated &
fix them with the four screws
tightly
7

Operation Instruction
Five power levels are available
User Options
Items bolded below are the default values
Level
High
M. High
Med.
Defrost
Hold
Power
100%
70%
50%
20%
0%
Display
PL10
PL7
PL5
PL2
PL0
Option
Setting
Discription
1
EOC Tone
OP:10
3seconds beep
OP:11
Continuous beep
OP:12
5quick beeps,Repeating
2
Beeper
Volume
OP:20
Beeper Off
OP:21
Low
OP:22
Medium
OP:23
High
3
Beeper
On/Off
OP:30
Keybeep Off
OP:31
Keybeep On
4
Keyboard
Window
OP:40
15 seconds
OP:41
30 seconds
OP:42
60 seconds
OP:43
120 seconds
5
On the Fly
OP:50
On-the-Fly Disable
OP:51
On-the-Fly Enable
6Door Reset
OP:60
Door reset Disable
OP:61
Door Reset Enable
7Max time
OP:70
60 Minute Maximum Cook Time
OP:71
10 Minute Maximum Cook Time
8Manual
Programming
OP:80
Manual Programming Disable
OP:81
Manual Programming Enable
9
Double Digit
OP:90
Single Digit Mode-10 programs
OP:91
Doule Digit Mode-100 programs
8

Default Cook Times
The oven is delivered with the following Preset Cook Times
unless otherwise noted in the product specification
1. Power Up
"
" displays when the oven is turned on for the first
time. If " " button pressed, the oven will change to idle
mode.
Note: Under idle mode, no button can be pressed.
Button
Display (Time)
Power
Cook Factors
1
0:10
100%
80%
2
0:20
100%
80%
3
0:30
100%
80%
4
0:45
100%
80%
5
1:00
100%
80%
6
1:30
100%
80%
7
2:00
100%
80%
8
2:30
100%
80%
9
3:00
100%
80%
0
3:30
100%
80%
2. Idle Mode
The oven shall enter idle mode after a set of seconds(60
press or a door open and close. The number of
seconds is determined by
the keyboard Timeout Window,
set
by
User
Option
4.
During idle mode, THE SCREEN is blank. And there
shall be no oven activity.
Opening and then closing the oven door, the oven
will exit the idle mode and into ready mode.
_ _ _ _ _ _ _
9
seconds by default) have expired in Ready Mode without
a keyboard

3. Ready Mode
Opening and closing the door while the oven is in
Idle Mode will put the oven into Ready Mode.
During Ready Mode, "READY" displays.
From the Ready Mode, the oven can go to almost all
of the other modes.
Only the fan and lamp work.
4. Door Open Mode
While the door of the oven is open, the oven shall be
in Door Open Mode.
During this mode, THE SCREEN is blank. And the fan
and oven lamp work.
When the door is closed, if User Option OP: 60 is
selected and the oven was running a manual or
preset cook cycle, the oven shall enter Pause Mode.
In all other cases, the oven shall return to Ready
Mode with User Option OP:61 set. Opening and
closing the door will clear out any information about a
Manual or Preset Program which was running.
5. Pause Mode
While in Manual Cook Mode or Preset Program Cook
Mode, if the door is open or closed, or if the " " pad
is pressed, the oven will enter Pause Mode.
While paused, THE SCREEN will display the remaining
cooking time.
Only the fan and lamp work.
Pause Mode will expire back to Idle Mode in the same
10
way as Ready Mode, dependent on User Option 4.

Additionally, if the " " button is pressed, the oven shall
immediately enter Ready Mode. OR if press " " button,
the oven will go into working mode.
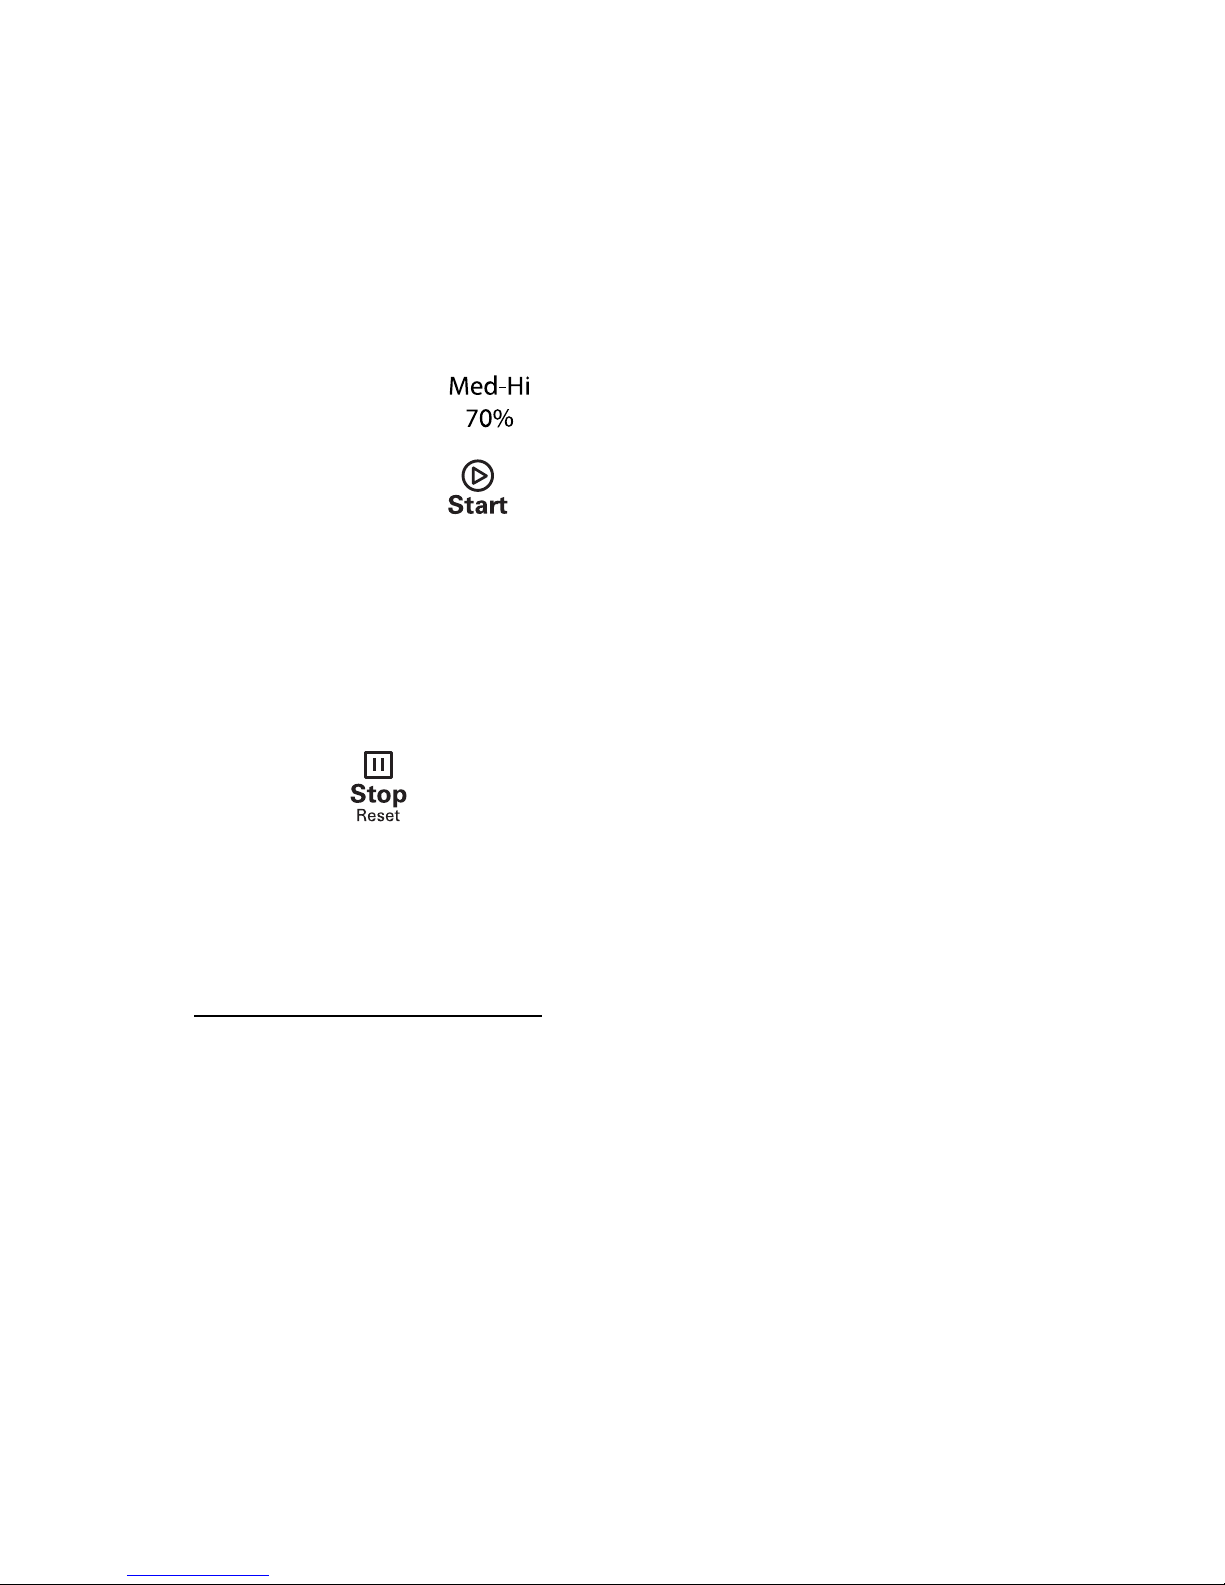
6. Manual Cook Entry Mode
While the oven is in the Ready Mode, pressing the
“ ” pad on the keyboard will put the oven into
Manual Cook Entry Mode.
During this mode, "00:00" displays
If you press" button
to select power level, THE SCREEN will display the
related power. If the same button pressed twice, the
power will change to PL10. If no power chosen, "PL10"
is default.
Only the fan and lamp work.
During setting process, press " " to enter Manual
Cook Mode. Press " " to enter Ready Mode.
7. Manual Cook Mode
Pressing the " " pad will cause to the oven to
begin Manual Cook Mode.
During this mode, remaining cooking time displays.
The fan and oven lamp will work.
When cooking program finish, the oven will enter End
",""," "or " "
of Cook Cycle Mode. If you press " " button under
this mode, the oven will enter Pause Mode.
11

8. End of Cook Cycle Mode
After the time has expired in a Manual Cook Mode, or a
Preset Program Cook Mode, the oven shall go into The
End of Cook Cycle Mode.
During this mode, "DONE" displays.
If either User Option OP:11 or "OP:12" is selected, the
oven shall continue to sound until the user acknowledges
this by either opening and closing the door or
pressing
the
" "pad. If User Option OP:10 is selected, after the 3
seconds beep, the oven shall go into Ready Mode.
9. Preset Program Cook Mode
This mode allows cooking of food items through a one
pad touch operation. While in Ready Mode, pressing
one of ten digit keys on the keyboard will cause the
oven to run the Preset Program associated with that
key.
THE SCREEN displays the remaining cooking time. If it
is multi-stage cooking, the total remaining cooking time
displays not a particular stage cooking time.
When cooking program finish, the oven will enter End
of Cook Cycle Mode. If you press " " button under
this mode, the oven will enter Pause Mode.
12

10. On the Fly Cooking
While the oven is cooking or under Pause Mode, if
User Option OP:51 is selected, press number buttons,
the preset cooking program will start automatically.
THE SCREEN displays the remaining cooking time.
When cooking program finish, the oven will enter End
of Cook Cycle Mode. If you press " " button under
this mode, the oven will enter Pause Mode.
11. Programming Mode
This mode allows the user to assign cook times and power
levels to the once touch button.
Open the door and press "1" for 5 seconds, the buzzer
will sound once and enter to Programming Mode.
"PROGRAM" displays. You can input the time you
need.
Press to input the
power level. The screen will display the related power.
If the same button pressed twice, the power will
change to PL10. If no power chosen, "PL10" is default.
Note: Set the time first, then choose the power
"
",""," "or " "
13

To change the cooking factors: If press "X2", the
screen will display "CF:XX". The default factor is 80%.
"CF:80" displays. If you need to change the cooking
factor, just press one of the number buttons to set.
After setting the time and power, press " ", the
cooking program will be saved. When the program
saved, "PROGRAM" displays.
If all the cooking time exceeds the MAX. time User
Option 7, when press " " to save the program, the
buzzer will sound three times briefly to tell you the time
is no use. And then the screen turns back to display
"PROGRAM". The time set before will have no change.
Close the door, the oven will turn back to Ready Mode.
If press " " button during setting process, the oven
turns to Door Open Mode. The program that not saved
will be lost. If there is program saved as memory
procedure, press the related number button, the saved
program will start. If no saved program, the buzzer will
alarm when pressing number button and it will not
work.
For example: set the program as memory cooking.
Program: Power level PL7 and cooking time 1 minute
and 25 seconds.
Step 1: Open the door, press number button "1" for 5
seconds,"PROGRAM" displays.
14
Step 2: Press number button "3", the program will be
saved in "3" & the screen displays “P:03”. After two
seconds, the screen will display the related time “:30”.
Step 3: Press number buttons "1", "2" and "5" to input the
cooking time.
Step 4: Press " " button," 1:25 70" displays. Setting
finished.
Step 5: Press " " to save. When use the program
next time, just press "3", the related program will start.
Note:
(1). If the electricity is cut off, the saved program will not lose.
(2). If the program need to reset, just repeat the above steps.
(3). If press " " at the last step, it will turn back to Ready
Mode. The setting will be no use.
12. Double Quantity cooking
To press "X2" button in ready mode, followed by the
starting of a preset program or if the “X2” button is
pressed in 5 seconds after starting a preset program,
the oven will start cooking with the quantity preset
cooking time.
15

Press "X2", "DOUBLE" displays. When press number
buttons, the screen will display the quantity preset
time.
For example, press number button "5" and its preset
time is 1 minute. Then press "X2", then time will
change to 1:00*(1+0.8)=1:48 (1 minute and 48
seconds).
When cooking program finish, the oven will enter End
of Cook Cycle Mode.
Note: This function can be used under preset program
mode.
13. Stage Cooking Programming
This allows the user to cook food items at manual cook mode
and programming mode.
Three stages can be set at most under cooking mode
or programming mode. After setting the power and time
for the first stage, press " " to set the second stage.
And the same step to set the third stage.
When setting the second or third stage, press " ",
"STAGE-2" or "STAGE-3" displays.
Press " " button to start cooking.
16

and time is 1 minute 25 seconds, and the second stage
is PL5 and 5 minutes and 40 seconds. The steps are:
(a) Open the door, press number button "1" for 5
seconds until the screen displays "PROGRAM".
(b) Press number button "3", the program will be saved
in "3" & the screen displays “P:03”. After two seconds,
the screen will display the related time “:30”.
(c) Press "1", "2", "5" to input the cooking time. "1:25"
displays.
(d) Press " ", "1:25 70" displays.
The first stage setting is finished
(e) Press " ", the screen displays "STAGE-2".
(f) Press "5", "4","0" button, "5:40" displays.
(g) Press " ", "5:40 50" displays.
The second stage setting is finished
(h) Press " " to save the program.
Example: In programming mode, press number button
“3” to set two stages cooking. The first stage is PL7
17

14. User Option Mode
This allows user to choose between various ways to operate
the oven.
Open the oven door and press "2" for 5 seconds. The
buzzers sound once and enter this mode.
The screen displays "OP: - -".
Press any number button to enter related mode setting.
For example: to set the sound of the buzzer to medium.
Press " 2 ", "OP:22" displays. If you want to change,
keep pressing "2", the screen displays "OP:20",
"OP:21","OP:22","OP:23", "OP:20" .....in cycle.
Press " " to save the current setting. After saved,
"OP: - -" display again.
During setting process, press " " to enter Door
Open Mode. Close the door will enter Ready Mode.
If " " button not pressed at the last step, the
program cannot be saved but stays at previous way.
18

15. Service Mode
Open the oven door and press "3" for 5 seconds to
enter service mode.
THE SCREEN displays "SERVICE".
To check how many times of closing / opening of the
oven door, press number button "3” and the screen
will display.
Press “1” for Tube Hours
Press “2” for Tube Cycles
Press “3” for Door Cycles
Press “4” for Clear Service Information
Press " " to enter Door Open Mode. Close the
door will enter Ready Mode.
16.Factory-default setting
In Ready Mode, press " " and " 0 " to
factory-default setting. The buzzer sounds once, and
the screen will display “CHECK”. If it is in the
factory-default setting, the screen will display “11”,
otherwise “00”.
19

When screen shows “11”, press " " after 3 seconds
to return to the ready mode.
When screen shows “00” and if you want to restore the
product to factory-default setting, press " " and
“CLEAR” will be displayed on screen. Process
completed. If you do not want to restore the oven to
factory-default setting, press no button and the oven
will return to the Ready Mode automatically.
Note: Be careful during the operation as it may clear
all configurations to factory-default setting.
Cleaning & Maintenance
Before cleaning, disconnect the Microwave from the
electricity supply.
Once the unit has cooled completely, wipe with a damp
&
soapy cloth.
DO NOT submerge the Microwave in water or use water
sprays to clean it
Always clean your Chefmaster Microwave daily
Use a vacuum cleaner to clean the air intake & exhaust
vents
20
Table of contents
Other Chef-Master Microwave Oven manuals

Popular Microwave Oven manuals by other brands


Panasonic
Panasonic NN9804 - MICROWAVE CONV. OVEN operating instructions

DeDietrich
DeDietrich Microwave oven Instructions for use

Candy
Candy CMXG22ST User instructions

Russell Hobbs
Russell Hobbs HOB GTS23 Instruction booklet

Candy
Candy CMGA25TNDB instructions

Samsung
Samsung GW73E Owner's instructions and cooking guide