Chuangda CMD-2000 Instruction Manual

Guangdong ChuangdaAutomatic Equipment Co.,Ltd.
1/ 63
Add: D11, New Lighting Source Industrial Basis, Nanhai District, Foshan City, Guangdong Province
Tel: +86- 0757-82629566 82629546 82326616 Fax: +86- 0757-82622156
CMD-2000 Operating Instruction Manual
(For Small Circular Knitting Machine)

Guangdong ChuangdaAutomatic Equipment Co.,Ltd.
2/ 63
Add: D11, New Lighting Source Industrial Basis, Nanhai District, Foshan City, Guangdong Province
Tel: +86- 0757-82629566 82629546 82326616 Fax: +86- 0757-82622156
Table of Contents
Table od contents......................................................................................................................................................... 2
1 Schematic diagram of the electric control driver board of CMD-2000 small circular knitting machine.................. 4
2 Functional diagram of the main machine panel........................................................................................................ 6
3 Start Menu ................................................................................................................................................................ 7
4 Machine parameter setting........................................................................................................................................ 7
4-1 Jacquard parameter setting .................................................................................................................... 8
4-1-1 Preliminary instruction....................................................................................................................... 8
4-1-2 Set the needle selector angle.............................................................................................................. 9
4-1-3 Set the needle selector pattern.........................................................................................................110
4-1-4 Set unused yarn number................................................................................................................. 132
4-1-5 Special setting changes .................................................................................................................. 153
4-1-6 Set yarn number / Grouping............................................................................................................. 14
4-1-7 Synchronizer origin adjustment ....................................................................................................... 17
4-1-8 Save jacquard parameters to a USB memory................................................................................... 18
4-1-9 Load jacquard parameters from a USB memory.............................................................................. 17
4-2 Set electrical parameters...................................................................................................................... 17
4-2-1 Oil pump and mahine cleaning setting............................................................................................. 18
4-2-2 Machine operation setting................................................................................................................ 19
4-2-3 Set electrical output 1....................................................................................................................... 19
4-2-4 Set electrical output 2....................................................................................................................... 22
5 Read knitting patterns............................................................................................................................................. 22
5-1 Enter the pattern function interface ..................................................................................................... 22
5-2 Read pattern files from the Memory disk............................................................................................ 23
5-3 Read pattern files from a USB memory .............................................................................................. 27
5-4 Add patterns......................................................................................................................................... 26
5-5 PatternAnti-Theft Function Operating Instruction.............................................................................. 29
6 Check instructions .................................................................................................................................................. 30
6-1 Needle selection check ........................................................................................................................ 31
6-2 Operaiton check................................................................................................................................... 32
6-3 Synchronizer check.............................................................................................................................. 32
6-3-1 Synchronizer chennel check............................................................................................................. 33
6-3-2 Synchronizer error correction setting............................................................................................... 35
6-4 Needle selector setting......................................................................................................................... 36
6-5 Touch-screen calibration...................................................................................................................... 36
7 Count setting........................................................................................................................................................... 37
8 Rest......................................................................................................................................................................... 38
9 Color changte instruciton........................................................................................................................................ 38
10 System Upgrade.................................................................................................................................................... 39
11 Other auxiliary functions ...................................................................................................................................... 45
11-1 Date.................................................................................................................................................... 45

Guangdong ChuangdaAutomatic Equipment Co.,Ltd.
3/ 63
Add: D11, New Lighting Source Industrial Basis, Nanhai District, Foshan City, Guangdong Province
Tel: +86- 0757-82629566 82629546 82326616 Fax: +86- 0757-82622156
11-2 Language ........................................................................................................................................... 46
11-3 Indicating brightness.......................................................................................................................... 46
12 Machine operation................................................................................................................................................ 43
13 Dexsription of tips for mahcine abnormalities...................................................................................................... 50
14 Special funcitons ................................................................................................................................................. 47
14-1 Forced removal of system data.......................................................................................................... 48
14-2 Forced touch screen calibration......................................................................................................... 48
15 Troubleshooting for common problems................................................................................................................ 50
15-1 General steps to check why the machine fails to make patterns during operation ............................ 50
15-2 General steps to check why the machine makes wrong patterns during operation............................ 50
15-3 General steps to troubleshoot touch-screen failure............................................................................ 51
15-4 General steps to troubleshoot needle selector failure ...................................................................... 51
15-4-1 Some tips of the same eneedle selector do not work...................................................................... 51
15-4-2 One of the needle selector groups in the same connecting line does not work, other groups work normally........ 51
15-4-3 Some of the needle selectors in the same groups do not work....................................................... 51
16 Analysis of failure case......................................................................................................................................... 51
16-1Analysis of actual failure cases.......................................................................................................... 52
17 Warranty and after-sales service ........................................................................................................................... 53
17-1 Warranty ............................................................................................................................................ 53
17-2 After-sales service.............................................................................................................................. 53

Guangdong ChuangdaAutomatic Equipment Co.,Ltd.
4/ 63
Add: D11, New Lighting Source Industrial Basis, Nanhai District, Foshan City, Guangdong Province
Tel: +86- 0757-82629566 82629546 82326616 Fax: +86- 0757-82622156
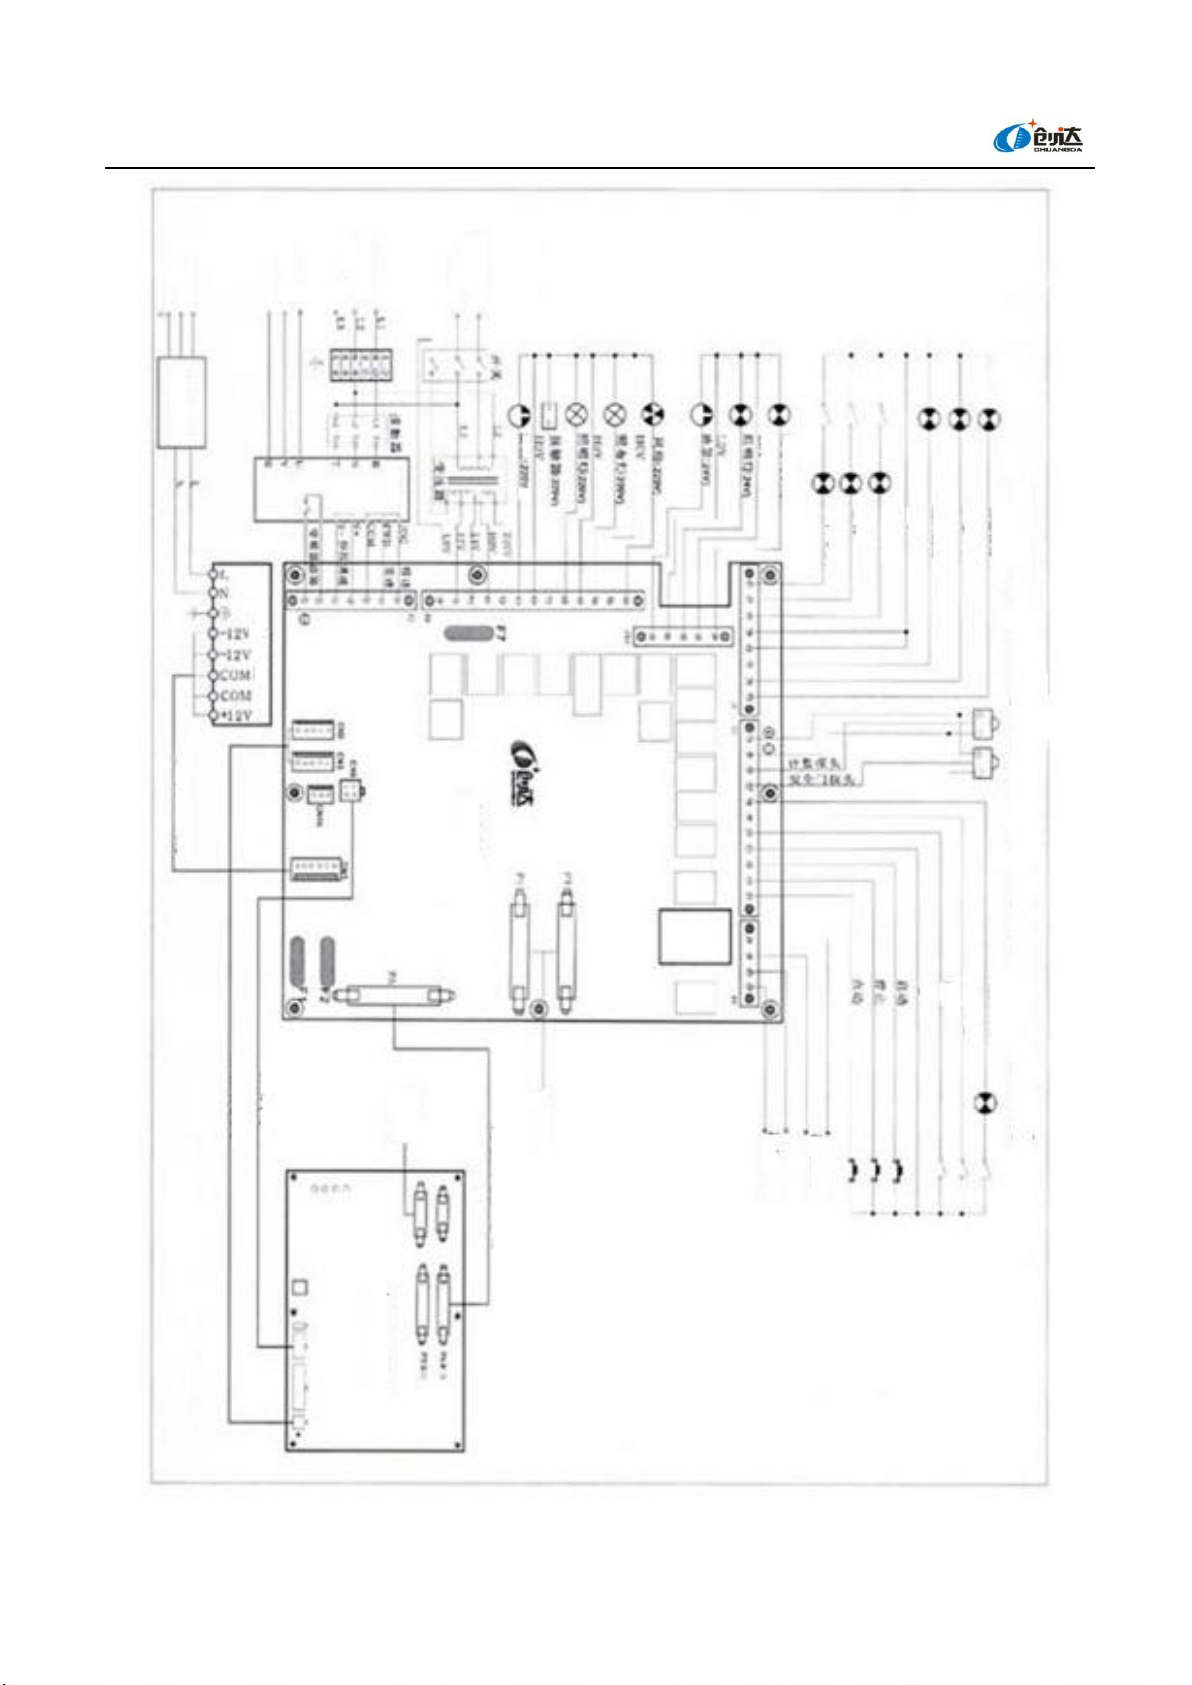
1. Schematic Diagram of the Electric Control Driver Board of CMD-2000 Small
Circular Knitting Machine
Guangdong ChuangdaAutomatic Equipment Co.,Ltd.
5/ 63
Add: D11, New Lighting Source Industrial Basis, Nanhai District, Foshan City, Guangdong Province
Tel: +86- 0757-82629566 82629546 82326616 Fax: +86- 0757-82622156
MD-2000 small circular knitting machine electrical wiring block diagram (for solenoid actuator)
Tri-color red lamp
Tri-color yellow lamp
Tri-color green lamp
LOV
Yarn break at middle segment
Broken needle
Yarn break at upper segment
Cloth lighitng lamp (24 V)
LOV
Connect switch power
~
220V
Total power input
~
380V
Connected to the motor
~
220V
Lighitng lamp (24 V)
LOV
Oil pump (24 V)
Fan (24V)
HOV
Cloth lighitng lamp (220 V)
Lighitng lamp (220 V)
Contactor (220V)
Oil pump (220V)
Switch
Transformer
Contactor
Transducerr
Power board
Power Filter
Switching power supply
System power cable
Communication signal line
Control panel power line
Control Panel
PA port
PB port
Actuator interface
Data connection cable (used to connect PA port)
Connect to encoder and
photoelectric switch
Spare output 1
Spare output 2
Oil insuficient (12V)
Air pressure insuficient
Cloth blroken
Start
Stop
Jog
Count probe
Security door probe
Guangdong ChuangdaAutomatic Equipment Co.,Ltd.
6/ 63
Add: D11, New Lighting Source Industrial Basis, Nanhai District, Foshan City, Guangdong Province
Tel: +86- 0757-82629566 82629546 82326616 Fax: +86- 0757-82622156
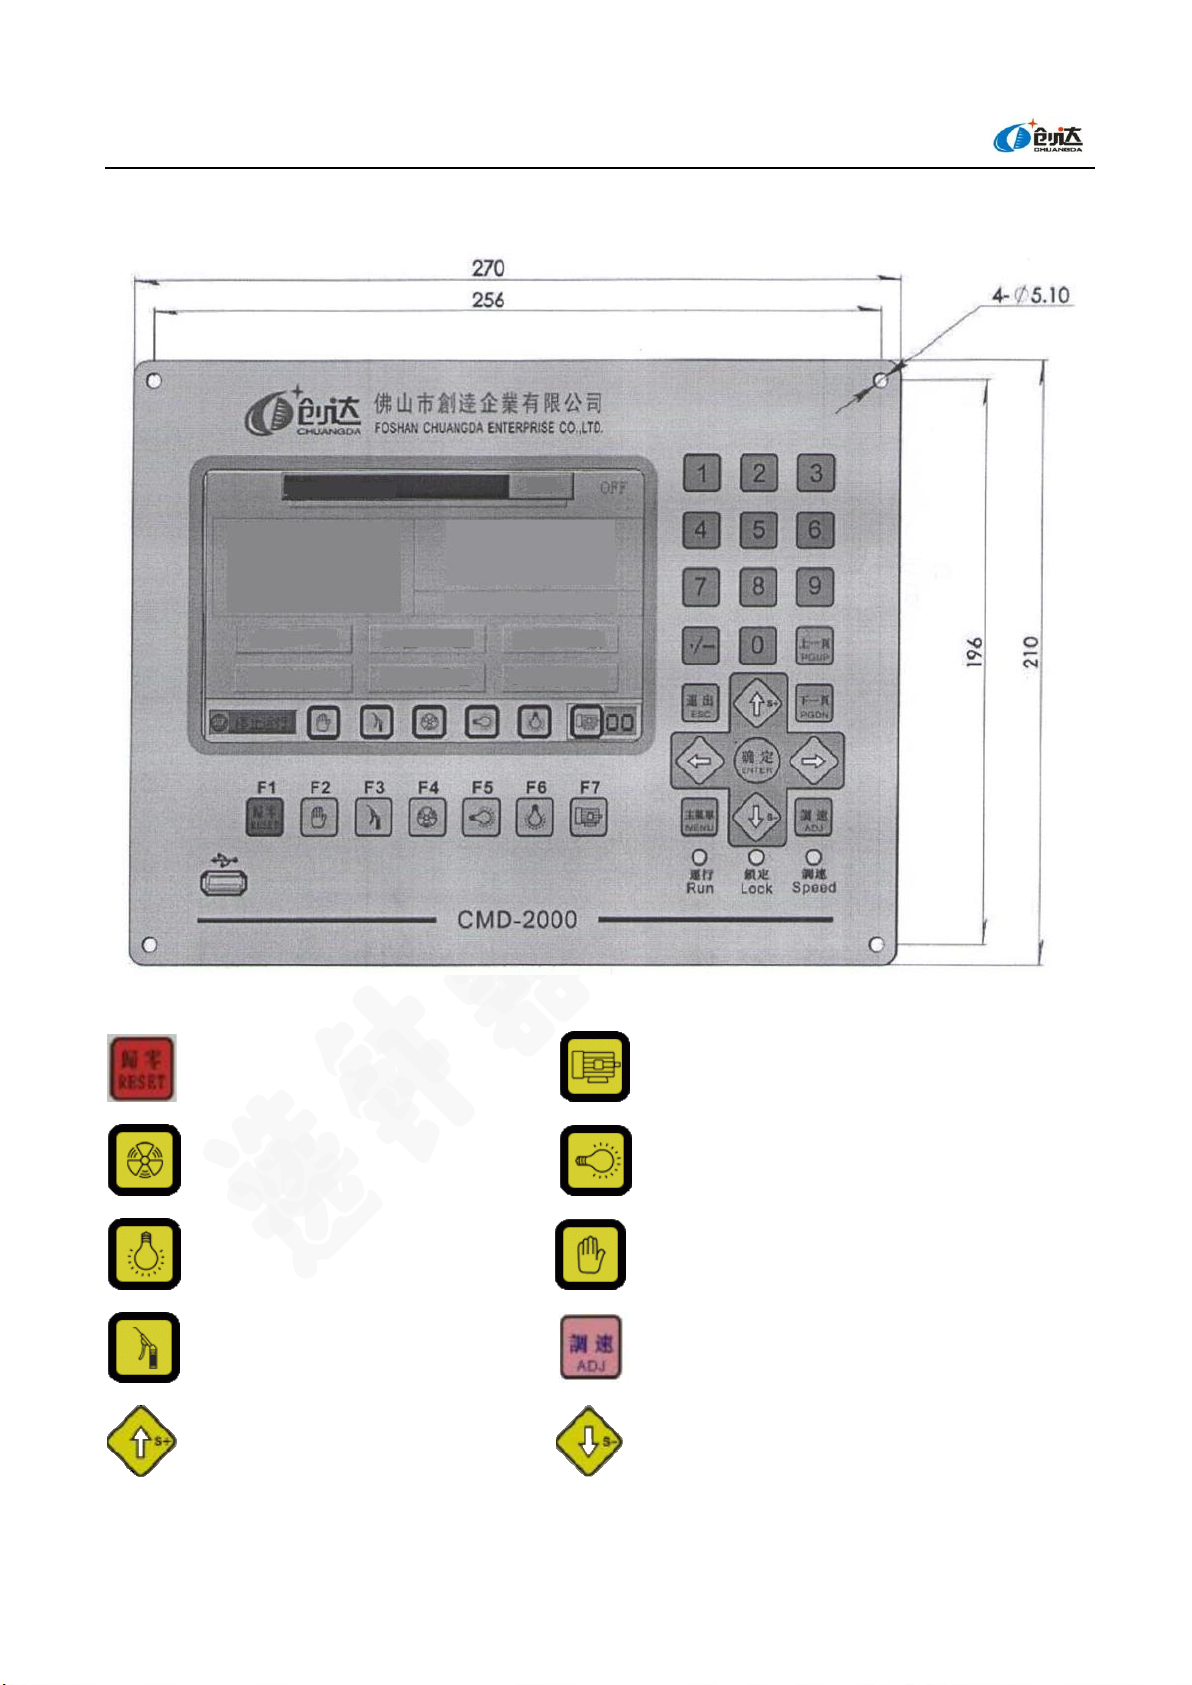
2. Schematic Diagram of the Main Machine Panel
Description of Electrical Control Keys
Operation date clearing key Transducer power supply control key
Fan control key Cloth lighting lamp control key
Illuminating lamp control key Forced control key
Clearing key Speed regulation enable key
Operation speed increase key Operation speed decrease key
Control panel not open
View
Needles: 2952
Number of units: 72
Number of actuator: 72
Needle selection segments: 8
Cylinder: Left
Synchronizer: Left
Rotation speed (RPM): 00.0
Shift: [A]
1 Pattern
2 Check
3 Count
4 Memory function
5 Reset
6 Next page tips
Stop running

Guangdong ChuangdaAutomatic Equipment Co.,Ltd.
7/ 63
Add: D11, New Lighting Source Industrial Basis, Nanhai District, Foshan City, Guangdong Province
Tel: +86- 0757-82629566 82629546 82326616 Fax: +86- 0757-82622156
3. Main Start Menu Knitting Screen Display
When you turn on the power, the main machine starts to work and the actuator gradually warms up.
At this time, following menu will appear on the screen, it displays such information as machine type,
needles, number of actuator units, number of actuator segments, proximity switch (photoelectric
switch), needle cylinder and synchronizer rotating direction and rotating speed, and shift etc. The
longitudinal boxes at the bottom show the operating state of the electrical part. On the bottom of the
box shows the electrical part of the running condition
(Note: This menu is a standby menu, and the computer has not entered the Jacquard mode)
(Fig. 1)
If the main machine cannot communicate with the electrical controller, it pos up the following warning box:
(Fig. 2)
At this point the machine will not operate. Please check the cable connecting the main machine and the power
OFF
AB BC
Needles 2016
Number of units: 48
Number of actuators: 48
Needle selection segment: 8
Needle cylinder: Right
Synchronizer: Left
Speed (RPM): 00.0
Shift:
1. Pattern type
2. Check
3. Count
4. Memory function
5. Reset
6. Next page tips
OFF
AB BC
Needles: 2016
Number of units: 48
Number of actuator: 48
Needle selection segment: 8
Needle cylinder: Right
Synchronizer: Left
Speed (RPM): 00.0
Shift:
1. Pattern type
2. Check
3. Count
4. Memory function
5. Reset
6. Next page tips
The control panel is not started!
Minimize
The control panel is not started!

Guangdong ChuangdaAutomatic Equipment Co.,Ltd.
8/ 63
Add: D11, New Lighting Source Industrial Basis, Nanhai District, Foshan City, Guangdong Province
Tel: +86- 0757-82629566 82629546 82326616 Fax: +86- 0757-82622156
supply panel or contact the manufacturer
4. Machine Parameter Setting
Guangdong ChuangdaAutomatic Equipment Co.,Ltd.
9/ 63
Add: D11, New Lighting Source Industrial Basis, Nanhai District, Foshan City, Guangdong Province
Tel: +86- 0757-82629566 82629546 82326616 Fax: +86- 0757-82622156
Click【Memory function】key to enter the following interface
(Fig. 3)
4-1 Jacquard Parameter Setting
"Preliminary Instructions" are used to input various parameters of the jacquard machine. This function
involves wider aspects and will be described in detail below.
Note: Mechanical preliminary instructions (for example: the name of the machine, the total needles,
number of units, etc.) have been previously entered into the computer by the manufacturer, if the user
needs to change them, contact the manufacturer.
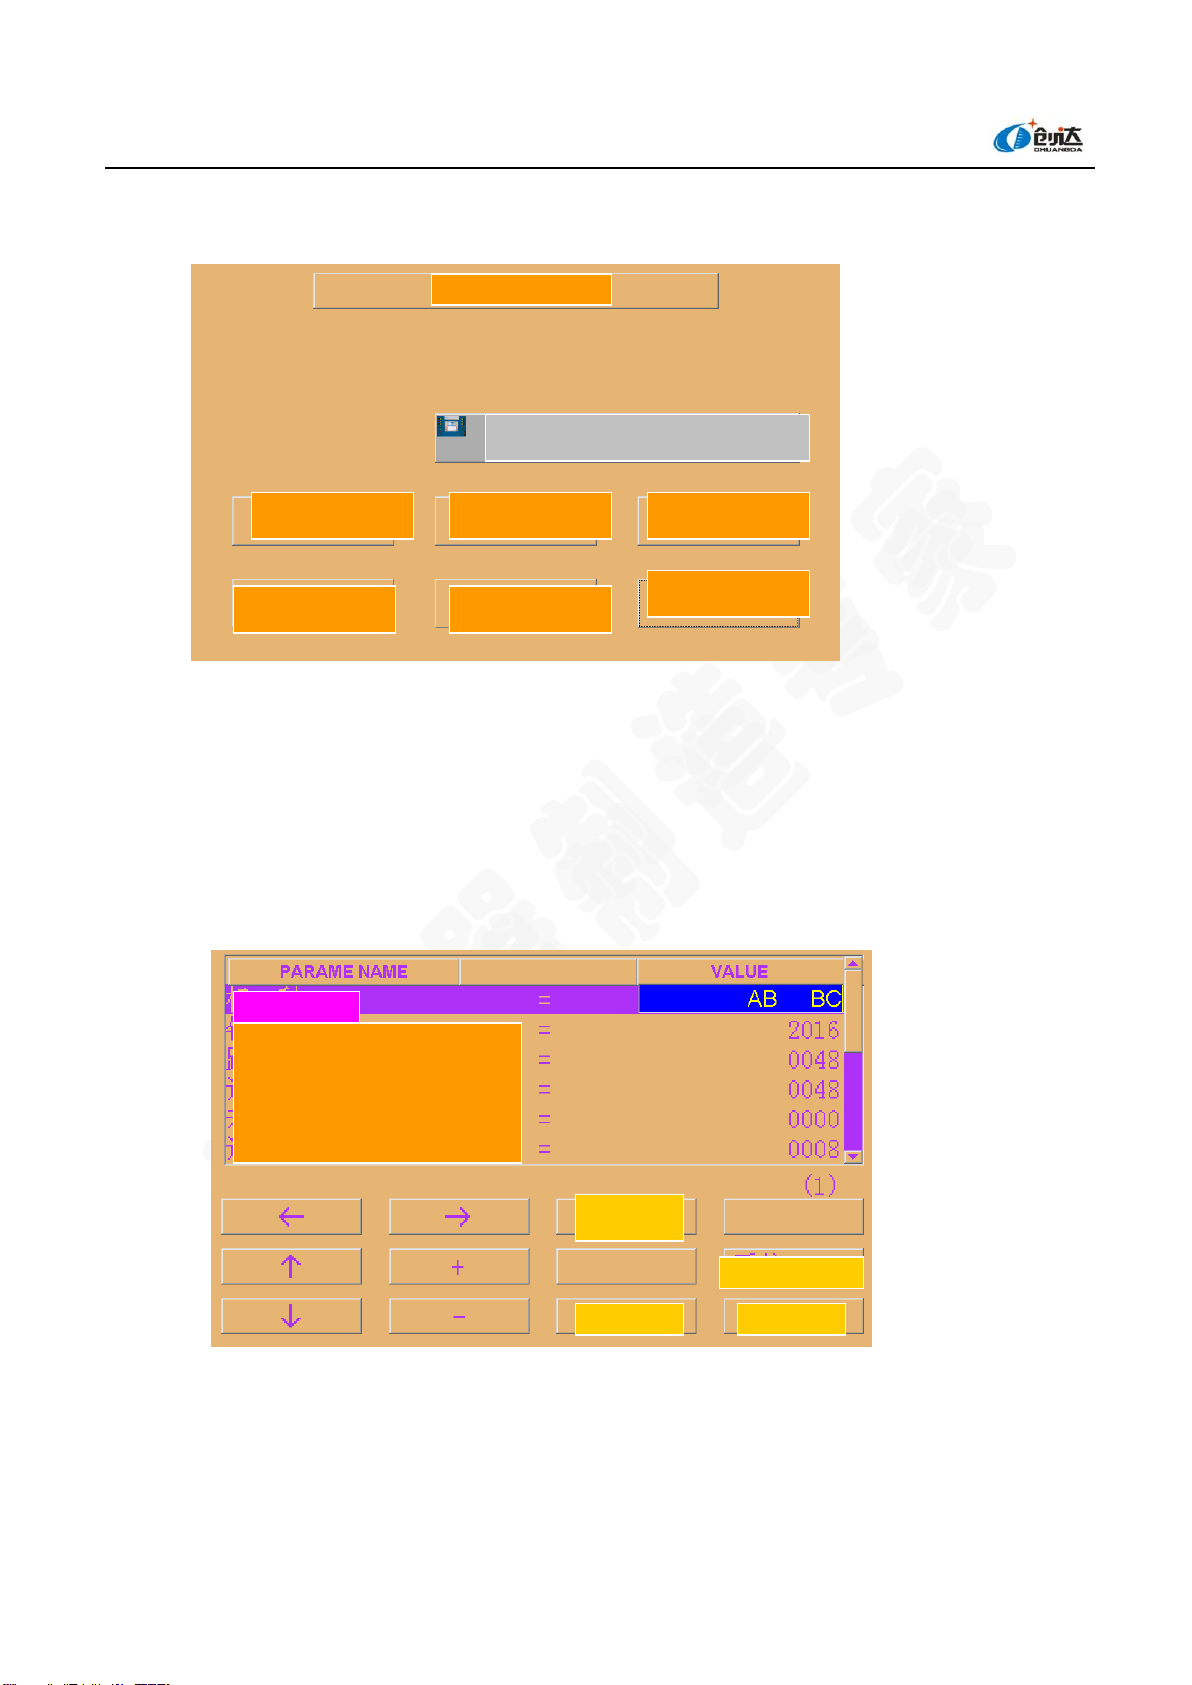
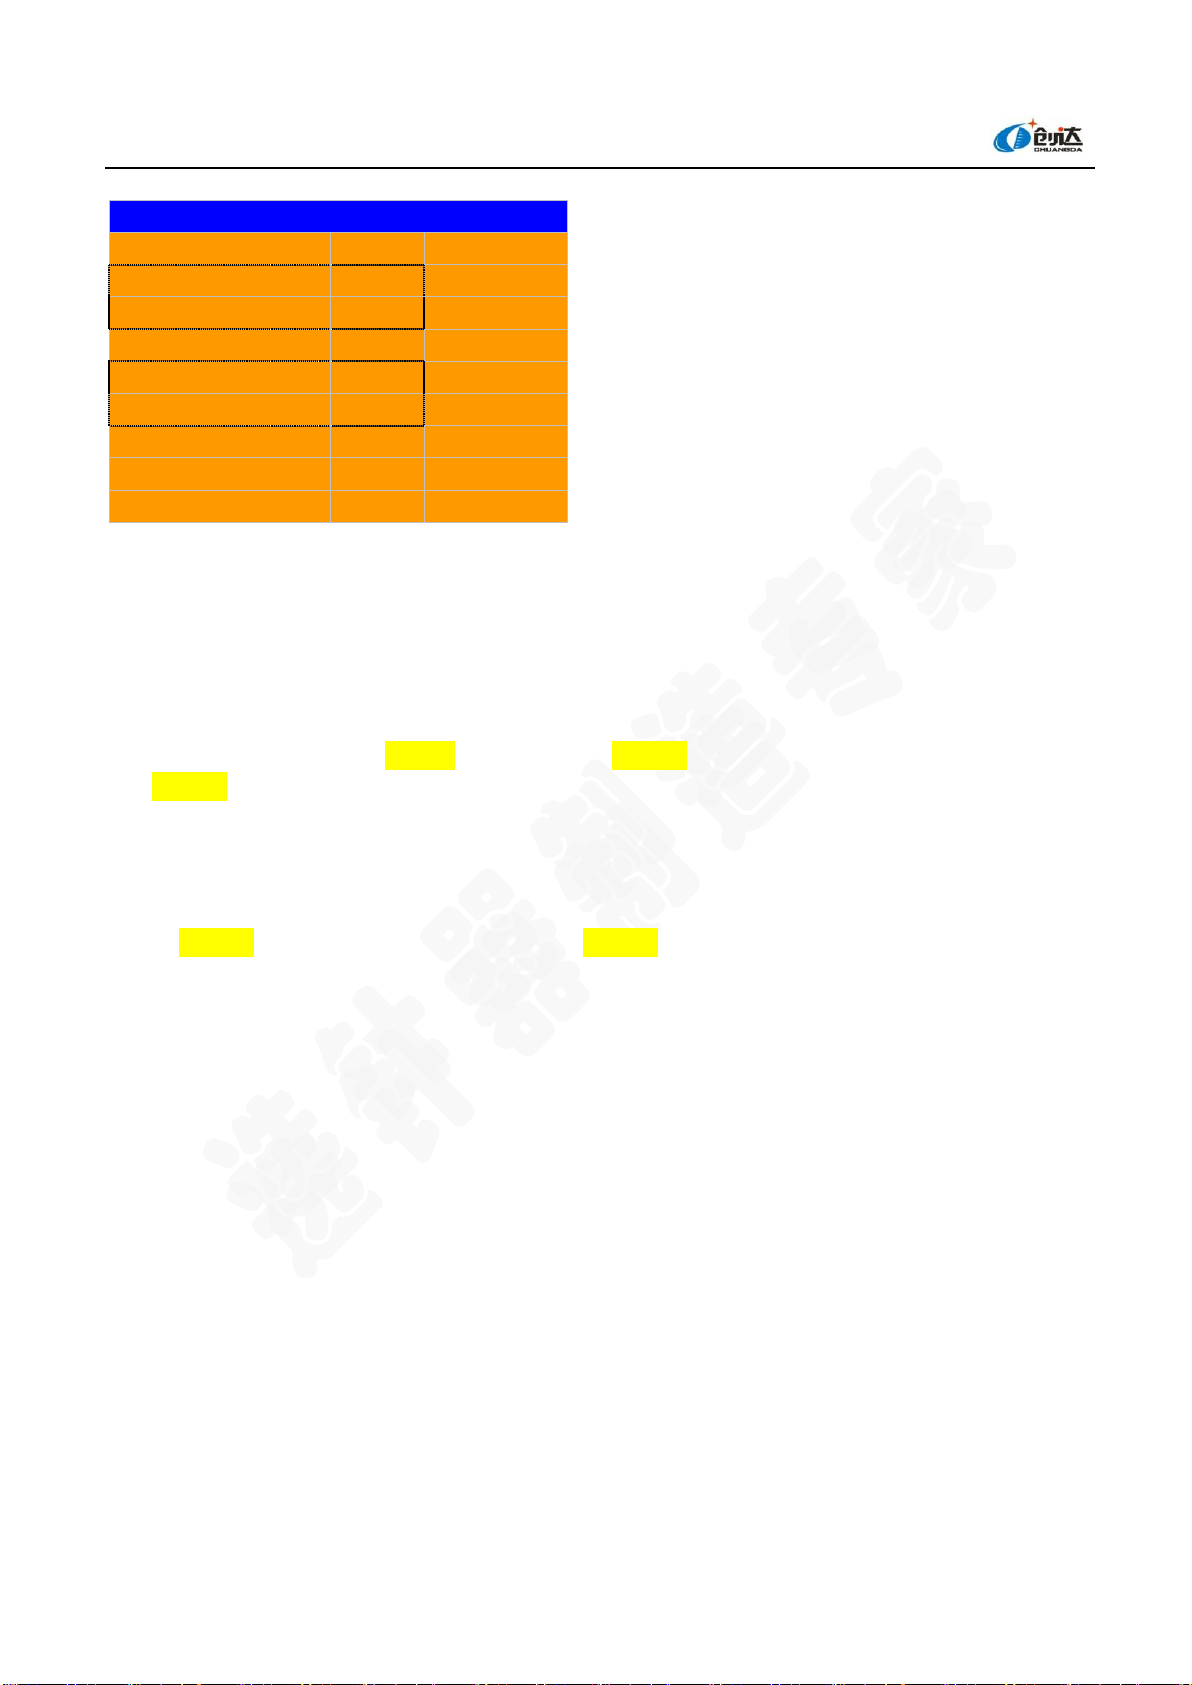
4-1-1 Preliminary Instructions
(Fig. 4)
Each page in this command can be changed to other pages by pressing【Previous page】【 Next page】. However, no
matter at what page, you can directly exit the preliminary instruction revision mode by pressing the [End] key. When
operating, you can use【↑】【↓】【←】【→】keys to move the cursor, use【+】【-】key to modify, or directly
use the numeric keypad to enter.
Function
6. Electrical parameter setting
1. Date
2. Plate making
3. Language/Mode
4. Preliminary Instructions
5. Indicating brightness
End/ESC
Machine type
Needles
Number of units
Number of actuators
Number of used units
Number of needle selection segments
Next page
System/MENU
Blank
End/ESC
Guangdong ChuangdaAutomatic Equipment Co.,Ltd.
10 / 63
Add: D11, New Lighting Source Industrial Basis, Nanhai District, Foshan City, Guangdong Province
Tel: +86- 0757-82629566 82629546 82326616 Fax: +86- 0757-82622156
Note: When wrong data are input, it is unable to quit [preliminary instructions].
①Machine Name: Enter the machine name, using up to 12 characters, and change the text using【+】【-】keys.
②The total needles: Enter the total needles of the machine.
③Number of units: Enter the number of yarn feeder units of the machine.
④Number of actuators: Enter the number of actuators used by the machine. (Note: If it is a 3-functionposition mode,
the number of actuators is two times of the number of units)
2- functionposition mode = 1 functionposition connecting 1 actuator
For example: 48-unit 2- functionposition, the number of units is 48, the number of actuators is 48.
3- functionposition mode = 1 3- functionposition connecting 2 actuator
For example: 48-unit 33- functionposition, the number of units is 48, the number of actuators is 96.
⑤Unused number of units: Input the total number of yarn feeders. (Note: You can also specify the unused units
with custom functions)
⑥Number of actuator segments: Enter the number of actuator segments
⑦Synchronization ratio : Enter the needle cylinder-synchronizer rotation ratio. (i.e., the number of revolutions of
the synchronizer must be the integral multiple of the number of revolutions of the machine)
Method to calculate the number of pulses per stitch: 1024 (number of pulses per revolution of the synchronizer)
×sync ratio / needles
Example: Total needles (1920), synchronization ratio (20), number of pulses per stitch (recommended value is
greater than 7 and smaller than 12) = 1024 * 20 /1920;
Total needles (2640), synchronization ratio (20), number of pulses per stitch (recommended value is greater than
7 and smaller than 12) = 1024 * 26 /2640.
⑧Needle cylinder rotating direction: Observe the direction of rotation of the needle cylinder on the machine and
input.
⑨Synchronizer rotation direction: Observe the rotation direction of the synchronizer and input.
⑩Actuator action setting: This function is temporarily not available, this value is in the range of 0-9999, default is
0.
⑪Bands: Indicates jacquard arrangement and number of pattern groups, please set the appropriate band value
according to the jacquard arrangement and number of pattern groups.
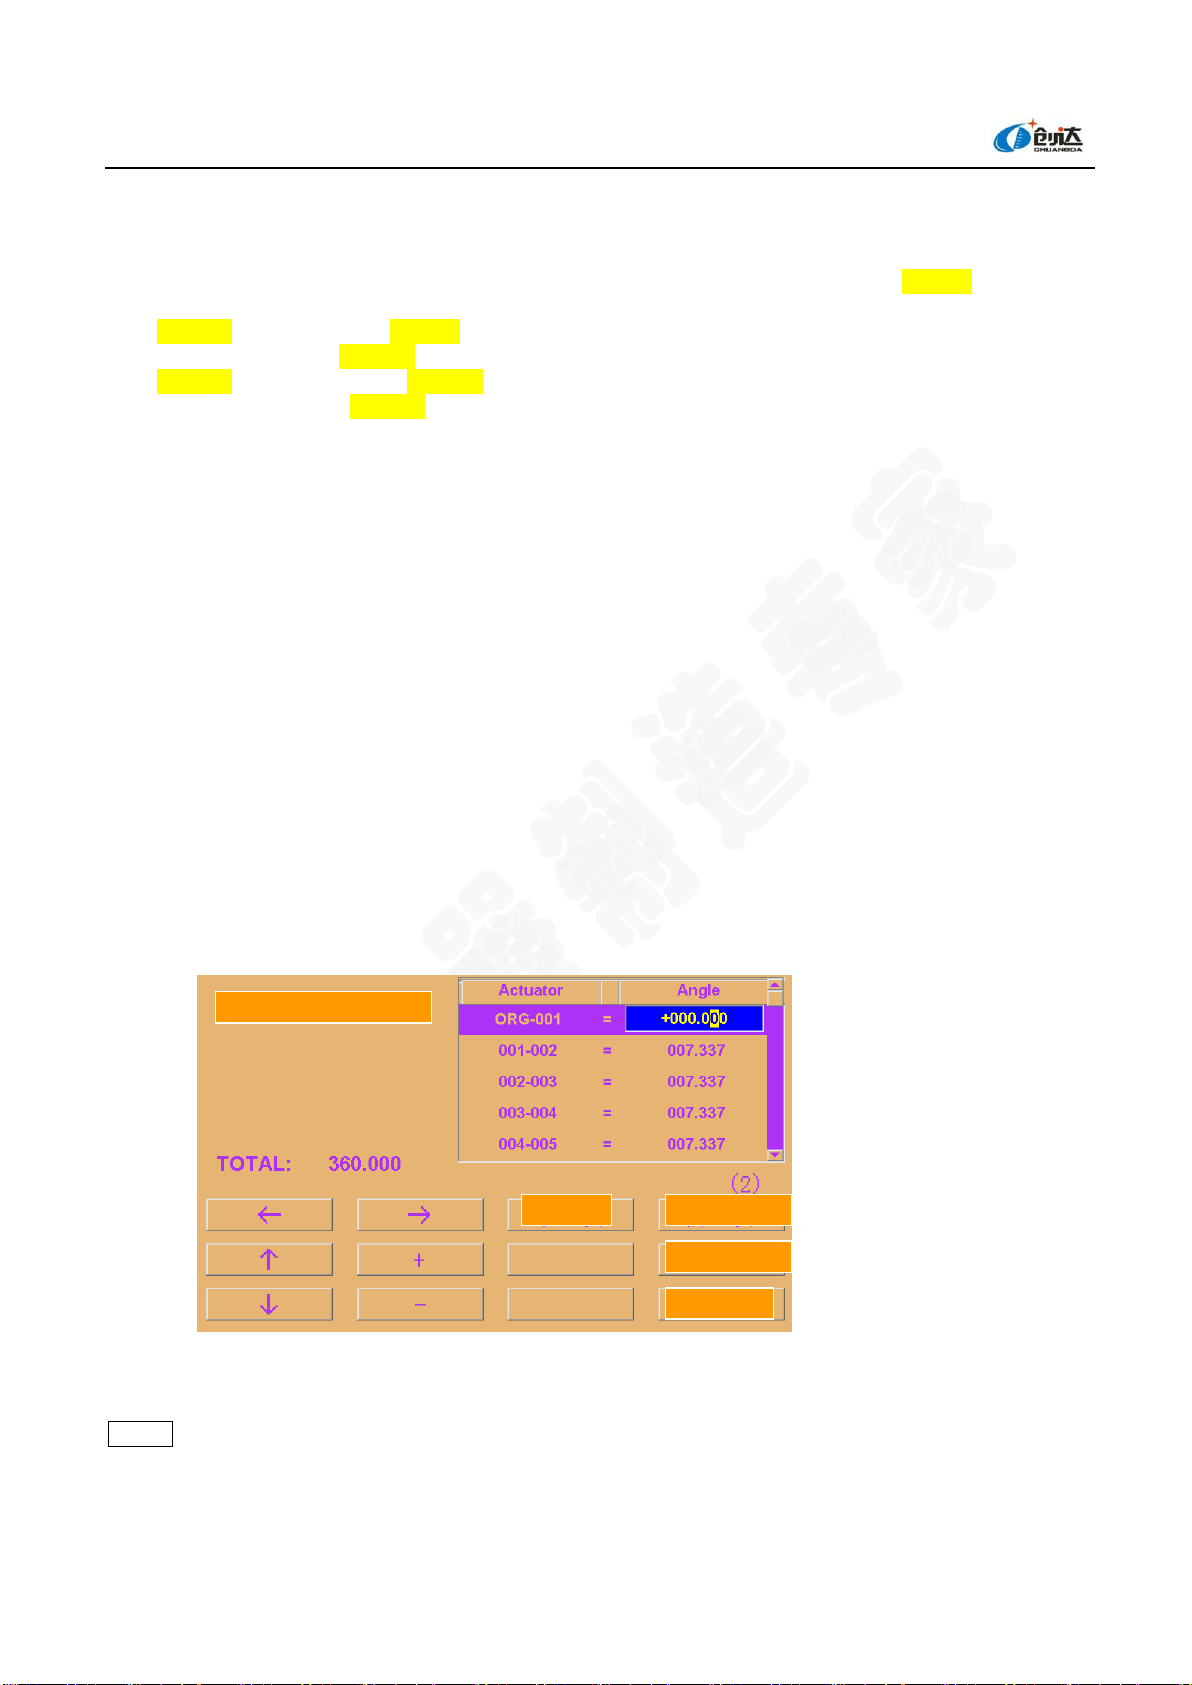
4-1-2ActuatorAngle Setting
Press【Next page】, the following menu will appear on the screen, this menu is used to input the precise mounting
position of the actuator base on the machine.
(Fig. 5)
The angle value from the origin to the first actuator is 000.000. (Note: ORG-001 must be 000.000)
All actuators must be in a 360-degree angle, if any one is not in a 360-degree angle, you cannot end the operation in
this step.
Repeat:This function can be used when you repeat to input the same data. When you press this key, the following
menu will appear on the screen, this function will save you time without the need to manually re-enter the same data.
Actuator angle
Next page
Previous page
Repeat/ MENU
End/ESC
Guangdong ChuangdaAutomatic Equipment Co.,Ltd.
11 / 63
Add: D11, New Lighting Source Industrial Basis, Nanhai District, Foshan City, Guangdong Province
Tel: +86- 0757-82629566 82629546 82326616 Fax: +86- 0757-82622156
Copy & Paste Dialog
Copy parameters
Start:
001
End:
002
Repeat parameters
Start:
003
End:
048
←
→
↑
+
Copy/ENT
↓
-
Cancel
Parameter replication start -- Enter the start line of the data to be duplicated.
Parameter replication end -- Enter the end line of the data to be duplicated.
Parameter-repeat start -- Enter the start line of the data to be filled with "replicate parameters".
Parameter-repeat end -- Enter the end line of the data to be filled with "replicate parameters".
After completing the above input, press the【Set】key.
Note: Differences between the functionposition and three- functionposition actuator angle values:
Two- functionposition actuator
ORG-001 = 000.000
001-002 =Angle values of the first and second sets of actuator.
002-003 = Angle values of the second and third sets of actuator.
003-003 = Angle values of the third and fourth sets of actuator.
* Three- functionposition (Note: Only ceramic piece 3- functionposition actuator)
ORG-001 = 000.000
001-002 =Angle values between the first and second rows of blades of the first set of actuator
002-003 = Angle values between the second row of blades of the first set of actuator and the first row of
blades of the second set of actuator.
003-004 = Angle values between the first and second rows of blades of the second set of actuator
4-1-3Actuator Pattern Setting
Press the 【Next page】key, the follow menu will appear on the screen
(Fig. 6)

Guangdong ChuangdaAutomatic Equipment Co.,Ltd.
12 / 63
Add: D11, New Lighting Source Industrial Basis, Nanhai District, Foshan City, Guangdong Province
Tel: +86- 0757-82629566 82629546 82326616 Fax: +86- 0757-82622156
(Fig. 7)
The screen displays the ideal position of the actuator cutter head after preheating and reset. At the center of the
screen are the colors of the codes at the right end, an inverted numbers indicates the status of actuator.
Repeat –You can use this key to enter the same information, the operation method is shown in Figure 6.
You can use【↑】【↓】keys to select a certain actuator number, use【+】【-】keys to modify the pattern .
After selecting the pattern, you can select "Welt", "Knit", "1X1A", "1X1B" and "Custom".
When you select "Custom”, the displayed menu will change as shown below:
(Fig. 8)
In this interface, press【↑】【 ↓】keys to move the "←" arrow , use【+】【 -】keys to change the state. After entering
a custom pattern, press the【Set】key to save and return to the menu in Figure 7.
Note: Following are the differences between two- functionposition and three- functionposition actuator.
● Two- functionposition actuator
ACT 1 = the first set of actuator
ACT 2 = the second set of actuator
Actuator
Pattern setting
:Knit
:Welt
Welt
Knit
1X1A
Knit
Welt
Next page
Previous page
Repeat/ MENU
End/ESC
Actuator
Pattern setting
:Knit
:Welt
Next page
Previous page
Set/ENT
Return
Custom
Guangdong ChuangdaAutomatic Equipment Co.,Ltd.
13 / 63
Add: D11, New Lighting Source Industrial Basis, Nanhai District, Foshan City, Guangdong Province
Tel: +86- 0757-82629566 82629546 82326616 Fax: +86- 0757-82622156
ACT 3 = the third set of actuator
ACT 4 = the fourth set of actuator
● Three- functionposition actuator (Note: only ceramic 3- functionposition actuator)
ACT 1 = the first row of blades of the first set of actuator
ACT 2 = the seconds row of blades of the first set of actuator
ACT 3 = the first row of blades of the second set of actuator
ACT 4 = the seconds row of blades of the second set of actuator
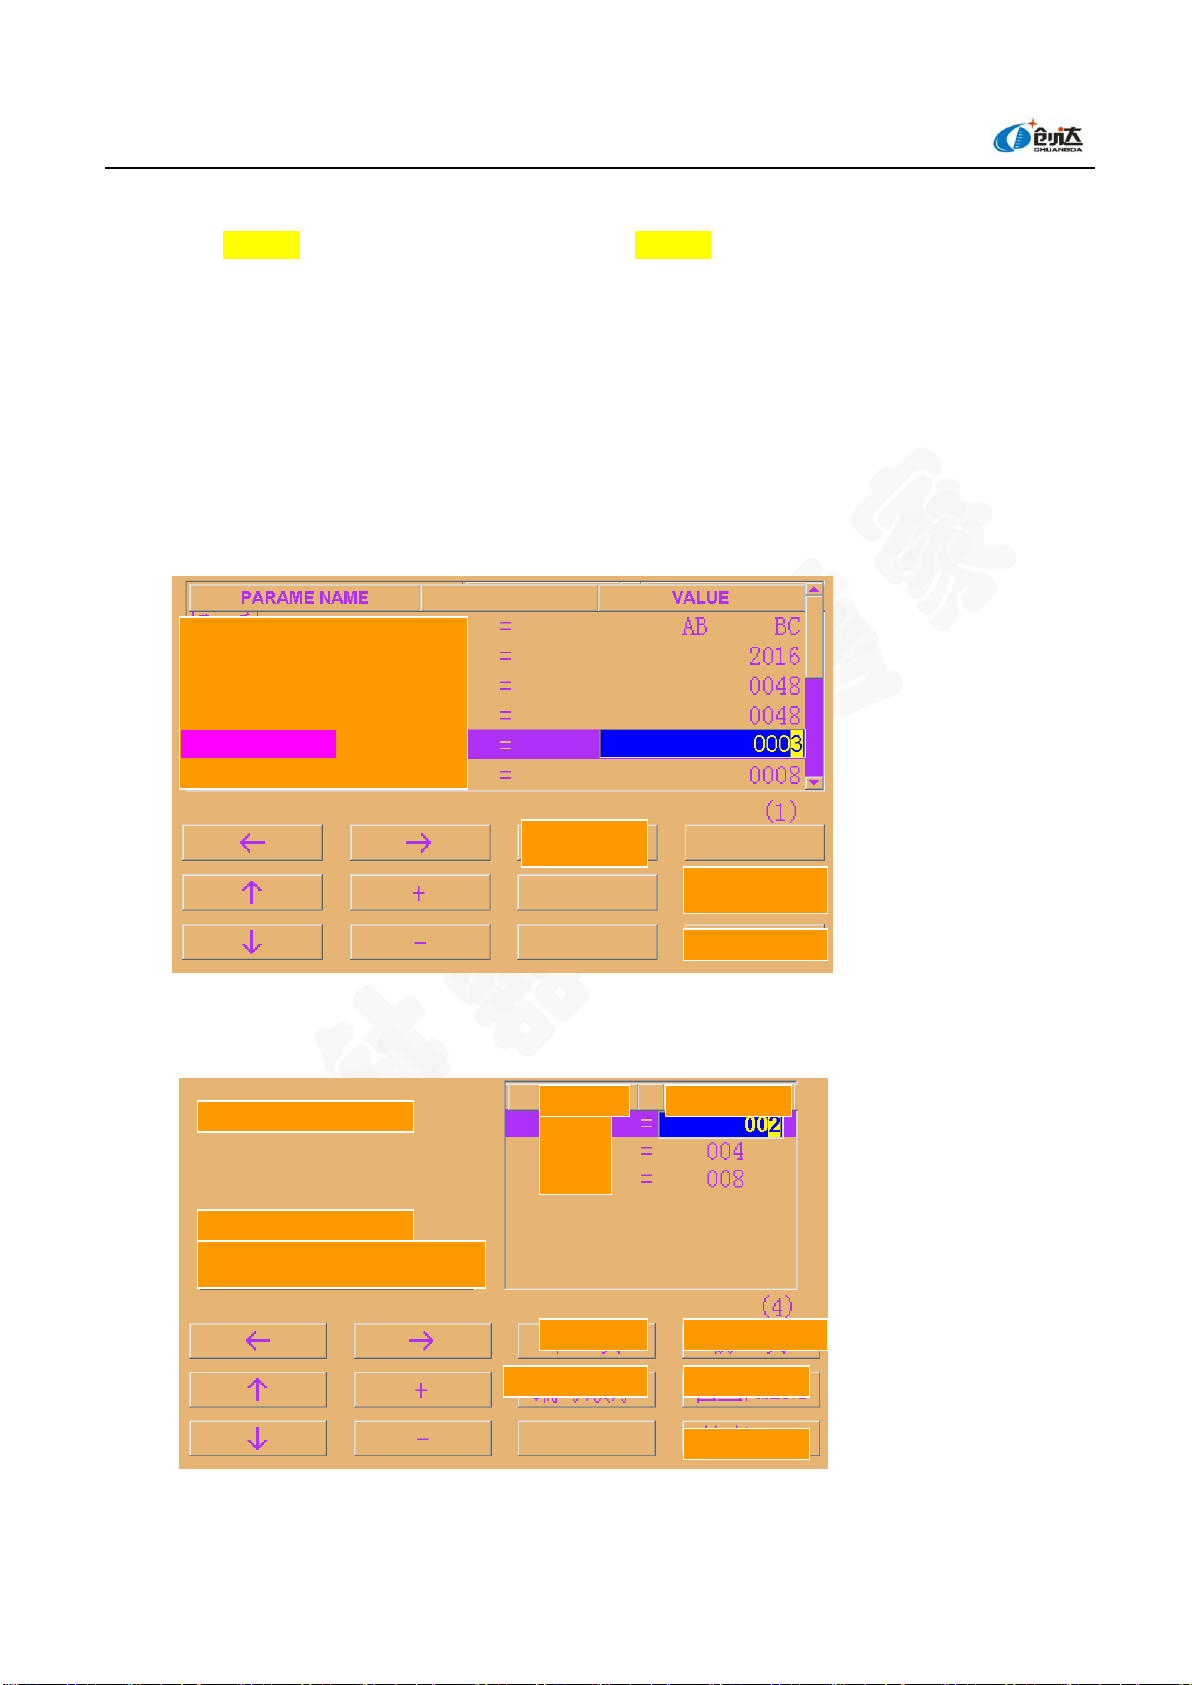
4-1-4 Unused Unit Setting
This menu is used to enter the numbers of the unused units set in the preliminary instructions.
For example, if you input 3 when setting the unused units in the preliminary instructions, then you can enter
the serial numbers of the unused units as shown in the following diagram.
(Fig. 9)
Press 【Next page】until enter the "input unused unit No." menu:
(Fig. 10)
Machine type
Needles
Number of units
Number of actuators
Number of used units
Number of needle selection sections
Next page
System/MENU
End/ESC
Input unused unit No.
Unused unit functions
Fully enclosed unit welt/ PGUP
Serial No.
Unit number
Unit 1
Unit 2
Unit 3
Next page
Previous page
Numbering sequence
Check/MENU
End/ESC

Guangdong ChuangdaAutomatic Equipment Co.,Ltd.
14 / 63
Add: D11, New Lighting Source Industrial Basis, Nanhai District, Foshan City, Guangdong Province
Tel: +86- 0757-82629566 82629546 82326616 Fax: +86- 0757-82622156
Set the actuator to be enclosed, and press the following keys to check:
Guangdong ChuangdaAutomatic Equipment Co.,Ltd.
15 / 63
Add: D11, New Lighting Source Industrial Basis, Nanhai District, Foshan City, Guangdong Province
Tel: +86- 0757-82629566 82629546 82326616 Fax: +86- 0757-82622156
Check - Check for data entry errors, if you enter wrong data, an error message will be displayed.
Numbering sequence - When unit numbers are not entered in sequence, you can press this key, the computer
will automatically arrange and display them in sequence.
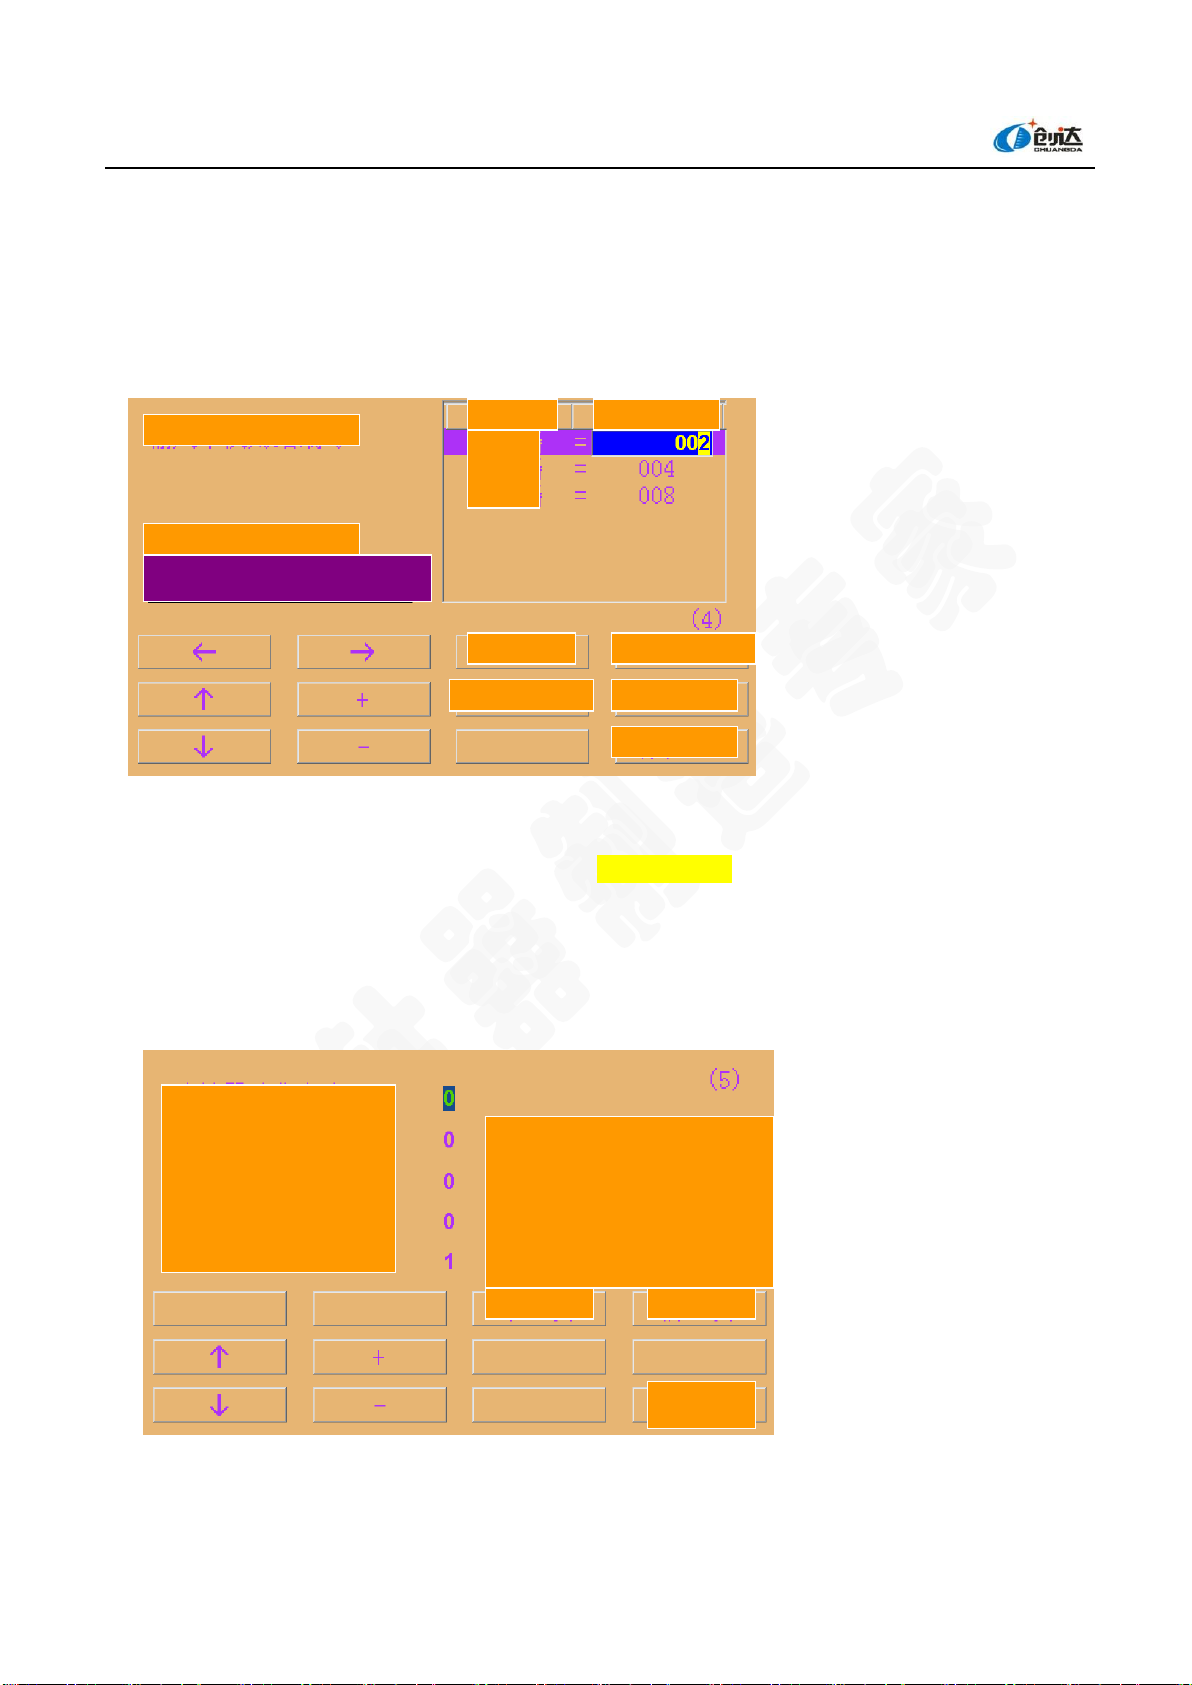
If you do not use【Check】【 Numbering sequence】keys and exit this menu,, the computer automatically checks
the input data .If you enter wrong information , you can not exit this menu.
(Fig. 11)
The work mode of the enclosed actuator can be selected through "unused unit action function".
If the key is not pressed, all the enclosed actuator will enter welt mode.
If the key is pressed, the enclosed actuator will select needles according to the movement direction set in the
"actuator pattern setting".
4-1-5 Special Configuration Change
(Fig. 12)
This depends on the knitting machine mode, and function of the cutter head at the top to the actuator.
Actuator blade movement direction
Input unused unit No.
Unused unit functions
Serial No.
Unit number
Unit 1
Unit 2
Unit 3
Next page
Previous page
Numbering sequence
Check/MENU
End/ESC
Enclosed unit custom knitting/PGUP
Actuator movement direction
Actuator type
Second band
Origin sensor
Actuator data format
0=Normally mounted 1=Reversely mounted
0=Open 1=Close
0=Open 1=Close
0=Ceramic pieces 1 = electromagnet
Next page
Previous page
End/ESC
Guangdong ChuangdaAutomatic Equipment Co.,Ltd.
16 / 63
Add: D11, New Lighting Source Industrial Basis, Nanhai District, Foshan City, Guangdong Province
Tel: +86- 0757-82629566 82629546 82326616 Fax: +86- 0757-82622156
= 0: Knitting will be carried out when the cutter head of the actuator moves upward; welting will be carried
out when the cutter head of the actuator moves downward.
= 1: Knitting will be carried out when the cutter head of the actuator moves downward; welting will be
carried out when the cutter head of the actuator moves upward.
Actuator type
This function is only suitable for 3- functionposition 16-segmentstep actuator.
= 0: The needle-selecting blade moves from the bottom of the first row.
= 1: The needle-selecting blade moves from the bottom of the second row.
Second band
This function is used in the following circumstances.
The band represents the number of rows of the jacquard pieces on the needle cylinder. For example, if a
machine has 2000 needles, 8 segmentstep of actuator, the band is 250, however, if the machine has 2006 needles, the
bank only process 2000 needles, and so the machine needs a second bank to process the 6 surplus needles.
= 0: The second band is used
= 1: The second band is not used
Origin sensor
Origin sensor of the conductor (usually set to 0)
=0: When it reaches origin, zero sensor switch glows , zero signal is valid
=0: When it reaches origin, zero sensor switch goes off, zero signal is valid
Actuator data format
= 0: Driving the ceramic chip actuator
= 1: Driving the solenoidelectromagnet actuator
4-1-6 Set Number of Units/Grouping
In this menu, you can enter the number of actuator units control by each group, each port can control up to 72
actuators.
(Fig. 13)
For example, 48-unit 2- functionposition
Set number of units/groups
Unit No.
This machine supports 2-position 144-unit and 3-position 72-unit
Next page
Previous page
End/ESC
Guangdong ChuangdaAutomatic Equipment Co.,Ltd.
17 / 63
Add: D11, New Lighting Source Industrial Basis, Nanhai District, Foshan City, Guangdong Province
Tel: +86- 0757-82629566 82629546 82326616 Fax: +86- 0757-82622156
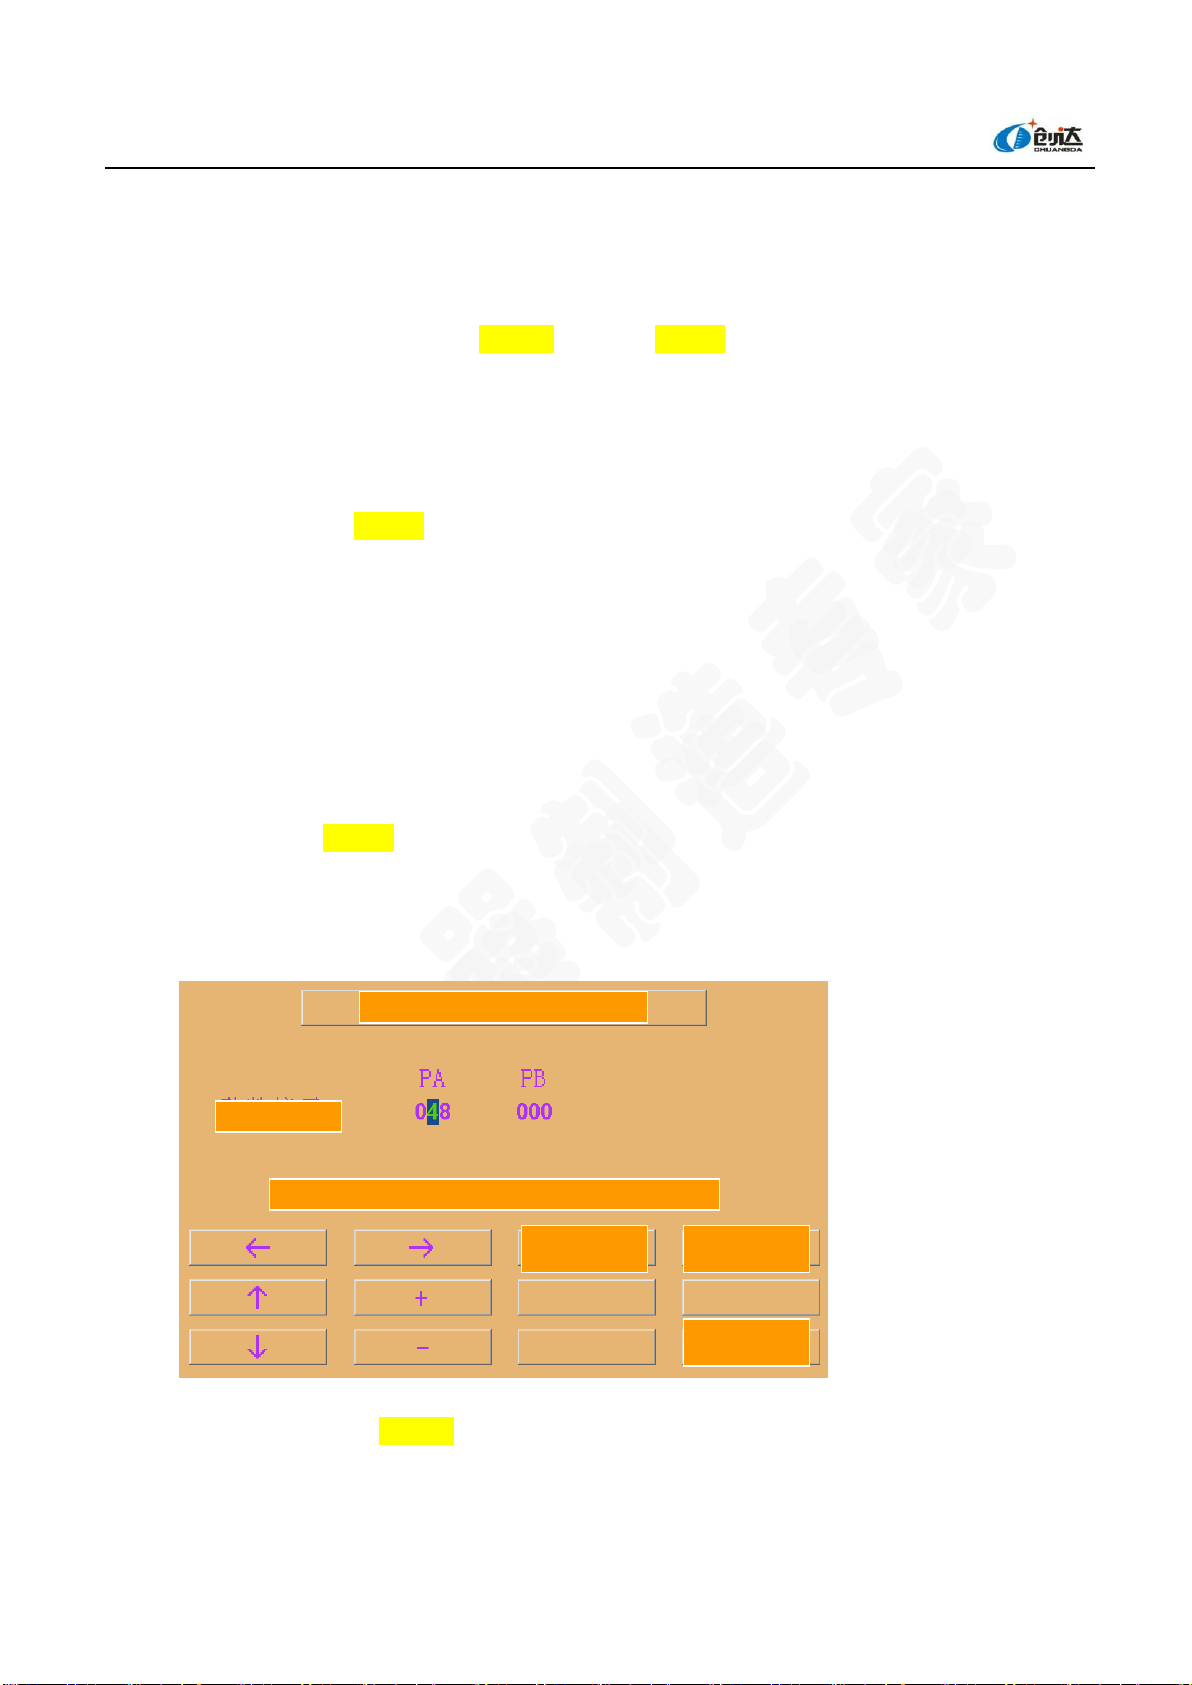
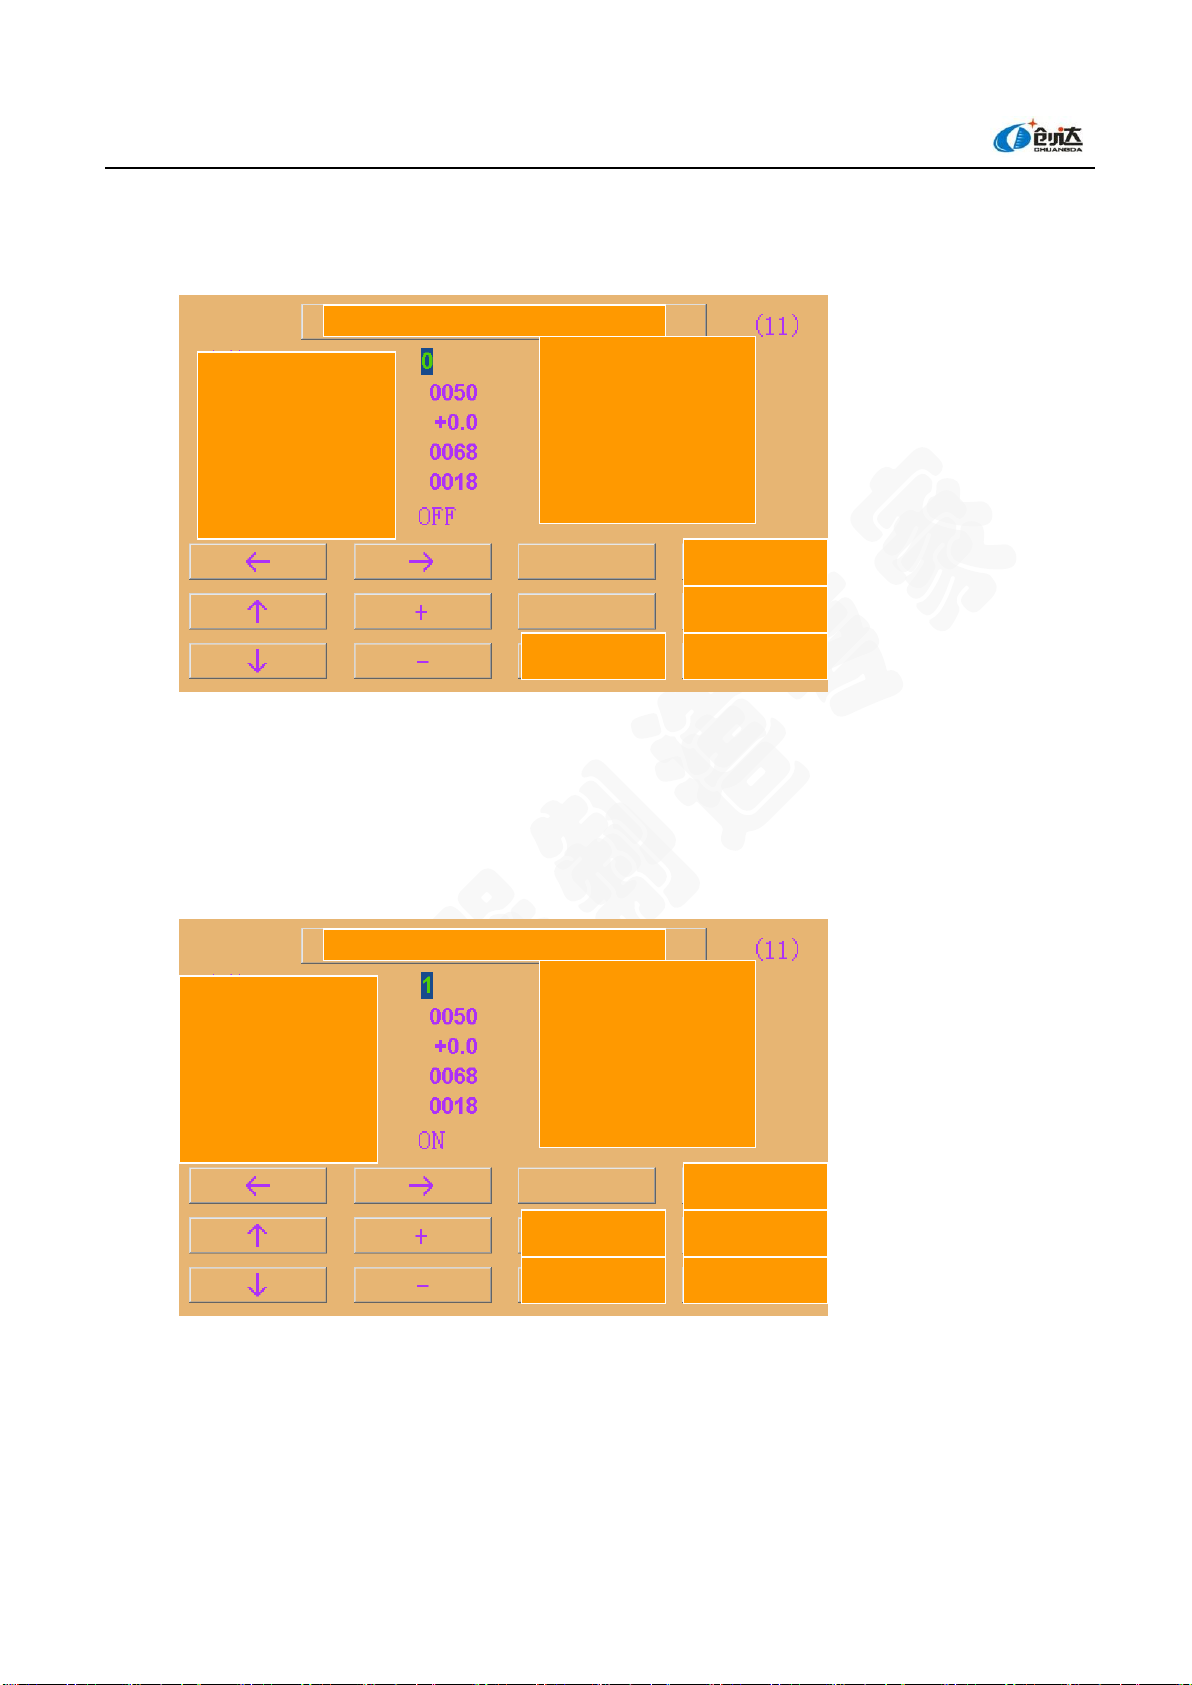
4-1-7 Synchronizer Origin Adjustment
Press [Next] to enter the following menu
(Fig. 14)
When the machine needs to re-align the origin, the origin adjustment function of the software can be used for
quick adjustment.
Firstly, set the "function" to 1, thus you can open the software origin adjustment function. Start the machine to
reach the mechanical zero point where the "Zero point Switch" displays ON, at this time the display interface
will change, as shown below:
(Fig. 15)
Press the 【Adjust】key to record the current value of the origin, as shown below, and the origin alignment is
completed this time.
Synchronizer origin adjustment settings
Function
Data adjustment
Offset value
Absolute value
Value adjustment
Zero position switch
(0 =OFF, 1 = ON)
(pulse, 0 -1023)
(NEEDLE, + = FAST)
(pulse, 0 -1023)
(pulse, 0 -1023)
Previous page
Clear
End/ESC
Cancel
Synchronizer origin adjustment settings
Function
Data adjustment
Offset value
Absolute value
Value adjustment
Zero position switch
(0 =OFF, 1 = ON)
(pulse, 0 -1023)
(NEEDLE, + = FAST)
(pulse, 0 -1023)
(pulse, 0 -1023)
Previous page
Clear
End/ESC
Cancel
Adjustment/ENT
Guangdong ChuangdaAutomatic Equipment Co.,Ltd.
18 / 63
Add: D11, New Lighting Source Industrial Basis, Nanhai District, Foshan City, Guangdong Province
Tel: +86- 0757-82629566 82629546 82326616 Fax: +86- 0757-82622156
(Fig. 16)
If the pattern knitted by the machine is wrong, you can fine-tune the machine zero-point by increasing or
decreasing the value of the "adjustment data".
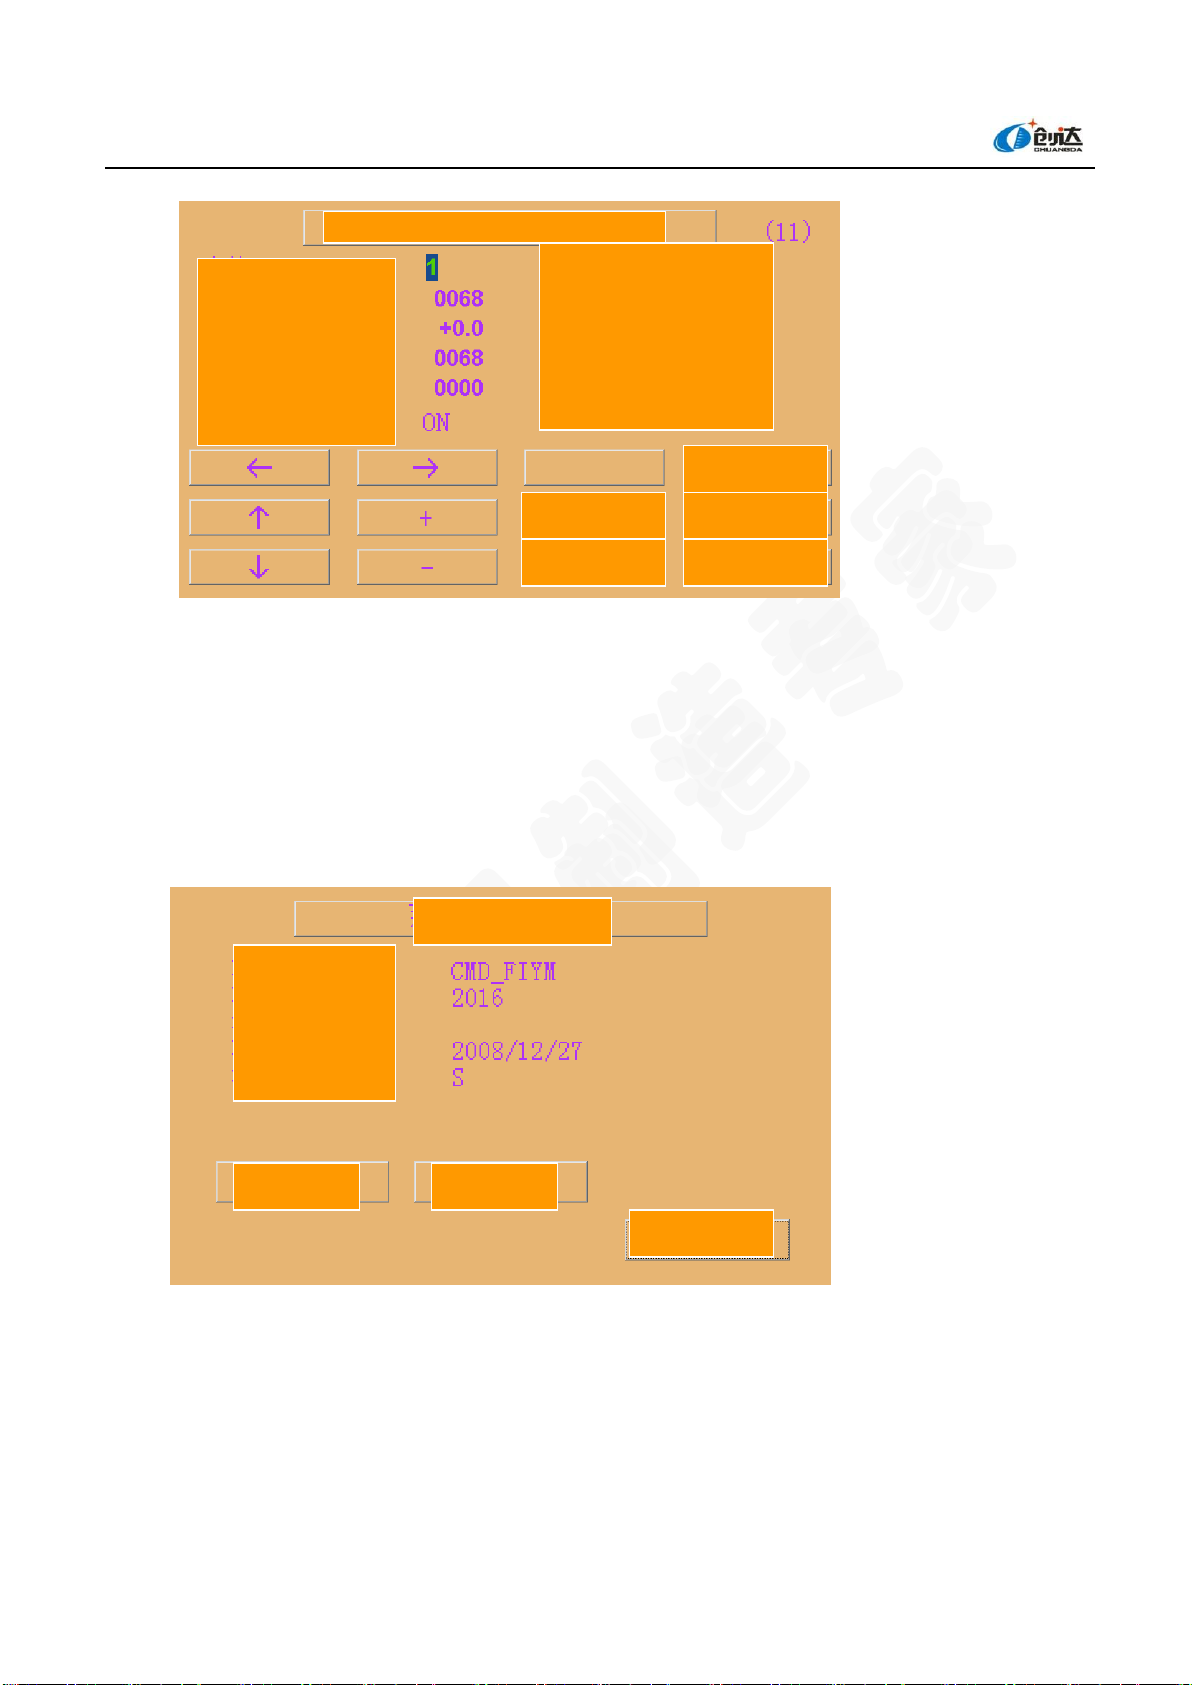
4-1-8 Save Jacquard Parameters toA USB Memory
In the "preliminary instructions" interface (Figure 4), Press the【System】key to display the following menu
(Fig. 17)
Insert a USB Memory, press the【output】key, the hot will show the following when it detects the USB
Memory:
Synchronizer origin adjustment settings
Function
Data adjustment
Offset value
Absolute value
Value adjustment
Zero position switch
(0 =OFF, 1 = ON)
(pulse, 0 -1023)
(NEEDLE, + = FAST)
(pulse, 0 -1023)
(pulse, 0 -1023)
Previous page
Clear
End/ESC
Adjustment/ENT
Cancel
System functions
Pattern name 1
Pattern name 2
Mechanical No.:
Pattern name 4
Machine type:
1 Input
2 Output
End/ESC
Guangdong ChuangdaAutomatic Equipment Co.,Ltd.
19 / 63
Add: D11, New Lighting Source Industrial Basis, Nanhai District, Foshan City, Guangdong Province
Tel: +86- 0757-82629566 82629546 82326616 Fax: +86- 0757-82622156
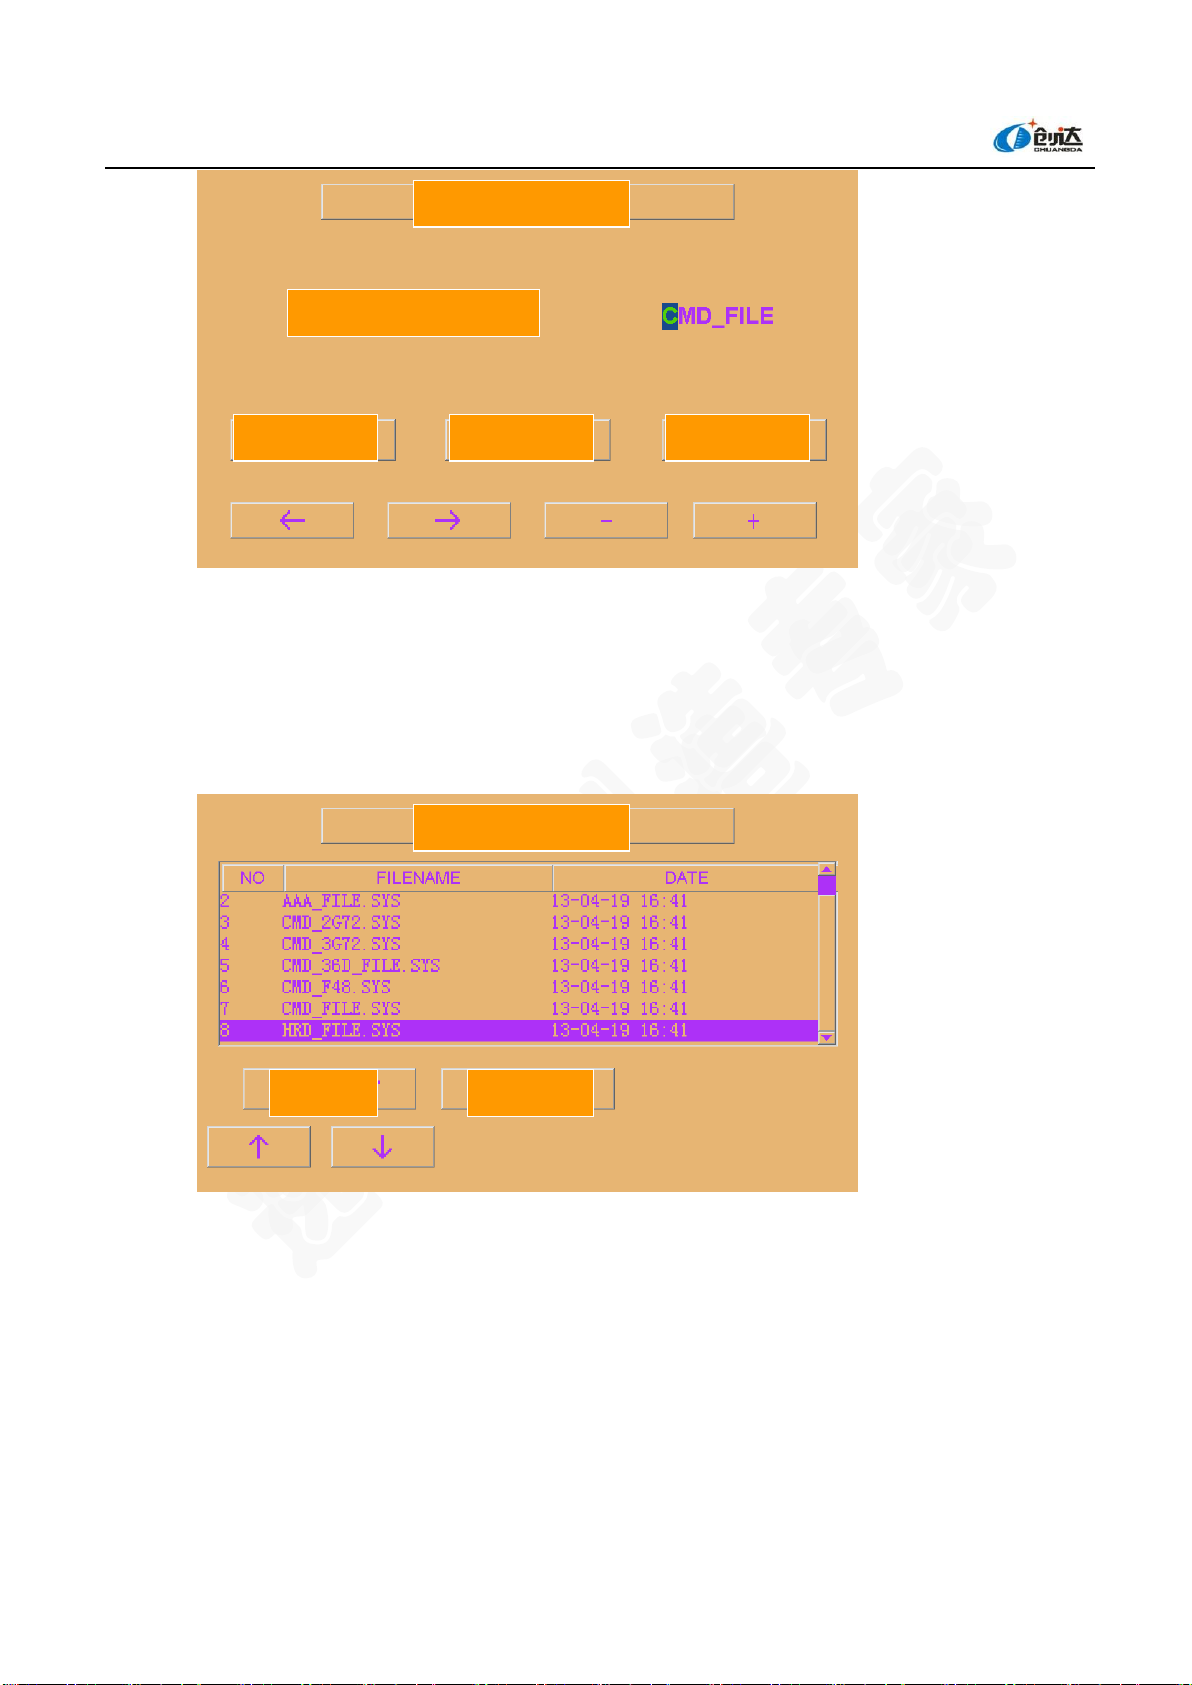
(Fig. 18)
Use 【+】, 【-】, 【←】, 【→】keys to modify the system parameter file names. When pressing the "WAC
format" key, the system files will be packed in WAC format; when pressing the "CMD format" key, the system files
will be packed in the format set by our company. At last, save them into the USB Memory
4-1-9 Load Jacquard Parameters from a USB Memory
(Fig. 19)
Insert a USB memory, click【Input】key in the interface in Figure 17 , after the USB memory is detected by
the computer, the names of the system parameter files will be listed (Figure 19) , use【↑】【 ↓】keys to select
the correct parameters, and then press the 【Execute】.
4-2. Electrical Parameter Setting
In the "memory function" interface, click 【Electrical parameter setting】to enter the electrical parameter setting
menu:
System functions
System parameter file name:
1WAC format
2CMD format
Cease
System functions
Run/ENT
Cease/ESC

Guangdong ChuangdaAutomatic Equipment Co.,Ltd.
20 / 63
Add: D11, New Lighting Source Industrial Basis, Nanhai District, Foshan City, Guangdong Province
Tel: +86- 0757-82629566 82629546 82326616 Fax: +86- 0757-82622156
4-2-1 Oil Pump and Machine Leaning Cleaning Setting
(Fig. 20)
Each page in this command can be changed to other pages by pressing【Previous page】【Next page】.
However, no matter at what page, you can directly exit the preliminary instruction revision mode by pressing
the [End] key. When operating, you can use【↑】【↓】【←】【→】keys to move the cursor, use【+】【-】
key to modify, or directly use the numeric keypad to enter.
The oil pump has three operation modes for choice
0 - continuous work mode;
1 - Second interval work mode: The pump starts work according to the second interval work time and stops
work according to the interval stop time;
2 –Revolution interval work mode: The pump starts work according to the revolution interval work time
and stops work according to the interval stop time.
Set cleaning revolutions Carry out machine cleaning according to the preset value.
Oil pump
Oil pump operation mode
Oil pump second-interval stop
Oil pump second-interval work
Oil pump ring-interval stop
Set cleaning revolutions
Next page
End/ESC
Table of contents


