Connects2 CAM-40 User manual

Connects2Vision
www.c2vision-eu.comwww.c2vision-eu.com
User Manual
Universal wide-angle brake light camera
2-in-1 solution: reversing camera / brake light.
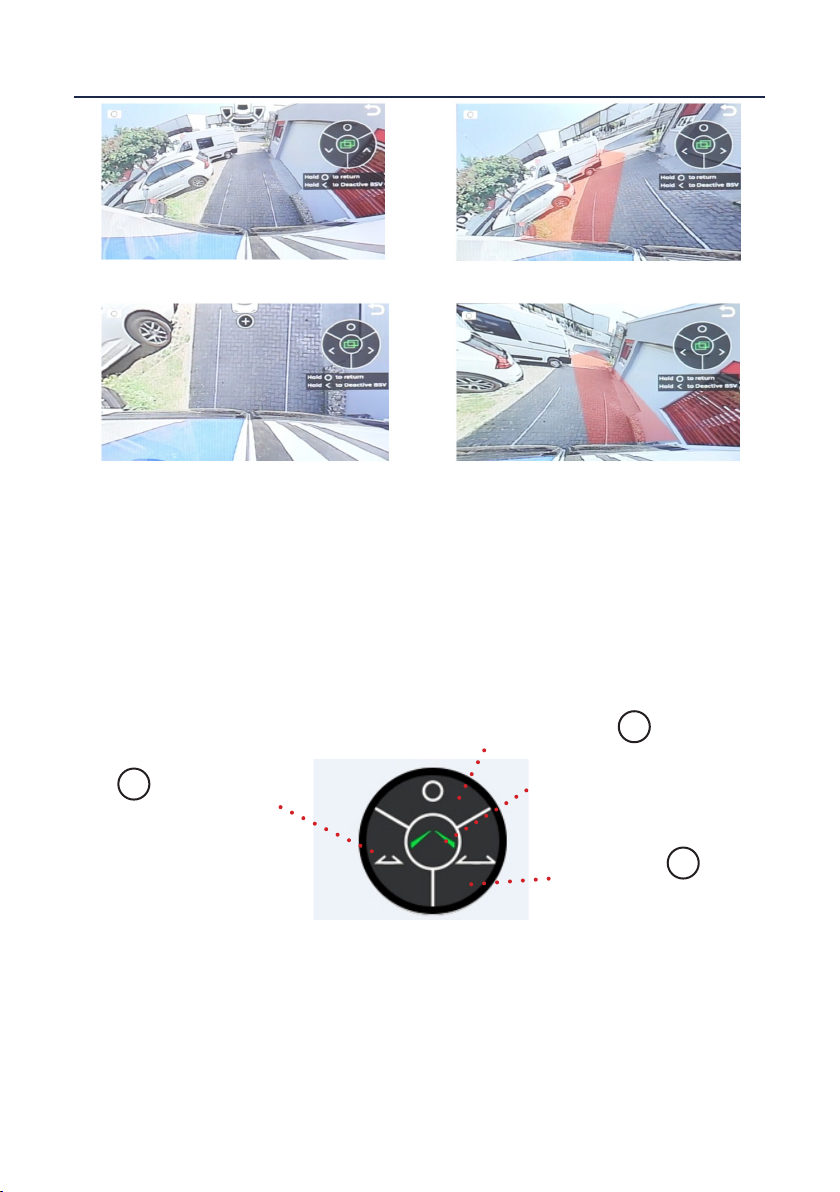
Includes 5 different viewing angles with wireless controller.
PRODUCT FEATURES:
CAM-40
Image Sensor: 1/4”
TV Lines: 480
Resolution: 720 x 480
Minimum Illumination: 0.1 Lux
TV System: NTSC
Waterproof Rating: IP67
Viewing Angle: 210 Degrees (Horizontal) 140 Degrees (Vertical)
Parking Lines: Yes (Removable)
Image Adjustment: Yes (up to 5 different viewing modes)
Enhanced Performance In Low Light: Yes
Operating Voltage: 12-24V DC (Negative Ground)
Operating Temperature: -20 Degrees C to +75 Degrees C
Prior to Installation
Read the manual prior to installation. Technical knowledge is necessary for installation. The place
of installation must be free of moisture and away from heat sources. Please ensure you use the
correct tools to avoid damage to the vehicle or product.
Connects2 can not be held responsible for the installation of this product.
Technical Support
Connects2 want to provide a fast and suitable resolution should you encounter any technical
issues. With this in mind, when contacting Connects2, try to provide as much Information as
possible. This will speed up the process and help us to help you.
Please use our dedicated online technical support centre: support.connects2.com
DISCLAIMER:
PRODUCT INFORMATION:
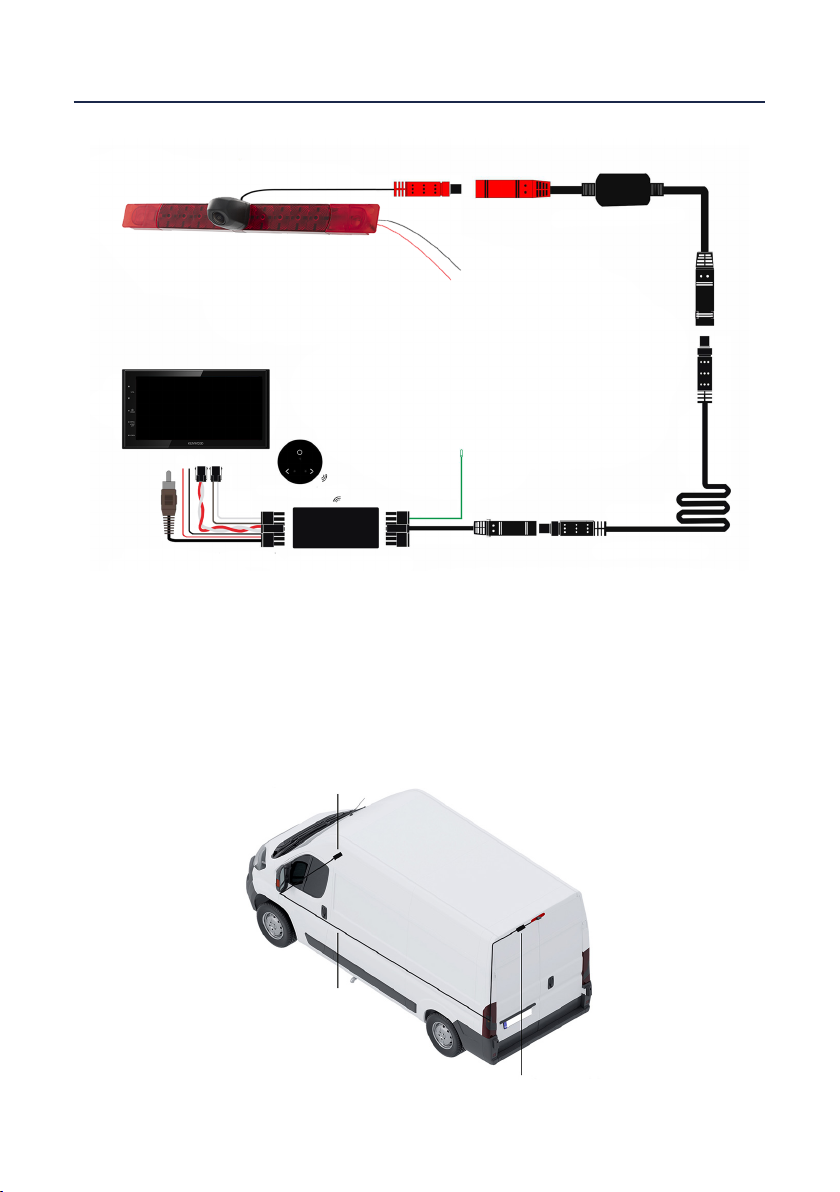
The CAM-40 is a wide-angle universal brake light camera, suitable for tment to
most cars & vans. The camera has a resolution of 720 x 480 and a eld of view of
210 degrees giving the driver a clear view of the rear of the vehicle. The CAM-40
also utilises several different camera views to assist the driver in manoeuvres in-
cluding: Birds eye, wide angle, reversing, blind spots and standard driving mode.

2
Connects2Vision
www.c2vision-eu.com
CAM-40
Extension Cable
Power Adapter
Cable
Control
Unit
Wireless Controller
(Mount on dashboard)
Control Unit
Extension Cable
Power Adapter
Cable
Vehicle Connection Overview
Wiring Diagram
INSTALLATION
Red Acc 12V Connect to vehicle 12V Accessory feed
Black Ground Connect to source of ground
Brown/White N/A N/A (wire not needed)
Red (Twisted) CAN + Connect to rear of OBD (see diagram on Page 3)
White (Twisted) CAN - Connect to rear of OBD (see diagram on Page 3)
Brown RCA Video In Connect to head unit’s video input connection
Source of 12V
reverse signal
for brake light
Ground
‘Reverse trigger’ wire
needs to be attached
to source of Reverse

3
Connects2Vision
www.c2vision-eu.comwww.c2vision-eu.com
USING THE WIRELESS CONTROLLER
The wireless controller included in the kit can be used to change the viewing mode of
the camera, as well as adjust key parameters for each viewing mode.
To bring up the HUD menu, put
the vehicle into reverse gear and
press A.
Note: The HUD menu will time-out after
3 seconds to allow an uninhibited view
of the camera image.
Press the Abutton to bring the HUD
menu back onto the screen.
The currently selected viewing mode is displayed by the icon in the centre of the HUD
menu. This will default to Driving/Rear-View mode, or to Reversing mode when in reverse
gear.
To change the camera mode, whilst the vehicle is in reverse gear, press Bor Cto cycle
through the Reversing, Wide Angle and Birds-Eye viewing modes.
Start-Up
HUD Menu
Switch to
Wide Angle
Switch to
Birds-eye
Go to Settings
Currently selected view
Viewing Modes
Reversing
(Select from HUD Menu)
Driving/Rear-View
(Default view when not in reverse)
A
B
C
Connecting CAN-Bus Wiring
FRONT OF OBD CONNECTOR
87654321
12 11 10 9
16 13
1415
Locate the vehicle’s OBD port
and unscrew/remove the female
connector.
On the reverse of the connector
(the side where wiring enters it),
connect the CAN + (red) and CAN
- (white) wires from the harness
to the locations specied in the
diagram (Pins 1and 9).
INSTALLATION

4
Connects2Vision
www.c2vision-eu.com
Adjusting Settings
To adjust settings for all viewing modes, press Afrom the HUD menu to enter the settings
menu.
Once in the settings menu, short press Ato cycle through the various settings screens
available. Screens include camera angle and position for each mode, and guideline
width for parking lines.
Once in a settings screen, the selected setting is indicated by the icon in the centre of
the display. The parameters can be adjusted with Band C.
To return to the previous screen, Press and hold A.
Activating/Deactivating Blind Spot View (BSV) Mode
When in any of the settings screens, a long press of Bwill activate or deactivate BSV
(Blind Spot View).
When active, this will trigger the blind spot camera image when an indicator is activated
and the vehicle is moving at a speed of over 40km/h.
When inactive, using the indicators will not trigger the blind spot view and the camera
will remain in Driving/Rear-View mode.
Note: this function will only work if the CAN-Bus wiring is connected.
Move to next setting
(Short Press)
Return to previous
(Long Press)
Adjust parameter
Adjust paramater
(Short Press)
Activate/Deactivate BSV
(Long Press)
Currently selected setting
Birds-Eye
(Select from HUD Menu)
Left Blind Spot
(Triggered by Indicator - See Below)
Right Blind Spot
(Triggered by Indicator - See Below)
Wide Angle
(Select from HUD Menu)
USING THE WIRELESS CONTROLLER
A
B
C
Table of contents