D-Link DGE-530T User manual


D-Link reserves the right to revise this publication and to make changes in the content hereof without obligation to notify any
person or organization of such revisions or changes.
Manual Revisions
Trademarks
D-Link and the D-Link logo are trademarks or registered trademarks of D-Link Corporation or its subsidiaries in the United States or
other countries. All other company or product names mentioned herein are trademarks or registered trademarks of their respective
companies.
Copyright © 2009-2010 by D-Link Systems, Inc.
All rights reserved. This publication may not be reproduced, in whole or in part, without prior expressed written permission from
D-Link Systems, Inc.
Revision Date Description
3.0 October 20, 2010 • Updated for hardware revision C
Preface

3D-Link DGE-530T User Manual
Table of Contents
Preface ................................................................................ 2
Manual Revisions .......................................................................... 2
Trademarks ..................................................................................... 2
Product Overview .............................................................. 4
Package Contents ......................................................................... 4
System Requirements .................................................................4
Introduction ...................................................................................5
Features ............................................................................................ 6
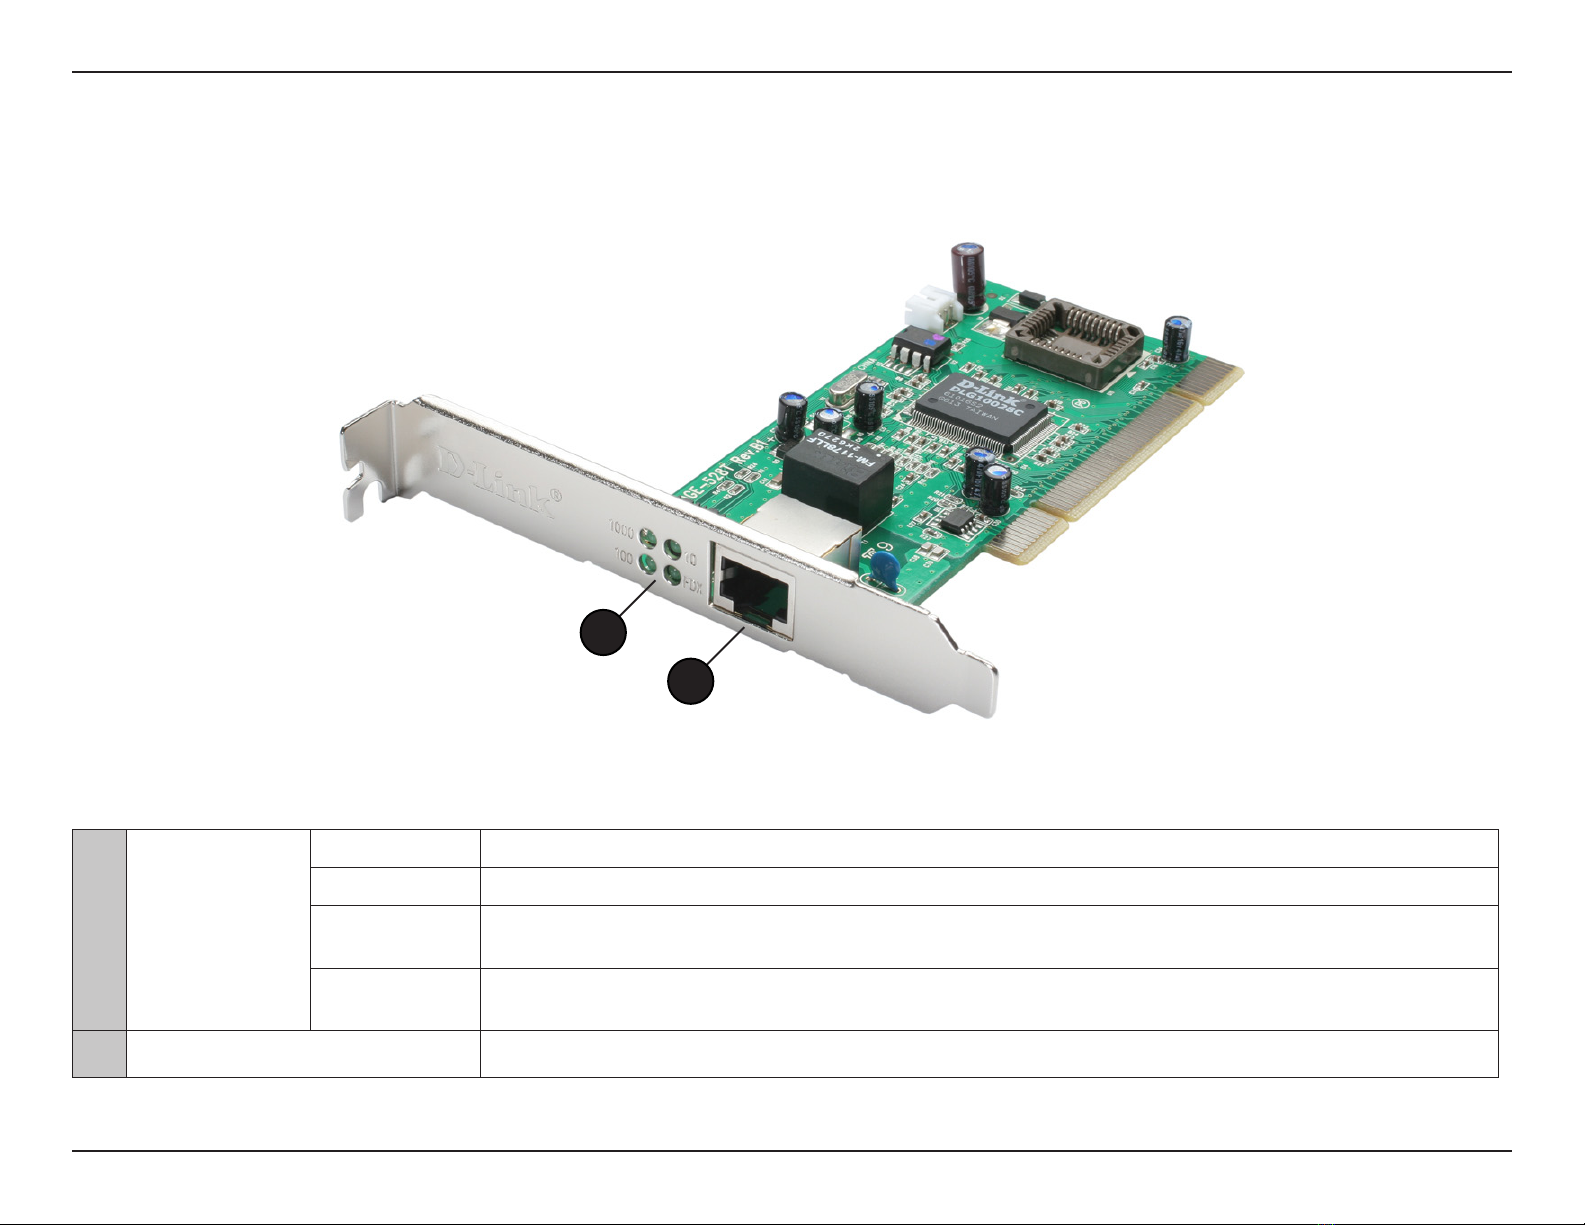
Hardware Overview ..................................................................... 8
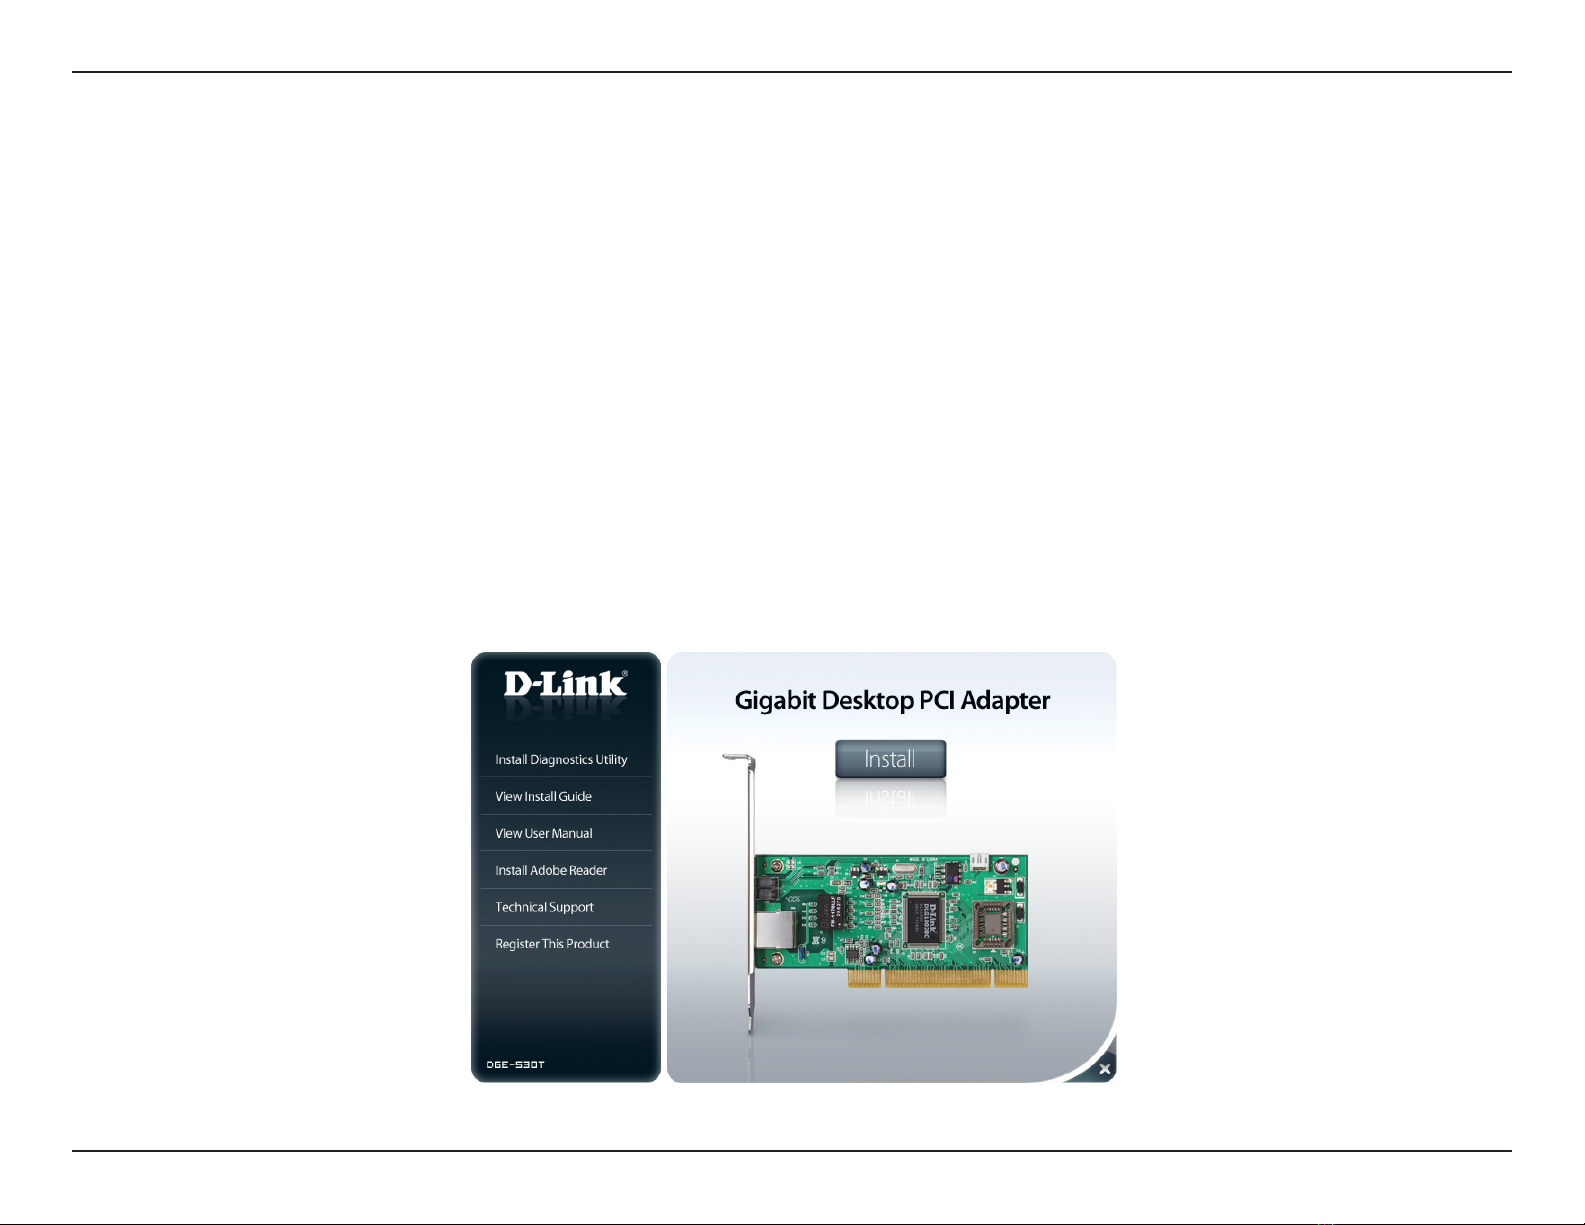
Installation ......................................................................... 9
Hardware Installation ................................................................12
Verify Installation ........................................................................14
Uninstalling the Adapter .........................................................15
Verify Connectivity .....................................................................16
Advanced Features ..........................................................17
Ethernet Diagnostics Utility ....................................................17
Installation.............................................................................17
Congure VLAN Settings .........................................................19
Add a VLAN ...........................................................................19
Delete a VLAN ......................................................................20
Modify a VLAN .....................................................................21
Cable Diagnostics Feature .......................................................22
Wake on LAN ................................................................................23
Connecting the WoL Cable .............................................24
QoS ..................................................................................................25
Jumbo Frames .............................................................................25
IEEE 802.1p Priority Tagging ...................................................26
IEEE 802.1Q VLANs .....................................................................26
Flow Control .................................................................................26
About PCI Bus ..............................................................................27
About Auto-Negotiation ..........................................................27
Troubleshooting ..............................................................29
Networking Basics ...........................................................30
Check your IP address ...............................................................30
Statically Assign an IP address ...............................................31
Technical Specications ..................................................33
Contacting Technical Support ........................................34
Warranty ...........................................................................35
Registration .....................................................................40
Table of Contents

4D-Link DGE-530T User Manual
Section 1 - Product Overview
System Requirements
Product Overview
Package Contents
Before installing the DGE-530T, check your system for the following minimum conguration requirements:
• An open PCI bus master slot, 32-bit, operating at 33MHz
• 512MB of RAM (1GB or more recommended)
• Intel Pentium 4 processor 2.0GHz (or equivalent) or faster
• The latest BIOS for your computer
• One of the following types of twisted-pair network cabling:
• 4 – pair Category 5 or better for 1000Mbps
• Category 5 or better for 100Mbps
• Category 3, 5 or better for 10Mbps
CAUTION: Under ordinary circumstances, a DGE-530T card will not be aected by a static charge that may be received through your body during handling of the unit.
In special circumstances, the user may carry an extraordinarily high static charge and it is good practice to reduce the charge by touching a ground before handling the
adapter card. If any of these items are missing or damaged, please contact your local reseller for replacement.
DGE-530T Gigabit Desktop Adapter (Rev C)
Low Prole Bracket
Wake on LAN (WoL) Cable
CD with drivers, software, and manual
Quick Install Guide

5D-Link DGE-530T User Manual
Section 1 - Product Overview
Introduction
The D-Link DGE-530T is ideal for the small oce or home oce environment. After completing the steps in this manual, you
will have the ability to share information and resources - such as les and printers - and take full advantage of a “connected”
environment for work and play!
The DGE-530T comes with drivers for the most popular operating systems and can be integrated into a larger network. However,
this manual is designed to help you network two computers running Windows® 2000, XP, Server 2003, Vista®, Windows® 2008,
and Windows® 7 in a peer-to-peer conguration. The standards compliant DGE-530T gives you the exibility to expand and
customize your Fast Ethernet / Gigabit Ethernet network at will.
The Fast Ethernet standard allows you to connect computers and devices at speeds up to 100 Mbps. Gigabit Ethernet allows
speeds up to 1000 Mbps. A Dual-Speed 100/1000 Mbps Ethernet / Gigabit Ethernet network combines both standards allowing
computers and devices of dierent speeds to communicate with each other. The DGE-530T is a Dual-Speed 100/1000 Mbps
Fast Ethernet / Gigabit Ethernet network card.
Cost-Eective, Scalable Migration
As an inexpensive alternative solution to ber-optic, the card allows you to instantly upgrade to Gigabit without requiring you to
install new, expensive ber cables. Gigabit Ethernet uses your existing CAT5 cabling while providing you with 10/100/1000Mbps
network speed auto-sensing and full/half duplex auto-negotiation.
Advanced Features and Security
The DGE-530T supports ACPI for lower power consumption and WoL for remote wake. This helps to lower total cost of ownership
(TCO). The card also features on-board screening of VLAN Tagged Ethernet frames, allowing you to assign multiple subnets
to each server and isolate devices within each VLAN from the rest of the network for better trac control and security. It also
supports 802.1p Priority Tagging to allow you to prioritize trac. The card also features embedded ow control and independent
FIFO, providing a means to protect against possible data loss during transmission on the network. With the Cable Diagnostic
feature, the card will automatically detect whether you have a bad cable, making your troubleshooting task easier.

6D-Link DGE-530T User Manual
Section 1 - Product Overview
Features
Designed for versatility and performance, the DGE-530T Network Adapter provides the following:
• Universal Bus support 3.3V
• Compliance with IEEE 802.3ab 1000BASE-T Gigabit Ethernet standards, IEEE 802.3u Fast Ethernet standards
• Supports Wake-on-LAN
• Full-duplex Gigabit Ethernet interface that delivers 2Gbps aggregate bandwidth
• Supports half and full duplex at 10Mbps, half and full-duplex at 100Mbps, and full-duplex operation at 1000Mbps
• Supports 802.3x Flow Control
• Supports 802.1Q VLAN
• Supports 802.1p Priority Tags
• Supports Cable Diagnostics
• Supports ACPI 2.0
• One built-in RJ-45 connector
• Auto-negotiation to the highest available speed
• Four LED indicators: Link/Activity, Full Duplex, 1000Mbps, 100Mbps.
• Low prole bracket included

7D-Link DGE-530T User Manual
Section 1 - Product Overview
• Driver Support for:
Microsoft Windows® 7 64-bit/32-bit
Microsoft Windows® Server 2008 64-bit/32-bit
Microsoft Windows Vista® 64-bit/32-bit
Microsoft Windows® 2000
Microsoft Windows® 2003
Microsoft Windows® XP 64-bit/32-bit
Netware Server 4.x , 5.x , 6.x
Linux for Kernel 2.4.x , 2.6.x
Novell Netware DOS ODI
DOS NDIS2
MAC OS 10.2, 10.3, 10.4
FreeBSD v4.x-v5.1
Novell Netware Client32 ODI

8D-Link DGE-530T User Manual
Section 1 - Product Overview
Hardware Overview
1LEDs
10 Green light indicates a connection to a 10Mbps device. The light will blink during data transmission.
100 Green light indicates a connection to a 100Mbps device. The light will blink during data transmission.
1000 Green light indicates a connection to a 1000Mbps (Gigabit) device. The light will blink during data
transmission.
Full Duplex Green light indicates there is a connection to an Ethernet device at any of the ports and the transmission
of data is occurring at full duplex (20/200/2000Mbps).
2Ethernet Port Connect to a 10/100/1000 Ethernet device such as a router or hub.
1
2

9D-Link DGE-530T User Manual
Section 2 - Installation
Installation
Note: Install the drivers before installing the adapter into your computer.
Turn on your computer and insert the D-Link DGE-530T Driver CD in the CD-ROM drive. The step-by-step instructions that
follow are shown in Windows® XP. The steps and screens are similar for the other Windows® operating systems.
If the CD autorun function does not automatically start on your computer, go to Start > Run. In the run command box
type “D:\autorun.exe” (where D: represents the drive letter of your CD-ROM drive).
Drivers for non-Windows operating systems are located on the D-Link CD.
Step 1 - When the autorun screen appears, click Install (this will launch the Network Utility program and install the drivers).
An Installation Wizard will guide you through the process, no matter which operating you are running. Your DGE-530T will be
installed successfully in just a few moments, allowing you to enjoy the many advantages of joining an Ethernet LAN.

10D-Link DGE-530T User Manual
Section 2 - Installation
Step 2 - Click Agree
Step 3 - Click OK

11D-Link DGE-530T User Manual
Section 2 - Installation
Step 4 - Click OK
Step 5 - Click Finish

12D-Link DGE-530T User Manual
Section 2 - Installation
Hardware Installation
1. Shut down the computer, unplug its power cord, and remove the chassis cover.
Important: Opening the case of your computer may compromise the warranty of your computer. Consult the computer
manufacturer before opening the case to ensure that you adhere to warranty guidelines. In some cases, you may need
to have the DGE-530T installed by your computer manufacturer.
Note: Write down the serial number and hardware revision (e.g. C1) before installing the adapter. If you contact technical
support, you will need this information.
2. Insert the contact edge of the DGE-530T card into the connector of any available
PCI Bus Master expansion slot. Press the card rmly into the connector such that
the card’s contacts are fully seated in the connector.
3. Install the bracket screw that secures the card to the computer chassis.
4. Replace the computer’s chassis cover.
5. Connect an Ethernet cable to your adapter and the other end to your network.
6. Reconnect the computer’s power cord, and switch the computer on. If the BIOS
section of your computer’s boot program is Plug-and-Play compliant, then at
power-up, the BIOS will automatically congure any newly installed DGE-530T
adapter.
Note: Due to a fault in some Plug-and-Play BIOS programs, occasionally a newly installed adapter is assigned an Interrupt Number
which has already been assigned to another device. In such a case, the conict of the Interrupt Number will cause faults in the behavior
of both devices. Therefore, the user must run the CMOS Setup utility and manually assign a non-conicting Interrupt Number.

13D-Link DGE-530T User Manual
Section 2 - Installation
Once you boot your computer, Windows® will automatically install your adapter.
Windows® XP users: You will receive a bubble stating that Windows found the DGE-530T adapter.
Windows® 7/Vista® users: You will receive a bubble stating that Windows has nished installing the DGE-530T adapter.

14D-Link DGE-530T User Manual
Section 2 - Installation
To verify that the drivers are installed, you may view Device Manager. To view the device manager, please follow the steps below:
Step 1:
Windows® 2000: Click on Start > Settings > Control Panel
Windows XP: Click on Start > Control Panel
Windows® 7/Vista®: Click on Start > Control Panel
Step 2:
Windows® 2000/XP: Click on the System icon. Click the Hardware tab and then click Device Manager.
Windows Vista®: Click on the System and Maintenance icon and then click on Device Manager.
Windows® 7: Click on the System and Security icon and then click on Device Manager under System.
Step 3:
Scroll down and click the plus (+) sign next to Network Adapters.
The D-Link DGE-530T Gigabit Ethernet Adapter will be listed.
Verify Installation

15D-Link DGE-530T User Manual
Section 2 - Installation
Uninstalling the Adapter
When uninstalling the DGE-530T in Windows® 7, Vista®, and Windows® Server 2008 the following pop-up warning message
will be displayed indicating an unidentied program wants to access your computer:
Click Allow to continue with the uninstall procedure. The DGE-530T drivers are WHQL-certied and should not cause any
damage to your PC.
Click Allow

16D-Link DGE-530T User Manual
Section 2 - Installation
Verify Connectivity
After you install your new D-Link adapter, by default, the TCP/IP settings should be set to obtain an IP address from a DHCP
server (i.e router) automatically. To verify your IP address, please see the following steps below:
Windows® 2000/2003/XP: Click on Start > Run. In the run box type cmd and click OK.
Windows® 7/Vista®: Click on Start > All Programs > Accessories > Command Prompt.
At the prompt, type ipcong and press Enter.
This will display the IP address, subnet mask, and the default gateway of your adapter.
If the address is 0.0.0.0, check your adapter installation, security settings, and the settings on your router. Some rewall software
programs may block a DHCP request on newly installed adapters.

17D-Link DGE-530T User Manual
Section 3 - Advanced Features
Installation
Step 1 - Click Install Diagnostics Utility.
Ethernet Diagnostics Utility
Step 2 - Click Next.
The following will show you how to install the D-Link Ethernet Diagnostics Utility. The utility will work with Windows® 7, Vista®,
and XP.
Advanced Features

18D-Link DGE-530T User Manual
Section 3 - Advanced Features
Step 4 - The software will install.
When the installation is complete, the utility will launch
automatically. To run the utility in the future, you can double-click
the utility icon in the lower-right corner on the task bar or from
the start menu (click Start > All Programs > DLink > Diagnostics
> Diagnostics Utility).
Step 3 - Click Install.

19D-Link DGE-530T User Manual
Section 3 - Advanced Features
Step 1 - Open the D-Link Ethernet Diagnostic Utility and click on
VLAN. Assign a VLAN ID in the box and click Add.
Add a VLAN
Congure VLAN Settings
Step 2 - Click Yes to continue.
Step 3 - Your VLAN will be created which may take up to 1 minute.
Do not close the utility during this process. Once completed, your
new VLAN will be listed.

20D-Link DGE-530T User Manual
Section 3 - Advanced Features
Step 1 - Open the D-Link Ethernet Diagnostic Utility and click on
VLAN. Click on the VLAN you want to remove and click
Delete.
Delete a VLAN
Step 2 - Click Yes to continue.
WARNING: Deleting a VLAN will remove all the VLANs.
Other manuals for DGE-530T
13
Table of contents