Daewoo GB14F8T1 User manual

VIDEO AUDIO
PR
STAND-BY POWER REC
REC
/
UK
Instruction manual
Colour televideo
GB14F8T1
GB20F8T2
GB21F1T2


Pleasekeepthevideomachine’sguaranteecardandreceiptsafeforwarranty
purposes.
WORTH
knowing
Precautions
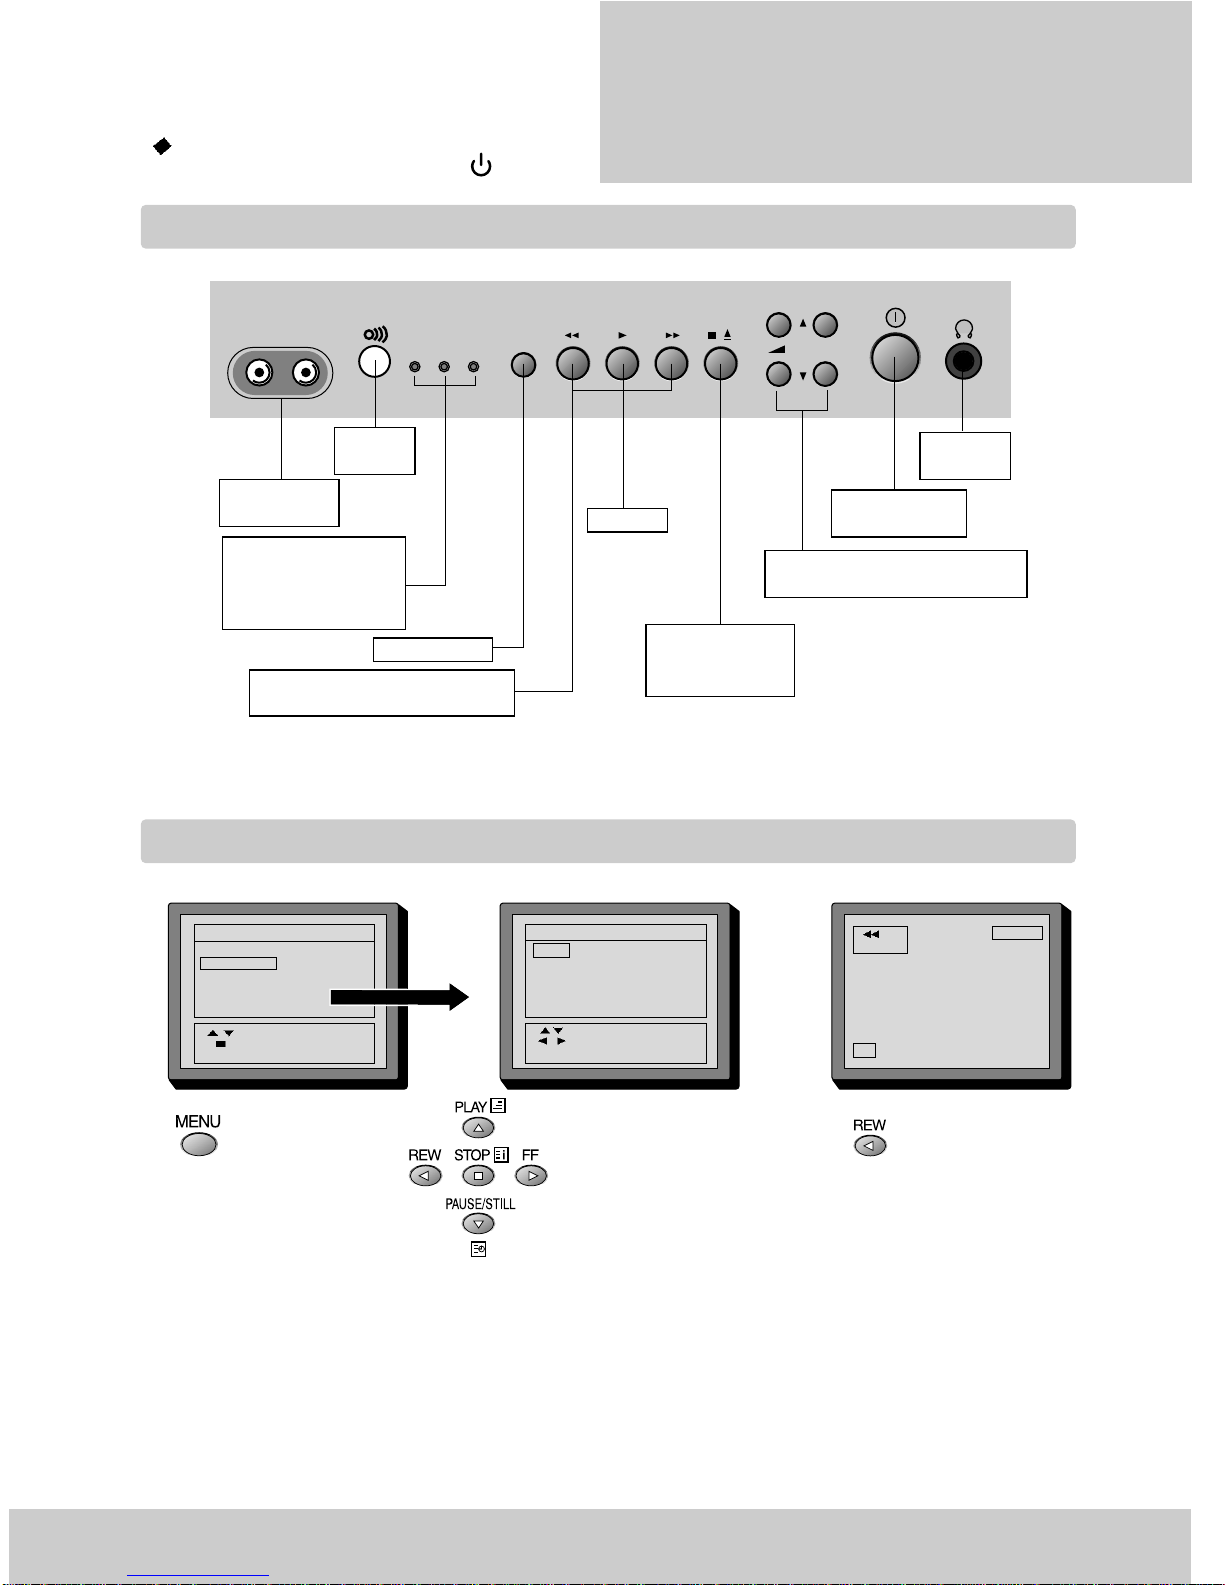
Read carefully through this manual to familiarise yourself with this high-
qualitytelevideo.
Make sure the rating of your household electricity supply matches that shown
onthe backof thetelevideo.
Refer to this chapter and the “Initial installation” chapter (pages 4-9) to help
youinstall andadjust yourtelevideo.
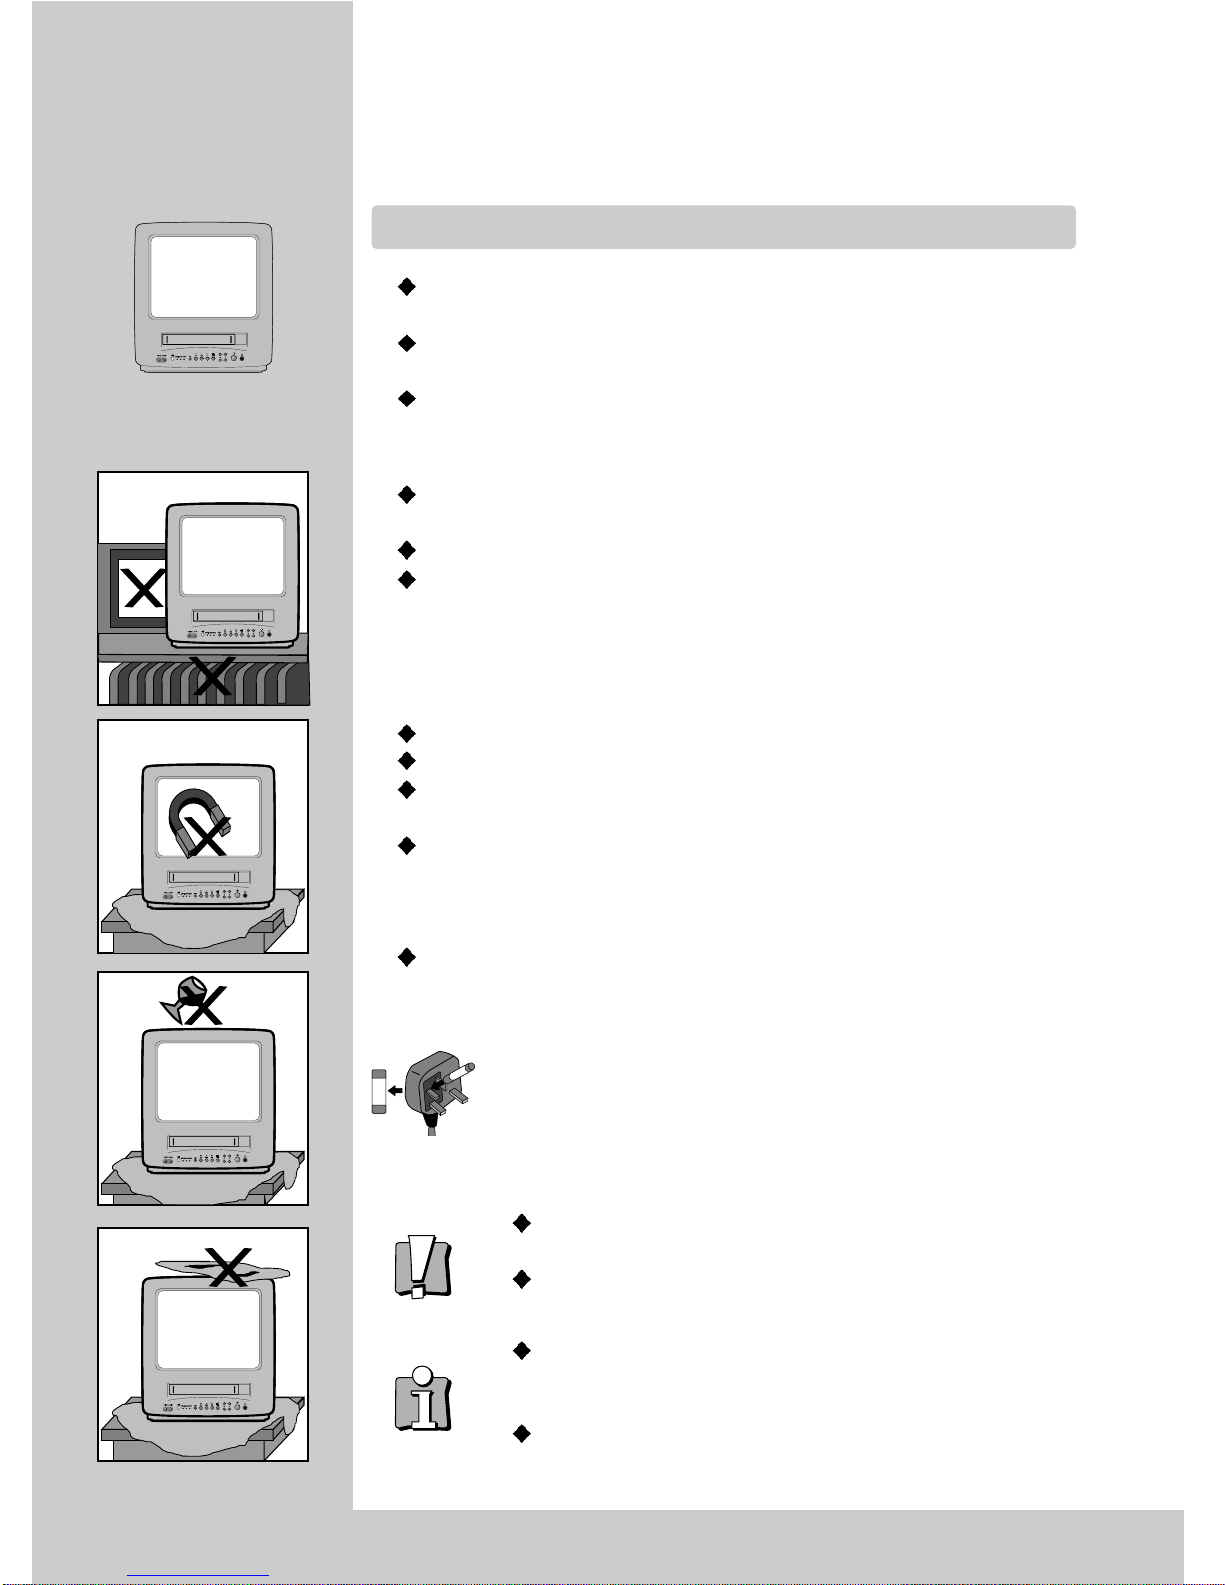
Donot…
expose the televideo to high levels of humidity and heat, to avoid the risk of
fireand electricshock.
openthe televideo.Have aqualified techniciancarry outrepairs.
connect the televideo to the power supply if you have just moved it from a
cold to warm environment. This can result in condensation inside the recorder
and cause serious damage to the machine and cassettes. Wait around two
hoursto allowit toreach roomtemperature.
Makesure…
thetelevideo isplaced ona steady,flat surface.
youplace thetelevideo wherethere isgood ventilationall around.
you clean the televideo only with a soft, lint-free cloth; do not use aggressive
oralcohol-based cleaningagents. (Unplugthe setfrom themains)
you disconnect the power supply if the televideo appears to be working
incorrectly, is making an unusual sound, has a strange smell, has smoke
emittingfrom itor liquidshave gotinside it.
Havea qualifiedtechnician checkthe televideo.
you disconnect the power supply and aerial if you will not be using the
televideofor along periodor duringa thunderstorm.
The power cable must be fitted with a fused plug approved by
ASTAor BSIto BS1362 andprovided witha 5Afuse.
The fuse cover must always be securely replaced. If the televideo is
not worikng, the fuse may need replacing (see also “Electrical
Connection”on page4). (U.K. Only)
For your own safety!
There are no components in this televideo you can service or
repairyourself.
Do not open the case of the televideo. Only allow qualified
personnelto repairor serviceyour set.
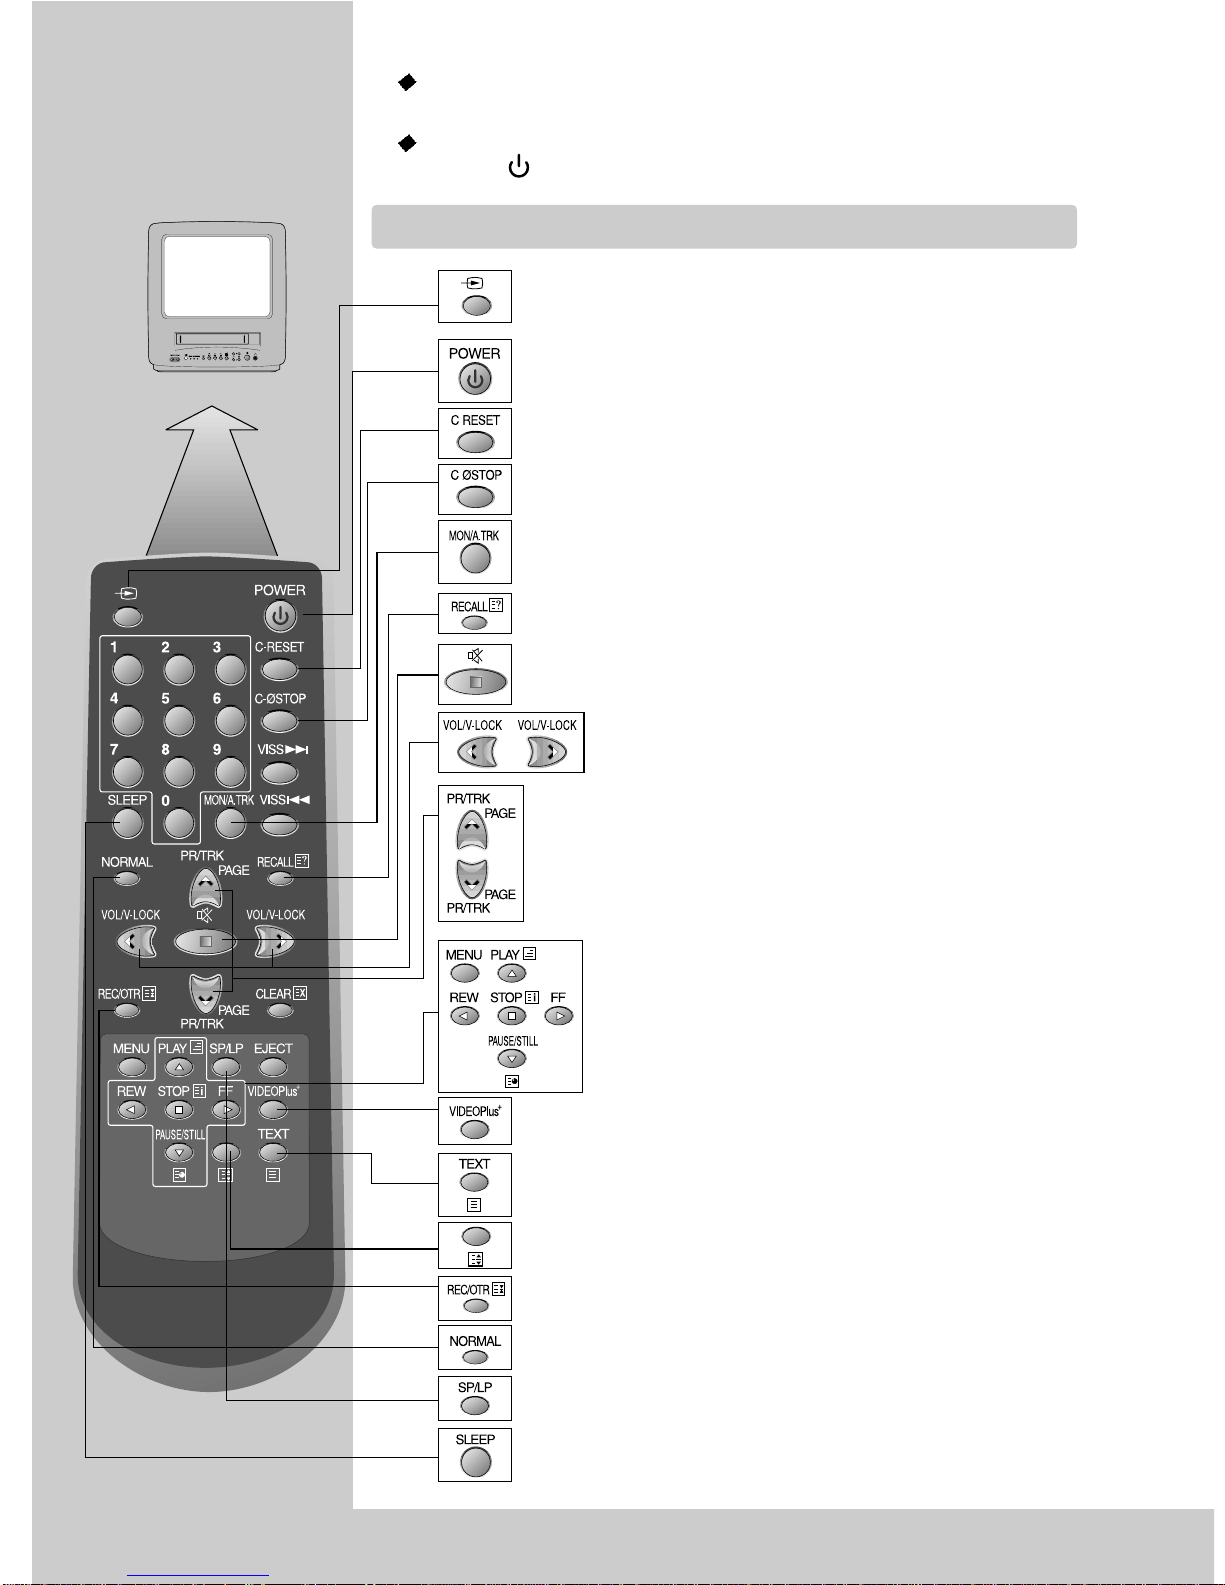
This televideo is designed for continuous operation. Switching it
off does not disconnect it from the mains (stand-by). To
disconnectit fromthe mains,you haveto unplugit.
Recording any copyright protected material may infringe a
copyright.
NOTE : If the receiver is moved or placed in a different direction, the main power switch must be
switchedoffforatleast15minutesinorder totakeout colourpurityerrorsonthescreen.
5A
5A


1
WORTH
knowing
Contents
Controls
Theremote controlunit 2
Thetelevideo,On-screen display 3
Initial installation
Mouldedplugs 4
Connectingupthe televideo, Fittingthe remote control’sbatteries 6
Settingtimeand date 7
Tuninginstations, EDIT, ManualTuning 8~10
Playing cassettes
Playingback 12
Still,Variablepicture search, Continuousplay 13
Recording cassettes
Simplerecording, Onetouch recording(OTR) 14
Timerrecordingusing VideoPlus+ 15
Whenrecordtime overlaps, WatchingProgrammes while recording 16
Normaltimerrecording 17
TimerReview-erasingor changing 18~19
More functions
Accessingthe beginningof thenext recording,Accessingthe beginningof theprevious
recording,Resetting thecounter tozero, Accessingcounter zeroposition 20
Cassettes,V-Lock,Child Lock, Mute 21
Pictureadjustments,picture type selection,Changing on-screen displays 22
Televisiontimer,Snooze automatic 23
VideoPlus+guidenumbers 24
Teletext,teletextcharacter set 25
Connections and copying
copying,Assembling 26
Scartsocket 27
Appendix
Beforeyou aska specialist 28
Playingback,Simple recording, Autotracking, One touchrecording 29
Index,Technicaldata 30
Yourproductguarantee 31/32
On the following pages, the pictures show the buttons you press on the remote control to
perform the function, and what you should see in the on-screen display or machine
display(ifpresent)
VideoPlus+ is a trademark applied for by Gemstar Development Corp.. The VideoPlus+
systemismanufacturedunderlicensefromGemstarDevelopmentCorporation.
Before doing anything with the televideo, please
readthechapter“Initialinstallation”.

Theremotecontrolistheprinciplemeansofcontrol,butthemainplaybackand
recordfunctionsarealsoavailableonthefrontofthemachine.
Pressthemainpowerswitchonthefrontpanelto turn on the set,
thenpress button.
2
CONTROLS
The remote control unit
TVstations-input sockets
Toswitch combinedTV/video onand off(stand by)
toreset thecounter
towind thecassette tocounter position0:00:00to
Recordmonitoring (only 2Tuners Model),Auto tracking
toselect on-screendisplays
Soundon/off
abutton forselecting inputsources forrecording:
Volumeup/down
V-lockup/down
Toselect channelsand adjust
Manualtracking up/down
Teletextpage up/down
playbackstart/stop.
pausewhile recording,
stillwhile playingback
rewinding/fastforwarding acassette fromStop, or
picturesearch backwards/forwardsfrom playbackmode
themenu control.
thecontrols fortimer recordingusing theVideoPlus+
codesvia on-screendisplay
Teletexton/off
Teletextsize
therecord orOTR button
(OneTouch Recordingmeans :each timeyou pressthe
buttonrecording isextended by30 minutes)
FAVOURITE/NORMAL1/NORMAL2
abutton thatdoubles themaximum recordingtime for
very longrecordings (SP/LP) : (only U.K. Model)
buttonfor thesleep timer(press repeatedly)
max.7m
30˚|30˚

3
CONTROLS
The televideo
On-screen display
Thetelevideo’s menusystem
givesyou easy-to-understand
accessto theless used
functionssuch astuning to
stations,clock settingand
more.
Themenus showyou which
buttonto pressfor thenext
step.
Inaddition, someother
functionsappear onscreen if
youwant (pressRECALL up
to3 timesfor on-screen
displays).
Press the main power switch on the front panel to
turn on the set,thenpressPOWER( )button.
NOTE : The combined TV/video close menus automatically after approx. 1 minute.
ifnoentryismade.
VIDEO AUDIO
PR
STAND-BY POWER REC
REC
/
Video input
Audio input
REC : Record
PLAY : Play
Indicator
STAND BY : STAND BY(Red)
POWER : Operation(Green)
REC : Record(Yellow)
REW / FF:
Rewind and Fast forward wind
STOP/EJECT:
To stop and to eject
the loaded cassette
VOLUME Down/Up Buttons
PROGRAM Down/Up Buttons
MAIN POWER
SWITCH
HEAD
PHONE
Remote
sensor
MAIN MENU
PICTURE
TVTIMER
RECORDTIMER
PRESET
MISCELLANEOUS
SELECT
ENTER
MENU EXIT
TV TIMER
01:01:1997WED
TIME 02:30
ONTIMER 06:00OFF
PR 01
OFFTIMER 00:00OFF
DATE
SELECT
MOVE
CLEAR CLEAR
MENU EXIT
01ABCC
SP
REW
–0:01:33
example

For your own safety read the following instructions carefully before attempting to
connectthisunittomains.
4
Initial
INSTALLATION
Moulded plugs
Should it be necessary to remove a moulded on plug from the mains cable, it
shouldbe cutoff andreplaced witha suitablereplacement.
If the terminals in the plug are unmarked or you are in any doubt as to the correct
connections,consult aqualified electrician.
The wires in this mains lead are coloured in accordance with the following
code Blue Neutral
Brown Live
As the colour of the wires in the mains lead of this appliance may not
correspond with the coloured markings identifying the terminals in your
replacementplug proceedas follows.
The wire which is coloured blue must be connected to the terminal which is
markedwith letterN orcoloured black.
The wire which is coloured brown must be connected to the terminal which is
markedwith letterL orcoloured red.
The moulded plug cannot be used for any other appliance, therefore remove
the fuse and dispose immediately and safely to prevent anyone, especially
children from plugging it in to a wall socket, which will create a safety
hazard.
After replacement of the fuse in the moulded plug, the fuse cover must be
refitted. If the fuse cover is lost a replacement cover must be obtained. The
colour of the correct replacement fuse cover is that of the coloured insert in
the base of the plug or the colour that is embossed in words in the base of
the plug recess or elsewhere on the plug. Always state this colour when
orderinga replacementfuse cover.
Only 5 amp. replacement fuses which are ASTA approved to BS 1362 should
befitted. (U.K. Only)
Werecommend theuse ofa goodquality plug.

This symbol means that this unit is double insulated, an earth connection is not
necessary.
Caution :
To prevent electric shock, do not remove any covers.
Caution :
No user serviceable parts inside, refer servicing to qualified service personnel.
5
Initial
INSTALLATION
Caution :
When operating this unit on 220-240V mains supply, please note that when the power
switch is in the off mode, the unit is not disconnected from the mains supply. However,
pleasebe assuredthat itis perfectlysafe toleave theunit connectedto themains supply.

Placeyourtelevideo
horizontallyonaflat,steadybasesothataircancirculatearounditforventilation.
away from humidity and heat, magnetic fields, such as those from loudspeakers
etc.,andwithnoheavyobjectsplacedontop.
6
Initial
INSTALLATION
Connecting up the televideo
Fitting the remote control’s batteries
Switchoff allcomponents whenconnecting ordisconnecting cables.
Plugthe aerialcable intothe “ANT”socket ofthe televideo.
Make sure the rating of the household mains supply matches the rating
shownon theback ofthe televideo.
Nowplug inthe mainslead.
Fit the batteries, size 1.5V AAA asshown above.
Protect your environment by returning used batteries to your dealer. Since
batteriescontain toxicsubstances theyrequire specialdisposal methods.
Make sure the batteries are always of the same type and age, and remove
themfrom theremote controlif youare notusing itfor along period.
1Removethebatterycover
onthereversesideofthe
remotecontrol. 2Installtwobarreries
(“AAA”size)intothe
remotecontrol. 3Replacethebattery
cover.
The buttons to use
are marked on the
followingpages.

7
Initial
INSTALLATION
Setting time and date
Switchyour televideoon.
Callthe televideo’sMAIN MENU.
Movethe cursordown tothe “TVTIMER”line.
Confirmby pressingthe ENTER/STOPbutton.
Set the numbers for the exact time and the correct
date. Both the On timer and the off timer can be
switched ON or OFF but both must be on to enable the
timerto function.
DATE: dd/mm/yy
TIME: Hour/Min
Storeleaving “TVTIMER”
Continuewith thefollowing page.
Mistake or change ?
Movecurson tothe positionyou wishto correctby using / / andRE-ENTER on
theremote control.
Ifyou donot set‘DATE’ and‘TIME’ menu,you cannot set‘on/off Timer’.
Timer controlled events require the exact time
andthecorrectdate.
Press the main power switch on the front panel
to turn on the set, then press button.
MAIN MENU
TVTIMER
RECORDTIMER
PRESET
MISCELLANEOUS
PICTURE
SELECT
ENTER
MENU EXIT
MAIN MENU
PICTURE
RECORDTIMER
PRESET
MISCELLANEOUS
TVTIMER
SELECT
ENTER
MENU EXIT
TV TIMER
01:01:1997WED
TIME 02:30
ONTIMER 06:00OFF
PR 01
OFFTIMER 00:00OFF
DATE
SELECT
MOVE
CLEAR CLEAR
MENU EXIT
01ARD

HavehandyaTVguideornewspapertohelpyoutoidentifythestations.
8
Initial
INSTALLATION
Tuning in stations
(If you see “AV” instead of “PR”, press
the button)
If not on-screen, call the televideo’s
“MAINMENU”.
AUTOMATIC TUNING SYSTEM
Selectthe PRESETmenu atthe MAINMENU.
Placethe cursorto “ATSS”with theup/down button.
Press the ENTER button until the tunning screen appears above the PRESET
menu.
Thecursor willmove fromleft toright onthe VHF-Lline, thenVHF-H, thenUHF.
Pleasewait untilthe EDITmenu appears.
MAIN MENU
PICTURE
TVTIMER
RECORDTIMER
PRESET
MISCELLANEOUS
SELECT
ENTER
MENU EXIT
ATSS SETTING
PR08 UHF
MENU EXIT
01ARD

9
Initial
INSTALLATION
EDIT
TheEDIT menusshows youthe programmeposition assignment.
You can change this programme position assingment according to
yourpersonal preferences.
SKIPPING THE CHANNELS
Youcan selectskip “YES”or “NO”with theSKIP button.
A programme marked with SKIP “YES” is skipped when changing
channelusing the /button.
A skipped programme number selected by NUMBER button 0…9
willbe displayedin red.
DELETE PROGRAMME POSITION DATA
Position the cursor to programme number to delete with the
up/down.LEFT/RIGHT buttons.
Press the DELETE button. while this is being carried out the “DELETE
pro.NO”. appears and the “deleted” programme number will
transferto programmeno.69 andchange skipto “yes”.
Any programme that was in No.69 will be transferred to programme
No.68.
CHANGING THE ORDER OF THE CHANNELS
Position the cursor to programme number to move and press the
SWAPbutton. The“SWAP P01TO P01”will appear.
Position the cursor to programme number to exchange and press the
SWAPbutton. Twoprogrammes willbe exchanged.
ENTER A STATION NAME
Pressthe stopbutton atthe EDITMODE.
stationname tablesappears abovethe screen.
Select station name in the station name list with /button and
pressENTER button.
Ifyou wantto deletea stationname, select“-----”.
If you can’t find the desired name in the list, you can enter your
own.
To do so, move the cursor to the “----” and press ENTER button.
Usingthe /button, selectthe desired,letter, numberor blank.
Pressthe button toselect thenext position.
(MAINMENU PRESET EDIT)
EDIT
PR NAME SKIP PR NAME SKIP
00 ------ YES 05 ------ NO
01 ------ YES 06 ------ NO
02 ------ YES 07 ------ NO
03 ------ YES 08 ------ NO
04 ------ YES 09 ------ NO
SELECT
DELETE
SWAP
SKIP
NAME
MENU EXIT
EDIT
---- CH5 RTL1 KABE N3
BBC1 SAT RTL2 3SAT SWF3
BBC2 ARD SAT1 1PLU SFB3
ITV ZDF PRO7 BR3 MDR3
CH4 WDR3 PREM HR3 RB3
SELECT
ENTER
MENU EXIT
EDIT
A---
SELECT
CHANGE
ENTER
MENU EXIT

Manual Tuning
10
Initial
INSTALLATION
You can also call up the PRESET menu at the
MAINMENU.
Press the NUMBER Button 0…9 or PR /
buttonto selecta programmenumber youwant.
The screen will change according to the selected
programmenumber.
SEARCHING FOR A CHANNEL
Locate the cursor to SEARCH UP or DOWN with
/button at the MANUAL TUNING SCREEN
andthen pressthe enter.
The tuning screen will appear and the cursor will
movefrom leftto right.
Tostop searching,press theMENU button.
Pressing and holding down the /button
during 3seconds, the band will change as
following.
Afterlocating astation, pressthe menubutton.
Select station name and memorize programme
number with UP/DOWN button or the NUMBER
button0…9.
use /buttonto setthe SKIPto ‘NO’
Press the “enter” key when the cursor is put on
the “STORE TO”, it is possible to memorise the
searchedchannel.
If you want to select “SKIP YES” PR. use the
digitkey.
FINE TUNING
If you are unable to get a good picture or sound
because of a poor broadcasting signal, it is
possibleto adjustthe finetuning.
Select the FINE TUNING at the PRESET MENU
andFINE TUNINGSCREEN willappear.
Press /button to get a good picture and
sound you want and to memorize press the
ENTER.
MANUAL TUNING
PR 08
SKIP NO
SEARCH UP
STATIONNAME ----
STORETO PR08
SELECT
MOVE
MENU EXIT
MANUAL TUNING
PR08 UHF
CHANGE
MENU EXIT
FINE TUNING
PR08 UHF
||||||||||||||||||||||||||||||||||||||||
CHANGE
ENTER
VHF-L VHF-H UHF

11

Your televideo is swiched on by the main power switch on the front panel and by
the button.
12
PLAYING
cassettes
Playing back
Load the cassette by pushing it
smoothly and squarely into the
cassette bay, with its windows
pointingup.
Startplayback.
Stopplayback.
Ejectthe cassette.
Fast forward or rewind the cassette
fromstop.
A smaller picture may be seen while switching from the
SEARCHmode tothe PLAYBACKmode.
Thisis NOTa signof malfunction.
When you load a protected cassette (e.g. pre-recorded film,
seepage 21)playback startsautomatically.
PLAY( ) switchesback tonormal playback.
Duringstill, orsearch, youdon’t hearthe sound.
If the still picture is jittering, you can steady it by using the
VOL/V-LOCKbuttons.
You can reduce horizontal interference stripes resulting from
inaccurate tracking (when playing tapes of poor quality or
recorded on other machines) by using the PR/TRK buttons during
playbackor tryauto trackingusing A.TRK
After approx. 5 minutes in still, the cassette plays back
automatically.
Searchand picturefunctions -page20.
VIDEO AUDIO
F F PR
PLAY ST/EJREW
STAND-BY POWER REC/OTR
REC
/
PLAY
0:00:00
STOP
0:00:00
EJECT 01 BBC1
FF
0:15:00 03 ITV
REW
0:09:00 03 ITV

13
PLAYING
cassettes
Still
Variable picture search
Continuous play
NOTE : ThissethasthefunctionofNTSCplayback.(SPtapeonly)
DonotuseNTSCSLP(x3)tape.
Stillpicture fromplayback.
Eachpress ofthe buttonadvances thepicture oneframe.
PLAY( ) switchesback tonormal playback.
STILL
0:00:00
Starting from playback you can control search speed in 2
steps either forwards ( ) or backwards ( ). Press
repeatedly.
PLAY( ) switchesback tonormal playback.
Callthe televideo’s“MAINMENU”.
Movethe cursordown tothe “AUTOREPEAT ON”line.
Confirm.
Cassetteswith…
…opensafety hole:
play endof cassette rewind play…
…closedsafety hole:
play endof cassette rewind play…
CUE
0:10:00
REV
0:09:00
REP
00:25:33
MAIN MENU
PICTURE
TVTIMER
RECORDTIMER
PRESET
MISCELLANEOUS
SELECT
ENTER
MENU EXIT
MISCELLANEOUS
CHILDLOCK
CHARACTERSETWEST
VIDEOPLUSPRESET
AUTOREPEATON
SELECT
CHANGE
MENU EXIT

•OTR PREPARATION
Before setting OTR, MAKE SURE THAT ……
Thecassettetapehasthesafetytab.
Thetapeislongenoughtorecordtheprogram.
During recordingyou canswitch the screen off pressing button.
Ifyou wantto recordfrom asource connected to yourvideo
seepage 26.
EvenifyouturnoffthePOWER,REC/OTRwillcontinuefortherest
ofthetime.
YoucanreleasetheOTRmodebypressing“STOP”duringRECmode.
Thevideo stopsautomatically, ifpause exceedsfive minutes.
Ifthe displayshows “AV”instead of“PR” press button.
Searchand picturefunctions -pages20.
TheTVstationsonyourtelevideohavebeentunedin(pages8/9).
Thetelevideoisswitchedon.
14
RECORDING
cassettes
Simple recording
One touch recording-OTR
Loada cassettewith itssafety tabin
place(see page21).
Choosethe stationwhose
programmeyou wantto record.
Ifthe programmeyou wishto record
isvery long,double thepossible
recordingtime with“LP” (LongPlay).
Upto eighthours withan E240
cassette.
Startyour recording.
Ifyou wishto interruptrecording
briefly– thencontinue.
Stopyour recording.
Choosethe stationyou wantand
pressthe buttononce forevery 30
minutesof programmeyou wishto
record.
STOP
0:00:00 01AB
REC
0:00:12 12CD
12CD
PAUSE
0:10:34 12CD
STOP
1:15:22 12CD
OTR
0:01:10
0:30
12CD
STOP
0:00:00 12CD
12CD
LP

VIDEOPLUS
NO---------
INTERVAL ONCE
0-9 DIGIT
INTERVAL
ENTER
VIDEOPLUS
EXIT
VIDEOPLUS
NO58624 -----
INTERVAL DAILY
0-9 DIGIT
INTERVAL
ENTER
VIDEOPLUS
EXIT
REC EVENT 1
INTERVAL DAILY
PDC OFF
DATE 21/01TUE
START 16:30
END 16:35
PR 02
SPEED SP
SELECT
MOVE
MENU EXIT
RECORD TIMER
DATE START END PR PDC
1 DAILY 16:30 16:46 02 OFF
2 --/-- --:-- --:-- --:-- ---
3 --/-- --:-- --:-- --:-- ---
4 --/-- --:-- --:-- --:-- ---
5 --/-- --:-- --:-- --:-- ---
6 --/-- --:-- --:-- --:-- ---
SELECT
ENTER
CLEAR CLEAR
MENU EXIT
15
RECORDING
cassettes
Timer recording using VideoPlus+
For timer recordings, clock, date, and stations
mustbesetcorrectly(pages7-9).
Load a cassette with its safety tab in place (see
page 21) and with sufficient free space for the
recording.
Callthe VideoPlus+menu.
From your TV magazine, type in the number next to the
programmeyou wantto record.
Selectto record
ONCE,DAILY(1x), WEEKLY(2x)
Confirm
If you want to extend the recording time by 1 minutes
steps.
Pressthe menubutton toconfirm.
Youcan switchyour televideooff.
(Donot usethe mainpower buttonon thefront panelof theset.) Thetelevideo willswitch
onand offautomatically torecord thetimer event.
If you do not set the clock, when you press the VideoPlus+ button to set the timer recording,
thisset automaticallychanges tothe “TVTIMER” menu.
Ifyoudon’thavetheVideoPlus+ numbers seepage17 for the normal timer.
If you have made a mistake, move back to the relevant position with the button and
changethe setting.
Duringrecording youcan switchthe screen off pressing button.
The screen will indicate if the station is not programmed (pages7~9) or if the station has no
VideoPlus+guide number(pages 24).
Shouldprogrammings overlap,you get a warning.
In the case of error messages correct the input or check the date and time on your televideo
(alsocheck yourTV guide).

16
RECORDING
cassettes
When record time overlaps
Watching programmes while recording (Only 2 Tuners Model)
When setting the Programmable Timer, be careful not to overlap the preset
times.
If you happen to overlap the preset Programs, the END Time has priority and the
overlappedProgrammes cannotbe recorded.
NOTE :
MAKE SURE THAT …
Theclock isadjusted tocurrent time
Thesafety tabis notmissing onthe cassettetape.
Thetape islong enoughto recordthe desiredprogramme.
* If you program events without setting the time, it will be automatically
returnedto “TVTIMER” mode.
If you program events that overlap, at least one of your events will not record
correctly.
If the start time you want to enter does not correspond to the PDC-time or if you
just want to record a part of a programme, you have to switch off PDC. Otherwise
therecorder won’trecord.
Just switch over to another
programme using PR/PAGE /
orthe NUMBERBUTTONS.
To check the recording switch to
the recorder (and back) using the
MONITOR/A.TRKbutton.
19:00 20:00 21:00 22:00
PROGRAMMING
PROGRAMME 1
PROGRAMME 2
PROGRAMME 3
PROGRAMME 1
PROGRAMME 2 PROGRAMME 3
RECORDING
NOT RECORDED
REC
0:00;05 01 ARS
02 KBS
REC
0:02:12 REC PR
02 KBS
This manual suits for next models
2
Table of contents
Other Daewoo CRT TV manuals

Daewoo
Daewoo DSC-3210EGB User guide

Daewoo
Daewoo DUX-21U7DT User manual

Daewoo
Daewoo D W X -28W, D W F -28W, D T F -29, D T P -25, D T P... User guide

Daewoo
Daewoo DTQ-26S2 FC User manual

Daewoo
Daewoo DTQ 20U6SC User manual

Daewoo
Daewoo Super Vision 14Q1 User manual

Daewoo
Daewoo DTC-20, DTC-21, DTY-21, DTY-25 User guide

Daewoo
Daewoo DTQ-20U4SC User manual

Daewoo
Daewoo DTQ-14P2/P3FCG User manual

Daewoo
Daewoo DTQ-14V1FCN/20V1FCN User manual