Daken DK120 Installation and operation manual

1
Finishing Mower
DK120, DK150, DK180
Operators Manual & Parts List
Clark Equipment P/L
30 Salisbury Road Hornsby NSW 2077
Phone Toll Free 1800 636 451

2
1. Introduction
Your Daken Finishing Mower has been designed to do a range of work to your satisfaction. This list of instructions
covers the basic requirements for safety and maintenance and will ensure good service if carried out as directed.
Please read the whole of this Operators Manual and familiarize yourself and/or any other operators that may be
required to operate this machine before attempting to:-
(a) Fit the machine to the tractor,
(b) Carry out any adjustments,
(c) Operate the machine.
OPERATOR ORIENTATION - The directions left, right, front and rear, as mentioned throughout this
manual, are determined when sitting in the tractor driver's seat and facing in the direction of travel.
Additional Information and Potential Changes
FHM reserves the right to discontinue, change, and improve its products at any time without notice or obligation to the
purchaser. The descriptions and specifications contained in this manual were in effect at printing. Equipment described
within this manual may be optional. Some illustrations may not be applicable to your machine.
If you want order spare part, please provide the model type, the serial number, the part code, and the date of
manufacture.
2. Safety First
Conventions used in this manual
This indicates a hazardous situation, which, if not avoided, could result in death or serious injury.
This indicates a hazardous situation, which, if not avoided, could result in minor or moderate injury.

3
This information is important in the proper use of your machine. Failure to follow this instruction could result in
damage to your machine or property.
THINK Safety! WORK Safely! Please read the following safety information carefully and follow the advice given to
avoid any potential dangers to yourself and others or damage to the machine. Special safety features are
incorporated in the design of the Finishing Mower for your protection. However, it can still be highly dangerous
to the careless operator.
YOU are responsible for the SAFE operation and maintenance of your Finishing Mower. YOU must ensure that
you and anyone else, who is going to operate, maintain or work around the Finishing Mower be familiar with the
operating, maintenance and safety procedures contained in this manual.
DON’T let familiarity trap you into danger.
DON’T allow riders on the Finishing Mower.
SPECTATORS (particularly children) must be kept well away while operating as sticks and stones can fly further
than you think.
NEVER start or operate your Finishing Mower unless sitting on tractorseat.
ALWAYS place all controls in neutral, lower machine, stop PTO and turn off engine before dismountingtractor.
ALWAYS keep hands, feet, hair and clothing away from movingparts.
DON’T attempt any adjustment whatsoever while the machine is operating or spinning.
DON’T attempt to clear any obstruction around the machine while the machine is operating or spinning to a
stop.
DON’T attempt to clear any obstruction from underneath the machine while the machine is operating or spinning
to a stop.
DON’T operate your Finishing Mower whilst it is in the raised position.
ALWAYS know what you are cutting. Never operate in an area that has hidden obstacles. Remove all sticks,
stones, wire or other objects that might be hooked or snagged, causing injury or damage from the working area
before starting.
MAKE REGULAR INSPECTION of cutter assembly for fracture and be sure that all blades and guards are properly
attached. Replace if any irregularity or excessive wearshows.
NEVER exceed the limits of your Finishing Mower. If it’s ability to do a job, or to do so safely is in question –
DON’T TRY IT

4
3. Specifications
Your Daken Finishing Mower is designed to cut a variety of grasses and other ground covers. You take the
responsibility if the machine is used for any other purpose.
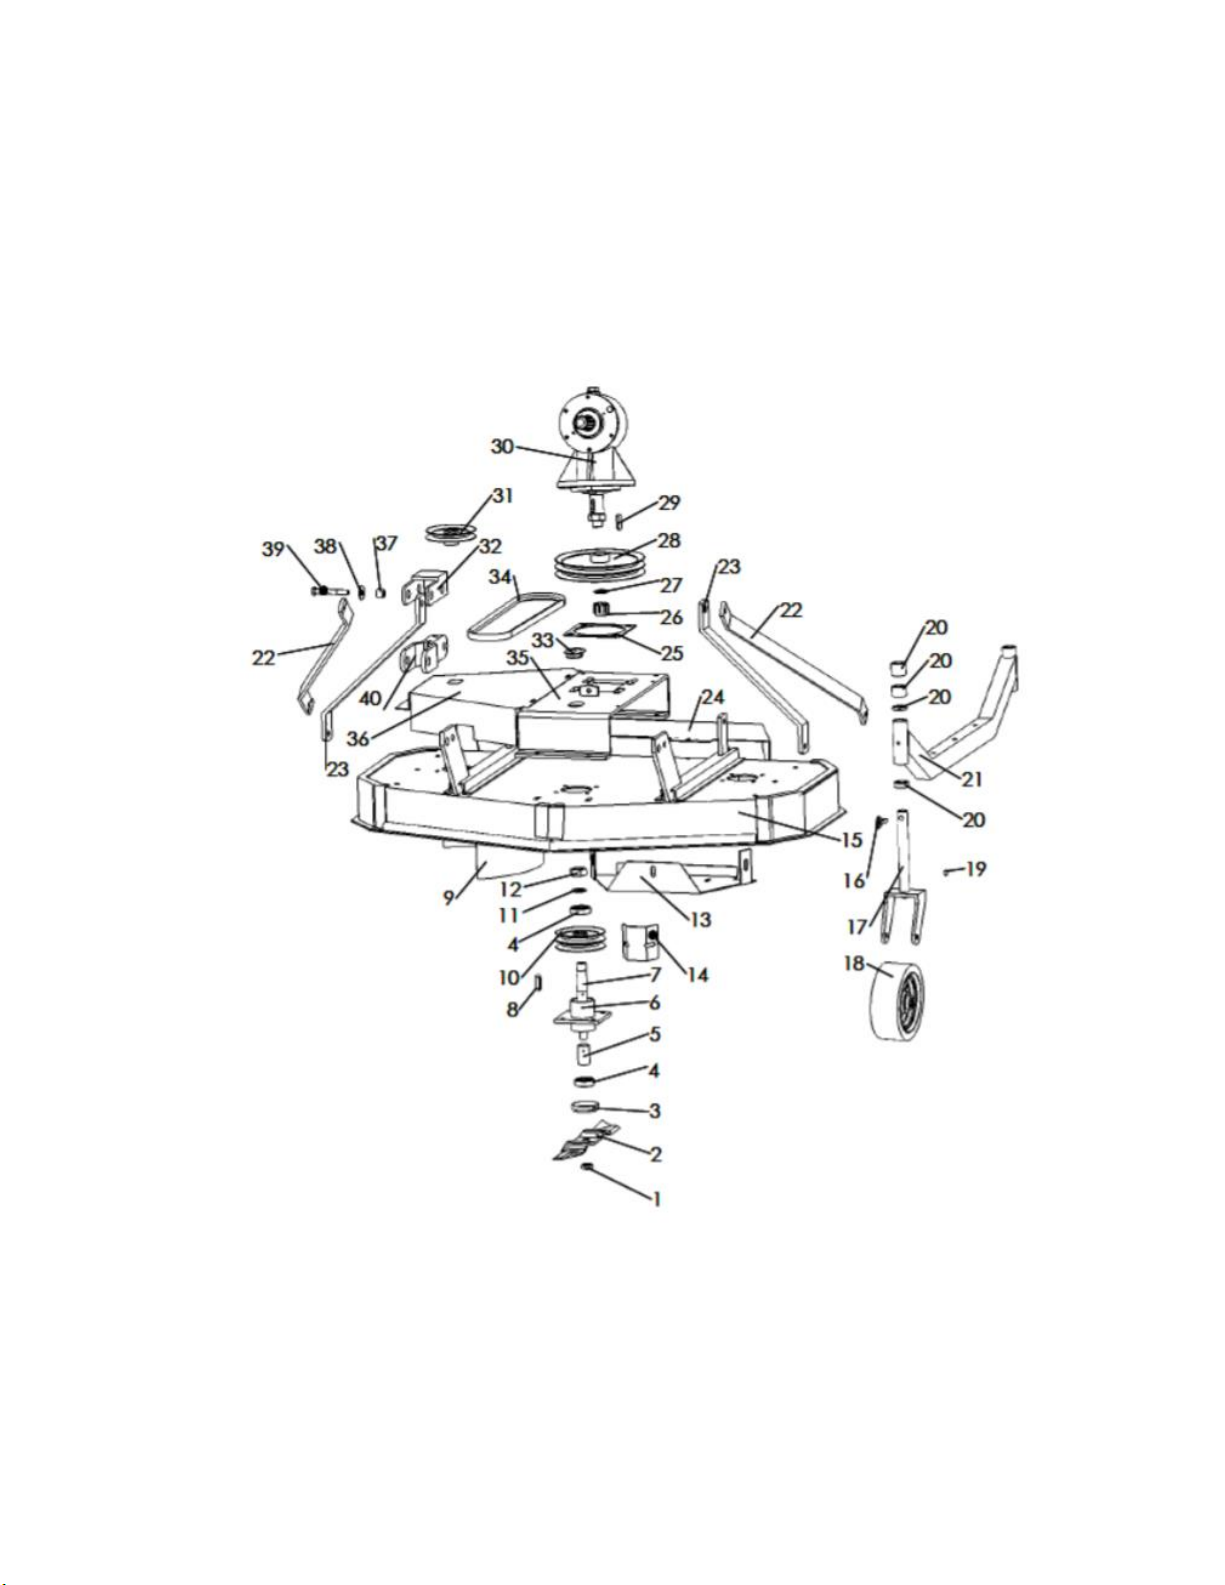
The Finishing Mower consists of three rotating shafts with five three steel blades attached to them. The blades
cut the grass while travelling over the working area. Rotational power to the shaft is provided by the tractor PTO
through the gearbox in the center of themachine.
The Finishing Mower attaches to the 3 point hitch on the tractor.
4. Operation
Checking before Operating
Before operating the machine, the following areas should be checkedoff:
1Before starting up the machine, check and lubricate all external grease points and ensure that all
lubricated parts inside the machine have been oiled.
2Use only an agricultural tractor of horsepower within limits of the machine specified.
3Check that the machine is properly attached to the tractor. Be sure retainers are used on the mounting
pins.
4Check the oil level in the gearbox. Add as required.
5Check that the tractor PTO shaft turns freely and that the machine drive shaft safety cover can telescope
easily.
6Check the blades. Be sure they are not damaged or broken. Repair or replace as required.
7Check and tighten the blade bolts.
8Check for entangled material in all rotating parts. Remove this material.
9Install and secure all guards, doors and covers before starting.
10 The chain on the protective parts of the universal joint shall be guaranteed in good condition, in case,
automatic rotation occurs.
Attaching / Unhooking
The Finishing Mower should always be located on a level, dry area that is free of debris and other foreign objects.
1. Remove protective cover from tractor’s PTO shaft, lower link and suspension mechanics of tractor. It
may be necessary to add weight to the 3 point hitch to lower the lift arms.
2. Reverse tractor at low speed towards the Finishing Mower and raise the lower links to proper level.
3. Connect tractor’s lower links with Finishing Mower’s left and right lower suspension pins. Connect the
tractor’s upper link with Finishing Mower’s upper suspension bracket and insertpin.
4. Attach the machine drive shaft to the tractor’s PTO shaft, slide the universal joint over the shaft and push
on the universal joint until the lock pin clicks into position. Pull on the universal joint to be sure it is locked
in position.
5. Check the length of the PTO drive shaft, there must be at least two thirds engagement to operate correctly.
6. If the drive shaft is too long it may need to be shortened.
7. Make sure the machine drive shaft telescopes easily and the shield rotates freely.
8. Use the 3 pint hitch to raise the machine from the ground before moving the machine.
9. Reverse the above procedure when unhooking the machine from the tractor.
CAUTION: Before attaching the mower to the tractor, the tractor and mower should be turned off.

5
Machine Running-in
.
Although there are no operational restrictions on the Finishing Mower, when used for the first time, it is
recommended that the following mechanical checks bemade:
A.
After operating for ½ hour or after completing 2 acres:
1. Check and tighten all nuts, bolts and other fasteners.
2. Check that the blades are in good condition and swing freely.
3. Check the oil level in the gearbox. Add as required.
4. Check that the machine drive shaft shield turns freely.
5. Lubricate all grease points.

6
After operating for 5 hours and 10 hours:
6. Repeat items 1 to 5 of Section A.
7. Press grease in each nipple three to five times.
8. Clean the machine, remove all grass and mud.
Field Operation
1. Place the 3 point linkage into its ‘float’ operating mode to allow the machine and the hitch to move up
and down.
2. Pull the machine into the field and align with the working area.
3. Adjusting the height: There are 4 sets of adjusting spacers on the wheel fork, which make the cutting
height range from 25mm to 100mm. Add or reduce adjusting spacer to get a desired cuttingheight.
4. Starting the Finishing mower:
a. Run the tractor engine at low idle.
b. Slowly engage the PTO control to start the mower.
c. Slowly bring the engine to the rated PTO speed. Never exceed rated speed.
d. Lower the mower to the ground and proceed with mowing.
5. Stopping the Finishing mower:
a. Slowly decrease engine speed to low idle.
b. Disengage PTO clutch slowly.
c. Place all controls in neutral, lower machine, stop engine and turn off ignition beforedismounting.
6. Ground speed:
Travel speed can vary between 5 and 13 kph depending on the grass and terrain conditions. It is the
responsibility of the operator to note the condition of the job being done and set the speed to obtain a
quality cutting job and maintain control of the mower. Decrease speed if you are producing a ragged cut,
leaving patches uncut or it is bouncing.
Routine Service and Maintenance
The Daken Finishing Mower is designed to cut grass on a finished surface. It is a simple and reliable system that
requires minimal maintenance. However, to prolong the life of your Finishing Mower, it is important and
recommended to carry out regular service and maintenance. The period recommended is based on normal
operating conditions. Severe or unusual conditions may require more frequent maintenance.
A.
Fluids and Lubricants
1. Grease: Use multi-purpose lithium based grease.
2. Gearbox Oil: Use N46 drive or 80w gear oil or equivalent for all operatingconditions. Gearbox
Capacity: 0.85 litre.
IMPORTANT: Check the oil level only when the Mower is cold and on level ground.
B.
Greasing
1. Use a hand-held grease gun for all greasing.
2. Wipe grease nipples with a clean cloth before greasing to avoid injecting dirt and grit.
3. Replace and repair broken grease nipples immediately.
4. If grease nipples will not take grease, remove and clean thoroughly. Also clean lubricant
passageway. Replace grease nipple if necessary.
NOTE: All maintenance, repairing, cleaning and lubricating must be conducted when the tractor and
mower are stopped and turned off.

7
C.
Maintenance
Daily Maintenance:
Check and tighten all nuts, bolts and connectionparts.
Check the oil in the gearbox. Fill it up to dedicated line ifnecessary.
Press grease in each nipple three to five times.
Clean the mower; remove all grass, mud anddebris.
Seasonal Maintenance:
Check the machine as for Daily Maintenance.
Check the oil in the Gearbox; replace if it is bad.
Check the bearings and oil seals of blade spindles to make sure mud and water have not been
entering. Disassemble, clean and replace them if necessary. Press grease intothem.
Check the distance between bearings and gears. Adjust if necessary.
Annual Maintenance:
Clean mud, grass and debris from the machine thoroughly.
Let the oil in the Gearbox drain out thoroughly. Check and clean it. Fill with new Gearbox oil up to
the dedicated oil level.
Check all clearance between bearings and gears if you have replaced them. Please run it without
load for 3-5 minutes.
Check and clean blade axles. Replace oil seals if required and press grease intothem.
Check all blades, replace them if they are worn or damaged.
Repair the side skirts if necessary. Replace damaged or broken protectivedevices.
Remove the drive shaft from the mower. Check and replace any components that are damaged or
worn. Reattach the drive shaft to the mower –it should telescope easily, and the guard should turn
freely on the shaft. Grease if necessary.
Drive belt Tension adjustment.
•With the tractor switched off, and the park brake engaged, remover the two covers. Loosen the 4
gear box mounting bolts, adjust the rear nut to side the gearbox mount forward or back as required.
5. Trouble Shooting
In this section we have listed many of the problems, causes and solutions to the problems that you may
encounter.
Problem
Cause
Solution
Finishing Mower doesn’t turn
Tractor clutch slips
Tighten or replace slip clutch
PTO shaft slips
Repair tractor PTO clutch
Wheel Failure
Traveling too Fast
Slowdown
Poor cutting job
Travelling too fast
Slow down
Blades dull
Sharpen blades
Grooves in grass
Bent blades
Straighten or replace blades
Scalping
Mower too low
Raise the mower
Grass being left
Travelling too fast
Slow down
Top link too short
Extend top link
Noisy gearbox
Poor gear mesh
Remove input shaft and gear. Replace worn parts.
Reassemble and use shims to give a gear backlash of 0.006-
0.018 inches measured at 2 13/16” from shaft centreline.
Clutch slips
Overload
Slow down
Clutch loose
Tighten springs on clutch plates
Clutch worn out
Replace clutch components or assembly as required.
Vibration
Out of balance
Check for bent, damaged or broken blades. Repair or replace
as required.

8
6.Parts Illustration
The following section contains a parts list for your machine. When ordering parts for your
Finishing Mower, always give your dealer the Model and Serial number of your machine. This
will assist him in ordering and obtaining the correct parts. Use the exploded view and parts list
of the area of interest to exactly identify the required part.

9
This manual suits for next models
2
Table of contents