DFSK K01H User manual


Thank you for choosing a DFSK K01H for your business.
We hope the vehicle gives you years of reliable service.
Please be aware that this manual covers a range of DFSK K01H series
vehicles, some features of which may not be available on your vehicle.
As our products are in continuous development and improvement, the
company reserves the right to upgrade the technical state and parameters
at any time.
Sokon Automotive.
K01H HANDBOOK

Contents
I. Identicationofthevehicle
1. Vehicle Identication Number
2. Engine Number
II. TechnicalData
1. Engine Specication
2. General Specications
3. Tyre Pressures
4. Wheel Alignment Parameters
5. Capacities
III. VehicleFeaturesandFunctions
1. Door locks
2. Keys
3. Front Door Window
4. Seats
5. Seat Belts
6. Dashboard
7. Ignition switch
8. Lights, turn signal and high/low beam
switch
9. Windscreen wiper and washers
10. Horn
11. Hazard asher switch
12. Fog light switch
13. Heater
14. Heater Control Panel
15. Instrument Cluster
16. Cigarette Lighter
17. Ash Tray
18. MP3 player & radio
19. Glove Box
20. Interior Light
21. Interior Rear-View Mirror
22. Exterior Mirrors
23. Sun Visor
24. Grab Handle
25. Tool kit
26. Handbrake
27. Foot Pedals
28. Gear Lever
29. Bonnet
IV. OperatingtheVehicle
1. Running-in
2. Starting the engine
3. Driving
4. Braking
5. Driving in snow and ice
V. CareandMaintenance
1. Fuel
2. Engine oil
3. Air lter
4. Transmission uid
5. Brake uid
6. Washers and wipers
7. Fuse box
8. Spare wheel
9. Changing a wheel
10. Engine fails to start
11. Jump start
12. Overheating
VI. Check&Service
1. Regular checks and maintenance
2. Service intervals
VII. Towingthevehicle
1. Towing the vehicle in an emergency
VIII. TipperBodyOperation
1. Isolator Switch
2. The Tipper Body Controls
IX. HandoverProceedure
X. WarrantyProceedure
XI. ServiceRecord
XII. BreakdownRecovery

I.IdenticationoftheVehicle
1.VehicleIdenticationNumber
The vehicle identication number (VIN) is located at the bottom of the windscreen on the left-
hand side, on the centre of the bulkhead inside the cab and on the chassis side rail beneath
the driver’s seat.
2.TheEngineNumber
The serial number of the engine will be found stamped on the top of the engine.
Both numbers should always be quoted with any vehicle enquiries, as the Factory records
are always led against the VIN and engine number, which aids traceability.
I. Identication of the vehicle
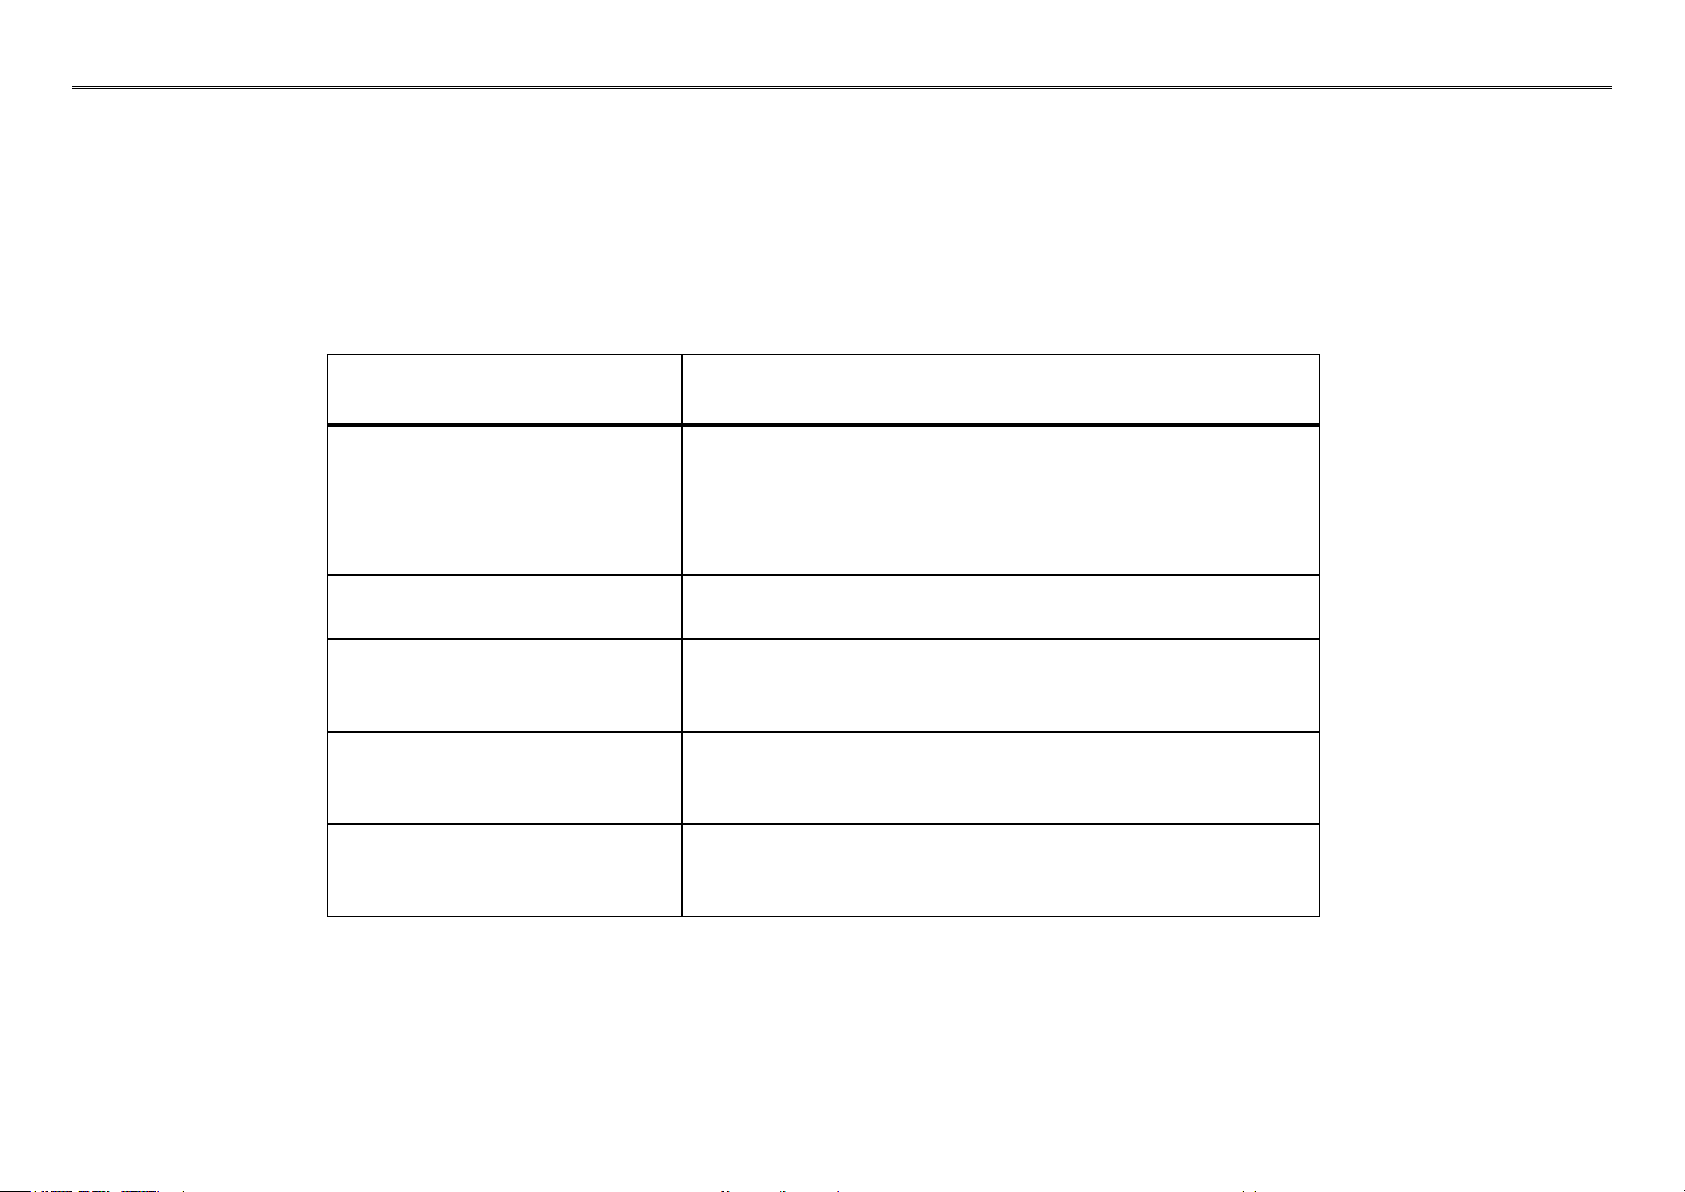
Model DK12-06
Type Four cylinders in line.
16 Valves, 4-stroke, water cooled, DOHC, VVC, EFI
petrol engine
Displacment 1240cc
Power Output kW(rpm) |hp 67/6000 | 90hp
Max Torque NM/(rpm) 119/3800
Fuel 93 RON or higher unleaded petrol
II.TechnicalData
1.EngineSpecications
II. Technical Data

K01H
L W H (mm) 4280 x 1560 x 1850
Load Space (mm) 2240x1400x350 / 2440x1400x530
Wheelbase (mm) 2760
Track (mm) 1310/1310
Kerb Weight (kg) 990
Gross Weight (kg) 1865
Seats 2
Turning Circle (m) 10.3
Max Gradient (%) ≥30
Fuel Tank Capacity (L) 40
Gearbox Type 5MT
Max Speed (mph) 74.5
Fuel Consumption combined (mpg) 37.6
FR/RR Suspension (mm) 555/1075
Tyre/wheel combinations 165R13LT-8PR 94/93S 5J x 13 40mm
2.GeneralSpecications
II. Technical Data
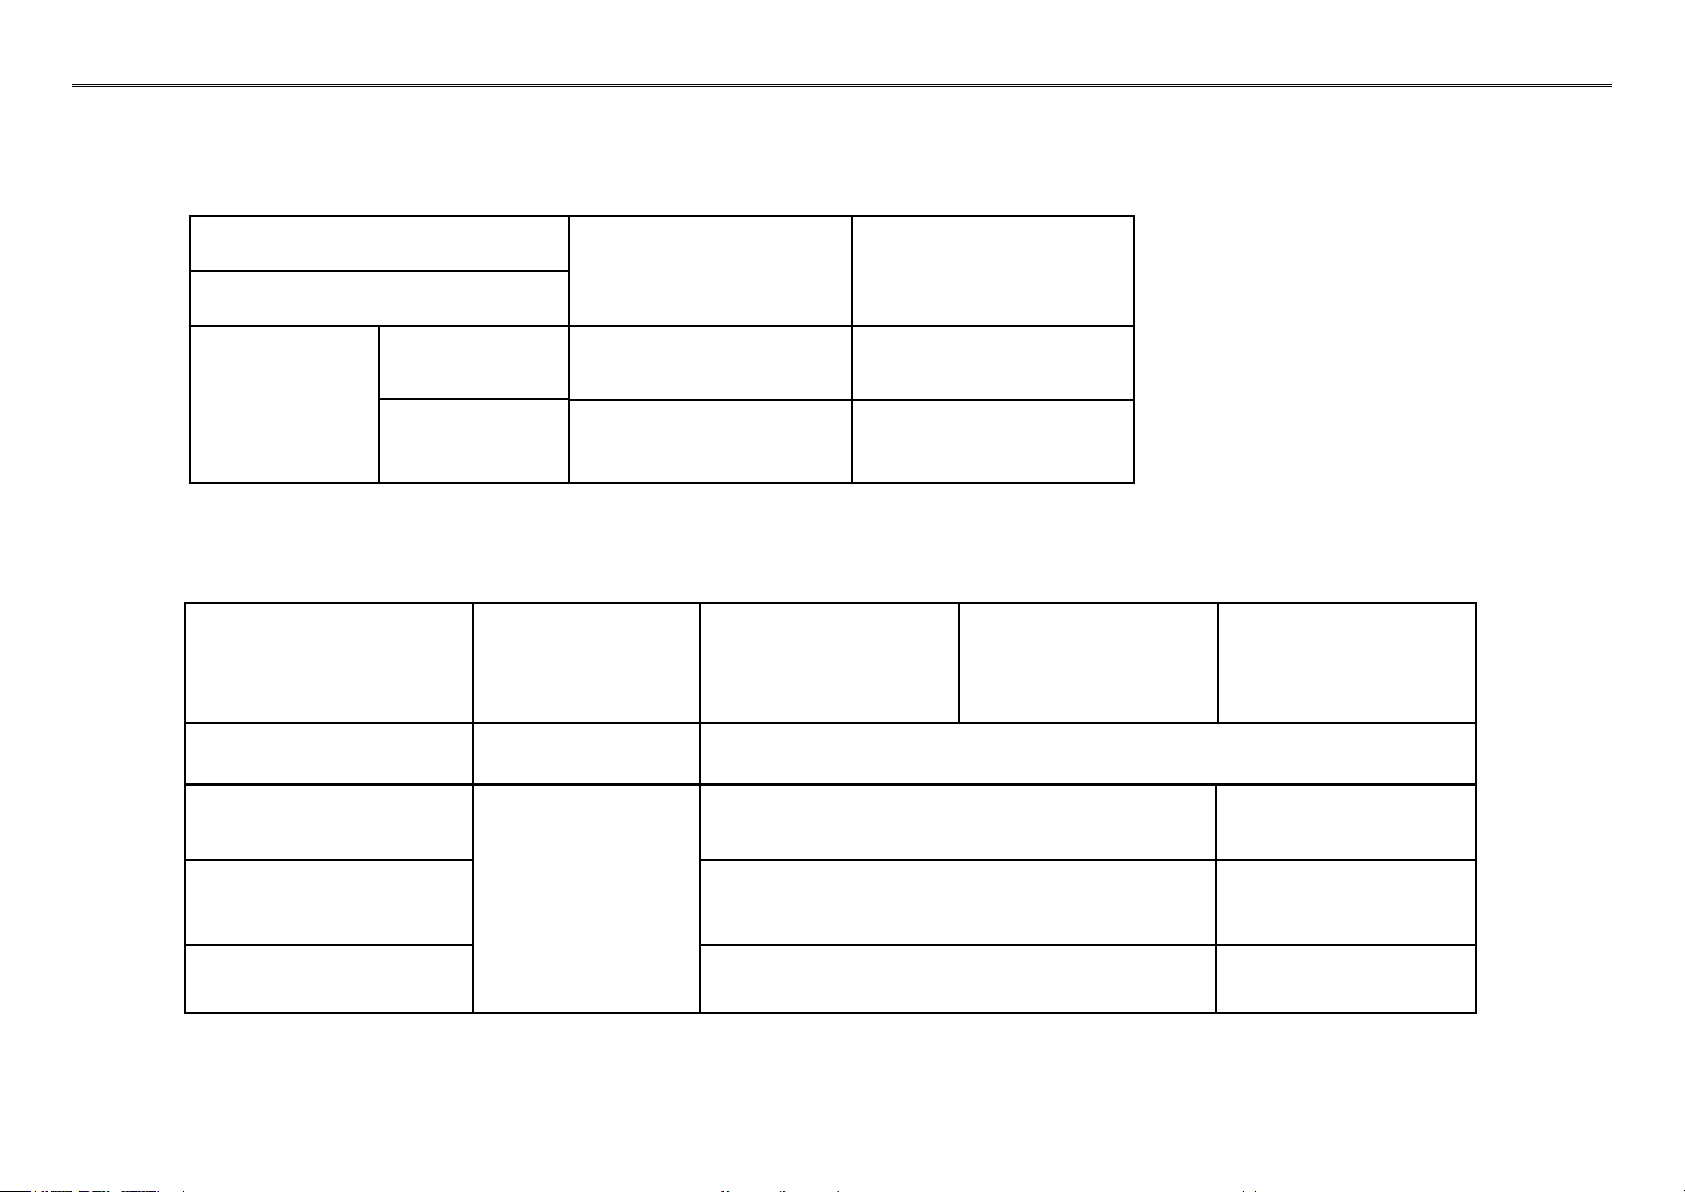
3.Tyrepressures(psi)
Tyre size
165R13LT (psi)
K01H Unladen
Fully laden
Front wheel Rear wheel
26 26
26 54
4.WheelAlignment
Item Unit EQ1020TF
Truck
EQ1021NF
Truck (Double cabin)
K01H
EQ1021GF24Q7
Truck
Toe-in mm 0~5
Tyre camber angle
(°)
1°30’ 1°30’
Master pin inclination
angle
8 8
Master pin caster angle 2°30’ 2°30’
II. Technical Data

5.Fluidsandoilcapacities
Item Unit
DK12-05 DK12-06
Cooling system L 5.2
Engine oil L 4.2
Fuel tank L 40
Transmission uid L 1.3
Rear axle uid L 1.2
Braking system uid
DOT 4
L 0.6
II. Technical Data

III.VehicleFeaturesandFunctions
1.DoorLocks
Inside the Vehicle
All the doors can be locked by pressing down the lock button. The door can not be operated from inside or outside the
vehicle. Pull the lock button to un-lock the door.
Outside the vehicle
The front doors can be locked and un-locked using the key. The locking button is up while un-locked, and down when
locked.
2.Keys
This vehicle is supplied with two keys that operate the ignition switch, the doors, and the fuel ller cap.
3.FrontDoorWindows-Electric
The operating switches are located on the door trim inside the door.
Switch 1 is for the driver to control the window on the passenger side.
Switch 2 is for the window in the driver’s side.
Switch 3 is located on the passenger side door trim for operating the passenger side window.
Button 4 is a toggle switch, which disables and re-enables switch 3, for the passenger side window.
Depress the button, the window will open.
Pull up the button, the window will close.
III. Vehicle Features and Functions

4.Seats
Adjustment of the Seats:
Lift the handle at the front of the seat and slide the seat forwards and rearwards as required.
Pull up the backrest handle beside the seat to adjust the seat back angle.
The backrest can also be folded forward.
Note:Donotadjusttheseatwhiledriving,ortheseatmaymoveabruptlyforwardorbackward
whichmaycausethelossofcontrolofthevehicle.
5.SeatBelts
While driving, seatbelts must be worn at all times.
To secure, pull the belt out steadily and insert the tongue into the buckle rmly until you hear a click.
Press the red button on the buckle to release the clip and the belt.
The seat belt will automatically retract back into the stowed position.
Do not attempt to make any modications to the seat belt.
The seat belts should not come into contact with harsh cleaning chemicals. If you need to clean the
belt use a pH neutral soap and water. If the seat belt shows signs of wear or is dirty or damaged,
then it should be replaced by an authorised service centre.
It is very important that if a seat belt is in use during an accident, even though there may not be any
obvious damage, it should be changed.
Seat belts are designed to be used by only one person at a time.
III. Vehicle Features and Functions
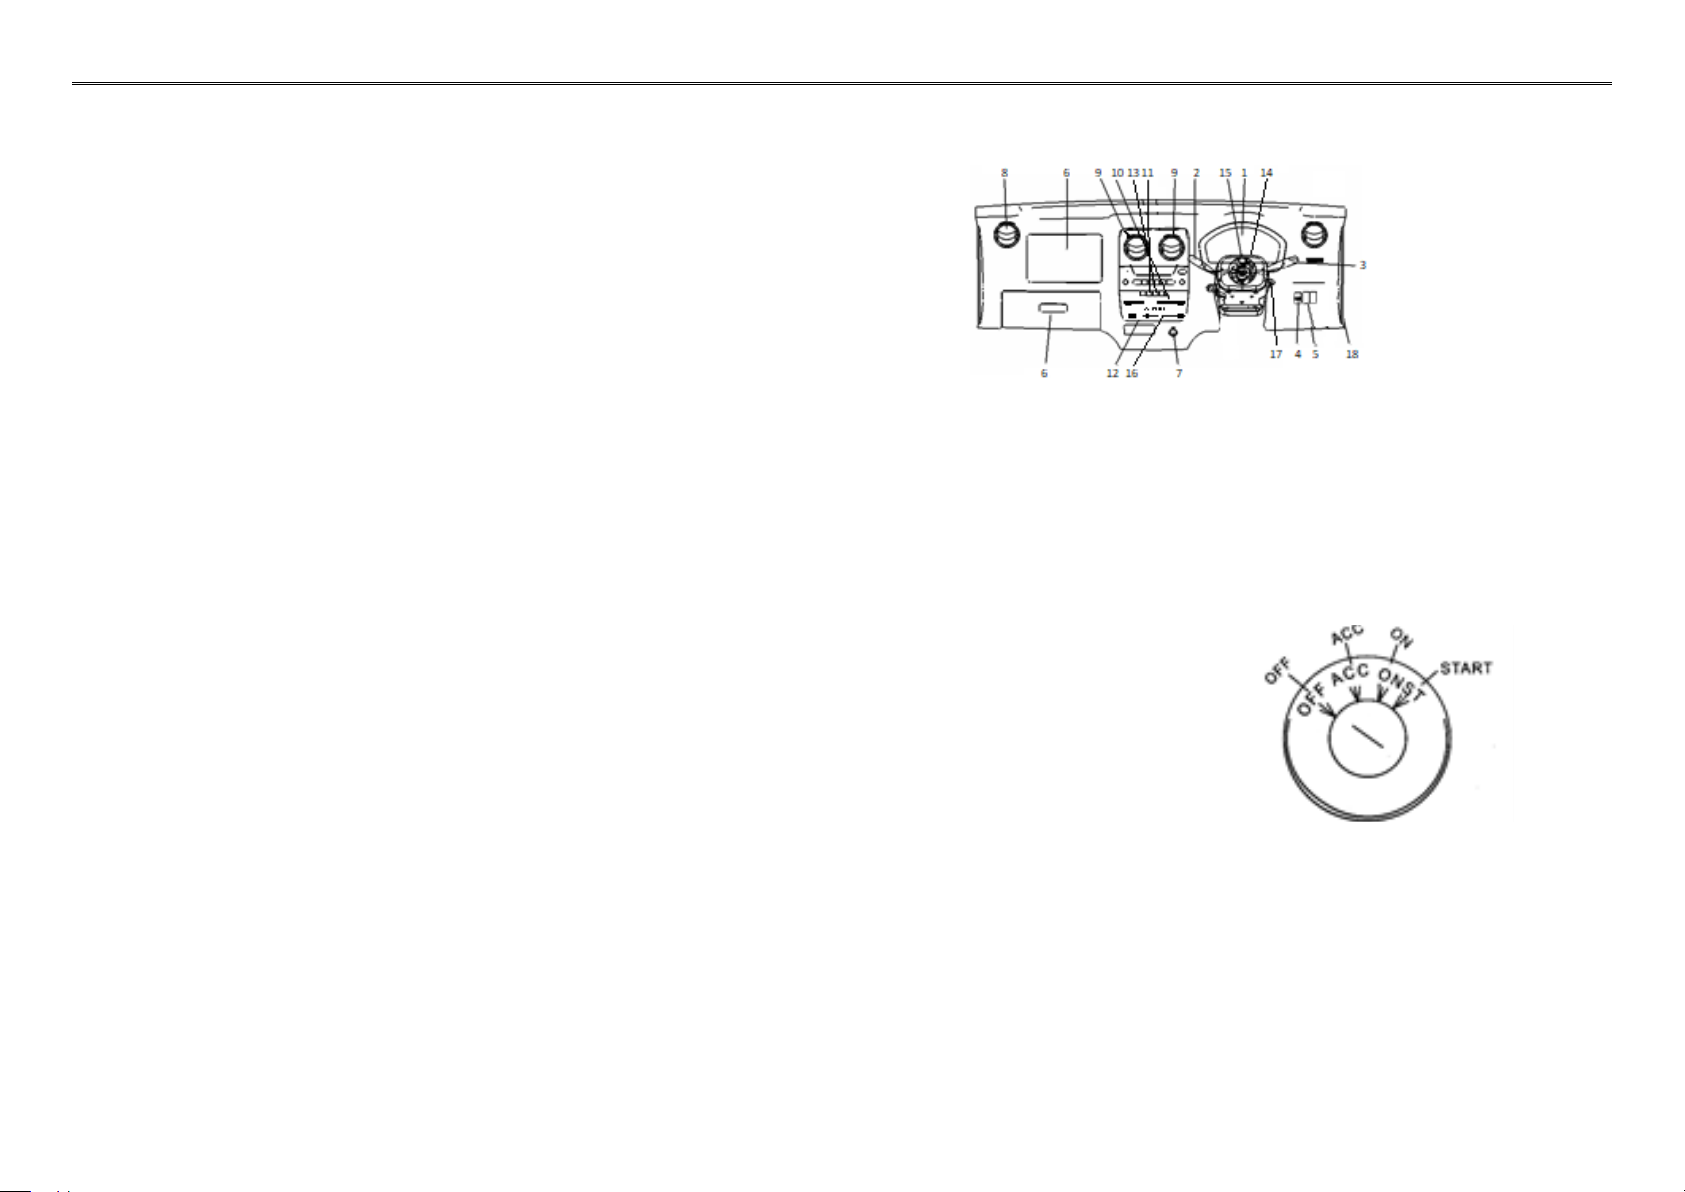
6.Dashboard(RHDversionillustrated)
1. Instruments and Gauges
2. Wiper & Washer Switch
3. Direction Indicator and Headlamp/High/Low Beam
Switch
4. Air Con Switch
5. Optional Switch Cover
6. Compartment
7. Cigarette Lighter
8. Heater Vents
9. Heater Vents
10. A/C Switch (optional)
11. Hazard Warning Lights
12. Rear Foglamp Switch
13. Front Foglamp Switch
14. Trip Meter Reset Button
15. Glove Box
16. Heater Controls
17. Ignition Switch
18. Bonnet Release Leaver
7.IgnitionSwitch
Located on the right-hand side of the steering column.
1. ‘OFF’: the auxiliary equipment will not function. Only the lights and horn will work.
The key can only be removed when in this position. The steering lock is also engaged.
2. ‘ACC’: connects power to auxiliary equipment such as the radio & cigarette lighter and
deactivates the steering lock.
3. ‘ON’: activates the engine ignition system.
4. ‘START’ : In this position the starter motor cranks the engine.
Do not keep the ignition key in the ’ON’ position for a long time without the engine running or the battery will discharge.
Note:Theworkingtimeforthestartershouldnotexceed5seconds.Iftheenginecannotbestarted,pleasewaitat
leastvetotenseconds,andtryagain.Iftheenginefailstostartafterseveralattempts,pleasecheckthefuellevel,
theelectricalsystemsorcontactanauthorisedDFSKservicecentre.
III. Vehicle Features and Functions
19

8.Lights,IndicatorsandHigh/LowBeamSwitch
The lighting/indicator stalk is in
the left side of the steering column.
9.WindscreenWiper/Washer
There are four positions:
OFF:The wipers do not operate.
INT:Intermittent wipe.
LO:Wipers operate at normal speed while driving
HIGH:High speed wipe.
Pulling back on the stalk activates the washers.
Note:
Infreezingweather
conditions,thewindscreen
shouldbeclearedoficeand
snowbeforeoperatingthe
wipers.
10.Horn
The horn is activated by pressing
down on the horn symbol on the
steering wheel.
11.HazardWarningLights
The hazard warning lights operate when the
ignition is in any position, or the key is not in the
ignition.
Press the hazard warning switch and all four
indicators will ash at the same time. Press the
switch again to turn o the lights.
Only use this function when the vehicle is stationary as a
warning to other road users.
12.FogLightSwitch
FrontFogLight
Turn the headlight switch to the
second position and press the
fog light switch. The fog light will
illuminate along with the indicator
light; to turn o press the switch
again.
RearFogLight
Turn the headlight switch to the second position and press
the fog light switch. The fog light will illuminate along with
the indicator light; to turn o press the switch again.
III. Vehicle Features and Functions
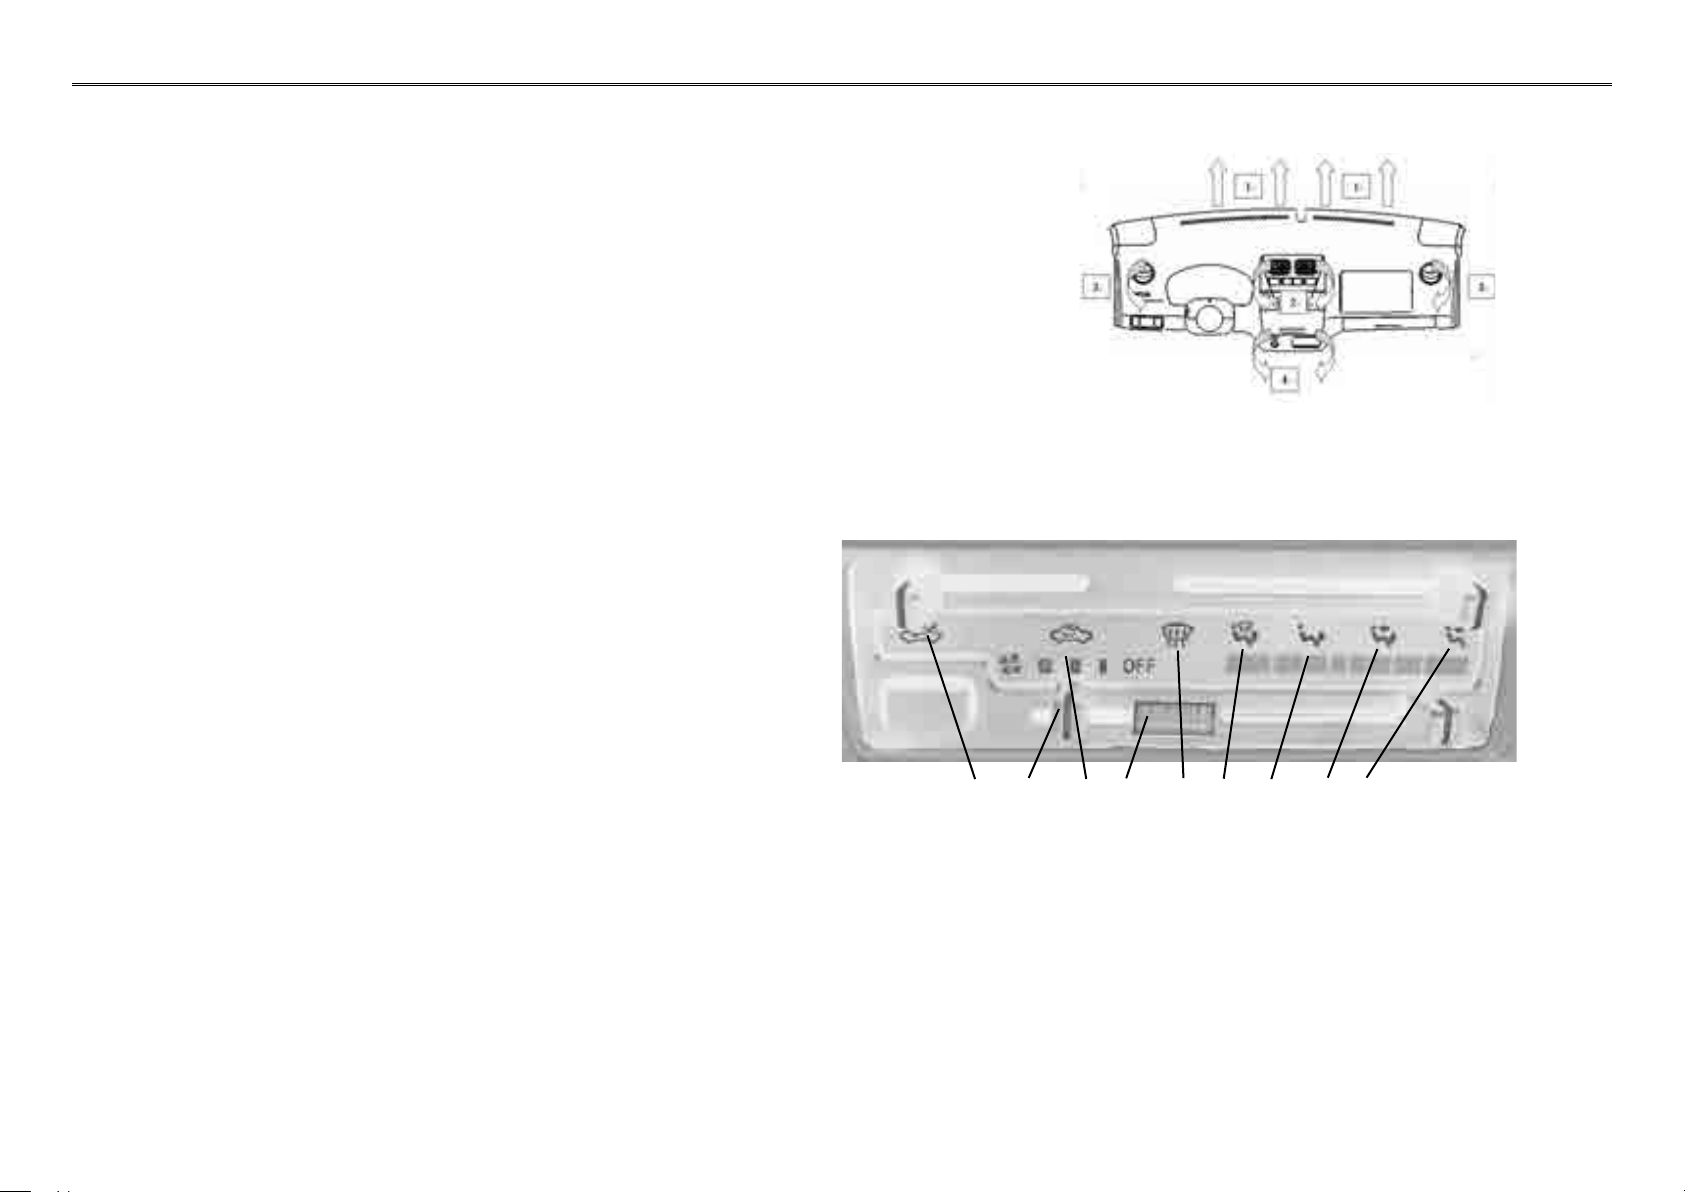
13.HeatingSystem:
1. Windscreen Defrost Vents
2. Centre Vents
3. Side Window Vents
4. Floor Vents
14.HeaterControlPanel
1. Air is directed through the centre and side vents.
2. Air is directed through the centre and oor vents.
3. Air is directed through the oor vents only.
4. Air is directed through the oor vents and the wind-
screen defrost vents.
5. Air is directed to the windscreen defrost vents only.
6. Re-circulated air Control. Control the circulation of
the air from inside & outside the vehicle.
7. Temperature control switch. Control the air temper-
ature (blue is cold, and red is warm)
8. Fan Speed Control
9. Ventilation Switch
This button controls the direction of air ow to the vents inside the vehicle.
III. Vehicle Features and Functions
4 237 5986 1
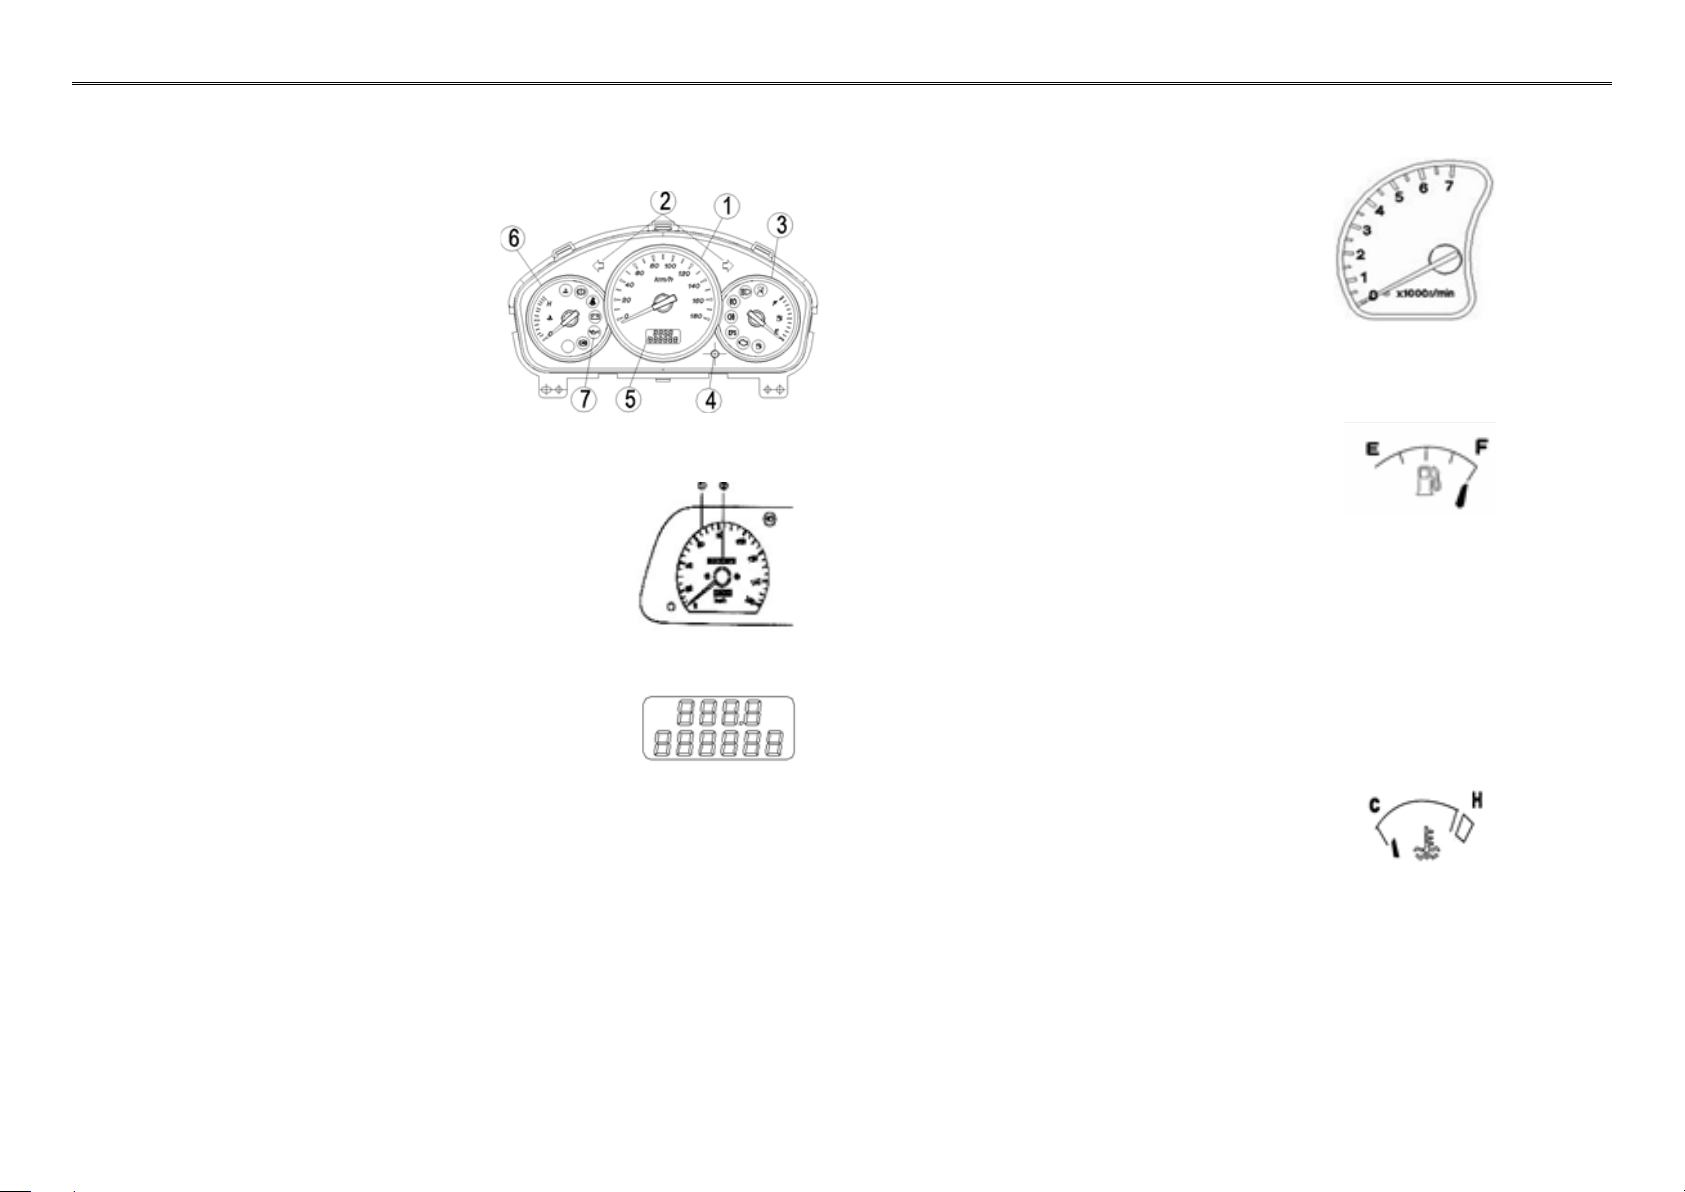
15.InstrumentCluster
1. Speedometer
2. Indicator Lights
3. Fuel Gauge
4. Trip Meter Re-Set Button
5. Odometer and Trip
Meter
6. Engine Temperature
Gauge
7. Warning Indicator Lights
Speedometer
The speedometer indicates the vehicle
speed in mph.
Odometer
The odometer has six -gures to show
the total vehicle mileage, the minimum
unit of distance is 1 mile. The trip meter
is calibrated to 0.1 of a mile.
Note:
Pleasepayattentiontotheaccruedmileageand
maintainthevehicleaccordingtotheservice
manual.
Tachometer
Shows the engine revolutions with 1 unit
as 1000rpm.
FuelGauge
When the pointer at the “F” position, it
indicates that the fuel tank is full of fuel;
when at the position “E”, it shows the fuel
tank is empty.
Note:Thefuelllerislocatedontheright-handside
ofthevehicle,justbeneaththerearofthedriver’s
door.
TemperatureGauge
While driving, the water temperature should
be kept in the “normal” range, that is: mid-
way between “C” & “H”. When the pointer
moves to the “H” it means the engine is overheating. You
should stop the vehicle.
III. Vehicle Features and Functions

WarningLampsandIndicators
Indicator Lamp
When the ignition switch is in the ON position,
the indicators will operate. To indicate left push
down the indicator stalk, to indicate right push
the indicator stalk upwards.
Headlamps
When the headlights are turned on, either main
beam or dipped, the headlamp indicator light
will be illuminated on the instrument panel.
HazardWarningLights
When the hazard warning lights are activated
this indicator light will ash on the instrument
panel.
Note:Hazardwarninglightsareonlytobeusedinan
emergency.
EngineOilPressure
When turning the ignition switch on, the engine
oil warning light comes on, then after the engine
is started it will go o immediately.
If the light fails to go o immediately, or illuminates while
driving, it indicates the engine oil level is dangerously low and
must be checked before driving the vehicle further. Failure to
do so risks serious damage to the engine.
Ignition/BatteryCharging
When turning the ignition switch on, the battery
warning lamp lights immediately. Once the
engine is started, it will go out immediately.
If the light does not extinguish immediately, or illuminates
while driving, it indicates an issue with the battery charging
system. To rectify this problem, you should contact a DFSK
service centre as soon as possible.
Brakes
When the ignition switch is in the “ON” or
in the “START” position, this warning light is
illuminated, and it will go out immediately the
engine starts. If the level of the brake uid is
below the minimum, the light will remain on.
Top up the uid reservoir with brake uid as specied in the
maintenance book.
Note:Drivingyourvehiclewiththewarninglightonis
dangerous.Asignicantdecreaseinbrakingperformance
maybeexperiencedanditmaytakeyoulongertostopyour
vehicle.Ifthewarninglightfailstogoout,pleasecontacta
DFSKservicecentreassoonaspossible.
SeatBeltWarningLamp
The seat belt reminder warning light will be
on if the engine is running and the safety belt
of either the driver or passenger has not been
fastened.
ParkingBrakeWarningLamp
When the engine is running the handbrake warning
light will be on as long as the handbrake is engaged.
III. Vehicle Features and Functions
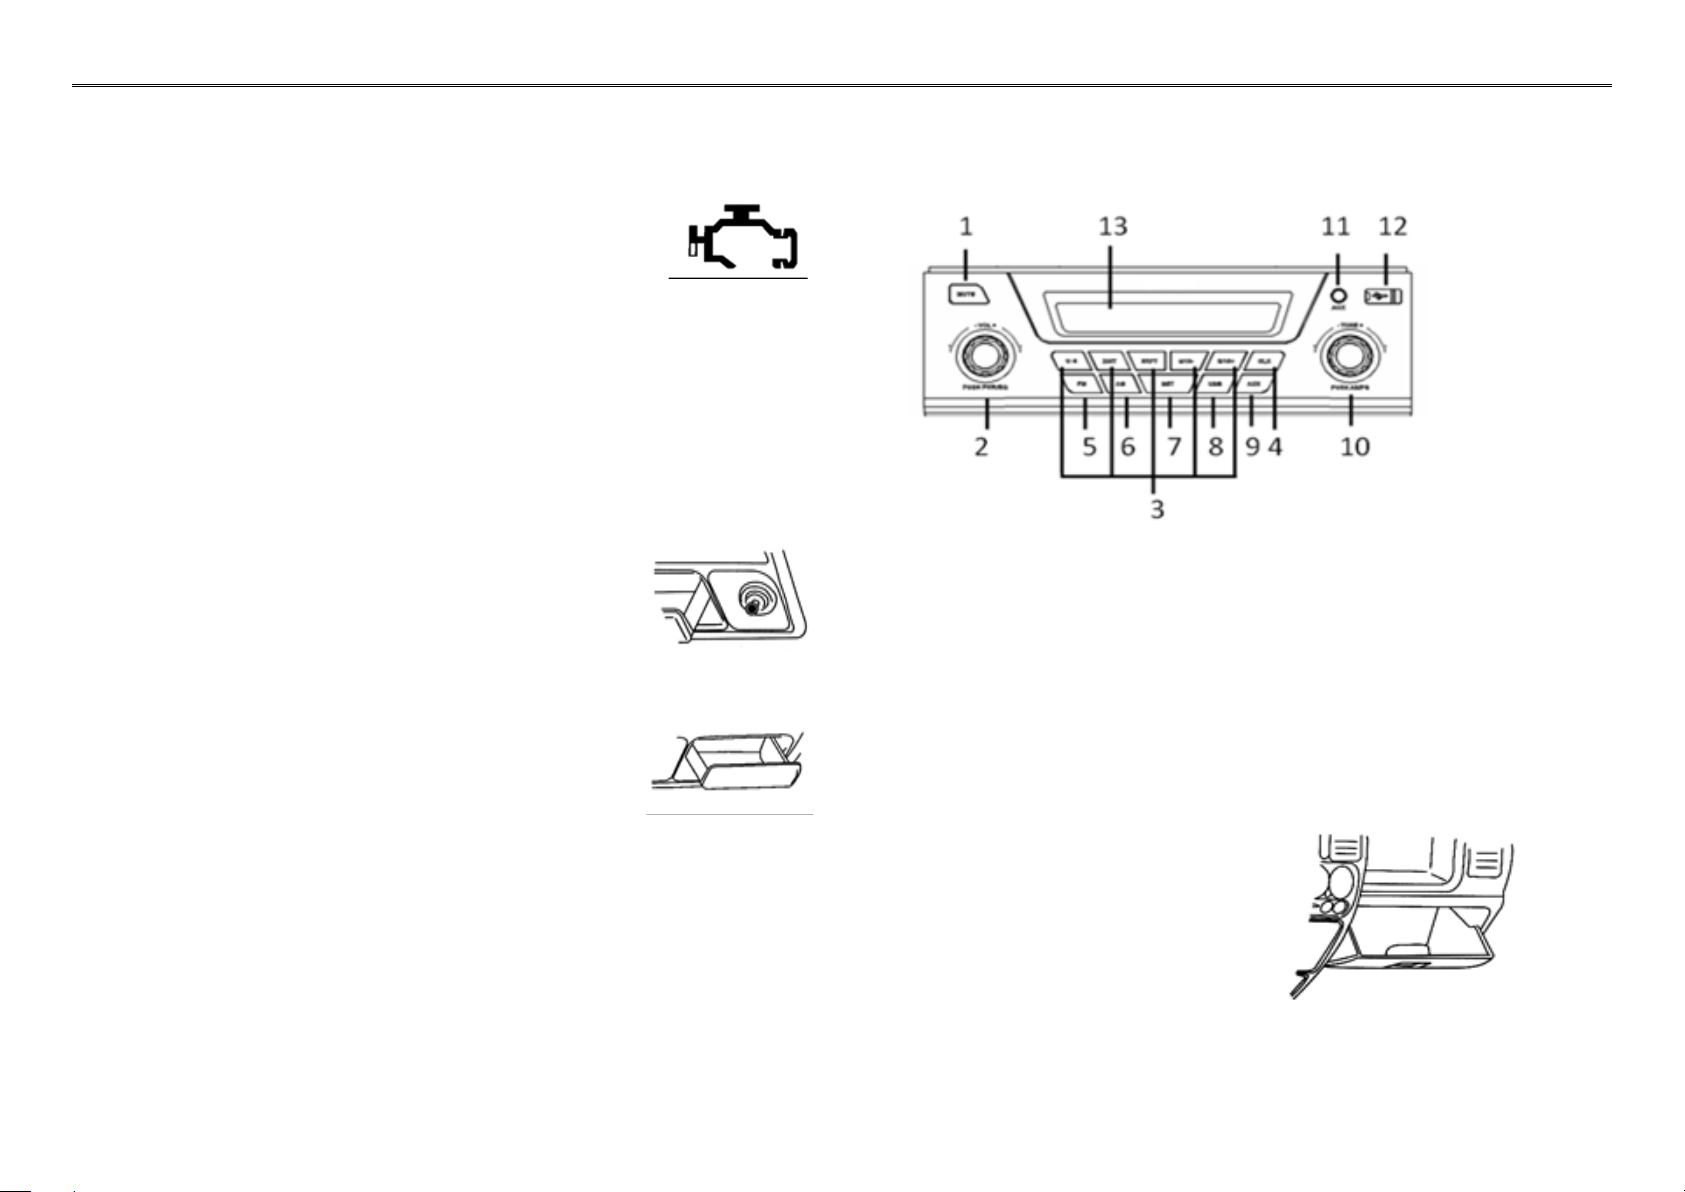
EngineWarningLight
When the ignition switch is in the “ON”
position, the warning light will be illuminated
showing the circuit is functioning correctly.
After the engine is started, the engine
warning lamp will go out. If the light fails to go out when
the vehicle starts, or comes on while driving, it indicates a
possible engine system malfunction. Please contact a DFSK
service centre as soon as possible.
16.CigaretteLighter
To use press the centre button in. After
several seconds it will pop out, back to its
original position. It is then ready for use.
17.AshTray
To remove the tray for emptying, push
it downwards, then pull out from the
housing. To replace, align the runners and
push the tray back into position.
Note:Thecigaretteendshouldbeputintotheash
trayafterextinguishingit.
18.MP3Player&Radio
(Picture for reference only)
1. Power Switch & Volume
2. Forward/Back
3. Wave Band Tuner
4. Balance Control
5. Tone Control
6. Hour Setting Key
7. Minute Setting Key
19.GloveBox
The vehicle tool kit can be found
inside the glove box.
III. Vehicle Features and Functions
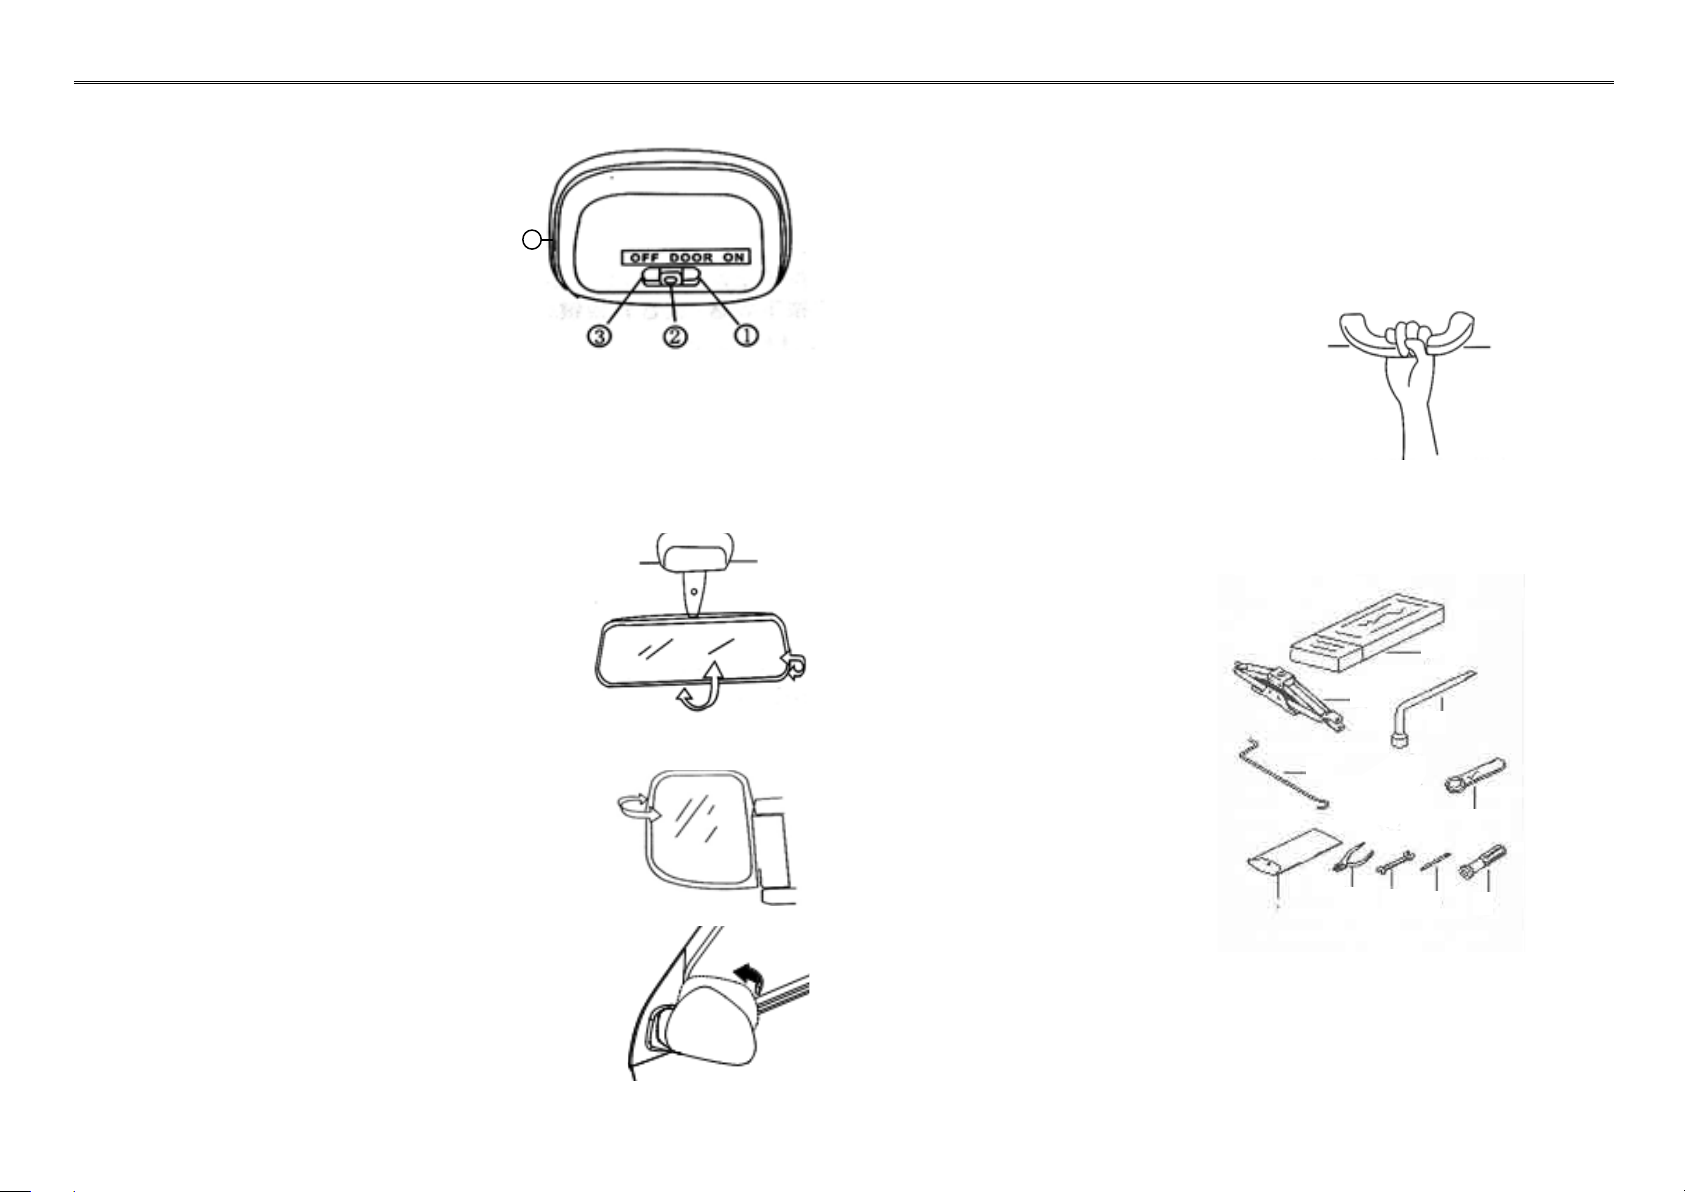
20.InteriorLight
1. “ON” the interior light will be
on.
2. “DOOR” the light is activated by
one of the doors being open.
3. “OFF” the interior light is o.
4. Individual reading light switch. Press once to turn on,
press again to turn o.
21.InteriorRear-ViewMirror
The interior rear-view mirror can
be rotated from side to side and
up and down along the central axis
to achieve the best position for the
driver.
22.ExteriorMirrors
The external door mirrors can be
manually adjusted, by pressing on
the edges of the mirror glass, so the
driver can gain a clear view behind
the vehicle.
Note:Objectsseeninthemirrorsmay
appearmuchsmallerandfurther
awaythanobjectsseenthroughthe
interiormirror.
23.SunVisor
The sun visor can rotate up and down on its pivot. It
can also un-clip and rotate towards the side window for
additional shade.
24.GrabHandle
A passenger handgrip is located in the
roof rail above the nearside door.
Note:Donothanganythingonthehandgripthatwill
obstructthedriver’slineofvision.
25.ToolKit
1. Tool Bag
2. Pliers
3. Spanner 12×14mm
4. Screwdriver bit
5. Screwdriver Handle
6. Spanner 19mm
7. Wheel Nut Brace
8. Crank for Jack
9. Emergency Warning
Triangle
10. Vehicle Jack - stored
under the bonnet.
The tools shown in the picture are one of each.
2,3,4,5,6,7,9 should be kept in the tool bag 1and stored
inside the vehicle in the glove box.
8 should be kept under the bonnet.
III. Vehicle Features and Functions
4
12
9
10
7
8
6
345
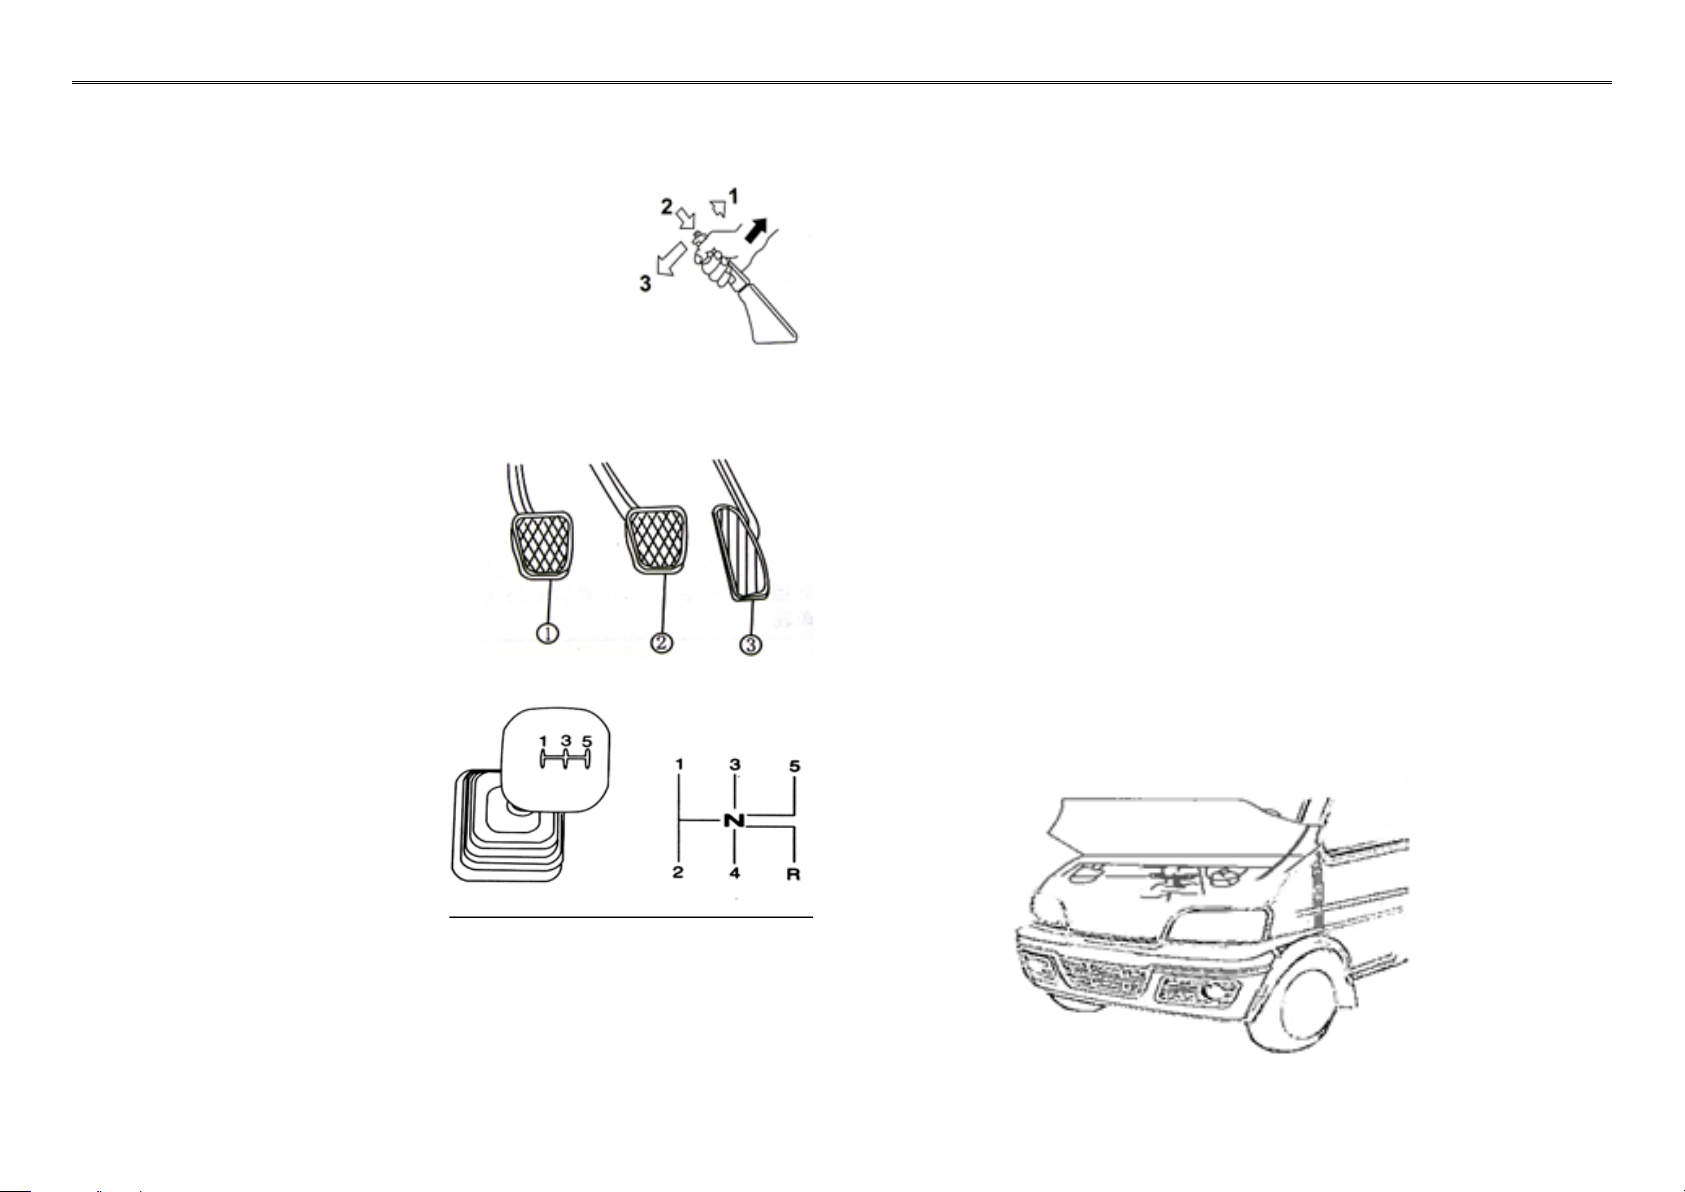
26.Handbrake
The handbrake is located between
the two front seats. The brake acts on
the rear wheels. When the handbrake
is applied, the indicator light for the
handbrake on the main instrument
panel will come on.
To release the handbrake, lift the lever slightly and depress
the button in the end of the lever and lower.
27.Pedals
1. Clutch Pedal
2. Brake Pedal
3. Accelerator Pedal
28.GearLever
1st gear position
2nd gear position
3rd gear position
4th gear position
5th gear position
Reverse gear position
Note:
Donottrytochangethegearleverstraightfrom5thgear
intoreversegear.
Pleaserstpushthegearleverbacktoneutralandthen
changeintoreversegear.
29.OpeningandClosingtheBonnet
The bonnet release handle is located beneath the right-
hand side of the instrument panel.
OpeningtheBonnet
1. Pull the bonnet release lever inside the cab.
2. Release the safety catch in the centre of the front edge of
the bonnet.
3. Open the bonnet and support with the strut.
ClosingtheBonnet
1. Remove the bonnet strut from the catch and secure it
fully in the clip
2. Lower the bonnet and allow it to drop under its own
weight for the last 30 cm.
2 R4
III. Vehicle Features and Functions

IV.OperatingtheVehicle
1.Running-in
The initial maintenance and running-in of the engine have a close bearing on your vehicle’s future performance and
dependability. We therefore recommend that you follow the procedures as detailed below:
1. The running-in mileage is 1,500 miles.
2. Do not exceed the running-in speed limit listed in the table below.
3. While running-in, the load carried shall be less than 400kg.
4. Do not idle the engine at high rpm before the engine has warmed up.
Gear The rst 1500 miles
The Max Recommended
Speed
Gear 1 10 mph
Gear 2 15 mph
Gear 3 25 mph
Gear 4 38 mph
Gear 5 60 mph
IV. Operating the Vehicle

2.StartingtheEngine
Before starting the engine ensure the gear lever is in the neutral position and the handbrake is applied.
Note:Oncetheenginehasstarted,releasetheignitionkeytoavoidcausingexcessivewearandpossible
damagetothestartergear.Whentheengineisstartedfromcoldavoididlingatahighrpm.
1.
To start, turn the ignition key to START. It is not necessary to depress the throttle whilst starting the engine.
2. If the engine fails to start after several attempts, the ignition might be ooded. In this situation, fully depress the throttle
pedal and turn the ignition key to START. Turn the engine over for ve seconds. Release the throttle pedal and repeat step
one.
3.Driving
When driving the vehicle, do not use the clutch pedal as a footrest as this can cause premature wear on the clutch and cause
it to malfunction, and mean early replacement.
While driving the vehicle, drivers should frequently check the gauges and warning lights in the instrument panel.
High rpm before the engine reaches normal working temperature (80-90 degrees Centigrade) will shorten the lifespan of the
engine.
Drive smoothly and avoid hard acceleration.
Anticipate the road ahead to avoid heavy braking.
4.Braking
Note: If water enters the brake drum when washing the vehicle, or driving through deep water, the brakes will temporarily
lose eciency.
To counter this, lightly press and release the brake pedal, several times at low speed, until normal braking eciency is
restored.
5.DrivinginSnowandIce
Drivingonsnowy/icyroads
Operate the brake pedal steadily and evenly while applying the brakes. Avoid sudden heavy braking.
IV. Operating the Vehicle
Table of contents
Other DFSK Automobile manuals


Popular Automobile manuals by other brands


Mitsubishi MOTORS
Mitsubishi MOTORS Lancer Evolution-VIII technical information

Buick
Buick 2014 Encore Car Infotainment system

Mini
Mini COOPER S owner's manual

Mitsubishi
Mitsubishi ECLIPSE CROSS 2017 owner's manual

Chevrolet
Chevrolet C6H042 owner's manual

Toyota
Toyota PRIUS PRI11-0902ENUK-07-00 Brief guide