DR Power Mow Pro-44 Quick start guide

TOW-BEHIND DR®FIELD and FINISH MOWER
SAFETY & OPERATING INSTRUCTIONS
Serial No.
Order No.
DR Power Equipment
Toll-free phone: 1-800-DR-OWNER (376-9637)
Fax: 1-802-877-1213
Website: www.DRpower.com
Read and understand this manual and all instructions before operating the TOW BEHIND DR FINISH MOWER.
Models: Mow Pro-44
Mow Pro-60

2TOW BEHIND DR®FIELD and FINISH MOWER

CONTACT US AT www.DRpower.com 3
This indicates a hazardous situation, which, if not avoided, could result in death or serious injury.
This indicates a hazardous situation, which, if not avoided, could result in minor or moderate injury.
Table of Contents
Chapter 1: General Safety Rules............................................................................................................................................................ 5
Chapter 2: Setting up The TOW-BEHIND DR FIELD and FINISH MOWER ...................................................................................... 8
Chapter 3: Operating the TOW-BEHIND DR FIELD and FINISH MOWER........................................................................................ 16
Chapter 4: Maintaining the TOW-BEHIND DR FIELD and FINISH MOWER .................................................................................... 21
Chapter 5: Troubleshooting .................................................................................................................................................................. 28
Chapter 6: Parts Lists and Schematic Diagrams.................................................................................................................................. 30
Conventions used in this manual
Serial Number and Order Number
A Serial Number is used to identify your machine and is located on the Serial
Number Label on your machine (Figure 1). An Order Number is used to check
and maintain your order history and is located on the upper left portion of your
packing slip. For your convenience and ready reference, enter the Serial
Number and Order Number in the space provided on the front cover of this
manual.
Additional Information and Potential Changes
DR Power Equipment reserves the right to discontinue, change, and improve its
products at any time without notice or obligation to the purchaser. The
descriptions and specifications contained in this manual were in effect at
printing. Equipment described within this manual may be optional. Some
illustrations may not be applicable to your machine.
Figure 1
Serial Number Label
This information is important in the proper use of your machine. Failure to follow this instruction could result in damage to your
machine or property.

4TOW BEHIND DR®FIELD and FINISH MOWER

CONTACT US AT www.DRpower.com 5
Read this Safety & Operating Instructions manual before you use the TOW BEHIND DR FINISH MOWER. Become familiar with
the operation and service recommendations to ensure the best performance from your machine. If you have any questions or
need assistance, please contact us at www.DRpower.com or call toll-free 1-800-DR-OWNER (376-9637) and one of our Technical
Support Representatives will be happy to help you.
Chapter 1: General Safety Rules
Labels
Your TOW-BEHIND DR FIELD and FINISH MOWER carries prominent labels as reminders for its proper and safe use. Shown
below are copies of all the Safety and Information labels that appear on the equipment. Take a moment to study them and make a
note of their location on your Mower as you set up and before you operate the unit. Replace damaged or missing safety and
information labels immediately.
#
13683
#
13649 #35507
#13758
#
37350
#
36584
#
36585
#
37122
#
37125
#
37349
#
37354
#
37355

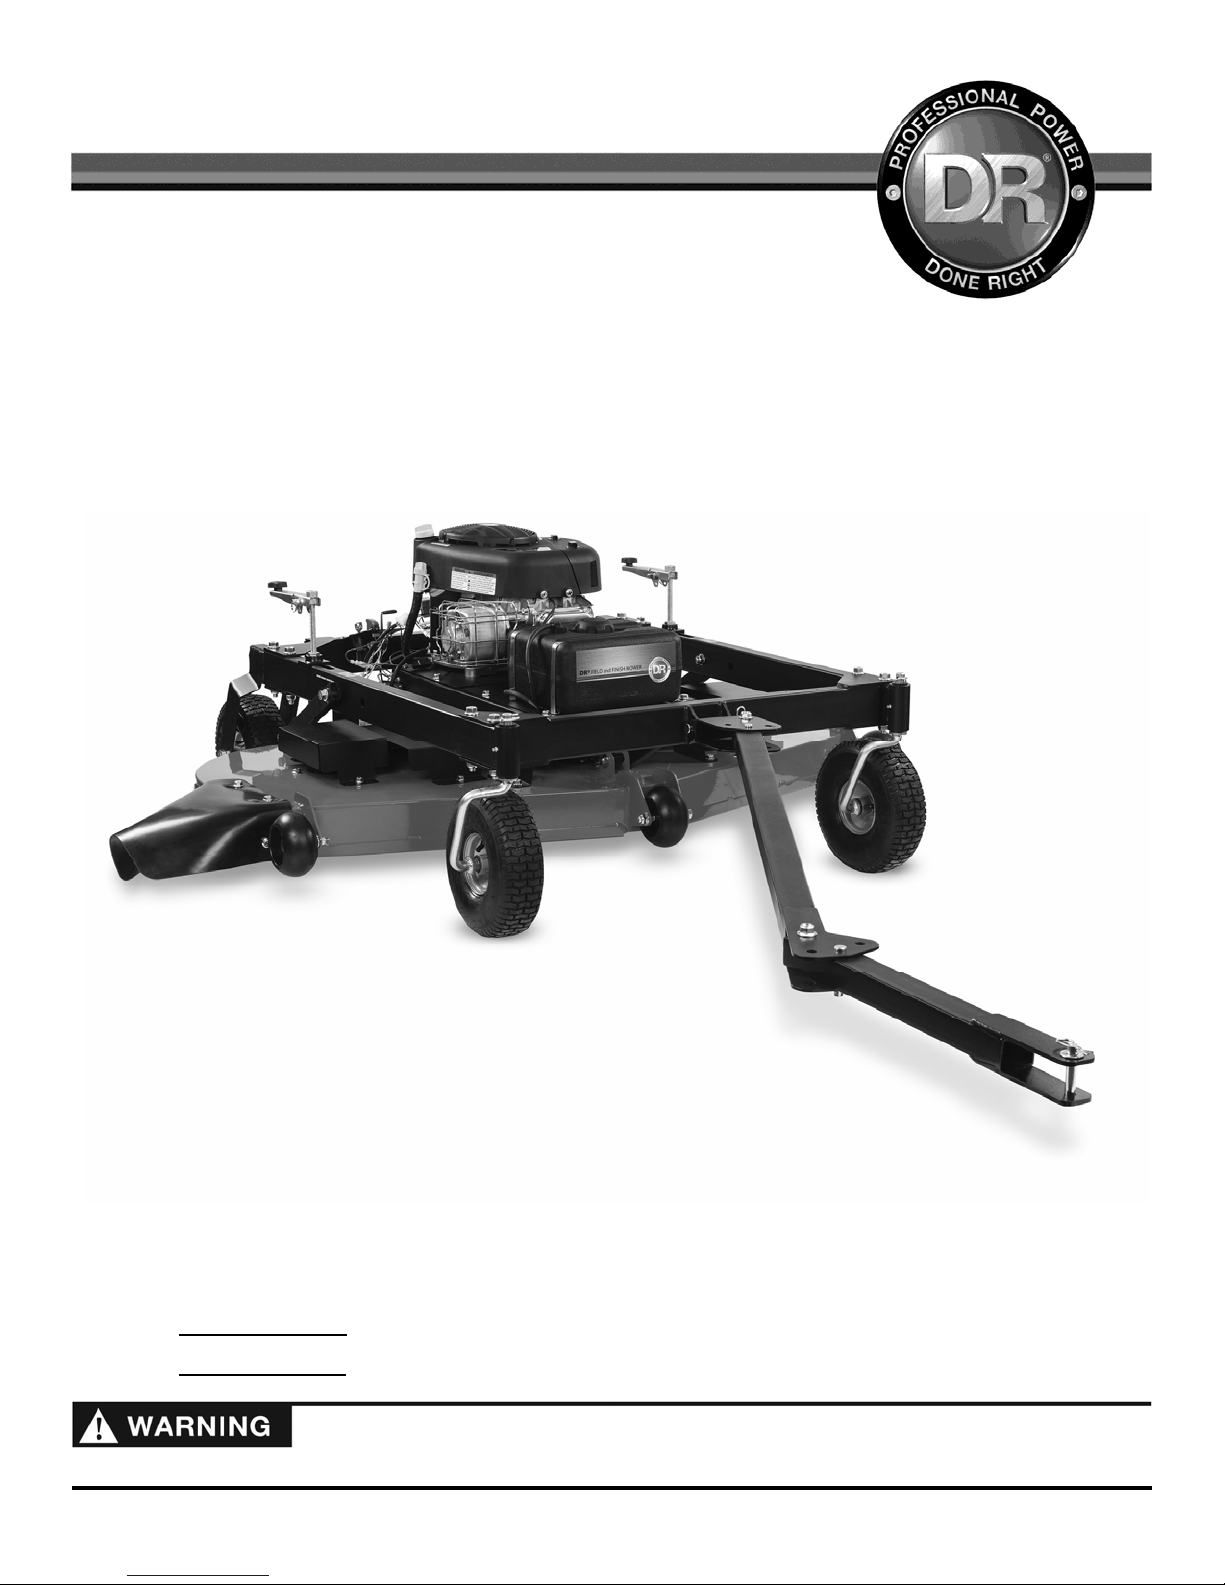
6TOW BEHIND DR®FIELD and FINISH MOWER
Gasoline is a highly flammable liquid that gives off flammable vapor that can be ignited and cause a fire or explosion. Always
follow these precautions:
Never run the engine in an enclosed area or without proper ventilation as the exhaust contains carbon monoxide, an odorless,
tasteless, and poisonous gas.
Store all fuel and oil in containers specifically designed and approved for this purpose. Keep away from heat and open flame
and out of the reach of children.
Replace rubber fuel lines and grommets when worn or damaged or after 5 years of use, whichever comes first.
Fill the gasoline tank outdoors with the engine off and after the engine has cooled completely. Don't handle gasoline if you or
anyone nearby is smoking.
If you spill gasoline do not start the engine. Move the machine away from the area until the gas vapors have dissipated.
Before performing engine maintenance or repairs, shut down the engine, disconnect the spark plug wire, and wait 5 minutes
for the engine to cool.
Never change the engine governor settings or modify the engine speed.
Never check for an ignition spark with the spark plug or spark plug wire(s) removed. Always use an approved spark tester.
Never tamper with safety devices. Regularly check their proper operation.
Allow the engine to cool completely before storing in any enclosed area.
Keep combustible substances away from the engine when it is hot. Never cover the machine while the muffler is still hot.
To reduce fire hazard, keep the engine and muffler free of debris build-up.
Do not operate the engine with the air cleaner or the carburetor air intake cover removed.
Do not use flammable solutions to clean the air filter.
Never operate the engine without the muffler and deflector, if so equipped. Inspect the muffler and deflector periodically and
replace if necessary.
The muffler and engine become very hot and can cause a severe burn. Do not touch.
Protecting Yourself and Those around You
Safety with Gasoline - Powered Machines
This is a high-powered machine with moving parts operating at high speeds. Always take the following precautions when
operating this machine:
Always wear protective goggles or safety glasses with side shields.
We recommend wearing sturdy shoes with non-slip tread, long pants, and gloves while using this machine. Be sure the
gloves fit properly and do not have loose cuffs or drawstrings.
Use ear protectors or ear plugs.
Allow only responsible adults who are familiar with these safety rules and operating instructions to use your DR FINISH
MOWER.
Keep your hands and feet away from the blades, belt, pulley, and concealed areas while the engine is running.
Keep people and pets away from your machine and out of the work area at all times. Disengage the blade and stop the engine
if a person or pet is within 100 feet of the machine.
Children are often attracted to the machine and the mowing activity. Never assume that children will remain where you last
saw them.
Never allow people to ride on the mower.
Before mowing, clear the area of objects such as rocks, toys, wire, bones, sticks, etc.
Never remove or alter standard parts or add anything to the DR FINISH MOWER, especially all shields and guards.
Before and while moving backwards, look behind, and down for small children.
Use extra care when approaching blind corners, shrubs, trees, or other objects that may obscure your vision.

CONTACT US AT www.DRpower.com 7
Use of machinery on slopes is a major factor in outdoor power equipment accidents. All slopes require caution. If you feel uneasy
on a slope, do not mow it. Always take the following precautions when using this machine on slopes:
Operate the machine up and down the face of slopes. Exercise extreme caution when changing direction on slopes.
Never operate near drop-offs, ditches, or embankments or on slopes greater than 20 degrees.
Never operate on wet or slippery slopes.
Never park the tow vehicle on a steep grade or slope.
California Proposition 65:
Engine exhaust and some of its constituents are known to the State of California to cause cancer, birth defects, and other
reproductive harm.
This product contains or emits chemicals known to the State of California to cause cancer, birth defects, and other
reproductive harm.
Slope Operation
General Safety
California Proposition 65
A Note to All Users
Under California law, and the laws of some other states, you are not permitted to operate an internal combustion engine using hydrocarbon
fuels without an engine spark arrester. This also applies to operation on US Forest Lands. All TOW-BEHIND DR FIELD and FINISH MOWERS
shipped to California, New Mexico and Washington State are provided with spark arresters. Failure of the owner or operator to maintain this
equipment in compliance with state regulations is a misdemeanor under California law and may be in violation of other state and/or federal
regulations. Contact your State Park Association or the appropriate state organization for specific information in your area.
No list of warnings and cautions can be all-inclusive. If situations occur that are not covered by this manual, the operator must apply common
sense and operate this TOW-BEHIND DR FIELD and FINISH MOWER in a safe manner. Contact us at www.DRpower.com or call 1-800-DR-
OWNER (376-9637) for assistance.
Safe operation of the TOW-BEHIND DR FINISH MOWER is necessary to prevent death or serious injury. Always take the
following precautions when operating this machine:
The TOW-BEHIND DR FINISH MOWER is designed to mow grass. Do not use it for any other purpose.
If the machine makes an unusual noise or vibration or if there are obstructions underneath the machine, shut off the tow
vehicle and the DR FINISH MOWER engines. Wait five minutes for the engine to cool. Disconnect the spark plug wire and
then inspect the machine for clogs or loose parts. Clear any obstructions and repair and/or replace damaged parts.
The mower blades are sharp. Wrap the blades or wear gloves and use extra caution when servicing.
Always keep the machine in good, safe operating condition. Always make certain nuts and bolts are tight. Do not use
substitute hardware.
Use the TOW-BEHIND DR FINISH MOWER only in daylight.
Always give undivided attention to the machine and your surroundings. Watch for traffic when mowing near roadways.
Disengage the mower blades and exercise extreme caution when on or crossing drives, walks, or roads.
If leaving the machine, shift the tow vehicle into neutral and set the parking brake; turn off the tow vehicle engine and remove
its key. Turn off the DR FINISH MOWER engine and remove its key.
Do not operate the mower when under the influence of alcohol, drugs, or medication.
Do not operate the mower when there is a risk for lightening.

8TOW BEHIND DR®FIELD and FINISH MOWER
Figure 2
Hand Crank
Height Adjusters
DR 13.3 TQ
Engine
Tow Bar Locking Pin
Tow Bar Tow Hitch
Oil Drain Tube
Fuel Fill
Oil Fill
Cap/Dipstick
Blade
Engage
Switch
Muffler
Throttle
Control
Key Switch
Front Caster
Wheels
Rear Fixed
Wheels
Discharge
Guard
Control
Panel
Carbon
Canister
Fuel Filter
Left Side
Fuel Filter
Pull Start
Handle
Chapter 2: Setting up The TOW-BEHIND DR FIELD and FINISH MOWER
It may be helpful to familiarize yourself with the controls and features of your TOW-BEHIND DR FIELD and FINISH MOWER by
reviewing Figure 2 before beginning these procedures. If you have any questions at all, please feel free to contact us at
www.DRpower.com.
TOW-BEHIND DR FIELD and FINISH MOWER Controls and Features (Mow Pro-44 Model)
Note: The model shown in Figure 1 may look slightly different from your machine.

CONTACT US AT www.DRpower.com 9
Figure 3
Hand Crank
Height Adjusters
Briggs and
Stratton 14.5 HP
Engine
Tow Bar Locking Pin
Battery
A
nti-Scalping
Wheels
Tow Bar
Tow Hitch
Oil Drain Hose
Fuel Tank
Fuel Fill
Oil Fill
Cap/Dipstick
Blade
Engage
Switch
Fuel Shutoff
Valve
Left Side14.5 HP Engine
Oil
Filte
r
Muffler
Fuel Filter
Throttle
Control
Key Switch
Front Caster
Wheels
Rear Fixed
Wheels
Discharge
Guard
Control
Panel
Fuel Filter
TOW-BEHIND DR FIELD and FINISH MOWER Controls and Features (Mow Pro-60 Model)
Note: The model shown in Figure 1 may look slightly different from your machine.

10 TOW BEHIND DR®FIELD and FINISH MOWER
Specifications
13.3 T
Q
Mow Pro-44 Model 14.5 HP Mow Pro-60 Model
Engine See your Engine Manual for oil capacity and other
En
g
ine s
p
ecifications.
See your Engine Manual for oil capacity and other
En
g
ine s
p
ecifications.
Starting System Manual Start Electric Start
Fuel Tank 3.5 L (.92 gal), Gasoline, Unleaded 2.5 Gal. (9.46 L), Gasoline, Unleaded
Battery NA 12V, 9Ah
Wheels Front: 11 X 4 Turf Tread
Rear: 11 X 4 Turf Tread
Front: 11 X 4 Turf Tread
Rear: 11 X 4 Turf Tread
Distance From
Centerline of Tow
Vehicle to Outer
Cutting Edge
Straight Back: 22"
Offset Position 1 (either L or R): 49.5"
Offset Position 2 (either L or R): 68"
Straight Back: 30"
Offset Position 1 (either L or R): 57.5
Offset Position 2 (either L or R): 76"
Number of Offset
Positions
5 5
Adjustable Cutting
Height
From 1-1/2"min. to 5-1/2" max. From 1-1/2"min. to 5-1/2" max.
Cutting Width 44" 60"
Cutting Capacity 2' high grass 2' high grass
Blade Tip Speed 18,500 - 19,000 ft/min 17,500 - 18,000 ft/min
No. of Blades 2 3
Blades Type Air Tipped Air Tipped
Deck 12 GA Welded Steel 12 GA Welded Steel
Discharge Side Side
Spindle 1" Dia. Shaft with 2 Sealed 20 mm Bearings 1" Dia. Shaft with 2 Sealed 20 mm Bearings
Belt A76 AK124
Electric Clutch 75 ft-lb 75 ft-lb
Max Speed Mow/Tow 5mph 5mph
Tongue Weight 10 lbs. 10 lbs.
Machine Dimensions 132" L x 60" W x 29" T 132" L x 75" W x 26" T
Machine Weight 270 lbs. 320 lbs.
Assembling the TOW-BEHIND DR FIELD and FINISH MOWER
Hardware Supplied in Product Package (Figure 4 and Table below):
Item # Part # Description Qty
1 ............. 23499.......... Washer, SAE Flat, 1/2", ZP...............................................4
2 ............. 35281 .......... Bolt, Hex, Flange, Tri Lobe, 3/8-16 X 3/4", GR5 ZP ........5
3 ............. 25549 .......... Pin, Clevis, 1/2" x 2 1/2", TRT..........................................3
4 ............. 18737 .......... Pin, Clevis, 1/2" OD X 4.5" LG.........................................1
5 ............. 16003 .......... Pin, Hair, 1/2" To 9/16", .12" Wire ..................................4
6 ............. 15720 .......... Key Ignition Switch ...........................................................2
Compare the hardware of the Product Package with Figure 4 and the “Hardware
Supplied” list above. If you have any questions, please contact us at
www.DRpower.com.
6
Figure 4
5
4
3
1
2

CONTACT US AT www.DRpower.com 11
The Mow Pro-44 Model is shipped mostly assembled. Go to “Installing the
Discharge Guard” section if you have a Mow Pro-44 Model.
Tools and Supplies Needed:
Wire Cutters
Two 3/4" Wrenches
7/8" Socket with Torque Wrench
1-1/16" Wrench*
5/16" Wrench
Blocking
*or Adjustable Wrench
Assembling the Deck to the Frame (Mow Pro-60 Model only)
1. Leave the Deck Bushings in place as you remove the Bolt and Locknut (by
hand) that secures the two side Sway Braces to the Deck (Figure 5).
2. Leave the Deck Bushing in place as you remove the Bolt and Locknut (by
hand) that secures the front Sway Brace to the Deck (Figure 6).
3. Remove the remaining Bolts and Locknuts from the three Sway Braces.
4. Remove the three Nuts, Hand Crank and Height Adjust Block from both
threaded Rods (Figure 7).
5. Position the two Threaded Rods so they are vertical.
6. Place the Frame Assembly as shown with the Caster Wheels next to the back
of the Deck Assembly. Turn the Casters toward the rear wheels (Figure 8).
7. With the help of another person, position the Frame over the Deck
Assembly with the Threaded Rods through the slots in the Frame (Figure 9).
Note: We recommend adding Blocking at both sides of the Pallet to help stabilize
the Wheels (Figure 10).
Frame
A
ssembly
Figure 8
Deck
A
ssembly
Front
Front
Threaded
Rod
Slot
Caster
Turned
this way
Caster Turned
towards Rear
Figure 10
Blocking
Hand Crank
Figure 7
Nuts
Height
A
djust Bloc
k
Threaded
Rod
Sway Brace
Figure 5
Bolt and
Locknut
Bushing
Sway Brace
Figure 6
Bolt and
Locknut
Bushing
Threaded
Rod
Figure 9
Slot in
Frame

12 TOW BEHIND DR®FIELD and FINISH MOWER
Note: The Bushings in the Deck Brackets should still be in place as instructed in
earlier steps.
8. Install the Bushing into the Bracket at the front of the Frame with the long
portion of the Bushing fully into the Frame Bracket (Figure 11). The Bushing
shoulder should be tight against the Bracket.
9. Install and secure the front Sway Brace with the two Bolts and Locknuts
using two 3/4" Wrenches.
10. Install the Bushings into the sides of the Frame with the long portion of the
Bushing fully into the Frame Bracket (Figure 12). The Bushing shoulder
should be tight against the Bracket.
11. Install and secure the two side Sway Braces with the Bolts and Locknuts
using two 3/4" Wrenches.
12. Pull up on the Threaded Rod and install the Height Adjust Block as far as it
will go followed by a Nut (Figure 13). When the Nut touches the Block, turn
the Rod so the Nut can set inside the Block.
13. Install a Nut at the top of the Threaded Rod, followed by the Hand Crank
and then another Nut (Figure 14).
Note: When tightened in the next step, the top nut must be flush with the end of the
Threaded Rod.
14. Hold the Hand Crank with a 1-1/16" Wrench (or Adjustable Wrench) as you
tighten the top Nut against the Hand Crank using a 7/8" Socket and Torque
Wrench to 25-30 ft-lbs.
15. Cut the Cable Tie that is securing the Control Panel to the Muffler Guard
using Wire Cutters (Figure 15).
16. Remove the Screws from the Frame using a 5/16" Wrench and install
Control panel to the Frame (Figure 16).
Frame
Control
Panel
Figure 16
Screws
Nut
Figure 14
Top of Threaded Rod
Hand
Crank
Threaded Rod
Figure 13
Height Adjust
Bloc
k
Nut
Sway
Brace
Figure 12
Bolt and
Locknut
Bushing
Bushing
Shoulder
Bushing
Shoulder
Sway Brace
Figure 11
Bolt and Locknut
Bushing
Bushing
Bushing
Shoulder
Control Panel
Figure 15
Cable Tie
Muffler

CONTACT US AT www.DRpower.com 13
Installing the Discharge Guard
1. Install the Discharge Guard with five 3/8-16 X .75" Bolts using a 9/16"
Wrench (Figure 17).
Note: If it is difficult to install the Bolt at the front (Mow Pro-60 Model) the Anti-
scalping Wheel can removed using a 9/16" Wrench and Adjustable Wrench
to make it easier.
Attaching the Tow Bar to the Push Bar
The Tow Bar can be installed for offsetting to the right or left depending on
which side of the Tow Vehicle you choose to mow. See section “Offset
Mowing” in Chapter 3 to determine how the Tow Bar should be installed for
your needs. The following steps describe positioning the Offset Bracket to
allow offset to the right side of the Tow Vehicle.
1. Secure the Offset Bracket to the Push Bar in the configuration shown (for
right side offset) using the 4.5" long Clevis Pin, Washer, and Hair Pin
(Figure 18).
2. Align the Tow Bar so it is pointed straight out from the Mower and install a
Clevis Pin, Washer, and Hair Pin in the Offset Bracket to lock the Tow Bar in
position.
3. Align the Tow Bar Extension with the Tow Bar and install a Clevis Pin,
Washer, and Hair Pin in the Tow Bar to lock the Tow Bar Extension in place
(Figure 19).
4. Raise the Deck (see “Adjusting the Mower Deck Height” in Chapter 3) and
with a helper, roll machine backwards off Pallet. You May need to use a bar
to lift deck over the Blocks if it gets hung up.
Offset
Bracket
Figure 18
Push Bar
Clevis
Pin Hair Pin
Washer
Clevis Pin
and Hair Pin
Washer
Tow Bar
Discharge
Guard
Figure 17
Bolts
Figure 19
Tow Bar
Extension
Washer
Clevis Pin
and Hair Pin
Tow Bar
Always install the Clevis Pins from the bottom with the Washers and Hair Pins
on top to prevent the Hair Pin from being pulled out by tall grass or bushes.

14 TOW BEHIND DR®FIELD and FINISH MOWER
Adding Oil and Gasoline
Tip: To avoid confusion, we recommend leaving the caps on the Fuel and Oil
Fills until you are ready to pour either gasoline or oil into the correct Fill.
En
g
ine Oil and Fuel Ca
p
acities
Oil (SAE 30 HD) Fuel (Unleaded)
DR – 13.3 TQ 37 oz (1.1 L) 0.92 gal (3.5 L)
Briggs and Stratton – 14.5 HP 48 oz. w/Filter 2.5 Gal (9.46 L)
Note: Use only SAE 30 HD (High Detergent) oil. Other types of oil could cause
problems with the operation of your machine.
Please refer to your Engine Owner’s Manual for detailed information for Oil and Fuel
procedures.
1. Place the machine on a level surface and remove the Oil Fill Cap/Dipstick
(Figure 20a: Mow Pro-44) (20b: Mow Pro-60).
2. Initially add 32 oz. of SAE 30 High Detergent oil (recommended by the
Engine Manufacturer) into the Oil Fill and wait one minute for the oil to
settle.
3. 13.3 TQ Engine: Replace the Dipstick but DO NOT screw on, and then
remove it to check the oil level (Figure 21). Continue adding a few ounces of
oil at a time, rechecking the Dipstick until the oil reaches the fill mark. Be
careful not to overfill.
14.5 HP Engine: Replace the Dipstick and screw on fully, and then remove it to
check the oil level (Figure 21). Continue adding a few ounces of oil at a time,
rechecking the Dipstick until the oil reaches the fill mark. Be careful not to
overfill.
4. Remove the Fuel Cap and fill the gas tank to within 1-1/2" below top of fill
neck (to allow for fuel expansion) with fresh, unleaded gas (Figure 20a: Mow
Pro-44) (20b: Mow Pro-60). Replace the Fuel Cap when finished.
Connecting the Battery Wire (Electric Start Model only)
We ship all Electric-Starting machines with the green negative (ground) Battery
Wire disconnected. This prevents the Battery from discharging during
shipment. Before using your TOW-BEHIND DR FIELD and FINISH MOWER,
you must connect the green negative Battery Wire.
1. Push the negative Wire Connector fully onto the negative terminal of the
Battery (Figure 22).
Figure 20b: Briggs and Stratton 14.5 HP Engine
Oil Fill Fuel Fill
Figure 20a: DR 13.3 TQ Engine
Oil Fill
Fuel Fill
Figure 21
Oil Dipstick
Oil Upper
Limit
Oil Lower
Limit
Figure 22
Green
Negative
(ground)
Wire
Battery
You must add oil before starting the engine. This machine is shipped
without oil. Traces of oil may be in the reservoir from factory testing, but
YOU MUST ADD OIL BEFORE STARTING THE ENGINE. Fill the
reservoir slowly, checking the level frequently to avoid overfilling.
To get an accurate reading when checking the oil level:
- The machine should be on a level surface.
- 13.3 TQ Engine: The dipstick SHOULD NOT be screwed down.
- 14.5 HP Engine: The dipstick SHOULD be screwed down.

CONTACT US AT www.DRpower.com 15
Connecting the TOW-BEHIND DR FIELD and FINISH MOWER to your Tow Vehicle
The Pin type Hitch that comes standard on the TOW-BEHIND DR FIELD and FINISH MOWER Tow Bar is quick and easy to attach
to Tow Vehicles with a hole in the Hitch Plate. A ball Hitch Kit is also available if you would prefer attachment to a 2" Ball on the
Tow vehicle. Visit our website at www.DRpower.com to order Ball Hitch Kit #36578.
1. Move your Tow Vehicle to a flat area and set the Parking Brake.
2. Align the Tow Hitch to the tow vehicle Hitch Plate with the top portion of the
Tow Hitch above the Hitch Plate and the bottom portion below (Figure 23).
3. Secure the Hitch with the Clevis Pin and Hair Pin.
Checking the Tire Pressure
Tools Needed:
Tire Pressure Gauge
Air Compressor
1. Remove the Valve Stem Protective Cap (Figure 24) and check the tire pressure
with a Tire Pressure Gauge.
Note: Figure 24 shows the fixed rear Wheels. Use the same procedure for the front
Caster Wheels.
2. Compare the tire pressure reading from with the manufacturer's
recommended tire pressure stamped on the side of the tire.
3. If the pressure is too low, add air through the Valve Stem with an air hose.
4. Replace the Valve Stem Protective Cap when finished.
Valve Stem
Protective Cap
Figure 24
Clevis Pin and
Hair Pin
Figure 23
Washer
Tow Hitch
Tow Vehicle
Hitch Plate
Do not over inflate the tires. Inflate to the manufacturers recommended
pressure found on the tires.

16 TOW BEHIND DR®FIELD and FINISH MOWER
Inspect the area where you will be working. The site must be free of
potentially hazardous obstacles such as glass, large stones, sticks, wire, rope,
and string-like materials. Make sure there are no people or animals in the
area around the TOW-BEHIND DR FIELD and FINISH MOWER.
Figure 25: Mow Pro 60
Fuel Shut-Off
Valve
Open
We do not recommend driving over 5 mph While towing or operating your TOW-BEHIND DR FIELD and FINISH MOWER.
Never use a truck (2 or 4wd) or jeep to operate the TOW-BEHIND DR FIELD and FINISH MOWER. It would be difficult to
see the Mower. Using these vehicles will void the TOW-BEHIND DR FIELD and FINISH MOWER warranty.
Chapter 3: Operating the TOW-BEHIND DR FIELD and FINISH MOWER
This chapter covers the procedures for starting and stopping your new TOW-BEHIND DR FIELD and FINISH MOWER and
discusses basic operation features. You may find it helpful to review the TOW-BEHIND DR FIELD and FINISH MOWER Controls
and Features in Chapter 2 before reading this chapter.
Operating Parameters
We recommend a few types of Tow Vehicles for the TOW-BEHIND DR FIELD and FINISH MOWER. The Tow Vehicle may be
either 2 or 4 wheel drive. See the Tow Vehicle Restrictions section below.
ATV
Lawn/Garden Tractor (17 HP and above and weighing at least 500 pounds)
Riding Lawn Mower (14 HP and above and weighing at least 400 pounds)
Utility Vehicle
Compact or Sub-Compact Tractor
Tow Vehicle Restrictions:
-Riding Lawn Mowers with Engines under 17 HP and weighing less than 500 pounds are not suitable for use on slopes greater
than 5º.
-Never operate your TOW-BEHIND DR FIELD and FINISH MOWER on slopes greater than 20º using any type of Tow Vehicle.
Before Starting the Engine
1. Check the oil level every time you use the machine. See your Engine
Owner’s Manual.
2. Check the gasoline level.
3. Open the Fuel Shut-Off Valve (Mow Pro-60) on the left hand side of the
Mower (Figure 25).
This machine is designed for cutting grass. Never use this machine for any other purpose as it could cause serious injury.
Contact with internal rotating parts will cause serious personal injury. Never put hands, face, feet, or clothing under the deck
or near the discharge area with the engine running.
Before performing any maintenance procedure or inspection, stop the engine and wait five minutes to allow all parts to stop
and cool. Disconnect the spark plug wire, keeping it away from the spark plug.

CONTACT US AT www.DRpower.com 17
Blade Switch
Safety Cover
Figure 26
Key Switch
Throttle
Leve
r
4. Make sure the Blade Switch Safety Cover is pushed down to the disengaged
position (Figure 26).
Note: The Blade Switch Safety Cover must be pushed down or the Engine will not
start.
Starting (Mow Pro-44 Model)
1. Ensure the Blade Switch Safety Cover is down (Figure 26).
2. When starting a cold Engine, push the Throttle Control Lever up to the
Choke position (Figure 15). When starting an already warm Engine,
push the Throttle Control Lever to the Run position.
3. Turn the Key Switch to the run position.
4. Grasp the Recoil Starter Handle and slowly pull until you feel resistance
(Figure 27). Let the Cord retract a little bit, and then pull the Cord rapidly to
start the Engine.
Note: One or two pulls usually starts the Mower, but more pulls may be necessary if
the Tank was completely empty before filling.
5. As the Engine warms up, slowly adjust the Throttle to the Run position.
Wait until the Engine runs smoothly before each Throttle adjustment. For
maximum performance, operate the Engine with the Throttle in the Run
position.
Starting (Mow Pro-60 Model)
1. Ensure the Blade Switch Safety Cover is down (Figure 26).
2. When starting a cold Engine, push the Throttle Control Lever up to the Choke position (Figure 26). When starting an
already warm Engine, push the Throttle Control Lever to the Run position.
3. Turn the Key Switch to the Start position until the Engine starts, then release. The Key will snap back to the center
Run position and the Engine will continue to run.
4. As the Engine warms up, slowly adjust the Throttle to the Run position. Wait until the Engine runs smoothly before each
Throttle adjustment. For maximum performance, operate the Engine with the Throttle in the Run position.
Stopping the Engine
1. Disengage the Blades by pushing the Blade Control Safety Cover down (Figure 25).
2. Move the Throttle Control Lever all the way down to the Idle position and turn the Key to Stop (Figure 26).
3. Remove the Key for safety.
Note: Close the Fuel Shut-Off Valve when transporting or storing the TOW-BEHIND DR FIELD and FINISH MOWER (Figure 24).
Recoil Starter
Handle
Figure 27
Never stop the engine by moving the throttle control lever to the choke position. This could cause an engine backfire resulting in
engine damage.

18 TOW BEHIND DR®FIELD and FINISH MOWER
Keep your foot clear of the mower deck when adjusting the height. You could
pinch your foot if it is under the deck.
The Height Adjust Handle should always be pinned on the inside of the
Frame and in the down position for mowing. This prevents the Height
Adjuster from rotating and lowering the Deck during use.
Engaging the Blades
1. Engage the Blades by pulling up on the Blade Switch Safety Cover and
pushing forward on the Blade Control Switch (Figure 28).
Stopping the Blades
1. Push down on the Blade Control Safety Cover (Figure 26).
Adjusting the Mower Deck Height
Note: The TOW-BEHIND DR FIELD and FINISH MOWER Deck cutting Height
ranges from a minimum of 1-1/2" to a maximum of 5-1/2".
1. Remove the Locking Pin from the Height Adjuster (Figure 29).
2. Lift the Handle up to the operating position and re-install the Locking Pin
(Figure 30).
3. Repeat Steps 1 and 2 for the Height Adjuster on the opposite side.
Note: Rotating the Height Adjusters Clockwise will lower the Mower Deck. Rotating
the Height Adjusters Counter Clockwise will raise the Mower Deck. Ten full rotations
equal 1" of height change.
4. Rotate both Height Adjusters in the desired direction, switching sides about
every ten full turns, until the top of the Sway Brace is aligned with the
desired cutting height lines on the Height Adjust label. (Figure 31).
5. After the height is set the same on both sides of the machine, rotate the
Handle to the inside of the Frame, pull the Locking Pin, fold the Handle
down and insert the Locking Pin to secure the Handle in the down position.
Sway Brace
Blade Height
A
djustment Labe
l
Figure 31
Locking
Pin
Height Adjuster Handle
Figure 30
Figure 29
Height Adjuster
Handle
Locking
Pin
Figure 28
Blade Switch
Blade Switch
Safety Cover
1
2
Shut off the engine before adjusting the deck height or serious injury may
result. The blades could sever your foot if it goes under the deck with the
engine running.
Never get off the Tow Vehicle without shutting off the Tow Vehicle engine
and engaging the parking brake.

CONTACT US AT www.DRpower.com 19
Offset Mowing
The Tow Bar allows you to offset the cutting path of the TOW-BEHIND DR FIELD and FINISH MOWER up to 68" (Mow Pro-44
Model) and 76" (Mow Pro-60 Model) from the center of the Tow Vehicle. The various offset positions are listed in the
“Specifications” section in Chapter 2. Offset mowing allows you to mow closer to equipment, trees, and fences while the Tow
Vehicle stays at a safer distance. It also allows you to drive in an area already cut and not through grass that hasn’t been cut yet.
See the section “Changing the Tow Bar Offset Direction” on the next page to allow offsetting the Mower to the left side of the Tow
Vehicle.
Offsetting the Tow Bar:
1. Remove the Hair Pin, Washer, and Clevis Pin that secures the Tow Bar in
the Offset Bracket (Figure 33).
2. Rotate the Tow bar to the Desired Offset (No Offset, Middle Offset, or Full
Offset).
3. Reinstall the Clevis Pin, Washer, and Hair Pin to Lock the Tow Bar in Place.
Offsetting the Tow Bar Extension:
1. Remove the Hair Pin, Washer, and Clevis Pin that secures the Tow Bar
Extension to the Tow Bar (Figure 34).
2. Rotate the Tow bar Extension so that the Offset angle is the same as at the
Offset Bracket (No Offset, Middle Offset, or Full Offset).
3. Reinstall the Clevis Pin, Washer, and Hair Pin to Lock the Tow Bar
Extension in Place.
Figure 33
Offset
Bracket
Tow
Bar
Clevis Pin
and Hair
Pin
Washer
Full
Offset
Middle
Offset
No
Offset
Figure 32: Full Offset Shown
Tow Bar
Center of
Mowe
r
Tow Bar
Extension
Center of
Tow Vehicle
Tow Bar
Washer
Tow Bar
Extension
Figure 34
Middle
Offset
Full
Offset
Clevis Pin
and Hair
Pin
No
Offset
When performing offset mowing, always be sure that the Tow Bar offset and the Tow Bar Extension offset match (Figure 32). This
ensures the Tow-Behind DR Field and Finish Mower will track parallel to the tow vehicle path.
Always install the Clevis Pins from the bottom with the Washers and Hair Pins
on top to prevent the Hair Pin from being pulled out by tall grass or bushes.

20 TOW BEHIND DR®FIELD and FINISH MOWER
Offset
Bracket
Figure 36
Push Bar
Clevis Pin
Hair Pin
Washer
Clevis Pin
and Hair
Pin
Washer
Tow Bar
Changing the Tow Bar Offset Direction
The Tow Bar can be installed for offsetting to the right or left depending on
which side of the tow vehicle you choose to mow. The following steps describe
installing the Offset Bracket to allow offsetting to the left side of the Tow
Vehicle.
1. Support the Tow Bar as you remove the Hair Pin, Washer and Clevis Pin that
secures the Offset Bracket to the Push Bar (Figure 35).
2. Turn the Tow Bar over to position the Offset Bracket for left side offset
(Figure 36).
3. Reinstall the Offset Bracket to the Push Bar with the Hair Pin, Washer and
Clevis Pin.
4. Remove the Hair Pins, Washers and Clevis Pins that are at the Tow Bar and
Tow Bar Extension offsets and reinstall with the Washers and Hair Pins on
top.
5. To adjust the offset see section “Offset Mowing” on the previous page.
Slopes and Uneven Terrain
Cutting Wet and Heavy Growth
Avoid steep slopes and other slippery areas.
Use a lower, slower speed when mowing in wet conditions.
Offset
Bracket
Figure 35
Push Bar
Clevis
Pin
Hair Pin
Washer
Tow Bar
Always install the Clevis Pins from the bottom with the Washers and Hair Pins
on top to prevent the Hair Pin from being pulled out by tall grass or bushes.
Check the owner’s manual for your tow vehicle to determine its recommended towing capabilities on slopes.
When operating the TOW-BEHIND DR FIELD and FINISH MOWER over uneven terrain or slopes, use extreme caution not to
tip over the machine.
Never use the TOW-BEHIND DR FIELD and FINISH MOWER on slopes greater than 20 degrees. Doing so could result in
serious injury or damage to your machine.
If you have to mow on sloping terrain, mow up and down, never across the slope, for better control.
This manual suits for next models
1
Table of contents
Other DR Power Lawn Mower manuals
Popular Lawn Mower manuals by other brands

Toro
Toro 22155 Operator's manual

Craftsman
Craftsman 917.376062 owner's manual

Swisher
Swisher QUADBOSS COMMERCIAL PRO QBFC14566CP Assembly Operation Service and Adjustment Repair Parts

MTD
MTD 600-669 parts list

Husqvarna
Husqvarna 917.287540 owner's manual

Bushranger
Bushranger 7101E-RIDER Operator's manual

Snapper
Snapper 1650 Series parts manual

Great Dane
Great Dane GSRKA1934S Operator's manual

Havener Enterprises
Havener Enterprises BRADLEY MOWERS 36 Owner's manual & parts list

Weed Eater
Weed Eater 60614 Operator's manual

Snapper
Snapper 215012, 215014, R215012, N2151 Operator's manual

Lastec
Lastec XR700 owner's manual