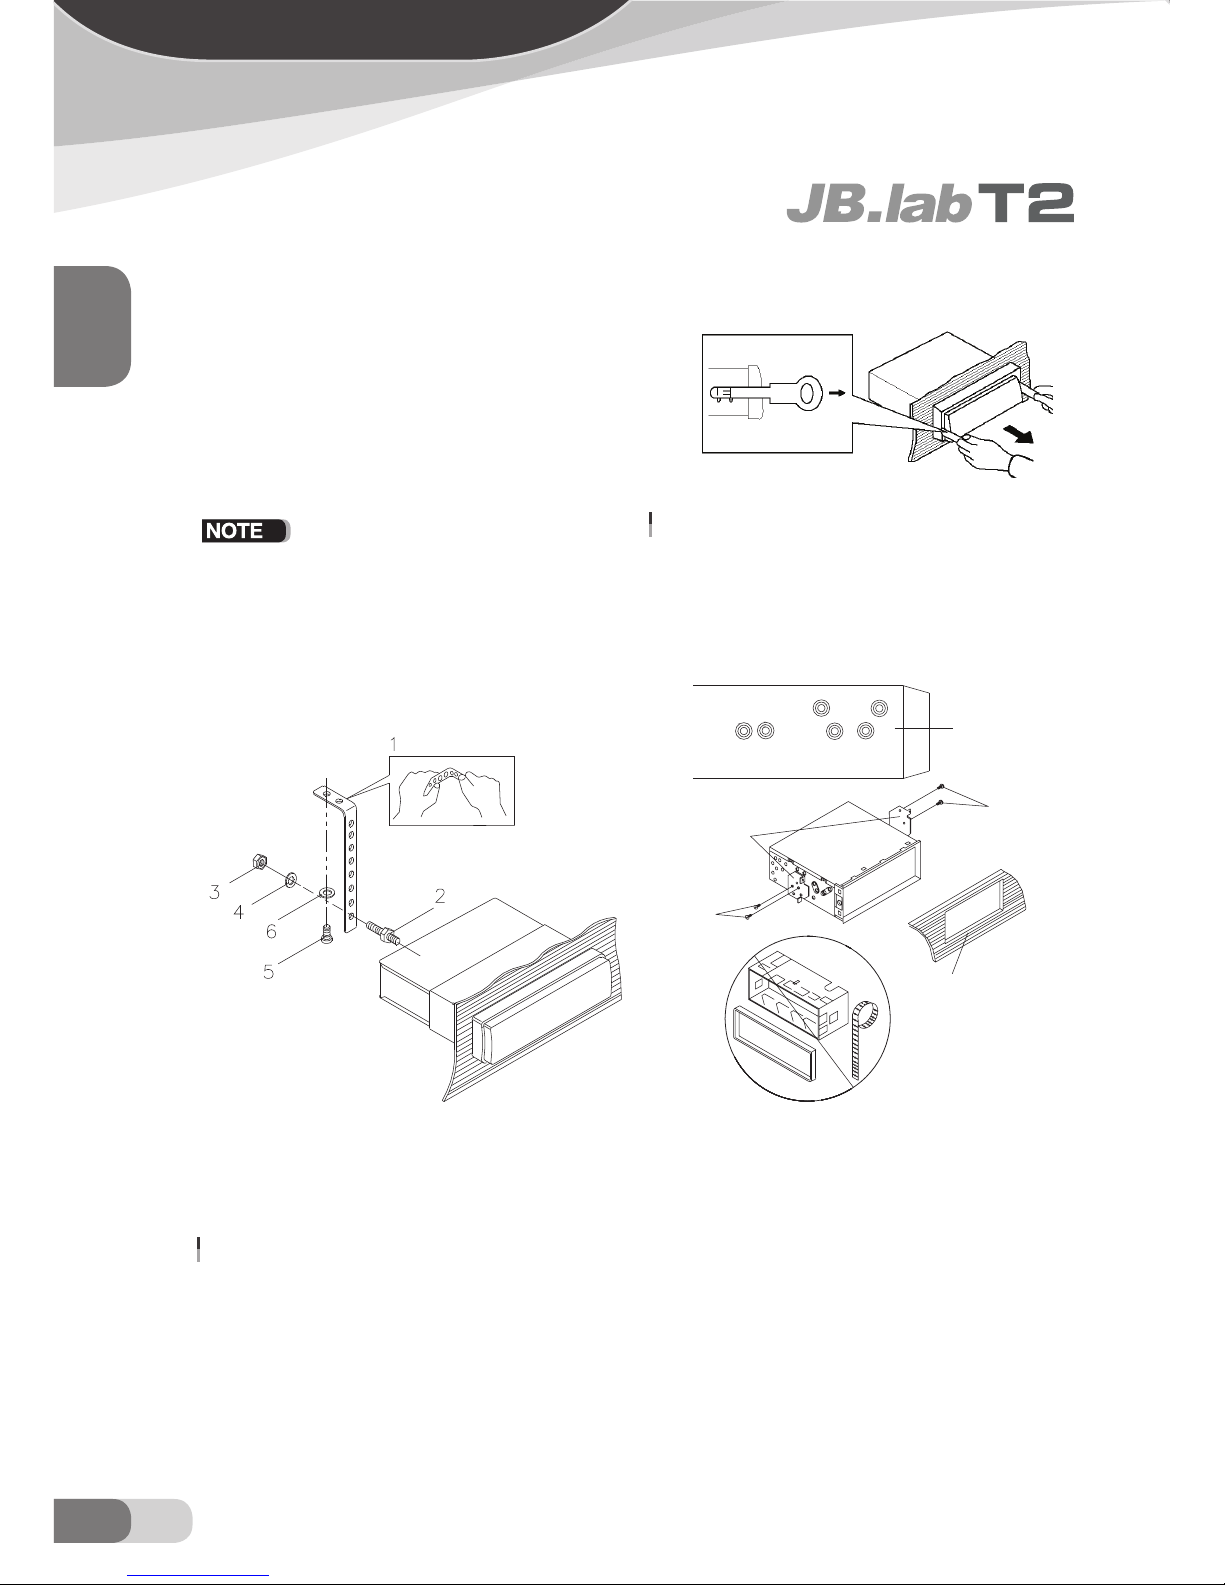
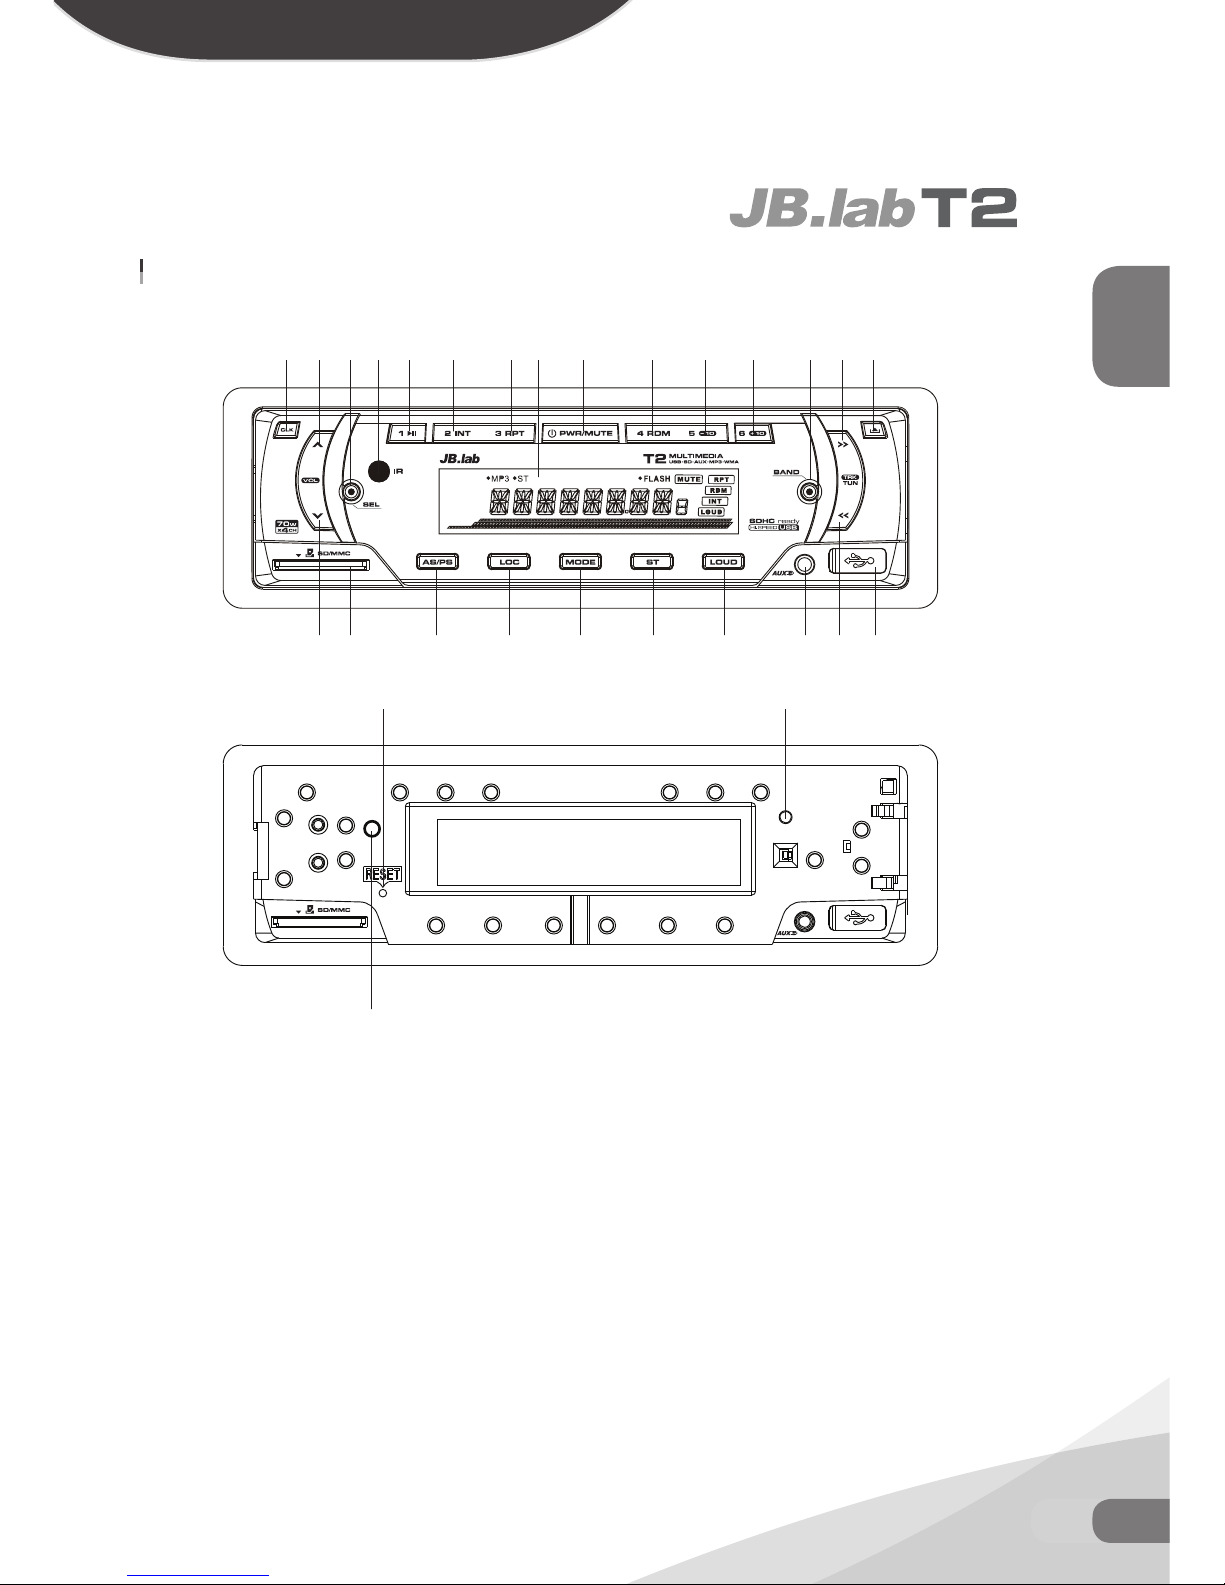
DS JB.lab T2 User manual

ENGLISH KOREA
OPERATION MANUAL
࣏ઘࣹࣳ
Please read these instructions carefully before using this product and keep this manual for future reference.
ࡅૂഀઅࠅݳ࣏നઊ࣏ࣹࣳݴઝӋઝࡂӚടৰചടڹބدৰԞࠅ܊إد

ENGLISH
02 EN
CONTENS
Installation 3
DIN Front-Mount (Method A) 3
Installing the unit 3
Removing the unit 4
DIN Rear-Mount (Method B) 4
Using the detachable front panel 5
Specification 5
Wiring Connection 6
Location of keys 7
Basic operation 8
Release 8
SEL and Vol control 8
Power ON/OFF & Mute 8
LCD Display 8
Tune , Seek, Track, Skip up /down 8
Band 8
Mode 9
Clock 9
Loudness 9
ST/MO 9
AS/PS 9
Preset station, TOP, INT, RPT, RDM 9
AUX input jack 10
USB Socket 10
MMC/SD card slot 10
Flashing LED 10
Reset 10
Remote control sensor 10
Remote control 11
Trouble shooting 12

ENGLISH
03EN
INSTALLATION
- Choose the mounting location where the unit will not inter
fere with the normal driving function of the driver.
- Before finally installing the unit, connect the wiring tempo
rarily and make sure it is all connected up properly and the
unit and the system work properly.
- Use only the parts included with the unit to ensure proper
installation. The use of unauthorized parts can cause mal-
functions.
- Consult with your nearest dealer if installation requires the
drilling of holes or other modifications of the vehicle.
- Install the unit where it does not get in the driver’s way and
cannot injure the passenger if there is a sudden stop, like
an emergency stop.
- If installation angel exceeds 30°from horizontal, the unit
might not give its optimum performance.
- Avoid installing the unit where it would be subject to high
temperature, such as from direct sunlight, or from hot air,
from the heater, or where it would be subject to dust, dirt or
excessive vibration.
DIN FRONT/REAR-MOUNT
This unit can be properly installed either from “Front”
(conventional DIN Front-mount) or “Rear” (DIN Rear-
mount installation, utilizing threaded screw holes at
the sides of the unit chassis). For details, refer to
thefollowing illustrated installation methods.
DIN FRONT-MOUNT (Method A)
Installation Opening
This unit can be installed in any dashboard having
an opening as shown below:
DIN FRONT-MOUNT (Method A)
Installation Opening
This unit can be installed in any dashboard having
an opening as shown below:
Installing the unit
1. Make sure the ignition is turned off, and then disconnect the
cable from the vehicle battery’s negative (-) terminal.
2. Disconnect the wire harness and the antenna.
3. Press the release button on the front panel and remove the con
trol panel (see the steps of “to detach the front panel”).
4. Lift the top of the outer trim ring then pull it out to remove it.
5. The two supplied keys release tabs inside the unit’s sleeve so
you can remove it. Insert the keys as far as they will go (with the
notches facing up) into the appropriate slots at the middle left
and right sides of the unit. Then slide the sleeve off the back
of the unit.
6. Mount the sleeve by inserting the sleeve into the opening of
the dashboard and bend open the tabs located around the
sleeve with a screwdriver. Not all tabs will be able to make
contact, so examine which ones will be most effective. Bend-
ing open the appropriate tabs behind the dashboard to secure
the sleeve in place.
7. Reconnect the wire harness and the antenna and be careful not
to pinch any wires or cables.
30
(1) Front Panel (2) Plastic Trim Ring (3) Unit Chassis (4)Mounting Sleeve
1
2
3
4
(1) Dsahboard (2) Taps

ENGLISH
04 EN
INSTALLATION
8. Slide the unit into the sleeve until it locks into place.
9. To further secure the unit, use the supplied metal strap to secure
the back of the unit in place. Use the supplied hardware (Hex
Nut (M5mm) and Spring Washer) to attach one end of the strap
to the mounting bolt on the back of the unit. If necessary, bend
the metal strap to fit your vehicle’s mounting area. Then use the
supplied hardware (Tapping Screw and Plain Washer) to attach
the other end of metal strap to a solid metal part of the vehicle
under the dashboard. This strap also helps ensure proper elec-
trical grounding of the unit.
- to install the short threading terminal of the mounting bolt
to the back of the unit and the other long threadingterminal
to the dashboard.
10. Reconnect the cable to the vehicle battery’s negative (-) ter
minal. Then replace the outer trim ring and install the unit’s
front panel (see the steps of “to install the front panel”).
REMOVING THE UNIT
1. Make sure the ignition is turned off, then disconnect the cable
from the vehicle battery’s negative (-) terminal.
2. Remove the metal strap attached the back of the unit (if at
tached).
3. Press the release button to remove the front panel.
4. Lift the top of the outer trim ring then pull it out to remove it.
5. Insert both of the supplied keys into the slots at the middle left
and right sides of the unit, then pull the unit out of the dash-
board.
DIN REAR-MOUNT (Method B)
If your vehicle is a Nissan, Toyota, follow these
mounting instructions. Use the screw holes marked
T (Toyota), N (Nissan) located on both sides of the
unit to fasten the unit to the factory radio mounting
brackets supplied with your vehicle.
(1) Metal Strap (2) Mounting Bolt (3) Hex unt (4) Spring Washer
(5) Tapping Screw (6) Plain Washer
Side View shwing
Screw Holes marked
T, N
Screw
Factory Radio
Mounting Bracket
Screw
Dashboard or Console

ENGLISH
05EN
FRONT PANEL
TO DETACH THE FRONT PANEL
1. To remove the front panel from the unit chassis. press this key
to release the front panel from the unit chassis. then pull it up a little
to take out from the unit chassis.
TO INSTALL THE FRONT PANEL
1. To attach the removable faceplate. insert left side of the face-
plate into the left of the chassis into the chassis until you hear it
“Click”.
PRECAUTIONS WHEN HANDLING
1. Do not drop the front panel.
2. Do not put pressure on the display or control buttons when de
taching or re-installing the front panel.
3. Do not touch the contacts on the front panel or on the main unit
body. It may result in poor electrical contact.
4. If any dirt or foreign substances adhered on the contacts, they
can be removed with a clean and dry cloth.
5. Do not expose the front panel to high temperatures or direct
sunlight in anywhere.
6. Keep away any volatile agents (e.g. benzene, thinner, or insecti
cides) from touching the surface of the front panel.
7. Do not attempt to disassemble the front panel.
SPECIFIATION
GENERAL
Supply Voltage : DC 12V. Negative Ground
Supply Voltage : Max. 10A
Current Consumption : 70watts x 4
Number of channels : 2 stereo channels
Unit Dimensions : 178[W] x 101.5[D] x 50[H] mm
RADIO
For 2 Bands
(Asia)
FM
Frequency Range : 87.5MHz - 108.0MHz
Effective sensitivity : 3uV
I.F Frequency : 450KHz
AM
Frequency Coverage : 522 to 1620 kHz
Effective Sensitivity : 40 dB
I.F Frequency : 450KHz
RCA LINE OUT
Output : 1200mv @ MAX
MMC/SD or USB
Frequency characteristics : 20Hz-100Hz <=5dB
10KHz-20KHz<=5dB
Signal to noise : 50dB [1KHz]
Release button
Re
l
e

T2 WIRING DIAGRAM
ENGLISH
06 EN
WIRING
Final Check
- Make use that all wires are properly connected and insulated.
- Make sure that the main unit is securely held in the mounting collar.
- Turn on the ignition to chaeck the unit for proper operation.
- If you have difficulties, consut your nearest authorized pro fessional installer for assistavce.
CAUTION
Do not connect more than one speaker to one
set of speaker leads.
RADIO ANTENNA
AMP
AMP
AUX IN JACKS
GROUND(-) (BLACK)
LEFT (WHITE)
LEFT (WHITE)
RIGHT (RED)
RIGHT (RED)
+12V ACC/SWITCH (RED)
FRONT LEFT / WHITE+BLACK / - FRONT RIGHT / GRAY+BLACK / -
FRONT LEFT / WHITE / + FRONT RIGHTT / GRAY / +
REAL LEFT / GREEN+BLACK / - REAL RIGHT / VIOLET+BLACK / -
REAL LEFT / GREEN / + REAL LEFT / VIOLET / +
+12V CONSTANT POWER SUPPLY (YELLOW)
POWER ANTENNA
AMPLIFIER TURN ON (BLUE)
RCA LINE OUT
FRONTREAR
/
5
/
5

ENGLISH
07EN
LOCATION OF KEYS
T2 LOCATION OF KEYS
1. Release
2. SEL
3. Volume +
4. Volume -
5. Power/Mute
6. LCD
7. Tune, Seek, Track, Skip up
8. Tune, Seek, Track, Skip down
9. Band
10. Mode
11. Clock
12. Loc
13. Loudness
14. ST/MO
15. AS/PS
16. 1, Play/Pause
17. 2, INT
18. 3, RPT
19. 4, RDM
20. 5, -10 File
21. 6, +10 File
22. AUX IN jack
23. USB interface
24. SD / MMC interface
25. Flashing LED
26. Reset
27. Remote Control Sensor
1227 511
815
9
1012 1314
7
4
3
26
24
25
617
22
21201918
23
16
27

1. RELEASE BUTTON
Press the REL button to release the front control
panel from the unit chassis, then pull it up a little to
remove from the unit chassis. When the front con-
trol panel is removed the LED indicator flashes.
2~4. SEL BUTTON (Select) AND VOL
CONTROL BUTTON
a) Press the SEL button briefly, it is activated as selecting
each mode of E. VOL.
VOL BASS TRE BAL FAD
When selecting a desired audio mode, press the VOL+
or VOL- button to adjust the audio effect. In each mode,
the waiting time is about 5 seconds, and the time waiting
time is over, it returns to the last display mode . The control
mode of E.VOL is operated with following numeric display.
- VOL: (MIN)00, 01,......46, 47(MAX).
- BASS/TRE: -07, -06,...,00,...+06,+07
- BAL: 0LR9, 1LR9, ..., 9LR9,..., 9LR1, 9LR0
- FAD: 0FR9,1FR9, ..., 9FR9,..., 9FR1, 9FR0
b) When pressed longer 2 seconds, it is activated as cycli-
cal mode of following functions for user’s selection.
BEEP USER SET VOL CLK CLK
After selecting the desired mode, press the VOL+ or VOL-
knob to select one setup item of the desired mode.
BEEP ON/BEEP OFF
BEEP ON mode: The beep is generated when any key
is pressed.
BEEP OFF mode: The beep sound is disabled.
VOL LAST/VOL DEFA
VOL LAST: The radio switches on at the actual volume
it had when it was last switched off.
VOL DEFA: After pressing SEL button, AVOL will be dis-
played. Then you can pre-select a constant switch-on
volume by using the VOL knob.
CLK ON/OFF
CLK ON: Clock will always show on the display when
power off.
CLK OFF: Clock will disappear on the display when
power off.
5. POWER ON/OFF & MUTE
When the unit is power off, the unit comes to on
by pressing any button except the EJECT and
the RELEASE button. When the unit is power on,
press and hold the power button for more than 0.5
seconds, the unit goes into power off mode. When
the unit is power on, press the power to switch the
MUTE state on/off.
6. LCD Display
7~8. TUNE, SEEK, TRACK, SKIP UP /
DOWN BUTTONS
a) During RADIO mode :
Press the or button shortly to manual tune up/
down for the desired radio station frequency step by
step. Press and hold the or button for longer
0.5 seconds, to automatically tune up/down for the
radio station frequency of strong signal.
b) During SD/MMC & USB mode:
Press the button briefly to play next track.
Press the button briefly to play the previous track.
9. BAND BUTTON
During radio mode, press the BND button briefly to
select the radio broadcasting band you would like to
hear. The AM/FM band is toggled cyclically through
the tuning bands
FM 1 FM 2 FM 3 MW 1 MW 2
10. MODE BUTTON
Press it to select RADIO, CARD(after inserting
MMC/SD card), USB(after inserting USB stick)
and AUX mode.
ENGLISH
08 EN
BASIC

11. CLOCK BUTTON
Press the CLK button briefly to display time for 5
seconds on the display, and then returns to its previ-
ous display unless the button is pressed again.
Then press the CLK button and hold for more than
1 seconds until the real time flashes on the display.
Then you can adjust HOUR or MINUTE by press the
VOL- or VOL+ button .
12. LOC BUTTON
Radio station search mode is divided by this LO/
DX switch, this button can be used to control an
attenuator in the tuner during search. The detecting
level of seek, scan, auto-memory will be reduced as
much as the attenuated level of the tuner. In radio
mode, press the LOC button to change local recep-
tion or distance reception.
This button is only for FM reception. In AM mode, LOC is void.
13. LOUDNESS BUTTON
When press shortly, the LOUD mode is turned on,
its to enhance the bass sound effect when the vol-
ume level is low. Press again to cancel the loudness
effect.
14. ST/MO BUTTON
In FM mode, press the ST button briefly to select
stereo or mono sound mode.
15. AS/PS BUTTON
During radio mode:
1) When long pressing for more than 1 seconds, the
radio searches from the current frequency and checks
the signal strength level until 6 station are found. And
then the 6 stations frequency are preset to the corre-
sponding preset memory numbered bank. The auto-
storage operation is implemented in the each selected
band. When the auto-storage operation is finished,
the radio execute the Preset scan.
2) When short pressing, the radio searches for each
preset station in the current band and holds at that
preset number for 5 seconds with releasing mute, and
then search again.
During SD/MMC or USB mode:
Press the AS/PS button, it is activated selecting
TRACK SEARCH mode :
In TRACK SEARCH mode, the LCD will display TRK T
“0” and flash the biggest digit 0 that the SD/MMC card
or USB stick contain. Then press the VOL+ or VOL-
button to select the number of the flashing digit from
0 ~ 9. Then press SEL button to confirm the number
and flash next smaller digit 0. With the same means,
select the number of the flashing digit with VOL+/-.
After finishing selecting the number of all flashing digit,
press SEL button to play the track of the selected se-
rial number.
Press the AS/PS button twice, it is activated selecting
TRACK SEARCH mode :
In FIRST CHARACTER SEARCH mode, the LCD will
display A--......, If there are files names its first charac-
ter are A , the ......is the first file name its first character
is A by the order of A~Z and 0~9; otherwise, the ......is
NONE. (If there are some songs in character A, press
the >>I and I<< to select your favour.)Then press the
VOL+ or VOL- button to select file’s first character by
the order of A~Z and 0~9.
Press the AS/PS button thrice, it is activated selecting
TRACK SEARCH mode :
In DIRECTORY SEARCH mode, the LCD will display
the root folder(if there is not the root folder, it will find
a root folder named ROOT). Then press the VOL+
or VOLbutton to select your desired folder and then
press or button to select your desired track
in the folder.
16~21. PRESET STATION MEMORY
AND TOP/>||, INT, RPT, RDM BUT-
TONS
a) During radio mode:
When pressed short, these buttons select a preset
station directly.If the six buttons are pressed for more
than 2 seconds, the station currently being listened to
is memorized into the selected preset button.
b) During SD/MMC or USB mode:
Press the TOP/ button briefly to interrupt the play-
ENGLISH
09EN
BASIC

back of the SD/MMC card or USB stick.
Press again to resume normal playback.
Press the INT button to play the first 10 seconds part
of each track, and the LCD will display INT ON.
Press again to stop scan, while the currently selected
track will be played, and the LCD will display INT OFF.
Press the RPT button to play the current track repeat-
edly, and the LCD will display RPT ONE.
Press again to cancel this function, and the LCD will
display RPT OFF.
Press the RPT button twice continuously to play the
tracks in the current folder repeatedly and the LCD
display will show RPT ABM.
Press the RDM button to play all tracks in random or-
der, and the LCD will display RDM ON.
Press again to cancel this function, and the LCD will
display RDM OFF.
Press the radio preset button 6 and 5 button to move
up and down10 tracks at a time.
When the remained total tracks is lack of 10, the both-
buttons are inactively.
22. AUX INPUT JACK
Press the mode button to select auxiliary input
playing mode. You can connect anymatched ex-
ternal audio device to the auxiliary input jack. Use
the volume control to adjust volume.
23. USB SOCKET
When needing to play the file in the USB stick,
insert the USB stick into the USB socket. The sys-
tem will change into the USB mode automatically,
and then play the first file in the USB.
- The main unit can only support the standard USB memory .
- USB MP3 player is not a standard which means different brand
name or different models have their own standard. So our
product cannot support all MP3 players.
- When connecting an MP3 player and it has a normal battery
in the player (non rechargeable battery), you shouldremove the
battery from the MP3 player then connect it to the USB inter-
face. Otherwise, it may cause battery burst.
- When in USB play mode, be sure not to remove the USB driver
from the USB interface.
24. MMC/SD CARD SLOT
When you need to play the file in the MMC/SD
card, insert the MMC/SD card into the MMC/SD
card slot. The system will change into the MMC/
SD mode automatically, and then play the first file
in the MMC/SD.
- When MMC/SD card and USB stick are both inserted into their
slot or socket, the system will change into the playback mode
of the latter one.
25. FLASHING LED
When the front control panel is removed this in-
dicator flashes
26. RESET BUTTON
Before operating the unit for the first time, or after
replacing the car battery or changing the connec-
tions. You must reset the unit.
Press this button with a cuspidal object. This
operation will erase the clock setting and some
stored contents.
27. REMOTE CONTROL SENSOR
ENGLISH
10 EN
BASIC
CAUTION !
When there are important files in the USB device, do
not connect it to the main unit to play. And our com-
pany assumes no responsibility

FUNCTION KEYS & CONTROL
1. MODE
Press it shortly to change the mode among Radio,
USB, SD CARD, AUX.
2. PWR
When the unit is not on, shortly press PWR to turn
on the unit. Press and hold it to turn the unit off.
3. MUTE
When the unit is on, shortly press MUT to mute the
sound, shortly press it again to resume the sound.
4. previous/next track, fast reverse / forward, tune
down or up
Shortly press / to play the previous/next track.
Press and hold / to fast reverse / forward. In radio
mode, press / to tune down or up.
5. LOUD
Press LOU Button to switch loudness function on
or off. When playing WMA/MP3 disc, in searching
mode, use it to confirm the selection.
6. VOL
Press it to decrease, increase the volume level.
7. SCN
Press it to scan tracks.
8. , 1
Press it to pause the playback, press it again will
resume the playback.
8. INT, 2
When playing MP3/WMA files, use it to select di-
rectory upward, downward.
9. LOC
Press it to enter LOCAL/DISTANT function.
10. DISP
Press DISP to change the display information.
When reading MP3/WMA files, press it to display
the corresponding information, such as: folder, file,
song title, artist and album.
11. ST/MO
Press ST/MO to change mono/stereo mode recep-
tion.
13. RPT, 3
Shortly press it to to continuously repeat the same
track. When playing MP3/WMA disc press and
hold it to repeat all the tracks in the current folder.
14. RDM, 4
Shortly press it to play all tracks on disc in random
order. When playing MP3/WMA disc, press and
hold it to play all tracks (in the current folder) in ran-
dom order.
15. -10, +10, 5, 6
When playing MP3/WMA files, use it to select 10
FILE upward, downward.
16. SEL
Press SEL to enter audio setting mode, the adjust-
ment mode will change in the following order, such
as:
Bass Treble Balance Fader
Press and hold it to enter SYSTEM SETTING
mode. And you can Use TRK/TUN / to
adjust the to select the item, and use VOL / to cor-
responding value.
ENGLISH
11EN
REMOTE CONTROL

ENGLISH
12 EN
TROUBLE SHOOTING
TROUBLE SHOOTING
Before going through the checklist, check wiring connection. If any of the problems persist after checklist has
been made, consult your nearest service dealer.
SYMPTOM
No power.
No sound.
Sound skips.
The operation keys
do not work.
The radio does not
Work. The radio sta-
tion automatic selec-
tion does not work.
CAUSE
The car ignition switch is not on.
The fuse is blown.
Volume is in minimum.
Wiring is not properly connected.
The installation angle is more
than 30 degrees.
The disc is extremely dirty or de-
fective disc.
The built-in microcomputer is not
operating properly due to noise.
The antenna cable is not con-
nected.
The signals are too weak.
SOPLUTION
If the power supply is connected to the car accessory circuits,
but the engine is not moving, switch the ignition key to “ACC”.
Disc cannot be loaded or ejected.
Replace the fuse.
Adjust volume to a desired level.
Check wiring connection.
Adjust the installation angle less than 30 degrees.
Clean the compact disc, then try to play a new one.
Press the RESET button.
Front panel is not properly fixed into its place.
Insert the antenna cable firmly.
Select a station manually.
T
he car ignition switch is not on
.
If the power supply is connected to the car accessory circuits,
but the engine is not moving, switch the ignition key to “ACC”
.
Di
sc cannot
b
e
l
oa
d
e
d
or e
j
ecte
d.
T
he installation angle is more
t
han 30 degrees
.
A
djust the installation angle less than 30 degrees
.
V
olume is in minimum.
A
d
j
ust volume to a desired level
.
Th
e
b
u
il
t-
i
n m
i
crocom
p
uter
i
s not
o
perat
i
ng proper
l
y
d
ue to no
i
se
.
Press the RE
S
ET button
.
Front panel is not properly
fi
xed into its place
.
Th
e s
i
gna
l
s are too wea
k.
S
elect a station manually
.

ENGLISH
13EN
MEMO

KOREA
14 KO
ୱ
ૂഀࣹௗࡻ
ણ୲
فࡂڙ൲ބವࠒ
فࡂڙބವࠒ
ࠔࣷ٩
Ҁࡘ
Ԟࡅࣹીࠩ
ലࣹીࠩ
܅ڤઙٳࠩ
03:0$ઙٳࠩ
ಶઍҩࣞઌࣳ
߸ڤৰઙٳࠩ
ࡘܲઙٳࠩ
ݼ௷ઙࠩ
ףઊଊࠋࣥ
ެݼઌೂ
ߚૂനҿ
܅ڤݼ௷ܩ࠱ެౡ
SPECIFIATION
GENERAL
Supply Voltage : DC 12V. Negative Ground
Supply Voltage : Max. 10A
Current Consumption : 70watts x 4
Number of channels : 2 stereo channels
Unit Dimensions : 178[W] x 101.5[D] x 50[H] mm
RADIO
For 2 Bands
(Asia)
FM
Frequency Range : 87.5MHz - 108.0MHz
Effective sensitivity : 3uV
I.F Frequency : 450KHz
AM
Frequency Coverage : 522 to 1620 kHz
Effective Sensitivity : 40 dB
I.F Frequency : 450KHz
RCA LINE OUT
Output : 1200mv @ MAX
MMC/SD or USB
Frequency characteristics : 20Hz-100Hz <=5dB
10KHz-20KHz<=5dB
Signal to noise : 50dB [1KHz]

KOREA
15KO
ૂഀࣹௗࡻ

KOREA
16 KO
ઘѿણ୲

17KO
فࡂڙ൲ބವࠒ
KOREA

فࡂڙ൲ބವࠒ
KOREA
18 KO

ENGLISH
19EN
فࡂڙ൲ބವࠒ

KOREA
فࡂڙ൲ބವࠒ
20 KO
Table of contents
Popular Car Receiver manuals by other brands

Boss Audio Systems
Boss Audio Systems 0791489111942 user manual

Pyle
Pyle PLCD69 owner's manual

Kenwood
Kenwood DDX-512 - DVD Player With LCD monitor installation manual

Xomax
Xomax XM-CDB624 user manual

Sony
Sony CDX-F7000 - Fm/am Compact Disc Player Installation/connections

Sony
Sony MEX 1GP - Giga Panel Radio Installation/connections