E-one clinic User manual
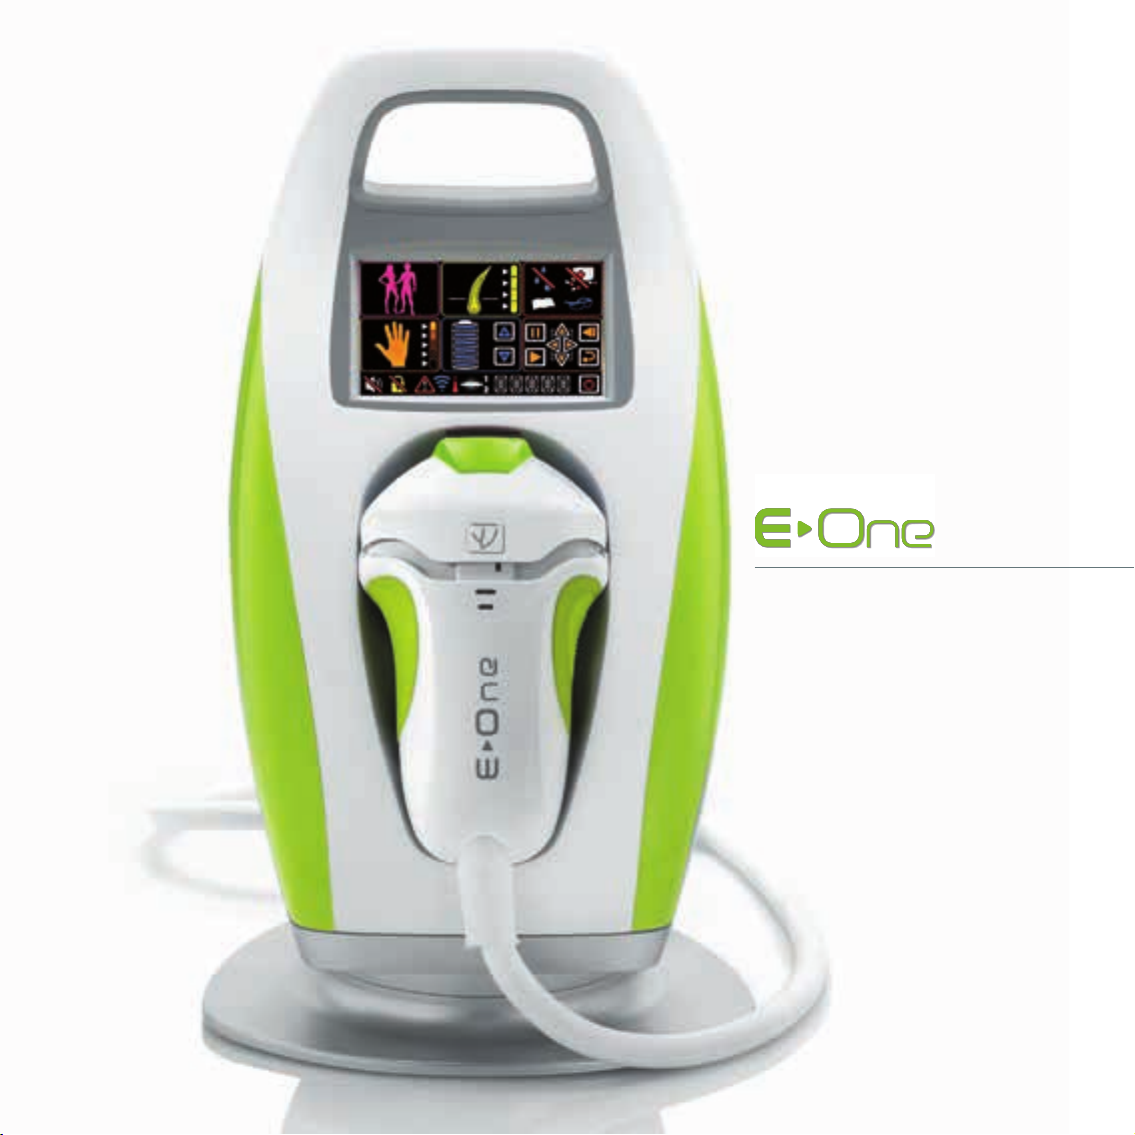
User Manual
Clinic
32
TABLE OF CONTENTS
PROHIBITED HANDLINGS
USING THE ACCESSORIES
MAINTENANCE
MARKINGS
ERROR MESSAGES
STANDARDS
SHOWROOM
WARRANTY CONDITIONS
CHANGING THE OPTIC CARTRIDGE
RETURNING USED OPTIC CARTRIDGES
SOFTWARE OPTIONS
HAIR REMOVAL WITH THE
PACKAGE CONTENTS
PRECAUTIONS FOR USE
GLOSSARY
INFORMATION PROVIDED BY
TOUCH SCREEN
Dear client,
You have just purchased an and I thank you for your
custom.
Habits change and is evidence of this. You can now
safely have access to a hair removal technology that uses
professional quality pulsed light in the comfort of your home.
I have personally ensured that the utmost attention be paid
to the implementation of each ; you will see, that
is an exceptional product.
I hope that you will be completely satisfied with your
and that you will share your experience on our company’s
official website at www.e-swin.com
Yours Sincerely,
Yves Vincent Brottier
Creator of
4
8
12
14
18
44
46
32
40
38
48
50
52
53
54
55
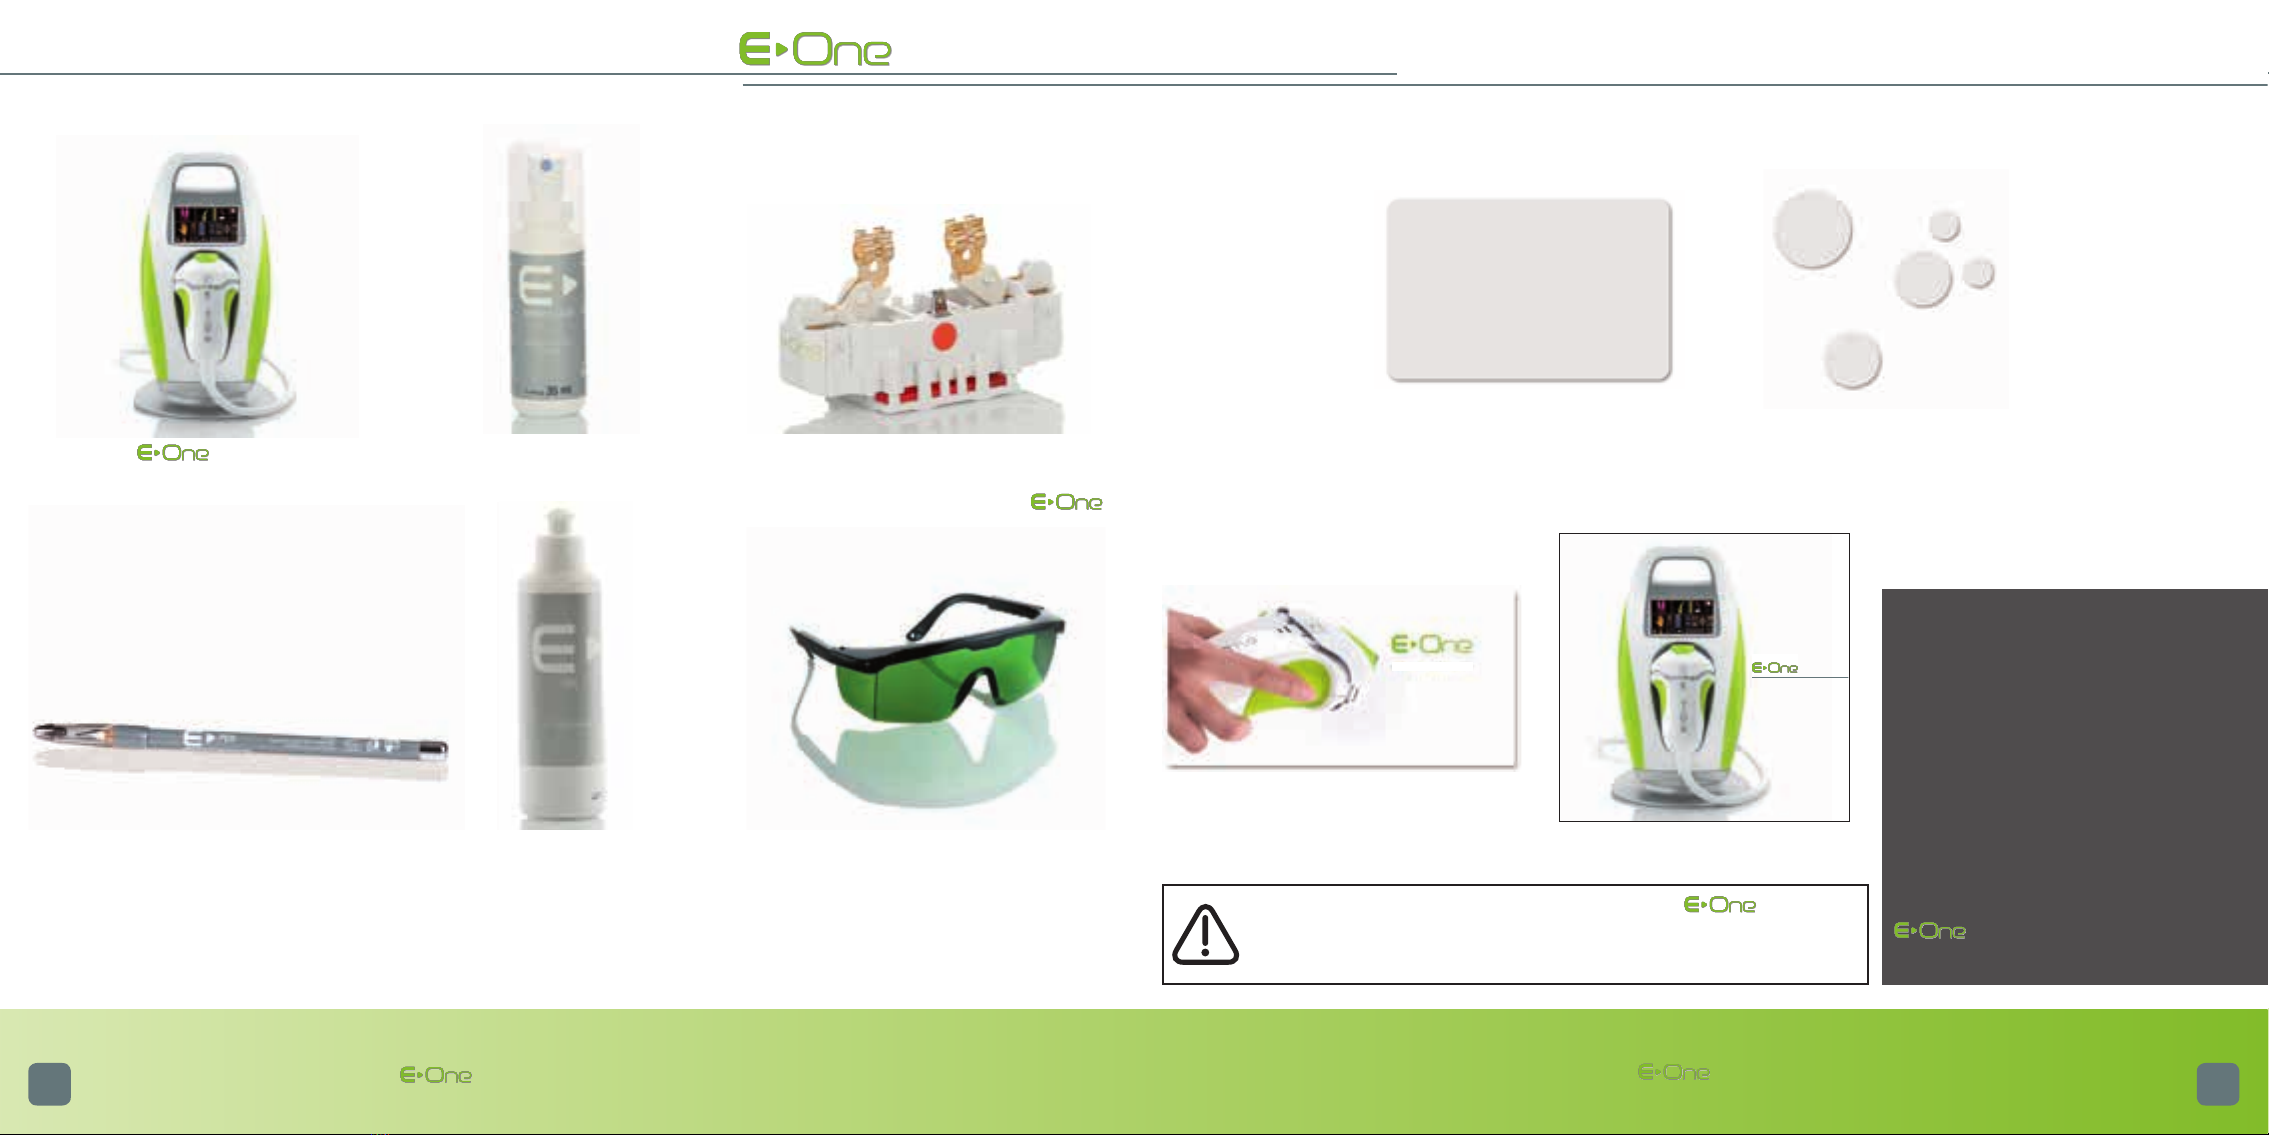
1 stop
Guide plate
See details on page 42
1 Clean - Optical Spray
See details on page 43
1 Patches
self-adhesive patches
See details of page 43
Hair removal follow-up
1 Hair removal follow-up
User Manual
Clinic
1 User manual
N
54
WARNING
Using the is exclusively restricted to use at home and
must not be used for professional purposes.
All manufacturer’s warranty will be voided if the device is used for professional purposes or if the optic
cartridges are used at an abnormally high rate. An device that has lost its warranty will not be able
to recover it afterwards.
REMINDER : Only E-Swin is authorised to sell and its
accessories: optic, stop, clean, patches, pen, gel,
mask, fun, etc. on its own website www.e-swin.com.
CAUTION:
YOU MUST KEEP ALL THE ELEMENTS
OF THE ORIGINAL PACKAGING
(BOXES, PACKAGING ETC.).
The manufacturer’s 2 year warranty will
cover parts and labour only if the device is
returned with all its elements in its original
packaging.
You must therefore carefully maintain the
entire original packaging in which your
was delivered to you.
1 Base and applicator.
See details on pages 12-13
1 Optic with filter included -
consumable cartridge and its optical filter
(included in the applicator of your )
1 Pen - pencil of work and sharpener
See details on page 42
1 gel -working gel
See details on page 42 1 Mask - Safety Glasses
See details on page 42
PACKAGE CONTENTS
7
98
FOR YOUR SECURITY
Before using your please read the following information carefully:
USAGE PRE CAUTIONS
• Voltage: 100 -240 V
• Nominal frequency: 50-60 Hz
• Maximum power consumption: 240 VA
• Make sure that the voltage corresponds to that of your installation. Any improper
connection may cause permanent damage not covered by warranty.
• Make sure that the power outlet to which you are connecting your is
undamaged, in perfect working condition and that it does not interfere with the
proper use of your (the power outlet must be easily accessible)
• This device is intended for personal use at home only and not for professional
purposes.
• Do not unplug by pulling the cable of the .
• Never use with wet hands.
• must never be used in the shower, bath or in any place where water can
splash the device (applicator or base).
• Never immerse the base of , its applicator or the Optic cartridge in water.
• Never use if damaged, never use in case of a functional anomaly appearing
on the touch screen, or following a fall (non-visible damage can be detrimental to
your safety).
• This device can be repaired only with special tools. For any problems after delivery,
please contact us on our website www.e-swin.com through your personal page.
• Optic cartridges and, more generally all accessories, must be ordered only via our
website www.e-swin.com, in the “Customer” section, “New Order of accessories”.
We disclaim any responsibility for the use of consumable cartridges and accessories
from another manufacturer.
• When using the device, make sure to place it on a flat surface, in a place
where the potential of a fall can be avoided.
• E-Swin SAS disclaims any responsibility for any damage resulting from
improper use of the device or use other than described in this manual.
• One pair of safety glasses (mask) is provided with the device: these glasses
must be worn at all times when using the device. If other people are around
you when using the , they should also wear the glasses mask.
• When the is being used, it must not come into contact with hair,
the periocular region delimited by the safety glasses mask (for example:
eyebrows and eyelashes must never be flashed with ), clothes or any
other object, so as to prevent all risk of injury, blockage or impairment.
• The applicator tip must not touch the mask at the time of the flash.
• Never use near an aerosol, a heat source, or any other electronic devices.
• Do not stack on top of other electrical devices.
• Your is provided with a power cord (2 meters long) and an applicator
cable (2 meters long). Do not use any extension cables or any cable other than
those provided by E-Swin SAS, as this could render the equipment non-compliant
from an electromagnetic point of view.
• The wireless communication equipment must be kept away (about 3 meters)
because they may interfere with the proper functioning of the device.
• The device must be installed in an environment unpolluted by electromagnetic
disturbance (computer, electrical appliances...).
Only people who can read and understand this user manual are authorised to use the .Only people who meet the criteria for use as described in this manual are able to use
the on their body.
NEED HELP?
To contact our sales department or technical support, please visit your personal customer
space on www.e-swin.com*, and click on “Contact us and After Sales”.
PEOPLE SUFFERING FROM HIRSUTISM
has been certified for its use in case of hirsutism (hormonal or idiopathic). 1110
DO NOT USE
• If you are taking medication that can lead to photosensitivity (please ask your
doctor before use)
• If there is a history of skin diseases, you will need to obtain medical advice before
using the .
• Do not use on animals.
• If you are pregnant or have diabetes.
• To treat white, grey or red hair. Specifically, certain people are born as red
phototype I (red hair type). As adults these people may experience a reduction of
this essentially orange colour. However, the melanin structure of this hair retains
characteristics that render light technologies ineffective for hair removal.
• On very dark skin or black skin (please refer to our website www.e-swin.com,
“Clinic” section).
• On an injured, burned, or infected skin.
• On skin that has been sunburnt and whose recovery time is less than one month.
• On skin lesions of unusual aspect, you must first have a medical consultation with
your doctor.
• On high-risk areas (blemishes, birthmarks, warts, unhealed wounds...).
• On moles: if they are located on the zone to be treated, they must first be
protected, specifically by covering them with the self-adhesive patches provided
with your .
• On tattooed areas: permanent makeup (e.g. lip tattoos) or cosmetic tattoos,
whatever their colour. If this is the case, use the delimitation plate stop that came
with your .
• If you have a skin condition (eczema, inflammation, acne...).
You must only use the pencil of work pen, the gel gel, the self-
adhesive patches patches, the guide plate stop and the safety
glasses mask provided with your . The use of any other
products may cause skin burns.
Cautions regarding UV
Artificial UV in a beauty parlour: you should take care about when using E-One and
also using artificial UV radiation.
Regarding high pressure UV dispensed by high powered machines, it is advisable
to wait a few days before or after such a session before starting treatment with
E>One.
Natural UV: when exposed to sunlight after a treatment session with the E>One, it
is imperative to use a sunscreen of very high protection on the treated areas for
2weeks following the session.
Self-tanning products:
Do not use E>One if you have applied a self-tanning product on the area to
be treated; wait until the effects of the self-tanning product have disappeared
completely before using E>One.
KEEP OUT OF REACH OF CHILDREN
• Any use of by an under aged person must be performed under the
supervision of an adult.
• Always store away the after each use, out of reach of children. Unplug
the power cord in its original bag, and wind back the applicator cable around the
applicator support cables provided for this purpose.
USAGE PRE CAUTIONS
GLOS SARY
1312
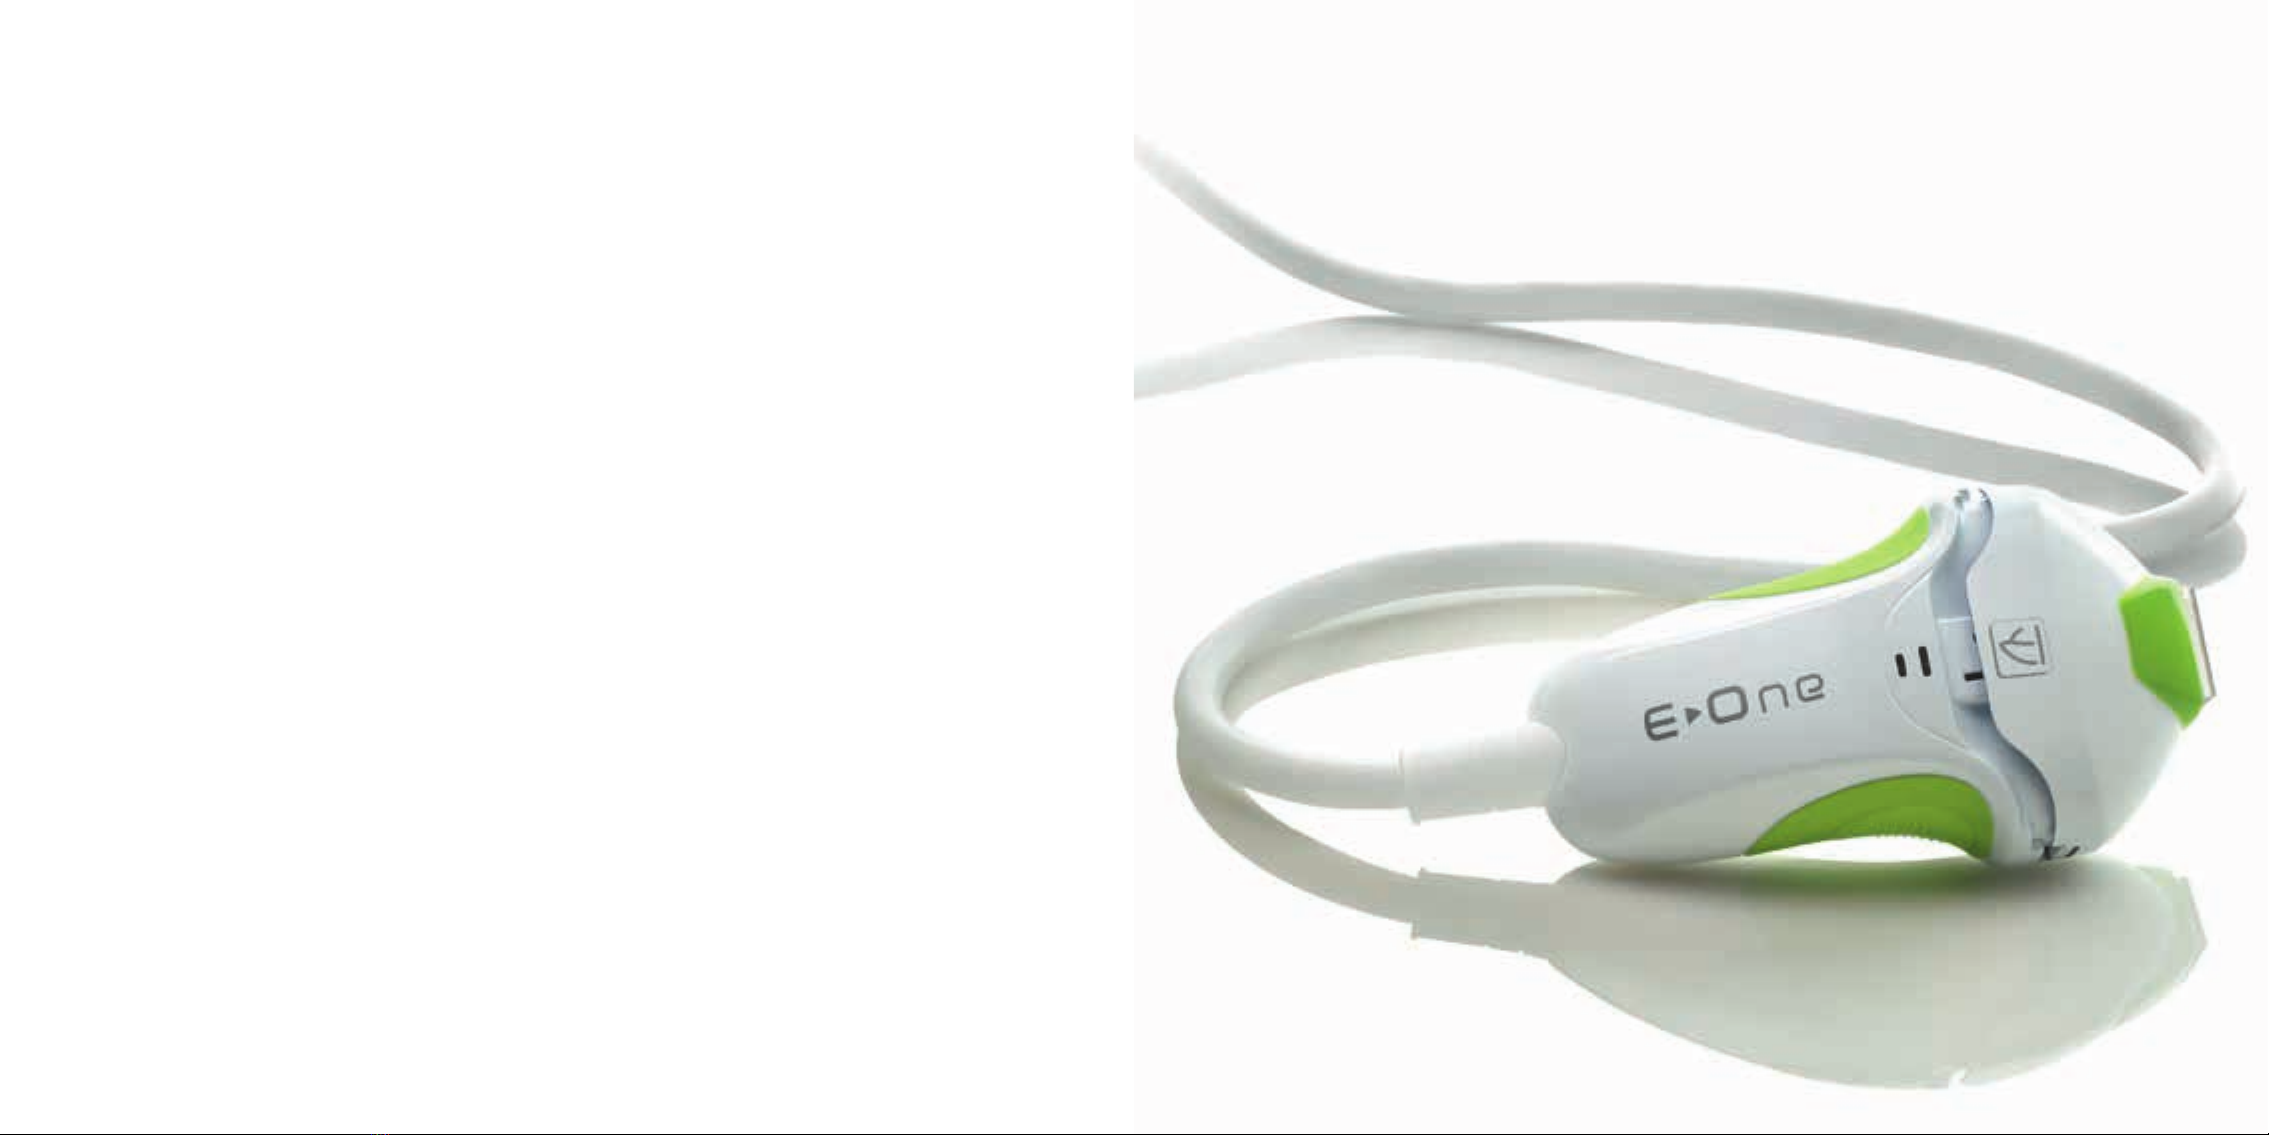
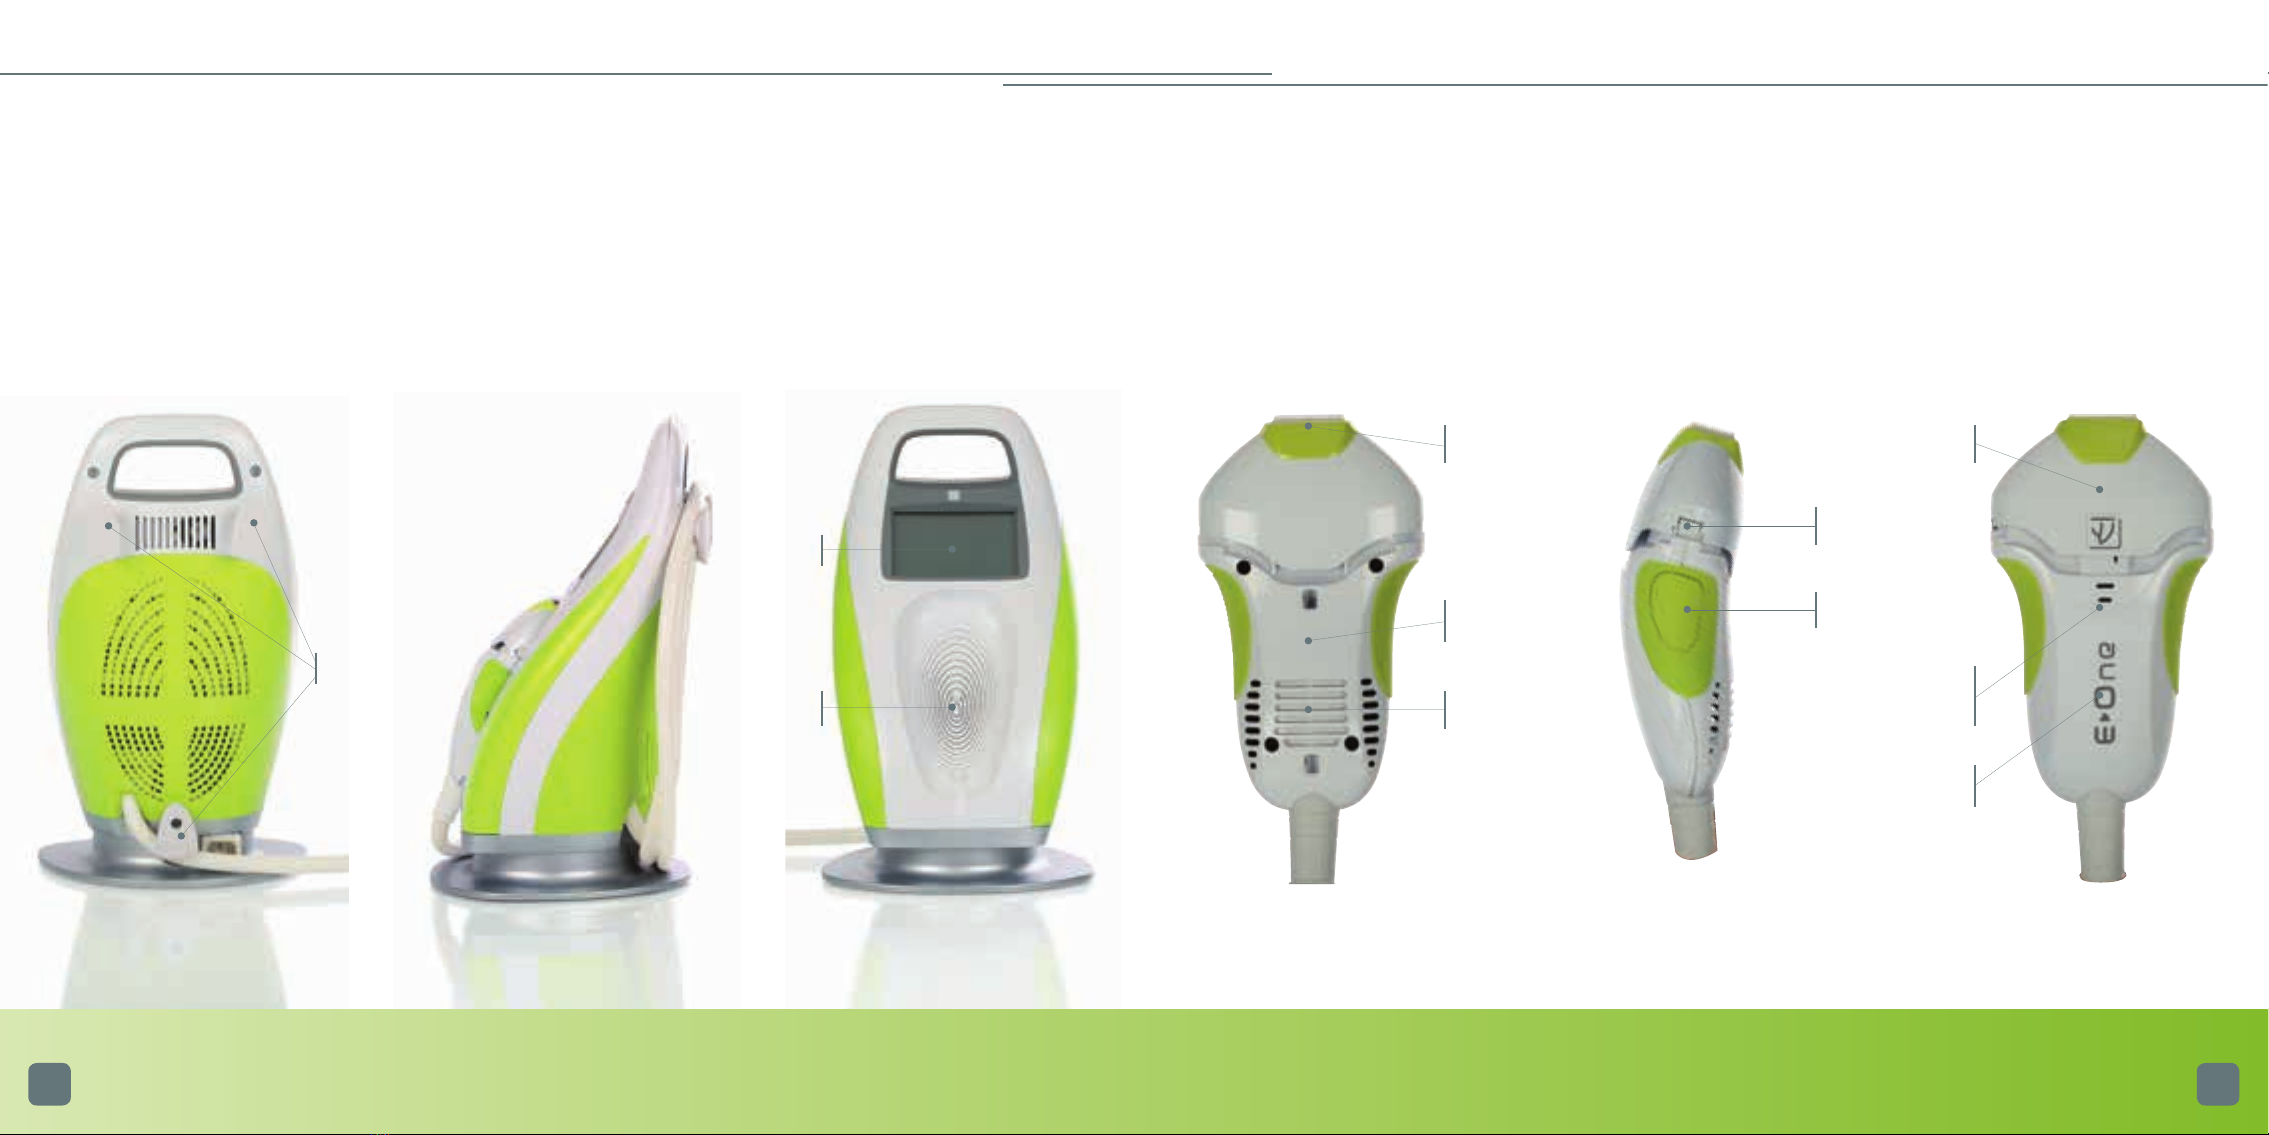
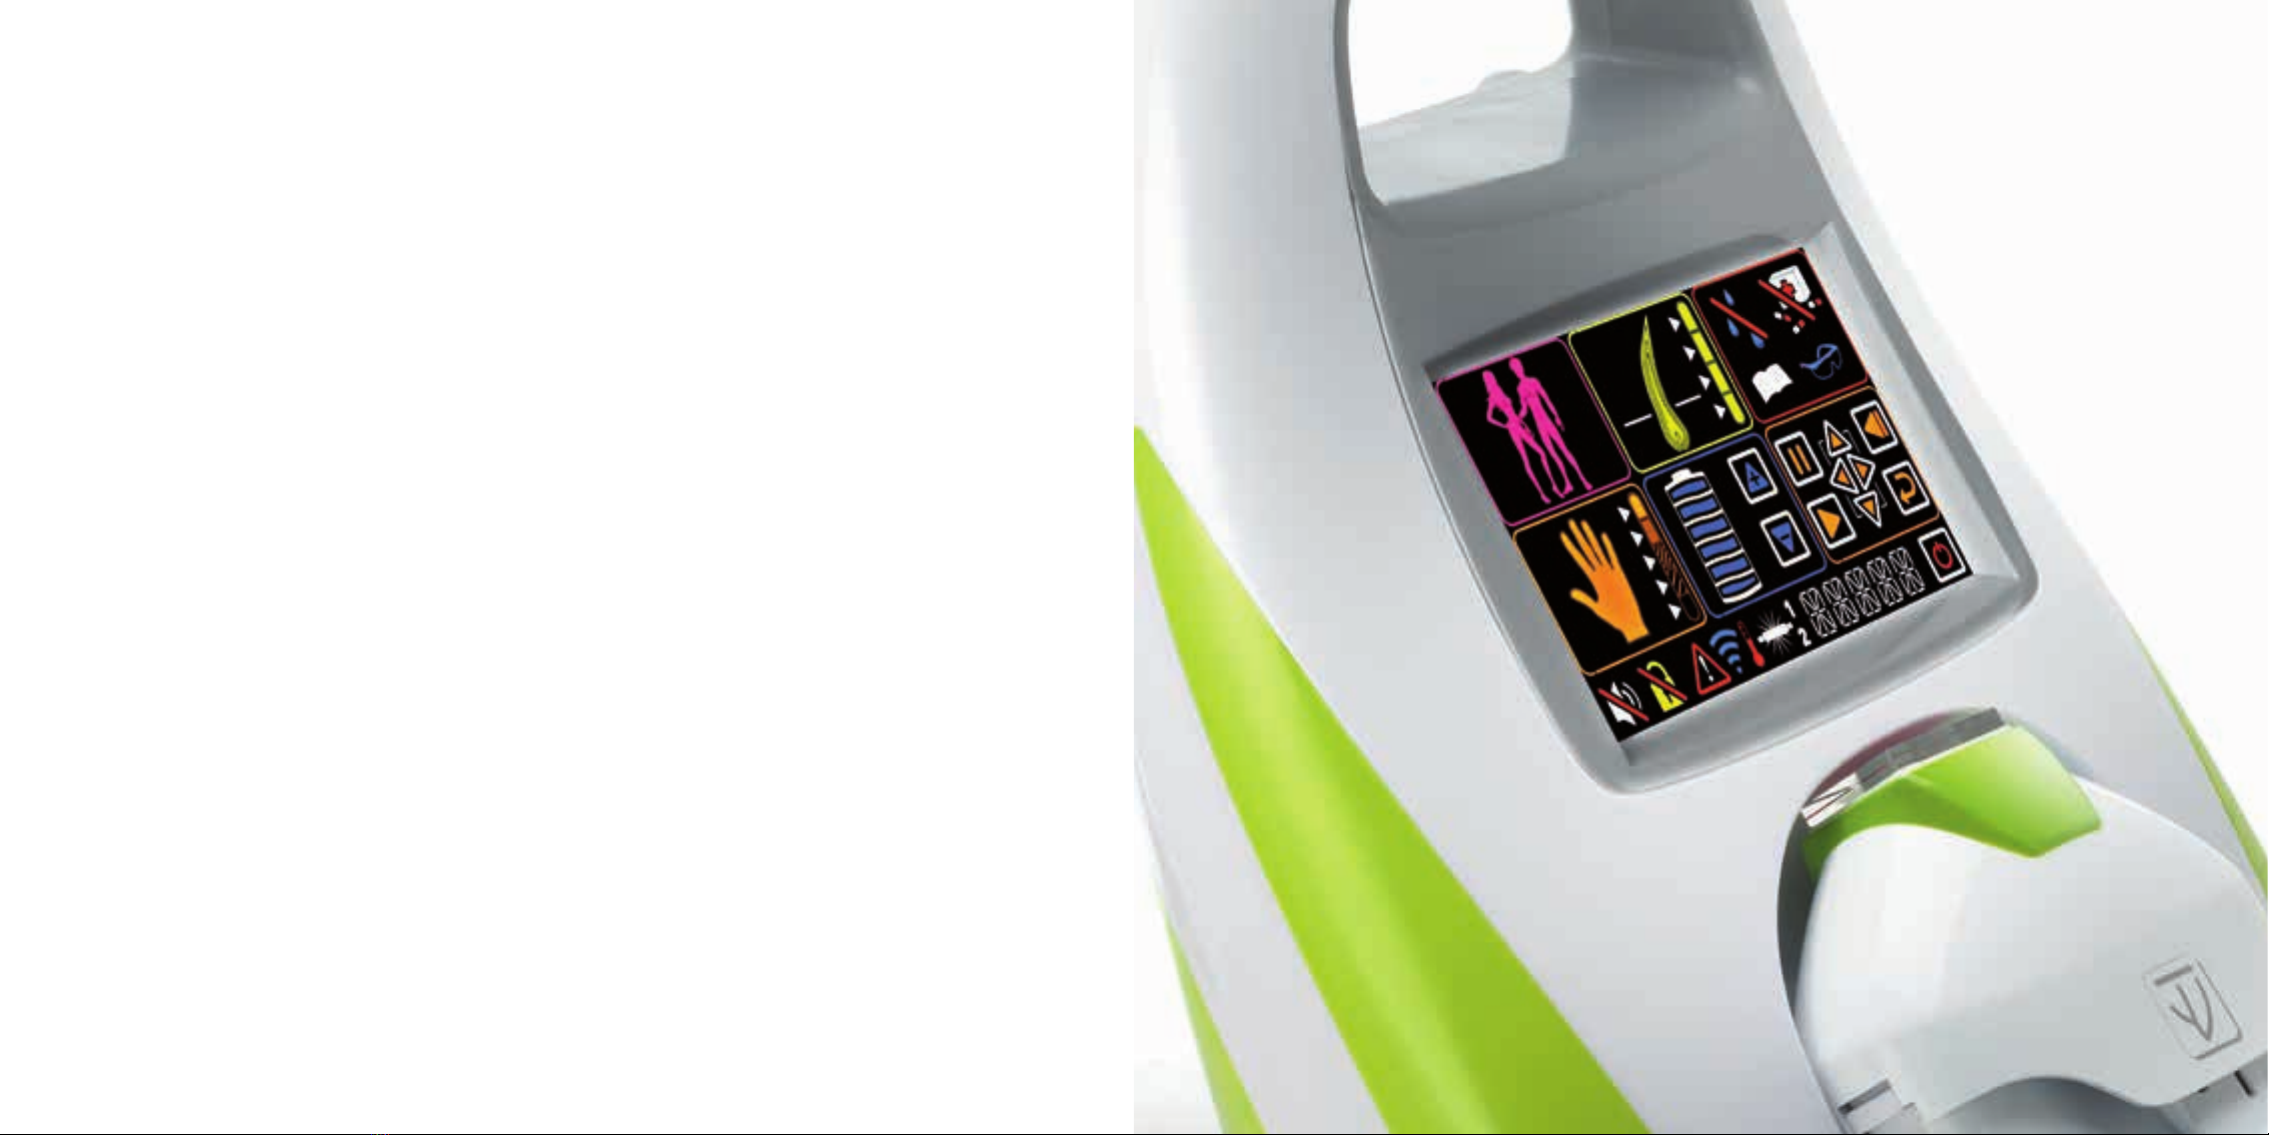
y THE BASE y THE APPLIcATOR
Applicator
support cable
Colour
touch screen
applicator
support area
Tip of optical
guide
lower
casing
air
vents
mobile head
mobile head
locking tab
start
button
Flash
availability
LED
upper
casing
6 7 4 5
2 3
128
14
13
119
10
22 121201918171615
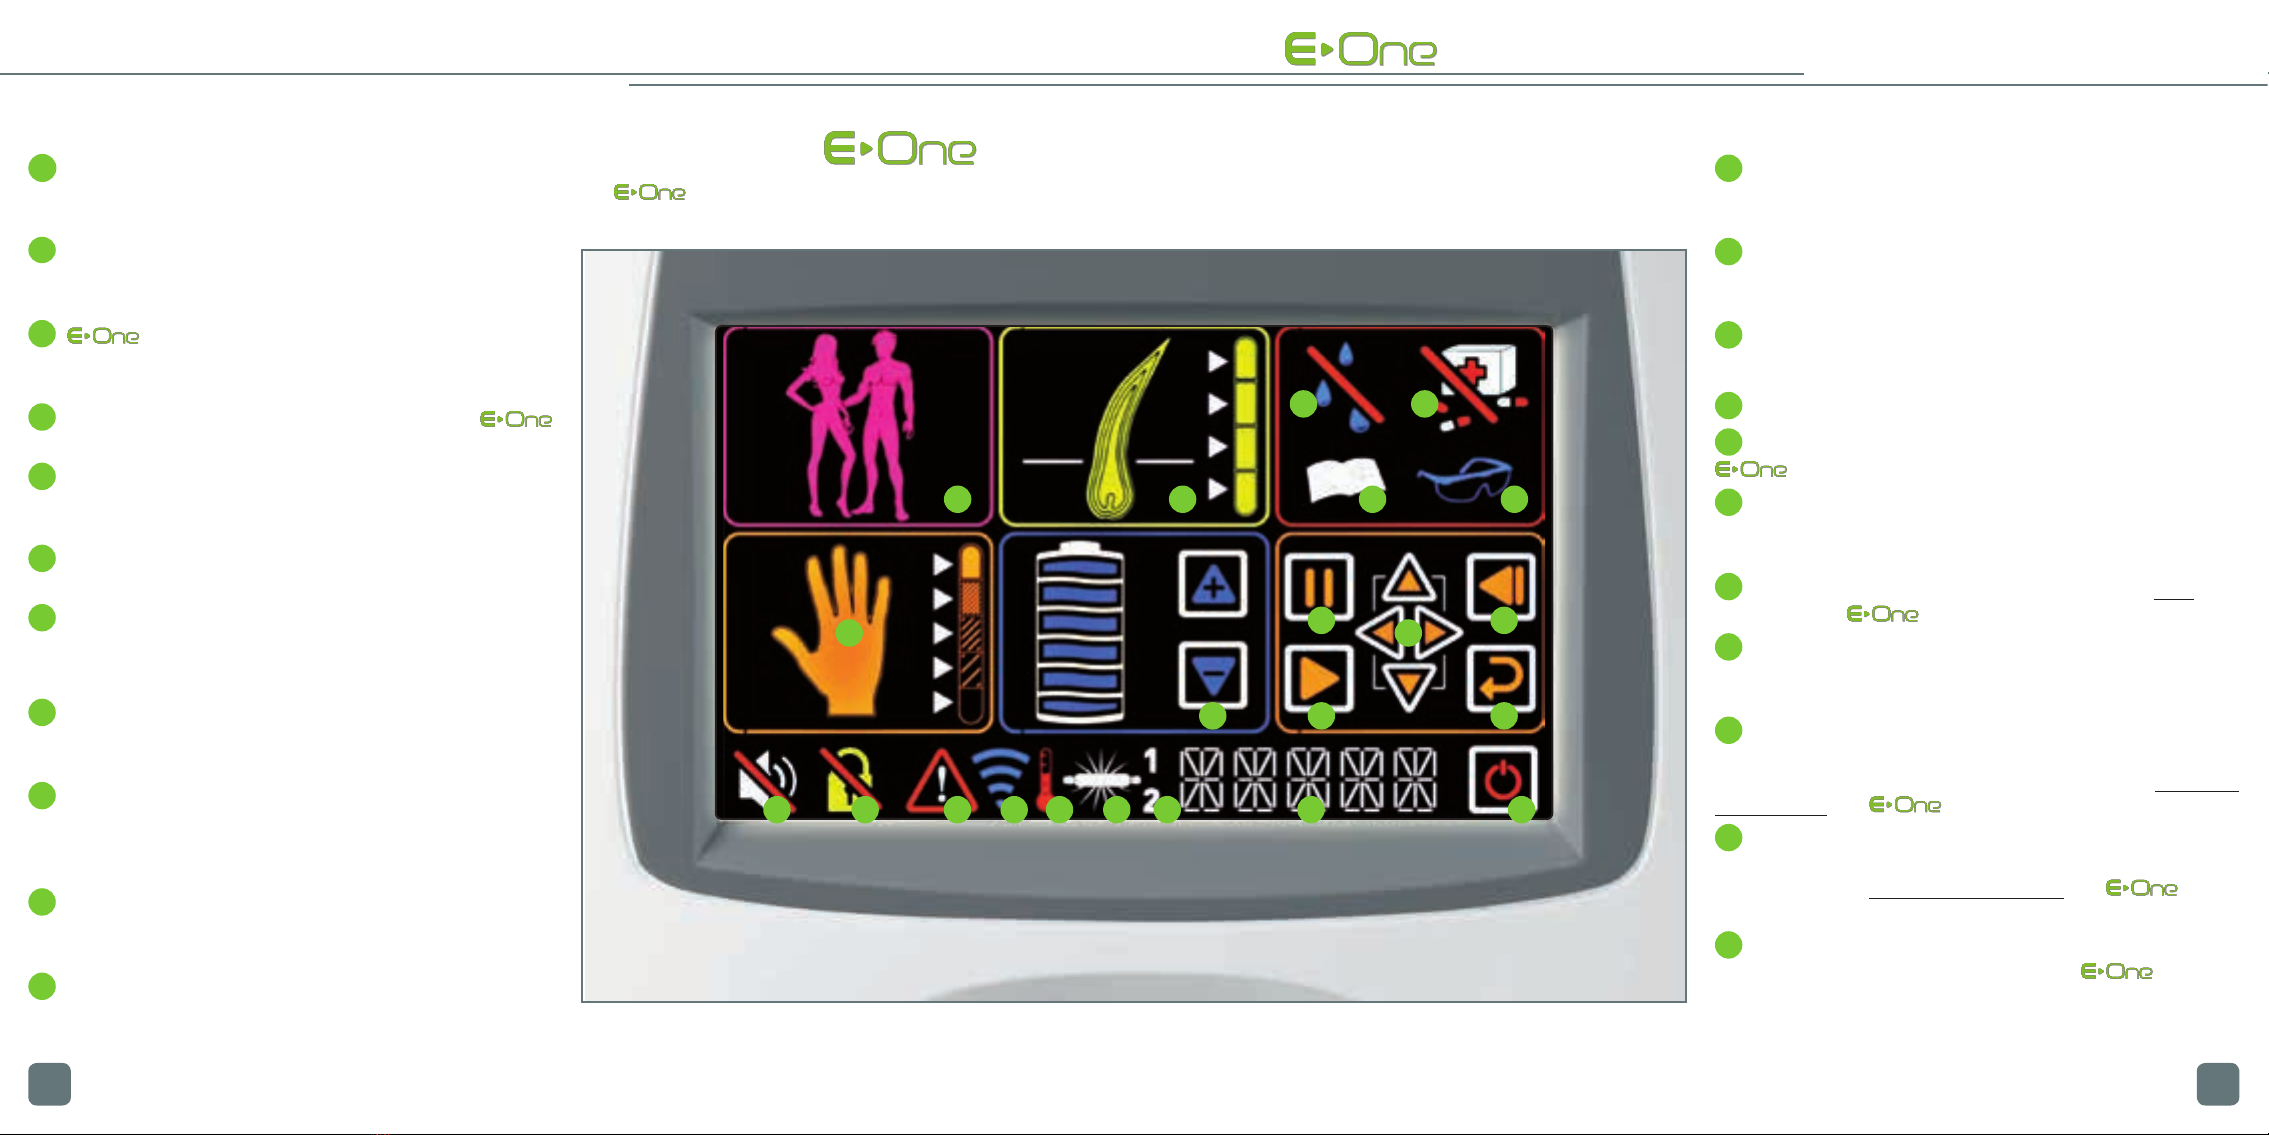
On / off of the device
1On / off switch.
Areas of safety icons
2Take care not to splash the device with water, use near
water or immerse in water. Projection of water on any part
of the device is strictly prohibited.
3must not be used in certain physiological
or medicated contexts (pregnant women, photosensitive
drugs...)
4Reading this instruction manual before using
is mandatory.
5Wearing the safety glasses (mask) is mandatory.
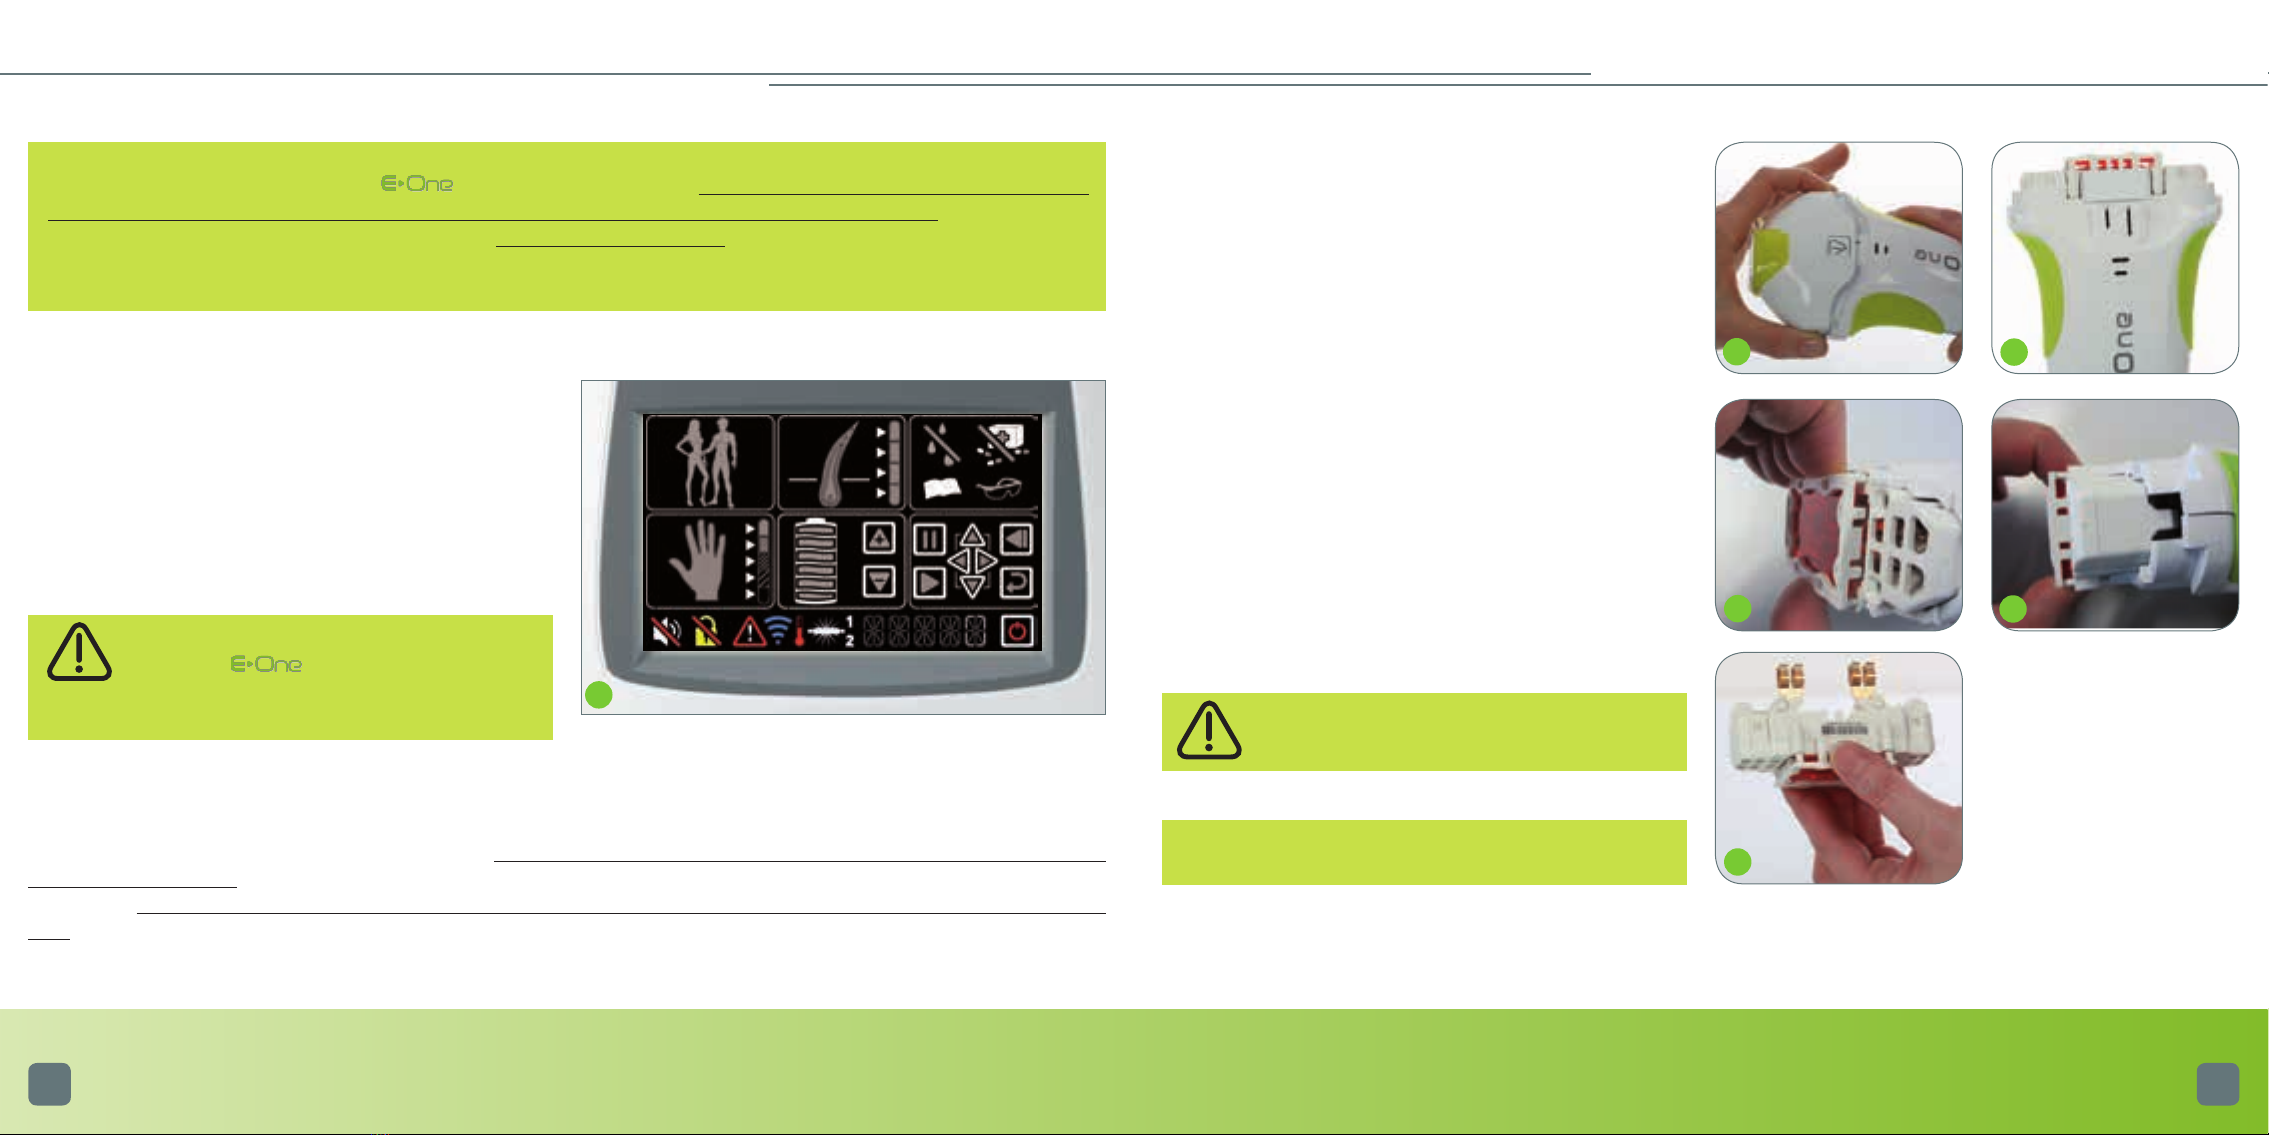
How to programme a hair removal session
6Silhouette of man / woman. This area allows you to
choose between “woman” and “man.”
7Thickness of the hair. This area allows you to select the
thickness of the hair, from the thinnest (bottom) to the
thickest (top).
8Skin colour.
This area allows you to select the colour of the skin, from
the lightest (bottom) to the darkest (top).
9Level of intensity.
The gauge represents the 6 levels of intensity of the issued
flash. The arrows adjacent to this gauge enable you to
increase or decrease the level of intensity.
10 Pause. This icon is displayed on the touch screen
throughout the duration of the hair removal session.
Pressing on it allows you to put the device in pause mode.
11 Play. Enables you to cancel the pause mode and to
resume the hair removal session.
1514
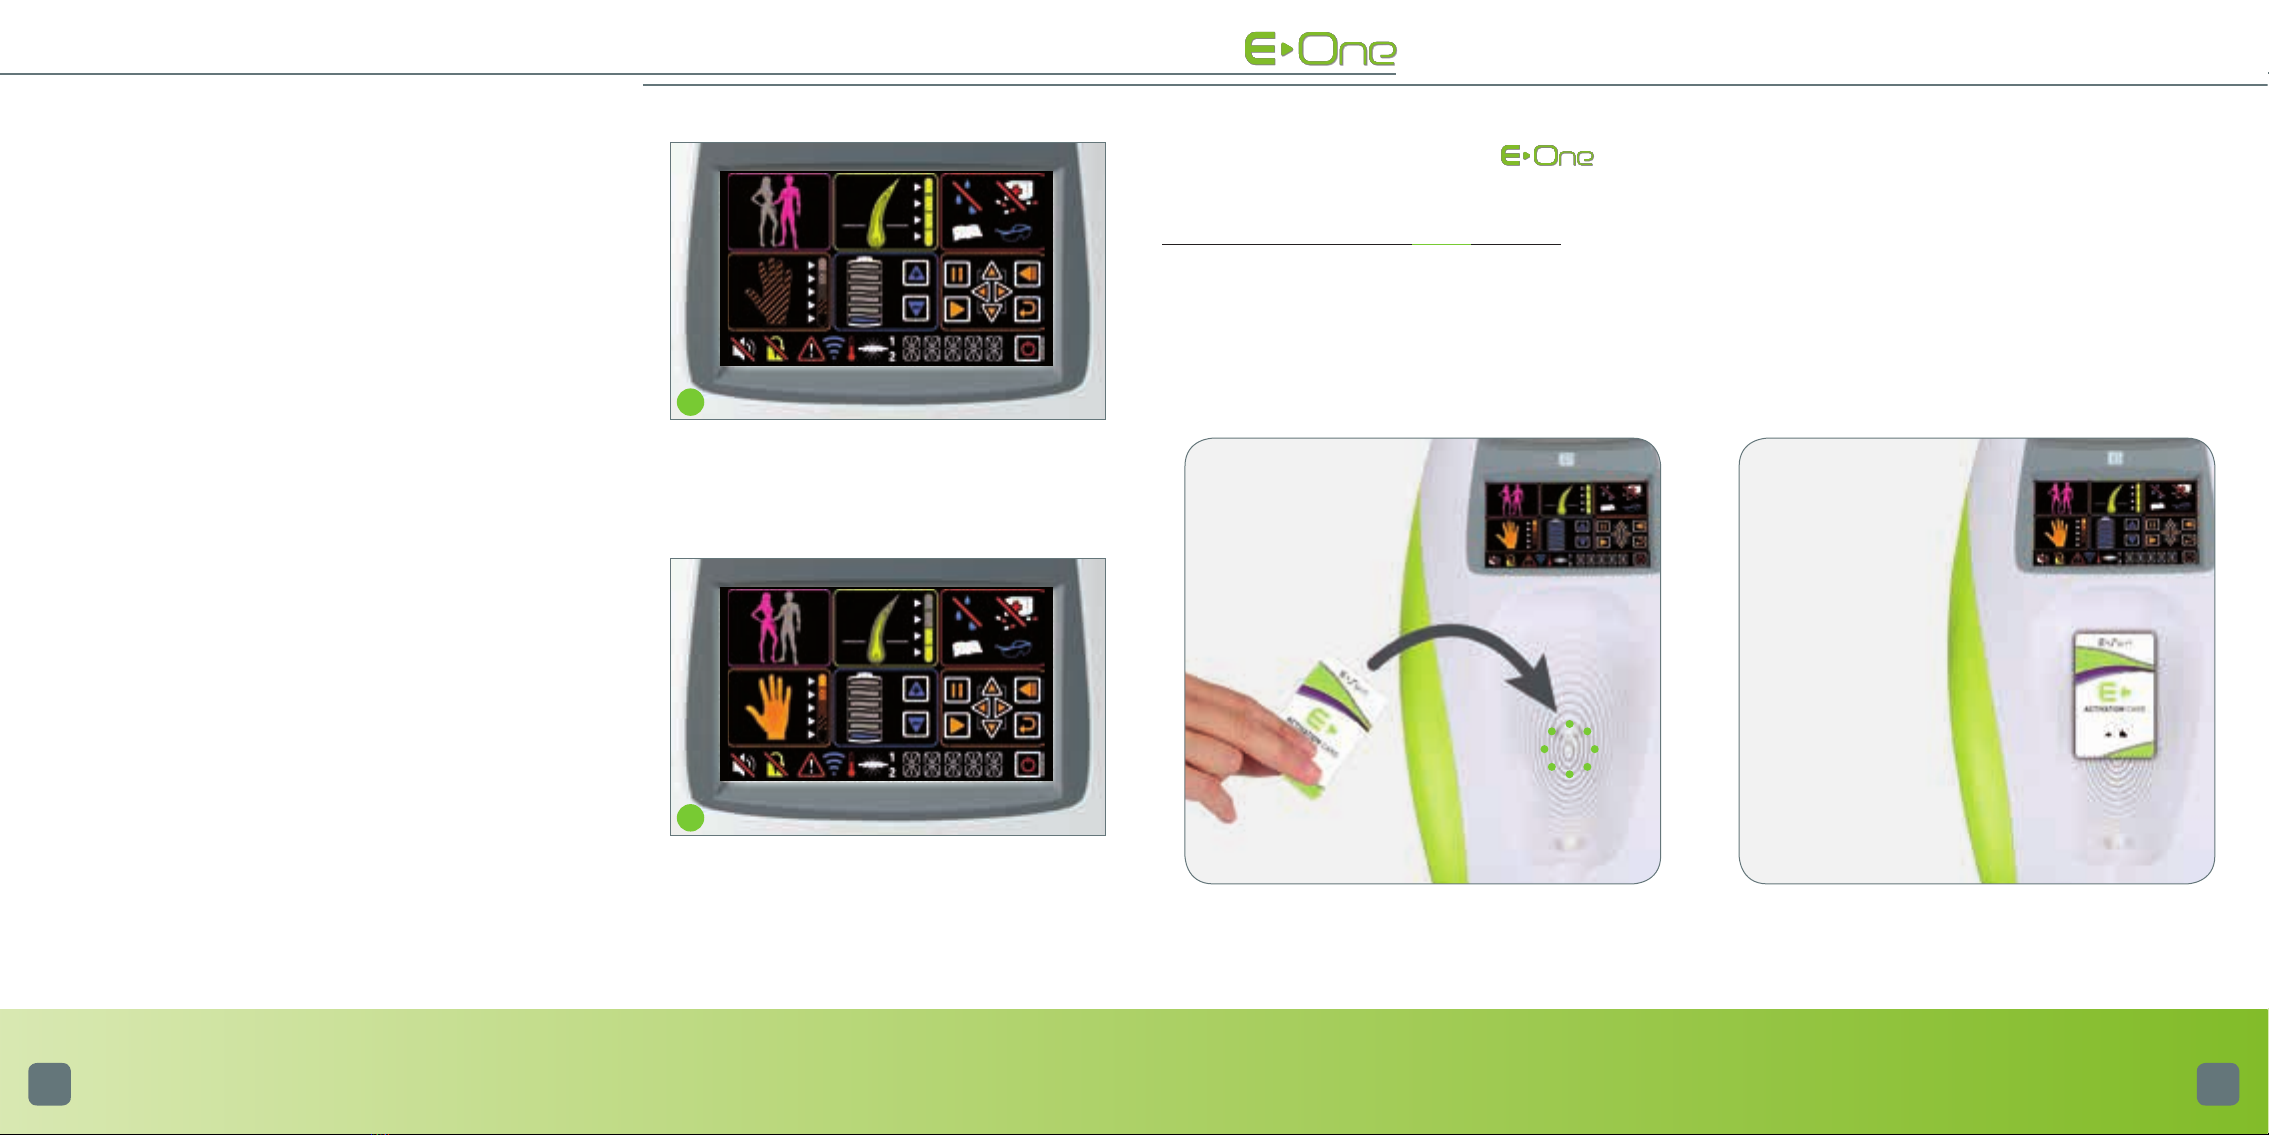
INFORMATION PROVIDED BY TOUCH SCREEN__
THE BASE OF THE IS EQUIPPED WITH A TOUCH SCREEN
For Clinic Access version, the screen is monochrome (without any color)
Browsing area
12 These buttons enables you to move from one character
to another (22), and to increase or decrease the digits of
each character.
13
Go back to the previous menu. This icon enables you
to modify any selection made previously. It is available only
when icons 16 and 20 have been selected.
14 Validation of input data (
22
).
Information in real time
15 Volume activation / deactivation.
16 Lock / unlock. This icon enables you to secure your
with a PIN code.
17 Warning. A number is displayed on the touch screen
when this icon is active; it corresponds to an error message
(see page 52.)
18 Detection of the activation card (this icon is only visi-
ble in case of clinic RC and RC Multi).
19 Temperature of the applicator. This icon is not active
during normal functioning of the device. If it blinks, please
refer to the corresponding error message (page 52).
20 Cartridge tube. When it blinks, it means that you can
issue a flash. Clicking on this icon enables you to enter the
2 successive activation codes of a new cartridge (this does
not concern the clinic RC and RC Multi).
21 Numbers 1 and 2 correspond to the 2 successive acti-
vations codes that need to be entered when changing the
Optic cartridge (
this does not concern the
cli nic
RC and RC Multi).
22 All these characters enables you to enter the cartridge
activation codes, the secure PIN code of , and also
to display the remaining number of flashes at any moment.
1918
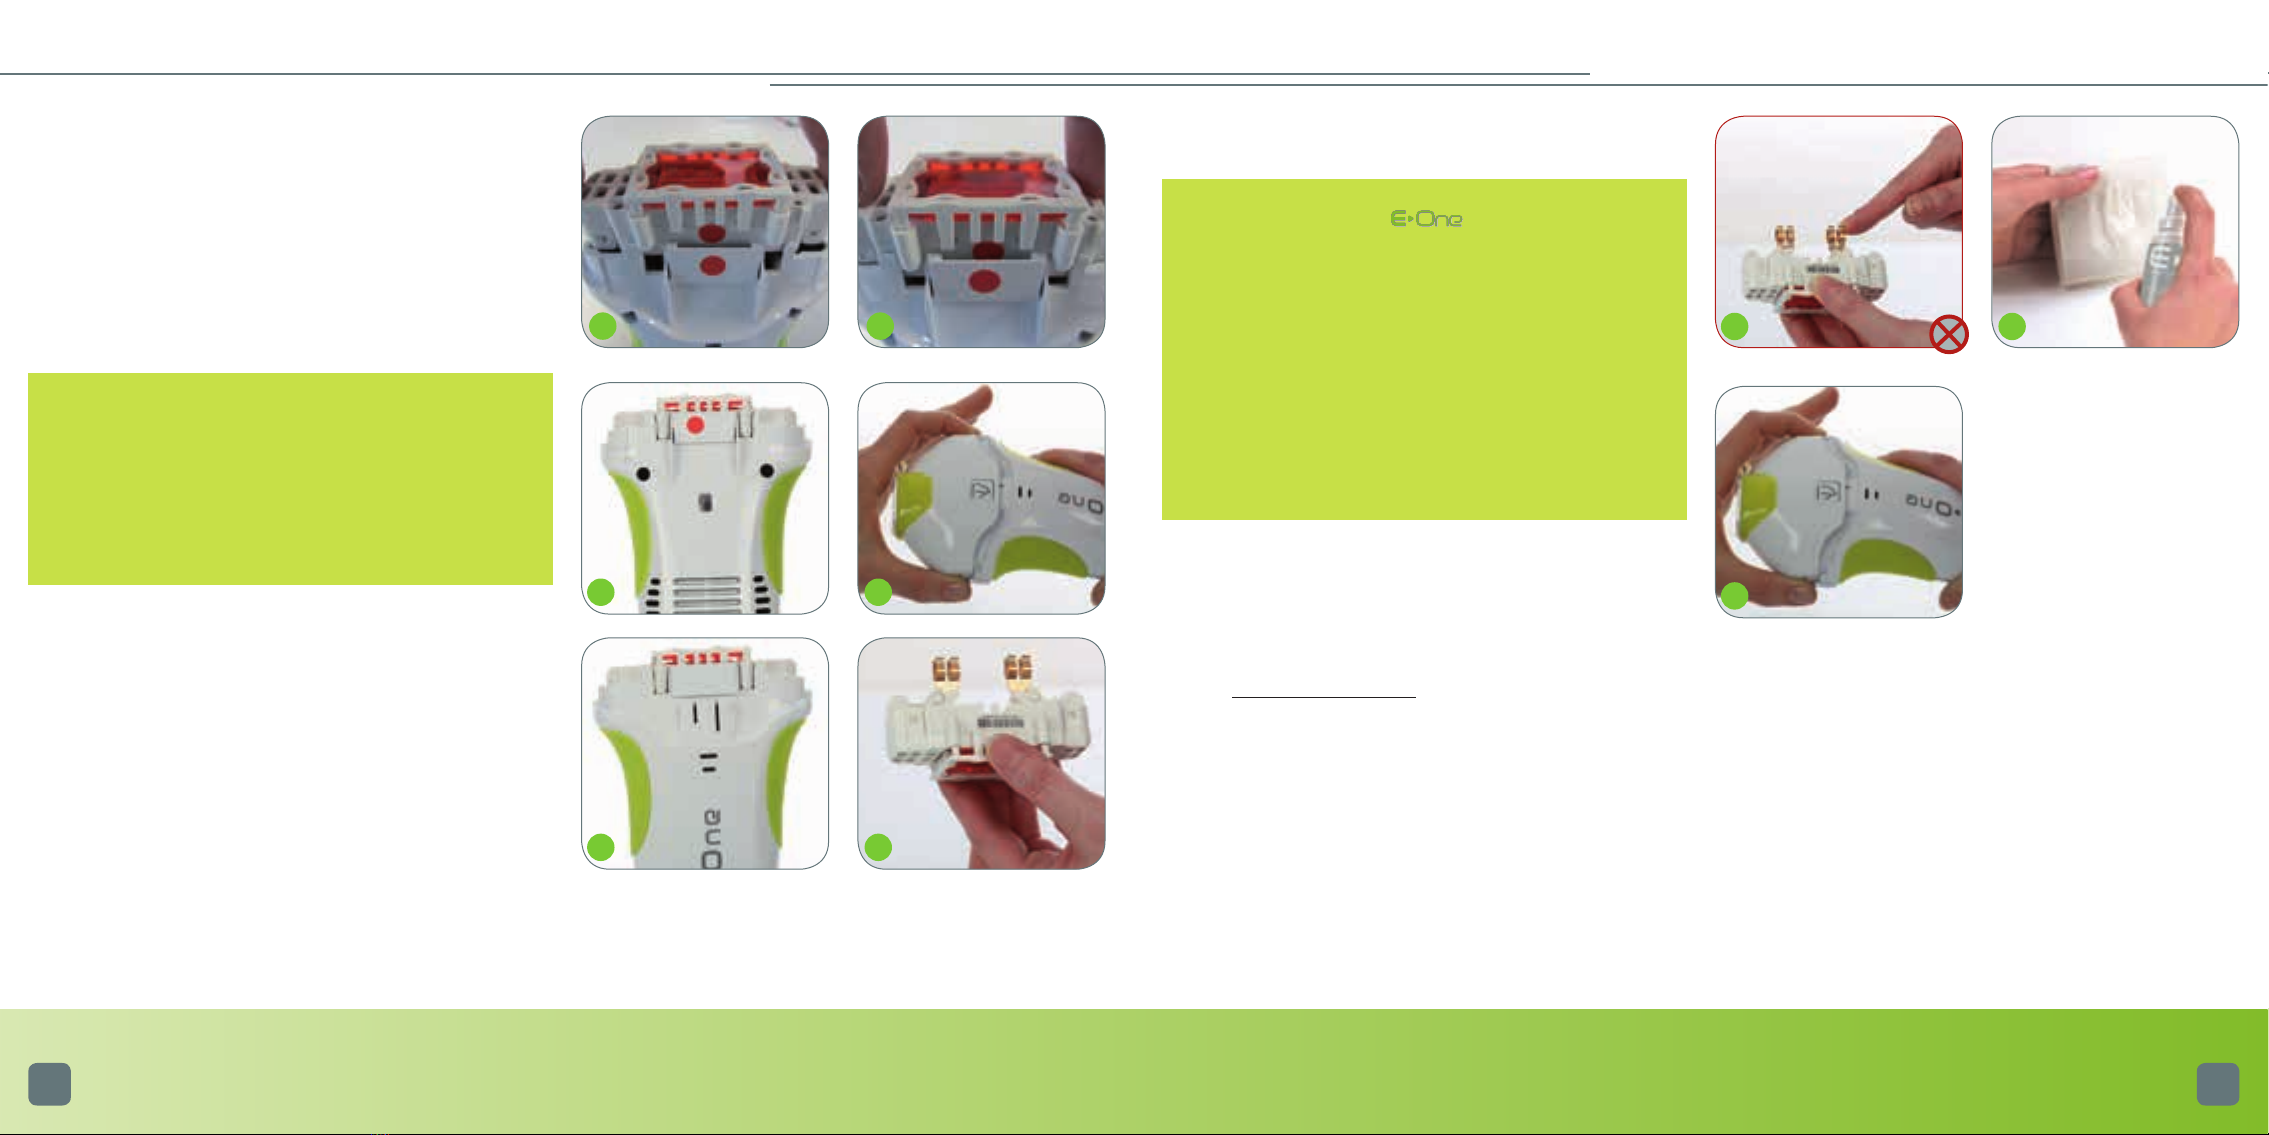
y BEFORE EAcH USE
REMOVING HAIR WITH THE ______
123
• Check the power cord (must not be pinched or crushed, wire must not be bare).
• Check the cable connecting the base to the applicator (no visible impairment).
• Check the external optical parts of .
> Check that the glass tip of the applicator (optical guide) is intact, and if this is not the case (if the optical
guide is cracked or chipped), changing the whole mobile head is essential. Ordering this part is possible at
www.e-swin.com * (go to “Customer Centre “, “New Order of accessories” then “mobile head applicator”).
• Verification and maintenance of the internal optical parts
- In all cases, the device must be unplugged before you start disassembling the mobile head.
- Before each use, and before plugging-in the , you must check the integrity of the internal optical parts:
tube, filter (flat red piece of glass), and optical guide. The filter must be cleaned systematically before each hair
removal session with the . It must be clean and free of dust.
To proceed to the verification code:
> Press simultaneously on the 2 locking tabs of the mobile head, and remove it (1)
> Delicately place the mobile head on a flat surface.
Once you have completed your treatment, you must wait for the fan to come to a complete stop (it
may take more than 10 minutes), before switching it off and unplugging it. This procedure enables
the internal optical parts to cool down. The other fans, located in the base of , will only
stop once the device is unplugged.
4 5
6 7
8 9
10 11
12 13
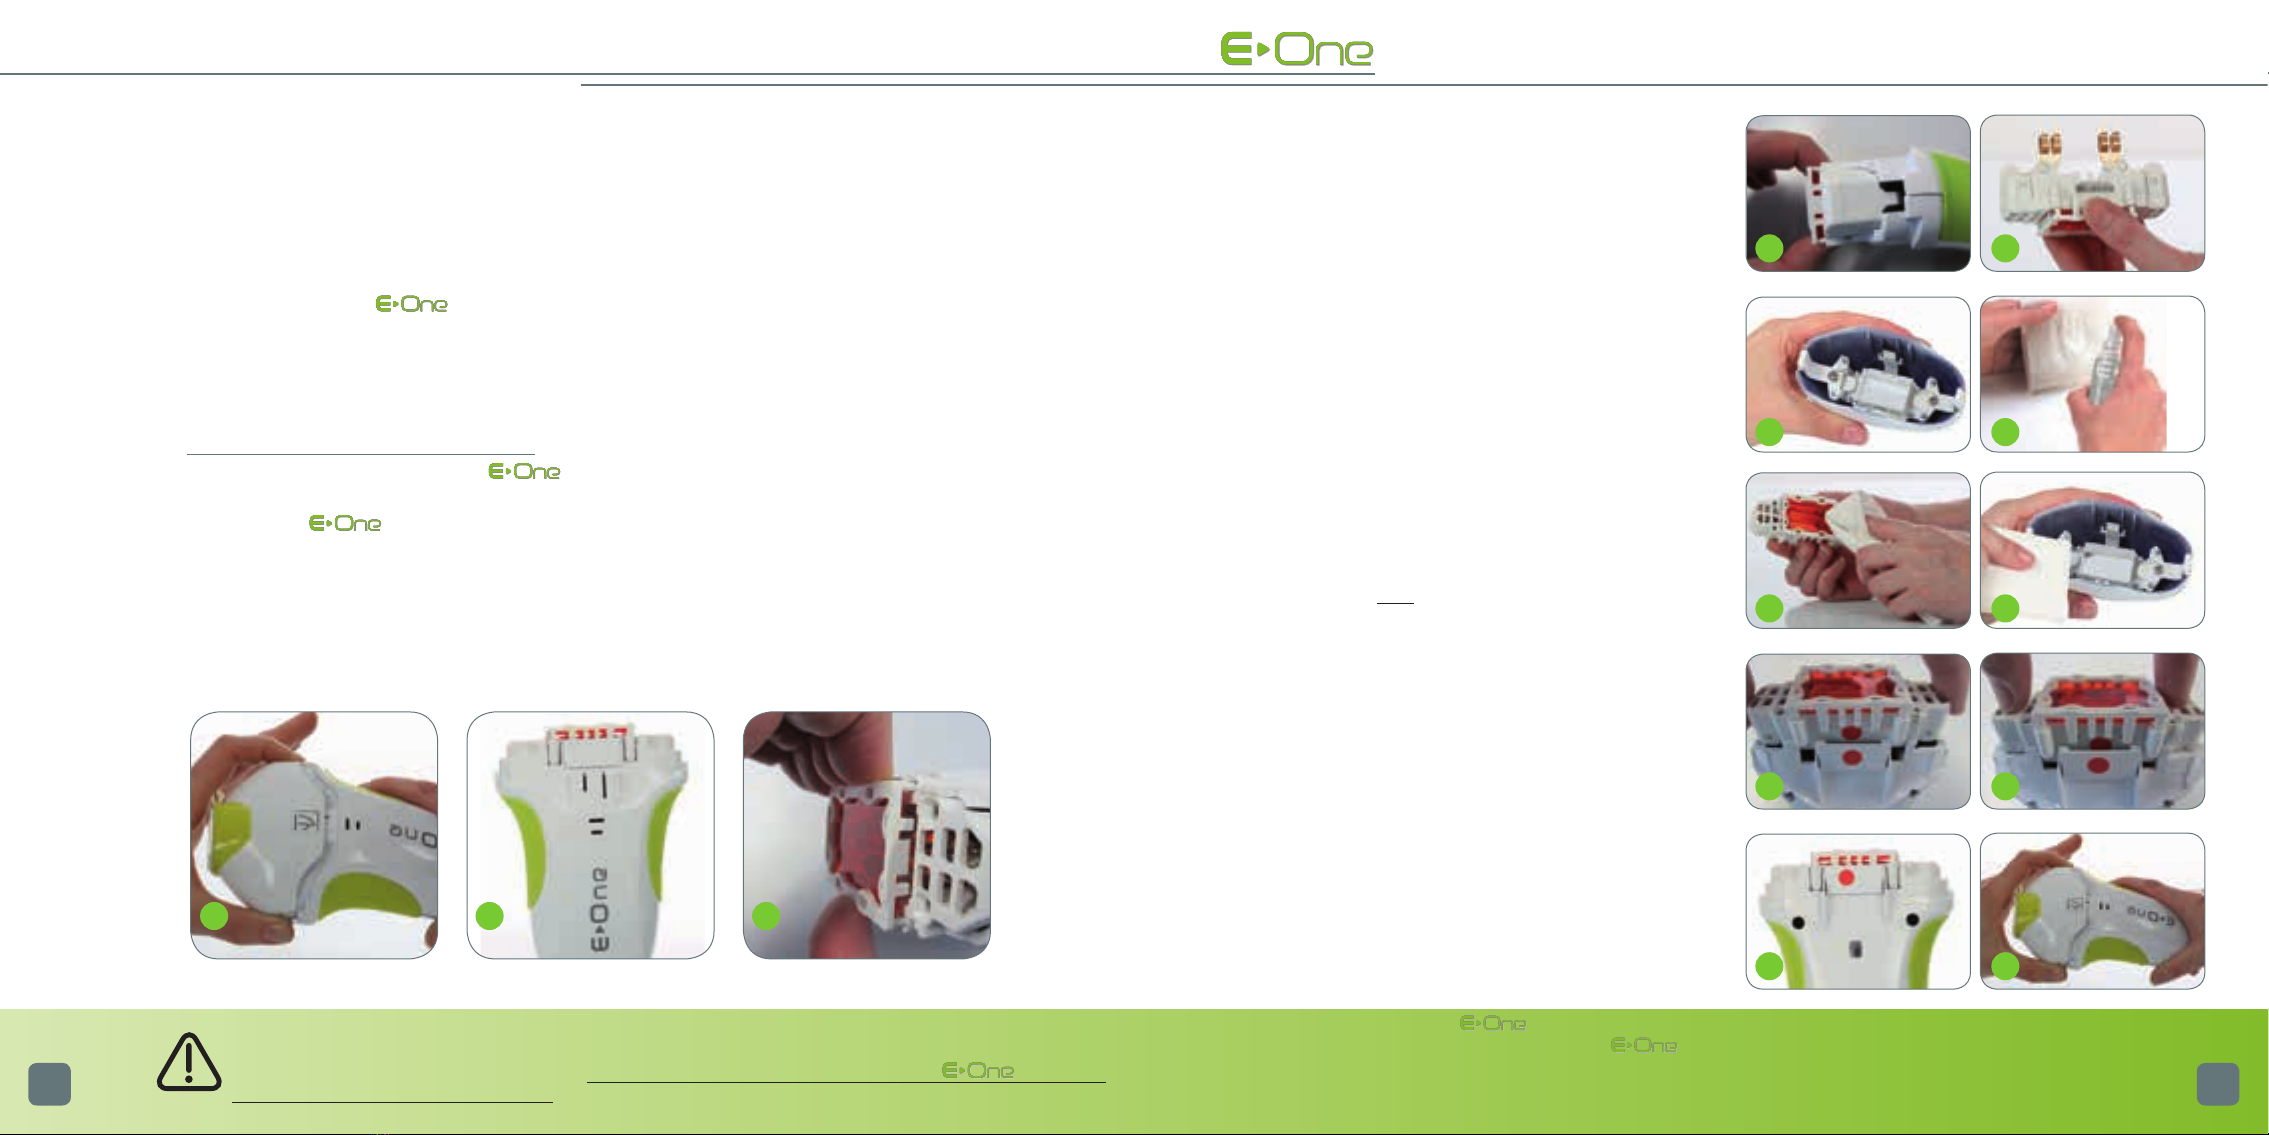
VERIFICATION • Removing the optic cartridge with filter (video avai-
lable on your personal customer page)
> Once the mobile head is removed, the optic car-
tridge with filter is then visible in the applicator (2).
> Remove the cartridge from the applicator: press fir-
mly on the filter support (3) and pull (4). The optic
cartridge with filter now presents itself to you (5); it
is imperative to hold it only by the plastic parts.
• Cleaning of the internal optical parts
> Once the filter cartridge is removed, the transparent
optical glass is also accessible (6).
> Using the spray Clean : spray it on a lint-free cloth
beforehand (7).
Note: Never spray directly on the optical parts.
> Afterwards clean only the accessible side of the filter
with this cloth (8). Repeat the same procedure for the
accessible part of optical glass (9).
Note: The filter must never be separated from its optic
cartridge.
> When cleaning is complete, take the optic cartridge
and align it with the applicator with the help of the red
dots (10). Push it into the slide way of the applicator
by pressing on it (11), so as to ensure that it is properly
in position (12).
> Re-attach the mobile part of the applicator by pres-
sing simultaneously on the locking tabs of the mobile
head (13), making sure to align the internal red dot of
the head with the red dot of the applicator.
Note: For better efficiency of the , t is recommended to clean the filter before each use with the spray
Clean provided when you purchased the . Any damaged filter due to non-compliance with
the procedure for use is not covered by the manufacturers warranty.
p
p
p
p
p
p
p
pp
2120
y STEP 3
STARTING AND SETTING UP YOUR
Reminders:
The definitions of the icons are indicated on pages 14 and 15.
Your is already equipped with an Optic car-
tridge. Therefore you do not need to enter any activation
code to run your device.
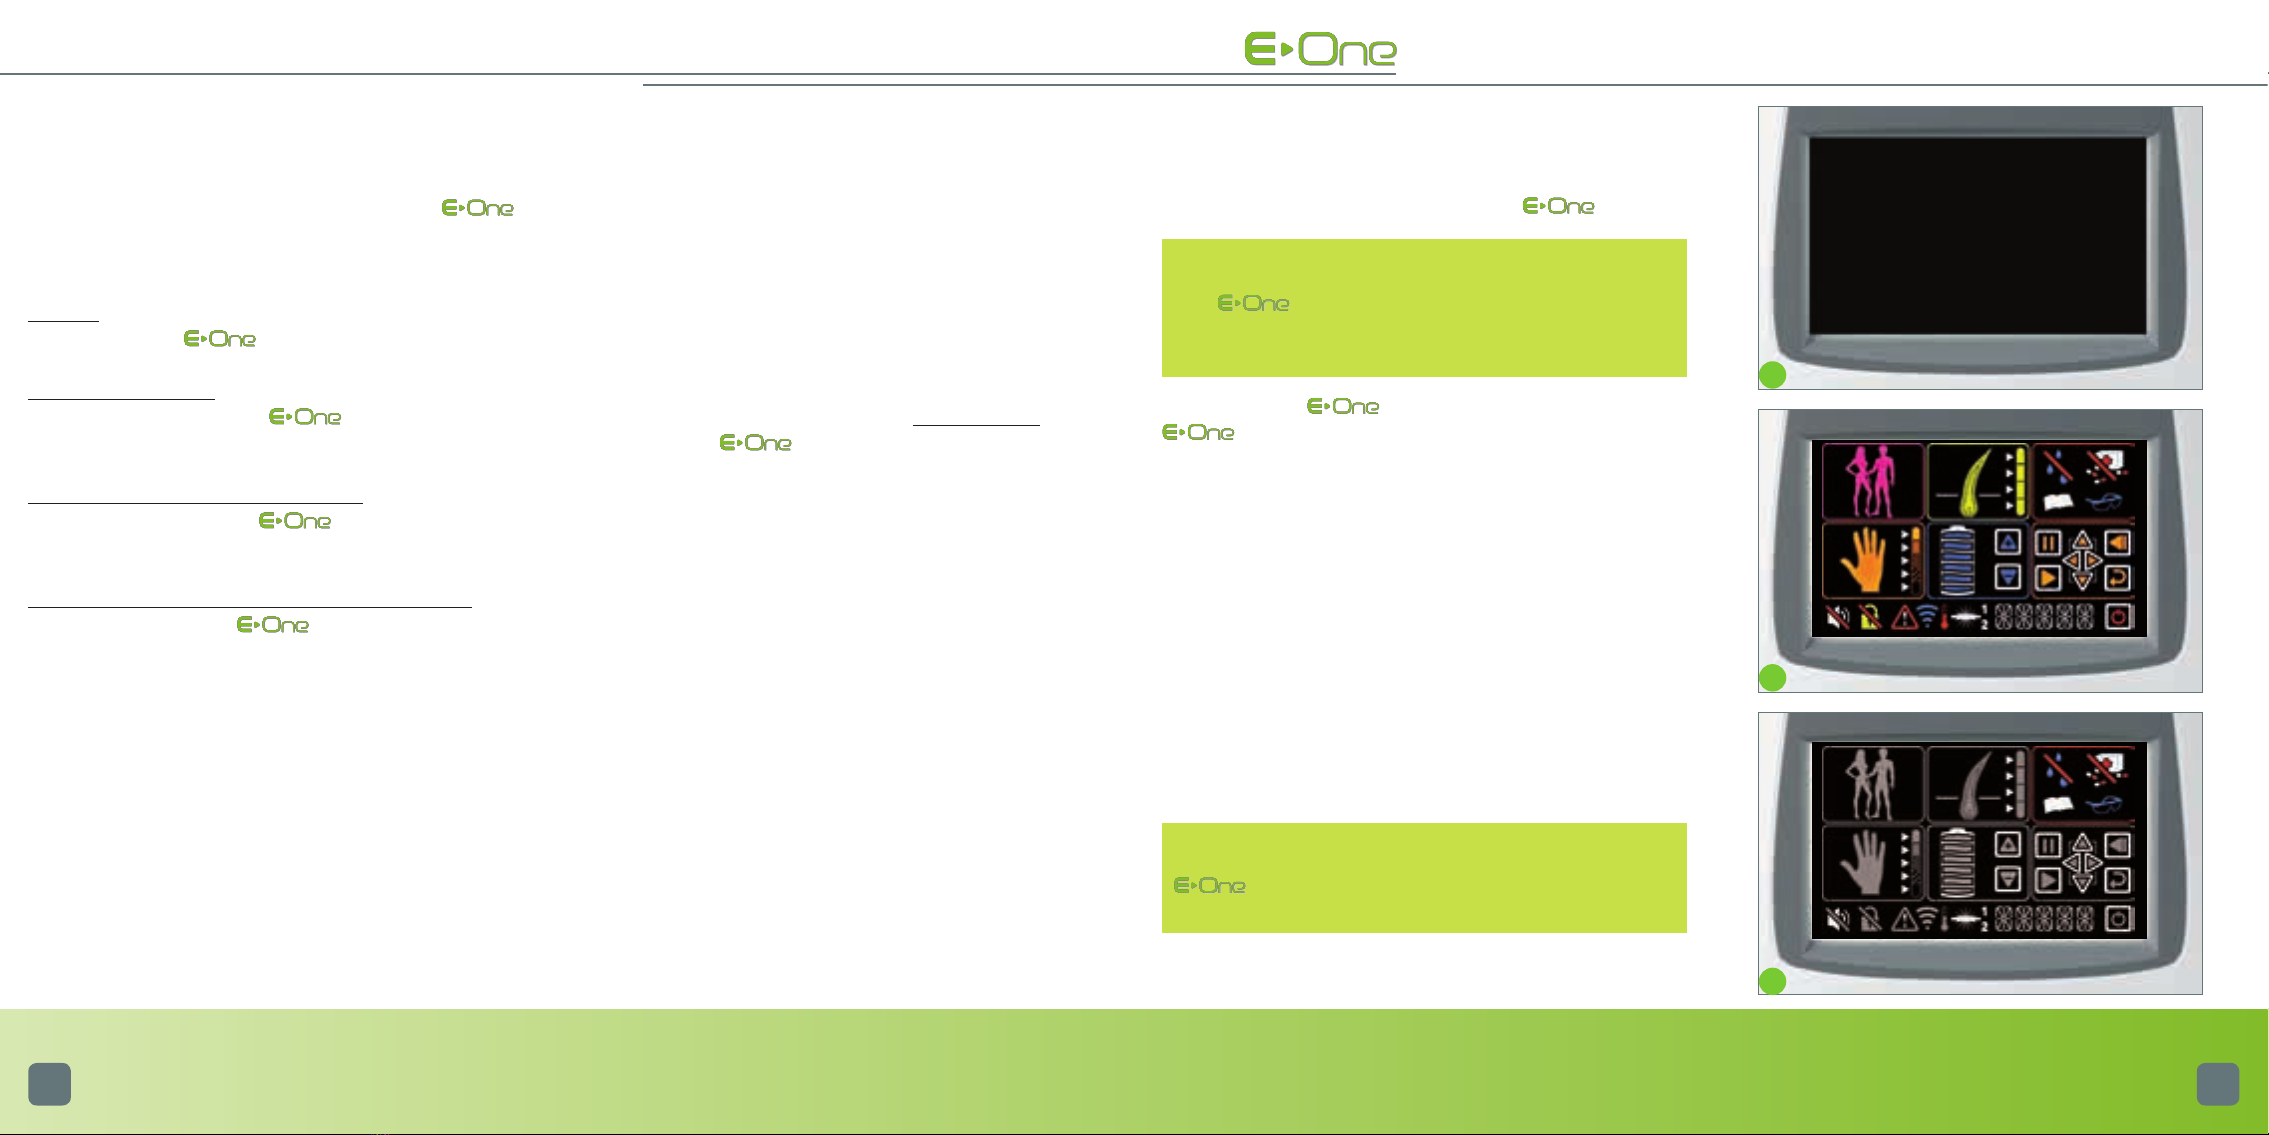
• Connect the to its power cord.
issues 3 beep sounds; the screen is black
(screenA).
Just press anywhere on the screen to enable all icons
to appear (screen B). These icons are explained on pages
14 and 15. The menus are displayed temporarily. Only the
safety icons keep blinking.
• Unlock the safety features (screen C).
It is mandatory to validate each safety feature by pres-
sing one by one on each safety icon (the order of valida-
tion does not matter).
Once all the safety icons are validated, all the other set-
tings icons for the flash will be available.
If an icon has not been validated, it will continue
to blink. You will not be able to set up or use your
so long as all the safety features have not
been confirmed and pressed.
A
B
C
HAIR REMOVAL WITH THE ______
y STEP 1
CHOOSING THE BEST TIME TO USE THE
If your previous hair removal method was:
- Razor:
You can use the immediately.
- Depilatory creams:
You should only use the
1 week after your last
depilatory cream treatment.
- Waxing, electric epilator, tweezers:
You should only use the 3 weeks after your last
depilation treatment.
- Laser technology, flash lamp or other method:
You should only use after hair re-growth has
started.
y STEP 2
PREPARE YOUR SKIN
• Your skin should be clean, dry and free of any cosmetic
product.
• Do not apply any cream, moisturiser, oil or any other
substance on your skin.
• Shave the area to be flashed on the same day of the
session with .
It is imperative that the areas of the skin to be flashed
are completely free of all hair by shaving (and not by
waxing, depilation cream, electric epilator or by any
other hair removal procedure). Shaving must be done
preferably on damp skin in order to reduce the aggres-
sive effect of the razor.
• Rinse your skin with water. After shaving, the skin should
be thoroughly rinsed to remove all the hairs that have been
cut.
2322
- ADJUST THE DESIRED INTENSITY LEVEL:
(screenG)
The arrows located next to the intensity level icon (9),
enable you to increase or to decrease the intensity of
the issued flash.
Click on one of the two blue arrows, until it gradually
reaches the desired intensity level.
When the last setting has been validated, the pause icon
(10) located in the browsing area becomes visible.
The icon representing the lamp (20) blinks; the device is
ready to flash.
At any time, you can change any of these settings; you
just need click on the corresponding icon and modify the
settings.
Always start with a test using the basic setting (the default adjustment proposed
by ) then gradually move the intensity up 1 notch until you reach the
desired intensity. Issue a flash, then wait 5 minutes after this flash to appreciate the skin reaction. In the
absence of skin reaction, you can continue to flash the entire desired area or move the intensity up again
by 1 notch and observe the reaction once again (and so on).
IN PRACTICE
Very dark skin and black skin are not represented here
because they are not compatible with the .
• Setting up your hair removal session
Simply give some information to each blinking icon to set
up your hair removal session. You do not need to press
on the validation icon to select each one of them (14). All
the settings must have been pressed to be able to use
. If one of them has not been selected, the icon
will continue to blink.
- IDENTIFY YOUR SILHOUETTE (screen D)
Select man / woman silhouette by clicking alternately
on the frame (6). The selected silhouette stays on the
screen: the other silhouette disappears.
- IDENTIFY THE THICKNESS OF THE HAIRS TO BE
REMOVED (screen E)
Choose the thickness of the hair (7), among the 4 thic-
knesses of hair proposed, from the thinnest (bottom) to
the thickest (top)
- IDENTIFY THE COLOUR OF THE SKIN (screen F)
Choose the colour of the skin (8), from the lightest (bot-
tom) to the darkest (top).
Important: The darker the skin (whether by photo type or tanning ), the more important
it is to stay close to the minimum default power setting.
By default, the proposed intensity level is adjusted to the minimum. This level enables most
users to obtain good quality results, with optimum safety in 100% of cases. Increasing the
intensity level of the will have the following consequences:
- an increase in the results obtained
- a reduction of the number of sessions needed to obtain lasting result
- an increased sensation on the skin when the flash is issued
- an increased risk of rashes and even burns on highly pigmented skin (olive) after a session.
NOTE:
D
E
F
G
HAIR REMOVAL WITH THE ______
2524
“I’m a man, I have white skin, I wish to remove the hair
from my armpits.”
My selections will be as follows:
. man
. fair skin (1st colour)
. the thickest hair (4th thickness)
. intensity level gauge (level 1)
If flashing is on the beard, the feeling can be significant. We
recommend that you place the gel in the fridge for 3 hours
before flashing this area.
“I am a woman, I have dark skin, I wish to remove the
hair on my arms”
My selections will be as follows:
. woman
. the darkest skin (5th colour)
. hair (2nd thickness)
. intensity level gauge (level 1)
y cASE STUDIES
H
I
y SPEcIAL cASE OF THE Clinic RC and rc Multi DEVIcE
These devices operate with an activation card, credited with 3000 flashes.
This card is specific to the Optic cartridge with which it has been ordered.
- Use the activation card of your Optic cartridge.
- Insert the card on the upper support clip located in the base of the applicator.
- Leave the card in this slot throughout the entire hair removal session.
- At the end of the session, remove the activation card, take care not to damage it, and store it in its case.
- Follow the procedure to switch off the device.
HAIR REMOVAL WITH THE ______
y STEP 4
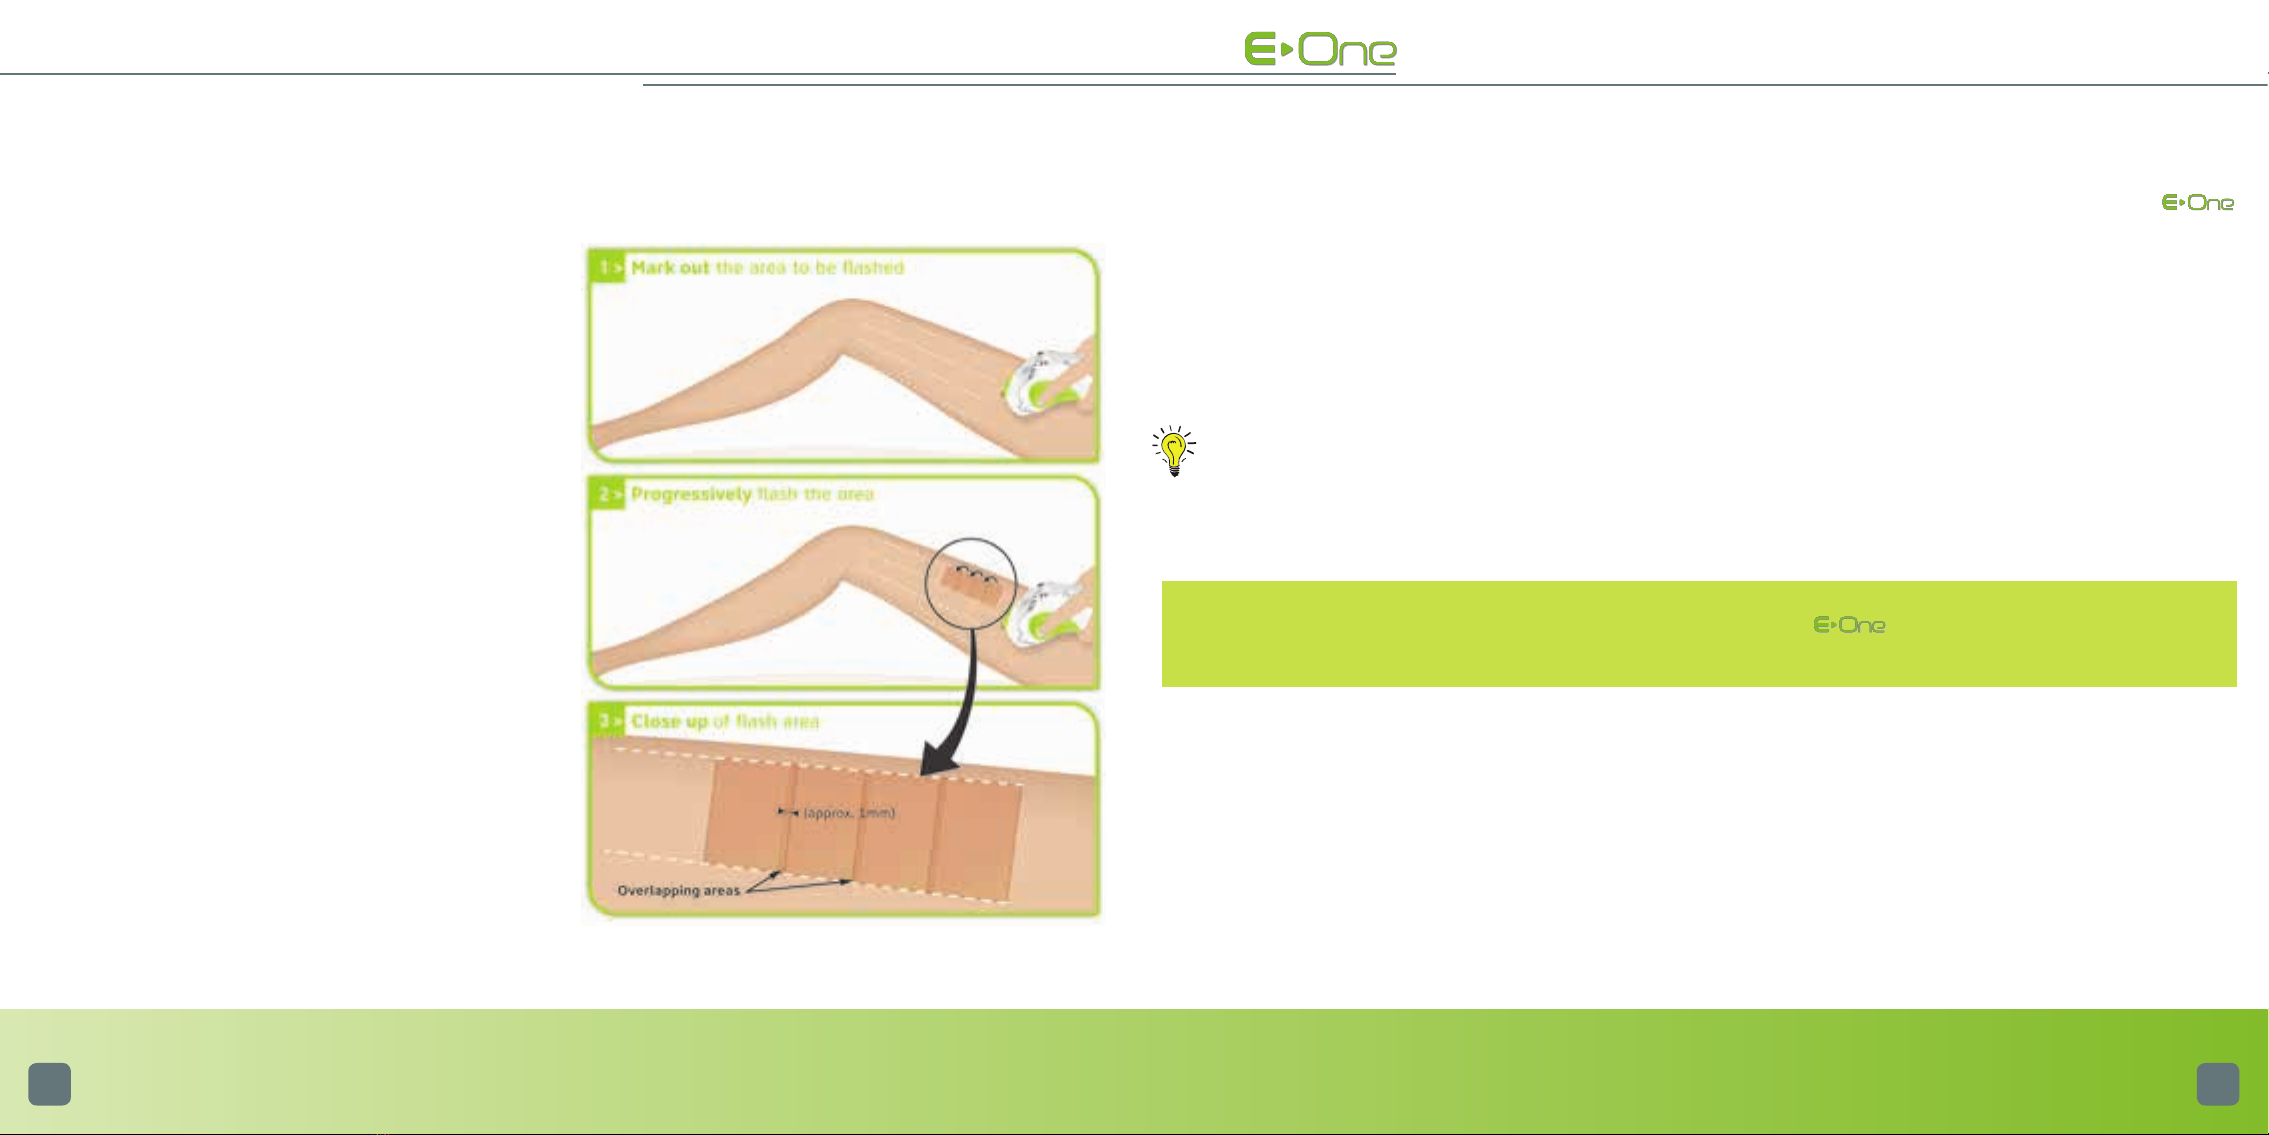
MARK OUT THE AREA TO BE FLASHED
• Mark out the area to be flashed with the help of the
pen, by tracing parallel white lines on the large areas.
• If necessary, use the guide plate stop to cover a rather
large area that should not be flashed (tattoos...)
• Cover small areas that should not be flashed (moles...)
with the patches.
• After applying a thick layer of gel over the entire area
to be flashed, move the applicator along the marked out
area (refer to the next page to know how to issue a flash).
• The applicator’s positioning leaves a ‘foot print’ on the
skin, which enables you to see the area that has just
been treated. Thus, from one flash to another, it is very
easy to distinguish between an area that has already
been flashed and another area that has not yet been. An
overlap of about 1 mm is possible.
• Apply a thick layer of gel over the entire area to be
flashed. It must, under no circumstance, enter inside the
mobile head.
2726
Reminder: The pencil of work Pen, the gel Gel, self-adhesive patches Patches, the guide plate Stop, the
safety glasses Mask to be used must be those supplied with your . The use of any other product may
cause skin burns and void the warranty of your device.
PRECAUTIONS TO BE TAKEN DURING THE SESSION
• You must wear your safety glasses mask at all times. If other people are around you while you are using ,
they should also wear the safety glasses mask Important: Do not flash the periocular area (located under the
safety glasses mask protecting your eyes, eyebrows, eyelashes...)
• If you are planning to flash a large area, do not apply the gel over the entire area from the beginning: as it will
dry out and lose its effectiveness in terms of optical transmission. Therefore apply the gel as you progress onto the
area concerned. Once the gel has been used on the skin and has been flashed, it should under no circumstance, be
collected and reused on another area: flashing the gel is likely to cause a change in its optical characteristics.
TIP!
• To easily remove the applicator from its base, you must grasp it next to the large white cable. The applicator is
then easily unhooked.
HAIR REMOVAL WITH THE ______
2928
20 21
y STEP 5
ENDING THE SESSION
• Press key 1.
• Once the fan located inside the applicator is off (after
10 minutes or so), the power cord can be unplugged. The
other fans, located inside the base of the will
only stop once the device is unplugged.
• Clean the glass tip of the applicator (optical guide)
with a damp cloth.
• Finish cleaning the optical guide with the spray Clean
(images 20 and 21).
Once you have completed your treatment with the
clinic, you must wait for the fans located
inside the applicator to turn off completely. This ena-
bles, among other things, the optical parts to cool
down properly. The fans located in the base, for their
part, only stop when the device is unplugged.
• Store your .
In case of sensitive skin, and after a hair removal ses-
sion with the do not use any hair removing
cream, for a whole week, on the areas that have been
flashed.
Notes:
After the hair removal session, small red spots may
appear: this is a normal reaction and will disappear
quickly.
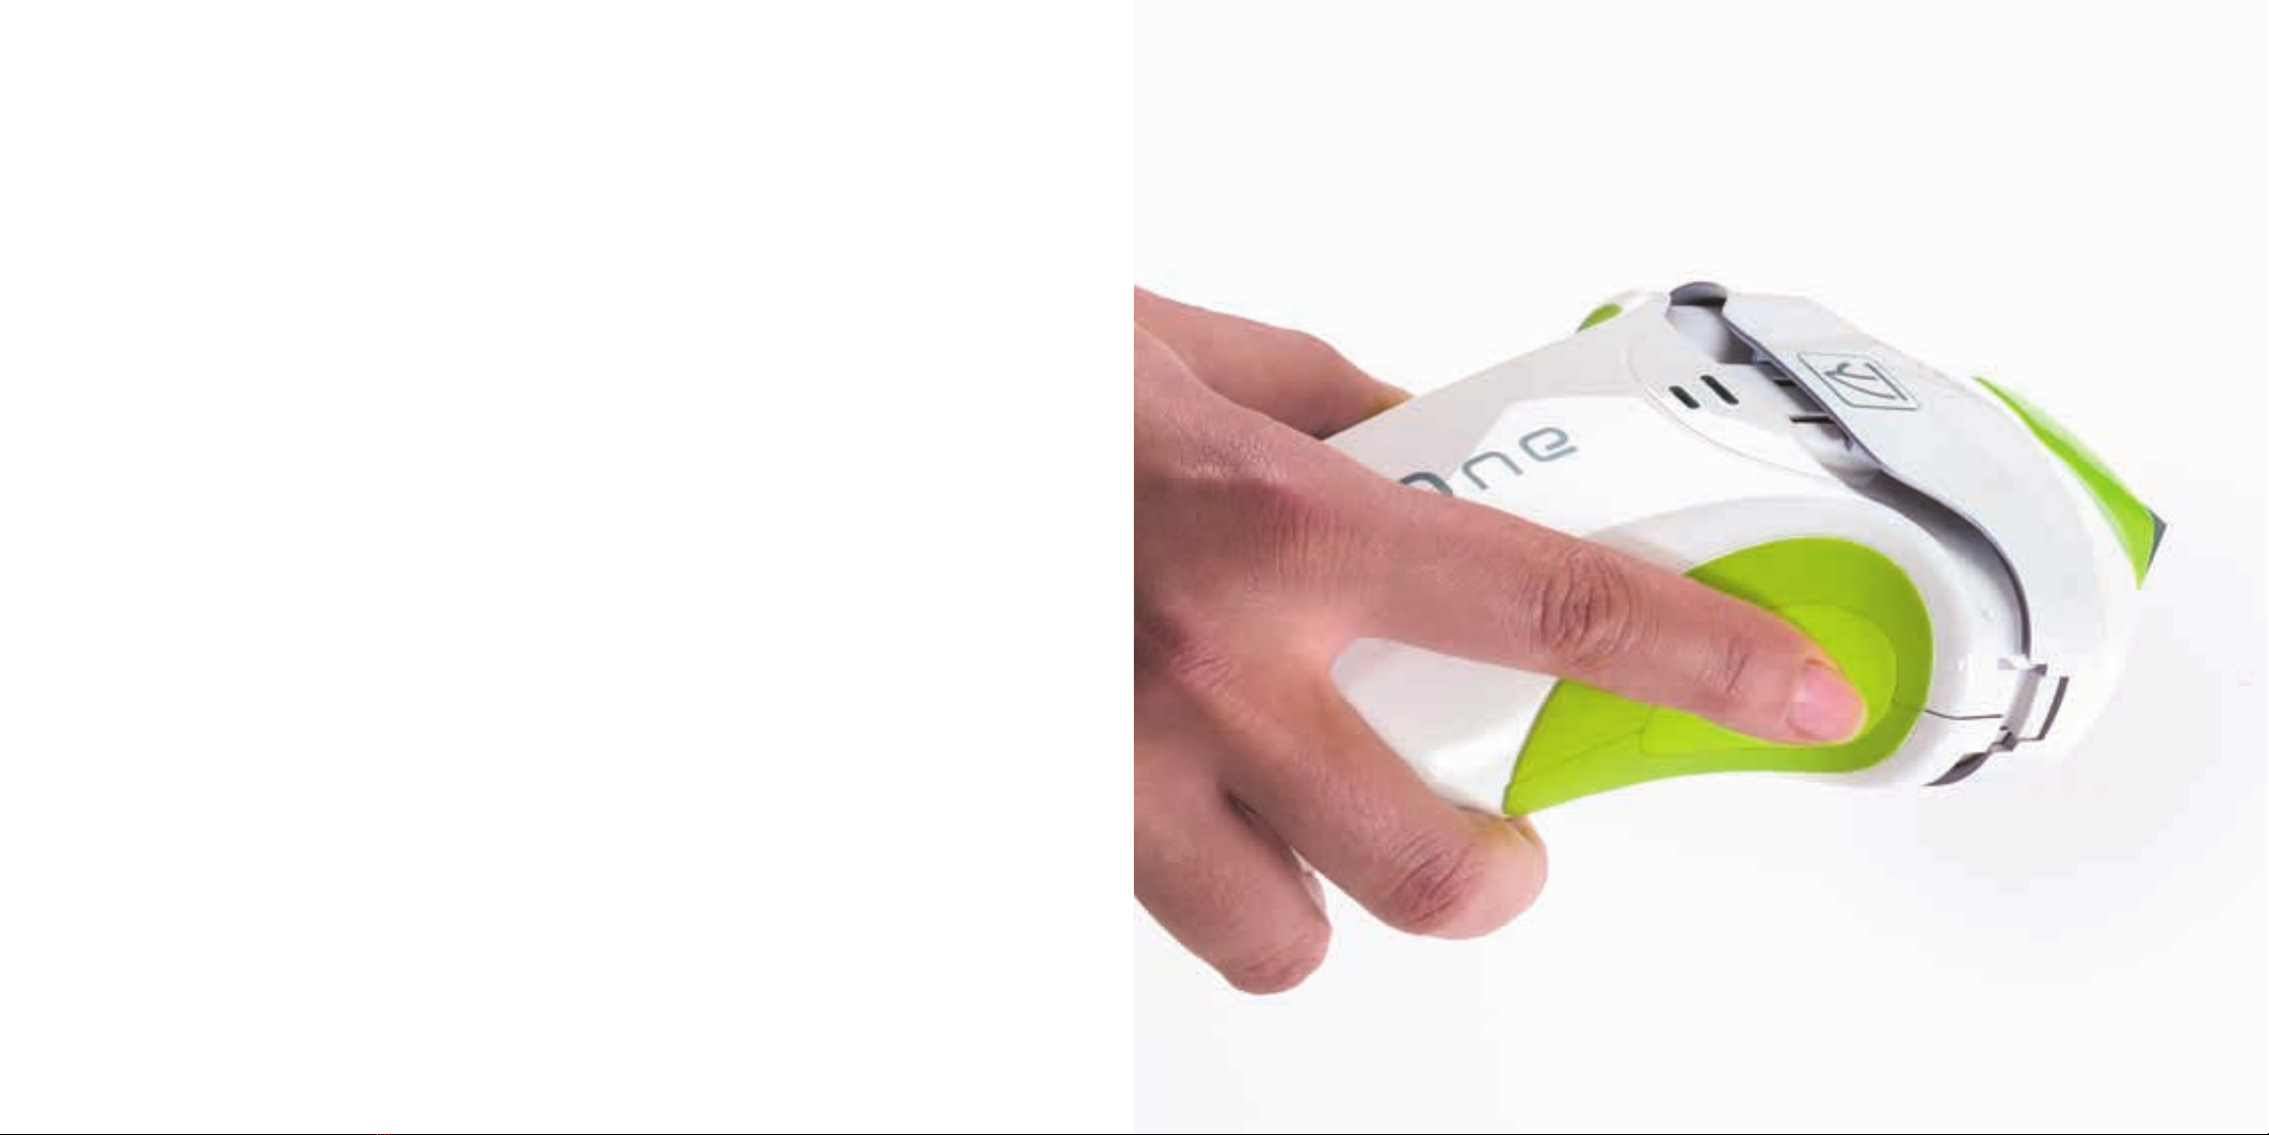
ISSUING A FLASH
- To be able to flash, the glass tip of the applicator (opti-
cal guide) must be applied onto the skin. Then pressure
should be exerted so as to “push down” the head of the
applicator, creating a pressure on the skin.
- The flash can then be triggered, by pressing the button
located on the side of the applicator.
- The pressure must be released and the applicator must
be moved away from the skin.
- The applicator is then moved onto the next area just
beside the one that has just been flashed. It can only be
triggered again after the indicator light has turned green
(if the applicator is triggered again
before the indicator light has turned green, you will not
be able to issue the flash).
- Make sure that you stretch the skin where it is the thin-
nest, so that the glass tip (optical guide) of the applicator
is in contact with the skin and that you have properly
removed all hairs from the area to be flashed.
14 15
16 17
18
19
Note : For each flash, the treated area corresponds to
the range covered by the tip of the optical guide, i.e.
3x 2 = 6 cm2. The glass surface (optical guide) at the
tip of the applicator must be placed well flat on the
skin.
Note : if the device remains idle for 10 minutes or so, it will automatically activate the energy saving
mode. The fans located inside the applicator will stop running, unlike those located inside the base:
these will only stop once the device has been unplugged. For the fans to be reactivated, you simply
need to issue a flash.
Once the hair removal programme has started, the device charges itself: vertical bars scroll at the bottom of
the touch screen, from right to left (where icon 22 is located). It also charges after each flash and precedes
the display of the number of remaining flashes on the Optic cartridge.
If the device is idle for 15 minutes, it will automatically go into “pause” mode.
HAIR REMOVAL WITH THE ______
31
3332
The Optic cartridge should not be changed
before the asks you to do so. You
will no longer be able to reuse a cartridge
that has been changed earlier than needed.
This step must be performed with utmost caution. Any improper handling can result in permanent dam-
age to the applicator and to the in a more general way. The warranty does not cover improper
handling. We therefore recommend you to be very attentive to the procedure to follow.
Apart from the classic procedure, only our technical department is authorised to ask you to change
the Optic cartridge (refer to page 40 of this instruction manual).
The filter must never be separated from its
Optic cartridge.
y STEP 1
The cartridge must be changed when the number of
flashes displayed is equal to 0. When this happens, the
lamp icon (20) appears, but does not blink (screen J).
You can monitor your usage on the touch screen at any
time.
J
__CHANGING THE OPTIC CARTRIDGE
y STEP 3
• Turn off the device
• Unplug the power cord from the device
y STEP 4
EXTRACTING THE CARTRIDGE (the video is avai-
lable on your personal client page)
• Take the applicator and press simultaneously on the
2locking tabs of the mobile head (23), and remove it.
• Once the mobile head is removed, the Optic cartridge
with filter presents itself in the applicator (24).
• Remove the cartridge from the applicator: strongly
pinch the filter support (25) and pull (26). The optic
cartridge with filter now appears (27) ; it is imperative
to only hold the plastic parts.
23 24
p
25 26
27
y STEP 2
• Before turning off and unplugging your device, you must wait for the fan located inside the applicator to stop
operating completely (this may take several minutes). This procedure enables the optical parts of the applicator to
cool down; the other fans located inside the base of the E>One Clinic, will only stop once the device is unplug-
ged.
The explanation of the different parts of the applicator can
be found on page 13
p
p
p
__CHANGING THE OPTIC CARTRIDGE
3534
y STEP 5
INSERTING A NEW CARTRIDGE (video available on
your personal client page)
• Take the new Optic cartridge and check the direction
for inserting this new cartridge.
• Align the Optic cartridge with the applicator with the
help of the red dots (28).
Note: The cartridges are not symmetrical, so they must
be inserted in a specific way, and certainly not any other
way. To help find your way, a red dot indicates the part
underneath the cartridge. This dot must be oriented to
match the side of the applicator that contains a venti-
lation grid, which is also marked by a red dot. You must
therefore align the 2 red dots.
• Push it into the slide way of the applicator by pressing
on both sides (29), so as to ensure that it is properly
maintained (30).
• Re-attach the mobile part of the applicator by pressing
simultaneously on the locking tabs of the mobile head (31)
making sure to align the internal red dot on the head with
the red dot on the applicator.
• After attaching the cartridge, you must make sure that
it is positioned correctly: it must be aligned to the fix part
of the applicator (32).
If this is not the case (if it overtakes by more than
2mm), it means that the cartridge was inserted incor-
rectly: you must take it out and check that:
28 29
- The red dots are aligned (28)
- You have not twisted the electrodes (33)
If you have twisted the electrodes, do not insert your
Optic cartridge in your as it may cause serious
damage to your device. You will need to send us back
the damaged cartridge and order another one.
Precautions: During the entire procedure of changing
the cartridge, you must under no circumstance touch:
- the electrodes of the tube (34)
If you accidentally touch the tube or its reflector, we
urge you to send us back your cartridge to proceed to
an exchange.
y STEP 6
• Before repositioning the mobile head of the applicator,
you must always clean the filter (located directly on the
Optic cartridge) with the spray Clean, but use it only
on its accessible surface. It is strictly forbidden to
spray Clean directly on the filter. It must be sprayed
beforehand on a clean, dry cloth, and it is this cloth,
which must be used to clean the accessible surface of
the filter.
y STEP 7
• Re-attach the mobile head by pressing delicately as
indicated on image to the right (36).
30 31
32 33
p
p
34 35
36
p
p
p
p
__CHANGING THE OPTIC CARTRIDGE
3736
y STEP 8
SPECIAL CASE OF THE Clinic rc and rc Multi
There is no need to enter any code when you change the Optic cartridge.
• When the number of flashes expires
- You must order an Optic cartridge (delivered with its activation card).
- You must send send us back your used cartridge and your old activation card (this is free of charge thanks to return
voucher available in the package containing your new Optic cartridge and its activation card).
The warranty does not cover improper handling. We therefore recommend you to be very attentive to the procedure
to follow.
SPECIAL CASE OF THE Clinic access and sc
In this case, it is compulsory to enter new activation codes every time you change the Optic cartridge.
• Plug in your device. The screen is black.
• Touch anywhere on the screen.
When changing the Optic, cartridge, once the new cartridge is inserted, you must press on the icon representing the
lamp (20). Figures 1 and 2 (21) correspond to the 2 successive activation codes that need to be entered to activate
the new cartridge.
- The number 1 appears (screen K). With the help of
the navigation icons (12), enter the first 5 digits code
provided. This enables you to change the digit in each
box and to move from one section to another. Once
the entire code is entered, you must validate with the
icon (14).
- The number 2 appears (screen L ). With the help of the
navigation icons (12), in the same way as above, enter
the second 5 digits code and validate (icon 14).
- Switch the unit off and switch it back on.
The cartridge codes will be provided with the shipment of your order. They will be accessible from your personal
client space. To do this, go to www.e-swin.com, enter your username and password and validate them. You then
gain access to your home page. Click on the “Optic cartridge activation codes”. If you are changing the cartridge
for the first time, you must first validate the conditions of acquisition of the codes, by clicking on “I have read and
considered the above information.” You will then be able to click on the serial number, which corresponds to that
of the new cartridge. A message will pop-up: it provides the activation code 1 and activation code 2, it confirms
that a copy of these codes have been sent to you via email for safekeeping, and that you can also find this email
in the “My Messages” section in your customer account. These activation codes are unique, they reflect the serial
number of your machine and will not work on another .
If the codes are correct, the current menu will be dis-
played again as well as the number of flash credit.
If the codes are wrong, an error message will be dis-
played (error message no. 11 or 12 depending on the
scenario; please refer to page 52 for their meanings) and
the warning icon (17) will blink. In each case you must
proceed to entering the full code. You must click on the
validation icon (14) to proceed again to entering the 2
successive codes completely.
K
L
You may need to have to change the cartridge before the expiration of the number of flashes initially planned, when,
for example, a tube has been broken, or is not working anymore ...
For any change of optical cartridge outside the normal procedure, please strictly refer to the instructions given by
our technical department.
Only our technical department is authorised to ask you to change the Optic cartridge outside the
normal procedure. Any change of Optic cartridge and/or inserting new cartridge codes without being
instructed by our technical team, will result in the irreversible loss of the remaining number of flashes on
your Optic cartridge; you will then need to buy a new Optic cartridge.
WARNING: It is strictly prohibited to make any modification of any kind to your .
y cHANGING THE OPTIC
cARTRIDGE OUTSIDE THE NORMAL PROcEDURE
3938
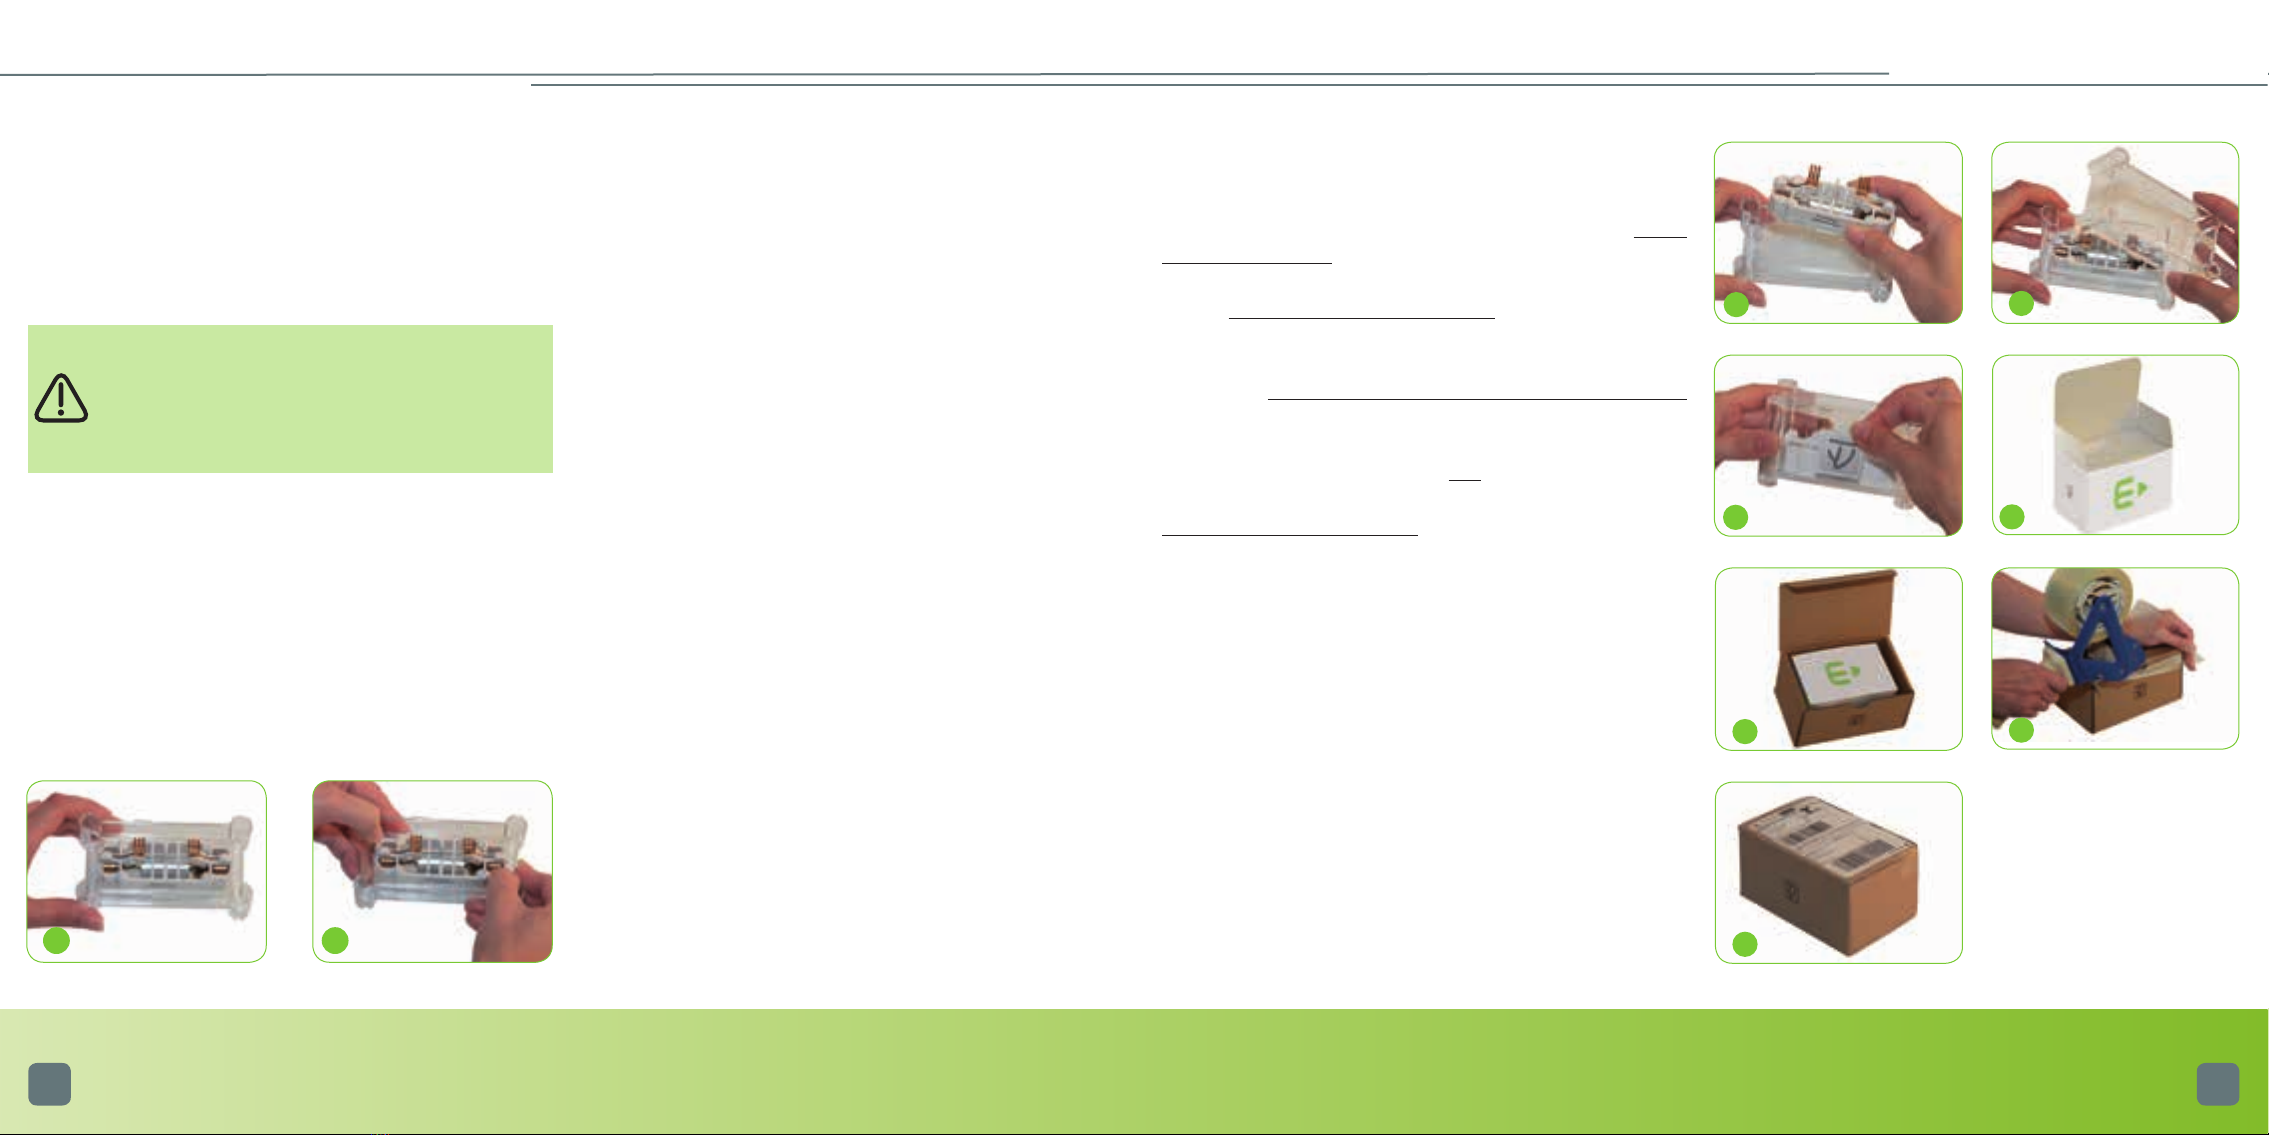
To preserve the environment, we recommend that you use the packaging of the Optic cartridge to send us
back the used cartridge.
__RETURNING THE USED OPTIC CARTRIDGE (FRANCE ONLY)
y STEP 1
RECEIVING THE NEW CARTRIDGE AND
UNPACKING
When unpacking the new
Optic
, cartridge, you
must keep all the elements that will allow you
to send us back your used cartridge safely and
for free (refer to step 2 for more details).
To remove the new Optic cartridge from its plastic case,
you must first break the breakable clips that hold the
cartridge in its case.
To do this, once you open the plastic case (image 37),
you must place each of your thumbs on the 2 clips and
exert lateral pressure towards the outside of the case
(image38) in order to break the clips.
You can now remove the new Optic cartridge from its
case.
37 38
p
p
y STEP 2
KEEPING THE ELEMENTS AT THE TIME YOU
RECEIVE YOUR NEW CARTRIDGE.
When you receive the new Optic cartridge, you must
keep the following items:
• the transparent plastic case and its lid
• the 2 white foam paddings of the cartridge case.
• the 2 cardboard boxes:
- The Optic box
- The brown strengthened cardboard box
You also have at your disposal:
• 2 sealing self-adhesive labels (stickers)
• the self-adhesive Colissimo prepaid return voucher
y STEP 3
HOW TO PACK THE USED CARTRIDGE
• Collect the used cartridge and place it inside the trans-
parent plastic case (image39), then close it with the help
of its plastic cover (image40).
• Stick each of the 2 sealing stickers on either side of the
case, so that each sticker covers the joint between the
case and its cover (image41).
• Take the 2 white foam paddings of the cartridge case
and place them on either side of the plastic case, by com-
pletely propping them between these 2 foam paddings.
• Place the case in the Optic box (image42).
• Then place the Optic cardboard box inside the brown
strengthened cardboard box (image43).
y STEP 4
PREPARING FOR DISPATCH
• Close the brown box making sure to firmly scotch tape
either side of the flaps (image44).
• Stick the self-adhesive Colissimo prepaid return voucher
on the brown cardboard box (image45).
Your package is ready to be dispatched. You just need to
drop it off at any post office.
39 40
45
44
43
41 42
Other manuals for clinic
1
Table of contents


