Eidos SHELLSHOCK-NAM 67 User manual


)
FPO
Inside Front Cover
Remove this page before printing.
See the “Ss Xbox ins cov.eps” file
for the actual page.
CONTENTS
using the xbox®
video game system 2
USING THE XBOX®CONTROLLER 3
DEFAULT CONTROLS 4
THE WAR SO FAR 5
GETTING INTO NAM 5
Main Menu 5
Pause Menu 6
Saving Games 6
Preferences 6
Game Options 6
Audio Options 7
Controls 7
IN-GAME DISPLAY 7
CHARACTER ABILITIES 10
BASE CAMP 11
Shellshock Xbox final 6/1/04 12:50 PM Page ii

2 3
)
)USING THE XBOX®
VIDEO GAME SYSTEM
USING THE XBOX®CONTROLLER
USING THE XBOX
®
VIDEO GAME SYSTEM
1. Set up your Xbox video game system by following
the instructions in the Xbox Instruction Manual.
2. Press the power button and the status indicator light
will light up.
3. Press the eject button and the disc tray will open.
4. Place the
SHELLSHOCK: NAM ‘67
disc on the disc tray
with the label facing up. Close the disc tray.
5. Follow the onscreen instructions and refer to this manual
for more information about playing the game.
ABOUT SAVING GAMES
Your progress is saved automatically to the Xbox Hard Disk
at preset mission checkpoints. You can also save manually
when you Quit to Profile. (This game does not support
the Xbox Memory Unit.)
NOTE: Do not reset the game while saving, or your game
data could be lost or corrupted.
AVOIDING DAMAGE TO THE DISCS OR THE DISC DRIVE
)
Insert only Xbox-compatible discs into the disc drive.
)
Never use oddly shaped discs, such as star-shaped
or heart-shaped discs.
)
Do not leave a disc in the Xbox console for extended periods
when not in use.
)
Do not move the Xbox console while the power is on
and a disc is inserted.
)
Do not apply labels, stickers or other foreign objects to discs.
1. Insert the Xbox Controller into any controller port
of the Xbox console.
2. Insert peripherals into the controller expansion slots
as appropriate.
3. Follow the onscreen instructions and refer to this
manual for more information about using the Xbox
Controller to play this game.
Shellshock Xbox final 6/1/04 12:50 PM Page 2

45
))
It would be the longest military conflict in United States history,
and when it was over, 58,000 Americans had given their lives
in this jungle war. Another 304,000 were wounded, and nobody
who returned home was left unscarred by their time in Vietnam.
In 1946, the Vietnamese fought the French for their freedom
in the first Indochina war.
At the end of that war in 1954, two Vietnams were created, South
and North. Trouble was…the communists in the North wanted one
country, one people, one Vietnam.
It began for the U.S. in 1959 when they sent advisors—
government men with money and weapons and advice to help
the South. Slowly, almost inevitably, it became a full-blown war
with the ever-growing U.S. forces joining the South Vietnamese
army to fight the North Vietnamese regulars and the National
Liberation Front.
By 1975 it was all over. But not before three-million Vietnamese
from both sides died to make it happen, and another two-million
Laotians and Cambodians also perished.
In Washington they built a Black Wall, a wall with all 58,000
American names. The ones who didn’t come back.
But in 1967, the war was still young. Hopes were high. Success
was, they say, a bright light at the end of the tunnel. Lessons
would have to be learned in Vietnam. And in 1967, class—and
hell—were definitely in session.
THE WAR SO FAR
MAIN MENU
Once you’ve powered up
SHELLSHOCK: NAM ‘67,
the Main Menu
appears. Your choices include
NEW PROFILE, LOAD PROFILE
,
DELETE PROFILE
and
CREDITS.
)
When creating a
NEW PROFILE,
you can select your style
of player character. Choosing a character takes you
to the virtual keyboard where you can input your profile save
name. Use the directional pad to highlight a letter and press
the
A
button to select it. Select
OK
to complete the name.
)
LOAD PROFILE
displays all saved profiles. Select a profile using
the directional pad and press the
A
button to load the profile
and start your game.
)
DELETE PROFILE
displays all currently saved profiles. Select
a profile using the directional pad and press the
A
button
to delete it.
)
Select
CREDITS
to roll the
SHELLSHOCK: NAM ‘67
credits.
GETTING INTO NAM
DEFAULT CONTROLS
This manual refers to the default controller mapping
when describing controls.
MENU Controls
Directional pad Highlight (select) menu item
A
button Confirm selection
B
button Cancel
b
+
X
buttons Drop highlighted item
Shellshock Xbox final 6/1/04 12:50 PM Page 4

6 7
))
PAUSE MENU
During play, press the
>
button to pause the game and display
the Pause menu. From here you can select a restart point, modify
game options or return to the game.
SAVING GAMES
)
Your progress is saved automatically at preset checkpoints
during each mission. This progress is saved only for the
duration of the game session. When you turn the power off,
this information is lost.
)
However, if you choose
QUIT TO PROFILE
from the Pause menu
during a mission, you will be prompted to save your progress.
If you choose
YES,
the last checkpoint activated will be saved
to your Xbox Hard Disk.
)
To resume a saved game, select a profile from the Profile
Select screen and choose
CONTINUE MISSION
. You resume play
at the last checkpoint activated before the game was saved.
PREFERENCES
Preference options only affect the profile loaded at the time
the options are set. Press the directional pad
1
/
2
to cycle
through options, and
4
/
3
to adjust the highlighted option.
GAME OPTIONS
Configure your game experience.
)
VIBRATION
—Toggle controller vibration
ON/OFF.
)
ROTATION
—Toggle the Look Up/Down control.
)
AUTO CENTER
—Toggle the Look Spring
ON/OFF
.
)
AUTO AIM
—Toggle auto aim
ON/OFF.
)
AUTO RELOAD
—Toggle auto reload
ON/OFF.
)
TURN SPEED
—Adjust turn sensitivity.
)
PITCH SPEED
—Adjust pitch sensitivity.
)
SUBTITLES
—Toggle subtitles
ON/OFF.
)
HINTS
—Toggle hints
ON/OFF.
AUDIO OPTIONS
Configure audio options.
)
MUSIC VOLUME
—Adjust the music volume.
)
SFX VOLUME
—Adjust the sound effects volume.
)
SPEECH VOLUME
—Adjust the volume of in-game speech.
CONTROLS
Reassign the controller buttons.
)
DEFAULT
—Select the default control set.
)
LEFT HANDED
—Select the default control set modified
for left-handed players.
)
CUSTOM
—Customize your own controller configuration.
IN-GAME DISPLAY
The following items appear
on screen during a mission:
)
PLAYER CHARACTER
—Check
the stance of your character
and some of the equipment
he is carrying.
)
ACTIVE WEAPON
—Displays
the weapon currently in your
hands. Press and hold
the
b
button to display the
Inventory, use the directional
pad to select a different item,
or press the
X
button to
switch quickly from your active weapon to grenades
and back again.
)
NO. OF CLIPS—
Displays the number of clips carried for your
weapon. It flashes when you are running low as a reminder
to collect more clips or swap weapons.
)
NO. OF ROUNDS
—Indicates how many rounds are in the loaded
clip. It flashes when ammo is low, signaling you to reload.
Shellshock Xbox final 6/1/04 12:50 PM Page 6

89
))
)
FIRE MODE
—Some weapons are capable of both
BURST
and
FULLY
AUTOMATIC
fire modes.
–
BURST
mode fires a short burst of bullets. This avoids
the adverse effects of spread and recoil and prevents you
from firing all your ammo in the first encounter.
–
FULLY AUTOMATIC
mode fires bullets as long as you hold down
the fire button and ammo is loaded. This mode allows you
to burn through ammo at an amazing rate. Best used
against multiple dangerous targets.
)
GRENADES
—
IMPACT
detonation sets grenades to explode
on impact.
TIMED
detonation sets grenades to explode
when thrown after a short time delay.
)
INVENTORY PANEL
—Displays all items in your possession.
Cycle through items with the directional pad to highlight them.
A highlighted item will be assigned for use when you release
the Inventory button.
)
COMPASS
—Useful navigation aid. Displays your direction
of movement plus various intel related to your location.
Compass Symbols & Colors
TRIANGLE
= Unit
RED
= Enemy
SQUARE
= Location
BLUE
= Neutral
CIRCLE
= Object
GREEN
= Ally
For example: enemy units are indicated by red triangles; friendly
objects by green circles; neutral locations by blue squares, etc.
)
OSD
—Displays vital intel such as mission objectives, tips, etc.
)
CHECKPOINTS
—Although they’re invisible, checkpoints are found
at key stages in a mission. When you reach a checkpoint, you
are notified in the OSD. If you die in a mission, you can return
to the last checkpoint you reached as long as you saved your
game. When exiting a mission, you’ll have the option to save
your last checkpoint. Be sure to save if you want to progress.
)
SUBTITLES
—Toggle subtitles
ON/OFF
in the Game Options menu.
)
HEALTH METER
—Displays current Health status. Each player
character has a unique green Health symbol. As health is lost,
the symbol gradually changes color, cycling through to red when
health drops to a critical level. Occasionally you’ll stumble
across First Aid Kits dropped by other soldiers or fallen from
a supply vehicle. Moving over one of these restores your health.
)
SHOCK DEFENSE METER—
Shows your current Shock status.
An empty meter means your player character can take
several hits in quick succession. With each hit the meter
fills up. When the meter is full, you’ll start to lose health.
The shock meter recovers over time if no hits are taken.
)
STAMINA METER
—Displays your current Stamina level. When
the meter contains stamina you are able to sprint. Sprinting
drains the stamina meter; it then replenishes when you’re
either walking or standing still.
)
CROSSHAIRS
—The tighter the crosshairs on the central reticle,
the greater the weapon accuracy. Various actions in the game
have positive or negative effects on the weapon’s accuracy.
Positive Effects Negative Effects
• Movement • Crouching
• Sustained firing • Lying down
• Firing in short bursts
The crosshairs also respond to item-based mission objectives.
When the crosshairs acquire a relevant item (such as ENEMY
INTEL or ENEMY AA GUN), the appropriate information appears.
)
OVERHEAT BAR
—Heavy machine guns overheat under sustained
firing. When the weapon reaches maximum operational
temperature, it ceases to fire, displayed by the overheat bar.
You then have to wait for the weapon to cool down before
resuming fire.
)
INTERACT ICONS
—These icons appear as you near an interactive
object, such as a person, ladder or mounted gun. See
CHARACTER ABILITIES
on the next page for more information.
)
INCOMING FIRE ALERT
—These appear at the screen periphery
when incoming fire is dangerously close to you. They can help
you find the most dangerous targets in the perilous world
of
SHELLSHOCK: NAM ’67.
)
INCOMING GRENADE ALERT
—These icons flash at the screen
periphery in the direction of any grenade landing dangerously
close to you, warning you to take immediate evasive action
before detonation.
)
DAMAGE ALERT
—When you are being bombarded by incoming
fire, a momentary flash of red appears at the screen periphery
in the direction of the incoming fire.
)
FLASH!
—This blinding effect is triggered when you are close
to an explosion. It will fade in time, depending on how
close to the explosion you were and how big the explosion was.
Shellshock Xbox final 6/1/04 12:50 PM Page 8

10
)
11
)
and makes you harder to hit. Use crouch whenever you
can, especially in low cover. Lying down amplifies
the effects of crouching. You will be even harder to hit
and even more accurate than when crouched.
)
SPRINTING
—Sprinting is a great way to get around the
battlefields of Vietnam quickly. You can only sprint in short
bursts as it is tiring and drains your stamina. When you run
out of stamina, you stop sprinting. Stamina recharges
while you are walking or resting.
)
INVENTORY
—The Inventory button displays your entire
Inventory so you can select any item quickly. When you
release the Inventory button, the Inventory is hidden.
)
QUICK SWITCH
—Pressing the Quick Switch button stows your
active weapon and equips a grenade. Press it again and you
stow your grenades and re-equip your active weapon. If you
use all your grenades, your original active weapon will be re-
equipped automatically. Being able to switch quickly between
grenades and guns will save your life.
)
PEERING
—Hold the directional pad
4
/
3
to peer left/right.
Release to return to a normal stance. Peering around a cover
object such as a rock or house lets you benefit from
the protection of cover while targeting enemies.
)
THROAT SLIT
—You won’t be taught this move until your arrival
in Special Forces. Equip your knife. Sneak up quietly behind
an enemy until you are within grabbing distance...then use
your knife to silently slit the enemy’s throat.
)
BEADING
—Beading is the process of getting your leading eye
down the line of the gun sights. Beading mode gives you a
slight zoom—a better view of the distant battlefield. However,
Beading mode reduces peripheral side vision and prevents you
from moving anywhere quickly. With a scoped weapon,
activating Beading mode displays Scope View.
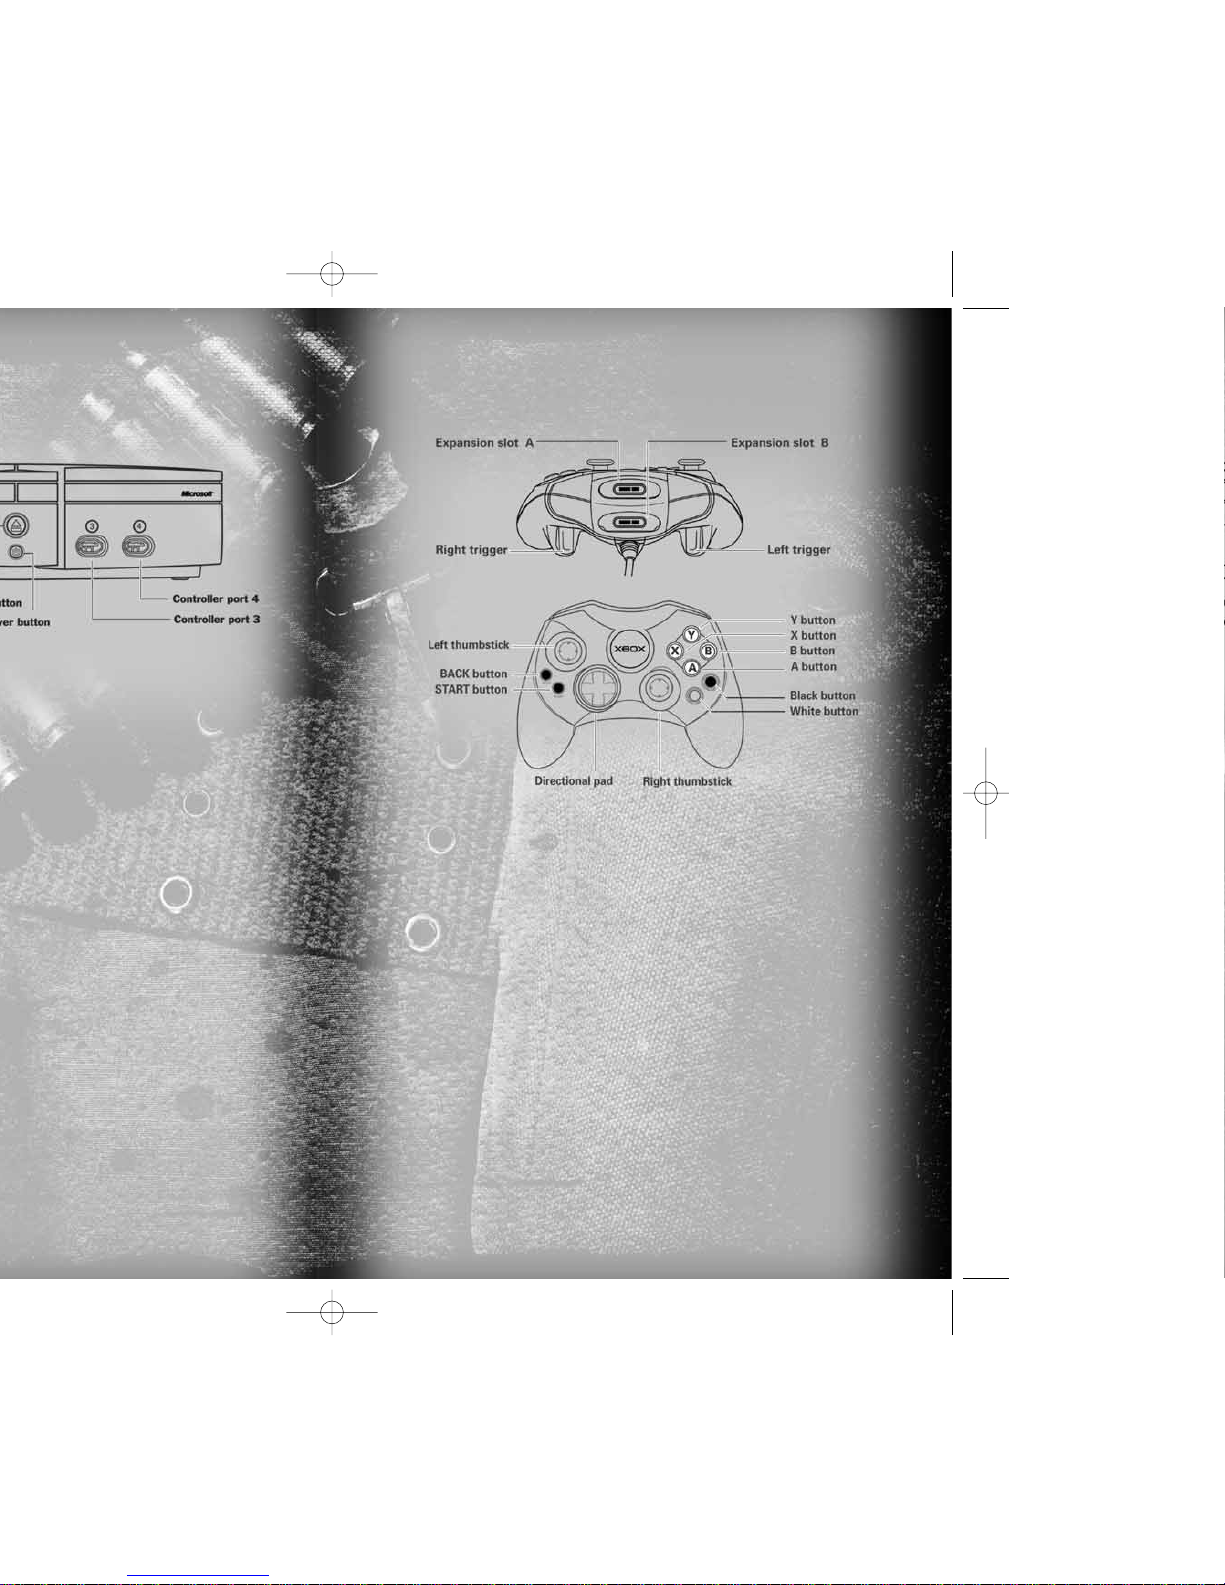
CHARACTER ABILITIES
Use the left thumbstick to move and the right thumbstick to look
around. You can control the pace of your movement in relation
to the pressure you apply to the left thumbstick. Push it slightly
and you’ll move slowly, push slightly harder and your movement
speed increases. The right thumbstick has a weaker ramping-up
effect that assists aiming.
)
ACTIONS
—When you are near an interactive object, an Interact
icon describing the action appears. When two or more
actions are available, multiple icons appear. Press and hold
the
A
button to initiate the action, press the directional pad
4
/
3
to scroll through the icons and release the
A
button
to perform the action.
LADDERS
—Press the Action button to climb onto the ladder.
Move using the left thumbstick. You will dismount
automatically.
CONVERSATION—
Press the Action button to initiate
a conversation. Highlight the
CONVERSATION
icon
with the directional pad. Re-press the Action button
when people finish talking—they might have more to say!
MOUNTED WEAPONS
—Weapons can be mounted on helos,
on jeeps or on tripods on the ground. Press the Action
button to use the weapon, fire and aim as usual, and press
the Action button again to cancel the weapon use.
DISARMING TRAPS—
This icon appears when you are close
to a trap that can be disarmed. Press the Action button
to enter Disarm mode. Using the directional pad, follow
the prompts to make a successful disarm. You have only
a limited time to successfully disarm the trap.
PICK-UPS
—When you are standing over an item that can
be picked up, an icon appears. Sometimes several pick-ups
are available near each other. Press and hold the
A
button
to initiate the interaction, press the directional pad
4
/
3
to scroll through the pick-ups and release the
A
button
to select the pick-up.
C4—
You can only place and use C4 when this icon appears.
Select the C4 from your Inventory and press the
A
button
to prime and place it.
)
CHANGING STANCE
—Most veterans will tell you that their
preferred stance in Vietnam was as low as possible. You will
quickly discover that a standing soldier is a dead soldier.
Crouching is a flexible stance to adopt in Vietnam. You can
quickly ramp up into a full sprint, and immediately return to
crouched when you stop moving. It increases your accuracy
Your home in Vietnam is the Base Camp. You can hang around
camp for as long as you like listening to the DJ spin some tunes—
shooting his mouth off about this or that. Maybe some shooting
practice is more your bag, or even chewing the fat with your Base
Camp friends. All this, and more is available at Base Camp!
)
EARNING CHITS
—Chits are the form of currency the U.S.
military paid its soldiers in Vietnam. They’re basically military
money vouchers and they can be earned in several ways.
–
Surviving your missions
—Simply surviving each mission
means the Army will pay you a modest wage.
–
Above and beyond
—Doing things above and beyond the call
of duty will often be rewarded with extra chits.
BASE CAMP
Shellshock Xbox final 6/1/04 12:50 PM Page 10

12
)
FPO
Inside Back Cover
Remove this page before printing.
See the “Ss Xbox ins cov.eps” file
for the actual page.
–
Trophies
—Some items found during a mission are valuable
souvenirs for tourists, C.O.s and stateside civilians. Once you
complete the mission, they are converted to chits.
)
SPENDING CHITS
—Chits can be spent in several places around
Base Camp, at Deuce’s Supplies and in the R&R compound. Talk
with Deuce or the civilians in the R&R compound to find out
what’s on sale and for how much. Finishing your tour as a rich
man means you missed out on your full Vietnam experience.
)
TAMAZEPAM
—These neurological suppressors, courtesy of Uncle
Sam, are the favorite performance enhancer of the sniper. They
calm the body’s movement and stabilize your aim while using
a sniping scope. Their effect wears off after a short time. They
are not “official” military equipment and will be confiscated
before you arrive back at Base Camp.
)
DEXEDRINE
—These government-developed bio-enhancers turn
your body into a very efficient machine, allowing you to sprint
for longer with a reduced stamina drain. Dexedrine effects wear
off after a short time. Like tamazepam, dexedrine is not
“official” military equipment.
)
POSTCARDS
—Little mementos of Vietnam can be collected
during your tour of duty. View them in the Photo Gallery.
)
R&R PASS
—Available from Deuce, this black market pass lets
you escape the war for a bit of downtime. Use it to leave Base
Camp via the back gate and relax in the R&R compound.
)
Command Bunker
— Your C.O. is here. Before every mission,
he briefs you on the upcoming objectives.
)
Firing Range
— Visit Weapons Sergeant Platt before leaving
Base Camp to select your combat equipment if you are
unhappy with the default assignment.
)
Hospital
— Look around, but don’t expect much conversation.
The nurses are busy girls and they’re bored with every wetback
grunt hitting on them. They’re after a real man!
)
Landing Zone
— To begin some missions you need to catch
a ride on the helicopter at the LZ.
)
Front Gate
— Some missions start at the front gate. Unless
you are starting a mission, the Gate Guard won’t let you out.
)
Back Gate
— The MP on the back gate has a business
relationship with Deuce and will occasionally bend the rules.
The back gate leads to the R&R compound.
)
Bunkers
— Standard base defenses, the corner bunkers are
built from reinforced concrete and provide interlacing fire
points that can create a Beaten Fire Zone if it ever gets hot.
)
Watchtowers
— While the guerrilla VC forces hide their camps
in dense vegetation, the well-equipped Americans defoliate
a large area around their camp in an attempt to stop sneaky
jungle soldiers from creeping up too close.
Shellshock Xbox final 6/1/04 12:50 PM Page 12
This manual suits for next models
1
Table of contents
Other Eidos Video Game manuals

Eidos
Eidos FORD STREET RACING User manual

Eidos
Eidos TOMB RAIDER-LEGEND User manual

Eidos
Eidos TOTAL OVERDOSE User manual

Eidos
Eidos COMMANDOS 2 User manual

Eidos
Eidos ROGUE TROOPER User manual

Eidos
Eidos RESERVOIR DOGS User manual

Eidos
Eidos HITMAN-BLOOD MONEY User manual

Eidos
Eidos HITMAN-CONTRACTS User manual

Eidos
Eidos HITMAN 2 User manual
Popular Video Game manuals by other brands

Merit
Merit PM0503-08 owner's manual

Sega
Sega Sonic Rivals ULUS 10195 owner's manual

Microsoft
Microsoft Xbox 360 user guide

Coleco
Coleco Zaxxon Cartidge instructions

Disney
Disney Disney High School Musical 3: Senior Year Nintendo DS... Instruction booklet

Techno Source
Techno Source 90610 operating instructions