Elgato EyeTV Hybrid User manual

Elgato Systems
EyeTV Software
Manual
1.0
© 2004
Elgato Systems LLC
900 Kearny Street • Suite 750
San Francisco, CA 94133
United States of America
Elgato Systems GmbH
Nymphenburgerstr. 86
80636 München

Table of Contents
1
Chapter 1
Chapter 2
Chapter 3
Chapter 5
Installation 3
Welcome to EyeTV! 3
Viewer Window 6
Watching Live Television 6
Watching Multiple Programs 6
Changing the Size of the EyeTV Viewer Window 7
Adjusting the Display Options 8
Closed Captions 8
Snapshots from the EyeTV Viewer Window 9
Controller 10
Controller Button Descriptions 11
Programs Window 13
Scheduled Programs & Stored Recordings 13
Scheduled Programs 13
Stored Recordings 14
Managing Stored Recordings 14
Managing Scheduled Programs 15
Live Recordings 15
Advanced Recording Features 16
Editor 18
Opening the EyeTV Visual Editor 18
Visual Editor Drawer 19
Fine Tuning Edits 20
Compacting a Recording 21
Examples of Using the Visual Editor 21
Program Guide 24
EyeTV Program Guide in North America:
Powered by TitanTV™ 24
New User Registration 24
TitanTV Sections 25
Navigating through the Program Guide 25
Chapter 4
Chapter 6

EyeTV Manual
2
Chapter 7
Chapter 8
Chapter 9
Navigating the Guide Tabs 26
Searching for Programs 27
Tuning to Live Television 27
Automatically Recording Programs 27
Remote Scheduling Programs 27
EyeTV Program Guide in Europe:
Powered by tvtv 28
New User Registration 28
Navigating through the Program Guide 29
View by Date 29
View by Filter 29
Searching for Programs 30
Automatically Recording Programs 30
Preferences 32
Advanced Features 37
Burning Video CDs 37
Burning Super Video CDs 37
Burning DVDs 38
Playing Video CDs 38
Opening QuickTime Movies 38
Exporting QuickTime Movies 39
EyeTV Tips and Tricks 40
EyeTV Keyboard Shortcuts 40
Troubleshooting 42
Downloading Updates 42
Getting Help 42

EyeTV Manual
InstallationChapter 1
Chapter 1 · Installation
3
This chapter will show you how to install EyeTV software and launch
EyeTV for the first time.
Welcome to EyeTV!
This guide shows you how to begin watching and recording television programs
on your Macintosh. It covers installing and configuring EyeTV software and
includes instructions for using the most common features of EyeTV.
This chapter contains installation instructions for the software. Installation
instructions for compatible hardware can be obtained directly from the
manufacturer.
Installation

EyeTV Manual
Chapter 1 · Installation
4
EyeTV System Requirements
EyeTV requires the following minimum system configuration:
• Macintosh computer with minimum PowerPC® G4 500Mhz or
G5 processor.
• Mac OS X 10.2.8 or later, with 256MB RAM (512MB
recommended)
• Minimum 20 MB free hard disk space
• Approximately 2GB of free hard disk space for each hour of
video to be recorded
• QuickTime 6.4
• An Internet connection to use EyeTV’s optional Electronic
Program Guide (EPG)
• A CD or DVD burner and Roxio’s Toast 6 Titanium CD
recording software to create Video CDs, Super Video CDs or
DVDs (Optional)
Installation
Step One: Installing EyeTV Software
• Insert the EyeTV software CD-ROM into your CD-ROM or
DVD-ROM drive.
• Drag and drop the EyeTV application where you would like to
install it. We recommend your Mac’s Applications folder.
Step Two: Launching EyeTV for the First Time
• Navigate to the folder where you installed the EyeTV
Software and double-click the EyeTV icon.
• The first time you launch EyeTV, a Setup Assistant will guide
you through the complete setup and configuration of your
EyeTV software.
• When you complete the Setup Assistant, an EyeTV viewer
window and the EyeTV Controller will appear.

EyeTV Manual
Chapter 1 · Installation
5
Registering EyeTV Online
Registering EyeTV entitles you to the following benefits:
• Notification of product updates
• Technical support
• Special offers
To register:
• Open your web browser and go to www.elgato.com/
registration.html
• Enter the requested information and click the “Register”
button.

EyeTV Manual
Viewer WindowChapter 2
Chapter 2 · Viewer Window
6
The EyeTV Viewer window displays live or pre-recorded programs on
your Macintosh. This chapter describes how to use the EyeTV Viewer
window.
Watching Live Television
With EyeTV you can watch live television in several different window sizes
or in full screen mode. A live television window always appears immediately
after EyeTV is started. Live television can be manipulated (i.e. paused, instant-
replayed, fast-forwarded) at any time using the Controller buttons (see Chapter
3, The EyeTV Controller) or using commands from the Controls menu. To close
or re-open the Live TV Window, select Close Window or Open Live TV Window
from the File menu.
Watching Multiple Programs
EyeTV supports multiple Viewer windows so you can watch live television in
one window and/or multiple pre-recorded programs in other windows (To learn
how to watch multiple pre-recorded programs, please see Chapter 4, The EyeTV
Programs Window).
Viewer Window

EyeTV Manual
Chapter 2 · Viewer Window
7
Changing the Size of the EyeTV
Viewer Window
You can change the size of the EyeTV Viewer window by grabbing the lower
right corner and dragging it diagonally.
The following pre-selected sizes are also available from the View menu.
To watch full screen:
Select Enter Full Screen from the View menu or press z-0. To exit full screen
mode, press the Escape key or press z-0 again.
To watch in a small size window (160x120):
• Select Small Size from the View menu or press z-1.
To watch in a half size window (320x240):
• Select Half Size from the View menu or press z-2.
To watch in a normal size window (640x480):
• Select Normal Size from the View menu or press z-3.
To watch in the largest sized window that will fit on your screen:
• Select Maximum Size from the View menu or press z-4.
Changing the Aspect Ratio of the Viewer Window
EyeTV will automatically try to choose the correct aspect ratio. Typical TV has
a 4:3 ratio, while a few widescreen formats also exist. If you would like EyeTV
to always choose a certain ratio, you can pick that from the View menu. This
could be useful if you are trying to remove letterboxing, or display content on
a widescreen monitor. Your choices are 4:3, 14:9, 16:9 and Wide. Some ratios
may visibly remove part of the image, to make it fit that shape without otherwise
stretching or distorting the picture.

EyeTV Manual
Chapter 2 · Viewer Window
8
Adjusting the Display Options
You can adjust how the Viewer Window presents video. Overscan masks the
edges of the window, to hide unwanted visual data. Deinterlace takes the
visible lines usually present in an analog TV signal and blends them together.
Motion-Adaptive, the default, intelligently deinterlaces when needed. You may
want to turn Deinterlace off if you are going to have EyeTV output directly to a
TV set, like through your computer’s S-Video port.
Closed Captions
Most programs in the US have embedded subtitles, known as Closed Captions.
These are designed for the hearing impaired, with extra features that normal
subtitles don’t have.

EyeTV Manual
Chapter 2 · Viewer Window
9
To turn on the display of Closed Captions, go to View – Closed Captions.
EyeTV 200 (in US and Canada) is the only unit that currently supports Closed
Captioning.
Snapshots from the EyeTV Viewer
Window
If you want to capture a snapshot of the current frame of video, you can press
z-C, which will save the picture to the clipboard. Or, you can press Shift-z-C
which will create a snapshot file on your desktop from the active video window,
named “EyeTVSnapshot.jpg”, “EyeTVSnapshot[1].jpg” and so on .
EyeTV Manual
ControllerChapter 3
Chapter 3 · Controller
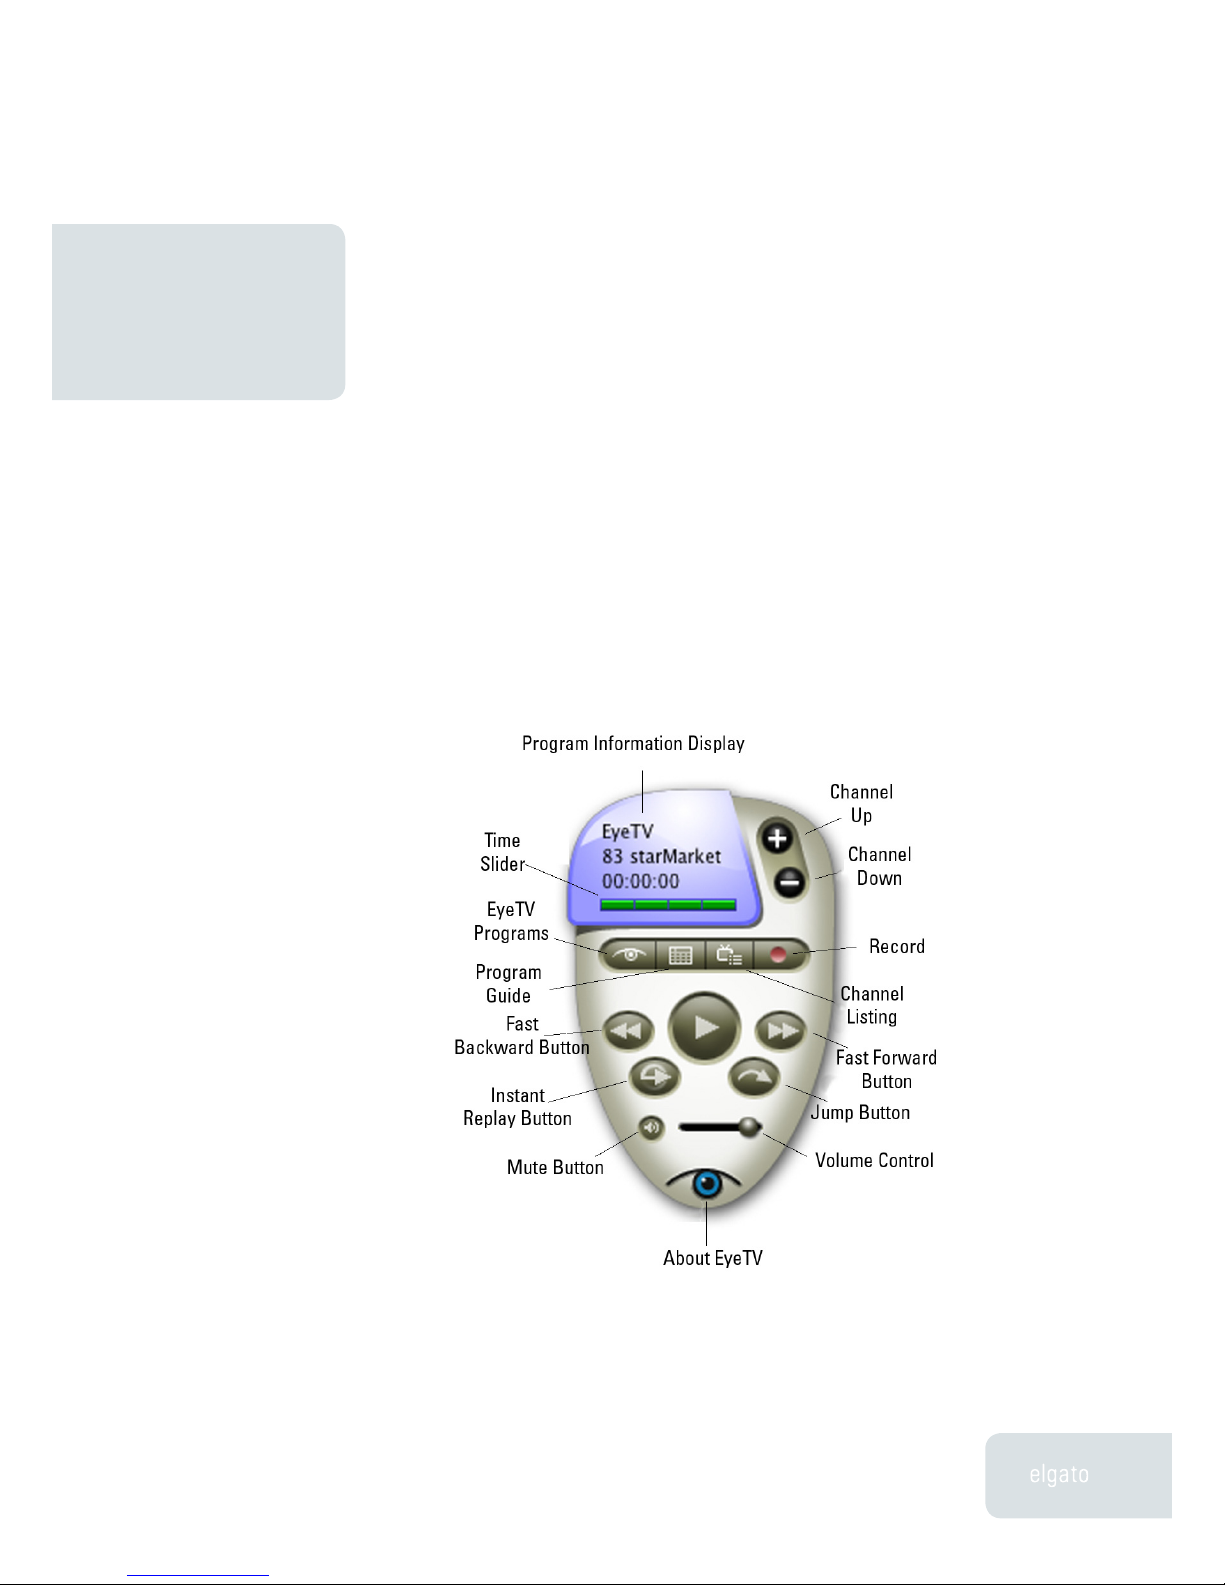
10
This chapter will show you how to use the EyeTV Controller. The
Controller enables you to fully manage your TV viewing experience.
You can use the Controller while watching either live or pre-recorded programs.
The picture and table on the next page describes the function of each of the
buttons on the Controller. Note that some additional functions are available
through the Controls menu and keyboard shortcuts.
Controller

EyeTV Manual
Chapter 3 · Controller
11
Controller Button Descriptions
Program Information Display
This area displays the name of the program currently being watched or
recorded, the elapsed time, and the channel on which the program is playing.
Clicking the time display toggles the display between elapsed time, total time,
and time remaining.
Timeshifting Control Buttons
Play/Pause - Click this button to play/pause the current program. In the case of
live television, EyeTV keeps recording the live feed onto your disk. The pause
time remaining for your now timeshifted show depends on the free space
available on your disk.
Record - Clicking this button starts or stops recording the current program. The
record button is animated during a recording. Because EyeTV has only one
tuner, and can only handle one video source at a time, channels and inputs
cannot be changed while recording. Once a recording has started, the cache is
flushed so you cannot skip backwards beyond the start time of the recording.
Time Slider - This bar gives a visual representation of your current position in
the show. For example, you are at the beginning of the show when the green
bar is at the left edge of the timeline and you are at the end of the show when
the green bar fills the timeline. Click anywhere inside the slider to jump to any
part of the recording; click and drag to scan through the program.
Instant Replay - Clicking this button will rewind the current program 7 seconds
and continue playing, creating an “instant replay” effect. Clicking this button
while holding down the Option key starts playing the current program from the
beginning.
Jump - Clicking this button will fast-forward the current program 30 seconds
and continue playing. This is useful for jumping over less desirable content.
Clicking this button while holding down the
Option key resumes watching live television.

EyeTV Manual
Chapter 3 · Controller
12
EyeTV Navigation Buttons
EyeTV Programs - Click this button to bring up the EyeTV Programs window,
which displays all of the shows that have been or will be recorded.
Program Guide - Clicking this button launches your default web browser and
brings up the TitanTV or tvtv web site so you can view TV program listings and
schedule shows for recording. (See Chapter 4, The EyeTV Programs Window).
Playback Control Button
Channel Listing - Use this drop-down menu to switch to any available channel.
Channel Up - Click this button to switch to the next higher channel.
Channel Down - Click this button to switch to the next lower channel.
Volume Control - Use this slider to control the volume of the program being
played.
Mute - Click this button to mute the sound, click it again to turn it back on.
Fast Backward - Click this button to play the current program in reverse at
high speed. Clicking this button while pressing the Option key plays the current
program in reverse in slow motion.
Fast Forward - Click this button to play the current program at high speed.
Clicking this button while pressing the Option key plays the current program in
slow motion.
EyeTV Manual
Programs WindowChapter 4
Chapter 4 · Programs Window
13
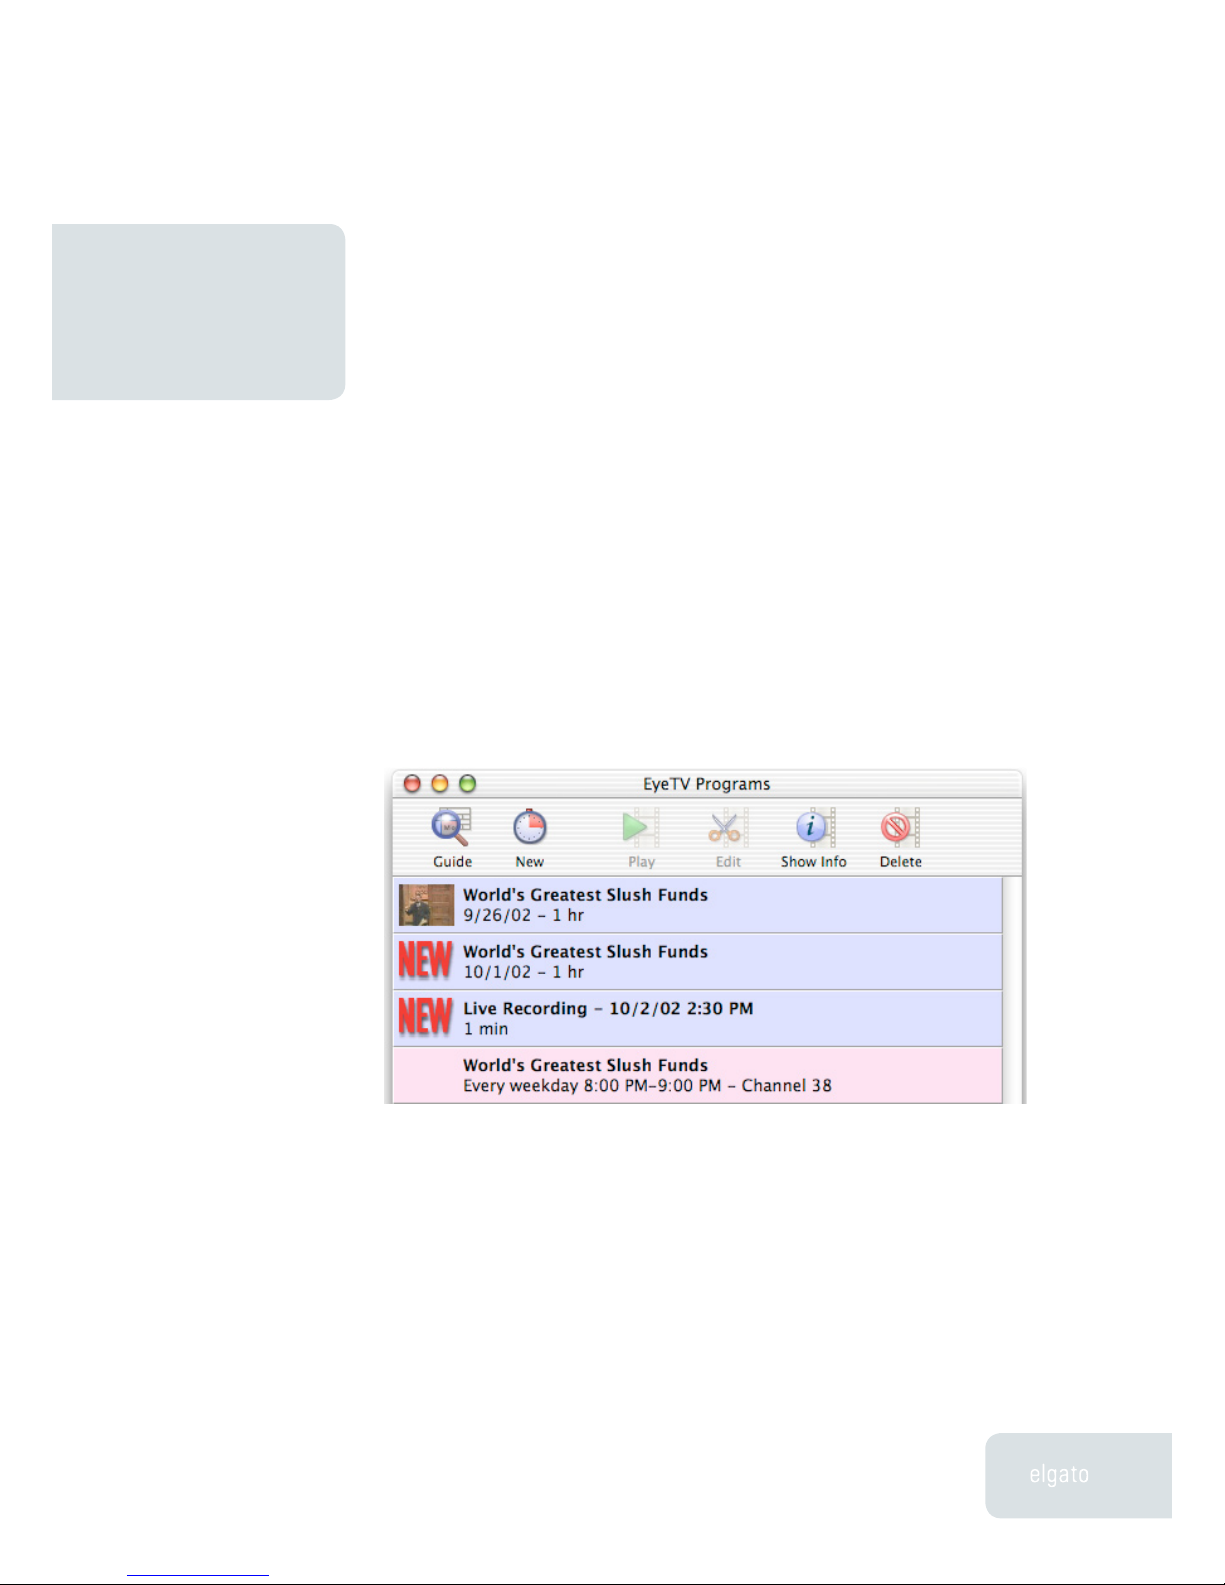
Programs Window
This section describes the functions of the EyeTV Programs window.
Scheduled Programs & Stored
Recordings
The EyeTV Programs window is a list of all previously recorded programs and
all programs scheduled to be recorded. Each time you record something or you
schedule something to be recorded using EyeTV, a new entry will be added to
the list in the EyeTV Programs window.
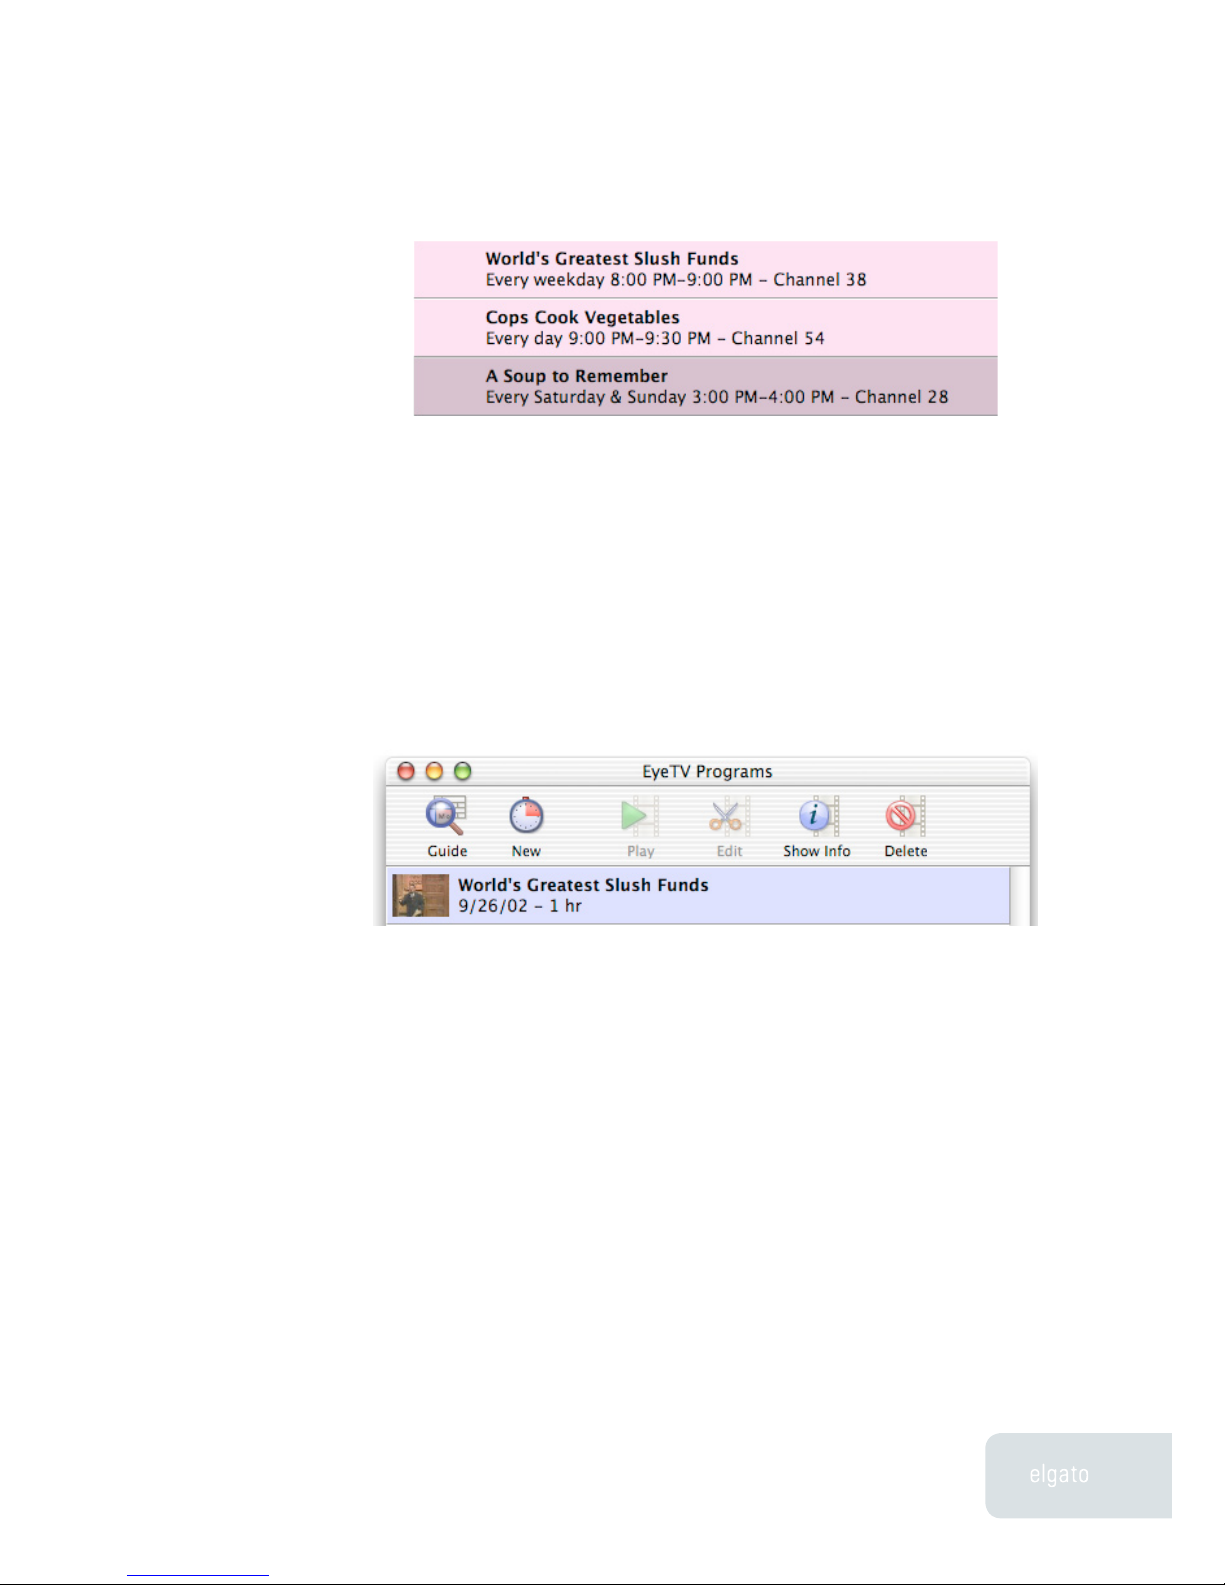
Scheduled Programs
Each time you schedule a program to be recorded, either manually or through
the Program Guide, a new entry will be added to the EyeTV Programs window.
These are called Scheduled Programs. Scheduled Programs are shaded pink.
EyeTV Manual
Chapter 4 · Programs Window
14
Once a scheduled program has actually been recorded, its shaded color
will change from pink to blue.
Stored Recordings
Programs that have been previously recorded are called Stored Recordings.
Once a Stored Recording has been played, the “New” icon is replaced by a
snapshot of the last frame viewed. All Stored Recordings are shaded blue.
Managing Stored Recordings
To play a recording, simply double-click it from the list, or highlight it and click
the Play button at the top of the window.
To view more details about a recording, or to change its title or description,
select the recording and click the Show Info button.
To delete a recording, select it and click the Delete button. If the recording was
associated with a repeating program, the repeating program (displayed in pink
in the lower half of the list) will not be deleted.

EyeTV Manual
Chapter 4 · Programs Window
15
Managing Scheduled Programs
To add a scheduled program using the EyeTV Program Guide, click the Guide
icon at the top of the window. This button launches your default browser and
brings up the TitanTV or tvtv web site. Clicking the RECORD button next to a
program tells EyeTV to schedule the program to be automatically recorded. For
more details, refer to the Program Guide chapter (Chapter 6).
To add a manually scheduled program, click the New button at the top of the
window and fill in the program’s parameters:
Live Recordings
While watching live TV, if a recording is started by pressing the record button
on the remote, a new recording is automatically added to the EyeTV Programs
window. It is displayed as a “Live Recording”, with the date and time listed.
You can enter the program information for this recording, or change the stop
time, by highlighting it in the Programs Window and clicking the Show Info
button.

EyeTV Manual
Chapter 4 · Programs Window
16
Advanced Recording Features
Auto-Launch of EyeTV to Record
EyeTV can launch automatically two minutes before a scheduled recording
is supposed to begin. For this to work, set the General Preferences to “Start
EyeTV when device is plugged in” (see Chapter 7, EyeTV Preferences).
Waking From Sleep to Record
The EyeTV software can wake up your Mac to enable scheduled recordings
to run (this feature only works with Mac OS 10.2 or later). Automatic wake up
occurs two minutes before the scheduled recording starts, in order to allow
your Mac time to wake up. For this to work, set the General Preferences to
“Start EyeTV when device is plugged in” (see Chapter 7, EyeTV Preferences).
This feature should work if your display, hard drives or CPU are asleep - make
sure the Energy Saver sleep interval in the System Preferences is set for two
minutes or greater. Note that the system will not go to sleep while a Live TV
window is open.
Booting the Computer to Record
The EyeTV software can power on your Mac to enable scheduled recordings
to run (this feature only works with Mac OS 10.2 or later). Automatic power-on
occurs two minutes before the scheduled recording starts, in order to allow
your Mac time to start up. For this to work, set the General Preferences to
“Start EyeTV when device is plugged in” (see Chapter 7, EyeTV Preferences).
Furthermore, automatic login must be enabled in the System Preferences. This
feature will power on your Mac, and potentially activate other peripherals that
receive power over the FireWire or USB buses.

EyeTV Manual
Chapter 4 · Programs Window
17
Please Note: In all of the above cases, if you have extended the scheduled
recording time in the Recording Preferences, EyeTV will launch two minutes
before the padded time. For example, with the two minutes of default padding,
EyeTV will launch four minutes before the scheduled time.

EyeTV Manual
EditorChapter 5
Chapter 5 · Editor
18
This chapter will show you how to use EyeTV’s built in Visual Editor
Opening the EyeTV Visual Editor
The Visual Editor is normally hidden from view. To begin editing, select a
recording in the EyeTV Programs Window, and click the Edit button. (Or, press
the grey button in the top right hand corner of the video window). A drawer
containing the editor will open below the window.

EyeTV Manual
Chapter 5 · Programs Window
19
Visual Editor Drawer
There are a number of items in the editor drawer:
Timeline: The horizontal blue bar represents the overall length of the recording.
Light blue sections mark the clips of video. The yellow section in the screenshot
is the currently selected clip. The currently selected clip can also be saved as
a QuickTime movie or EyeTV recording. In this example, the selected clips are
commercials that will be discarded later.
Playhead: A large triangle above the timeline indicates which point in the
recording is currently playing (or paused). Use the spacebar to toggle between
play and pause. All navigational features of the EyeTV Remote and menus are
also available, e.g. Fast Forward, Reverse, and so on. (see Chapter 8, Advanced
Features, EyeTV Keyboard Shortcuts).
Thumbnails: The top row of small pictures represents the beginnings of
individual scenes in the recording. There are two levels of detail for the
thumbnails. When Normal resolution is selected, each thumbnail starts at the
beginning of a scene transition, as determined by the EyeTV hardware. When
Fine is chosen, the thumbnail is at the beginning of groups of pictures, usually
around 15 frames, which represent approximately half a second of video.
Markers: Pairs of smaller triangles beneath the time line are designed
to bookend the clip you want to cut (or that you want to export) from the
recording. There are no markers visible for a new recording.
To add a marker, use the button in the center of the editor, beneath the timeline.
Press this button to add a new pair of markers at the current Playhead position.
Markers are preserved with the recording when the editor drawer is closed.
This allows you to begin editing your recording and save your work during
interruptions.
To delete a marker group, click either one of the pair, and press the Delete key.
To clear all markers, use the Clear All Markers command in the Edit menu.
Arrow keys: The arrow keys on the keyboard have different functionality
depending whether the editor drawer is visible or not. When the editor is visible
the right and left arrow keys can be used to navigate between thumbnails.
When the editor is closed, and EyeTV is playing over a clip marked for deletion,
the right arrow skips playback to the end of the clip.
Other manuals for EyeTV Hybrid
2
Table of contents
Popular Software manuals by other brands


Compaq
Compaq d530 - Convertible Minitower Desktop PC manual

AVG
AVG AVG 8.5 FILE SERVER EDITION user manual

HP
HP AB300 - Server Console Solution user guide

Enterasys
Enterasys 700 user guide

Vir2 Instruments
Vir2 Instruments Electri6ity user manual

VMware
VMware VCENTER APPLICATION DISCOVERY MANAGER 6.1.1 -... reference guide

Memorex
Memorex LOCK - VERSION 2-24 user manual

Sawgrass
Sawgrass Aficio GX7000 Getting started guide

Canon
Canon FAXPHONE L170 Software guide

Altigen
Altigen AltiContent manual

KAPERSKY
KAPERSKY ANTI-VIRUS 5.6 - FOR NOVELL NETWARE Administrator's guide

Kofax Image Products
Kofax Image Products VRS3 - installation guide