Elk Products ELK-6051 User manual

2320 Presidential Drive, Suite 101, Durham, NC 27703 USA Voice: 919-381-4235
Certification Exhibit
FCC ID: TMAELK-6051
IC: 4353A-6051
FCC Rule Part: 15.247
ISED Canada’s Radio Standards Specification: RSS-247
TÜV SÜD Project Number: 72126638
Manufacturer: ELK Products, Inc.
Model: ELK-6051
Manual

1
Wireless Carbon Monoxide Alarm
ELK-6051
ELK-6051 Wireless Carbon Monoxide Alarm
Instruction
s
Read and retain carefully for as long as the product is being used. It contains vital
information on the operation and installation of your Alarm. This booklet should be regarded as
part of the product. If you are just installing the Alarm, this booklet must be given to the
householder. This booklet is to be given to any subsequent user.

2
Table of Contents
1. Read This First ...................................................................
2. Carbon Monoxide – The Silent Killer ..................................
3. Where to Place CO Alarms ................................................
4. Installation ..........................................................................
5. Testing / Monitoring & Maintenance ....................................
6. What to do when the alarm sounds ....................................
7. How to Protect your Family .................................................
8. Technical Specification ........................................................
9. Getting the CO Alarm Serviced ...........................................
10. Warranty .............................................................................
11. Limitations of CO Alarms ....................................................
12. Troubleshooting ..................................................................
13. Display & Indicator Summary .............................................
14. Agency Compliance……………………………………………
page
3
4
9
15
17
21
22
24
25
25
26
28
29
31

3
1. Read This First
• Congratulations on becoming the owner of an Elk Carbon Monoxide Alarm. This product
is designed to help protect you and your household from the dangerous effects of Carbon
Monoxide- the silent killer.
• The Carbon Monoxide Alarm (CO Alarm) is powered up by carefully rotating it onto the
mounting plate which activates the on/off switch. The red, amber & green lights will
immediately flash in sequence to show they are working. Please wait 15 seconds after
connecting the power before button testing.
We recommend that you:
• Install a CO Alarm in every room that contains a fuel burning appliance, particularly
rooms where people spend a lot of time e.g. bedrooms, kitchens and sitting rooms.
• In rooms with an appliance, install (preferably) on the ceiling, (300mm from walls) and
between 1.5m to 3m horizontally from appliance. In rooms remote from the appliance
install at ‘head height’, where the light indicators can be seen.
• Test the Alarm weekly by pressing the test/hush button. The horn will sound (at a
diminished sound level initially and then quickly reach maximum sound output level).
• Replace Alarm after approx. 10 years of operation (see ‘Replace by’ date on side wall
label).
• Do not install during building construction so as to avoid contamination.
• Individuals with medical problems may consider warning devices which provide audible
and visual signals for carbon monoxide concentrations under 30ppm.

2. Carbon Monoxide – The Silent Killer
5
2.1 What is Carbon Monoxide?
Many people are killed each year, and many more suffer ill health from Carbon
Monoxide (CO) poisoning. CO is an invisible, odorless, tasteless and extremely toxic
gas. It is produced by appliances and vehicles burning fuels, such as coal, oil,
natural/bottled gas, paraffin, wood, petrol, diesel, charcoal etc. CO is absorbed by
red blood cells in the lungs in preference to oxygen - this results in rapid damage
to the heart and brain from oxygen starvation.
High levels of CO in a house can be caused by:
• Incorrectly or poorly installed fuel-burning appliances.
• Blocked or cracked chimneys/flues.
• Blocked vents or draught-proofing which makes areas with fuel burning
appliances or fireplaces airtight.
• Engines of cars, lawnmowers etc. left running in confined spaces.
• Portable paraffin or gas heaters in badly ventilated rooms.
2.2 What happens when your CO Alarm detects Carbon Monoxide?
When the Alarm detects potentially dangerous levels of CO, it flashes the red alarm
light immediately and then sounds a loud alarm if the CO persists. Table B below
shows how the CO Alarm reacts to different levels of CO gas and exposure time.
At higher levels of CO, the alarm turns on sooner. The rate of flashing of the red light
indicates the level of CO. If your CO Alarm sounds, follow the instructions on page
and NEVER IGNORE THE ALARM !

6
2.3 Symptoms of Carbon Monoxide Poisoning
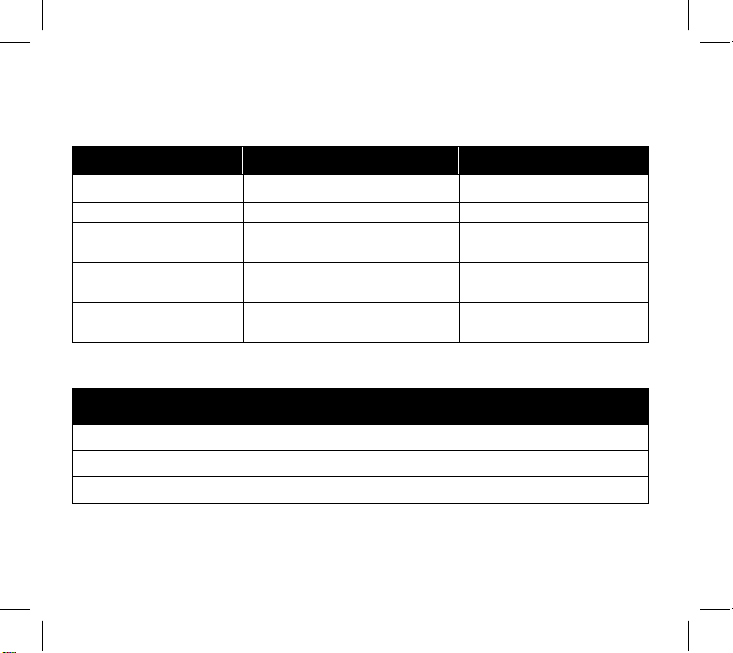
Table A
Concentration
of CO in Air Inhalation Time (approx) and Symptoms Developed
ppm
35 The maximum allowable concentration for continuous exposure in any
8 hour period according to OSHA
*.
150 Slight headache after 1.5 hours.
200 Slight headache, fatigue, dizziness, nausea after 2-3 hours.
400 Frontal headaches within 1-2 hours, life threatening after 3 hours, also maximum
parts per million in flue gas (on an air free basis) according to US Environmental
Protection Agency.
800 Dizziness, nausea and convulsions within 45 minutes. Unconsciousness within
2 hours. Death within 2-3 hours.
1,600 Headache, dizziness and nausea within 20 minutes. Death within 1 hour.
3,200 Headache, dizziness and nausea within 5-10 minutes. Death within 25-30 minutes.
6,400 Headache, dizziness and nausea within 1-2 minutes. Death within 10-15 minutes.
12,800 Death within 1-3 minutes.
The following symptoms may be related to CARBON MONOXIDE POISONING and should be discussed
with ALL members of the household:
Mild exposure: Headaches, running nose, sore eyes, often described as “flu” -like symptoms;
Medium exposure: Dizziness, drowsiness, vomiting;
Extreme Exposure: Unconsciousness, brain damage, death.
Many cases of reported CARBON MONOXIDE POISONING indicate that while victims are aware they
are not well, they become so disoriented they are unable to save themselves by either exiting the
building or calling for assistance.
ppm = parts per million *OSHA Occupational Safety & Health Association

7
Table B: CO Alarm Response
Red Light
Horn/Sounder
CO Gas Level
0 ppm to < 50 ppm
OFF *
OFF*
>50 ppm
1 flash every 3 secs.
On within 60-240
minutes (typ 90 minutes)
>110 ppm
2 flashes every 3 secs.
On within 10-50 minutes
(typ 30 minutes)
>250 ppm
3 flashes every 3 secs.
On within 4-15 minutes
(typ 9 minutes)
* unless it has alarmed previously (see CO Alarm Memory below) ppm values shown in table are for example purposes only
Alarm Indicators
Pre-Alarm: Red LED flash only
CO Alarm: Red LED flash + sounder
Faults: Yellow LED flash + beeps

8
Pre-Alarm (before horn sounds): When the Alarm detects over 50 ppm CO the
red light flashes in accordance with Table B. This helps locate CO leaks as the unit
gives an indication straight away.
(Without this feature the CO level would need to be at 50 ppm CO for typically
72 minutes for an alarm sound to be given). Note the Pre-Alarm signal may be
triggered by CO coming for example, from cooking with gas, from car engines or
from nearby barbecues. This is usually not a concern, unless the Pre-Alarm signal
persists until the alarm sounds and the CO source is unknown.
NOTE: The CO Alarm may sound if cigarette smoke is blown into it, or aerosols
are released nearby.
CO ALARM MEMORY
The CO Alarm memory is an important feature of the CO Alarm where even if the
house is unoccupied during an alarm condition it warns the homeowner that the
unit has previously detected CO gas and been in alarm. The memory feature has two
operation modes:
- memory indication for 24 hour period after alarm.
- memory recall on demand
24 hour memory indicators: After alarm, the RED light will flash at different rates
every 50 seconds depending on the level of CO detected - see Table C.
Memory recall on demand: To review the memory status after initial 24 hours,
press and hold the test button, thered led will flash in accordance toTable C. Display
models will show the peak level of CO measured.

9
Table C: COAlarm Memory
Indicator
s
COGas Level
RedLight Respons
e
24Hours
On Demand(Button Press)
ppm > 50 ppm
1 flashes every 50 sec
1 flashes
ppm > 110 ppm
2 flashes every 50 sec
2 flashes
ppm > 250 ppm
4 flashes every 50 sec
4 flashes
Reset Memory: Hold down the test button until the red light stops and the green
light starts flashing. Cover the horn with a cloth to muffle the alarm during this time.
Please note that the memory will also be reset when the unit is switched off.
3. Where to Place CO Alarms
NATIONAL FIRE PROTECTION ASSOCIATION REQUIRED PROTECTION
For your information the National Fire Protection Association’s standard 720
advises as follows:
Carbon Monoxide Alarms shall be installed as follows:
(1) Outside of each separate dwelling unit sleeping area in the immediate vicinity
of the bedroom.
(2) On every occupiable level of a dwelling unit, including basements but excluding
attics and crawl spaces.
(3) Other locations where required by applicable laws, codes or standards.
The equipment should be installed using wiring methods in accordance with the
National Fire Protection Association’s Standard 72, 720. (National Fire Protection
Association, Batterymarch Park, Quincy, MA 02269)

10
IMPORTANT!
Specific requirements for Carbon Monoxide Alarm installation vary from state to
state and from region to region. Check with your local Fire Department for current
requirements in your area.
3.1 Ideally a Carbon Monoxide Alarm should be installed in:
- Every room containing a fuel burning appliance, and
- Remote rooms where occupants spend a considerable amount of time
- Every bedroom.
However, if the number of Carbon Monoxide Alarms to be fitted is limited, the
following points should be considered when deciding where best to fit the Alarm(s)
- If there is an appliance in a room where people sleep, place a CO Alarm in
this room
- Locate a CO Alarm in a room containing a flueless or open-flued appliance, and
- Locate an Alarm in a room where the occupant(s) spend most of their time (e.g.
sitting room)
- In a bedsit, the CO Alarm should be placed as far away from the cooking
appliance as possible, but near to where the person sleeps
- If the appliance is in a room not normally used, such as a boiler room, the CO Alarm
should be placed just outside the room so that the alarm will be heard more easily.

11
300mm
CO Alarm
150mm
1.5 to 3 m
DEAD AIR
DON'T LOCATE
HERE
1.5 to 3 m
Figure 1
Location in room with a fuel burning appliance

CO
Alarm
CO Alarm
about
1 to
2m
Figure 2
Location in rooms with sloped
ceilings, the CO Alarm should be
located at the high side of the room
Figure 3
Location in bedrooms & other
rooms remote from the appliance
(i.e. at breathing level)
12

13
3.2 Unsuitable Locations
Do not place the CO Alarm in any of the following areas.
(1) In the immediate vicinity of a cooking appliance (keep it at least 1 metre
horizontally from it).
(2) Outside the building.
(3) In an enclosed space (e.g. in or below a cupboard).
(4) In a damp or humid area.
(5) Directly above a sink or cooker.
(6) Next to a door, window, air vent or anywhere that it would be affected by
draughts.
(7) Next to an extractor fan.
(8) Over heat sources such as radiators or hot air vents.
(9) Where it would be obstructed, e.g. by curtains or furniture.
(10) In an area where the temperature could drop below 40°F (4.4°C) or rise above
100°F (37.8°C).
(11) Where dirt or dust could block the sensor.
(12) Where it could be easily knocked or damaged, or where it could be
accidentally turned off or removed.
(13) In a bathroom or other areas where the CO Alarm may be exposed to
water splashes, dripping or condensation (e.g. above an electric kettle).
(14) Near paint, thinners, solvent fumes or air fresheners.

14
3.31 If locating the CO Alarm in a room with a fuel burning appliance
(see figure 1)
• If it is mounted on a wall, it should be located at a height greater than the height of
any door or window but still be at least 150mm from the ceiling.
• If it is mounted on the ceiling it should be at least 300mm from any wall or light
fitting.
• The CO Alarm should be a horizontal distance of between 1.5m and 3m from the
potential CO source.
• If there is a partition in the room, the CO Alarm should be located on the same side
of the partition as the potential source.
• In rooms with sloped ceilings, the CO Alarm should be located at the high side of
the room (see fig 2).
3.32 If locating the CO Alarm in a bedroom or in rooms remote from a fuel
burning appliance (see figure3)
• Mount the CO Alarm relatively close to the breathing zone of the occupants.
Whatever position is chosen makesure it is possible to view the three light indicators,
when in the vicinity of the Alarm.
WARNING: A CO Alarm should not be used as a substitute for proper installation,
use and maintenance of fuel-burning appliances, including appropriate ventilation
and exhaust systems.
WARNING: Your CO Alarm is intended for use in ordinary indoor locations of family
units. It is not designed to measure compliance with OSHA commercial or industrial
standards.

15
4.
Installation
Warning: The Installations of this apparatus should not be used for a substitute
for proper installation, use and maintenance of fuel burning appliances including
appropriate ventilation and exhaust systems.
4.1 Installation Procedure
1. Select a location complying with the advice in
Section 3.
2. Remove the mounting plate from the packaging/
Alarm.
3. Place the mounting plate on the ceiling/wall
exactly where you want to mount the Alarm. With a
pencil, mark the location of the two screw holes.
4. Taking care to avoid any electrical wiring in the
ceiling, drill holes using a 5.0mm drill bit through
the center of the marked locations. Push the plastic
screw anchors provided into the drilled holes.
Screw the mounting plate to the ceiling/ wall.
5. Alternatively, if desired, the CO Alarm will also
free stand on a flat surface with the mounting plate
attached.
Figure 4
6. This CO Alarm is designed for use with an ELK-M1 Control and ELK-M1XRFTWM
Wireless RF Receiver. It must be RF enrolled into the M1 Control using the
instructions which accompany the ELK Control and/or Receiver.

16
7. Carefully line up the Alarm on the base, gentle
press home & twist on. (see figure 4) This
connects the batteries and the red, amber & green
lights will immediately flash in sequence to show
they are working.
8. Wait 15 seconds and then press the Test button
to ensure that the Alarm works (see figure 5).
9. Install all the other Alarms similarly.
4.2 How to Tamperproof the Alarm
The Alarm can be made resistant to unauthorized
removal. Break off the small pillar on the base as
shown in figure 6a. To remove the Alarm from the
ceiling it is now necessary to use a small
screwdriver, to release the catch (push catch
towards the ceiling) and then twist off the Alarm
(see figure 6b).
Red
Light
Amber
Light
Green
Light
Test
Button
Figure 5
Figure 6a Figure 6b Figure 7

17
It is possible to further secure or tamperproof the Alarm by using a No.2 or No.4 (2
to 3mm diameter - not supplied) self-tapping screw 6 to 8mm long to firmly lock the
Alarm and its mounting plate together (see figure 7).
5. Testing / Monitoring & Maintenance
Testing
NOTE: Always notify your Alarm Monitoring Center prior to performing any testing.
Frequent testing of the system is a requirement to ensure its continued and safe
operation. To test the Alarm, press the hold the test button.
The Green LED will flash and the horn will ramp up to full sound to indicate the
Alarm is operating correctly.
Guidelines and best practices for testing are as follows
1. After the system is installed
2. Once weekly thereafter
3. After prolonged absence from the dwelling (e.g. after holiday period)
4. After repair or servicing of any of the systems elements or household electrical
works.
Silencing (Hush)
When the Alarm sounds, after sensing CO, pressing the test/hush button will
immediately stop the horn (the red light will continue to flash). If CO is still present,
the red light and the horn will turn on again after about 4 minutes. The unit can only
be silenced once during a CO incident. At levels > 300ppm CO the unit cannot be
silenced.

18
Visual Status and Self-Test
The CO alarm will self-check itself and give a status update every 50 seconds if
there are any problems.
The status of the Alarm can also be checked on demand by using the test button.
The table below shows the visual status response to both the self-check and on
demand testing.
Monitoring
Summary
Status
Result
Red LED
(Alarm) Amber LED
(Fault) Green LED
(Power) Sounder
Action
Standby
No
visual
or
audible indication
if
unit
is OK
Unit OK
(
Button
Test) Off Off On
Ramps
upto fullsound
Low
Battery Off 1 Flash Off 1 Beep
See
Note
Sensor
Fault Off 2 Flashes Off 2 Beeps
Replace
Unit
End
of
Life
(EOL) Off 3 Flashes Off 3 Beeps
Replace
Unit
Note* - R
eplace the
batteries
If the Alarms are indicating a fault, pressing the test button will silence the beeps for
a 24 hour period. This is for your convenience and can only be done once.
Maintenance
Clean the outside case by occasionally wiping with a clean damp cloth. Do not use
any cleaning agents, bleaches, detergents or polishes, including those in aerosol
cans. Avoid spraying air fresheners, hair spray, paint or other aerosols near the CO
Alarm. Do not place air fresheners near the unit.

19
Use the narrow nozzle of a vacuum cleaner to remove fluff and other contamination
from the cover slots and gas entry holes.
Caution: Do not paint the CO Alarm.
Remove the CO Alarm when decorating. Do not allow water or dust to contaminate
the Alarm.
Warning: Do not open or tamper with the CO Alarm. There are no user serviceable
parts inside and this can damage the Alarm.
Battery Replacement
Check the ‘Replace by’ label on the side wall - if it
has been exceeded replace the entire unit. If the
Replace by’ label on the side wall has not been
exceeded, remove the Alarm from the mounting
plate, remove the battery cover (see figure 8) and
replace the batteries. Use only Duracell Alkaline
AAA size batteries (obtained from local retailer).
Insert the new batteries with the orientation shown
on the base. Replace the battery cover and replace
the Alarm back on its mounting plate (this action
automatically switches on the batteries). Button
test the Alarm (after 15 seconds) to check
the batteries are installed correctly and that they
are not depleted.
Figure 8

20
AudioLINK
AudioLINK feature allows an authorized person to download information from the Alarm
through by way of a mobile App. For more information on using this feature, please
refer to
the
relevant section on
www.elkproducts.com.
Warning!
Constant exposures to high or low temperatures or high humidity may reduce battery
life.
Use only batteries specified in marking. Use of a different battery may have a
detrimental effect on alarm operation.
For environmentally sound disposal, remove the Alarm from its mounting plate,
open the battery door and remove the batteries. Dispose in accordance with best
practice and guidance on WEEE disposal and recycling.
Quick Test with Carbon Monoxide
The Carbon Monoxide Alarm checks for CO gas every 4 seconds and when exposed
to the CO gas, the red light will flash (as per Table B) to confirm that it is detecting the
CO gas.
The Alarm can be tested with carbon monoxide gas by using one of the kits that comes
with the gas either in a glass phial or aerosol can. Follow the instructions on the kit.
If a test gas kit is not readily available, it is also possible to gas test the Alarm using
a joss stick or cigarette smoke. To do this remove the Alarm from its base and slide
Table of contents