ENSONIQ KT-76 User manual

KT Quick-Start Guide
1
Welcome!
Thank you for purchasing the ENSONIQ KT. You’ll find the KT to be a wonderful instrument,
full of exciting sounds and features.
Thanks also for opening up the ENSONIQ KT Quick-Start Guide tutorial. This is designed to be
an easy and fun way to get familiar with your new KT. Be sure to go through the Guide in
order—it’ll take about an hour.
This tutorial covers two different products, the KT-76 and the KT-88. The KT-76 has a 76 note
keyboard, whereas the KT-88 has an 88 note keyboard. In this manual, when there are notable
differences, the keyboards will be specifically addressed as the KT-76 and the KT-88. When the
text pertains to both products, they will be referred to as KT.
You’ll need the following materials:
• A KT
• An audio monitoring system (keyboard amp, mixer, headphones, audio cables, etc.)
Getting Ready
1. Plug the KT’s power cable into the AC Line jack on the rear panel of the KT.
2. Plug the other end of the cable into a grounded AC outlet.
3. Connect the SW-6 Foot Switch (found in the accessory kit) into the Foot Switch jack on the
rear panel of the KT.
☞ Important: Always make sure your audio system is turned off (or down) when making
connections in order to avoid damaging speakers or other components.
4. Connect the audio outputs of the KT to the line level inputs of a mixer, instrument amplifier,
stereo, or any other sound system, using 1/4 inch audio cables. If your system is stereo,
connect the Left/Mono and Right/Mono outputs of the KT to two input channels of your
mixer, stereo, etc. (If you’re connecting to your home stereo, you may need a set of 1/4 inch-
to-RCA cables. You can find these at most electronic supply stores.) If your system is mono,
use either the KT’s Left/Mono output or the Right/Mono output, but make sure nothing is
plugged into whichever output jack you’re not using. For listening through headphones,
simply plug your phones into the front panel jack marked “Phones.” If you’re running the
KT through a mixer in stereo, be sure to pan the left channel fully left, and the right channel
fully right to get the full effect of the KT’s stereophonic sound.
Grounded
AC Power
Mixer
Amp
Audio Outputs
Phones
Power
Switch

KT Quick-Start Guide
2
Note: The KT audio outputs are line-level, and are intended to be connected only to
line-level inputs, such as those on a mixer, stereo pre-amp, keyboard amp, etc.
Connecting the KT audio outputs to a mic-level input, such as a guitar amp or the
microphone jacks on a tape deck, is not recommended, and might result in damage to
the device’s input.
5. Switch the audio system on.
6. Slide the KT’s Volume Slider all the way down.
7. Turn the KT power on by flipping the rear panel Power switch. Your display will flash one
of the following screens:
ENSONIQ KT-76
64 Voices!
ENSONIQ KT-88
64 Voices!
During the course of the tutorial, you may find that the KT’s displays
vary slightly from the screens shown here. Don’t be alarmed!
8. Slide the KT’s Volume Slider all the way up. As with any digital musical instrument, the KT
will give the best results if you keep the Volume Slider full on. Use the volume control on
your mixer or amp to adjust its level.
☞Important: The one occasion where the Volume Slidershould not be turned all the way up
is when you’re using low-impedance (8 ohm “Walkman™”-style) headphones. The KT’s
headphone output volume is optimized for mid- to high-impedance headphones (50 - 600
ohms). If you use low impedance headphones, be sure to lower the Volume Slider , as the
KT’s high output volume levels could damage your hearing.

KT Quick-Start Guide
3
Playing the KT
The KT’s display now looks like this:
r:ROM 00
KT Grand Piano
This is one of the KT’s many sounds. Take a few moments to enjoy this realistic piano sound by
playing some music on the KT’s keyboard. We’ll talk about how to find other amazing sounds in
your KT a little later on.
Playing the KT Demo Song
Your KT has a built-in song to give you an idea of the kind of music you can make. Let’s listen to
it.
1. Locate the {MAKE_DEFAULT_PRESET} button—you’ll find it on the lower right-hand corner
of the KT’s front panel.
Make
Default Preset
Copy Preset
2. While holding down {MAKE_DEFAULT_PRESET}, press the {PLAY} button.
Record Stop Play
Continue
As the song plays, the display will show:
rSONG70 Tempo+00
KT Demo Song
3. If you’d like to stop listening to the demo song before it finishes, simply press the
{STOP"CONTINUE} button.

KT Quick-Start Guide
4
Sounds
Selecting and Playing More Sounds
Now let’s take some time to explore some of the many sounds in your KT.
• Press the {SELECT_SOUND} button. Whenever you want to listen to KT Sounds, you start
by pressing this button.
Select
Sound
This puts the KT in Select Sound mode. Your display will once again look like this:
r:ROM 00
KT Grand Piano
In the center of the KT’s front panel, there are two long rows of buttons. Printed between these
two rows are numbers, running from 0 to 9.
Song
Cmds Sequence
Cmds Track
Cmds Quantize
Track Mute
Tracks Store
Seq Data
Store
Sound Data
Click
Env 1 LFO Filters
Locate Sequencer
Control
Wave Pitch Env 2 Env 3 Output
Effects
Effects
1 2 3 4 5 60 7 9
Volume
Pan Output
Bus Key
Range Transpose Channel
Program MIDI
Status Pressure
Type Sustain
Pedal Timbre Release
8
GM DrumsDrums
• Press the button directly below the printed number “1.” The display now shows:
r:ROM 01
Cool B-Three

KT Quick-Start Guide
5
We’ve just selected a new sound—a Hammond organ. Play a few notes on the keyboard to hear
what it sounds like.
Note that the number in the top center of the display has changed from “00” to “01.” Each sound
in the KT has its own address, and that’s what this number represents. The display is telling us
that this sound resides at ROM location 01. ROM is itself an area within the KT’s memory. You
can think of the number on the display as a street address, and ROM as the name of the town.
We’ll explain this a bit more fully later on.
• Press the button directly below the printed number “2.” The display now shows:
r:ROM 02
Studio Keys
Here’s a special hybrid of electric piano.
Pressing each one of the KT’s ten lower number buttons will select a different sound. Take some
time now to press each button in turn and listen to the sound it selects.
• When you’re done, press the lower {0} button to get us back where we started.
10 Sets of 10
Your KT holds a great many sounds, and they’re grouped into sets of ten, like the ten we’ve just
discovered. Let’s find the other ten sets of ten in the ROM area of the KT’s memory.
So far, we’ve been pressing the buttons below the numbers printed in the center of the KT’s front
panel—we refer to these buttons as the “lower number buttons.”
The “upper number buttons,” the buttons above the numbers, select the ten sets of ten. When
you turned your KT on, it placed us in the group of ten sounds corresponding to the button
above the “0.”
Let’s go to the set of ten sounds associated with the button above “1.”
• Press the upper {1} button, and then the lower{0} button. Your display shows:
r:ROM 10
Concert Grand
Note that the address is now ROM 10. This tells you that this sound is reached by pressing the
upper number button above “1”—the first digit in the address—and the lower button below the
“0”—the second digit.
• Play a little music on your new Concert Grand.
• Press the other lower number buttons to view and play the remaining nine sounds in this set
of ten.

KT Quick-Start Guide
6
• Press another upper number button of your choice.
• Press each of the ten lower number buttons in turn to select the ten sounds in that set.
Take some time now to explore the rest of the sounds stored in the KT’s ROM memory. Press an
upper number button , and then press the ten lower number buttons to see what ten sounds that
upper number button invokes. Have fun and take your time—there are a hundred terrific
sounds here for you to experience!
• When you’re done, press the upper {0} button and the lower {0} button to take us back to
where we started r:ROM 00, KT Grand Piano.
BanksSo far, we’ve been exploring the sounds contained in the KT’s ROM memory. “ROM” stands for
“Read Only Memory.” What this means is that all the sounds in the ROM memory are
permanent—you cannot write over them. ENSONIQ has filled this area with sounds that you’re
always going to want to have available.
The KT’s memory also contains an area where you can store sounds that you yourself have
created, sounds that you’ve changed in some way, or new sounds you’ve purchased. This part of
the KT is referred to as its “Internal” (or “INT”) memory.
Each of these areas of memory is referred to as a “Bank,” and each contains its own 100 sounds.
We’ve already listened to the ROM bank sounds, now we’re ready to venture into the Internal
bank.
• Press the {BANK} button.
Bank
i:
r:
a:
b:
INT
ROM
CARD
CARD
Your display now looks like this:
i:INT 00
Studio Guitar
On the upper left in the display, “r:ROM” has changed to “i:INT.” This display tells us that we’re
at INT (Internal) location 00. To use the analogy we used earlier, our street address is 00 again,
but now we’re in a different town.
The sound at this new address is Studio Guitar.
Now would be a good time to listen to the exciting sounds stored in the INT bank. Start with
Studio Guitar and the other ten sounds you can find by pressing the lower number buttons. Next,
press an upper number button, and then the ten lower number buttons to hear the ten sounds that
upper number button calls up—just as we did when we were checking out the ROM bank.
By the way, with a Memory Card in the KT’s Memory Card Slot, you can access yet another two
complete banks of sounds in addition to the ROM and INT Banks. See the KT Musician’s Manual
“Section 13—Storage” for details.

KT Quick-Start Guide
7
Drum Sounds
As you explored the ROM and INT sound banks, you may have noticed that sound locations 80
through 99 contain Drum Sounds, and that these sounds are the same in both banks.
Drum Sounds are a special sound category in the KT—they’re specially programmed to put the
KT’s full percussion power readily at your fingertips. They always appear at locations 80-99 so
that they’re always handy.
• Press the upper {8} button and the lower {0} button to take us to the first Drum
Sound—r:DRUM 80 Rock Kit-EM. As you can see, the display for Drum Sounds is slightly
different than with Standard Sounds. It looks like this:
r:DRUM 80
Rock Kit-EM
Since the Drum Sounds are part of any bank you call up, there’s no ROM or INT designation in
the upper left corner of the display. Drum Sounds have their own abbreviation—”r:DRUM.”
Typically in KT Drum Sounds, there’s a different instrument (or pitch) on every key of the
keyboard.
• Play the highest key on the keyboard to hear handclaps.
• Play the KT’s lowest key for a punchy bass drum.
• Now try out all the keys in between!
• Select the other Drum Sounds in locations 80 through 99, and be sure to check out all the keys
on the keyboard in each Drum Sound—there’s a lot to hear!
What Are Sounds?
Sounds are KT programs constructed from samples—or recordings—of real-world and synthetic
sounds. The KT contains an extensive set of tools for altering and manipulating these samples
into the incredible sounds you’ve been hearing.
The KT is designed to make it easy for you to program your own sounds. For more details, see
your Musician’s Manual, starting with Section 5—Understanding Sounds.
SoundFinder™
Sounds of similar types can be selected using ENSONIQ’s exclusive SoundFinder feature.
SoundFinder searches for the next or previous sound of the same type. It searches through all of
available memory, including the a:CARD and b:CARD sound banks (if a PCMCIA card is
installed). General MIDI sounds are not accessible with SoundFinder.
Any time you’d like to locate other sounds of the same type as the sound you’re currently
playing, SoundFinder™ can find them for you.
• Press the upper {0} button and the lower {0} button. Now press the {BANK} button so that
your display once again looks like this:
r:ROM 00
KT Grand Piano
This is the piano sound we started with.

KT Quick-Start Guide
8
• Press the {SOUNDFINDER} {>} button—it’s just above the word SoundFinder™ to the left of
the display:
Previous Next
SoundFinder ™
Cursor
The display shows:
r:ROM 09 Piano & Strings
This is the next piano sound in the KT’s memory. You can try it out if you’d like.
• Press the {>} button again. Now the display looks like this:
r:ROM 10
Concert Grand
Every time you press the {>} button, SoundFinder™ will locate the next piano sound available.
You can also go back to a piano sound you encountered earlier, by simply pressing the {<}
button until the KT finds it for you.

KT Quick-Start Guide
9
Making Sounds Come Alive
Velocity
• Press the {BANK} button once, and then the upper {7} button and the lower {9} button to
call up the sound, “Tutorial Sound.” The display shows:
i:INT 79
Tutorial Sound
This sound is like an old-style analog synthesizer with a bit of breathiness added.
• Play a few notes softly on the keyboard—notice how quiet the sound is.
• Now play harder—can you hear how the volume of Tutorial Sound changes as you play with
more force?
The KT keyboard responds to how loudly or softly you play by sensing the velocity of your
keystrokes. Velocity is just one of the 15 modulators which the KT uses to make sounds come to
life. Modulators are simply devices that change a sound in some way or another. Your
Musician’s Manual has much more to say about them—for now, let’s just experience a few more
of the modulators that are most commonly used.
Pitch Bend Wheel
The Pitch Bend Wheel is the left-most wheel at the bottom end of the KT keyboard.
• Play a chord on the keyboard and, while holding the keys down, slowly push the Pitch Bend
Wheel away from you. Hear how the pitch of the chord is bending upward?
• Now slowly pull the Pitch Bend Wheel all the way back towards you—the pitch bends
downward.
• Let go of the Pitch Bend Wheel—since it’s spring-loaded, it jumps back to the center,
returning your sound to its original pitch.
Modulation Wheel
The Modulation Wheelis the wheel just to the right of the Pitch Bend Wheel.
• Play a chord, and, while holding it down, push the Modulation Wheel away from you. As
you move the Modulation Wheel further and further away, the breathy part of Tutorial
Sound fades away, leaving only the synth component.
• Bring the Modulation Wheel all the way back to return Tutorial Sound to its original state.
Pressure
• Play a note on the keyboard, and press down on it. In our Tutorial Sound, Pressure, or “after-
touch,” adds vibrato and makes the breathy part of the sound swirl in stereo around your
speakers or headphones!

KT Quick-Start Guide
10
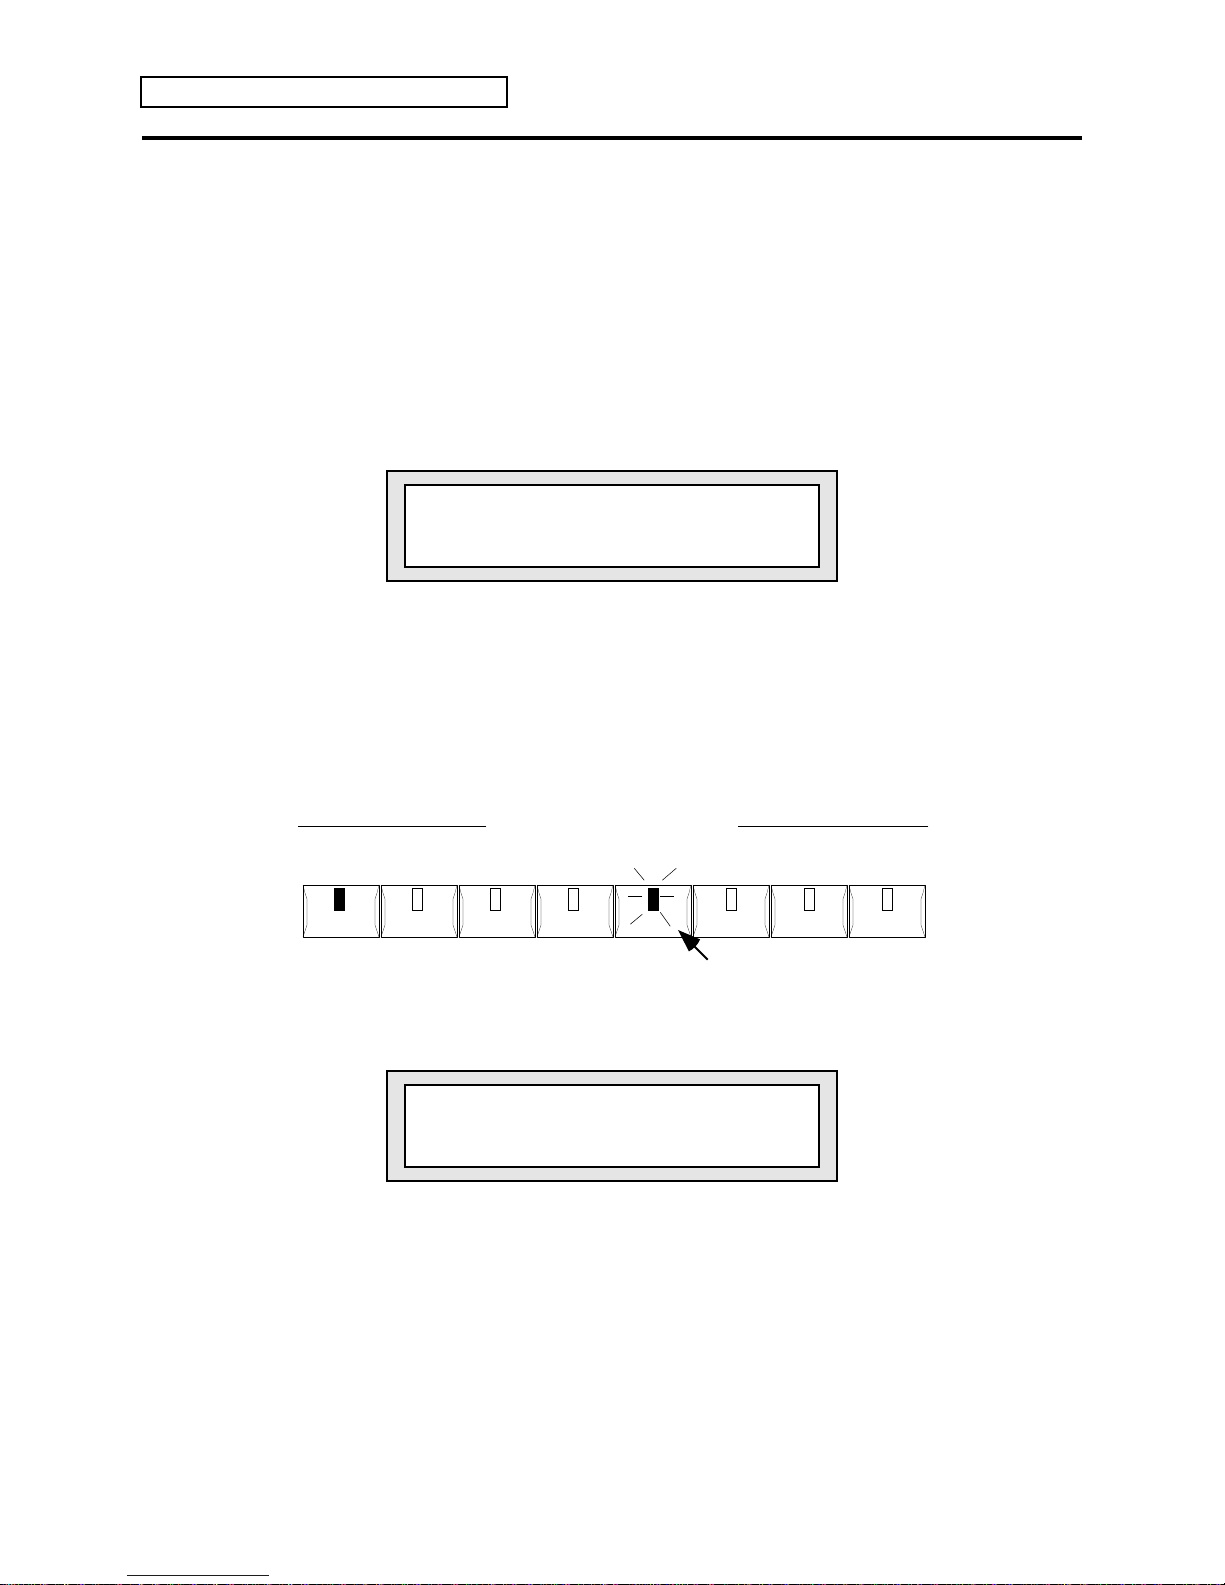
Transpose Keyboard
• Play a brief C major chord on the keyboard just to get a sense of what it sounds like.
• After you’ve played the C chord (and released it), hold down the
{TRANSPOSE_KEYBOARD} button located in the upper right corner of the KT’s front panel.
Hold This Button
and Play a Note
Transpose
Keyboard
semi
–6 –5 –4 –3 –2 –1 +1 +2 +3 +4 +5
G A B B CD E F
note
F#EA
#b b b
• While holding down the {TRANSPOSE_KEYBOARD} button, press the D just above middle
C on the keyboard. You’ll see a small light go on to the left of the
{TRANSPOSE_KEYBOARD} button, right above the “D” printed on the KT’s front panel.
+2
D
On
• Let go of the {TRANSPOSE_KEYBOARD} button and the D on the keyboard.
• Play your C major chord again—what you’ll hear is a D major!
• Press the {TRANSPOSE_KEYBOARD} button again to turn off the
{TRANSPOSE_KEYBOARD} feature.
The KT’s Transpose Keyboard feature makes it easy to change the musical key you’re playing in
without actually having to physically change what you play at all. This makes playing music in
new keys a snap—just play what you always did and let the KT do the transposing. You can use
Transpose Keyboard regardless of whether your music is in a major or minor key.
We’ve just seen that if your original key is C, you can transpose by simply holding down the
{TRANSPOSE_KEYBOARD} button and touching the key on the keyboard with the same name
as the key you want to transpose to.
If you’re starting in a key other than C, you can transpose using the numbers and letters printed
above and below the Transpose lights as a guide.
Let’s take an Eb major chord and transpose it to the key of Ab.
• Play an Eb major chord on the keyboard.
• Count the number of semitones between Eb and Ab. Make E natural the first key you count
and Ab the last. You’ll find the number of keys to be five.
• Look at the row of small lights. The light farthest to the right has a “+5” printed above
it—that’s the distance from Eb to Ab, isn’t it?
semi
–6 –5 –4 –3 –2 –1 +1 +2 +3 +4 +5
G A B B CD E F
note
F#EA
#b b b
We can also see that directly under the light is the letter “F.” This tells us that to raise the key of
our music by five semitones, we’ll need to play an F on the keyboard.
• Hold down the {TRANSPOSE_KEYBOARD} button and play an F on the keyboard. The light
between the “+5” and the “F” goes on.
• Now let go of the {TRANSPOSE_KEYBOARD} button and the F on the keyboard. When you
play an Eb major chord, the KT sounds an Ab major chord.
• Press the {TRANSPOSE_KEYBOARD} button again to return to normal operation.

KT Quick-Start Guide
11
Changing Effects
• Press the {EDIT_SOUND} button.
Edit
Sound
Edit
Seq/Preset
Edit
Track
System•MIDI
• Press the upper {8} button.
• Press the lower {0} button and hold it down for a few seconds. The display will look like
this:
flashing
m
WARM CHAMBER FX1=40
FX2=35
The top line, WARM CHAMBER, will be slowly flashing. This means that this area of the display
is selected for editing.
• Press the {VALUE} {[} button twice.
Value
No

KT Quick-Start Guide
12
The display now reads: flashing
m
EQ-CHORUS+REVERB FX1=25
FX2=35
• Play a few chords on the keyboard. Can you hear how much richer and bigger Tutorial
Sound has become?
This is because we’ve changed Tutorial Sound’s effect. Originally, our sound had a subtle,
reverberation-type effect. Now we’ve added an equalizer, a chorus and a bigger reverb. These
are just a few of the many KT effects you can use to add an extra sparkle to sounds. For more
information on these and the other KT effects, refer to your Musician’s Manual, Section
3—Understanding Effects.
Saving Sounds
We’ve just edited Tutorial Sound. Here’s how we can save our work.
• Press the {SAVE} button.
Enter
Yes
Save
The display now reads:
Save SOUND _Tutorial Sound
This screen gives us the opportunity to give our sound a new name—let’s call it “Synth Breath.”
• Press the {CURSOR} {>} button once.
Previous Next
SoundFinder ™
Cursor
The underline has moved underneath the “T” in “Tutorial.”
• Slide the Data Entry Slider all the way down. You’ve created a blank space where the “T”
was.
• Press the {>} button again so that the underline is beneath the “u.”

KT Quick-Start Guide
13
• Press the {]} button repeatedly until a capital “S” is displayed.
• Continue pressing the {>} button to underline each space in turn, and then use the {[} and
{]} buttons—or the Data Entry Slider—until you’ve spelled out “Synth Breath.” Don’t forget
to leave a space between the two words! You’ll also want to add a space on the end to get rid
of the “d” from “Tutorial Sound.”
When you’re done, the screen will look like this:
Save SOUND
Synth Breath_
• Press the {SAVE} button again. The display will change to:
SaveTo i:INT 79
Synth Breath_
• Press the {SAVE} button again. The screen briefly says:
Saved.
We’ve just edited and saved our first sound. From now on, whenever you go to Internal location
i:INT 79, Synth Breath will be there, just as we saved it.
KT Quick-Start Guide
14
Presets
What is a Preset?
When KT sounds are combined by layering and/or splitting them across the keyboard, that
combination is called a “Preset.” You can use up to eight sounds of your own choosing, stacked
or split in any way you want. For more about presets, see your Musician’s Manual, Section
8—Understanding Presets.
Making Your Own Preset
• Press the lower {0} button. The display shows:
i:INT 70
Voice Bell
• We’ve just selected Voice Bell. Play a few notes on the keyboard to familiarize yourself with
what it sounds like.
• Press the {MAKE_DEFAULT_PRESET} button.
Two of the KT’s {SEQUENCER/PRESET_TRACK} lights have lit.
1 2 3 45 6 78
Sequencer/Preset Tracks
Flashing
• Press {SEQUENCER/PRESET_TRACK} button {1}. On the display you’ll see:
Trk01 i:INT 70
Voice Bell
• Play the keyboard, and you’ll find that it’s the same sound we selected before we pressed the
{MAKE_DEFAULT_PRESET} button.
• Press {SEQUENCER/PRESET_TRACK} button {2}—it’s our Synth Breath sound.
• Rapidly click twice— “double-click”—{SEQUENCER/PRESET_TRACK} button {1}. Now
both sounds are playing together!
We’ve just “layered,” or “stacked,” two sounds.
• Press {SEQUENCER/PRESET_TRACK} button {2}.

KT Quick-Start Guide
15
• Press the {EDIT_TRACK} button.
Edit
Track
• Hold down the lower {2} button (Beneath the display) for a few seconds. The display shows:
iPSET01 Trk2 - KeyRange=A0 C8
i
flashing
On the bottom line of the display, “A0” is slowly flashing.
• Play a Middle C on the keyboard. The “A0” changes to a “C4,” which is Middle C.
• Now “C8” is flashing.
On the KT-76, play the highest note on the keyboard—the “C8” changes to “G7,” the note
you just played.
On the KT-88, play the highest note on the keyboard—“C8” stops flashing and remains
solidly lit (C8 is the note you just played).
• Play up the keyboard from the bottom.
Synth Breath is now playing only in the key range we’ve just selected.
• Press the {SELECT_SEQ/PRESET} button.
Select
Seq/Preset
The display shows:
iPSET01 Seq/Preset-01
This tells us which Seq/Preset memory location we’ve been working in. We’ll talk about what
“Seq” means later.
• Double-click on {SEQUENCER/PRESET_TRACK} button {3}.
• Play up and down the keyboard.
You’ll now find that from the bottom of the keyboard to the B just below Middle C, Voice Bell
plays, and that from there on up, it’s Synth Breath! We’ve just created a “split.”

KT Quick-Start Guide
16
Renaming Your Preset
• Press the {EDIT_SEQ/PRESET} button.
Edit
Sound
Edit
Seq/Preset
Edit
Track
System•MIDI
• Press the upper {4} button and the lower {4} button. The display reads:
iPSET01 STOP Rename SEQ/Pset
This screen allows us to rename our preset.
• Press the {ENTER} button—it’s the same button we used earlier as our{SAVE} button. The
display now shows:
New name = Seq/Preset-01
Renaming a preset is just like naming a sound.
• Use the {>} button to underline each space in turn, and then use the {[} and{]} buttons or
the Data Entry Slideruntil you’ve spelled out “2 Sounds at Once.”

KT Quick-Start Guide
17
When you’re done, the screen will look like this:
New name = 2 Sounds at Once
• Press the {ENTER} button. The display briefly shows:
Command
Successful!
Then the KT will return to the first screen we encountered when we began renaming our preset.
Saving Your Preset
Let’s save the changes we’ve made to our preset.
• Press the {SELECT_SEQ/PRESET} button. This puts the KT into Select Seq/Preset mode.
• Press the lower {1} button. The display asks:
Save changes? 2 Sounds at Once
• Press the {YES} button. It’s the same button we used earlier as {SAVE} and {ENTER}.
If you’ve made changes to a preset, and then select another one, the KT will ask you if you want
to save your work. You can also save changes by reselecting the preset you’re working on, which
is what we just did.

KT Quick-Start Guide
18
Selecting Other Presets
Presets are selected in much the same way sounds are. We use the upper and lower number
buttons to select presets within a Bank, and we use the {BANK} button to travel between the
ROM and Internal areas of the KT’s memory.
• Press the {BANK} button.
• Press the upper and lower {0} buttons. On the display you’ll see:
rPSET00
MIDI-Blend
• Play the keyboard to hear what MIDI-Blend sounds like. MIDI-Blend is a preset made up of
three sounds layered together—Dynamic Grand Piano, Big Money Pad and Warm Syn &
Tines.
• Press the other lower number buttons to hear more presets built into your KT.

KT Quick-Start Guide
19
Sequencing
What is a Sequence?
A sequence is simply a piece of music recorded by the KT. Each sequence can contain up to eight
independent performances—using eight different sounds—playing together to produce a
complete musical arrangement. Each one of these performances is called a “track.” To learn all
about sequences and sequencing, see your Musician’s Manual, Section 10—Understanding the
Sequencer.
Selecting and Playing a Sequence
We select sequences in exactly the same way that we select presets—in fact, they exist side-by-
side in the same areas of the KT’s memory. When you’re in Select Seq/Preset mode—as we are
now—use the upper and lower number buttons to select sequences within a bank, and use the
{BANK} button to switch between banks.
• Press the {BANK} button and the lower {0} button. On the display you’ll see:
flashing
m
iSEQ 00 Tempo120 TutorialSequence
• Press the {PLAY} button.
• “TutorialSequence” will start to play. When you’d like it to stop playing, press
{STOP"CONTINUE}.
Creating Your Own Sequence
• Press the lower {2} to select the next empty Seq/Preset location. The KT will prompt you to:
Press ENTER to Make new Pset=02
• Press the {ENTER} button. The display will show:
New Sequence Location = 02
i
flashing

KT Quick-Start Guide
20
The KT is asking you to verify the location of the new sequence.
• Press the {YES} button. Shown next will be:
Time Signature = 04/4
i
flashing
The KT is asking what the new sequence’s time signature should be. We’ll leave it as it is.
• Press the {YES} button twice. This brings us to the screen where we can name our new
sequence:
New name = Seq/Preset-02
Let’s call our new sequence “I Made This One!”
Naming a sequence is the same as renaming a preset and naming a sound.
• Use the {>} button to underline each space in turn, and then use the {[}and {]}buttons or
the Data Entry Slideruntil you’ve spelled out “I Made This One!”
When you’re done, the display will look like this:
New name = I Made This One!
• Press the {ENTER} button one more time. The display will briefly show:
Command
Successful!
Other manuals for KT-76
1
This manual suits for next models
1
Table of contents
Other ENSONIQ Electronic Keyboard manuals


