Eurotech EWF150 User manual
Washer Owner’s Manual
MODELS EWF150 AND EWF172
SAVE THESE INSTRUCTIONS FOR FUTURE REFERENCE
ENGLISHFRANÇAISESPAÑOL
IMPORTANT!
To get the best performance from
your washer, read all operating
instructions before using it for the
first time.
Version 2

2
CONTENTS
IMPORTANT SAFETY INSTRUCTIONS..................................................... 3
DESCRIPTION OF THE MACHINE ............................................................ 4
INSTALLATION INSTRUCTIONS ............................................................... 5
INSTRUCTIONS FOR USING THE WASHER............................................ 7
CARE LABEL INSTRUCTIONS .................................................................. 8
CONTROL PANEL ...................................................................................... 9
WASHER PROGRAMS............................................................................. 10
CARE AND MAINTENANCE......................................................................11
COMMON LAUNDRY PROBLEMS........................................................... 12
TROUBLESHOOTING .............................................................................. 14
WARRANTY.............................................................................................. 15
QUICK START REFERENCE ................................................................... 16

3
ENGLISH
To reduce the risk of fire, electric shock, or injury to
persons when using your appliance, follow basic
precautions, including the following:
♦Read all instructions before using the appliance.
♦Do not run appliance while you are out of the
home.
♦Donotallowchildrentoplayonor in the appliance.
Childrenshould beclosely supervised whennear
the appliance.
♦Before the appliance is removed from service or
discarded, remove the door to the washing
compartment.
♦Do not reach into the appliance if the drum is
moving.
♦Do not install or store this appliance where it will
be exposed to the weather.
♦Do not tamper with controls.
♦Do not repair or replace any part of the appliance
or attempt any servicing unless specifically
recommended in the user-repair instructions or
in published user-repair instructions that you
understand and have the skills to carry out.
♦Do not add gasoline, dry-cleaning solvents, or
other flammable or explosive substances to the
wash water. These substances give off vapors
that could ignite or explode.
♦Under certain conditions, hydrogen gas may be
producedin ahot watersystem that hasnot been
used for 2 weeks or more. HYDROGEN GAS IS
EXPLOSIVE.Ifthehot water systemhasnotbeen
used for such a period, before using a washing
machine or combination washer-dryer, turn on all
water faucets and let the water flow from each
for several minutes. This will release any
accumulated hydrogen gas. As the gas is
flammable, do not smoke or use an open flame
during this time.
IMPORTANT SAFETY INSTRUCTIONS
NOTE: This manual does not cover every possible
condition and situation that may occur. Use
common sense and caution when installing,
operating, and maintaining any appliance.
Do not wash or dry articles that have been
previously cleaned in, washed in, soaked in,
or spotted with gasoline, dry-cleaning
solvents, cooking oils, or other flammable
or explosive substances because they give
off vapors that could ignite or explode.
WARNING!
WARNING!
This appliance must be properly grounded.
Improper connection of the equipment
grounding conductor can result in a risk of
electric shock. Check with a qualified
electrician or serviceman if you are in doubt
as to whether the appliance is properly
grounded.
The plug must be plugged into an appliance
outlet that is properly installed and grounded
in accordance with all local codes and
ordinances.

4
B
A
C
1. Door
2. Stainless steel drum and barrell
3. Stove-enamelled power-coat paint
4. Four adjustable rubber-covered feet
5. Emergency drain and lint filter
DESCRIPTION OF THE MACHINE
The washing machine is a domestic appliance capable of washing any type of fabric.
♦The machine is constructed in sheet steel panels with a treated and painted finish that ensures its
aesthetic quality remains unaltered over time.
♦Themotorand all movingpartshavebeen designed andproducedina manner thatguaranteesminimum
noise levels.
♦The stainless steel drum is large and well mounted to ensure a better quality wash and a longer life of
clothing.
♦The control panel lets you use all the wash and dry programs with ease.
♦The access door has a wide opening to facilitate easy loading and unloading of the washing.
SPECIFICATIONS:
Supply voltage: Single-phase 115 V, 60 Hz
Fuse: 15 Amp
Inlet supply hose: Two 5-ft (1.5 m) fill hoses (hot and cold)
Supply pressure: 15-142 PSI
Outlet hose: 5.5 ft (1.7 m) polypropylene hose, 3/4” ID
CAPACITY:
Model EWF150 Large – 5 kilos (weight of clothes)
Model EWF172 Extra Large –7 kilos (weight of clothes)
DIMENSIONS:
MODEL EWF150
A. Width 23-3/8” 59.37 cm
B. Depth* 21-3/8” 54.29 cm
C. Height 33-1/4” 84.45 cm
* Depth w/door open: 36-7/8” (93.66 cm)
MODEL EWF172
A. Width 23-3/8” 59.37 cm
B. Depth* 23-1/8” 58.74 cm
C. Height 33-1/4” 84.45 cm
* Depth w/door open: 38-3/4” (98.43 cm)
For additional information, see the type plate on the inner door facing.
1
23
4
5
5
ENGLISH
FIG. 2
Z
U
INSTALLATION INSTRUCTIONS
Read these instructions carefully and completely before you install the machine. The installation should be
carried out by a qualified person who is familiar with all local codes and ordinances for electrical and
plumbing connections. Incorrect installation may cause damage and/or injury. If the integrity of the machine
is in doubt, do not use it. Call your dealer for qualified assistance.
The washer can be installed anywhere provided that the temperature is not less than 38°F (3°C) and the
electrical cords and hoses behind the machine are not cramped.
To install the washing machine, follow the steps below:
1. Move the machine to its installation position and remove the outer
wrapping and the polystyrene base.
2. Model EWF150 hasaplastic strip tapedtothe bottom ofthemachine
to secure two cones that prevent the tub from moving during
shipment. This plastic strip and the cones must be removed. To do
this, simply peel away the tape on the bottom sides of the unit that
hold the plastic strip and cones in place.
NOTE: Failure to remove these cones will likely cause the unit to
vibrate excessively during the spin cycles.
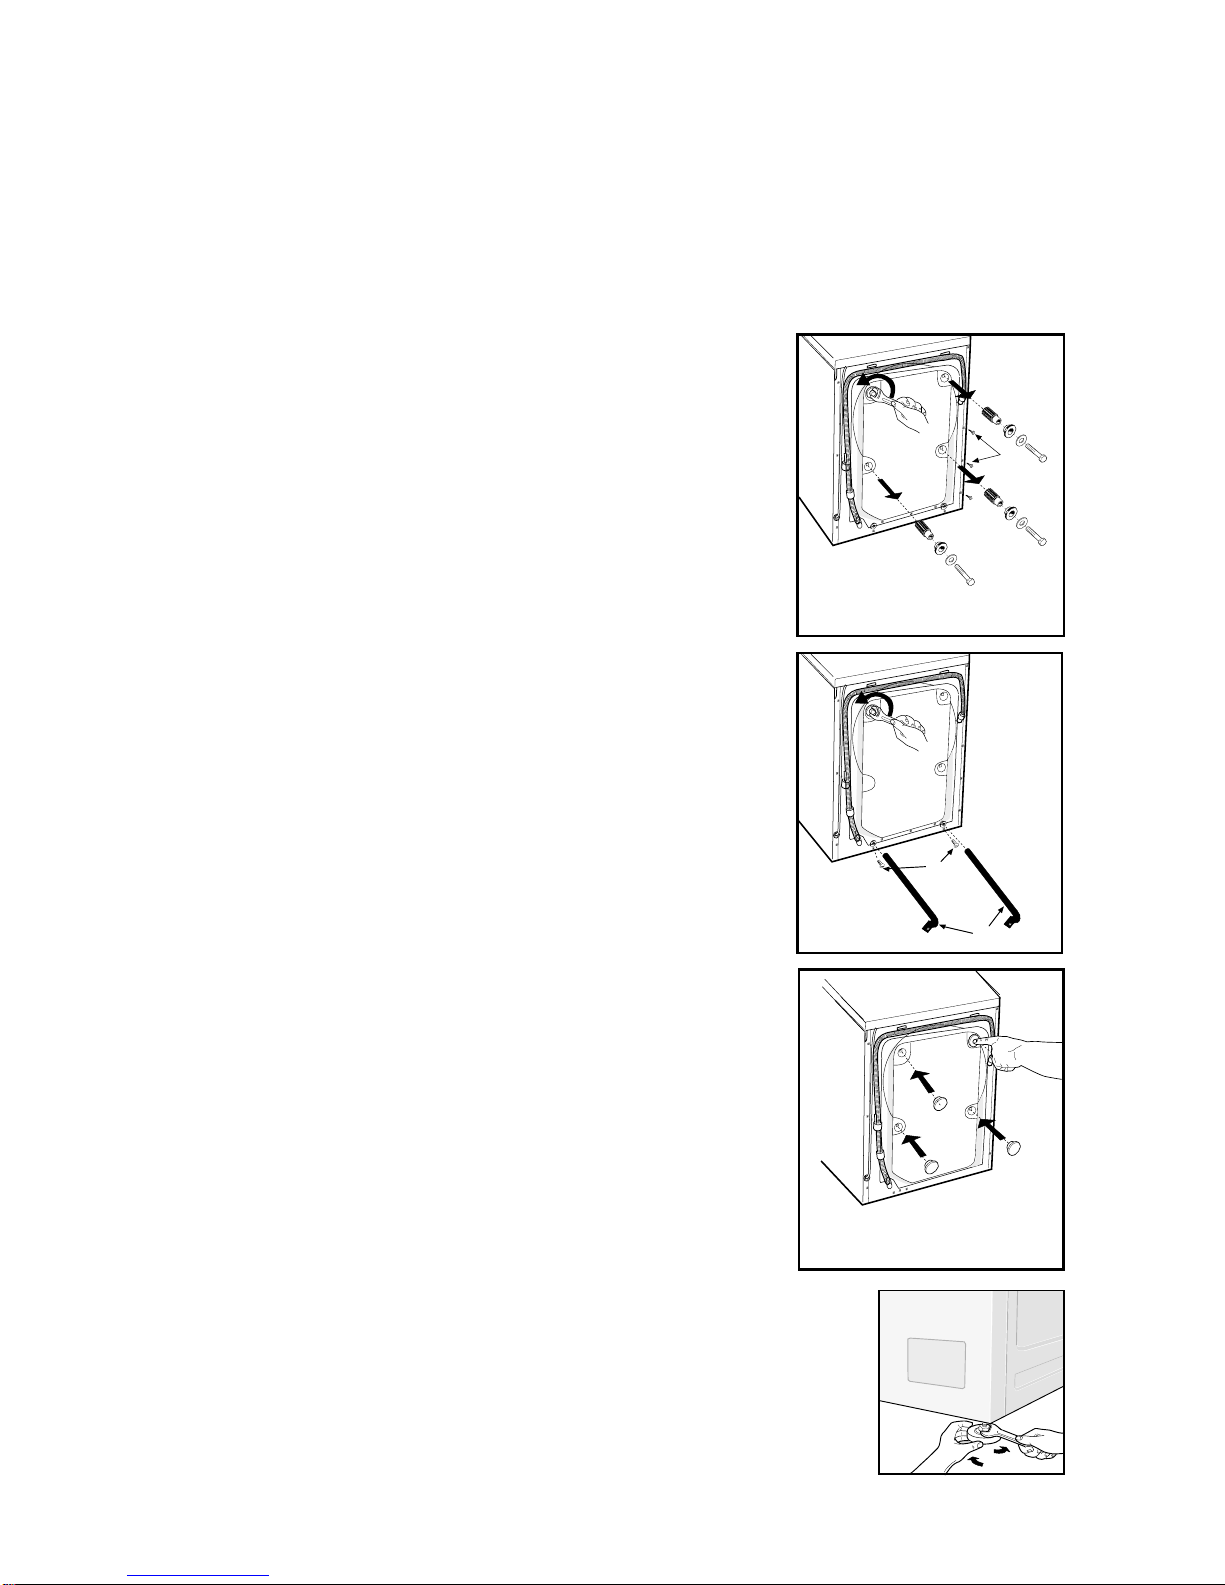
3. The drum on both models is locked in position. Loosen the four
locking bolts and remove them along with the plastic spacers
(Fig. 1).
NOTE: If the plastic spacers cannot be removed, open the side
panel by loosening the screws indicated as “V”in
Fig. 1. Remove the spacers and replace the panel.
4. Next, loosen the two locking screws (Z) and remove the two pins
(U), as illustrated in Fig. 2. Keep the bolts, screws and pins for
future use.
5. Plug the holes with the plastic plugs provided with the unit (packed
inside the drum with the documentation) (Fig. 3).
6. To level the machine, adjust the feet by screwing or unscrewing as
needed. Once the machine is level, tighten the locknuts (Fig. 4).
V
FIG. 1
FIG. 3
FIG. 4

6
ELECTRICAL CONNECTION
Check to make sure the main power supply and the outlet are appropriate to support a 110/120 V, 15 amp
single-phase circuit. The power supply voltage is indicated on the filter door on the bottom right of the
washing machine.
Grounding Instructions
This appliance must be grounded. In the case of malfunction or breakdown, grounding will reduce the risk
of electric shock by providing a path of least resistance for electric current. This appliance is equipped with
a cord having an equipment-grounding conductor and a grounding plug. The plug must be plugged into an
appropriate outlet that is properly installed and grounded in accordance with all local codes and ordinances.
WARNING!
Improper connection of the equipment-grounding conductor can result in a risk of electric
shock. Check with a qualified electrician or serviceman if you are in doubt as to whether the
appliance is properly grounded.
Do not modify the plug provided with the appliance. If it will not fit the outlet, have a proper
outlet installed by a qualified electrician.
If the power supply cord is damaged in any way please contact the dealer.
Position the appliance so that the plug can be accessed and disconnected easily in case of
emergencies.
WATER SUPPLY CONNECTION
Before making the water supply connection, allow a quantity of water to flow from
the top. The water should be clean and free from impurities, especially where the
system is new or has been left unused for a length of time.
There are two hoses provided with the machine. The hot water hose is indicated
with a red strip running the length of the hose.
Insert the filter/washer supplied (Fig. 5) before connecting the water inlet hose to
the valve. Check that the other end of the hose is tight (Fig. 5A). Turn the supply
valve on (Fig. 5B).
The drain outlet should be positioned at a height of between 23”(60 cm) and 35”
(90 cm) above the floor (Fig. 6).
NOTE: To prevent siphoning, do not seal the drain hose connection into the drain
outlet.
If the machine is not connected to a drain outlet, place the drain hose and bracket
supplied over the edge of a sink or wash basin and anchor it in place.
FIG. 5
FIG. 5A
Cold
Hot
close open
FIG. 5B
FIG.6
23.5" (60 mm) minimum
35" (90 mm) maximum
7
ENGLISH
INSTRUCTIONS FOR USING THE WASHER
1. Before placing the items in the washer, sort the laundry by type of fabric and
care label instructions (see page 8).
2. Make sure nothing is in the garment pockets to avoid damage to clothes, the
machine or the filter.
3. Close zippers and hooks to prevent snagging.
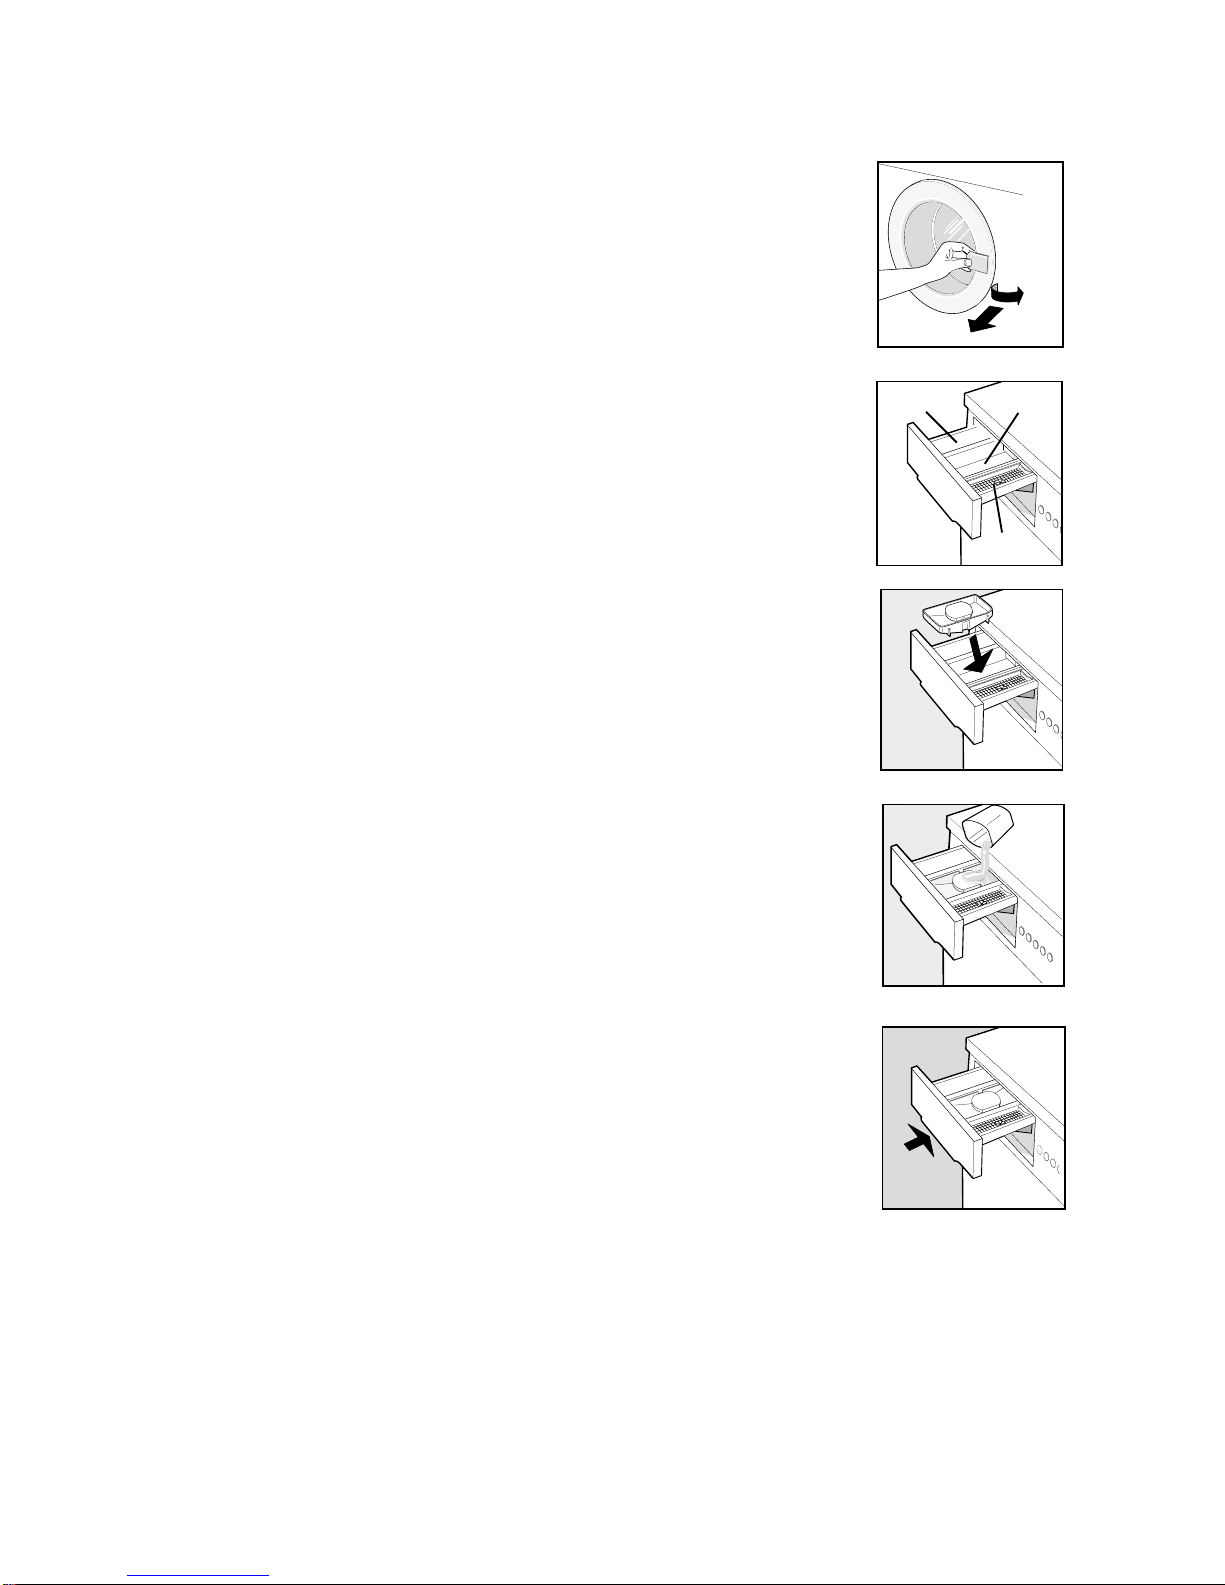
4. Open the door (Fig. 8).
5. Load the laundry and close the door securely.
6. Pour detergent and fabric softener into the appropriate compartments in the
detergent drawer (Fig. 9). Use only low sudsing detergent made for front-
loading washers and follow label instructions.
The amount of detergent varies among the different brands, but for most
detergents, you need only one or two tablespoons. Too much detergent could
leave a residue on your clothes and possibly damage the washer.
NOTE: When using a liquid detergent, insert the special container supplied
with the washer into the main wash compartment (Fig 9a). Pour the
manufacturer’s recommended dosage of liquid detergent into the container
(Fig 9b).
NOTE: Do not add detergent to the prewash compartment unless you are
usinga washprogram that has a prewashcycle; otherwise,the machine could
oversudsandspill ontothefloor. Also, donotuse liquid detergentfora prewash
program because the detergent will be washed out the back of the drawer.
NOTE: It is not recommended that you use bleach in your Eurotech washer. If
you need extra whitening, we recommend that you use a low-sudsing powder
detergent with bleach additive.
NOTE: Excessive use of fabric softener can damage garments.
7. Close the detergent drawer securely (Fig 9c).
Caution! To avoid water spillage, do not open the detergent drawer while the
machine is operating.
8. Select program options (see pages 9 and 10).
9. Turn the Temperature knob to the desired temperature (see pages 9 and 10).
10. Set the Program knob to the desired program (see pages 9 and 10).
11. Press the On button (see page 9). (The power indicator light should come on.)
NOTE: For safety reasons, there will be a two to three minute delay at the end of
the program before you can open the door.
RECOMMENDED LOAD SIZES
To reduce wrinkling, you should determine the load size based on the type(s) of
fabrics being washed.
Cotton and Linen Fabrics—These items should be washed in full loads because
the tumble action of the tub along with the gentle rubbing, lifting and falling
movement of the clothes gives the best cleaning result.
Permanent Press Fabrics—These items need more room to move freely during
washing for the most wrinkle-free results. Therefore, fill the machine only half full
for permanent press items.
Delicate Fabrics—These fabrics, such as machine washable wool and silk, should only be washed in one-
third size loads for the best results.
FIG. 8
FIG. 9
Prewash Main Wash
Fabric
Softener
FIG. 9a
FIG. 9b
FIG. 9c

8
Normal wash setting
Permanent Press or Wrinkle
Resistant setting
Gentle/Delicate setting
Hand wash only
Ironing is necessary
Do not wash
Do not wring. Hang dry,
drip dry, or dry flat
Maximum water temp
200˚F/95˚C
Gentle or Delicate setting
Normal setting
Maximum water temp
160˚F/70˚C
Maximum water temp
140˚F/60˚C
Maximum water temp
120˚F/50˚C
Maximum water temp
105˚F/40˚C
Maximum water temp
85˚F/30˚C
WASH CYCLE
WASH WATERTEMPERATURE
TUMBLE DRY CYCLE
Do not tumble dry
Any heat
TUMBLE DRY HEAT SETTING
High heat
Medium heat
Low heat
No heat/Air fluff
Do not tumble dry
Line dry or hang to dry
SPECIAL DRYING INSTRUCTIONS
Drip dry (do not spin or wring)
Dry flat
Dry in shade.
Do not bleach
Any bleach when needed
Only non-chlorine bleach
BLEACH INSTRUCTIONS
Permanent Press or Wrinkle
Resistant setting
Machine dry
IRONING INSTRUCTIONS
High temperature setting
Medium temperature setting
Low temperature setting
Do not iron or press with heat
Iron without using steam
This symbol indicates the fabric
should be dry cleaned only.
DRY CLEAN SYMBOL
Most clothes and other washable items have permanent care labels. Read these labels carefully! Care label
instructions and warnings should be followed for the best cleaning results.
The table below defines the typical symbols used on fabric care labels. (Note: Some manufacturers may use
slightly different symbols.)
CARE LABEL INSTRUCTIONS
CARE LABEL SYMBOLS
9
ENGLISH
WARM
COLD
SOAK
SPIN
HEAVY STAIN
NORMAL
R
I
N
S
E
S
R
I
N
S
E
S
R
I
N
S
E
S
REGULAR
PERMA PRESS
DELICATE
EXTRA
RINSE NO
SPIN HALF
LOAD ON
OFF
WARM
RINSE HEAVY STAIN
NORMAL
QUICK
WASH
WOOL /
HANDWASH
SPIN
HOT
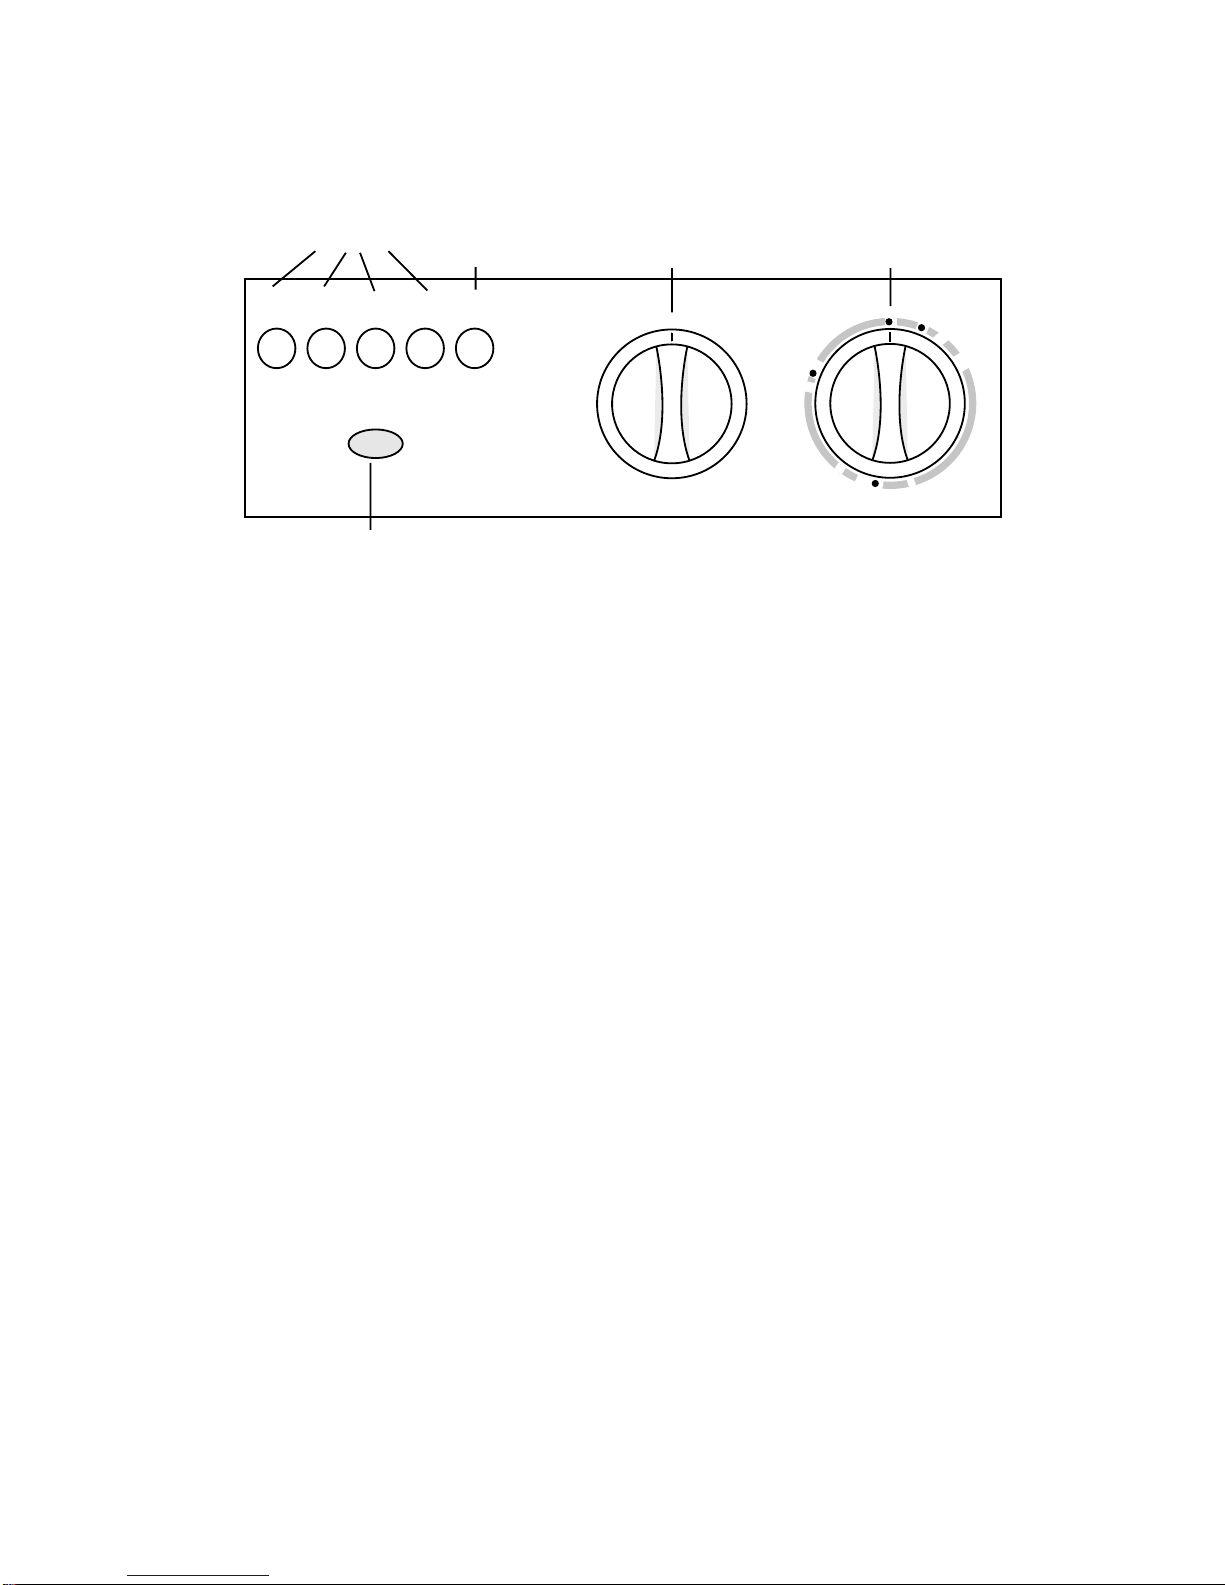
CONTROL PANEL
The control panel is simple to understand and easy to operate.
PROGRAM CONTROL KNOB
Each wash program is specifically designed to give you the cleanest laundry possible. The table on page 10
defines each program in detail, so you can determine which program is best for each type of load.
TEMPERATURE CONTROL KNOB
The Temperature Control Knob lets you select the best wash temperature for each load. The temperature
options are restricted on some of the programs (as shown in the table on page 10). For example, the Wool/
Hand Wash program is restricted to cold or warm. This is to prevent accidentally washing delicate items in
hot water.
OPTION BUTTONS
These buttons give you even more wash options. Be sure to press the option buttons before you set the
Program knob to a wash program. Each option is explained in detail below.
Warm Rinse
If you select this option, the last rinse is with warm water. This function is not available with the Wool/Hand
Wash program.
Extra Rinse
The washing machine has been set up so that water consumption is reduced to a minimum. Two or three
rinses are usually sufficient. If desired, select this button for one additional rinse. This option is not available
with the Quick Wash program.
No Spin
This option omits all of the spin cycles. Recommended for delicate fabrics that should not be spun.
Half Load
This option is designed to save water when you are only washing a small, slightly soiled load. This option is
not available with the Wool/Hand Wash program.
ON/OFF BUTTON
This button merely switches the power to the machine off and on.
POWER INDICATOR LIGHT
This light glows when the power to the machine is on.
CANCELLING A PROGRAM
To cancel a program after it has started, simply turn the Program knob to any one of the dots around the
dial.
Option
Buttons
Power Indicator Light
On/Off
Button Temperature
Control Knob Program
Control Knob
10
NOTES:
(1) For an explanation of the recommended load sizes, see page 6.
(2) Model EWF172 has a maximum 1200 rpm spin speed; Model EWF150 has a 1000 rpm maximum.
(3) When you select the Heavy Stain program with the Temperature knob on Hot, the washer heats the
water to 140°F for the main wash cycle.
(4) To reduce wrinkling, the maximum spin speed for the Permanent Press program is 800 rpm.
(5) The Wool/Hand Wash program has a 500 rpm spin speed to eliminate stress on delicate fabrics.
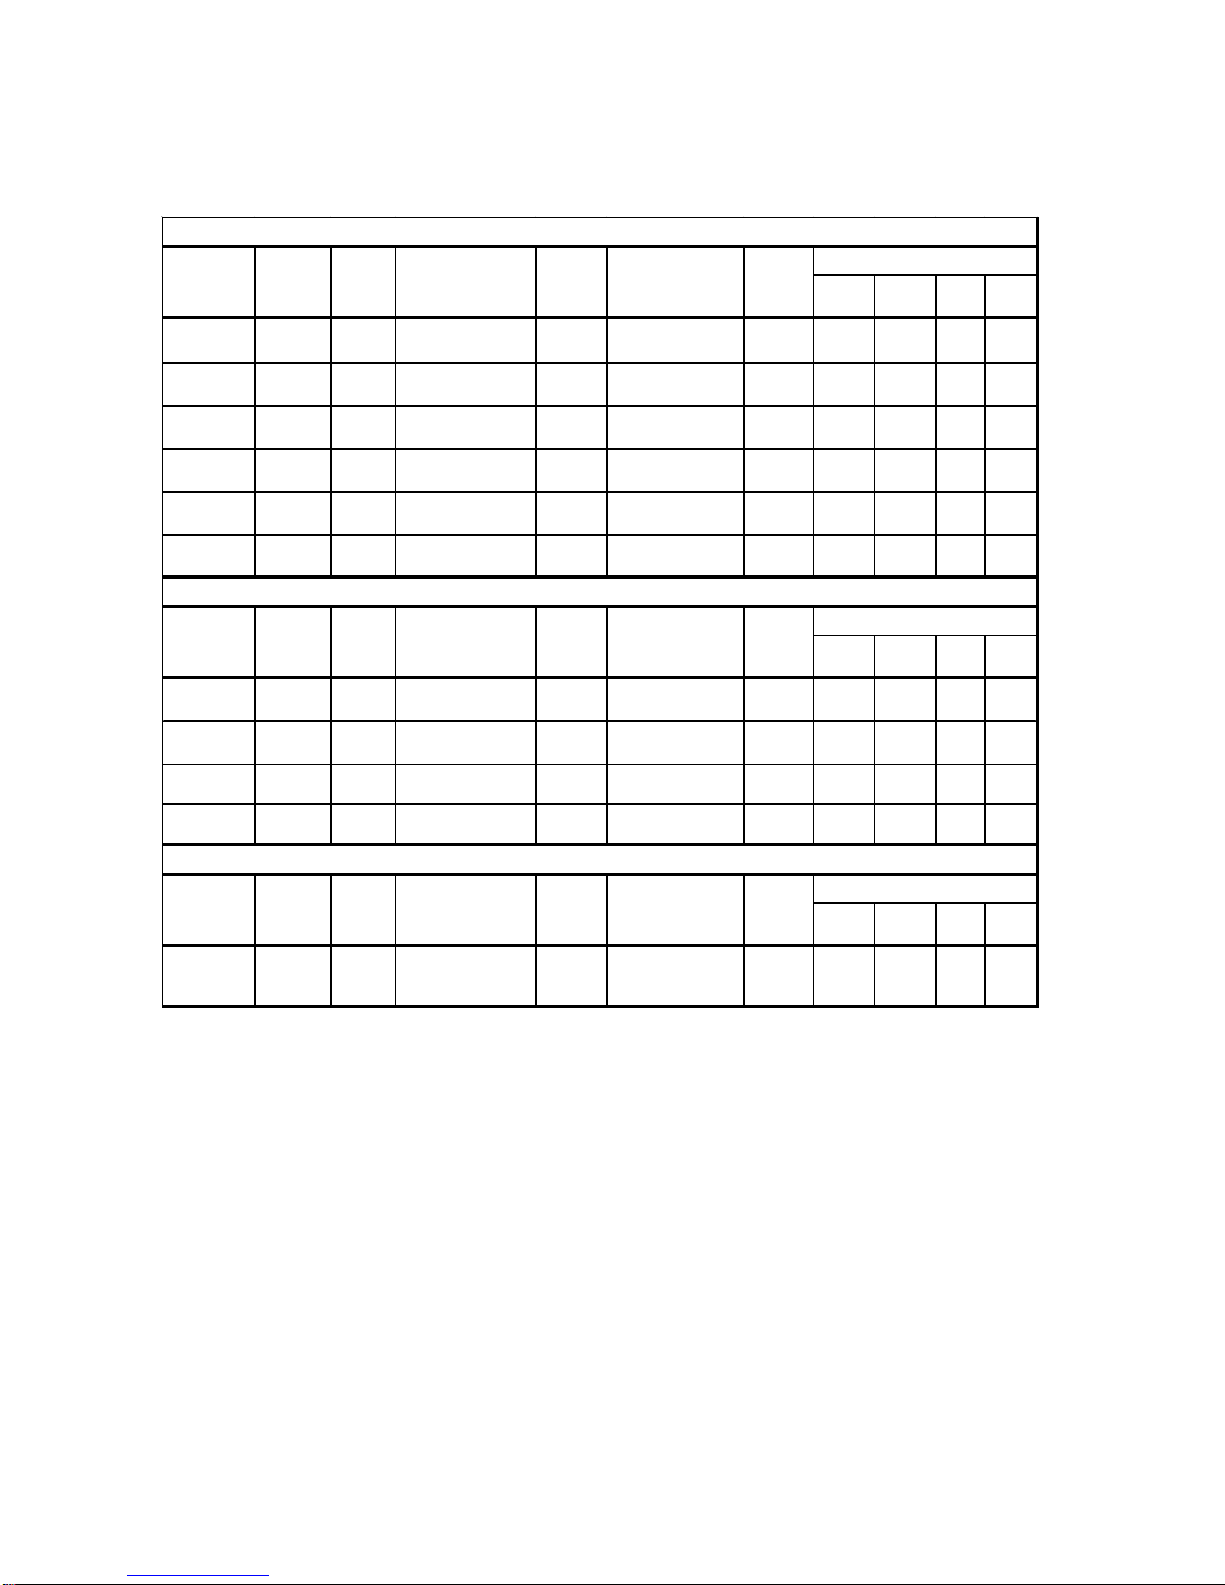
WASHER PROGRAMS
The table below defines each program in detail to help you determine which program is best for each type
of load.
Warm
Rinse Extra
Rinse No
Spin Half-
load
S oak Col d Heavy Any F ull 5-mi nute pre-s oak,
drain, no s pin n/a No No No Yes
Heavy S tain
(Note3) Any Heavy Cottons,Linens Full Longmainwash,3
rinses,drain&spin 1200 Yes Yes Yes Yes
Normal Any Normal Cottons,Linens,
Blends,Synthetics Full Mainwash,3
rinses,drain&spin 1200 Yes Yes Yes Yes
Quick was h Coldor
Warm Light Cottons,Linens,
Blends,Synthetics Full Shortmainwash,2
rinses,drain&spin 1200 Yes No Yes Yes
R ins e Cold Light Cottons , Linens ,
Blends,Synthetics Full 3rinses,drain&
spin 1200 Yes Yes Yes Yes
S pin n/a n/a Cottons , Linens ,
Blends,Synthetics Full Drainandspin 1200 n/a n/a n/a n/a
Warm
Rinse Extra
Rinse No
Spin Half-
load
Heavy S tain
(Note3) Any Heavy Cottons,Linens,
Blends,Synthetics Half Longmainwash,2
rinses,drain&spin 800 Yes Yes Yes Yes
Normal Any Heavy Cottons,Linens,
Blends,Synthetics Half Mainwash,2
rinses,drain&spin 800 Yes Yes Yes Yes
R ins e Cold Light Cottons , Linens ,
Blends,Synthetics Half Rins e, drain, gentle
spin 800 Yes No Yes Yes
S pin n/a n/a Cottons , Linens ,
Blends,Synthetics Half Drainandgentle
spin 800 n/a n/a n/a n/a
Warm
Rinse Extra
Rinse No
Spin Half-
load
Wool/Hand
Was h Coldor
Warm Light Machine-was hable
wool andsilk,nylon One-third High-water level
was h, 2 r i ns es ,
drain,gentlespin
500 No Yes Yes No
L oad
Size
(Note1) Program
Description
Spin
S peed
(Note2)
Options Available
Program Temp
Options Soil
L evel F abrics
L oad
Size
(Note1) Program
Description
Spin
S peed
(Note2)
Options Available
F abrics
Program Temp
Options Soil
L evel F abrics
Options Available
REGULAR
PERMA PRESS
DELICATE
L oad
Size
(Note1) Program
Description
Spin
S peed
(Note2)
Program Temp
Options Soil
Level
11
ENGLISH
CARE AND MAINTENANCE
The washing machine does not require special care; however, to best ensure a long life, certain precautions
are recommended (see page 3).
WARNING! Before performing the operations described below, make sure that the power is off and
the unit is unplugged.
CLEANING THE DETERGENT DRAWER
The drawer should be cleaned periodically with a damp, slightly soapy cloth.
CAUTION: Neverclean the door with cleaning solvents orabrasivecleansers.
You could damage the finish.
You can remove the drawer completely by pressing on the plastic part of the
softener compartment marked “PUSH”(Fig. 10). Clean the drawer with a soft
brush under warm running water.
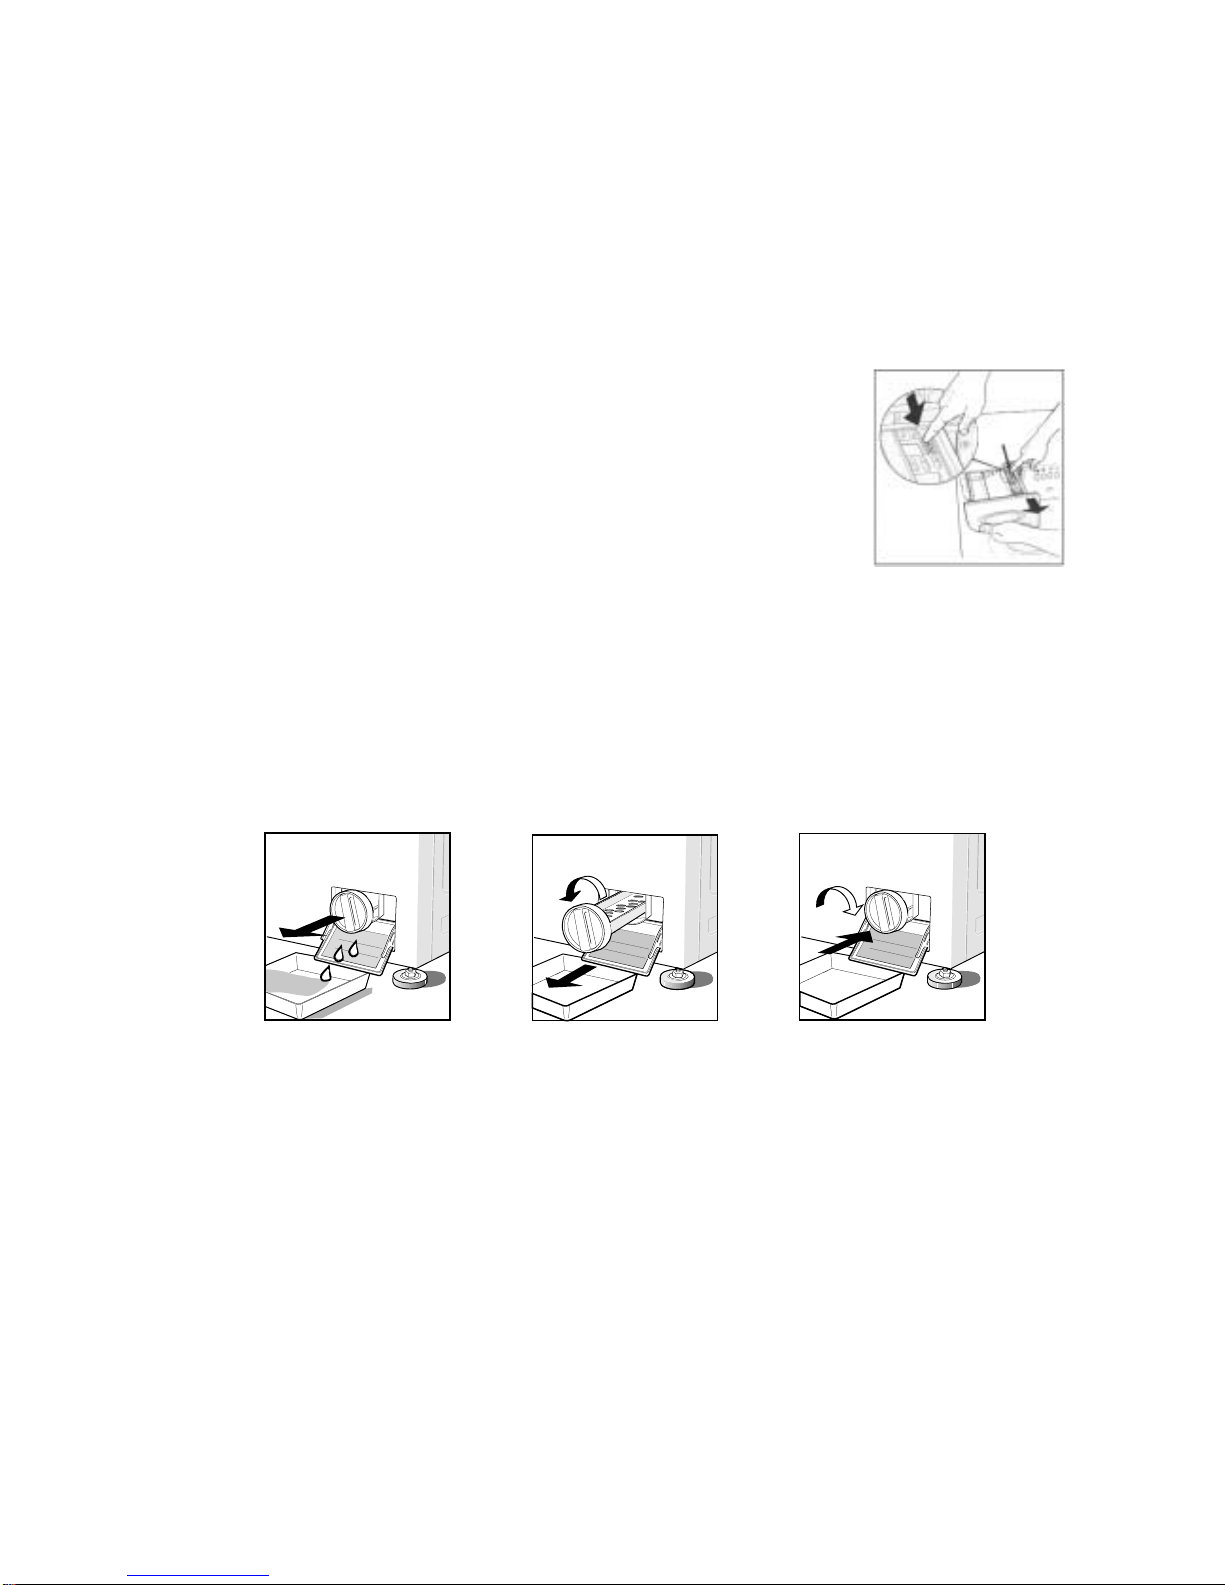
CLEANING THE LINT FILTER
The lint filter should be cleaned about once a month. Make sure the washer has drained before opening the
filter door.
1. Place a pan or towel under the filter door (Fig. 11), since a small amount of water could spill.
2. Remove the filter by turning it a half turn counterclockwise and pulling outwards (Fig. 12).
3. Clean the filter with a soft brush under running water until all residue is removed.
4. Replace the filter and turn it clockwise until it is securely locked in place (Fig. 13). Give the cap a gentle
tug to confirm that the filter is in securely.
CLEANING THE CONTROL PANEL
To clean the control panel, use only a warm, damp cloth. To prevent penetration of liquid into the door lock
and electrical components, never spray water or cleaning solvents on the control panel. Also, never
use abrasive cleaners or scouring pads on the outer surfaces because they will scratch the finish and could
remove the writing on the control panel. Some paper towels may also scratch the finish.
FIG. 10
FIG. 11
FIG. 12
FIG. 13

12
Most items can be safely washed in a Eurotech washing machine. We recommend that you follow the care
label instructions as closely as possible for the best cleaning results. Should problems occur, some possible
causes and suggested solutions are listed below.
NOTE: Eurotech has no control over what is put in our appliances once installed in a customer’s home. You
are solely responsible for what you wash in your Eurotech washing machine.
COMMON LAUNDRY PROBLEMS
You may need to add slightly more detergent if clothes are heavily
soiled, have oily stains, or if your water is very hard.
Select a hotter temperature setting for each type of load.
Be sure to add a prewash and/or presoak for heavily soiled or oily
items.
Once wet, the clothes must have room to tumble freely, especially
synthetics and permanent press.
Be sure you use a laundry detergent, not a “soap.”Soap reacts with
the minerals in hard water to form a soap curd, which can be
deposited on clothes.
Problem Possible Cause Suggested Solution
Graying Not enough detergent
Water not hot enough
Improperly prewashed or
presoaked
Washer overload
Soap used in hard water
areas
Separate clothes that shed lint (chenille and terrycloth) from clothes
that attract lint (synthetics, corduroy, velveteen).
Non-phosphate detergents can combine with minerals in hard water
and form a residue which can appear to be lint. Use a low phosphate
detergent. If possible, install a water softener.
Read labels. Most softeners should only be used in the final rinse.
Addsoftenertothe softener compartment. If addedtothewash cycle,
softeners can have a reaction with detergents, producing a white
residue.
Pilling, which can look like lint, is produced by normal wear on cotton/
polyester blend fabrics. To reduce pilling, wash these fabrics inside
out. For the best results, wash in the delicate cycle.
Lint or residue
left on clothes Improper sorting of clothes
Non-phosphate detergent
Fabric softener used
improperly
Pilling
Add slightly more detergent.
Use the hottest recommended temperature for each type of load.
If possible, install a water filter. A small amount of Calgon or other
type of water conditioner added once a week is advisable in hard
water areas.
Yellowing Not enough detergent
Water not hot enough
Iron or manganese in
water
Follow garment care label instructions carefully (see page 7). Some
fabrics will shrink no matter how they are washed. Some may be
machine washed but not machine dried.
Shrinkage Improper washing or
drying
Knits tend to shrink more than woven fabrics. If a knit has been
heat-shaped, wash in cool or warm water. Dry with the low setting.
This can occur when special stabilizing finishes are reduced from
wear or repeated washings. Garment may sometimes be reshaped
by pressing after washing and drying.
Shrinkage can occur if the knit fabric was not stretched properly by
the manufacturer. Press back into shape each time garment is
washed and dried.
Knit shrinkage Overheating
Delayed or gradual
shrinkage
Poor construction
Dark clothes, especially cottons, can bleed excess dyes into wash
water. White or light-colored clothes can absorb the dye and discolor.
Separate light items from dark items.
Always empty all pockets before washing.
Cool or cold water is best for retaining dark or bright colors.
Fading and
discoloring Improper sorting
Crayons or pens in pockets
Water too hot
Protein stains, such as milk, egg, blood and soy formula should be
removed in cold water. Oily stains should be washed in the hottest
water recommended for each fabric type.
The longer a stain remains on a fabric, the harder it is to remove.
Treat stains promptly. Do not set stains by machine drying or ironing
fabrics until stains are completely removed.
Stains Incorrect water
temperature
Old stains

13
ENGLISH
COMMON LAUNDRY PROBLEMS (cont’d)
Problem Possible Cause
Empty all pockets and turn inside out before laundering.
Fasten all hooks, snaps, and zippers before laundering to avoid snags.
Remove sharp buckles. Turn knits inside out.
Before washing, rinse harsh chemicals (such as battery acid, hair care
chemicals, cleaning solutions, etc.) from towels and other articles to
avoid holes in fabrics. Do not allow these unrinsed items to contact
other fabrics.
Mend all garments before laundering to prevent enlarging of rips.
These items may fray at edges from normal wear, not the washer.
Wash only in half loads and don’t wash in the same load with heavy
items, such as towels or jeans.
Rips, snags,
excess wear Sharp objects in pockets
Hooks, snaps, zippers,
buckles
Harsh chemicals
Existing rips and tears
Permanent press items
Permanent press items should be washed in half-loads to prevent
wrinkling. If possible, use a slower spin speed.
Use lower wash temperature settings.
Excessive
wrinkling Machine too full
Water too hot

14
TROUBLESHOOTING
Before calling for technical assistance, check that the operations described below have been carried out
correctly; this will save both time and money.
Does not work/Indicator light is not lit
Check that:
1) The On/Off button is pressed in.
2) The plug is correctly inserted in the socket.
3) The main power supply is on.
Indicator light is on but unit does not work
Check that:
1) The door is closed securely.
2) The On/Off button is pressed in.
3) The programmer knob is on a program.
4) The plug is correctly inserted in the socket.
5) The main power supply is on.
6) See “Does not fill with water”below.
Does not fill with water
Check that:
1) There is water in the pipes.
2) The tap to the water source is open.
3) The water supply hose is not kinked.
4) The inlet filter between the valve and water feed hose is clean (see page 6).
Fills and drains continuously
Check that:
1) The drain hose is positioned at the correct height (see page 6).
2) If connected to a sink, the drain hose outlet is not under water.
Does not drain and spin
Check that:
1) The No Spin button is not pressed in.
2) The drain hose is in the correct position.
3) The drain hose is not kinked.
4) The amount of detergent is not excessive.
5) The detergent dispenser is not encrusted with residue.
6) The detergent is low-sudsing specifically for front-loading washers.
Vibrates and is noisy
Check that:
1) Large items have not become entangled (sheets, tablecloths, etc.).
2) The washing machine is level (see page 4).
3) The four packing screws, spacers and two lower rods have been removed (see page 4).
The door will not open
1) For safety reasons, the door remains locked for two to three minutes after the program has finished.
If you think you have resolved the problem, try starting the machine again. If the problem persists, call for
technical assistance (see page 15).
BEFORE CALLING FOR SERVICE
Before calling for service or contacting AM Appliance Group regarding a warranty issue, be prepared to
explain:
1) The washer model number (shown on the detergent dispenser)
2) The serial number of the machine (located on the inner door facing)
3) The specific problem
15
ENGLISH
MODELS EWF150 AND EWF172
Be sure to complete the Warranty Registration Card you received with your appliance and mail it to
AM Appliance Group to validate your appliance warranty.
Cosmetic damage must be reported to your dealer within five days from the date of purchase. After
unpacking the washer, thoroughly check the unit for cosmetic damage.
AM APPLIANCE GROUP WILL NOT PAY FOR:
A. Service calls to:
1. Correct the installation of the appliance.
2. Repair damage due to shipment, delivery, installation, misuse or abuse.
3. Instruct how to use the appliance.
4. Replace house fuses or correct house wiring.
5. Correct house plumbing, including drainage problems related to improper installation.
6. Clean or service air device in drain line.
B. Repair and/orreplacement parts forfailure of productif applianceisused forother than home/residential
use.
C. Damage resulting fromaccident,fire, floods, actsofGod, alteration, misuse,abuse,improper installation,
or installation not in accordance with local electrical or plumbing codes.
D. Any shipping costs for parts during the limited warranty period.
E. Replacement parts or repair labor costs for units operated outside the continental United States.
F. Pickup and delivery. Eurotech appliances are designed to be repaired in the home.
FOR RESIDENTIAL INSTALLATIONS ONLY
One-Year Full
From date of purchase.
LENGTH OF WARRANTY
Ninety-Nine Year Li ited
IN NO EVENT SHALL AM APPLIANCE GROUP BE RESPONSIBLE
FOR ANY INCIDENTAL OR CONSEQUENTIAL DAMAGES.
Somestateswill notallowthe exclusion orlimitationof incidental orconsequentialdamages, so thisexclusion
or limitation may not apply to you. This warranty gives you specific legal rights and you may also have other
rights which vary from state to state.
For warranty service, contact the dealer from whom you purchased the unit or an authorized Eurotech
service agent. Service will be provided during normal business hours. Should you have a service problem
that cannot be resolved locally, contact AM Appliance Group at the numbers listed below. Before calling for
service or contacting AM Appliance Group regarding a warranty issue, make a note of the model, type
name, and serial number (located on the inner door facing).
Eurotech replacement parts (labor costs not included) for the stainless
steel inner or outer drum if either fails to hold water due to a
manufacturing defect, such as rusting or cracking. Service must be
provided by an authorized Eurotech service agent.
Eurotech replacement parts and/or repair labor to correct defect in
materialsor workmanship.Service must be provided byan authorized
Eurotech service agent.
Write to us at:
AM Appliance Group
P. O. Box 851805
Richardson, Texas 75085-1805
Or call our
Customer Service Center at
800-898-1879 or 972-238-0794
Two-Year Li ited
From date of purchase. Eurotech replacement parts (labor costs not included) for all parts due
to defect in materials or wormkanship. Service must be provided by
an authorized Eurotech service agent.
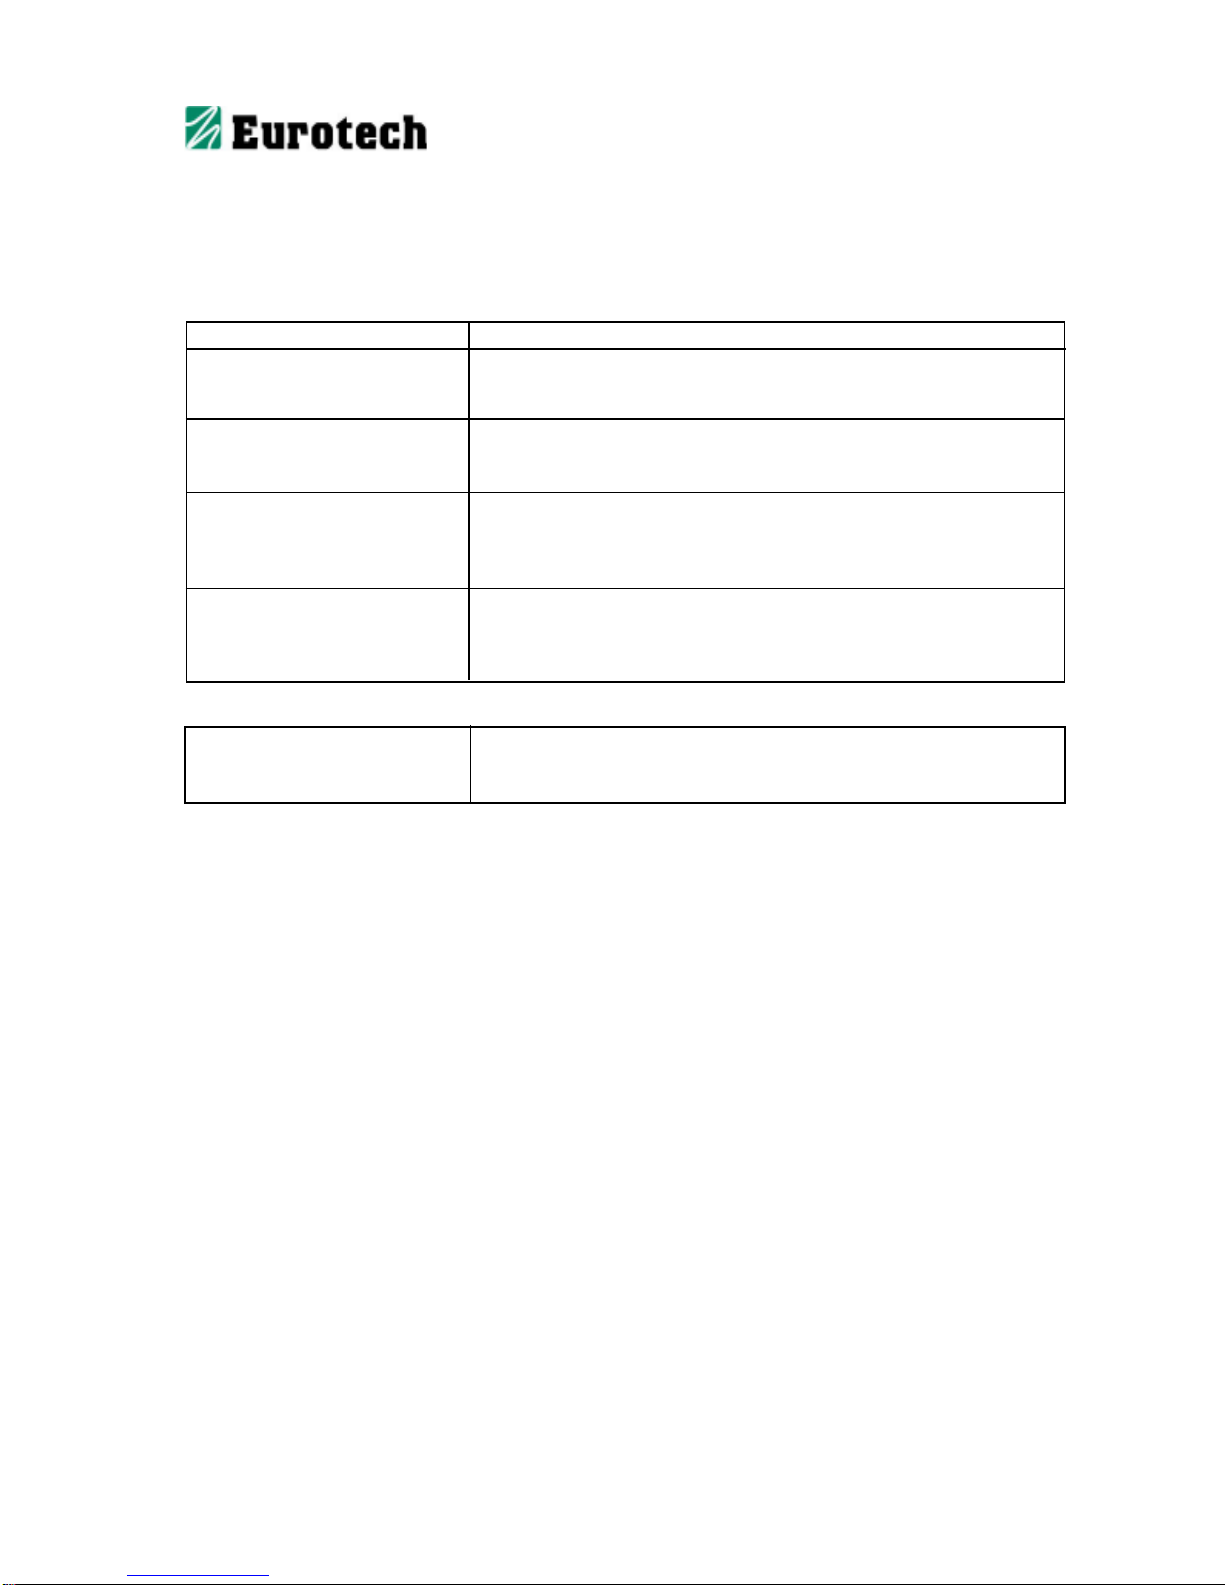
PRODUCT WARRANTY
AM APPLIANCE GROUP WILL PAY FOR:
Five-Year Li ited
From date of purchase. Eurotechreplacement parts (laborcostsnot included)forany defective
solid-statecontrols,timers, motors, orpumps.Replacementof cabinets
that may have rusted through. Service must be provided by an
authorized Eurotech service agent.
FOR NON-RESIDEN IAL INS ALLA IONS
Six-Month Full Warranty
From date of purchase. Eurotech replacement parts and/or repair labor to correct defect in
materials or workmanship. Service must be provided by an authorized
Eurotech service agent.
16
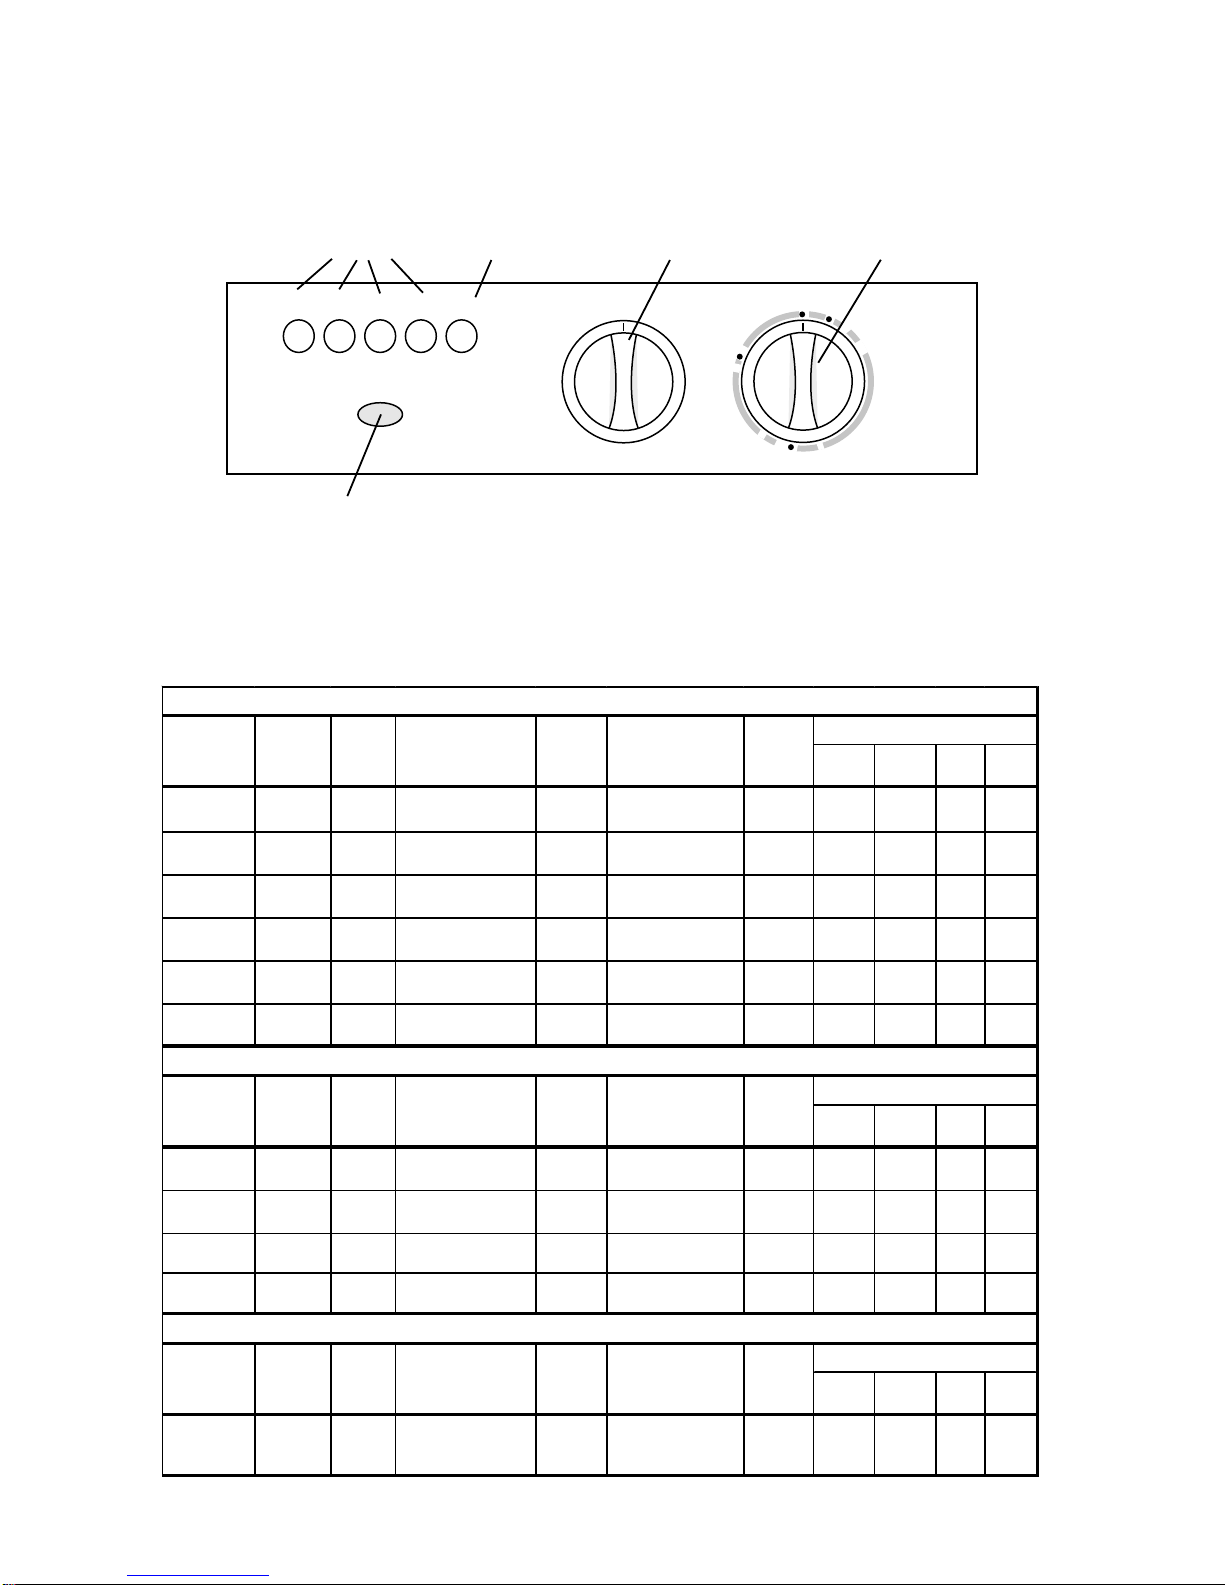
QUICK REFERENCE GUIDE
(Refer to pages 7–10 for detailed operating instructions.)
WARM
COLD
SOAK
SPIN
HEAVY STAIN
NORMAL
R
I
N
S
E
S
R
I
N
S
E
S
R
I
N
S
E
S
REGULAR
PERMA PRESS
DELICATE
EXTRA
RINSE NO
SPIN HALF
LOAD ON
OFF
WARM
RINSE HEAVY STAIN
NORMAL
QUICK
WASH
WOOL /
HANDWASH
SPIN
HOT
Option
Buttons
Power Indicator Light
On/Off
Button Temperature
Control Knob Program Control
Knob
WASHER PROGRAMS
The table below defines each program in detail to help you determine which program is best for each type
of load.
Warm
Rinse Extra
Rinse No
Spin Half-
load
S oak Col d Heavy Any F ull 5-mi nute pr e-s oak,
drain, no s pin n/a No No No Yes
Heavy S tain
(Note3) Any Heavy Cottons,Linens Full Longmainwash,3
rinses,drain&spin 1200 Yes Yes Yes Yes
Normal Any Normal Cottons,Linens,
Blends,Synthetics Full Mainwash,3
rinses,drain&spin 1200 Yes Yes Yes Yes
Quick was h Coldor
Warm Light Cottons,Linens,
Blends,Synthetics Full Shortmainwash,2
rinses,drain&spin 1200 Yes No Yes Yes
R ins e Cold Light Cottons , Linens ,
Blends,Synthetics Full 3rinses,drain&
spin 1200 Yes Yes Yes Yes
S pin n/a n/a Cottons , Linens ,
Blends,Synthetics Full Drainandspin 1200 n/a n/a n/a n/a
Warm
Rinse Extra
Rinse No
Spin Half-
load
Heavy S tain
(Note3) Any Heavy Cottons,Linens,
Blends,Synthetics Half Longmainwash,2
rinses,drain&spin 800 Yes Yes Yes Yes
Normal Any Heavy Cottons,Linens,
Blends,Synthetics Half Mainwash,2
rinses,drain&spin 800 Yes Yes Yes Yes
R ins e Cold Light Cottons , Linens ,
Blends,Synthetics Half Rins e, drain, gentle
spin 800 Yes No Yes Yes
S pin n/a n/a Cottons , Linens ,
Blends,Synthetics Half Drainandgentle
spin 800 n/a n/a n/a n/a
Warm
Rinse Extra
Rinse No
Spin Half-
load
Wool/Hand
Was h Coldor
Warm Light Machine-was hable
wool andsilk,nylon One-third High-water level
was h, 2 r i ns es ,
drain,gentlespin
500 No Yes Yes No
L oad
Size
(Note1) Program
Description
Spin
S peed
(Note2)
Options Available
Program Temp
Options Soil
L evel F abrics
L oad
Size
(Note1) Program
Description
Spin
S peed
(Note2)
Options Available
F abrics
Program Temp
Options Soil
L evel F abrics
Options Available
REGULAR
PERMA PRESS
DELICATE
L oad
Size
(Note1) Program
Description
Spin
S peed
(Note2)
Program Temp
Options Soil
Level
This manual suits for next models
1
Table of contents
Other Eurotech Washer manuals


Popular Washer manuals by other brands


Bauknecht
Bauknecht TRPC 86531 Instructions for use

Electrolux
Electrolux EWF934 EWF734 Instruction booklet

Haier
Haier HW80-B1239N user manual

ROSIERES
ROSIERES RILL 100 H/C User instructions

Indesit
Indesit IWE 61051 Instructions for use

Alliance Laundry Systems
Alliance Laundry Systems Frontload Washer user guide


