forest river Starcraft Bus User manual

Maintenance Manual
TABLE OF CONTENTS
Sections Pages
Chapter 1 – Chassis & Frame 2 – 3
Chapter 2 – Exterior 3 – 5
Chapter 3 – Systems 5 – 8
Chapter 4 – Interior 8 – 9
Chapter 5 – Wheelchair Lift 9 – 11
Chapter 6 – Wheelchair Tie Downs 11 – 12
Chapter 7 – Entry Doors 12 – 13
Chapter 8 – Emergency Exit / Escape Hatch 13 – 14
Chapter 9 – Child Checkmate System 15
Customer Bus Information 16
Helpful Contacts 16
MAINTENANCE MANUAL
This booklet has been designed and written to supply information regarding
maintenance requirements for all makes and models built by Starcraft Bus.
As the owner of a new Starcraft Bus product, it is important to recognize the
importance of performing routine maintenance during the warranty period.
Just like oil changes, if proper maintenance is not performed, the warranty
coverage can be denied.
Familiarizing yourself with this manual will help you make sure that proper
maintenance is performed. Please remember, routine maintenance is not
covered by warranty.
With proper and scheduled maintenance on your Starcraft Bus, we believe
you will enjoy your Starcraft Bus for many years to come.
FLASH DRIVE
In an effort to provide our dealers and end user customers with the most
current and up-to-date information on your bus, Starcraft Bus has provided
you with a ash drive. This ash drive contains a large amount of important
information regarding your specic vehicle. Please take time to review the
material housed on the drive.
You will nd this ash drive in a small manila folder within your new bus
packet.
The information provided in this maintenance manual is neither
intended to nor should it be used to replace the chassis
and other component manufacturers’ service,
warranty and care information.
IMPORTANT:
CONTACT YOUR SELLING DEALER PRIOR TO HAVING ANY
WARRANTY WORK PERFORMED ON YOUR BUS.

CHAPTER 1 – CHASSIS AND FRAME
Axles, Bearings, Brakes and Hubs
• Verify that all linkages, cables, levers, and clevis points under the vehicle
are covered with grease to prevent rust.
• Move trucks at least 25 feet every 15 days to lubricate working parts and
prevent corrosion.
• *For more information please refer to your Ford, GM, or International
Owner’s and maintenance manuals that came with your bus.
CHAPTER 2 – EXTERIOR
Metal
• Aluminum skin is painted and prepared by Starcraft Bus with an automo-
tive paint nish. To clean, use a mild detergent soap and water.
• Use an automotive type wax or polish; same as you may use on your
personal vehicle. By waxing your bus once a year, it retains its nice, new
appearance.
Fiberglass – Gel Coat
• Fiberglass skin is painted and prepared by Starcraft Bus with an automo-
tive paint nish. To clean, use a mild detergent and warm water using a
soft brush or rag.
• Use an automotive type wax or polish; same as you may use on your
personal vehicle. By waxing your bus once a year, it retains its nice, new
appearance.
TPO / ABS
• TPO / ABS can come in a wide range of textures and colors. It is a strong
plastic compound (ABS) or rubber compound (TPO) commonly used
for molded articles within the manufacturing industry and is used for a
wide range of production components inside and outside of your Starcraft
Bus. The most common exterior components are fender ares on your
Starcraft commercial shuttle bus.
• TPO / ABS components are lightweight and strong,however the surface is
not as hard as berglass and can scratch easily.
• The proper care, cleaning and maintenance of your TPO and ABS
components is quite simple because of the basic properties and longevity
of the material itself.
• Periodic cleaning is the primary maintenance. Starcraft Bus suggests
using Murphy’s Oil Soap with a soft nylon brush or sponge. DO NOT USE
solid or granulated cleaners, as they will mar the natural nish.
Page 3
CHAPTER 1 – CHASSIS AND FRAME
Your Starcraft Bus vehicle is designed to be as maintenance free as
possible. However, all vehicles require some care to reduce the possibility
of unwanted breakdowns during travel. Maintenance to your bus may not
seem necessary at the time of purchase, yet it is very important to keep
your bus in its best condition for your enjoyment and use. Normal mainte-
nance is required to maintain warranty coverage, reduce wear, and prolong
the life of your bus.
Engine
• Start the engine every 15 days.
• Run it at fast idle until it reaches normal operating temperature.
• Shift the transmission into all gears while engine is running.
Fuel System
• Regularly move vehicles short distances to mix fuel anti-oxidation agents.
• For vehicles being stored for prolonged periods, a commercial gasoline or
diesel fuel stabilizer should be used.
• *For more information please refer to your Ford, GM, or International
Owner’s and Maintenance Manuals that came with your bus.
Tires & Wheels
• Tires installed on your bus are matched to the weight of your vehicle
according to the rating of the tires. The most important item in tires is
to inspect and check air pressure no less than once per week, perhaps
daily during travel. Correct PSI air pressure is listed on each tire as per
rating (shown on data sticker on the driver side door jamb). When air
pressure is not maintained as specied, tires will run hot, especially in
summer months and blow outs can occur. Pressure must always be
checked when tires are cold, preferably in the morning. DO NOT adjust
or lower tire pressure when warm, as it will be too low when cool. All tire
pressures rise when tires are moving on roadway. A tire is considered
“cold” after 3 hours of not moving. Again, please refer to your Ford, GM, or
International Owner’s and Maintenance Manual for torque specications,
cleaning procedures, etc.
• Alignments are NOT performed by Starcraft Bus. Please conrm with your
selling dealer to determine if an alignment has been completed on your
Starcraft Bus (alignments are not a warrantable expense with Starcraft
Bus).
Page 2
Page 1

CHAPTER 2 – EXTERIOR
• Corner and roof extrusions have “putty tape” sealant between the
components. This material can and will also dry and/or crack from
weather elements, permitting leakage and eventually major deterioration.
Starcraft Bus advises the owner to have these extrusions removed, and
have the old putty tape replaced with new sealant material every ve
years.
• Windows, entrance doors, and cargo doors (but not limited to) may also
use a closed cell foam seal. The seal may also deteriorate over time,
lose its memory, shrink with weather conditions, etc., over a period of ve
years.
• All sealants must be maintained to prevent failure plus leakage damage.
For best results, sealant requirements are:
- Resistant to checking
- Resistant to shrinking
- Dries rapidly
- Adheres to metal, TPO, and berglass
- Expands and contracts with temperature changes
- Color should match
- For suggested sealants, please contact your Starcraft Bus
servicing dealer.
• AT LEAST THREE TIMES PER YEAR, INSPECT ALL ROOF SEAMS;
FRONT, REAR AND ALL AROUND VENTS AND ATTACHMENTS.
Remove any loose sealant and reseal these areas. For a list of recom-
mended sealants, please contact our authorized Starcraft Bus dealer.
FAILURE TO INSPECT AND CORRECT CAN VOID THE WARRANTY
COVERAGE, CLASSIFIED AS NEGLIGENCE.
CHAPTER 3 – SYSTEMS
Batteries
• As a manufacturer, we suggest you have your bus inspected each spring
to check for any loose wires and/or loose connections in the load center
and have tightened if loose. Also, have the fuses inspected for continuity
and operation.
• Maintaining the state-of-charge while vehicles are in storage or not being
used is the bus owner’s responsibility.
Page 5
CHAPTER 2 – EXTERIOR
• Do not use Armor All or other oil solvent base cleaners on your TPO or
ABS components as they will leave a slick surface.
• A good thorough cleaning should keep your TPO and ABS components
looking good and remove most stains. For more stubborn stains, you
should contact your Starcraft Bus authorized dealer.
• DO NOT use citrus based cleaners on ABS materials. The ABS will break
down and become brittle.
Exterior Roof
• To clean, use a mild detergent and warm water using a soft brush or rag.
• Use an automotive type wax or polish; same as you may use on your
personal vehicle. By waxing your bus once a year, it retains its nice, new
appearance.
Underbody
• Most individuals are aware of the effects that prolonged exposure to
salt and ice melting chemicals have and the adverse effects on any
coated metal surfaces, our chassis are no exception. The effects of these
corrosives are magnied with time and therefore should be removed
from the chassis as soon as possible after a unit has been on the road.
• Washing the frame is especially important during the winter driving
season. The danger of exposure to road chemicals is not limited to only
the northern snow states. Many southern states use salt and ice melt
solutions as well, and any vehicle which originates from a northern state
has potential exposure.
Extrusions and Vents
• All components installed on the exterior of your bus have some type or
form of “putty/foam tape” placed between the mounting ange or surface
to guard against water entry and leakage.
• Additional sealant, referred to as “cap seal” is used to protect along the
edges of extrusions or be a secondary surface sealant. All of these seal-
ants are subject to weather elements such as UV rays from the sun, rain,
snow, cold, heat, air pollution, frost and other exposures causing dry-out,
shrinkage and possible cracking.
• Cap seal must be examined each year, preferably each spring and fall, for
looseness, cracking, and separation from any attached surface. If upon
inspection you nd the above conditions, repairs must be made. These
conditions will permit water to enter slowly and eventually cause water
damage.
Page 4

CHAPTER 3 – SYSTEMS
• USE EXTREME CAUTION AROUND ENGINE COMPARTMENT AND
ANY OTHER MOVING PARTS. HAVE SYSTEM MAINTENANCE AND
SERVICE PERFORMED BY A QUALIFIED TECHNICIAN.
• For the below information, refer to the illustration on Page 6.
1 = Charge Level / Pressure
• Recharging MUST be done by a QUALIFIED TECHNICIAN.
2 = Evaporator Filters
• A properly maintained, clean lter maximizes air ow and system
performance.
• Filters should be inspected visually every month and cleaned/replaced as
needed.
2 = Evaporator Coil(s)
• A properly maintained, clean evaporator coil will ensure maximum heat
transfer and system performance.
2 = Evaporator Blower(s)
• Proper air ow across evaporator coil allows for efcient heat transfer.
Be sure to check to make sure all blowers are actually operating.
3 = Evaporator Drain Line(s)
• Prevents water from collecting in the evaporator drain pan. On a hot
humid day the evaporator should drip water under the vehicle.
4 = Sight Glass / Moisture Indicator(s)
• Deep Green OR Purple = Absence of Moisture.
• Yellow OR Pink = Moisture is present – IMMEDIATE SYSTEM SERVICE
IS REQUIRED TO PREVENT SYSTEM DAMAGE.
5 = Condenser Coil(s)
• A properly maintained, clean condenser coil will ensure maximum heat
transfer and system performance. Clean with non-caustic cleaner.
5 = Condenser Fan(s)
• Proper air ow across condenser coil allows for efcient heat transfer.
Check to make sure all fans are actually operating when compressor is
engaged.
6 = Hoses / Piping
• Properly supported hoses prevent the possibility of refrigerant leaks.
Check for residue around connections (sign of refrigerant leak) / hose
wear from rubbing other objects / loose or missing clamping.
7 = Wiring Harness(es)
• Properly supported and protected harnesses prevent the possibility of
electrical issues.
Page 7
CHAPTER 3 – SYSTEMS
• Check the battery state-of-charge every 15 days. If the battery eye is
“red,” recharge the battery until the eye turns green. Check battery condi-
tion for possible storage damage using either a Bear or Midtronics battery
tester. Batteries without an eye – recharge if the voltage is less than 12.40
volts.
• Batteries, whether supplied from manufacturer or dealer, require
constant inspection and maintenance. To preserve long life in any battery,
three important functions are required: Charge battery every 30-60 days
to keep fully charged during non-use, especially during winter months.
Certain types require water to be checked and added as necessary. Keep
water above cell mass to avoid permanent damage. Store battery in a
cool place when not in use, around 40 degrees Fahrenheit.
• A fully charged battery will measure at 1.265 specic gravity. A discharged
battery will measure at 1.120 specic gravity or 11.7 volts DC. A hydrom-
eter is required to measure “specic gravity.”
• Most batteries with deep cycle rating require water to be added as
needed. This depends on the amount of draw time that is on that specic
battery.
• Use distilled water if possible as it is nearly mineral free. Not keeping
batteries charged will result in shorter life expectancy.
• Be sure to keep all battery terminals clean at all times to ensure good
contact.
Air Conditioning
Page 6

CHAPTER 4 – INTERIOR
Flooring
• To care for and clean your oor covering, use a mild soap in water and a
damp cloth. DO NOT pour water on oors as it may seep under / in attach-
ment points in the buses oor.
Seating – Vinyl
• To clean, use a mild solution of soap and water with a sponge or soft
cloth. DO NOT use any abrasive cleaner as scratching of vinyl could
occur, causing dull colors and/or scratches. Avoid cleaners with bleach.
For stubborn stains you may need a strong all purpose spray cleaner
which will need to be sprayed on and QUICKLY wiped off.
Seating – Fabric
• To clean fabric seat covering of dust, use a soft attachment of a vacuum
cleaner. To remove solid spots on fabric use clear Ivory dish washing
liquid and water.
*For more stubborn stains you may need to contact your authorized
Starcraft Bus dealer.
Windows
• On window(s) which have opening sliders, there are “weep or drain”
holes at lower sections of frame extrusions, generally at the end of each
moveable panel. Dirt, debris, insects, etc. can and will accumulate,
potentially plugging up these weep holes. Should water accumulate
(stand in threshold of window), your weep holes and / or channels in win-
dow have become plugged. Be sure to keep these draining areas open
at all times.
CHAPTER 5 – WHEELCHAIR LIFT
• Regular maintenance of the wheelchair lift will help optimize its perfor-
mance and reduce the need for repairs. This chapter contains cleaning
and lubrication instructions.
• Lubrication
Lubrication should be performed at least every six months, or sooner
depending on usage. Lubricate lift at torsion springs (both sides with
penetrating oil); knuckle links (both sides with penetrating oil), and; the
hinge (with penetrating oil). Lubricate the outer barrier (both sides with a
dry graphite lubricant).
Page 9
CHAPTER 3 – SYSTEMS
8 = Compressor Belt(s)
• Properly tensioned belts ensure maximum compressor performance and
belt life.
CHAPTER 4 – INTERIOR
TPO / ABS
• TPO / ABS can come in a wide range of textures and colors. It is a strong
plastic compound (ABS) or rubber compound (TPO) used commonly for
molded articles within the manufacturing industry and is used for a wide
range of production components inside and outside of your Starcraft Bus.
The most common interior components are front bulkhead window trims
on your Starcraft School bus / MFSAB vehicles.
• TPO / ABS components are lightweight and strong, however the surface
is not as hard as berglass and can scratch easily.
• The proper care, cleaning and maintenance of your TPO and ABS
components is quite simple because of the basic properties and longevity
of the material itself.
• Periodic cleaning is the primary maintenance. Starcraft Bus suggests
using Murphy’s Oil Soap with a soft nylon brush or sponge. DO NOT USE
solid or granulated cleaners, as they will mar the natural nish.
• Do not use Armor All or other oil solvent based cleaners on your TPO or
ABS components as they will leave a slick surface.
• A good thorough cleaning should keep your TPO and ABS components
looking good and remove most stains. For most stubborn stains, you
should contact your Starcraft Bus authorized dealer.
• DO NOT USE citrus based cleaners on ABS materials. The ABS will break
down and become brittle.
Wall / Ceiling Covering – Vinyl
• To clean, use a mild solution of soap and water with a sponge or soft
cloth. DO NOT use any abrasive cleaner as scratching of vinyl could
occur, causing dull colors and/or scratches. Avoid cleaners with bleach.
For stubborn stains, you may need a strong all-purpose spray cleaner
which will need to be sprayed on and QUICKLY wiped off.
Wall / Ceiling Covering – Fabric
• To clean fabric wall covering of dust, use a soft attachment of a vacuum
cleaner. To remove solid spots on fabric use clear Ivory dish washing
liquid and water.
Page 8

CHAPTER 5 – WHEELCHAIR LIFT
• 1800 Cycles
- Clean lift with mild soap and water and wipe dry. Prevent rust by
coating all surfaces with a light weight oil. REMOVE EXCESS OIL.
- Spray penetrating oil where specied in the Lubrication section in
this chapter. Remove excess from surrounding areas.
• 3600 Cycles
- A certied technician must perform the following safety check(s).
- Check hydraulic cylinder for evidence of leaks.
- Inspect hydraulic hoses for damage.
- Verify that all ttings are tight.
CHAPTER 6 – WHEELCHAIR TIE DOWNS
The “Q’Straint, M-series or QRT MAX” systems are very exible in ac-
commodating most wheelchair styles as shown below.
It is recommended that Tri-Wheeler users transfer to an ambulatory seat.
However, if this procedure is not possible, securement of the Tri-Wheeler
and its occupant can be accomplished by using the optional Q’Straint rear
middle belt G5-5010 and fastening it to a solid frame member on the base
of the Tri-Wheeler chair and then by following all regular Q’Straint secure-
ment instructions.
• Auxiliary wheelchair equipment should be effectively secured to the
wheelchair or removed from the wheelchair and secured in the vehicle
during transport so as to not break free and cause injury in an impact.
• Whenever possible, items attached to the wheelchair in front of the
passenger should be removed and secured separately during transporta-
tion to prevent potential injury to the passenger.
Child Stroller Wheelchair –
Rear Attachments
Standard Power Wheelchair –
Front Attachments
Page 11
CHAPTER 5 – WHEELCHAIR LIFT
• Cleaning
Regular cleaning with mild soap (i.e. dish soap, car wash liquid) and
drying thoroughly will protect the lifts’ painted surfaces. Cleaning is
especially important in areas where roads are salted in winter. Make sure
that lift pivot points remain clear and clean prior to lubrication.
Maintenance Schedule
• Under normal operation conditions, maintenance inspections are required
at least every six months (1750 cycles).
• Service should be increased under conditions of heavier use (more than
10 cycles per day).
• 10 Cycles
- Listen for abnormal noises as lift operates (i.e. grinding or binding
noises).
- Verify that control pendant is undamaged and cable connector is tight.
- Verify that system properly detects objects in threshold area and
actuates the audible alarm.
- Verify that sensor inhibits downward movement of platform when a
weight is present on lowered bridgeplate.
• 150 Cycles
- Inspect electrical wiring for frayed wires, loose connectors, etc.
- Place vehicle in non-interlock mode and verify that lift does not operate.
- Verify that lift decals are properly afxed, clearly visible, and legible.
Replace, if necessary.
- Verify that armrest fasteners are properly tightened.
- Verify that mounting and support points are undamaged.
- Verify that mounting bolts are sufciently tight and free of corrosion.
- Verify that link pins on arms are properly installed, free from damage,
and locked in position.
- Verify that bridgeplate operates without binding during lift functions.
- Verify that bridgeplate deploys fully when platform stops at oor level.
- Verify that bridgeplate rests at against baseplate.
- Verify that rollstop is opened completely when platform is at ground
level.
- Verify that rollstop closes and locks when platform leaves ground.
Page 10
CHAPTER 7 – ENTRY DOORS
- Inspect torque arm attaching rivets for looseness. Replace as needed
(this can be handled through an authorized Starcraft Bus dealer).
- Inspect lower door hinge pivot for any defects and repair or replace as
required (this can be handled through an authorized Starcraft Bus
dealer).
- Inspect door leaf center overlap seal for damage. Clean only with a
mild detergent.
CHAPTER 8 – EMERGENCY EXIT / ESCAPE HATCH
Emergency Exit / Escape Hatch
All Starcraft Bus products are equipped with an EMERGENCY EXIT hatch.
Please review and understand fully the information in this chapter.
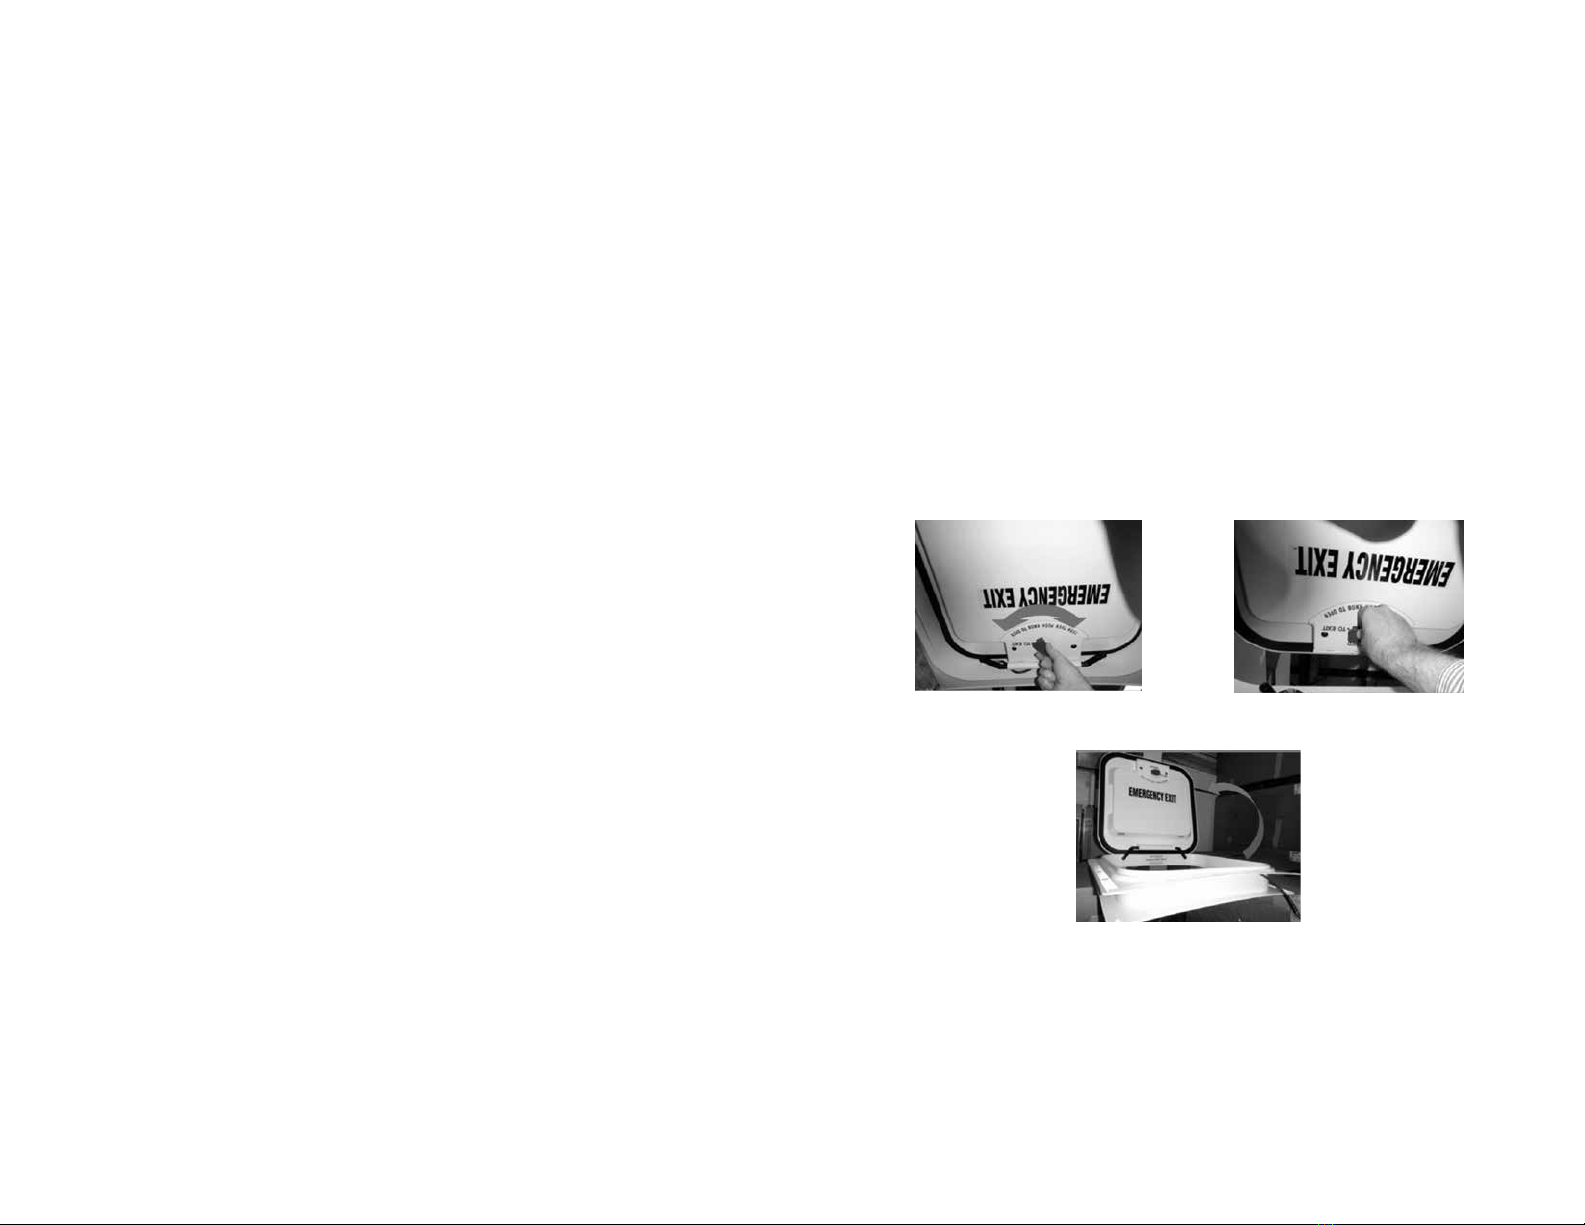
Opening an Emergency Hatch
2. Push the red knob into the lid.
3. Continue to push the lid to the
fully open position.
Page 13
1. Rotate the red knob 90 degrees
in either direction.
CHAPTER 6 – WHEELCHAIR TIE DOWNS
Maintenance
• Inspect your Q’Straint, M-Series and/or QRT Max series regularly, before
and after every use.
• The Q’Straint, M-Series and/or QRT Max series must be replaced if
suspected to have been in use during impact or show ANY sign(s) of
damage or excessive wear and tear. Belts should be replaced if they have
been worn during impact, even if the damage is not obvious.
• Prevent contamination of belt webbing from oil, gases, polishes and
chemicals, in particular – battery acid.
• Be sure to visually inspect the wheelchair tie down tracking for dirt and
debris after every use. This should be cleaned out with a shop vac as
needed.
CHAPTER 7 – ENTRY DOORS
Six-month Actuator Maintenance Schedule
- Lubricate the main gears with white lithium aerosol grease.
- Lubricate all other moving parts with white lithium grease.
- Inspect the open limit switch actuating tab for proper adjustment.
Ensure that it is limiting the operator from driving the doors past 90
degrees while opening. Adjust as required (this can be performed by
an authorized Starcraft Bus dealer).
- Inspect the operation of the current sensing system built into the motor
control board. The red LED must illuminate when the door reaches
the fully closed position.
- Inspect for bent push-pull rods; replace as necessary (replacement
and parts for replacement should be handled through an authorized
Starcraft Bus dealer).
- Inspect the entire system for loose fasteners or components. Repair as
required (this can be handled by an authorized Starcraft Bus dealer).
- Inspect for tightness of the set screws binding the actuator arms to the
door leaf drive hex. Tighten or replace as needed.
- Inspect emergency release lever for proper operation.
Lubricate the shaft running through the center of the body with WD-40
or equivalent.
Six-Month Door Leaf Maintenance Schedule
- Inspect all door frame mechanical joints for looseness. Tighten as
needed.
Page 12

Page 15
CHAPTER 9 – CHILD CHECKMATE SYSTEM
EP1 Operation Check List
• Upon starting the bus, the EP1 Alarm Unit will emit an audible noise
indicating that the system is now operational.
• Close the front door and turn on the master switch. Open the front door
and the red overhead lights will ash.
- Expect an audible sound from the EP1 Alarm Unit as the red lights are
activated.
• Close the front door and the overhead lights will stop ashing.
• Turn the ignition to the “OFF” position. The system’s alarm, a high-pitched
beep, will begin to sound. After approximately eight seconds, the bus horn
will begin to sound on and off.
• Turn the ignition back to the “ON” position. The EP1 Alarm Unit will sound
a high pitched tone three times at 30 second intervals (90 seconds)
reminding the driver to perform their child check.
• Proceed to the rear of the bus and depress the RVT Reset Button for at
least three seconds. You will hear the deactivation signal, a rapid chirping
sound from the EP1.
- Note: The Child Checkmate EP1 system’s deactivation process is
designed so that the ignition key must remain in the “OFF” position for at
least one second before switching to the “IGNITION” or “ACCESSORY”
position.
• The system has now been deactivated and the key can be removed safely
from the ignition.
DOME LIGHT OPTION — IF EQUIPPED
• Turn the ignition to the “ON” position to illuminate dome lights for 20
seconds.
• Once the system has been activated, turn the ignition to the “OFF”
position and the dome lights will illuminate.
• Turn ignition to the “ON” position. The dome lights will remain illuminated.
Proceed to the rear of the bus to deactivate the system.
• The dome lights will remain on for two minutes.
• Stepping on the brake pedal will trigger an audible sound. This will also
turn the dome lights off.
CHAPTER 8 – EMERGENCY EXIT / ESCAPE HATCH
7. Rotate the red knob back into
position.
8. The red knob should be in this
position during normal operation
of the vehicle.
Page 14
1. If the hatch was opened with
the lid in the fully closed position,
the release hinge will still be in
the down position.
Closing an Emergency Hatch
2. Push the release hinge
upward to the position shown
above.
3. Lower the lid into position.
4. Guide the release hinge into the handle base on
the lid as shown above.
5. Pull down on the top of the lid
to force the release hinge and the
lid together until you hear “clicks.”
This will be the spring loaded
handle setting in place.
6. Grasp both sides of the lid and
pull down to fully close the hatch.

CUSTOMER BUS INFORMATION
VIN # _____________________________________________________
Body # ____________________________________________________
HELPFUL CONTACTS
Ford Chassis 800.392.3673
GM Chassis 800.353.3867
International Chassis 888.633.8380
Braun 800.946.6158 or www.braunlift.com
Ricon 800.322.2884 or www.riconcorp.com
Trans Air 800.673.2448 or transairmfg.com
Carrier 717.767.3341 or www.mcc-hvac.com
A & M 574.225.5000 or www.anmsystems.com
Q’Straint USA or Canada
Phone 800.987.9987 or fax: 954.986.0021
Child Checkmate 877.494.8222 or www.childcheckmate.com
Page 16

2367 Century Drive, Goshen, Indiana 46528 • 1.800.348.7440 • www.starcraftbus.com
Uncontrolled When Printed
Form_751-02-06 Implemented on 4/1/14
Other manuals for Starcraft Bus
1
Table of contents
Other forest river Automobile manuals


