Fowke Electronic X50W User manual

User manual
1
Video camera
Model: X50W
Catalogue
Hazard, safety and warning notices…………………………….…………………………… ………………………….……3
1.1 System Requirements…………………………………………………………………………………………………………..4
1.2 Picture Presentations……………………………………………………….…………………………………………………..4
1.3 Functions of keys………………………………………………………………………………………………………………….5
2 Start to use………………………………………………………………………………………………………………………6
2.1 Installation of the SD card…………………………………………………………………………………………………….6
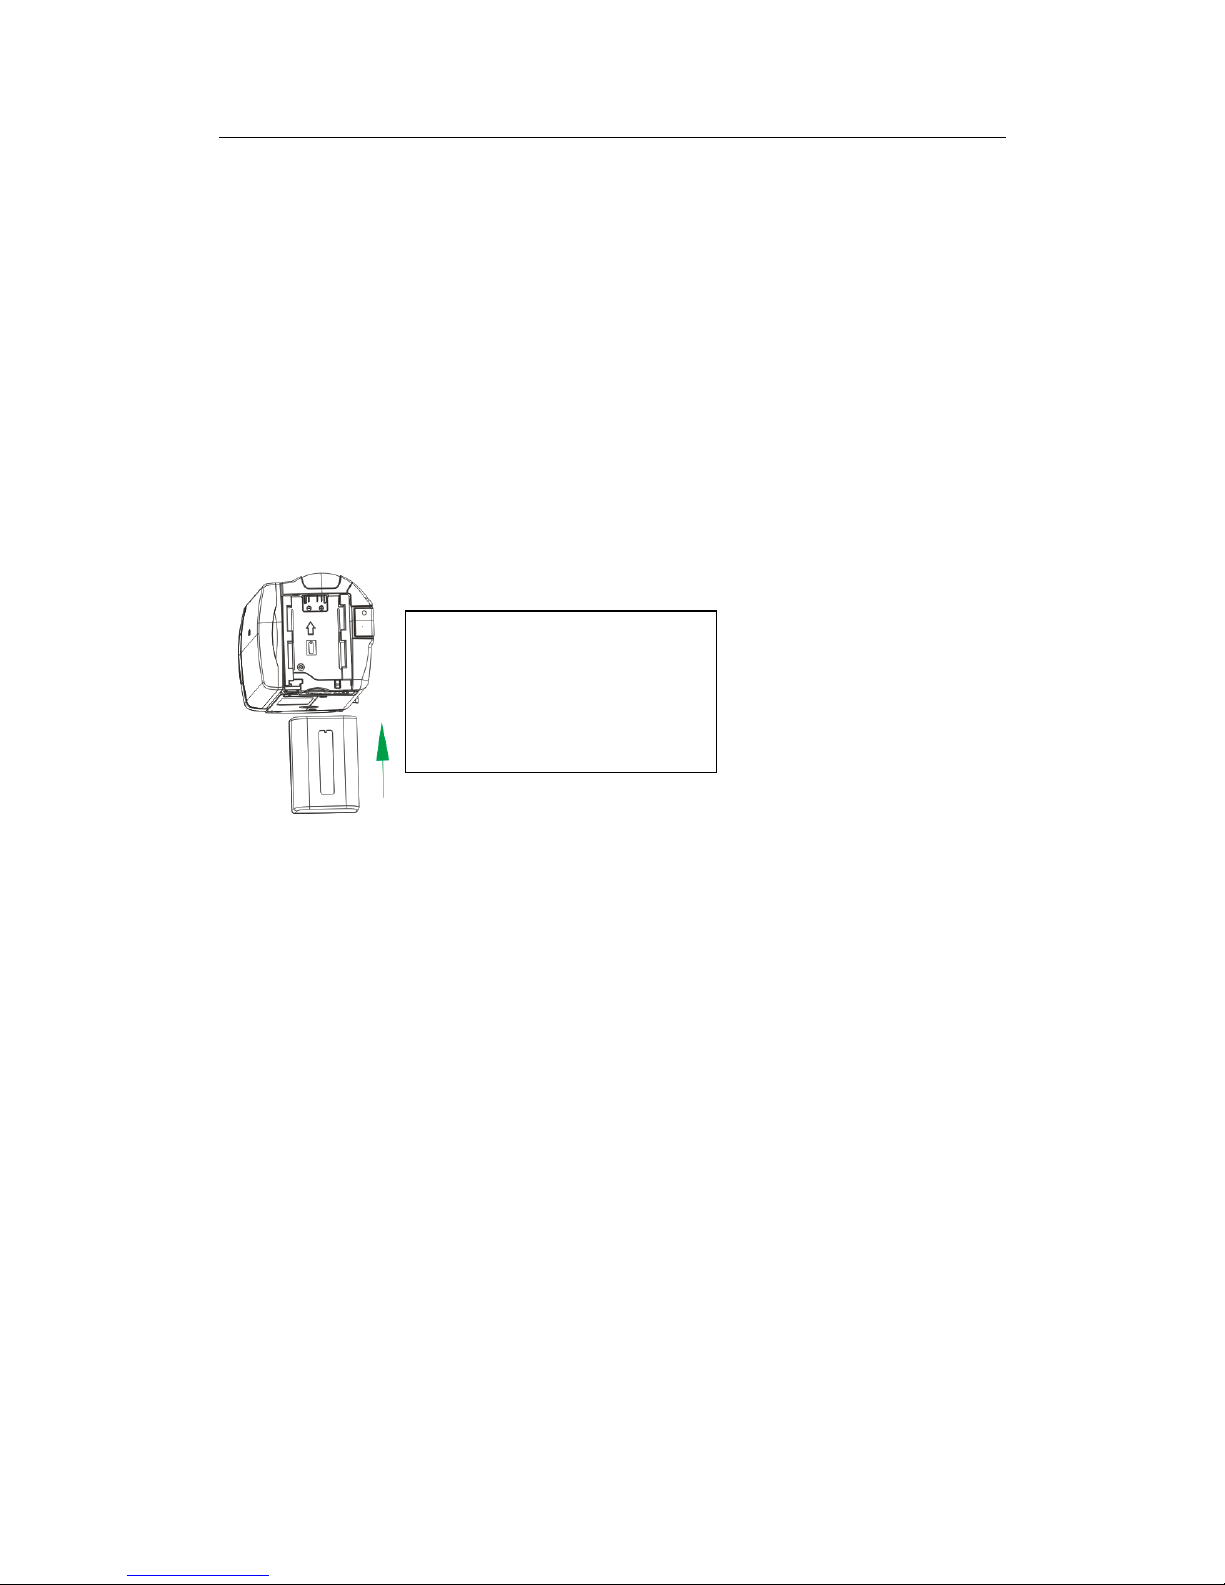
2.2 Installation of battery…………………………………………………………………………………………………………..7
2.3Charging the battery………………………………………………………………………………………..7
2.4 Power on and power off the camera…………………………………………………………………………..8
2.5 Switch working mode………………………………………………………………………………………………..8
2.6 Instructions of use remote………………………………………………………………………………………….8
2.7 Connect to PC……………………………………………………………………………………………………….9
2.8 Connect to TV………………………………………………………………………………………………………………..9
2.9 Use external microphone……………………………………………………………………………………………..10
2.10 Use zoom function………………………………………………………………………………………………………….10
2.11Use fill light function………………………………………………………………………………………………………….10
2.12Use micro spur function……………………………………………………………………………………………………11
3Use the camera………………………………………………………………………………………………………………………11
3.1Movie Mode…………………………………………………………………………………………………………………….11
3.1.1 Movie and the operation of each menu………………………………………………………………………11
3.1.2 Movie Size……………………………………………………………………………………………………..12
3.1.3 Video Quality………………………………………………………………………………………..12
3.1.4 Exposure……………………………………………………………………………………………………………………….13
3.1.5 White Balance……………………………………………………………………………………………………………………13
3.1.6 Effect……………………………………………………………………………………………………………………….14
3.1.7 DIS……………………………………………………………………………………………………………………….14
3.1.8 WDR……………………………………………………………………………………………………………………15
3.1.9 Time Lapse………………………………………………………………………………………………………………..15
3.1.10 Lapse Duration………………………………………………………………………………………………………………16
3.1.11 Slow Motion………………………………………………………………………………………………………………….17
3.2Photo Mode…………………………………………………………………………………………………………………….18
3.2.1 Take Photo……………………………………………………………………………………………………………………….18
3.2.2 Resolution………………………………………………………………………………………………………………..18
3.2.3 Photo Quality…………………………………………………………………………………………..19
3.2.4 ISO………………………………………………………………………………………………………………………….19
3.2.5 Exposure……………………………………………………………………………………………………………………..20
3.2.6 White Balance……………………………………………………………………………………………………………………20

User manual
2
3.2.7 Effect……………………………………………………………………………………………………………………..21
3.2.8 Stabilizer……………………………………………………………………………………………………………………..21
3.2.9 WDR………………………………………………………………………………………………………………….22
3.2.10 Face Tracking……………………………………………………………………………………………………………..22
3.2.11 Driver Mode……………………………………………………………………………………………………………..23
3.2.12 Photo Burst……………………………………………………………………………………………………………..23
3.2.13 Date Stamp……………………………………………………………………………………………………………………..24
3.3 Playback……………………………………………………………………………………………………………………………24
3.3.1 Playback Video……………………………………………………………………………………………………………24
3.3.2 Protect Video……………………………………………………………………………………………………..…25
3.3.3 Delete Video………………………………………………………………………………………………………..25
3.3.4 Playback Photo………………………………………………………………………………………………………..26
3.3.5 Protect Photo………………………………………………………………………………………………………..27
3.3.6 Delete Photo………………………………………………………………………………………………………..27
3.4 Setting Mode………………………………………………………………………………………………………………..28
3.4.1 Language……………………………………………………………………………………………………………………….28
3.4.2 Beep ………………………………………………………………………………………………………………….29
3.4.3 Light Frequency………………………………………………………………………………………………………………..29
3.4.4 Power Save………………………………………………………………………………………………………………..30
3.4.5 TP Calibration…………………………………………………………………………………30
3.4.6 Date Time………………………………………………………………………………………………………………..31
3.4.7 Format……………………………………………………………………………………………………………………31
3.4.8 Factory Reset………………………………………………………………………………………………………………..32
3.4.9 FW Version………………………………………………………………………………………………………………..32
4 WIFI Connection…………………………………………………………………………………………………….33
4.1 APP installation on mobile phone……………………………………………………………………….........33
4.2 Connect to mobile phone………………………………………………………………………………….....33
5 Appendix…………………………………………………………………………………………………………………….34
5.1 Specification………………………………………………………………………………………………………34
5.2 Common problems and solutions…………………………………………………………………………………………35

User manual
3
Hazard, safety and warning notices
Incorrect use of the camera and accessories is dangerous for you and others and can damage,
destroy the camera or cause serious accident .We therefore ask you to read and strictly observe
the following hazards ,safety and warning notices.
Hazards for children and persons with limited ability to operate this camera
◇Children and persons with limited ability are forbidden to touch this camera, accessory and
packaging. These are not toys for children which would cause dangers of electrocutions,
poisoning and suffocation. Please make sure camera, accessory and packaging stay away from
children and persons with limited ability.
◇Never let children or persons with limited abilities operate this camera or accessory. The
camera and accessory can only be operated by persons physically and mentally able to operate it
safely.
Power supply and electrical hazard
◇Switch off the camera and remove the batteries if a foreign body or liquid has entered the
camera. Otherwise have danger of fire or electrocution.
◇Switch off the camera and remove the batteries once camera has been dropped down and
housing broken. Otherwise have danger of fire or electrocution.
◇A plugged in power adaptor (no supplied) can continue to provide power and therefore
represents a hazard source. Anything was forbidden to cover the power adaptor when using.
Keep it airy at all times. Otherwise it may represent a fire hazard.
◇The power supply can’t be used during thunder or lightning. Otherwise have danger of
electrocution.
LCD screen
◇LCD screen is glass product, easily damaged, please protect it carefully.
◇If LCD screen broken, never touch the outflow liquid. In case of contact with skin, rinse
immediately with lots of clean water.
◇In case of contact with eyes , rinse immediately with lots of clean water and go see doctor
immediately.
◇In case of swallowing the liquid, rinse the mouth with clean waters, drink lots of clear water
and go see doctor immediately.
Safety use warnings
◇Do not fall, hit or puncture the camera, otherwise the camera can be damaged.

User manual
4
◇Do not use any corrosive cleaners to clean the camera, otherwise the camera can be damaged.
◇Avoid direct LED light, strong light can impair eyesight.
◇None of camera’s components can be repaired by users themselves. Do not open the housing
or repair by themselves. If any failures occur, please look for professional person to repair
to contact the dealer.
Use and storage environment
◇This camera is intended for taking digital photos and video clips. It is designed for private
use and not suitable for commercial purposes.
This camera is suitable to work in the environment of temperature between 0℃~45℃(32℉
~113℉)and humidity under ≦70%.Do not use or store in below environments :
A place of moisture or dust
A place of High temperature or sun exposure
A place of low temperature
A place with strong vibration
Proper disposal of waste
◇Do not fling camera, accessory and packaging casually.
◇Electronic waste can’t be disposed like domestic waste. Please comply to the local laws and
environmental requirements, dispose different wastes separately.
◇Waste batteries can’t be disposed like domestic waste. Consumers are obliged to return
waste batteries to communal collection points or battery retailers.
◇Please use the collection points of local community or contact battery retailers from whom
you purchased. This prevents potentially harmful effects on the environment and health as a
result of incorrect disposal. For further information, contact the respective government of local
community.
Pre-use inspection
In order to ensure your benefit, please make test shot with SD card before use in important
occasion. We will not be responsible for any accidents that caused by incorrect use.
About this manual
◇This manual only serves as a general guide to the use of products. The picture is for reference
only; specifications are subject to actual products.
◇The content of this manual might be inconsistent with the camera due to product update or
software upgrade; Please refer to the camera object, no further notice.
Trademark information and Copyright statement
We reserve the right of final explanation of this manual.
No unit or individual may reproduce, disseminate or distribute in any form without our written
consent.

User manual
5
Microsoft and windows are trademarks of Microsoft Corporation registered in the US.
Pentium is a registered trademark of Inter Corporation.
Macintosh is a trademark of Apple Computer Inc.
Other names and products can be trademarks or registered trademarks of the respective
owners.
Welcome to choose this product, we will service you warmly!
Please read this manual carefully before use. Please keep it properly for further check.
This is a HD video camera that support 4K HD resolution and WIFI wireless function. It has below
main features:
◇4K HD imaging ◇Support H.264
◇14MP CMOS sensor◇120fps High speed imaging
◇Time lapse ◇Slow motion recording
◇Micro spur ◇3.0 inch touch screen
◇WIFI wireless, operation by mobile phone ◇IR remote control
◇Dual ultra bright flashlights , cold & warm color options ◇Support external
microphone
◇Max support 64GB SD card ◇Support external 37MM extend lens
Computer system requirement
The camera can connect to computer to copy files, playback and used as U disk. If the camera
is connected to computer, the following specifications are required at least: The Pentium2.0
GHZ or upper processor/Windows XP or upper system/2GB RAM/80G or more ROM/Standard
USB port or upper port/1GB and more display card/1024x768 or higher screen definition.
If the configuration of computer is quite low, camera may not work properly or get stuck when
connecting to computer.
1.2 Picture Presentations
Front view Back view
Lens
Work
indicator light
Charging
indicator light
Video key
Battery
compartment

User manual
6
Top view Bottom view
Left view
1.3 Functions of keys
Key icon
Key name
Functions
Power/Fill light key
Long press it for 2 seconds: Power on/off ;
After powering on, short press the key to turn on/off
fill light. The switch sequence is as follows: Warm
light/Code light/ Warm+ cold light/Off .
Micro spur
“ ”means micro spur mode(close-range shooting).
Remote receiver window
Fill light Window
Micro spur switch
Zoom key
Mode key
Speaker
Photo button
Tripod hole
SD card cover
Power/Fill light key
Menu
DISP/WIFI key
USB jack
External microphone jack
HDMI jack

User manual
7
“ ”means normal mode(normal –range shooting).
Menu key
In each mode: shift to/back to previous menu/exit.
Mode key
Switch working modes: Photo mode/Video
mode/Playback mode.
After entering into each mode: switch menu.
During recording video: Pause/ Restart recording.
DISP/WIFI key
In each mode: short press the key to Show all icons/Hide
all icons/Show standard icons on the screen.
In Photo mode/Video mode: press it for 2seconds to
switch on/of WIFI function .
Photo key
In photo mode: press heavily to take photo. Video mode:
During recording video, press heavily to capture photo.
In Video playback mode: Press heavily to pause/ restart
play video.
Video key
In Video mode: press it to start/ Pause to record video
In Video playback mod: press it to stop recording
Zoom key
In Photo mode/Video mode:Zoon in/out picture
In Playback mode:press it to page-up/page down
In Video mode /Playback mode: when playing a video,
press it to fast forward/fast backward.
In Menu: Choose menu upward/downward.
2 Start to use
2.1 Installation of the SD card
This camera must install a SD card to take photo or video, please install SD card according to
below steps, please refer pictures.
1.Open the SD card cover;
2.Insert the SD card according to the direction. Push the SD card until a “Click”is sounded which
means SD card installation is finished.;
3.Close the SD card cover.
Open the SD card cover
according to the direction
of arrow
Insert the SD card according the
direction of arrow

User manual
8
Notice:
Please use qualified SD card and the transfer speed should be CLASS 10(included) or above.
Before use a new SD card, please format it by camera.
Do not take out the SD card when the camera is working, otherwise the SD card might be
damaged or lose data.
Some of the SD cad might cause camera halted or work abnormally, please try it out to ensure it
is compatible with the camera.
2.2 Installation of battery
This camera uses a removable lithium battery, please install the battery correctly before use.
Below is the steps, please refer to the pictures:
1.Please ensure install the battery with the direction of metal contactors upward;
2. Follow the arrow direction on battery compartment, push the battery from down to up until a
“Click”is sounded which means SD card installation is finished.
Notice:
Please install battery correctly, incorrect installation may damage the camera or can’t be
powered on it and cause accidents.
Do not use substandard lithium battery and adaptor.
Adaptor specification: Input AC 100~240V/50~60HZ,output DC 5V/1.5A.
2.3 Charge the battery
2.3.1Install the battery, connect camera with adaptor via USB cable, connect the adaptor with
electric supply. When charging the camera ,the indicator will light up, after fully charging, the
indicator light will be off.
2.3.2 Connecting to computer, the camera also can be charged. Install the battery, connect
camera with adaptor with USB cable. When charging the camera ,the indicator will light up, after
fully charging, the indicator light will be off.
2.3.3 Camera adaptor specification: Input AC 100~240V/50~60HZ,Output DC 5V/1.5A. Please
check the local adaptor specification before use.
2.3.4 Shoot during charging. In order to support long shoot, the camera supports to take photo or
video during charging. When using this function, please connect the adaptor with electric
supply. After connecting according to 2.3.1, power on the camera to shoot.
1. Install battery into the battery
compartment according to this
direction.
2. Push battery until a “Click”is
sounded

User manual
9
Notice:
Before use electric supply must ensure the specifications of local power supply meet
requirements.
Please ensure that the charging process is ventilated and can’t be covered with any object. After
charging, remove the power supply as soon as possible.
When shooting during charging, it is forbidden to use the computer to power the camera,
otherwise it may damage the computer.
2.4 Power on and power off the camera
1.Install the battery, long press power key to power on the camera;
2. In the state of boot, long pres the power key to power off the camera;
3. The camera supports the function of power on/off the camera via open/close the screen;
unfold the screen the camera will power on automatically; fold the screen the camera will power
off automatically;
4.The camera support the function of power on/off automatically. When the camera is not in use
for long time, camera will power off automatically to save battery. When the battery is low, “Low
battery” will shown on the screen and power off automatically later.
2.5 Switch working modes
2.5.1The camera support three working modes and one Setting modes.
Video mode: “ ”will show on top left corner of the screen, at that time camera can record
video and set relevant parameter;
Photo mode: “ ” will show on top left corner of the screen, at that time camera can take
photo and set relevant parameter;
Playback mode: “ ” will show on top left corner of the screen, at that time camera can
playback photo or video and make related operation;
Setting mode: “ ” will show on top left corner of the screen, in this mode users can set the
system parameter.
2.5.2 Switch working modes
Press【Mode】key can switch working modes: Photo mode/Video mode/Playback mode, related
icon of each mode will show on top left corner of the screen.
2.6 Instructions of remote control
Camera also can be operating by remote control; key functions of remote control are as below:
Icon
Key name
Functions
Photo key
Photo mode: take photo
Video key
Video mode: start / stop recording ;
Video playback mode: stop play during playback.

User manual
10
Fill light/
Up key
Photo/Video mode: Turn on /Turn off /Switch fill light;
Menu mode: select upper menu item
Menu key
Shift to the menu/Back to upward menu/Exit
Confirm
key
Confirm operation;
Playback mode: Play/Pause video
WIFI key
Photo/Video mode: Turn on/Turn off WIFI
Mode key
Switch working mode;
Setting menu: Switch menu
Down key
Menu mode: Select downward menu item
Zoom In
key
Photo/Video mode: Zoom in frame;
Playback mode: Fast forward during play video
Playback
key
Enter into playback mode
Zoom Out
key
Photo/Video mode: Zoom out frame;
Playback mode: Fast backward during play video
Notice:
Before use remote control please take off the battery protective slice.
When use remote control, please aim at the remote receive window of camera, objects can not
be shielded in the middle.
2.7 Connect to PC
The camera can be connected to PC to transfer files, view and edit photos and videos.
After connection, power on and select “new disk driver”, camera can use as U disk. Select
“Webcam”then camera can use as webcam. Please see below picture:
Notice:
Photo key
Video key
Fill light/Up key
Menu key
WIFI key
Zoom in key
Zoom out
key
Mode key
Play back
key
Confirm key
Down key
Please take off the battery
protective slice.
使用前请将电池保护片取下

User manual
11
Because of PC system, when selecting “Webcam”item, users need to download Amcap to use
webcam.
2.8 Connect to TV
Except PC camera also can connect to TV, the method is as follows:
1. Use HD cable to connect the HD jack of camera and HD jack of TV;
2. Switch TV HD jack to connected camera HD jack;
3. Power on and operate the camera all the contents will show on TV screen , just see as
below picture:
2.9 Use external microphone (optional accessory, not supplied)
This camera supports to use external microphone.
Use external microphone can reduce the surrounding noise, improve the voice quality of video
and provide users better experience of tone quality, operation method is as follows:
1. In order to avoid damage, the camera, please read technical parameters, operation,
instruction and notice of external microphone carefully before use;
2. Install the external microphone according to the picture’s direction and lock the fixed nut, as
shown in the picture;
3. Insert the external microphone 3.5mm connection plug into the MIC and turn on the
microphone switch.

User manual
12
2.Insert 3.5mm connection plug
Notice:
The output impedance of external microphone is 0.2KΩ~2.2KΩ,Because each external
microphone parameter is different, the specific effect is selected after actual adaptation.
2.10Use zoom function
The camera has a digital zoom function to zoom in and zoom out. In Photo/Video mode, Moving
the zoom button to the right can bring the object closer (magnifying the object), and the zoom
key to the left can pull away from the object (shrink the object).
2.11Use fill light
The camera built in super warm and cold fill light, which can fill the light in a darker environment
to take beautiful pictures and video. The method of using the fill lights is as follows:
In Photo/Video mode: short press【Power】key, turn on and switch : warm light/cold light/warm &
cold light/off.
2.12 Use micro spur
The micro spur allows you to make a clear picture of the close range of photos/video files.
Photo/Video mode, the micro spur switch can be used to switch the micro range/normal mode.
When switching to micro spur mode, there is a micro spur icon “ ”on the left of the screen.
This mode is used for shooting near objects.
When switching to normal mode, there is a micro spur icon “ ”at the top left of the screen.
This mode is used to shoot normal shadows.
3Use the camera
This chapter helps you understand how to use the various advanced features of the camera.
3.1 Video Mode
After the camera is turned on, it will enter the video mode automatically. After entering the video
mode, the screen will display some ICONS which have the following implication:
1Video mode
indicator icon
2Frame rate
indicator icon
3Video resolution
indicator icon
4Surplus video time
indicator icon
1.Fix external
microphone

User manual
13
5Far/Close focus
switch indicator icon
6 Zoom out/in
indicator icon
7Battery capacity
indicator icon
8SD card indicator icon
2 3 4
3.1.1 Video Recording
Users can make a very beautiful video file by setting the menu. The operation is as follows:
1.Insert SD card correctly, install battery, long press【Power】key to power on;
2. The camera automatically enters the video mode after turning up, users can also switch from
other modes to video mode by pressing 【Mode】key;
3. In the Video mode, press the 【Video】key to start the video, press【Mode】key to pause the
video, press 【Mode】key to continue the video, press the 【Video】key again to stop the video;
4.In the Video mode, press【Photo】key to capture photo;
5. If the memory card is full, the screen will show "memory is full" and automatically end the
video. Users need to change a new memory card, or delete the file in this memory card to
continue recording.
The user can set the parameters in the video mode so that you can get more beautiful pictures.
The operation is as follows. If you're not familiar with the camera, you can also use the camera's
default settings.
3.1.2Movie Size
This function can set the size of the movie, and the larger the size, the smaller the movie file will
be.
1. In Video mode, press 【Menu】to shift to the the menu, press the【Zoom】key to the right and
select "Movie Size";
2. Press【Photo 】key to enter the Movie size sub-menu;
3. Turn left/right the【zoom】key to select desired movie size: 4K /2.7k/1080P(60fps) /
1080P(30fps) /720P(120fps) /720P(60fps);
4.Press【Photo】key to save and return, press 【Menu】key to return to video mode.
This function supports touch screen operation:
1. In Video mode, press【Menu】to shift to the menu;
2. Click ”Movie Size”, enter into sub-menu, click 【 】key and【 】key on the screen to
select;
3. Select desired movie size, click 【Menu】key on the bottom of screen to back to video mode.
1
5
7
6
8

User manual
14
Notice:
If the transfer speed of SD card is too slow, please don not select higher resolution
(4K/2.7K/1080P (60fps)/720P(120fps)).
If video resolution is between 4K to 2.7K, camera can not capture photo during record video.
3.1.3 Video Quality
This function can set the quality of video, the better the quality, the bigger the video file.
1. In Video mode, press 【Menu】key to shift to the menu, press 【Zoom】key to the right to
select “Video Quality”;
2. Press 【Photo】key to enter into the sub-menu of “Video Quality”;
3. Press【Zoom】key to left/right to select desired Video quality: Super Fine/Fine/Normal;
4. Press 【Photo】key to save and back ,press 【Menu】key to back to video mode.
This function supports touch screen operation:
1. In Video mode, press 【Menu】key to shift to the menu;
2. Click “Video Quality”to enter into sub-menu, click and select desired video quality item, click
【Menu】key to back to video mode;
3.1.4 Exposure
This function can adjust the brightness of video recorded according to the ambient brightness.
The larger the EV is, the brighter the video is recorded. The smaller the EV is, the darker the video
file is recorded. When ambient brightness is low, the adjustment of this function is invalid.
1. In video mode, press【Menu】key to shift to the menu, press【Zoom】key to the right to select
“Exposure”;
2. Press 【Photo】key to enter into the sub-menu of “Exposure”;

User manual
15
3. Press【Zoom】key to left/right to select desired value of Exposure:-2.0EV/ -1.7EV/ -1.3EV/
-1.0EV/ -0.7EV/ -0.3EV/ 0EV/ +0.3EV/ +0.7EV/ +1.0EV/ +1.3EV/ +1.7EV/ +2.0EV;
4. Press 【Photo】key to save and back ,press 【Menu】key to back to video mode.
This function supports touch screen operation:
1.In Video mode, press【Menu】to shift to the menu;
2.Click ”Exposure”, enter into sub-menu, click 【 】key and【 】key on the screen to select;
3.Select desired value of Exposure, click 【Menu】key on the bottom of screen to back to video
mode.
Notice:
When ambient brightness is low, the adjustment of this function is invalid.
3.1.5 White Balance
This function can adjust the color deviation of the recorded video image according to the
different light source environment. Suggest use automatic mode.
1. In Video mode, press【Menu】key to shift to the menu, press【Zoom】key to the right to select
“White Balance”;
2. Press 【Photo】key to enter into the sub-menu of “White Balance”;
3. Press 【Zoom 】key to left/right to select desired effect of White Balance :
Auto/Daylight/Cloudy/Tungsten/Fluor H/Flour L;
4. Press 【Photo】key to save and back ,press 【Menu】key to back to video mode.
This function supports touch screen operation:
1.In Video mode, press【Menu】to shift to the menu;
2.Click ”White Balance”, enter into sub-menu, click 【 】key and【 】key on the screen to
select;
3.Select desired effect of White Balance, click 【Menu】key on the bottom of screen to back to
video mode.

User manual
16
3.1.6 Effect
This function can set the special effect of recording video files.
1. In Video mode, press【Menu】key to shift to the menu, press【Zoom】key to the right to select
“Effect”;
2. Press 【Photo】key to enter into the sub-menu of “Effect”;
3. Press 【Zoom 】key to left/right to select desired effect :
Normal/B&W/Sepia/Vivid/Natural/Negative/Warm/Cold/Red/Green/Blue;
4. Press 【Photo】key to save and back ,press 【Menu】key to back to video mode.
This function supports touch screen operation:
1.In Video mode, press【Menu】to shift to the menu;
2.Click ”Effect”, enter into sub-menu, click 【 】key and【 】key on the screen to select;
3.Select desired effect, click 【Menu】key on the bottom of screen to back to video mode.
3.1.7DIS
This function can turn on or turn off DIS, when recording video turn on DIS can reduce the video
ambiguity caused by jitter.
1. In Video mode, press【Menu】key to shift to the menu, press【Zoom】key to the right to select
“DIS”;
2. Press 【Photo】key to enter into the sub-menu of “DIS”;
3. Press【Zoom】key to left/right to select:ON/OFF;
4. Press 【Photo】key to save and back ,press 【Menu】key to back to video mode.
This function supports touch screen operation:
1.In Video mode, press【Menu】to shift to the menu;
2.Click ”DIS”, enter into sub-menu, click the item of “ON”or “OFF”, click 【Menu】key on the
bottom of screen to back to video mode.

User manual
17
3.1.8 WDR
WDR refers to a new technique which allows images to be clearer in a very strong light and dark
contrast. The camera is a HD 4K video camera with the new technology, which can be used to
shoot clear images in bright and dark places.
1. In Video mode, press【Menu】key to shift to the menu, press【Zoom】key to the right to select
“WDR”;
2. Press 【Photo】key to enter into the sub-menu of “WDR”;
3. Press【Zoom】key to left/right to select:ON/OFF;
4. Press 【Photo】key to save and back ,press 【Menu】key to back to video mode.
This function supports touch screen operation:
1.In Video mode, press【Menu】to shift to the menu;
2.Click ”WDR”, enter into sub-menu, click the item of “ON”or “OFF”, click 【Menu】key on the
bottom of screen to back to video mode.
3.1.9 Time Lapse
Time-lapse video call shrink the video,it is a kind of can compress time filming technique, it can
take a few minutes, a few hours of video compression process in a short time and save for video
files. This feature is mainly used to take pictures of slow things, such as the opening of flowers.
This function can set the delay time for the Time Lapse.
1. In Video mode, press【Menu】key to shift to the menu, press【Zoom】key to the right to select
“Time Lapse”;

User manual
18
2. Press 【Photo】key to enter into the sub-menu of “Time Lapse”;
3.Press 【Zoom 】key to left/right to select desired delay time item :
Off/0.5s/1s/3s/5s/10s/30s/1min;
4. Press 【Photo】key to save and back ,press 【Menu】key to back to video mode.
This function supports touch screen operation:
1.In Video mode, press【Menu】to shift to the menu;
2.Click ”Time Lapse”, enter into sub-menu, click【 】key and【 】key on the screen to select;
3.Select desired delay time item , click 【Menu】key on the bottom of screen to back to video
mode.
Notice:
When Movie size selected 4K and 2.7K, this function is invalid due to the size of video file is big
and “Time Lapse”menu will become grey and can not select.
3.1.10 Lapse Duration
Lapse Duration is when the memory card is full, the camera automatically restarts the recording
from the first file of the memory card and overrides the old video file. This function can set the
length of each video file in the loop.
1. In Video mode, press【Menu】key to shift to the menu, press【Zoom】key to the right to select
“Lapse Duration”;
2. Press 【Photo】key to enter into the sub-menu of “Lapse Duration”;
3. Press【Zoom】key to left/right to select desired video length:unlimit//5min/10 min /15 mins/20
min/30 min/60 min;
4. Press 【Photo】key to save and back ,press 【Menu】key to back to video mode.
This function supports touch screen operation:
1.In Video mode, press【Menu】to shift to the menu;
2.Click ”Lapse Duration”, enter into sub-menu, click 【 】key and【 】key on the screen to
select;
3.Select desired delay video length , click 【Menu】key on the bottom of screen to back to video
mode.

User manual
19
Notice:
When Movie size selected 4K and 2.7K, this function is invalid due to the size of video file is big
and “Lapse Duration”menu will become grey and can not select.
3.1.11 Slow Motion
Slow motion is the shooting of a scene with a high frame rate and then played at normal speed.
This function can help you take pictures of fast-moving objects, such as rabbits that run quickly.
This function sets whether to start slow motion photography when recording video.
1. In Video mode, press【Menu】key to shift to the menu, press【Zoom】key to the right to select
“Slow Motion”;
2. Press 【Photo】key to enter into the sub-menu of “Slow Motion”;
3. Press【Zoom】key to left/right to select:ON/OFF ;
4. Press 【Photo】key to save and back ,press 【Menu】key to back to video mode.
This function supports touch screen operation:
1.In Video mode, press【Menu】to shift to the menu;
2.Click ”Slow Motion”, enter into sub-menu, click 【 】key and【 】key on the screen to
select;
3. Select ON or OFF , click 【Menu】key on the bottom of screen to back to video mode.
Notice:
This function requires that the frame rate be set to be more than 60 FPS.
3.2Photo Mode
The camera has a powerful camera function. In the photo mode, users can make a very beautiful
picture by setting the menu. The operation is as follows:
The camera automatically enters the video mode when the camera is turned on, and the user

User manual
20
needs to press【Mode】key to switch to the camera mode. After entering the photo mode, some
ICONS will be displayed on the screen, which means the following:
1Photo mode
indicator icon
2Photo resolution
indicator icon
3Number of photo to
take indicator icon
4Far/Close focus
switch indicator icon
5Zoom out/in
indicator icon
6Battery capacity
indicator icon
7SD card indicator
icon
2
3.2.1Take Photo
1. Insert SD card correctly, install battery, long press【Power】key to power on;
2.Press 【Mode】key to switch to photo mode;
3. In the photo mode, aim the camera lens at the scene that needs to be taken, adjust the angle
and position, grasp and keep the camera stable;
4.Slightly press the 【Photo 】
key,the white focus frame on the screen will change to green focus frame, keeping press the 【Ph
oto】key down to the button,the photo will be taken until "click" is sounded.
5. If the memory card is full, the screen displays "SD card is full" and a new memory card is
needed to be replaced, or the files in the card need to deleted to continue taking photos.
In the Photo mode, users can set the parameters of the photo menu and then take photos. The
menu under the photo menu is operated as follows. If you're not familiar with the camera, you
can also use the camera's default Settings.
3.2.2Resolution
This function can set the size of the photo (resolution), the higher the resolution, the larger the
size of the photo, the better the quality of the photo, and the larger the storage space it occupies.
1. In Photo mode, press【Menu】key to shift to the menu, press【Zoom】key to the right to select
“Resolution”;
2. Press 【Photo】key to enter into the sub-menu of “Resolution”;
3.Press 【Zoom 】key to left/right to select desired Resolution :5M(2592*1944) ,
7M(3640*2048)16 :9,10M(3648*2736) ,14M(4992*2808)16 :9,20M(5120*3840) ,
30M(6272*4704);
4. Press 【Photo】key to save and back ,press 【Menu】key to back to video mode.
This function supports touch screen operation:
1
4
6
3
5
7
Table of contents