FOXEER LEGEND 3 User manual

USER MANUAL

/ The Basics
5
/ Getting Started
7
11
12
13
/ Camera Status Screen
/ Camera Modes
/ Setting Camera
/ Video Modes
/ Photo Modes
/ Settings Menu
/ Connecting to the FOXEER App
/ Transferring Files to a Computer
15
17
19
33
33
34
37
37
/ Battery
/ Trademarks
/ Customer Support
/Table of Contents
3 4

/The Basics /The Basics
1.Charger Light ( red )
2.Mode Light ( Video:blue/Photo:green )
3.Wifi Status Light ( yellow )
4.Camera Status Screen
8.Shutter/Select Button and Status light ( red )
9.micro HDMI Port ( cable not included )
10.microSD Card Slot ( microSD Card not included )
11.micro USB Port
12.Battery5.Microphone
6.Lens
7.Power/Mode Button and Status light( red )
5 6

1. Remove the camera from its package.
2. Remove the camera bottom cover, insert the battery
and microSD card and then close the bottom door. The
card must have a U3 rating and a capacity up to 128GB.
3. Charge the battery by connecting the camera to a
computer or other USB charging adapter using the
included USB cable. The camera charger light turns on
during charging and turns off when charging complete.
*The included lithium-ion battery comes partially
charged. No damage occurs to the camera or battery if
used prior to a full charge.
For more battery information, see Battery.
Camera Default Settings
Video
Photo
Wireless
1080p60 S.Fine
16MP S.Fine
ON
/Getting Started /Getting Started
7 8

Inserting+Removing microSD Cards
To Insert the microSD Card:
Slide the memory card into the card slot with the label
facing the top of the camera. When fully inserted, the
card clicks into place.
To Remove the microSD Card:
Place your fingernail against the edge of the memory
card and lightly press it further into the camera.The card
springs out far enough to be removed.
Powering ON+OFF
To Power On:
Press and hold the Power/Mode button for three
seconds. The camera mode light and status light flash
three times and the sound indicator emits three beeps.
When the camera status screen displays information,
mode light and status light are always on, your camera
is on.
To Power Off:
Press and hold the Power/Mode button for three
seconds. The camera mode light and status light flash
six times and the sound indicator emits six beeps,camera
status screen displays FOXEER, then power off.
NOTICE: Use care when handling memory cards.
Avoid liquids, dust and debris. As a precaution, power off
the camera before inserting or removing the card. Check
manufacturer guidelines regarding use in acceptable
temperature ranges.
/Getting Started /Getting Started
9 10

Video
Photo
Setup
Record video or time lapse video
Capture a single photo or a series of
photos (Timing, Auto, Burst)
Adjust general camera settings
The Legend 3 features several camera modes. To cycle
through the modes, press the Power/Mode button
repeatedly:
1.Camera Modes
2.Looping
3.Electronic Image Stabilization
4.Metering
5.Scene
6.Numbers of Files Captured
11.Wireless
12.Battery Life
13.System Time
7.Resolution/fps
8.Interval
9.Storage
10.Motion Detection
/Camera Status Screen /Camera Modes
11 12

1. Press the Power/Mode button repeatedly until it
appears.
2. Press the Shutter/Select Button to open the Settings
Menu.
3. Use the Power/Mode Button to cycle through the
settings.( hold the button down to scroll up )
4. To select a option, leave the option highlighted, press
Shutter/Select Button to open the parameter menu.
5. To exit setting mode, press and hold Shutter/Select
Button.
To Navigate Settings Menus:
/Setting Camera /Setting camera
V-QLTY
Photosize
Resolution : 2.5K 30
: 16M 4:3
: S.Fine
P-QLTY : S.Fine
2.5K 60
2.7K 30
2.7K S 30
2.5K 30
13 14

Capturing video
Video (default)
Time Lapse
Video
Captures video.
Creates video from frames
captured at specific intervals. Time
Lapse Video only available those
30fps video except SuperVision,
and without sound.
1. Press the Power/Mode button repeatedly until get to
Video mode.
2. To select Time Lapse Video mode, please set the
interval of TLapse VID, the Time Lapse Video icon
appears in the upper left on your camera status screen.
3. Press the Shutter/Select button. The camera beeps
once and the camera mode light and status light flash
while the camera is recording.
4. To stop capturing, press the Shutter/Select button.
The camera beeps 3 times and the camera mode light
and status light flash 3 times.
Video mode contains two capture modes: Video, Time
Lapse Video.
/Video Mode /Video Mode
When the camera is in low battery or full SD
card, camera will stop capturing automatically,
the video will be stored before shut off.
PRO
TIP
15 16

Capturing Photo
1. Press the Power/Mode button repeatedly until you
get to photo mode.
2. To select Timing capture, Auto capture or Burst, please
set the option on the setting menu.
Single (default)
Timing
Auto
Burst
Captures a single photo.
Press the Shutter/Select button,
camera begins count down and
capture a picture within setting
time.
Press the Shutter/Select Button,
camera captures photo
automatically on setting interval
until press the Shutter/Select
button again.
Captures max 10 photos within 1
second, suitable for capturing
best moment on rapid motion.
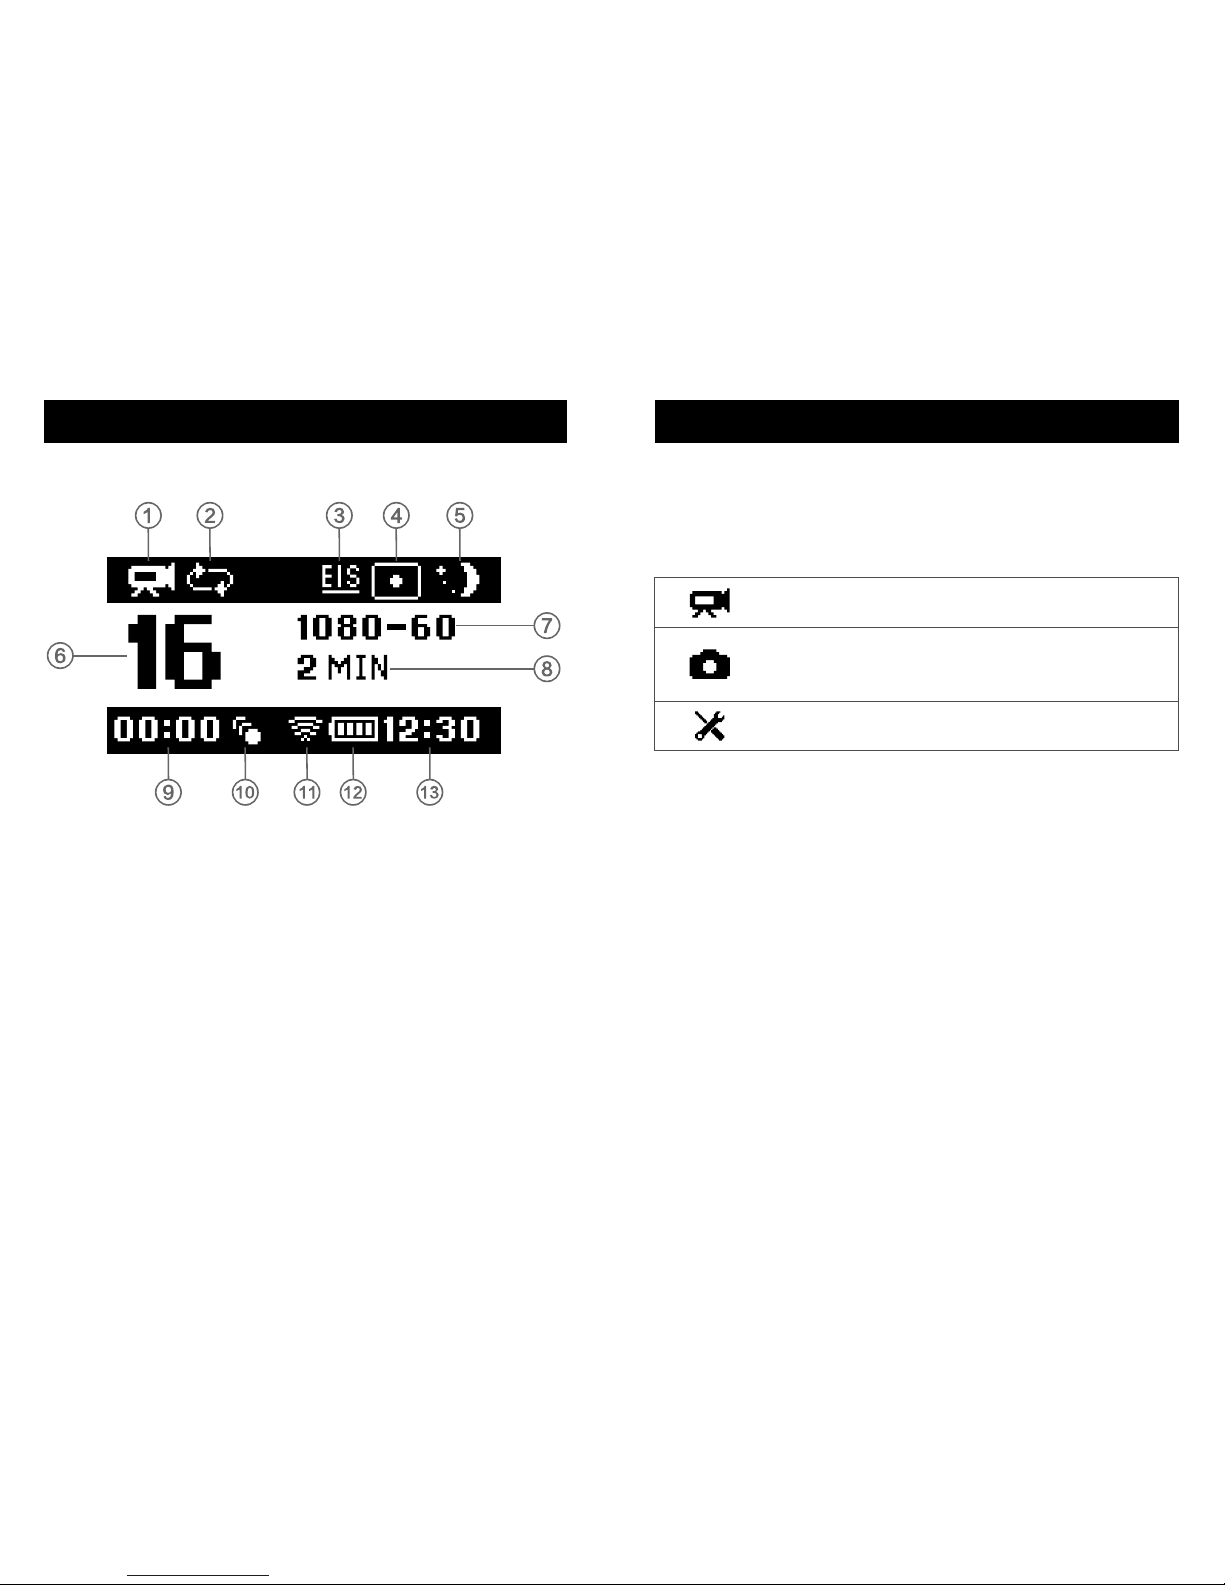
①Timing Photo
To select Timing photo mode, please set the interval of
SelfTimer, the Timing Photo icon appears in the upper left
on your camera status screen.
②Auto Photo
To select Auto photo mode, please set the interval of
AutoPhoto, the AutoPhoto icon appears in the upper left
on your camera status screen.
③Burst
To select Burst mode, please set the rate of PhotoBurst, the
Burst icon appears in the upper left on your camera status
screen.
3. Press the Shutter/Select button, camera mode light
and status light flash, and the counter on the camera
status screen increases by one.
Photo mode contains four capture modes: Single,
Timing, Auto and Burst.
/Photo Mode /Photo Mode
17 18

Resolution
Photo Size
Video Resolution
4K
4K SuperVision
2160
2.7K
2.7K SuperVision
2.7K
2.5K
2.5K
1440
1440
1080
1080 SuperVision
1080
1080 SuperVision
1080
960
NTSC/PAL
30/25
25/25
30/25
30/25
30/25
30/25
60/50
30/25
60/50
30/25
120/100
60/50
60/50
30/25
30/25
120/100
Screen Resolution
3840x2160 16:9
3840x2160 16:9
2880x2160 4:3
2704x2028 4:3
2704x1520 16:9
2704x1520 16:9
2560x1440 16:9
2560x1440 16:9
1920x1440 4:3
1920x1440 4:3
1920x1080 16:9
1920x1080 16:9
1920x1080 16:9
1920x1080 16:9
1920x1080 16:9
1280x960 4:3
Resolution
4608x3456 4:3
4254x3264 4:3
4000x3000 4:3
3840x2160 16:9
2560x1920 4:3
2048x1536 4:3
960
960
720
720 SuperVision
720
720
720 SuperVision
720
60/50
30/25
240/200
120/100
120/100
60/50
30/25
30/25
1280x960 4:3
1280x960 4:3
1280x720 16:9
1280x720 16:9
1280x720 16:9
1280x720 16:9
1280x720 16:9
1280x720 16:9
Photo Size
16M
14M
12M
8.3M
5M
3M
/Settings Menu /Settings Menu
19 20

Quick Capture
The Camera will capture video or photo automatically
after powered on when QUIKCAP is on.
EIS
With EIS, the camera will have more stable video with
higher quality, only applies for 1080P60fps and 1080P30fps.
Video Quality
Normal, Fine, Super Fine for different bitrate video
compression.
Motion Detection
With Motion Detection ON, the camera will start
recording when an object is in motion in front of the
camera.
Long Exposure
Long Exposure applies only single photo and determines
the amount of time that the shutter is open. The options
for this setting are 1/30, 1, 2, 5, 10, 30, 60 seconds.
/Settings Menu /Settings Menu
For best results when using the Long Exposure,
mount your camera on a tripod or other stable
surface to reduce the amount of blur in your
videos or photo.
PRO
TIP
Examples
Sunrise, sunset, dawn, dusk, twilight, night.
Dawn, dusk, twilight, traffic at night, Ferris
wheel, fireworks, light painting.
Night stars, Milky Way (complete darkness)
Settings
1/30sec, 1sec
2sec, 5sec, 10sec
30sec, 60sec
21 22
Photo Quality
Normal, Fine, Super Fine for different photo quality.
Default Mode
Legend 3 can be configured to default Video or Photo
mode while power on.

Video Stamp
Date, Time, Date_Time can be selected, also OFF.
Photo Stamp
Date, Time, Date_Time can be select, also OFF.
Time Lapse Video
Time Lapse Video available shooting interval from 1sec
to 10sec.
Dual Files
Turn on the dual files function, you can store two files
with same content but different resolution.
Looping
Available intervals for Looping are 2, 3, 5 minutes. If you
select the looping option, the recorded video will be
split into multiple files when written to the memory card,
the camera will record until memory card is full, and
then overwrite the oldest previously recorded file first.
Timing Photo
Available intervals for Self-Timer are 2, 3, 5, 10, 30, 60
seconds.
PhotoBurst
Available intervals are 3, 5 or 10 photos every second.
AutoPhoto
Available intervals are 3, 5, 10, 30 and 60 seconds.
CarDV
Your camera will power on and record automatically
when connecting to external power.
/Settings Menu /Settings Menu
Examples
Surfing,cycling and other sports
Busy street corner
Sunset
Lengthy activity, such as construction
Interval
1sec
2sec
5sec
10sec, 30sec, 60sec
23 24

CAUTION: When camera is used as car DV, please
avoid heat and pay attention to the safety of battery,
recommend removeing the battery.
Delay off function can only be used when Car DV
is on.
PRO
TIP
Description
Watch the video on the area of north America.
Watch the video on the PAL/HDTV(apply to the
most of TV except the area of north America)
Setting
NTSC
PAL
Delay Off
After removing external power, the camera will shut off
after the set interval time. Available intervals are 5,
10 ,20, 30, 60 seconds.
TV System
Video format setting is mainly for watching the video on
TV/HDTV to control the video frame rate of the
recording.
OSD
The OSD (on-screen display) setting determine whether
to display camera settings when displaying on other
screens. The options for this setting are On (default) and
Off.
Auto Off
Your camera can be configured to automatically power
off after a specific period of time (3,5,10 minutes) in
which no videos or photos are captured and no buttons
are pressed, You can also configure the camera to never
automatically power off.
Beeps
You can turn on or turn off the beeps.
/Settings Menu /Settings Menu
25 26
Light Frequency
Light Frequency can be configured to Auto, 50Hz, 60Hz.
If flash on screen, please adjust the light frequency.

Resulting Quality
Ultra-sharp video or photo
Moderately sharp video or photo
Softer video or photo
Sharpness Setting
High
Medium(default)
Low
Mic Volume
You can set mic volume to 100%, 90%, 80%, 70%, 60%,
50%, Off.
Sharpness
Sharpness controls the sharpness of your video footage
or photos.
Description
Automatically adjust According to the
environment situation.
Warm light(Incandescent or sunrise, sunset)
Settings
Auto
Incandescent
Sunlight of one hour later after sunrise.
Normal sunlight
Sunlight of noon
Cold light(cloudy day or shadow)
Sunny shade
Sunny blue sky shade
When using the flash
Fluorescent lights
Underwater
General outdoor
D4000
D5000
Sunlight
Cloudy Day
D9000
D10000
Flash
Fluorescent
Underwater
Outdoor
White Balance
White balance adjusts the overall color tone of videos
and photos.
EV COMP
Exposure Value Compensation affects the brightness of
your video or photo. Adjusting this setting can improve
image quality when shooting in environments with
contrasting lighting conditions.
/Settings Menu /Settings Menu
27 28
Video Timing Alarm
Your camera can be configured to start alarm for 3, 5, 10
minutes after recording, beeps last until you press any
button.

Exposure Value Compensation adjusts brightness
within the existing ISO Limit. If brightness has
already reached the ISO Limit in a low-light
environment, increasing the Exposure Value
Compensation does not have any effect.
PRO
TIP
Effect
The Legend 3 have seven effect filter -Normal(default),
Art, Brown, Negative, Black&White, Vivid, 70 age Film,
you can set different effects for your video and photo to
make your work different.
/Settings Menu /Settings Menu
Settings
-2.0 -1.7 -1.3 -1.0 -0.7 -0.3 0.0 +0.3 +0.7 +1.0 +1.3 +1.7 +2.0
29 30
Scene
The Legend 3 have seven scene Normal(default) ,
Flash , Night , Sports , Landscape , Portrait
and Sunset , you can select the appropriate mode
in different scenarios.
ISO LIMIT
ISO Limit adjusts the camera’ s sensitivity in low-light
environments, and creates a balance between brightness
and resulting image noise. Image noise refers to the
degree of graininess in the image.
Pixel Quality
Automatically adjust according to the
environment.
Darker photo in low lighting environment ,
minimal image noise.
Darker photo in indoor lighting, marginal image
noise.
Brighter photo in very low light, lower image
noise.
Brighter photo in low light,more image noise.
Brighter photo in low light, moderate image
noise.
Setting
Auto
100
200
400
800
1600

Date Format
The Legend 3 has 3 types of date display format:
YY/MM/DD, DD/MM/YY, MM/DD/YY.
Bluetooth
Camera connects to the FOXEER remotely. For instructions
on pairings, see the user manual for the remotely.
Wifi
You can turn On/Off WIFI in the settings menu, or you
can press and hold Shutter/Select Button to turn On/Off
WIFI when in photo or video mode.
Time Setup
You can setup the camera time manually by the menu,
also sync with mobile phone time after connecting
camera with APP.
Wifi Password
With this setting, you can set the Wifi password. If you
forgot the password, reset the camera. The default
password is 1234567890.
Default Setting
Reset camera to factory default.
Firmware Version
Display the current camera firmware version.
/Settings Menu /Settings Menu
31 32
CAUTION: Format will wipe all your data of SD card.
Format SD Card
Format the SD card.
Wifi SSID
With this setting, you can set camera’ s name.
Metering
The Legend 3 camera can setup 3 types of metering
modes: Center-weighted metering , Multi-spot
metering , Spot metering .

If the battery reaches 0% while recording, the camera
saves the file and powers off.
To maximize battery life, close Wifi.
Extreme cold temperatures can decrease battery life. To
maximize battery life in cold conditions, keep the camera
in a warm place prior to use.
Shooting at higher frame rates and resolutions increases
power consumption.
To Maximize Battery Life
1.Open the battery door by placing your thumb in the
indentation in the battery door (on the bottom of the
camera) and sliding it to the left.
2.Remove the battery from the camera.
Removing the Battery from the Camera
To connect your Legend 3 to the FOXEER App:
1.Download the FOXEER App to your smartphone/tablet
from the Apple App Store or Google Play.
2.Follow the on-screen instructions to connect your
camera to the App. The default password for your camera
is 1234567890.
The FOXEER App lets you control your camera remotely
using a smartphone or tablet. Features include full
camera control, live preview, playback and sharing of
content.
/Connecting to the FOXEER App /Battery
To play back contents on your computer, copy the files to
your computer first.
Connect the camera to your computer using the included
USB cable.
/Transferring Files to a Computer
33 34

Battery Storage and Handling
The camera contains sensitive components, including the
battery. Avoid exposing your camera and battery to very
cold or very hot temperatures. Low or high temperature
conditions may temporarily shorten the battery life or
cause the camera to temporarily stop working properly.
Avoid dramatic changes in temperature or humidity when
using the camera, as condensation may form on or within
the camera.
Do not turn on your camera if it is wet. If your camera is
already on, turn it off and remove the battery immediately.
Allow the camera to dry thoroughly before using it again.
Do not dry the camera or battery with an external heat
source such as a microwave oven or hair dryer. Damage to
the camera or battery caused by contact with liquid is not
covered under the warranty.
Do not store your battery with metal objects, such as
coins, keys or necklaces. If the battery terminals come in
contact with metal objects, this may cause a fire.
Battery Disposal
Many localities have laws in place requiring battery
recycling. Check your local laws to make sure that you
can dispose of rechargeable batteries in your regular
trash. To safely dispose of lithium-ion batteries, protect
terminals from exposure to other metal with packing,
masking or electrical tape so they do not cause a fire
while being transported.
Lithium-ion batteries, however, do contain recyclable
materials and are accepted for recycling by the
Rechargeable Battery Recycling Corporation’ s (RBRC)
Battery Recycling Program.
Never dispose of a battery in a fire because it may
explode.
/Battery
CAUTION: Do not drop, disassemble, open, crush,
bend, deform, puncture, shred, microwave, incinerate or
paint the camera. Do not insert foreign objects into the
battery opening on the camera. Do not use the camera
or the battery if it has been damaged-for example, if
cracked, punctured or harmed by water. Disassembling
or puncturing the battery can cause an explosion or fire.
/Battery
35 36

/Trademarks
/Customer Support
FOXEER is dedicated to providing the best possible service.
To reach FOXEER Customer Support, visit www.foxeer.com.
FOXEER is trademarks or registered trademarks of XAT
in China and internationally. Other names and marks are
the property of their respective owners.
37
Table of contents
Popular Camcorder manuals by other brands

Hitachi
Hitachi SK-HD1200 Specifications

Sony
Sony Handycam HDR-UX7 operating guide

Sony
Sony CCD-CR1 - Video Camera Recorder 8mm operating instructions

Panasonic
Panasonic Palmcorder PV-D427 operating instructions

Panasonic
Panasonic SDRS150 - SD MOVIE CAMERA operating instructions

JVC
JVC GR-D33US Service manual