GoPro Hero 4 Black User manual

QUICK START GUIDE
Download the User Manual at
gopro.com/support

Congratulations on your new HERO4 Black camera. This Quick Start
Guide will show you the basics of capturing life’s most incredible
moments with your GoPro.
To learn more, download the User Manual at gopro.com/support.
JOIN THE GOPRO MOVEMENT
twitter.com/GoPro
youtube.com/GoProfacebook.com/GoPro
instagram.com/GoPro
/ Hello
When using your GoPro camera as part of your active lifestyle, always be
aware of your surroundings to avoid injury to yourself and others, and to
prevent damage to your camera.
Before using your GoPro camera, please read carefully all
the safety precautions in the Important Product + Safety
Information Guide included with your camera.
To see the complete list of country certifications,
refer to the Important Product + Safety Information
Guide included with your camera.

/ Getting Started
STEP 1
Remove the camera from
the housing.
STEP 2
Remove the camera side
door and insert a microSD
card (sold separately).
(Requires a Class 10 or UHS-1 card.
For a list of the recommended SD cards,
visit gopro.com/support.)
STEP 3
Open the battery door and insert
the battery.
STEP 4
Charge the battery using the
included USB cable.
Shutter/Select Button [ ]
Camera Status Screen
Wireless Status Light (blue)
Camera Status Light (red)
Settings/Tag Button [ ]
Power/Mode Button [ ]
/ The Basics
POWERING CAMERA ON AND OFF
To Power On:
Press the Power/Mode button [ ].
To Power Off:
Press and hold the Power/Mode
button [ ] for two seconds.

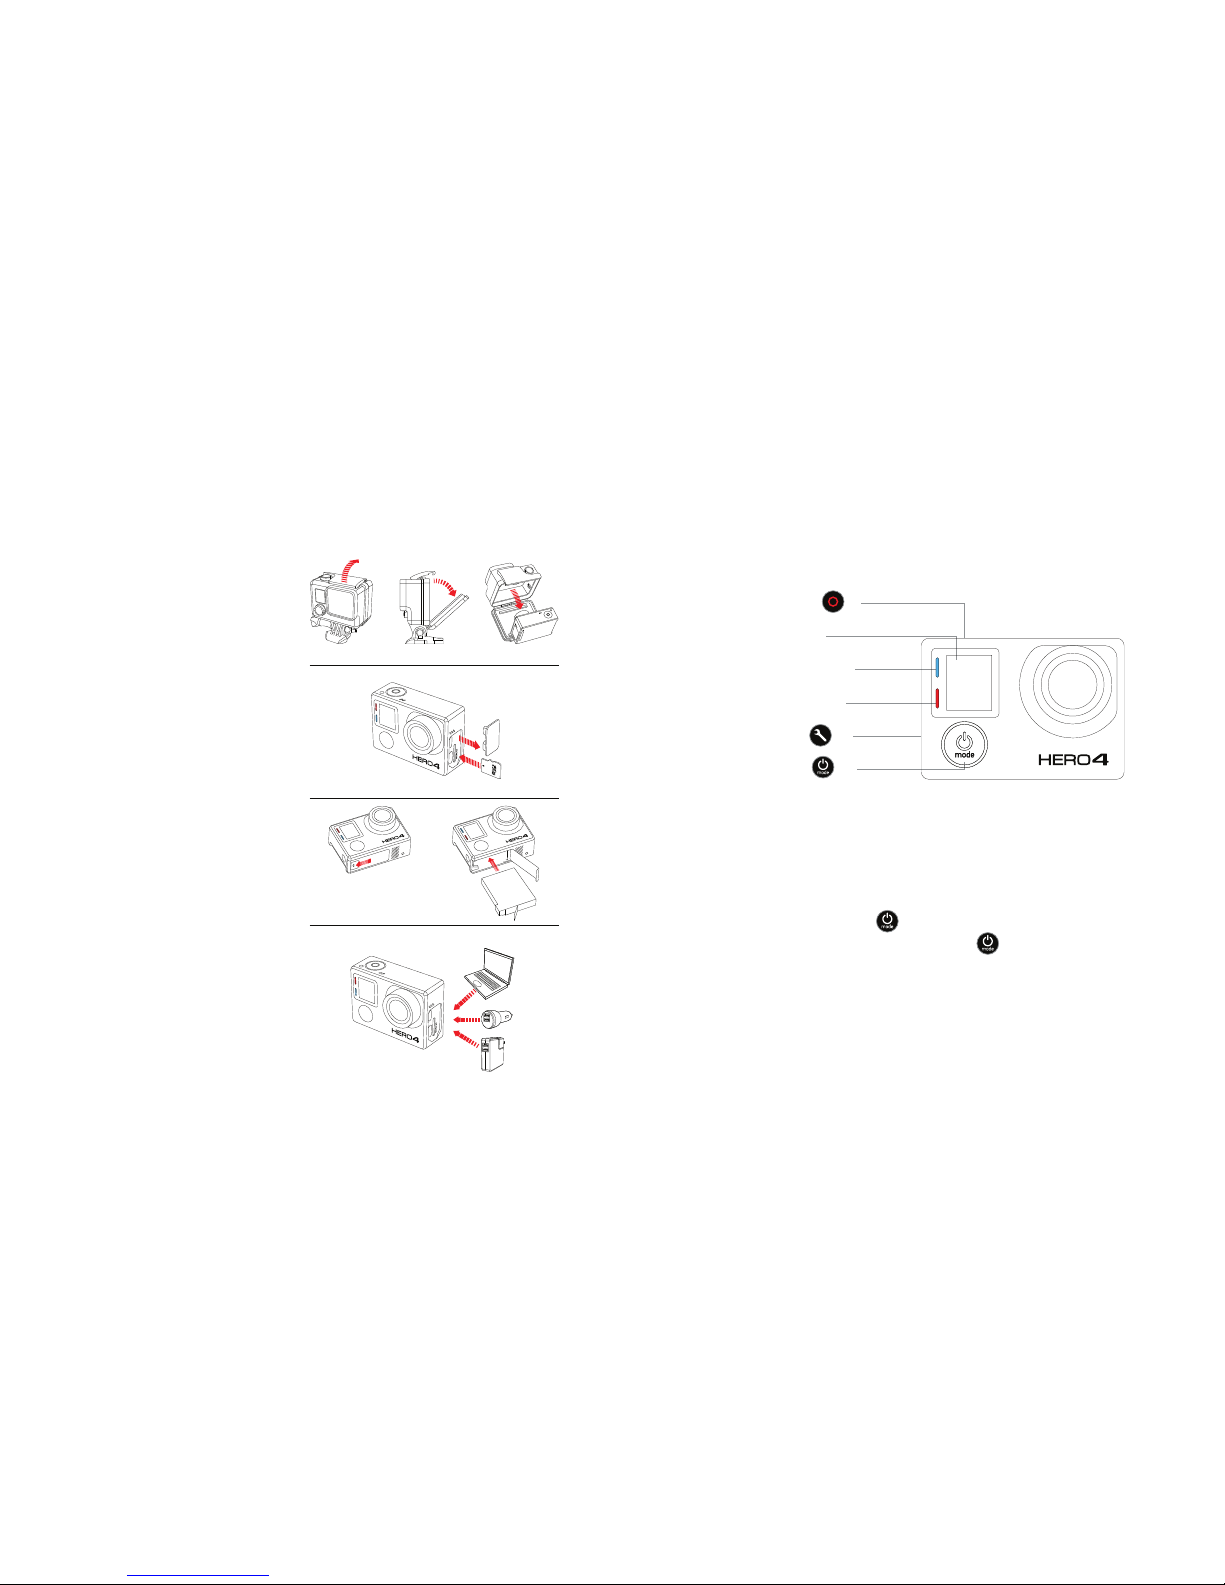
/ Capturing Video and Photos
Select your camera mode, then press the Shutter/Select button [ ] to
start/stop recording or take a photo.
QUIKCAPTURE
When the camera is off and
QuikCapture is enabled, you can
turn the camera on and immediately
begin capturing video or Time Lapse
photos just by pressing the Shutter/
Select [ ] button. Press once
for video, press and hold for two
seconds for Time Lapse photos.
Press again to stop recording and
power off the camera. You can turn
QuikCapture on/off in Setup mode.
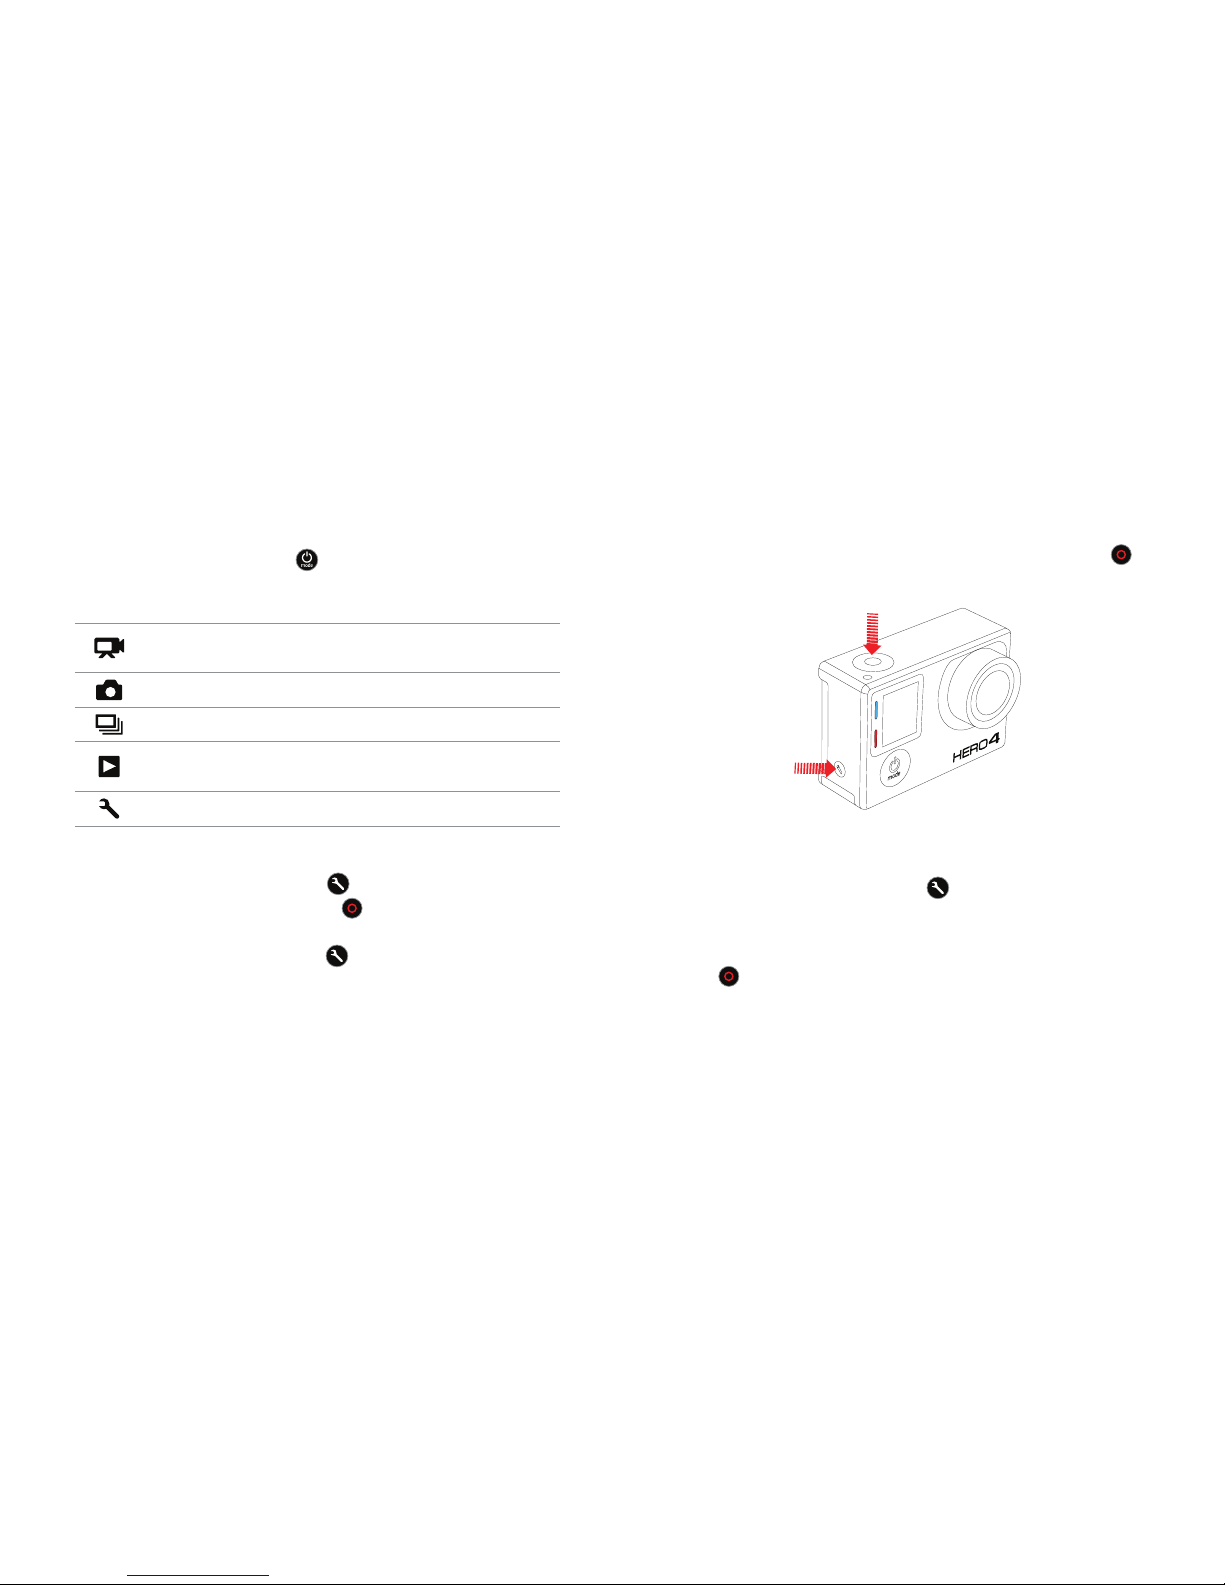
HILIGHT TAG
Press the Settings/Tag button
[ ] to tag key moments while
recording video or playing back
footage on an LCD Touch BacPac.
HiLight Tags help you quickly
find the highlights later for easy
playback, editing and sharing.
*Playback only appears when the camera is connected to a TV or LCD Touch BacPac (sold separately).
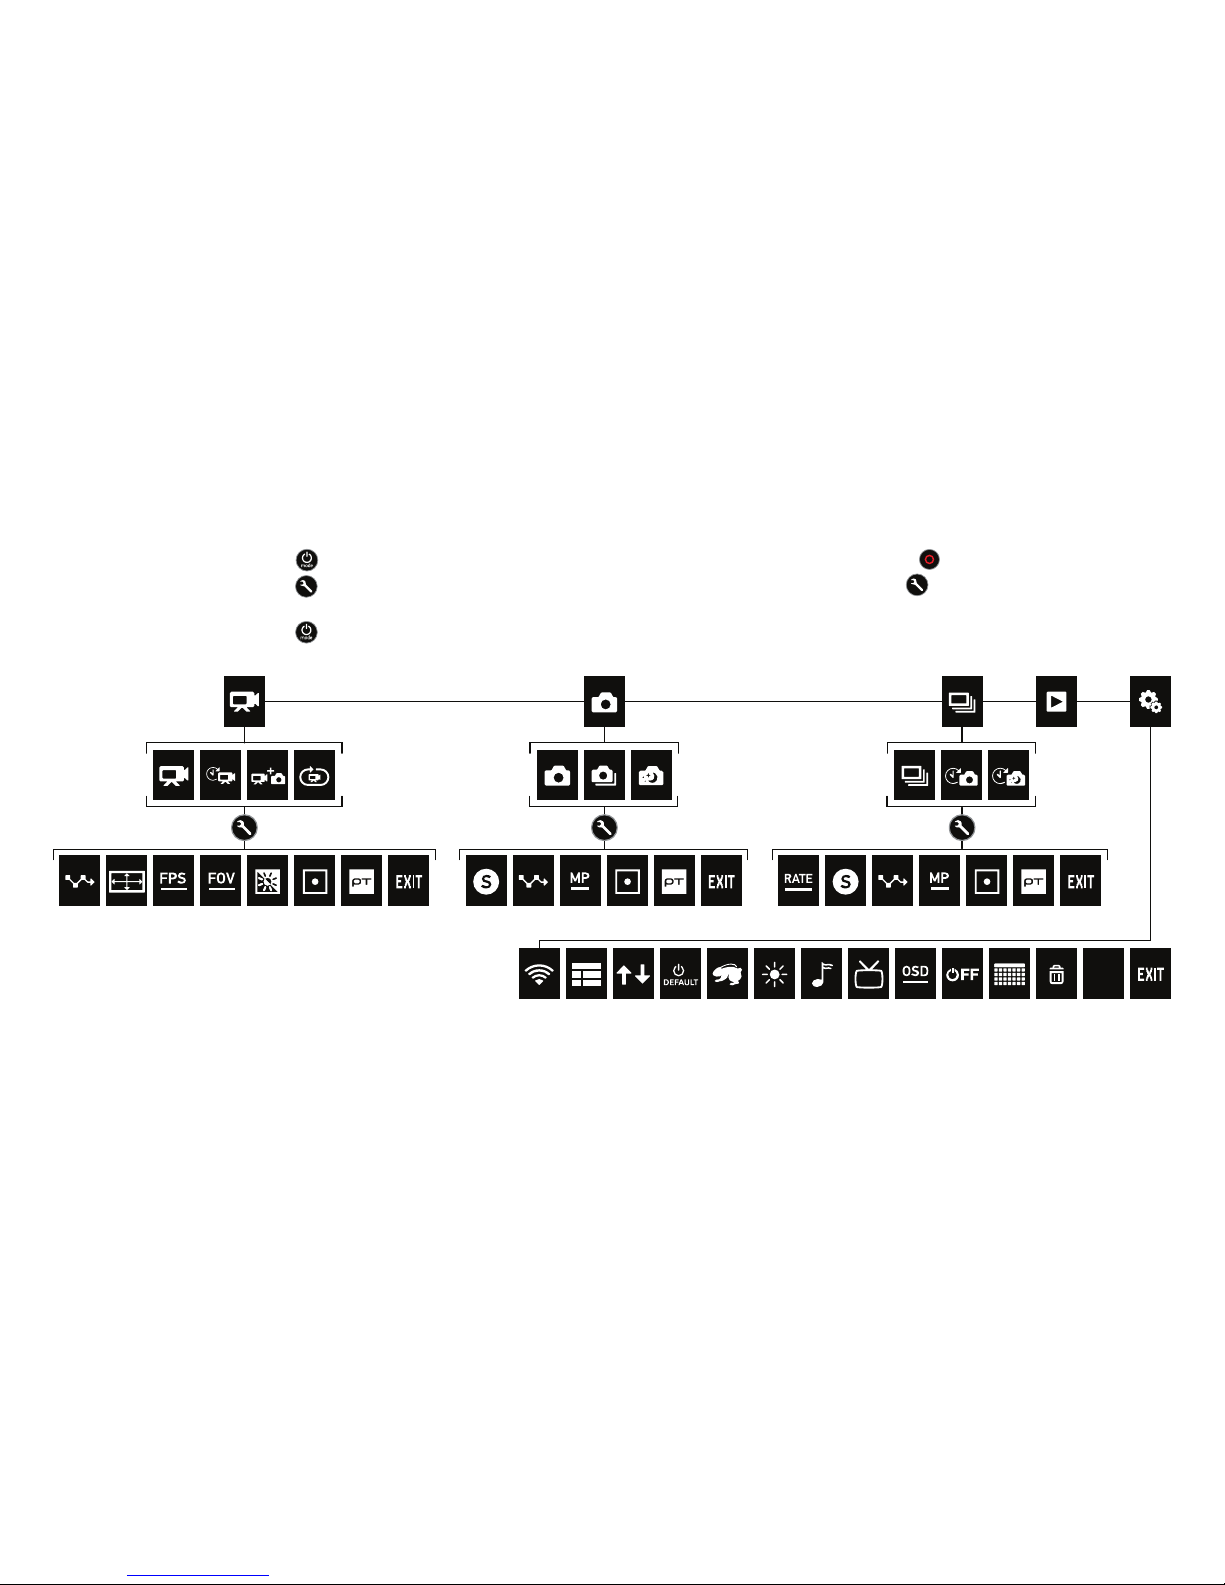
/ Selecting Camera Modes
2. If necessary, select a different capture mode:
a. Press the Settings/Tag button [ ] to open the settings menu.
b. Press the Shutter/Select button [ ] repeatedly until you get to
the desired capture mode.
c. Press the Settings/Tag button [ ] to close the settings menu.
1. Press the Power/Mode button [ ] repeatedly to cycle through the
camera modes.
Camera Modes Description
Video Video, Time Lapse Video, Video + Photo,
Video Looping
Photo Single, Night, Continuous
Multi-Shot Burst, Time Lapse, Night Lapse
Playback* Play back content on a TV or LCD
Touch BacPac™
Setup Adjust general camera settings

/ Adjusting Camera Settings
1. Press the Power/Mode button [ ] to cycle to your desired mode.
2. Press the Settings/Tag button [ ] to enter the Settings menu
for that mode.
3. Press the Power/Mode button [ ] to cycle through the options.
4. Press the Shutter/Select button [ ] to select your desired option.
5. Press the Settings/Tag button [ ] to exit the settings menu.
To learn more about settings, download the User Manual at
gopro.com/support
Camera
Reset

SIDE MOUNTING
VERTICAL MOUNTING
/ Mounting Your Camera
SURFBOARD MOUNTING*
*Surfboard mounts are included with HERO4 Black/Surf only.
To learn more about mounting your camera, visit gopro.com/support.
/ Mounting Your Camera
FLAT SURFACE MOUNTING
CURVED SURFACE MOUNTING
Mount your GoPro to helmets, gear and more with the included Curved +
Flat Adhesive Mounts and hardware.
APPLYING + REMOVING ADHESIVE MOUNTS
Apply adhesive mounts to clean, smooth surfaces at room temperature
only, at least 24 hours before use. To remove, heat with a hair dryer then
peel off mount.

/ Housing Backdoors / Swapping Backdoors
Your HERO4 Black camera comes with two backdoors, each designed for
different uses and environments.
STANDARD BACKDOOR
Provides waterproof protection to 131’ (40m).
Use when shooting under water or in wet, damp
or dirty conditions.
SKELETON BACKDOOR
Not waterproof—use in dry, dirt-free environments
only. Enables enhanced audio capture during
low-speed activities.
STEP 1
Open the housing so the backdoor
hangs downward.
STEP 2
Pull down on the backdoor until it
snaps free from the hinge.
STEP 3
Align the new backdoor with
the hinge.
STEP 4
Push up on the backdoor until it
clicks into place.

/ Playing Back Videos and Photos
There are several ways to play back your videos and view your photos.
/ Sharing Videos and Photos
There are a few ways to share your videos and photos.
COMPUTER
Connect the camera to your
computer with the included USB
cable to transfer content for playback.
For help accessing your GoPro
content, download the latest GoPro
soware at gopro.com/getstarted.
SMARTPHONE + TABLET
Use the GoPro App to play back
content on your smartphone
or tablet. For more info, see
GoPro App.
COMPUTER
Connect the camera to your
computer with the included USB
cable to transfer content for sharing.
LCD TOUCH BACPAC™
This removable LCD touch screen
seamlessly attaches to the back
of your GoPro, delivering quick
playback of videos and photos
(sold separately).
TV
See your content on the big screen.
Connect your camera to your TV
with a micro HDMI*, composite or
combo cable (sold separately).
SMARTPHONE + TABLET
Use the GoPro App to share videos
and photos by text, email or on your
social networks. For more info, see
GoPro App.
*For video resolutions above 1080p60 fps, HDMI playback may only be supported at 1080p 60 fps.

/ Help and Resources/ GoPro App
CONTROL. VIEW. SHARE.
The GoPro App lets you control your camera remotely using a smartphone
or tablet. See what your camera sees with live preview. View photos and
play back videos, then share your favorites via email, text, Facebook,
Twitter and more.
TO CONNECT TO THE GOPRO APP
1. Download the GoPro App and open it
on your smartphone or tablet.
2. When the app stops searching,
tap Connect Your Camera.
3. Follow the app’s on-screen
instructions to connect your camera.
The default password is goprohero.
To learn more about the GoPro App, visit
gopro.com/getstarted.
UPDATE YOUR CAMERA
Get the latest features and
best performance.
CREATE A GOPRO ACCOUNT
Enter for a chance to win Video of
the Day, Photo of the Day and more.
DOWNLOAD THE
USER MANUAL
Find detailed info on settings,
modes and more.
Visit gopro.com/getstarted to learn more:
GET THE GOPRO APP +
GOPRO STUDIO
Control your camera remotely. View
and share content. Create videos.
WATCH A TUTORIAL VIDEO
Learn tips + tricks from the pros.
CONTACT CUSTOMER
SUPPORT
Get help and find answers to
frequently asked questions.

USER MANUAL

2 3
twitter.com/GoPro
youtube.com/GoProfacebook.com/GoPro
instagram.com/GoPro
/ Join the GoPro Movement
To download this user manual in a different language, visit
gopro.com/support.
Pour télécharger ce manuel de l’utilisateur dans une autre langue,
rendez-vous sur gopro.com/support.
Wenn Sie dieses Benutzerhandbuch in einer anderen Sprache
herunterladen möchten, besuchen Sie gopro.com/support.
Per scaricare questo manuale utente in un’altra lingua, visita
gopro.com/support.
Para descargar este manual de usuario en otro idioma, visite
gopro.com/support.
Para baixar este manual do usuário em outro idioma, acesse
gopro.com/support.
このユーザーマニュアルの他言語版をダウンロードするに
は、 gopro.com/supportにアクセスしてください。
若要下載其他語言版本的使用說明書,請前往:
gopro.com/support。
如需下载本用户手册的其他语言版本,请访问
gopro.com/support。
Чтобы загрузить это руководство пользователя на другом языке,
посетите страницу gopro.com/support.

4 5
/ Table of Contents
Using the Mounts
83
Troubleshooting
86
Customer Support
88
Trademarks
88
Regulatory Information
88
The Basics
6
Getting Started
8
Camera Status Screen
13
Camera Icons
14
Camera Menus
16
Camera Modes
18
Navigating Settings Menus
19
Video Mode
20
Photo Mode
34
Multi-Shot Mode
41
Playback Mode
50
Setup Mode
54
Connecting to the GoPro App
63
Transferring Files to a Computer
64
Protune™
65
Battery
71
Important Messages
76
Camera Housing
78
/ Table of Contents

6 7
10. Microphone
11. HE RO P or t
12. Settings/Tag Button [ ]
13. Battery Door
/ The Basics
1. Camera Status Light (red)
2. Shutter/Select Button [ ]
3. Wireless Status Light (blue)
4. Camera Status Screen
5. Power/Mode Button [ ]
6. Micro HDMI Port
(cable not included)
7. microSD Card Slot
(microSD card not included)
8. Mini-USB Port
(supports composite A/V
cable/3.5mm stereo mic
adapter, not included)
9. Audio Aler t
/ The Basics

8 9
/ Getting Started/ Getting Started
4. Charge the battery by connecting the camera to a computer or
other USB charging adapter using the included USB cable. The
camera status light turns on during charging and turns off when
charging is complete.
NOTICE: Using a wall charger other than a GoPro Wall Charger can
damage the GoPro battery. Only use chargers marked: output 5V
1A. If you do not know the voltage and current of your charger, use
the included USB cable to charge the camera from your computer.
When charging with a computer, be sure that the computer is
connected to a power source. If the camera status light does not
turn on, use a different USB port.
The included lithium-ion battery comes partially charged. No damage
occurs to the camera or battery if used prior to a full charge.
PRO TIP: With the Dual Battery Charger, you can charge your battery
outside of the camera. For details, visit gopro.com.
For more battery information, see Battery.
WARNING: Use caution when using your GoPro as part of your
active lifestyle. Always be aware of your surroundings to avoid
injury to yourself and others. Abide by all local laws when using
your GoPro and related mounts and accessories.
CHARGING THE BATTERY
1. Remove the camera from its housing.
2. Remove the camera side door and insert a microSD card (sold
separately). The card must have a Class 10 or UHS-1 rating and
a capacity up to 64GB. Visit gopro.com/support for the list of
recommended SD cards.
3. Open the bottom door, insert the battery and then close the
bottom door.

10 11
POWERING ON + OFF
To Power On:
Press the Power/Mode button [ ] once. The camera status lights
(red) flash three times and the sound indicator emits three beeps. When
the camera status screen displays information, your camera is on.
To Power Off:
Press and hold the Power/Mode button [ ] for two seconds. The
camera status lights (red) flash several times and the sound indicator
emits seven beeps.
PRO TIP: When the camera is off and QuikCapture is enabled, you can
turn the camera on and immediately begin capturing video or Time
Lapse photos just by pressing the Shutter/Select button [ ]. Press
once for video, press and hold for Time Lapse photos. Press again to
stop recording and power off the camera. For details, see QuikCapture
in Setup Mode.
/ Getting Started
CAMERA SOFTWARE UPDATES
To get the latest features and best performance from your HERO4
camera, make sure you are using the most current camera soware.
You can update your camera soware via the GoPro App or GoPro
soware. For more information, visit gopro.com/getstarted.
CAMERA DEFAULT SETTINGS
The HERO4 Black camera powers up with the following default
settings:
Video 1080p30 SuperView™
Photo 12MP, Wide Field of View (FOV)
Multi-Shot Burst option (set to 30 photos in 1 second)
QuikCapture Off
Wireless Off
PRO TIP: To open the settings menu for the current mode, press the
Settings/Tag button [ ].
/ Getting Started

12 13
Your HERO4 Black features a status screen that displays the following
information about modes and settings:
1. Camera Modes/FOV
(field of view)
2. Camera Settings
3. Resolution/fps
(frames per second)
4. Protune™
5. Number of Files Captured
6. Time/Storage/Files
7. Wireless
8. Battery Life
Note: The icons that appear on the camera status screen vary by mode.
/ Camera Status Screen
INSERTING + REMOVING MICROSD CARDS
The HERO4 Black camera is compatible with 4GB, 8GB, 16GB, 32GB
and 64GB capacity microSD, microSDHC and microSDXC memory
cards (sold separately). You must use a microSD card with a Class
10 or a UHS-1 rating. (For a list of the recommended SD cards,
visit gopro.com/support.) GoPro recommends using brand name
memory cards for maximum reliability in high-vibration activities.
To Insert the microSD Card: To Remove the microSD Card:
Slide the memory card into the
card slot with the label facing the
front of the camera.
When fully inserted, the card
clicks into place.
Place your fingernail against
the edge of the memory card
and lightly press it further into
the camera.
The card springs out far enough
to be removed.
NOTICE: Use care when handling memory cards. Avoid liquids, dust
and debris. As a precaution, power off the camera before inserting
or removing the card. Check manufacturer guidelines regarding use
in acceptable temperature ranges.
/ Getting Started

14 15
/ Camera Icons
Auto Low Light
Auto Off
Beeps
Burst Photos
Color
Continuous Photos
Date/Time
Default Mode
Delete
Exposure Value
Compensation
Field of View
Frames Per Second
Interval
ISO Limit
LEDs
Looping
Megapixels
Multi-Shot Mode
Night Lapse
Night Photo
On-Screen Display
Orientation
Photo Mode
Playback Mode
Protune
QuikCapture
Rate
Setup Mode
Sharpness
Shutter
Single Photo
Spot Meter
Time Lapse
Touch Display
Video
Video + Photo
Video Format
Video Mode
Video Resolution
White Balance
Wireless
/ Camera Icons

16 17
/ Camera Menus/ Camera Menus
*Playback appears only if the camera is connected to a TV or LCD Touch BacPac (sold separately).
Camera
Reset

18 19
/ Camera Modes
The HERO4 Black features several camera modes. To cycle through
the modes, press the
Power/Mode button [ ] repeatedly
.
These modes appear:
Video Record video
Photo Capture a single photo
Multi-Shot Capture a series of photos
(Time Lapse, Burst, etc.)
Playback Play back videos and photos
Setup Adjust general camera settings
Each camera mode has its own settings menu.
TO NAVIGATE SETTINGS MENUS:
1. Verify that the camera is in the desired camera mode. If an icon for
that mode does not appear on the camera status screen, press the
Power/Mode button [
] repeatedly until it appears.
2. Press the Settings/Tag button [ ] to open the settings menu for
that mode.
3. Use the Power/Mode button [ ] to cycle through the settings.
4. Press the Shutter/Select button [ ] to cycle through the options
within a setting. To select an option, leave the option highlighted
when you move to another screen.
5. To go back to the previous screen or exit the settings menu, press
the Settings/Tag button [ ].
/ Navigating Settings Menus

20 21
/ Video Mode / Video Mode
Video mode contains four capture modes: Video, Time Lapse Video,
Video + Photo and Video Looping.
Capture Mode Description
Video (default) Captures video.
Time Lapse Video
Creates video from frames captured at
specific intervals. Time Lapse Video is
available only in 4K and 2.7K 4:3 resolutions.
Time Lapse Video is captured without audio.
Protune™, Auto Low Light, and Spot Meter are
not available in this capture mode.
Video + Photo
Simultaneously captures both video and
photos. You can set the camera to capture a
photo at selected intervals while you record
video. For details, see Video + Photo Intervals
in this section.
Looping
Lets you continuously record and save only
the best moments, which helps to conserve
space on your microSD card. You must
select an interval. Protune is not available in
this capture mode.
Note: Looping is not available in high-performance video modes.
CAPTURING VIDEO
1. Press the
Power/Mode button [
] repeatedly until you get to
Video mode.
2. If necessary, select a different video capture mode (Video, Time
Lapse Video, Video + Photo, or Video Looping):
a. Press the Settings/Tag button [ ] to open the settings menu.
b. Press the Shutter/Select button [ ] repeatedly until you get
to the desired capture mode.
c. Press the Settings/Tag button [ ] to close the settings
menu. The icon for the selected capture mode appears in the
upper le on your camera status screen.
3. Press the Shutter/Select button [ ]. The camera beeps once
and the camera status lights flash while the camera is recording.
4. To stop capturing, press the Shutter/Select button [ ]. The camera
status lights flash three times and the camera beeps three times.
If the memory card is full or the battery is out of power, your camera
automatically stops recording. Your video is saved before the camera
powers off.
PRO TIP: When the camera is off and QuikCapture is enabled, you
can turn the camera on and immediately begin capturing video just
by pressing the Shutter/Select button [ ]. Press again to stop
recording and power off the camera. For details, see Setup Mode.
Other manuals for Hero 4 Black
2
Table of contents
Other GoPro Camcorder manuals
Popular Camcorder manuals by other brands

Hamilton/Buhl
Hamilton/Buhl HDV5200-01 instruction manual

Easypix
Easypix DV 5311 HD quick start guide

BZB Gear
BZB Gear BG-BWEB-S user manual

D-MAX
D-MAX DAZ-530 user manual

Easypix
Easypix aquapix WDV1080 FULL HD Lagoon manual

Blackmagicdesign
Blackmagicdesign Blackmagic Cinema Camera Installation and operation manual