Hammond M-SOLO User manual

Introduction Hook-Up Power On and Play Instrument Types System Appendix
MIDI/USB
OwnerʼsManual
*#1
Model:
English
OpenHere
日本語
Page41
TABLE OF CONTENTS
IMPORTANT SAFETY INSTRUCTIONS..................2
IMPORTANT - PLEASE READ ................................4
WHAT IS M-solo?...................................................5
NAMES AND FUNCTIONS.....................................6
TOP PANEL..................................................................................................6
REAR PANEL ...............................................................................................8
ACCESSORIES ............................................................................................8
CONNECTIONS......................................................9
BASIC HOOK-UP .......................................................................................9
USING A MUSIC PLAYER.......................................................................10
USE WITH A DIGITAL PIANO ...............................................................10
CONNECT A MIDI EQUIPMENT..........................................................11
CONNECT THE COMPUTER VIA USB................................................11
PLAY THE INSTRUMENT .................................... 12
POWER ON AND OFF............................................................................12
AUTO POWER OFF.................................................................................12
PLAY WITH PATCHES .............................................................................13
PLAY WITH CONTROLLERS..................................................................14
CHANGE THE PITCH...............................................................................15
CREATE YOUR OWN PATCH.................................................................16
RECORD TO THE PATCH........................................................................19
SIGNAL FLOW..........................................................................................19
INSTRUMENT TYPES.......................................... 20
TW...............................................................................................................20
Vx.................................................................................................................22
Farf ..............................................................................................................23
Ace ..............................................................................................................24
Ens...............................................................................................................25
Syn...............................................................................................................26
SYSTEM CONFIGURATION ................................ 28
OPERATING PROCEDURE ....................................................................28
RESET TO THE FACTORY SETTING.....................................................28
SYSTEM PARAMETERS..........................................................................29
MIDI/USB............................................................ 30
WHAT IS “MIDI”?......................................................................................30
WHAT MIDI/USB CAN DO ON THE M-solo.....................................30
INSTRUMENT TYPES AND NOTE MESSAGE...................................30
MIDI IMPLEMENTATION.......................................................................30
DRAWBAR DATA LIST............................................................................31
TROUBLESHOOTING ......................................... 33
TROUBLES.................................................................................................33
MESSAGES................................................................................................33
UPDATING THE SOFTWARE............................... 34
PREPARING OPERATING TIME ............................................................34
PREPARING UPDATE FILE.....................................................................34
PREPARING MEDIA.................................................................................34
OPERATION PROCEDURE ....................................................................34
CONFIRMING VERSIONS ......................................................................35
BACKUP YOUR SETUP........................................ 36
PREPARING MEDIA.................................................................................36
BACK-UP THE SETUP .............................................................................36
RESTORE THE SETUP .............................................................................36
SPECIFICATIONS................................................ 38
SERVICE.............................................................. 39
ank you, and congratulations on your choice of the Ham-
mond Drawbar Keyboard M-solo.
e M-solo Drawbar Keyboard is condensed the sound and
playability of the legendary Hammond Tone Wheel organ,
Transistor Combo organs, Strings Ensemble and Polyphonic
Synthesizer.
Please take the time to read this manual completely to take
full advantage of the many features of your M-solo; and please
retain it for future reference.
*#1 Owner’s Manual
2IMPORTANT SAFETY INSTRUCTIONS
Before using this unit, please read the following Safety instructions, and adhere to them.
Keep this manual close by for easy reference.
In this manual, the degrees of danger are classied and explained as follows:
WARNING
CAUTION
WARNING
is sign shows there is a risk of death or severe injury if this unit is not properly used as
instructed.
is sign shows there is a risk of injury or material damage if this unit is not properly used
as instructed.
*Material damage here means a damage to the room, furniture or animals or pets.
Do not open (or modify in any way) the unit or its AC
adaptor.
Do not attempt to repair the unit, or replace parts in
it. Refer all servicing to your retailer, the nearest Ham-
mond Dealer, or an authorized Hammond distributor,
as listed on the “Service” page.
Never use or store the unit in places that are:
Subject to temperature extremes (e.g., direct sun-
light in an enclosed vehicle, near a heating duct, on
top of heat generating equipment)
Damp (e.g., baths, washrooms, on wet oors)
Humid
Exposed to rain
Dusty
Subject to high levels of vibration.
Be sure to use only the AC adaptor GQ36-120300-E2
supplied with the unit. And, make sure the line voltage
at the installation matches the input voltage specied
on the AC adaptor’s case. Other AC adaptors may use a
dierent polarity, or be designed for a dierent voltage,
their use could result in damage, malfunction, or elec-
tric shock.
Do not excessively twist or bend the power cord, or
place heavy objects on it. Doing so can damage the
cord, producing severed elements and short circuits.
Damaged cords are re and shock hazards!
is unit, either alone or in combination with an ampli-
er and headphones or speakers, may be capable of pro-
ducing sound levels that could cause permanent hearing
loss. Do not operate for a extended periods of time at a
high volume level, or at a level that is uncomfortable. If
you experience any hearing loss or ringing in the ears,
you should immediately stop using the unit, and consult
a physician.
Do not allow any objects (e.g., flammable material,
coins, pins); or liquids of any kind (water, soft drinks,
etc.) to penetrate the unit.
Immediately turn the power o, remove the AC adaptor
from the outlet, and request servicing by your retailer,
the nearest Hammond Dealer, or an authorized Ham-
mond distributor, as listed on the “Service” page when:
e AC adaptor, the power-supply cord, or the plug
has been damaged; or
If smoke or unusual odor occurs
Objects have fallen into, or liquid has been spilled
onto the unit; or
e unit has been exposed to rain (or otherwise has
become wet); or
e unit does not appear to operate normally or ex-
hibits a marked change in performance.
In households with small children, an adult should pro-
vide supervision until the child is capable of following
all the rules essential for the safe operation of the unit.
Protect the unit from strong impact. (Do not drop it!)
Do not force the unit’s power-supply cord to share an
outlet with an unreasonable number of other devices.
Be especially careful when using extension cords - the
total power used by all devices you have connected to
the extension cord’s outlet must never exceed the power
rating (watts/amperes) for the extension cord. Excessive
loads can cause the insulation on the cord to heat up and
eventually melt through.
Before using the unit in a foreign country, consult
with your retailer, the nearest Hammond Dealer, or an
authorized Hammond distributor, as listed on the “Ser-
vice” page.
Do not put anything that contains water (e.g., ower
vases) on this unit. Also, avoid the use of insecticides,
perfumes, alcohol, nail polish, spray cans, etc., near the
unit. Swiftly wipe away any liquid that spills on the unit
using a dry, soft cloth.

3
Introduction
CAUTION
e unit and the AC adaptor should be located so their
location or position does not interfere with their proper
ventilation.
Always handle the AC adaptor by the plug when plug-
ging into, or unplugging from, an outlet or this unit.
At regular intervals, you should unplug the AC adaptor
and clean it by using a dry cloth to wipe all dust and
other accumulations away from its prongs. Also, discon-
nect the power plug from the power outlet whenever the
unit is to remain unused for an extended period of time.
Any accumulation of dust between the power plug and
the power outlet can result in poor insulation and lead
to re.
Try to prevent cords and cables from becoming entan-
gled. Also, all cords and cables should be placed so they
are out of the reach of children.
Never climb on top of or place heavy objects on the
unit.
Never handle the AC adaptor or its plugs with wet
hands when plugging into, or unplugging from, an
outlet of this unit.
Before moving the unit, disconnect the AC adaptor and
all cords coming from external devices.
Before cleaning the unit, turn o the power and unplug
the AC adaptor from the outlet.
Whenever you suspect the possibility of lightning in
your area, disconnect the AC adaptor from the outlet.
In the unlikely event that you need to dispose of
this unit, be sure to contact your dealer or your
nearest town or municipal office for its proper
disposal.
Note: is equipment has been tested and found to comply
with the limits for a Class B digital device, pursuant to part
15 of the FCC Rules. ese limits are designed to provide rea-
sonable protection against harmful interference in a residential
installation.
is equipment generates, uses and can radiate radio frequency
energy and, if not installed and used in accordance with the
instructions, may cause harmful interference to radio commu-
nications.
However, there is no guarantee that interference will not occur
in a particular installation.
If this equipment does cause harmful interference to radio or
television reception, which can be determined by turning the
equipment o and on, the user is encouraged to try to correct
the interference by one or more of the following measures:
Reorient or relocate the receiving antenna.
Increase the separation between the equipment and receiv-
er.
Connect the equipment into an outlet on a circuit dierent
from that to which the receiver is connected.
Consult the dealer or an experienced radio/TV technician
for help.
FOR UNITED KINGDOM:
FOR YOUR SAFETY, PLEASE READ THE FOLLOWING
TEXT CAREFULLY
is appliance is supplied with a molded 3-pin mains plug for
your safety and convenience.
e plug contains a 13 amp fuse.
Should the fuse need to be replaced, please ensure that the re-
placement fuse has a rating of 13 amps and that it is approved
by ASTA or BSI to BSI1362.
Check for the ASTA mark or the BSI mark on the
body of the fuse.
If the fuse cover is lost, the plug must not be used until a re-
placement cover is obtained.
A replacement fuse cover can be obtained from your local
Hammond Dealer.
If the tted molded plug is unsuitable for the socket outlet in
your home, then the fuse should be removed and the plug cut
o and disposed of safely.
ere is a danger of severe electrical shock if the cut-o plug is
inserted into any 13 amp socket.
To replace the fuse, open the fuse compartment with a screw-
driver and replace the fuse and fuse cover.
*#1 Owner’s Manual
4IMPORTANT - PLEASE READ
Power Supply
Do not use this unit on the same power circuit with any de-
vice that will generate line noise (such as an electric motor
or light dimming system).
e AC adaptor will begin to generate heat after long hours
of consecutive use. is is normal, and is not a cause for
concern.
Before connecting this unit to other devices, turn o the
power to all units. is will help prevent malfunctions and/
or damage to speakers or other devices.
Placement
Using the unit near power ampliers (or other equipment
containing large power transformers) may induce hum. To
alleviate the problem, change the orientation of this unit, or
move it farther away from the source of interference.
is device may interfere with radio and television recep-
tion. Do not use this device in the vicinity of such receivers.
Noise may be produced if wireless communications devices,
such as cell phones, are operated in the vicinity of this unit.
Such noise could occur when receiving or initiating a call,
or while conversing. Should you experience such problems,
you should relocate such wireless devices so they are at a
greater distance from this unit, or switch them o.
Do not expose the unit to direct sunlight, place it near
devices that radiate heat, leave it inside an enclosed vehicle,
or otherwise subject it to temperature extremes. Also, do
not allow lighting devices that normally are used while
their light source is very close to the unit (such as a piano
light), or powerful spotlights to shine upon the same area
of the unit for extended periods of time. Excessive heat can
deform or discolor the unit.
When moved from one location to another where the
temperature and/or humidity is very dierent, water drop-
lets (condensation) may form inside the unit. Damage or
malfunction may result if you attempt to use the unit in
this condition. erefore, before using the unit, you must
allow it to stand for several hours, until the condensation
has completely evaporated.
Do not allow rubber, vinyl, or similar materials to remain
on the unit for long periods of time. Such objects can dis-
color or otherwise harmfully aect the nish.
Do not paste stickers, decals, or the like on the M-solo.
Peeling such matter o the M-solo may damage the exterior
nish.
Maintenance
To clean the unit, use a dry, soft cloth; or one that is slightly
dampened.
To remove stubborn dirt o plastic parts, use a cloth im-
pregnated with a mild, non-abrasive detergent. Afterwards,
be sure to wipe the unit thoroughly with a soft, dry cloth.
Try to wipe the entire surface using an equal amount of
strength, moving the cloth along with the grain of the
wood. Rubbing too hard in the same area can damage the
nish.
Never use benzine, thinners, alcohol or solvents of any
kind, to avoid the possibility of discoloration and/or defor-
mation.
Additional Precautions
Please be aware that the contents of memory can be irre-
trievably lost as a result of a malfunction, or the improper
operation of the unit. To protect yourself against the risk of
losing important data, we recommend that you periodically
save a backup copy of important data you have stored in the
unit’s memory in another MIDI device (to another storage
medium (such as a USB Flash Drive or an external hard
drive).
Unfortunately, it may be impossible to restore the contents
of data once it has been lost. Hammond assumes no liabil-
ity concerning such loss of data.
Use a reasonable amount of care when using the unit’s but-
tons, sliders, or other controls, and when using its jacks and
connectors. Rough handling can lead to malfunctions.
When connecting / disconnecting all cables, grasp the
connector itself - never pull on the cable. is will avoid
causing short circuits, or damage to the cable’s internal
elements.
To avoid disturbing your neighbors, try to keep the unit's
volume at reasonable levels. You may prefer to use head-
phones, so you do not need to be concerned about those
around you (especially when it is late at night).
When you need to transport the unit, package it in the box
(including padding) that it came in, if possible. Otherwise,
you will need to use equivalent packaging materials.
Trademark
All trademarks and brand names mentioned in this manual
are the property of their respective owners and not in any way
aliated or associated with Hammond Suzuki. e trademarks
are only mentioned for explanation purposes.

5
Introduction
WHAT IS M-solo?
If you have played some digital pianos or digital keyboards,
maybe you will surprised with exterior of this instrument. It
has no “Tone” buttons such as “Piano” or “Strings”, and it has
numbers of unfamiliar knobs and buttons. What is this?
INSTRUMENT TYPES
is instrument has six “Instrument Types.” All the types aimed
“creating” tones by yourself rather than “selecting” a tone.
TW
is is the Hammond’s legendary Tone Wheel Organ which
played from 1950’s to today. It is used at widely genre, ballad,
rock and house music.
To create the settings, operate the 9 Drawbars which assigned
each harmonic.
Vx
is is a Transistor Organ which come from UK and it has de-
cent tone. e sound of the original model often heard on the
songs by Doors, Iron Buttery, and so on.
To create the settings, operate the 7 Drawbars which assigned
each harmonic, and 2 Drawbars which has each brightness of
tone.
Farf
is is a Transistor Organ which come from Italy and it has
colorful tone. e sound of the original model often heard on
the 1970’s punk rock or new wave rock .
On this instrument, 9 Drawbars are assigned in place of Tablets
on the original model.
Ace
is is a Transistor Organ which come from Japan and it has
bright tone. e sound of the original model often heard on
the Japanese songs which genre called “Group Sounds” with
Vibrato or Reverb eects.
On this instrument, 9 Drawbars are assigned in place of Tablets
on the original model.
Ens
is is a kind of electronic instrument which used as in place
of strings ensemble in 1970’s. It is liked clear and modulated
sound, likely models are produced by plural manufacturer, and
it is used at widely genre from jazz to rock music.
On this instrument, the variation “Human Voice” is mounted
also.
Syn
e synthesizer can be making changing sound by timewise
unlike organs is grown up to polyphonic in the 1970’s.
On this instrument, each Drawbar are assigned to the param-
eter of the synthesis. e setting can be express by 9 numbers
like the old Hammond synthesizer, “102200.”
+
Digital Piano
This instrument
ese Instrument Types are contrastive with Digital Pianos.
You can various playing performance by using this instrument
along with the Digital Piano.
WHERE THE NAME“M-solo” COME FROM
In between 1950’s to 1960’s, the “M series” also called “Ba-
by-B” was produced which minimized famous Tone Wheel
Organ “B-3.”
e “M-solo” which has 49 notes single keyboard is named as
a successor of the M series.
FEATURE OF THE M-solo
is is a compact Drawbar Keyboard that designed for re-
al-time operation which is rarely seen in today.
There is no display, or finely parameters. The buttons and
Drawbars on the top panel are all of the current setting for
playing.
e setting can be recorded up to 3 exclusive Patch buttons.

*#1 Owner’s Manual
6NAMES AND FUNCTIONS
TOP PANEL
COMMON
❶MASTER VOLUME knob
Controls the volume of the entire instrument.
❷TRANSPOSE button (P. 15)
Transposes the keyboard and sound engine of this keyboard by
pressing the ❸with pressing and holding this button.
❸OCTAVE buttons (P. 15)
Shifts the keyboard octave up and down.
❹SYSTEM/RECORD button
1. Record current setting to the Patch by pressing any of ⓴
with pressing and holding this button. (P. 19)
2. Congure the system parameters. (P.28)
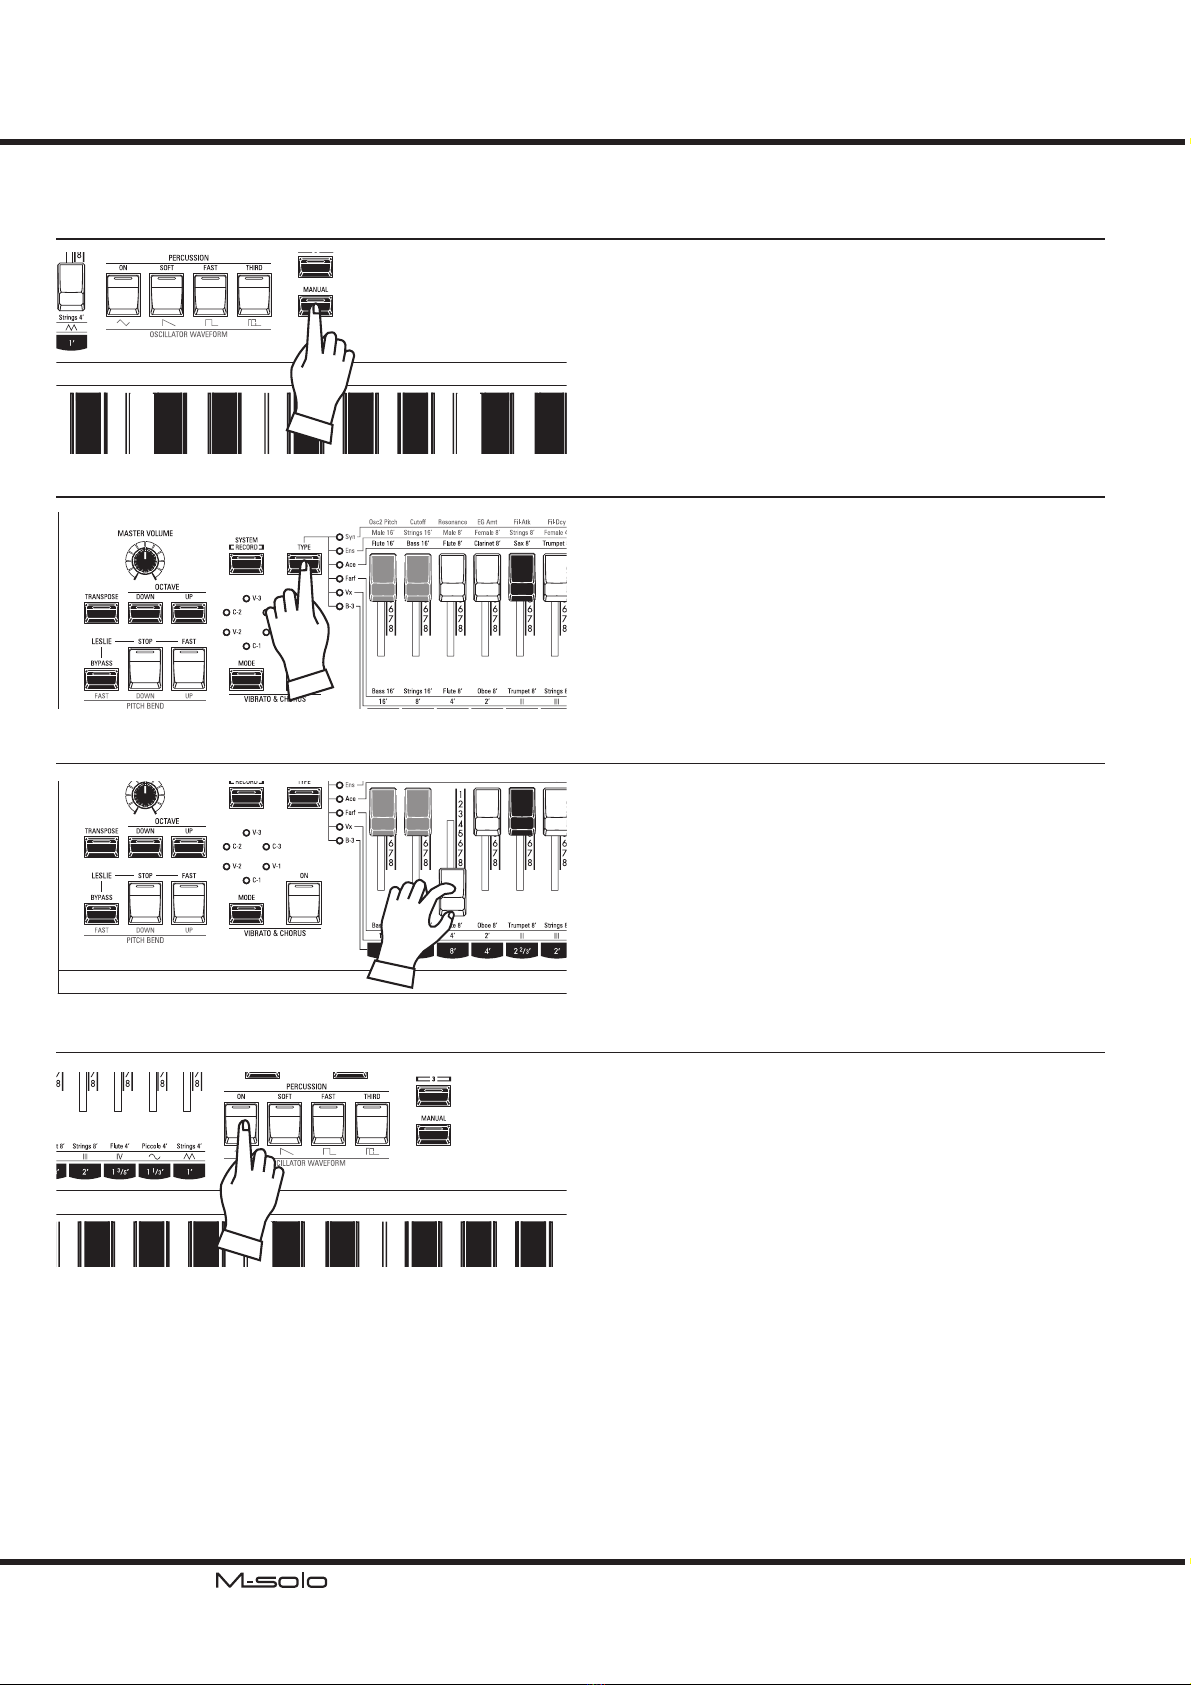
❺TYPE button (P. 16)
Select the Instrument Type of this instrument.
TW.....................Hammond Organ B-3, produced in 1955 to 1974.
Vx ...................... British Transistor Organ, in 1960’s.
Farf ...................Italian Transistor Organ, in 1960’s to 1970’s.
Ace .................... Japanese Transistor Organ, in 1960’s to 1970’s.
Ens .................... Strings Ensemble Keyboard, in 1970’s.
Syn .................... An easy Polyphonic Synthesizer, 1970’s.
❻DRAWBARS (P. 16)
It is dierent purpose by ❺Instrument Type.
TW, Vx, Farf, Ace
............................ Creates the basic harmonics.
Ens .................... Adds each waveform of it.
Syn .................... Controls each parameter.
PERCUSSION
Adds percussive tone to the beginning of sounding when the ❺
Instrument Type is at “TW.”
❼ON button (P. 16)
Adds Harmonic Percussion (decay).
❽SOFT button (P. 16)
Slightly reduces the volume of the Percussion.
❾FAST button (P. 16)
Makes faster the decay rate of the Percussion.
❿THIRD button (P. 16)
Switches harmonic of the Percussion from second to third.
OSCILLATOR WAVEFORM
When the ❺Instrument Type is at “Syn,” the buttons ❼
through ❿selects oscillator waveform.
.......... Triangle, having smooth odd-harmonic.
.......... Sawtooth, having odd and even-harmonic.
.......... Square, having heavy odd-harmonic.
.......... Pulse, can be changing pulse width.
LESLIE
Adds “Leslie Eect” which the sound goes through the rotor.
is eect is enabled when the ❺Instrument Type is at “TW”,
“Vx”, “Farf” or “Ace” Organs.
⓫BYPASS button (P. 17)
Disables the Leslie eect and output the “dry” sound.
⓬STOP button (P. 17)
Selects the rotor state of the Leslie eect when the ⓭[FAST]
button is at “OFF” and “ON.”
ON ..................... STOP/FAST
OFF ................... SLOW/FAST
⓭FAST button (P. 17)
Toggles the rotor state between “FAST” and “either SLOW or
STOP.”
❶
❶
❷
❷
❸
❸
❹
❹
❺
❺
❻
❻
❼
❼
❽
❽
❾
❾
❿
❿
⓫
⓫
⓬
⓬
⓭
⓭
⓮
⓮
⓯
⓯
⓰
⓰
⓱
⓱
⓲
⓲
⓳
⓳
⓴
⓴

7
Introduction
PITCH BEND
is changes the pitch during playing when the ❺Instrument
Type is at “Ens” or “Syn.”
⓫OCTAVE button (P. 14)
Normally the pitch will changed 2 semitones by the [DOWN]
and [UP] buttons.
e pitch will changed 1 octave by Pressing and Holding this
button.
⓬DOWN button (P. 14)
It lowers the pitch gradually.
⓭UP button (P. 14)
It raise the pitch gradually.
VIBRATO & CHORUS
⓮MODE button (P. 17)
e eect types will selected automatically with ❺Instrument
Types.
TW.....................It selects the depth of either the Vibrato or Chorus.
Vx, Farf, Ace, Ens
............................ It selects the depth of either the Vibrato.
Syn .................... Selects the depth of either the Delay Vibrato, Wah-Wah or
Pulse Width Modulation.
⓯ON button (P. 17)
Switches ON and OFF the VIBRATO & CHORUS eect.
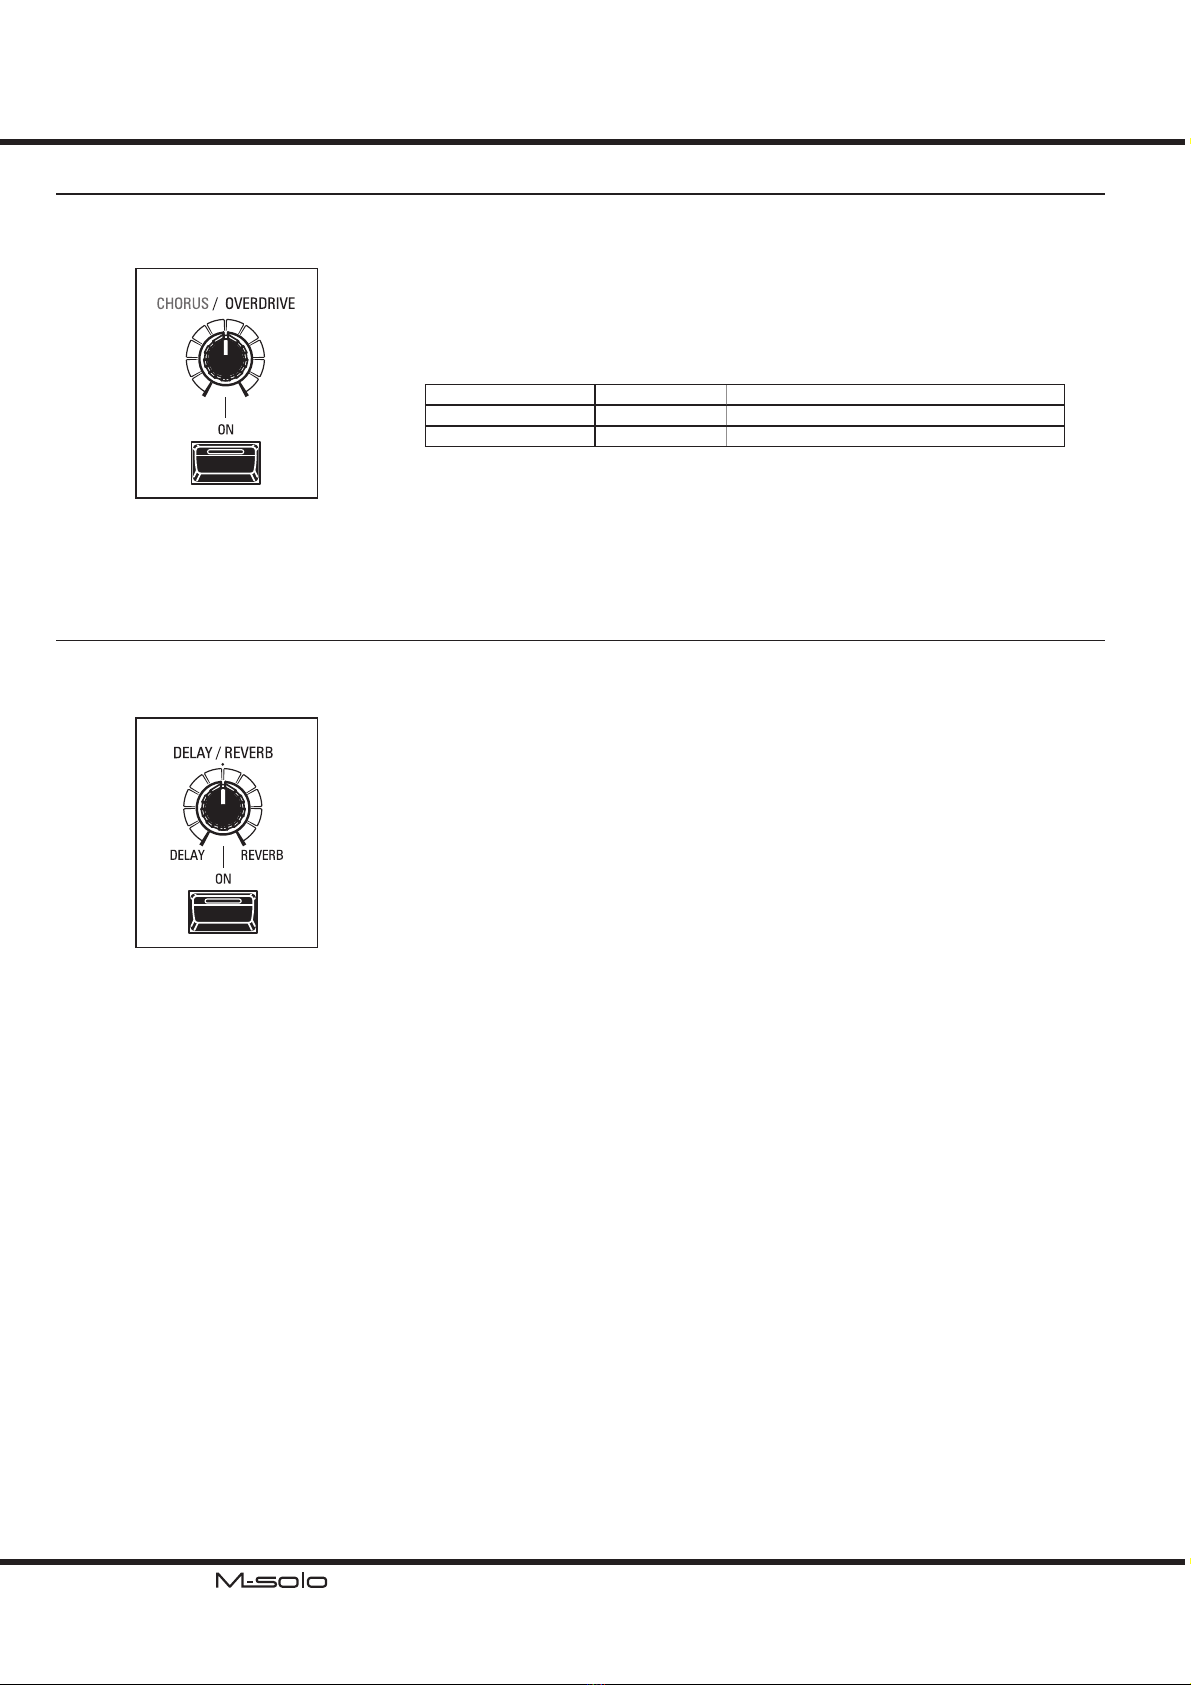
CHORUS / OVERDRIVE
e eect types will selected automatically with ❺Instrument
Types.
⓰CHORUS/OVERDRIVE knob (P. 18)
Controls the depth of the eect.
⓱ON button (P. 18)
Switches ON and OFF the eect.
DELAY / REVERB
⓲DELAY/REVERB knob (P. 18)
Select the eect types either the DELAY or REVERB and
controls its depth.
⓳ON button (P. 18)
Switches ON and OFF the DELAY / REVERB eect.
PATCH
123
⓴PATCH buttons (P. 19)
Recalls the Patch to play. e setting will not matched with the
top panel.
MANUAL button (P. 19)
Play with setting on the top panel.
KEYBOARD
Keyboard
49 notes, light-weight keyboard.
VELOCITY AND SOUND ENGINE
The keyboard on this instrument has Velocity
feature for ON and OFF. But sound engine in
this instrument does not change loudness or
timbre by the Velocity.
The Velocity in this instrument is used for
controlling the VMC (Virtural Multi Contact)
when the instrument type is at “TW.”
*#1 Owner’s Manual
8
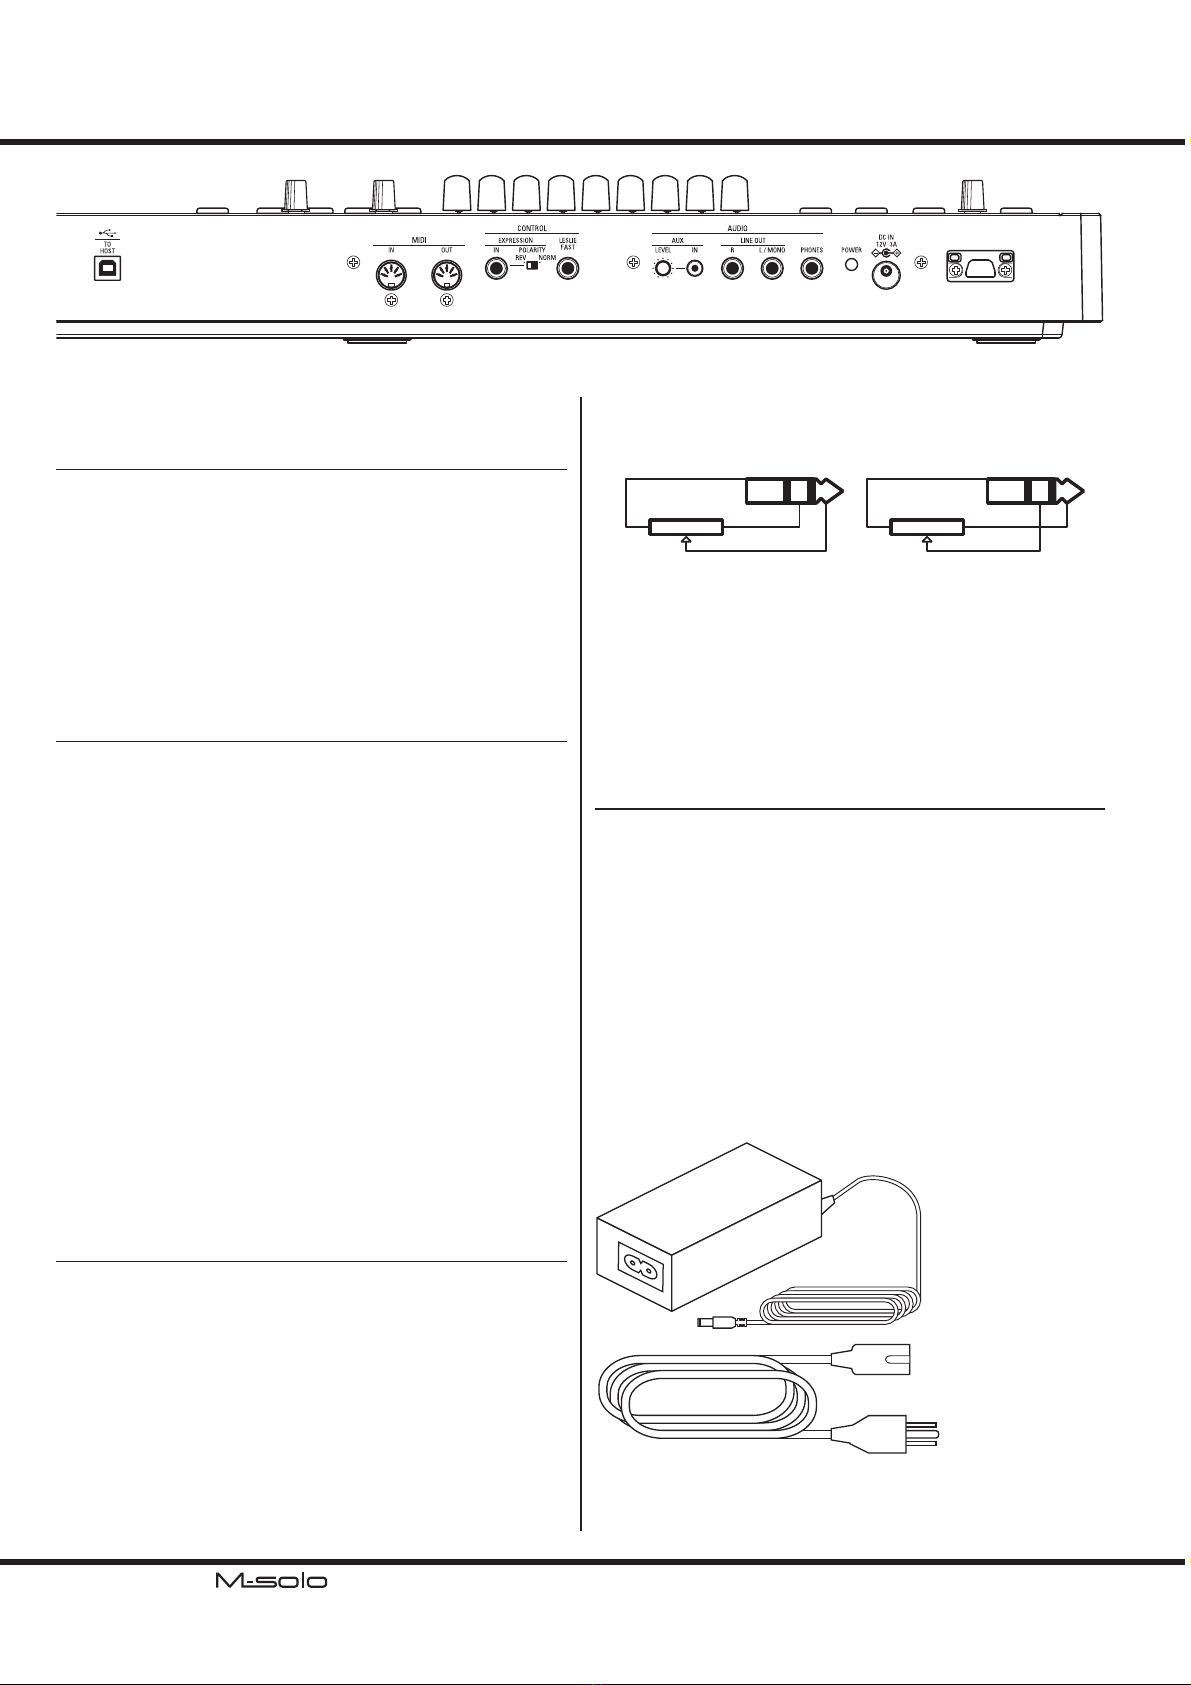
REAR PANEL
POWER SUPPLY
❶CORD HOOK (P. 9)
Fix the DC cord of the AC power adaptor by attach it into this
hook for avoid the disconnect unexpectedly.
❷DC IN jack (P. 9)
Connect the AC power adaptor to supply the power.
Use only GQ36-120300-E2.
❸POWER button (P. 12)
Turns ON and OFF this instrument.
AUDIO
❹PHONES jack (P. 9)
Use this jack to connect a set of stereo headphones.
NOTE: Connecting Headphones does NOT mute the LINE OUT. If you
wish the sound to go through the Headphones only, discon-
nect all other audio outputs.
❺LINE OUT L/MONO jack (P. 9)
❻LINE OUT R jack
Use these jacks to connect external audio equipment.
If the connected mixer or monitor speaker is stereophonic,
connect both the L and R jacks. If it is monaural, connect only
to the L/MONO jack.
❼AUX IN jack (P. 10)
Use this jack to connect an external audio source. When con-
nected, the sound will be mixed with this instrument’s sounds
and sent out to the LINE OUT jacks and the PHONES jack.
❽AUX LEVEL knob (P. 10)
Adjusts the volume of the sound coming in from the AUX IN
jack.
CONTROL
❾LESLIE FAST jack (P. 14)
Switches the Leslie “FAST” or not which instead of the Leslie
[FAST] button (P. 6).
Connect the “momentary” type Foot Switch. e recommend-
ed Foot Switches are listed below:
HAMMOND ... FS-9H, VFP1
BOSS ................ FS-5U
YAMAHA......... FC4A, FC5
NAMES AND FUNCTIONS - continued
❿EXPRESSION POLARITY switch
Selects the polarity of the connected Expression Pedal.
MIN MAX
Potentiometer
NORMAL
MIN MAX
Potentiometer
REVERSE
⓫EXPRESSION jack (P. 14)
Use this jack to connect an Expression Pedal to control volume
while playing.
e recommended Expression Pedals and corresponded setting
of the ❿are listed below:
HAMMOND ... EXP-50J, EXP-20, V-20H, V-20R; NORM
KORG................ XVP-10, XVP-20; REV
ROLAND ......... EV-5; NORM
YAMAHA......... FC7; REV
MIDI/USB
⓬MIDI OUT port (P. 11)
Transmits MIDI data to a connected MIDI device.
⓭MIDI IN port (P. 11)
Receives MIDI date from a connected MIDI device.
⓮USB TO HOST port (P. 11)
Use to connect to a computer to transmit MIDI messages or
Update les.
ACCESSORIES
❶AC Adaptor GQ36-120300-E2
❷AC Cord Set
❶
❶
❷
❷

9
Hook-Up
CONNECTIONS
BASIC HOOK-UP
Connect audio cables and accessories as shown below.
e M-solo is not self-contained - an external amplier/speaker system is required in
order to hear the sound. However, if you connect a set of stereo headphones to the
PHONES jack, you can hear the sound through the headphones even if an external
amplier is not connected.
NOTE: Make sure both the instrument and amplier are “OFF” before connecting ampliers
or headphones.
*#1 Owner’s Manual
10
USING A MUSIC PLAYER
AUX IN Jack
Use the [AUX IN] jack to connect a music player or mobile phone which on the
market.
Use the [AUX LEVEL] knob on the Rear Panel to control the volume of a device
connected via the [AUX IN] jack.
e audio signal via the [AUX IN] jack will combine with the output from the [LINE
OUT]jacks and [PHONES] jack.
NOTE: The [MASTER VOLUME] knob does not aect the audio signal coming into the [AUX IN]
jack.
CONNECTIONS - continued
AUX IN
Digital Piano
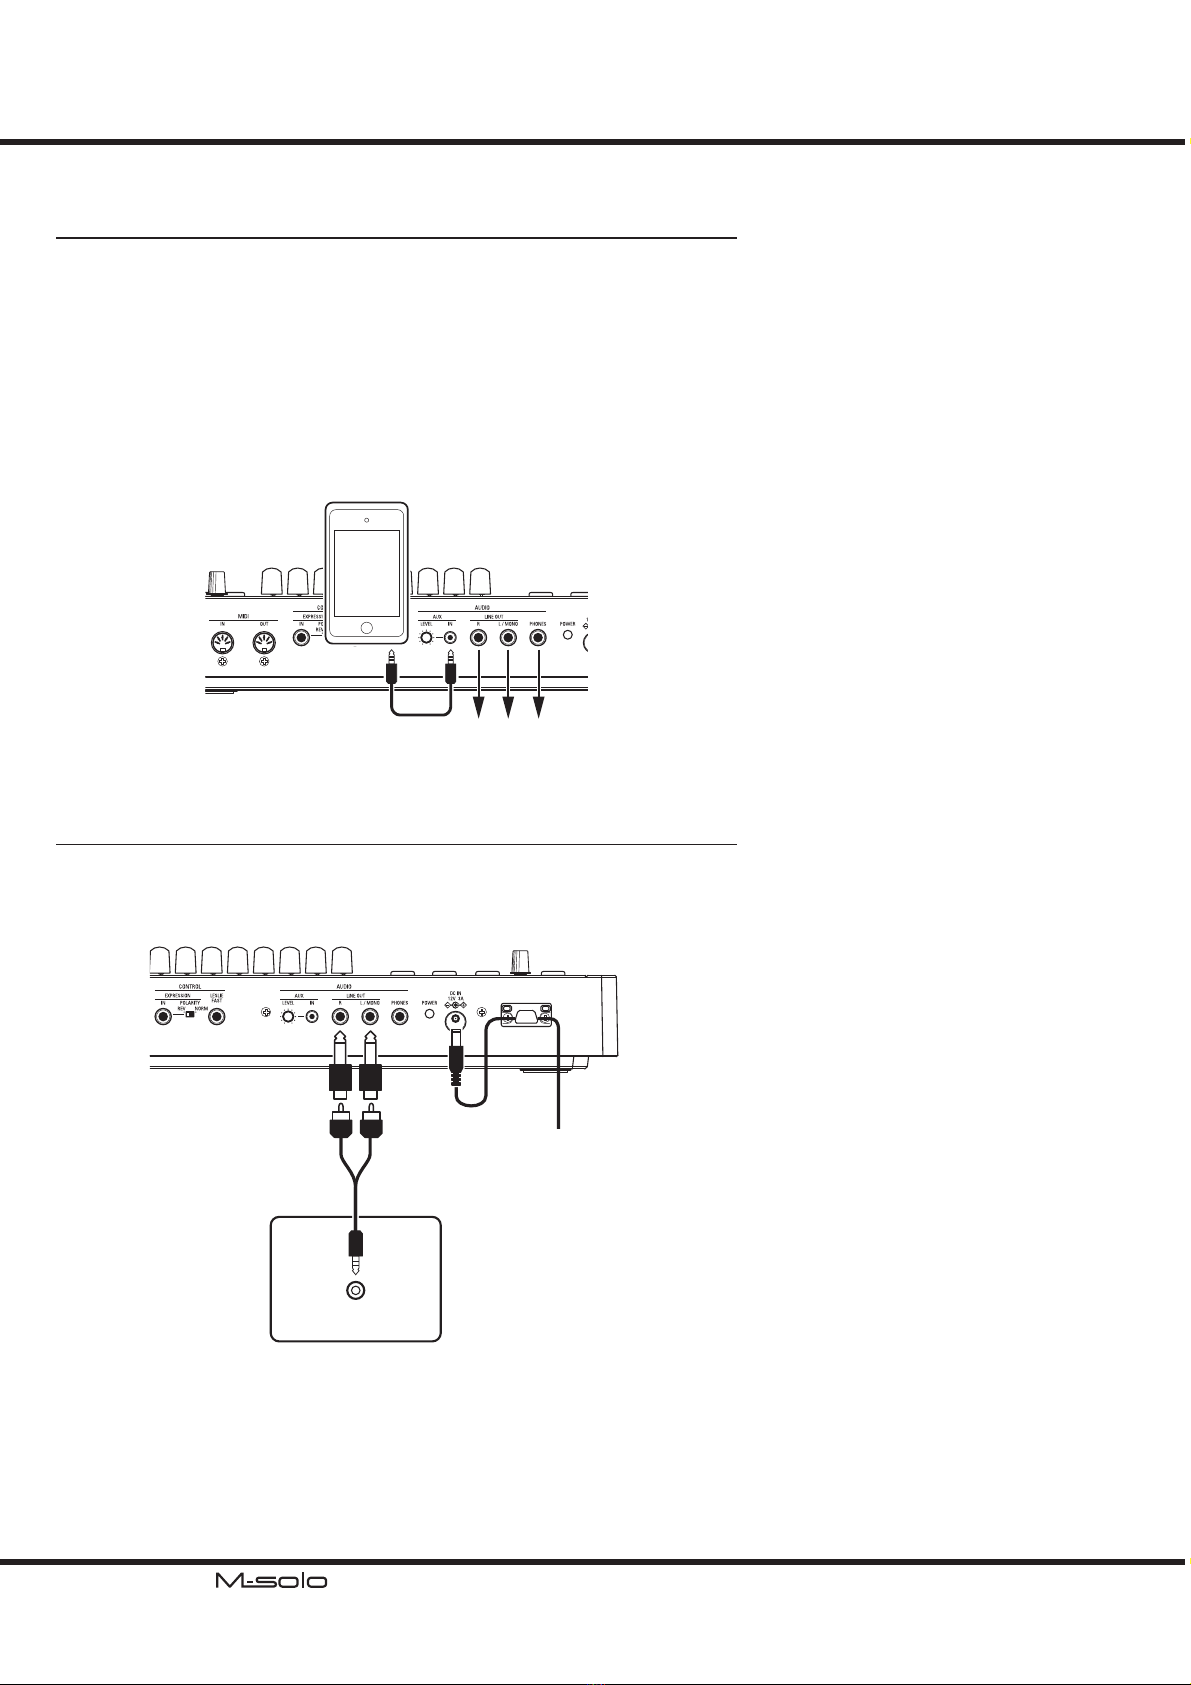
USE WITH A DIGITAL PIANO
AUX IN Jack on the Digital Piano
If your digital piano has a [AUX IN] jack, the [LINE OUT] jacks of this instrument
can be mixed into the digital piano and output from its speaker system.
Please read the owner’s manual of your digital piano also.

11
Hook-Up
CONNECT THE COMPUTER VIA USB
RECORD AND PLAYBACK
e USB MIDI connection will allow you to Record and Play sequences with only
one cable connection and no MIDI interface between the computer and this key-
board as shown as below.
CONNECT A MIDI EQUIPMENT
RECORD AND PLAYBACK
To record and playback the performance of this instrument, connect the MIDI cables
between this instrument and the MIDI sequencer or MIDI interface of the computer.
NOTE: This instrument has only single Part. It does not expanded keyboards by connecting
other MIDI keyboards.
USB CONNECTING MODES
The USB port of this instrument works as “USB
MIDI”when normally powered ON.
Use the “Mass Storage Mode” for updating
this instrument, or back-up the setup of this
instrument with special operation. (P. 34)
OUT IN
- MIDI -
USB
MIDI Interface
for PLAY
for REC
Computer
*#1 Owner’s Manual
12 PLAY THE INSTRUMENT
POWER ON AND OFF
After making the connections described on the previous pages,
you are ready to turn this instrument power “ON.” Follow the
procedure below to prevent malfunction or damage.
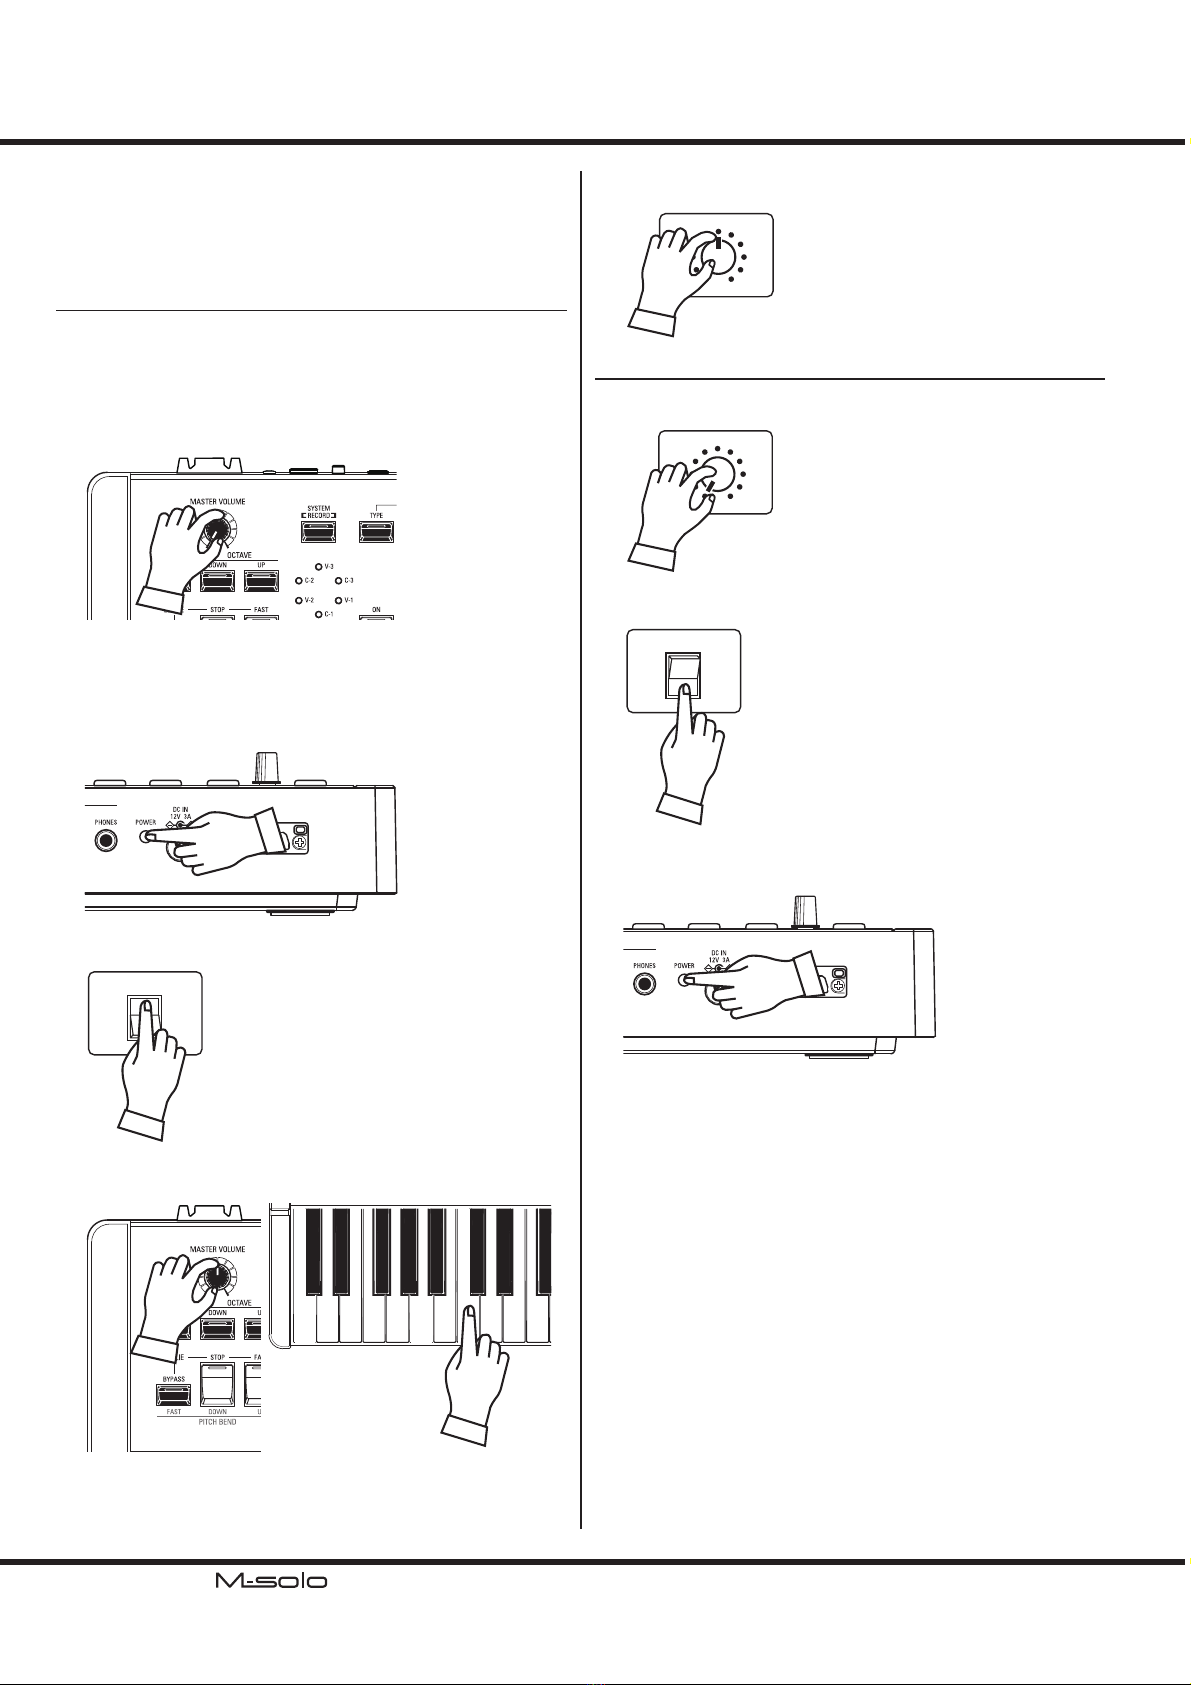
POWER ON
1. Before turning the power to this instrument “ON,” make
sure you have connected all peripherals (Expression Pedal,
Foot Switch, etc.) properly. Also be sure to set the [VOL-
UME] knob to its minimum setting.
NOTE: Do not step the Foot Switch. This instrument detects the po-
larity of the Foot Switch while starting up.
2. e [POWER] button is located on the low-noted side
of the Rear Panel. Press the [POWER] button to turn the
power to the instrument “ON.” When the LED of the VI-
BRATO & CHORUS [MODE] changes from rotating to
stayed “ON,” it is ready to play.
3. Turn the power to the connected amplier “ON.”
POWER
Amplier
ON
OFF
4. Hold down a playing key and turn the [VOLUME] clock-
wise slowly. Adjust the [VOLUME] as needed.
5. Adjust the volume of the amplier.
VOLUME
Amplier
POWER OFF
1. Set the volume of the amplier at “0.”
VOLUME
Amplier
2. Turn the power to the amplier “OFF.”
POWER
Amplier
ON
OFF
3. Press the [POWER] button of this instrument for 2 sec-
onds. e LEDs will “OFF” and shutdown.
AUTO POWER OFF
For save the energy, this instrument has an “AUTO POWER
OFF” feature which will automatically turn the power to the
instrument “OFF” if no keys or buttons are pressed for 30
minutes.
To disable the Auto Power O, turn the power on with Pressing
and Holding the [OVERDRIVE] button. Keep pressing the
[OVERDRIVE] button until the LED is blinked.
NOTE: You can switch the “auto power o” at enabled or disabled(P.
29).
13
Power On and Play
PLAY WITH PATCHES
e M-solo has three Patchs to experience feature of this instrument, and play this
instantly.
RECALL THE PATCHES
Press any of the PATCH buttons [1] to [3] to recall the Patch with against setting of
the top panel. You can adjust the recalled Patch by using knobs or buttons.
NOTE: You can record to the Patchs with your own settings(P. 19).
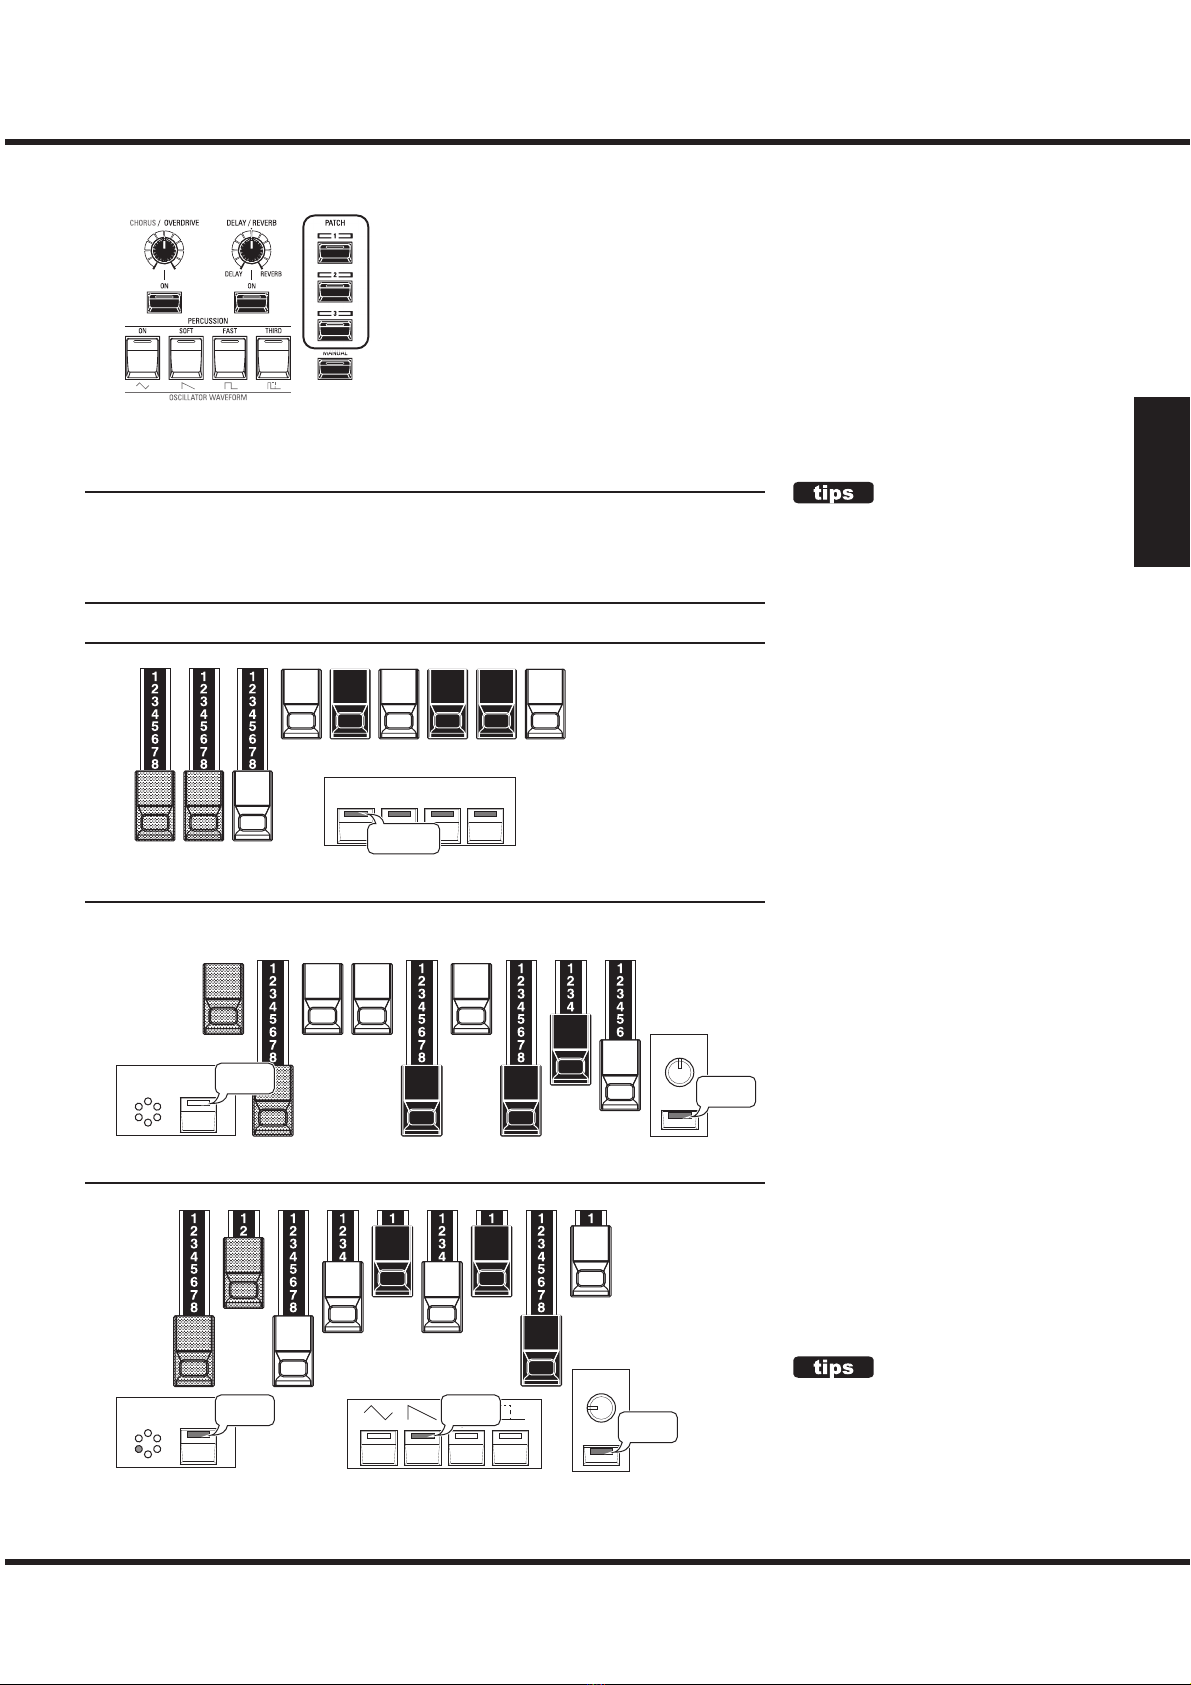
FACTORY PATCHES
1 Jazz Organ
51/3'
16' 8' 4' 22/3'2' 13/5'1
1/3'1'
ON SOFT FAST THIRD
PERCUSSION
All “ON”
2 Strings Octave Unison
Male16´
Strings 16´
Male 8´
Female 8´
Strings 8´
Female 4´
Strings 4´
Attack
Release
CHO/OD
VIB&CHO
ON
OFF
3 Resonance & Sweep
Osc2 Pitch Cutoff Resonance EG Amt Fil-Atk Fil-Dcy Amp-Atk Amp-Dcy Amp-Rel
CHO/OD
VIB&CHO
Triangle Sawtooth Square Pulse
ON
ON
ON
RETURN TO THE FACTORY SET-
TINGS
The Patchs are re-writable, and the contents are
not as same as shown left gure.You can return
to the factory settings with special operation
(P. 28).
OVERRIDE THE PATCH
You can override the Patch values by operating
its knobs or buttons while playing by a Patch. It
is not recorded automatically.
*#1 Owner’s Manual
14 PLAY THE INSTRUMENT - continued
PLAY WITH CONTROLLERS
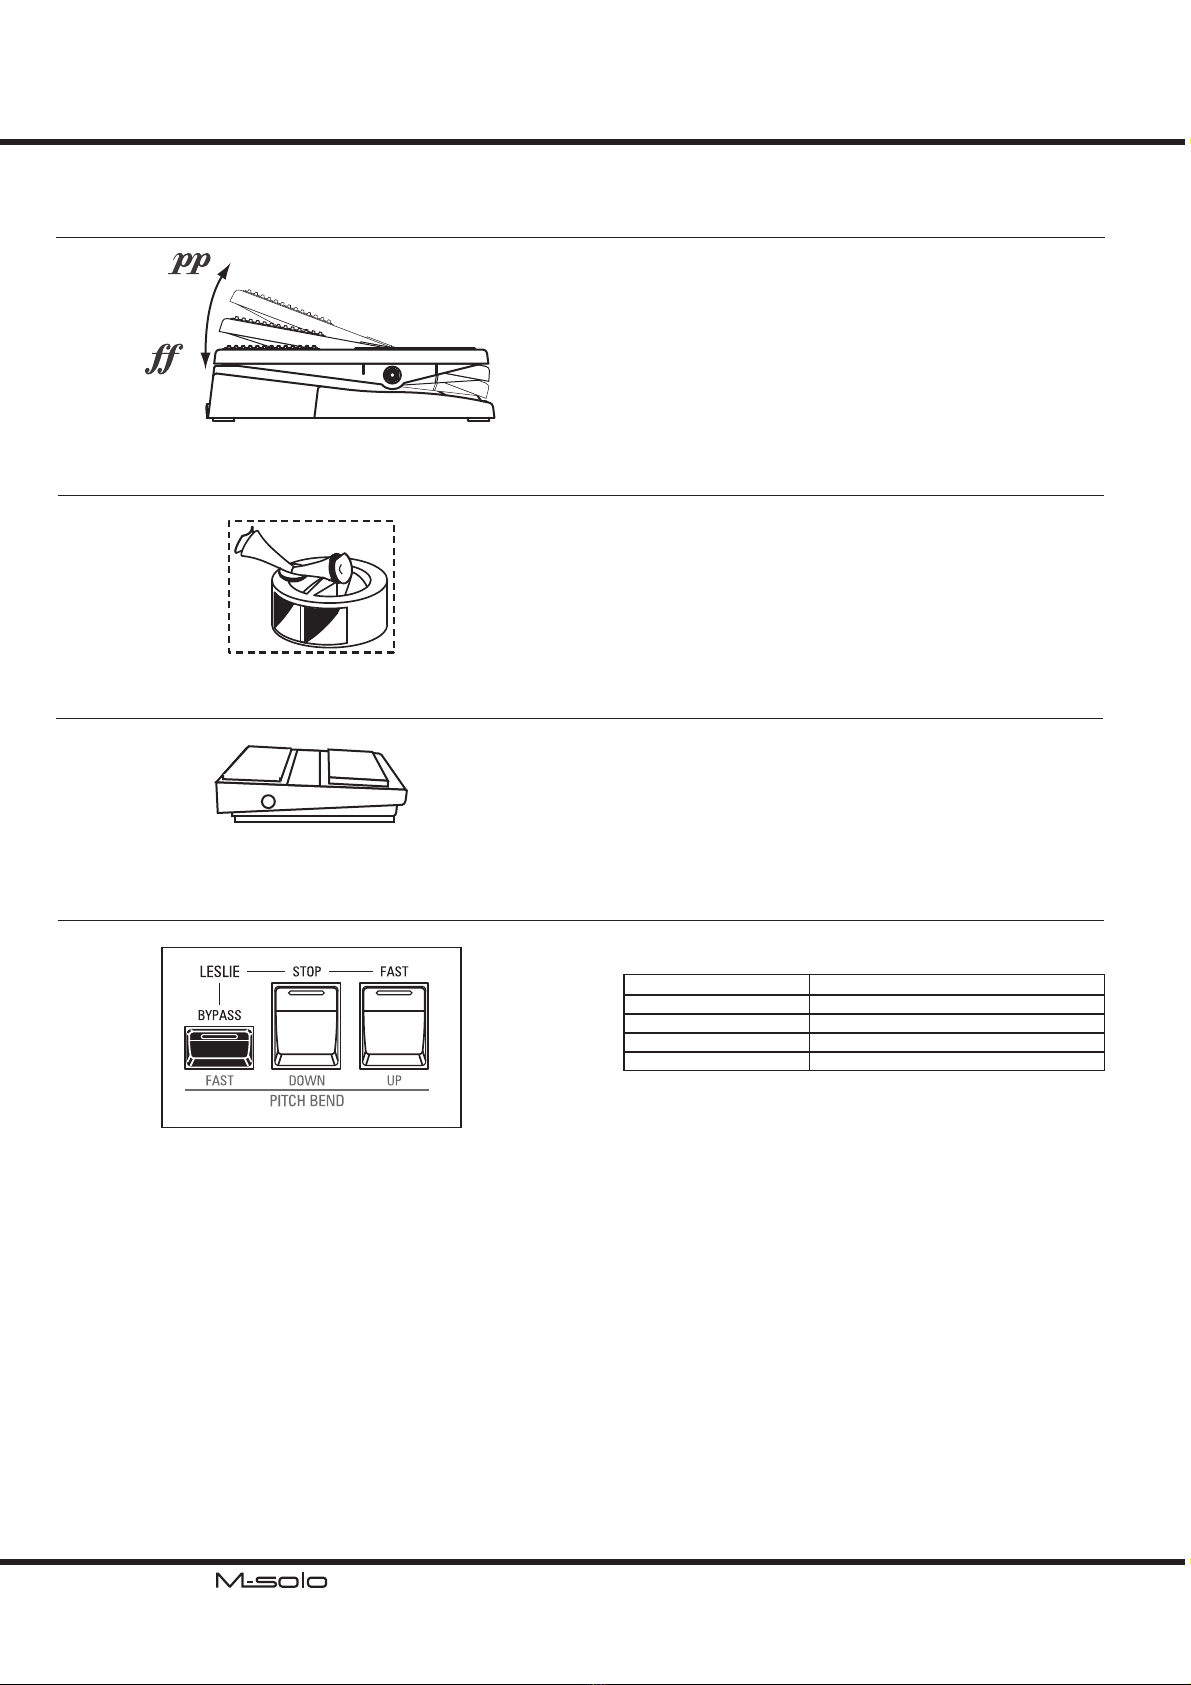
EXPRESSION PEDAL
FOOT SWITCH
You can use an Expression Pedal to control the crescendo and
decrescendo.
Press forward with the front of your foot to louder and back
with your heel to softer.
You can use a Foot Switch to control the Leslie FAST or not
instead of pressing the LESLIE [FAST] button.
It toggles between FAST and not by tapping the Foot Switch.
NOTE: The mode of the“not” is set by the [STOP] button which SLOW
or STOP.
EXP-20 (optional)
FS-9H (optional)
PITCH BEND
LESLIE
e rotating Leslie eect is not only a essence of the sound, but
also used as making uctuation in the performance.
See P. 17 “LESLIE.”
e Pitch Bend feature is available at “Ens” or “Syn”.
Button Operation Pitch Bend
[UP] Raise 2 semitones.
[OCTAVE] + [UP] Raise 1 octave.
[DOWN] Lower 2 semitones.
[OCTAVE] + [DOWN] Lower 1 octave.
To stop the pitch bending at half way, press the button for the
counter direction ([DOWN] during raise, [UP] during lower).
e pitch returns by the buttons are released.
15
Power On and Play
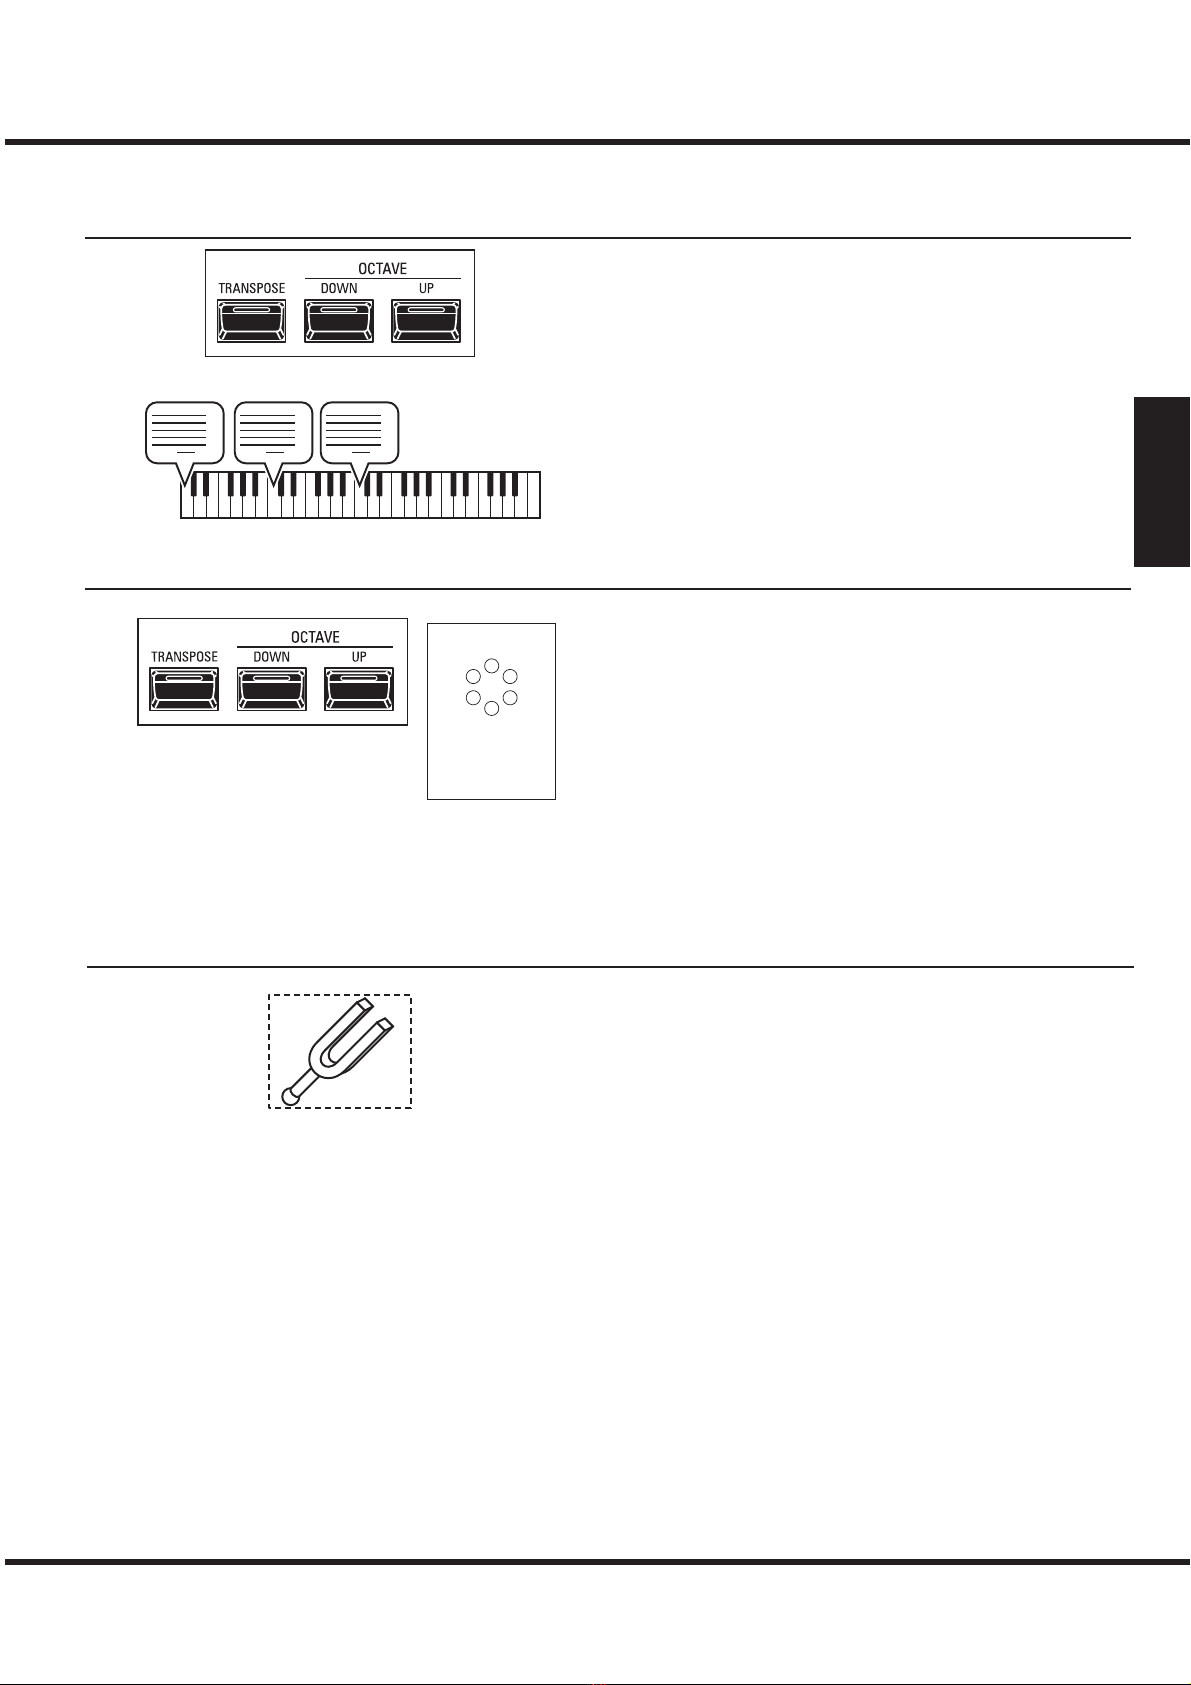
CHANGE THE PITCH
OCTAVE
TRANSPOSE
To change the octave, simply press the OCTAVE [DOWN] or
[UP] button by three options “lower/normal/higher.”
See left gure for relation of the LED on the OCTAVE buttons
and keyboard.
NOTE: The Octave is recorded in the Patch.
To change the transpose, by pressing and holding the [TRANS-
POSE] button and press the OCTAVE [DOWN] or [UP] but-
ton which ranging from -6 to +6 semitones.
To conrm the current transpose value...
1. e LED on the [TRANSPOSE] button indicates whether
the Transposed or not.
2. While the [TRANSPOSE] button is pressed, the LED on
the OCTAVE buttons indicates higher or lower.
3. e LED on the VIBRATO & CHORUS indicates con-
crete value during operating the [TRANSPOSE].
NOTE: The Transpose is not recorded in the Patch.
12
3
4
O = 0
5
6
XXX
UPUP DOWNDOWN
MASTER TUNE
e Master Tune adjusts the pitch between this instrument and
other instruments.
See P. 29 “MASTER TUNE.”
*#1 Owner’s Manual
16
SELECT THE INSTRUMENT TYPE
ADD DRAWBARS
ADD THE PERCUSSION
Select the Instrument Type most appropriate to the musical
style you wish to play.
TW..................... Tone Wheel Organ (P. 20)
Vx ...................... Transistor Organ, “Vx” type (P. 22)
Farf ................... Transistor Organ,“Farf” type (P. 23)
Ace .................... Transistor Organ, “Ace”type (P. 24)
Ens .................... Strings Ensemble Keyboard (P. 25)
Syn .................... Polyphonic Synthesizer (P. 26)
e Drawbars control the basic organ sounds. You can hear the
eect each Drawbar has on the sound by pulling out or pushing
in Drawbars while holding keys.
e purpose or the performance of the Drawbars are dierent
by Instrument Type to Type. See P. 20 “INSTRUMENT
TYPES” for details.
e Percussion adds the percussive tone to the beginning of
the phrase.
NOTE: The Percussion is available for the Instrument Type“TW“ only.
❶[ON] button
Toggles the Percussion ON and OFF.
❷[SOFT] button
Toggles the Percussion volume.
OFF ................... Normal
ON ..................... Soft
❸[FAST] button
Toggles the decay rate of the Percussion.
OFF ................... Normal
ON ..................... Fast
❹[THIRD] button
Toggles the harmonic of the Percussion.
OFF ................... Second harmonic
ON ..................... Third harmonic
CREATE YOUR OWN PATCH
SELECT MANUAL
Select the [MANUAL] to create your own setting at the start.
e MANUAL is a special Patch which its setting is always
matched with top panel. Use this for create new Patch as a
palette, or “on-the-y” style which adjusting knobs or buttons
during playing.
PLAY THE INSTRUMENT - continued

17
Power On and Play
ADD EFFECTS
VIBRATO & CHORUS
e Vibrato & Chorus adds a vibration to the sound.
LESLIE
e inbuilt digital Leslie that replicates the sound of a twin-rotor Leslie Speaker Cabinet.
NOTE: The digital Leslie is not available for the Ens and Syn.
❶[ON] buttons
Toggles the Vibrato & Chorus “ON” or “OFF”.
❷[MODE] button
is allows you to select from three degrees of Vibrato and three degrees of Chorus. Each
successive press of this button selects a dierent amount of Vibrato or Chorus.
Instrument Type Effect MODE
TW Vibrato & Chorus V: Vibrato, C: Chorus
number: depth of the Vibrato or Chorus eect.
Vx, Farf, Ace, Ens Vibrato Six degrees of Vibrato increasing in intensity from V-1
through C-3.
Syn Delay Vibrato,
Wah-Wah or PWM V: Delay Vibrato, C: Wah-Wah or PWM
number: depth of the Delay Vibrato or Shape Modu-
lation.
❶[BYPASS] button
OFF ................... Digital Leslie is enable.
ON ..................... Disables the digital Leslie, producing a“dry”organ sound.
❷[STOP] button
Selects the rotor state when the [FAST] button is at “OFF.”
OFF ................... Toggles between“FAST” and “SLOW” by [FAST] button.
ON ..................... Toggles between“FAST” and “STOP”by [FAST] button.
❸[FAST] button
Toggles the rotor state between “FAST” and “either SLOW or STOP.”
OFF ................... either SLOW or STOP
ON ..................... FAST
NOTE: The LED of the [FAST] button indicates the movement of the rotor as simplied.
WHAT IS “STOP”?
The original Leslie Speaker System has only 2 modes: SLOW and FAST and the “half-moon” switch has
their also. But a player unplugged the motor for SLOW and it made STOP the rotor. The above [STOP]
button simulates it.
SLOW
800Hz
Ampli-
er
Horn
Driver
Woofer
Drum
Rotor
Horn
Rotor
Stationary
Speaker
Leslie Speaker System
*#1 Owner’s Manual
18 PLAY THE INSTRUMENT - continued
DELAY / REVERB
e “Delay” makes repeating sounds for several times.
e “Reverb” of this instrument simulates an eect “Spring Reverb” of the recent electric instruments.
❶[ON] button
Toggles the Delay / Reverb eect “ON” or “OFF”.
❷[DELAY/REVERB] knob
Selects either of Delay or Reverb eect and adjust the amount of the eect.
Turn counter clockwise this knob to Delay or clockwise to Reverb eect is selected, and
the eect will deeper along with degree.
NOTE: The Delay/Reverb eect is “rotated” by the Leslie eect. It simulates the Reverb Unit is
mounted in the Leslie or organ cabinet on the vintage models.
CHORUS / OVERDRIVE
e “Overdrive” adds distortion to the sound by increasing the pre-amplier input gain.
And the “Chorus” refers to a shimmering, non-periodic enhancement of the sound.
❶[ON] button
Toggles the eect “ON” or “OFF”.
❷[CHORUS/OVERDRIVE] knob
Adjust the amount of the eect.
Instrument Type Effect [AMOUNT] knob
TW, Vx, Farf, Ace Overdrive Overdrive depth.
Ens, Syn Chorus Modulation depth.

19
Power On and Play
RECORD TO THE PATCH
You can record the setting which you created to the Patch.
SYSTEM
RECORD 1
2
3
Press and Hold the [SYSTEM/RECORD] button and press any [1] to [3] of the
PATCH buttons which you wish to record. e LED on the selected PATCH button
ashes a moment and “ON” to completed the procedure.
e current setting cannot recorded to the [MANUAL] button. It is used for playing
with controlling the top panel at real-time.
THE CONTENTS TO RECORD
The contents which recorded into the Patch are
all the settings on the top panel except Master
Volume and Transpose.
SIGNAL FLOW
e signal ows in this instrument are dierent by Instrument Type to Type.
TW Organ
Tr. Organ
Ens & Syn
Drawbars ExpressionVib & Cho Overdrive LeslieDelay/Reverb
Percussion
Drawbars ExpressionVibrato Overdrive LeslieDelay/Reverb
Osc, Filter & AmpVibrato
P. Bend
Expression Chorus Delay/Reverb
e Vibrato & Chorus of the Tone Wheel Organs modulates the audio signal which
generated by the Tone Wheel. But the Vibrato of the Transistor Organs (Vx, Farf
and Ace) modulates the oscillating frequency of the transistor oscillator. ey makes
dierent eects.
e Expression is mounted at pre-Overdrive. Not only the volume, the Overdrive
eect is also modulated by the Expression Pedal.
e Delay/Reverb is mounted at pre-Leslie. en, the delayed sound or reverbration
will rotated by the Leslie eect. is simulates the structure of the vintage organs.
*#1 Owner’s Manual
20 INSTRUMENT TYPES
TW
WHAT IS “TW”?
The “TW” comes from the Hammond’s vintage
Tone Wheel organ model B-3.
e Hammond Organ’s original purpose was to duplicate
the pipe organ, however, they became famous for produc-
ing a unique sound of their own.
Tone Wheels are the method by which Tone Wheel
Hammond Organs generate sound. Each frequency is
generated by a steel disk 1 7/8˝ in diameter and contain-
ing a number of high spots on its outer edge. (See the illustration above.) ese disks
are the Tone Wheels. e most common Tone Wheel generator has a total of 96 tone
wheels, all with dierent numbers of teeth - some wheels have 2 teeth, others have
4, 8, 16, 32, 64, 128, up to 192 teeth. e classic Tone Wheel design uses 91 tone
wheels to generate the musical tones.
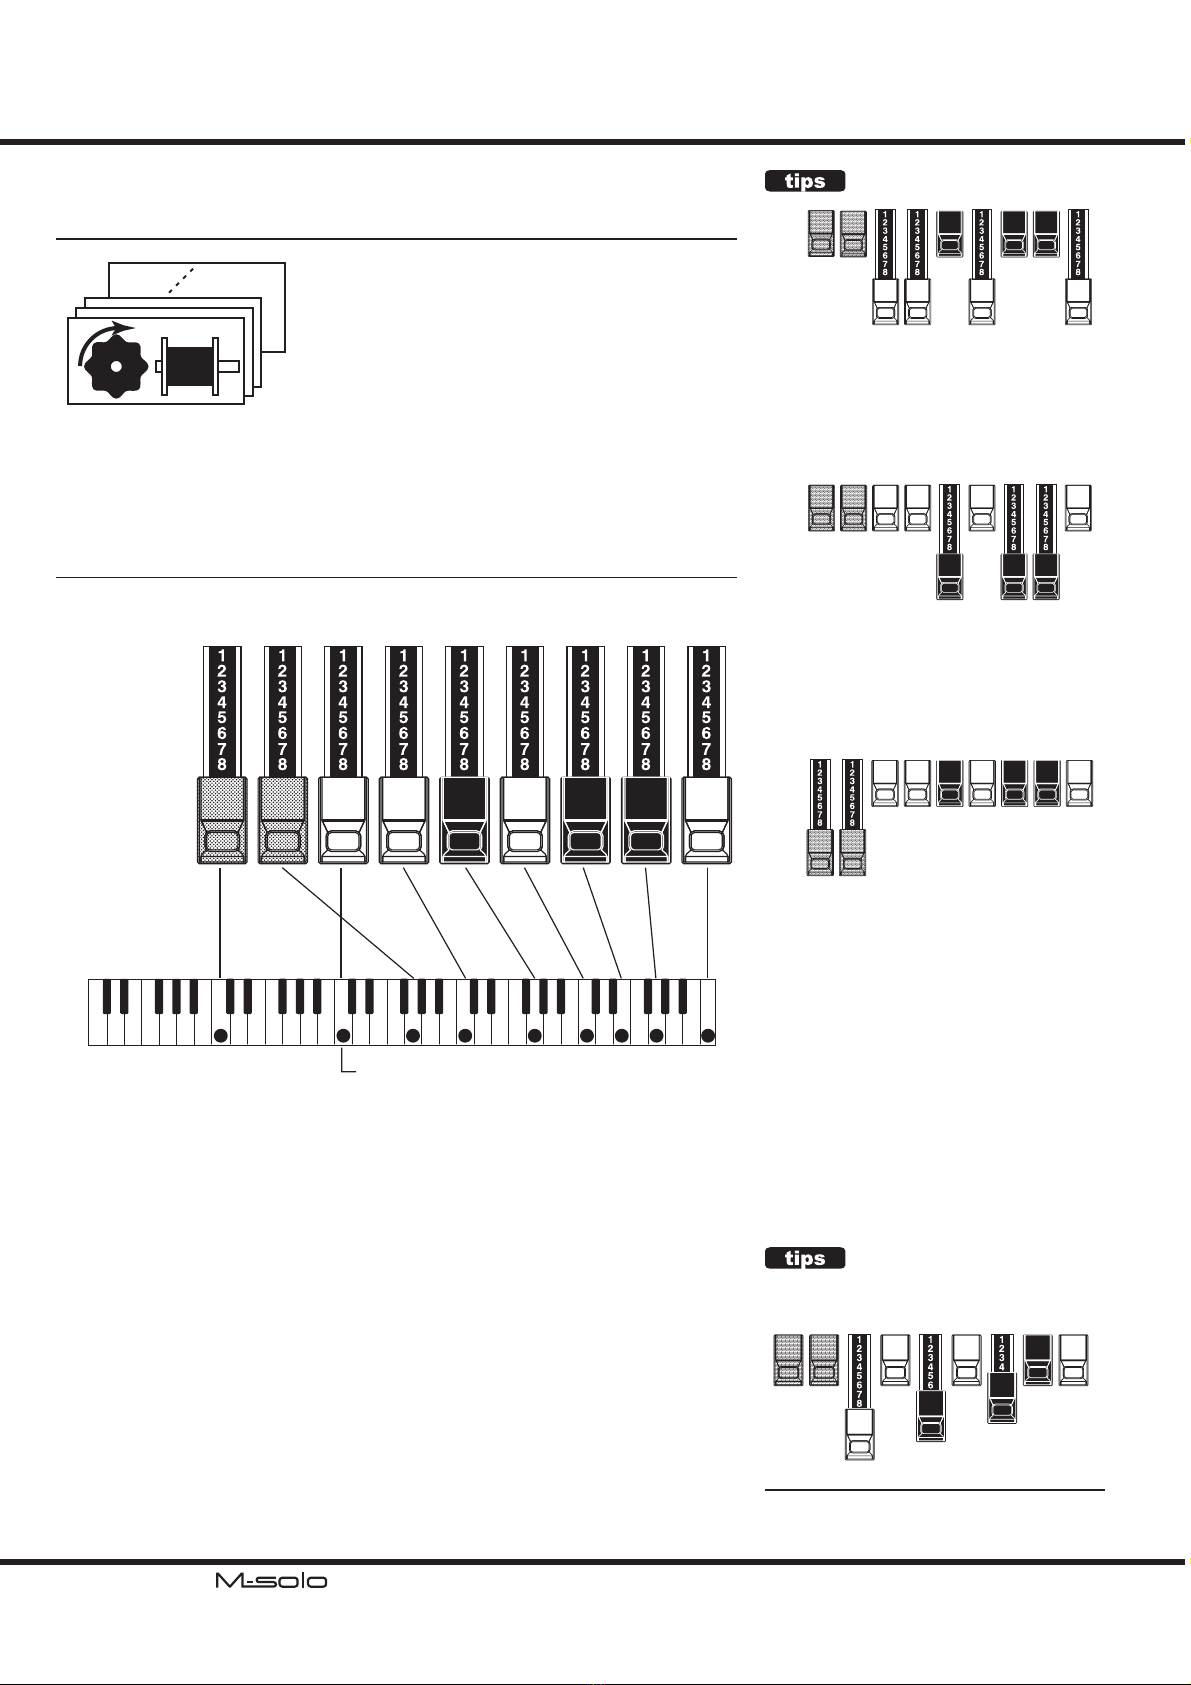
HOW THE DRAWBARS WORKS?
51/3'
16'
Sub
Fund. Sub
3 Funda-
mental 2 3 4 5 6 8
Footage:
Harmonic:
8' 4' 22/3'2' 13/5'1
1/3'1'
Middle “C”
Each Drawbar may be set in eight dierent positions in addition to the silent or “0”
position. Each position, as marked on the Drawbars, represents a dierent degree of
intensity of the harmonic it controls. When drawn out to position “1,” the harmonic
it represents will be present with minimum intensity, when drawn out to position 2
with greater intensity, and so on up to position “8.”
If you pull the fundamental (8´), the third harmonic (2⅔´) plus the fth harmonic
(1´) Drawbars out completely and play the keyboard you will notice the sound
resembles a clarinet.
If you push the 8´ Drawbar half-way, you’ll notice the sound becomes more high-
pitched and a bit “harder.” Now pull the 8´ Drawbar back out fully and push the 2⅔´
and 1´ in halfway. Notice how the sound becomes mellower.
Experiment with the Drawbars to obtain your own favorite registrations.
DRAWBAR REGISTRATION
Below is an example of using Drawbars to
create dierent sounds.
Example of“Clarinet”
51/3'
16' 8' 4' 22/3'2' 13/5'1
1/3'1'
DRAWBAR AND COLOR
51/3'
16' 8' 4' 22/3'2' 13/5'1
1/3'1'
The first white Drawbar represents the
“Fundamental” or “8´ base” tone. All of the
other white Drawbars are octave intervals or
harmonics of the fundamental tone. The tonal
brilliance is greatly increased by adding white
Drawbars, but the harmonics added are always
in“consonance”or harmony.
51/3'
16' 8' 4' 22/3'2' 13/5'1
1/3'1'
The black Drawbars represent the “dissonant”
harmonics which are also necessary in building
rich tone colors. The mellowness of a horn,
the pungency of strings, and the brilliance of
reed voices owe much of their character to
the presence of these harmonics in different
degrees.
51/3'
16' 8' 4' 22/3'2' 13/5'1
1/3'1'
The two brown Drawbars on the far left give
depth and richness to the sound. The left 16´ is
one octave lower than the 8´, and 5⁄´ is the third
harmonic of the 16´ fundamental. Normally,
the tones are built on the 8’fundamental, but, if
you want to add depth to the tone or to expand
the playing range by one octave lower, build
your tones on the 16´ fundamental.
Table of contents
Other Hammond Keyboard manuals


