Hauschild SpeedMixer DAC 400.2 VAC-P User manual
Hauschild GmbH & Co. KG · Waterkamp 1 · 59075 Hamm
Tel: +49 2381 48205-0 · Fax: +49 2381 48205-17 · info@hauschild-speedmixer.com
User manual
Hauschild SpeedMixer®
DAC 400.2 VAC-P –1100.2 VAC-P
DAC 400.2 VAC-P LR –1100.2 VAC-P LR
DAC 400.2 VAC-P HV –800.2 VAC-P HV
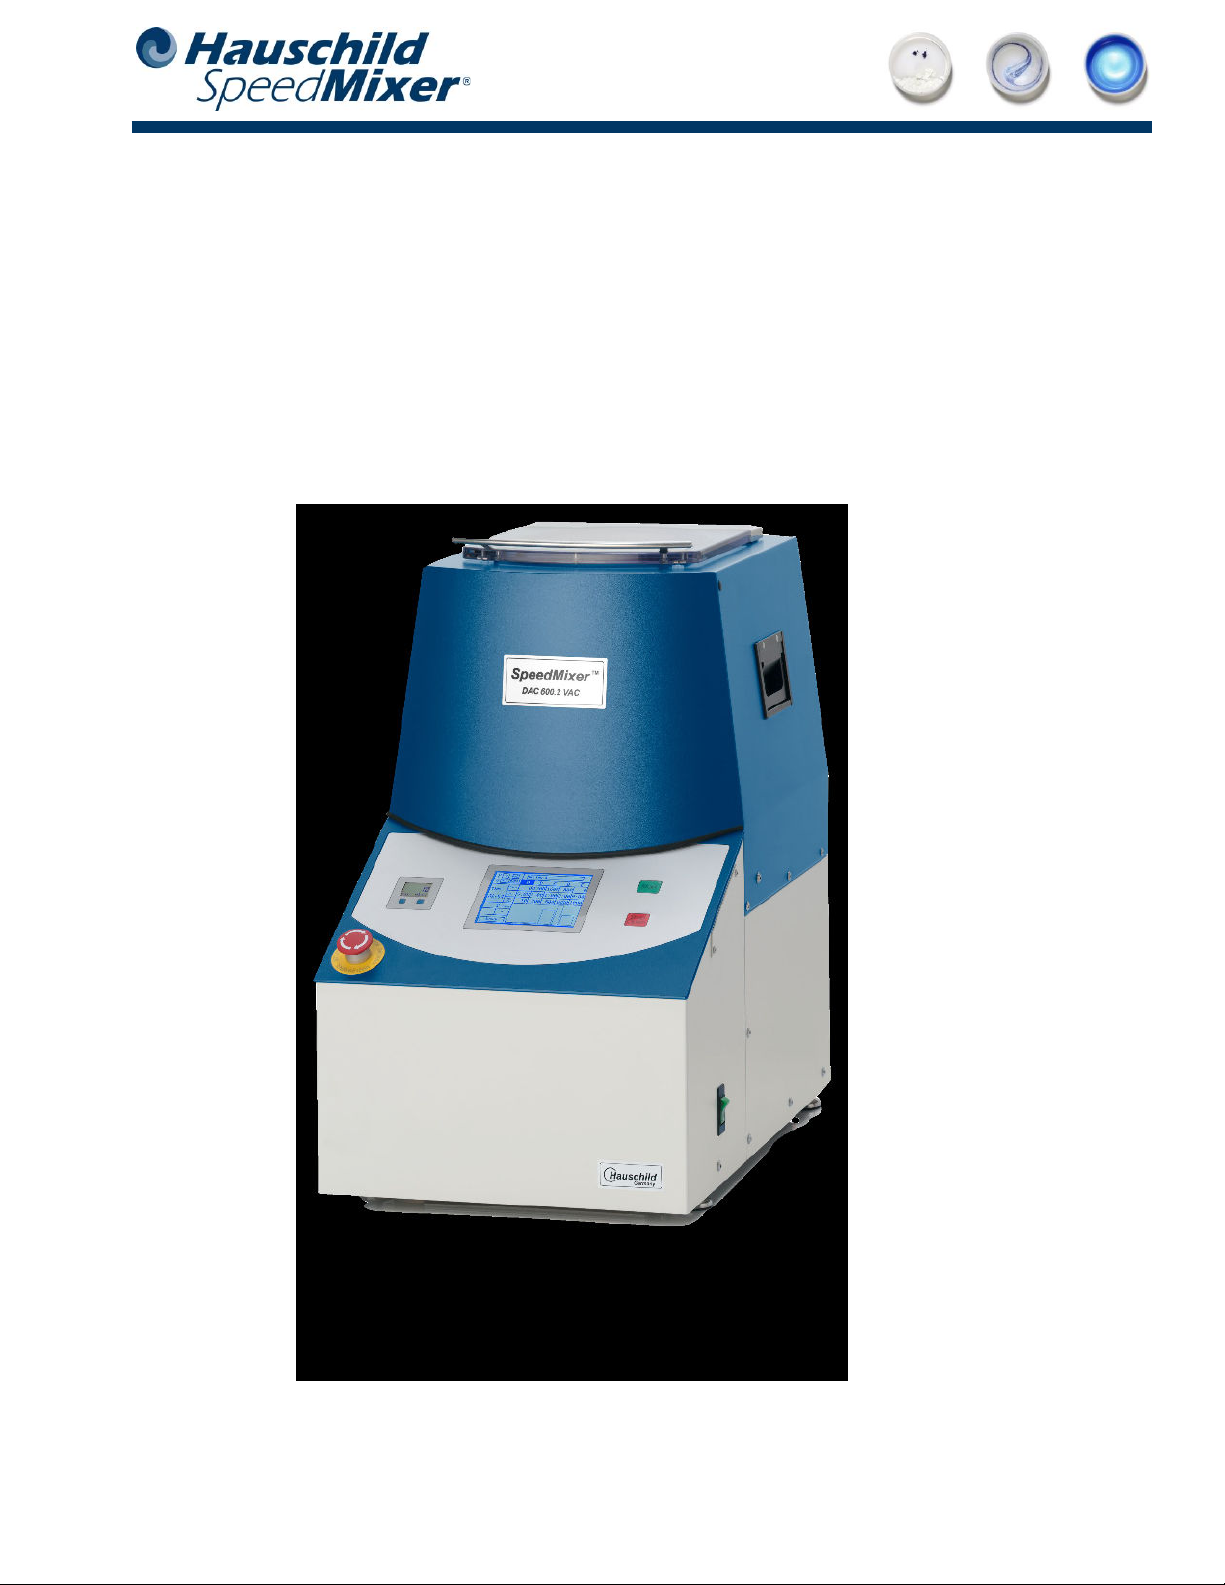
Figure 1: Overview of the Hauschild SpeedMixer®
Hauschild GmbH & Co. KG · Waterkamp 1 · 59075 Hamm
Tel: +49 2381 48205-0 · Fax: +49 2381 48205-17 · info@hauschild-speedmixer.com 29
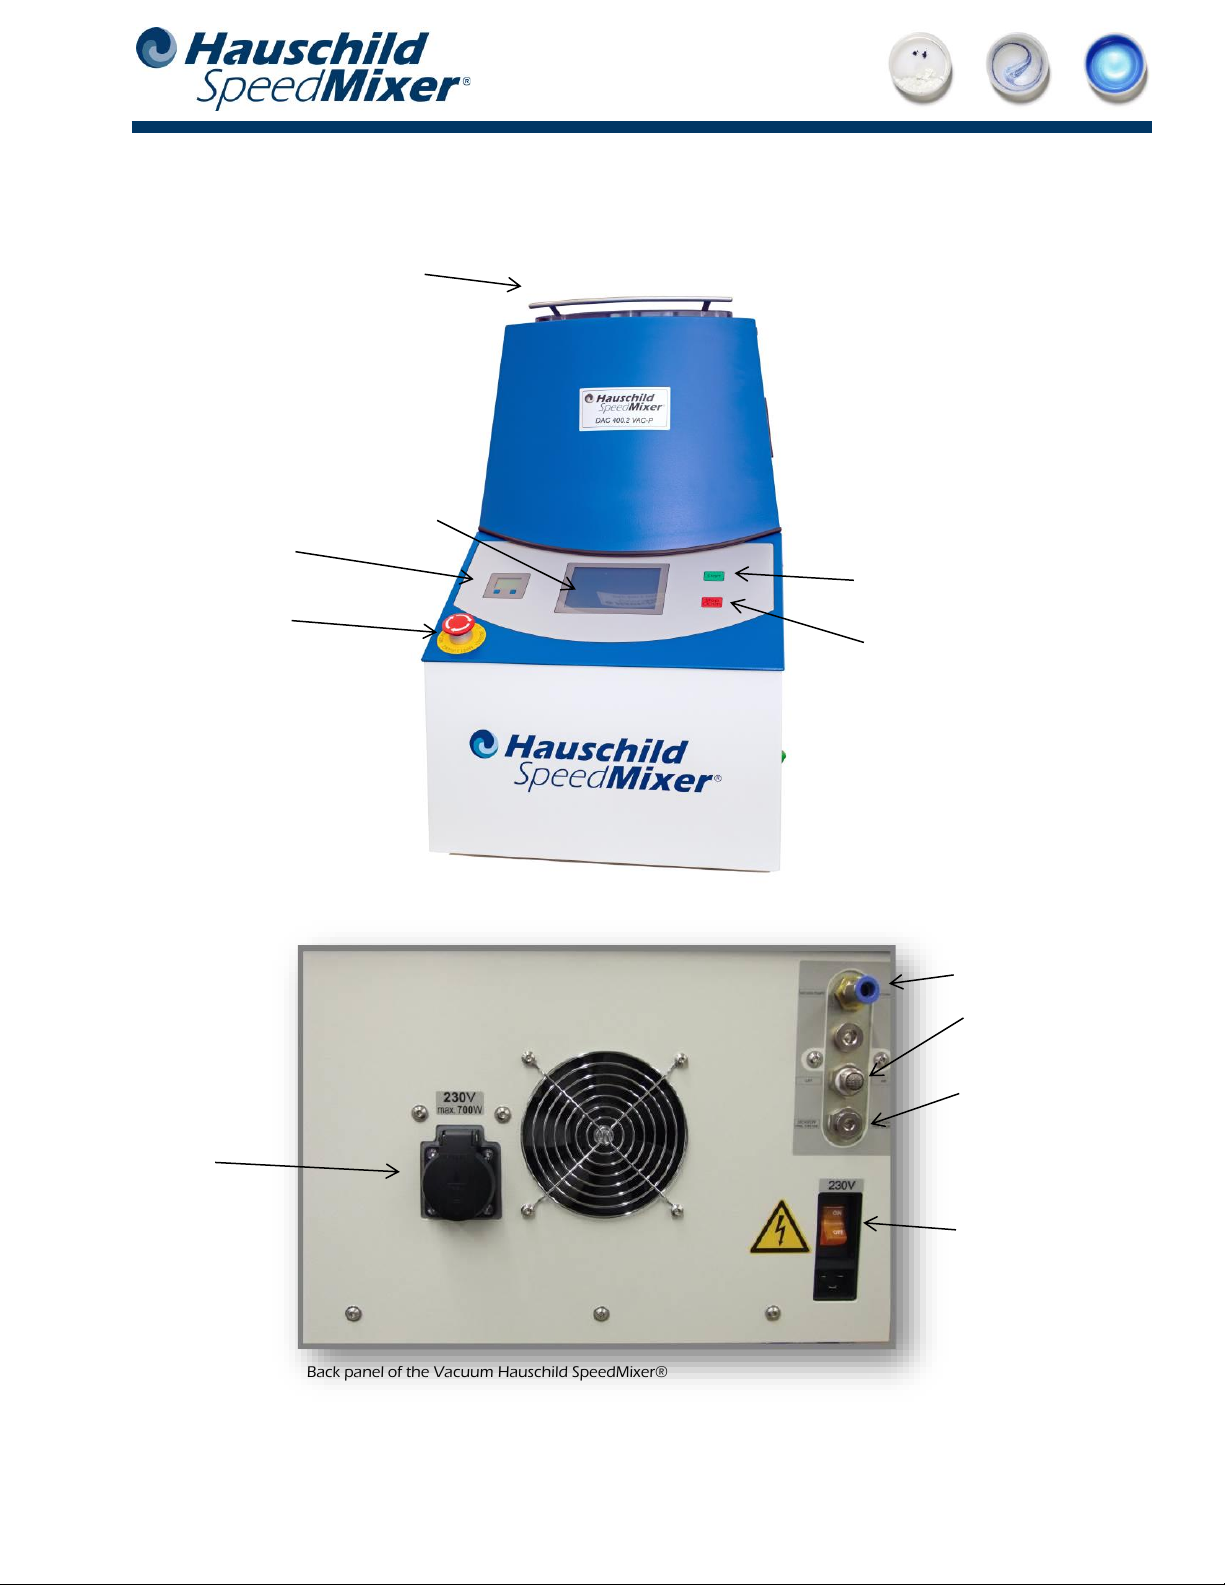
Controls of the machine
8
9
10
7
11
General view of the Vacuum Hauschild SpeedMixer®
Back panel of the Vacuum Hauschild SpeedMixer®
1
5
2
4
3
6

Hauschild GmbH & Co. KG · Waterkamp 1 · 59075 Hamm
Tel: +49 2381 48205-0 · Fax: +49 2381 48205-17 · info@hauschild-speedmixer.com
Description of the device
1
Lid
2
Digital manometer
3
Emergency stop Button
4
Display
5
„Start“ Button
6
„Stop/Open“ Button
7
Power outlet (max. 700W)
8
Vacuum connection
9
Sound damper
10
Nitrogen port
11
Power supply / Main switch
The mixing chamber of the unit can be emptied with the aid of a vacuum pump (see item 8). A vacuum pump can
be connected via the quick connector using a hose (outer diameter 10mm).
General notes on operation
-The maximum negative pressure (vacuum) for the device must not go below 3 mbar. Therefore, only use
a vacuum source that has a maximum negative pressure of 3 mbar.
-The maximum overpressure must not exceed 1450 mbar (21 psi). When clearing with compressed air or
with nitrogen, make sure that this value is not exceeded.
-The air pressure in the drum inside the device is indicated by the pressure gauge. After switching on the
unit, open the lid of the vacuum drum in order to equalize the pressure inside the unit with the ambient
pressure. Make sure that the mixing cup you are using has an opening so that the air can be released
safely.
Initial Setup
Pre-selection of
vacuum level
Vacuum
On/Off
Hauschild GmbH & Co. KG · Waterkamp 1 · 59075 Hamm
Tel: +49 2381 48205-0 · Fax: +49 2381 48205-17 · info@hauschild-speedmixer.com
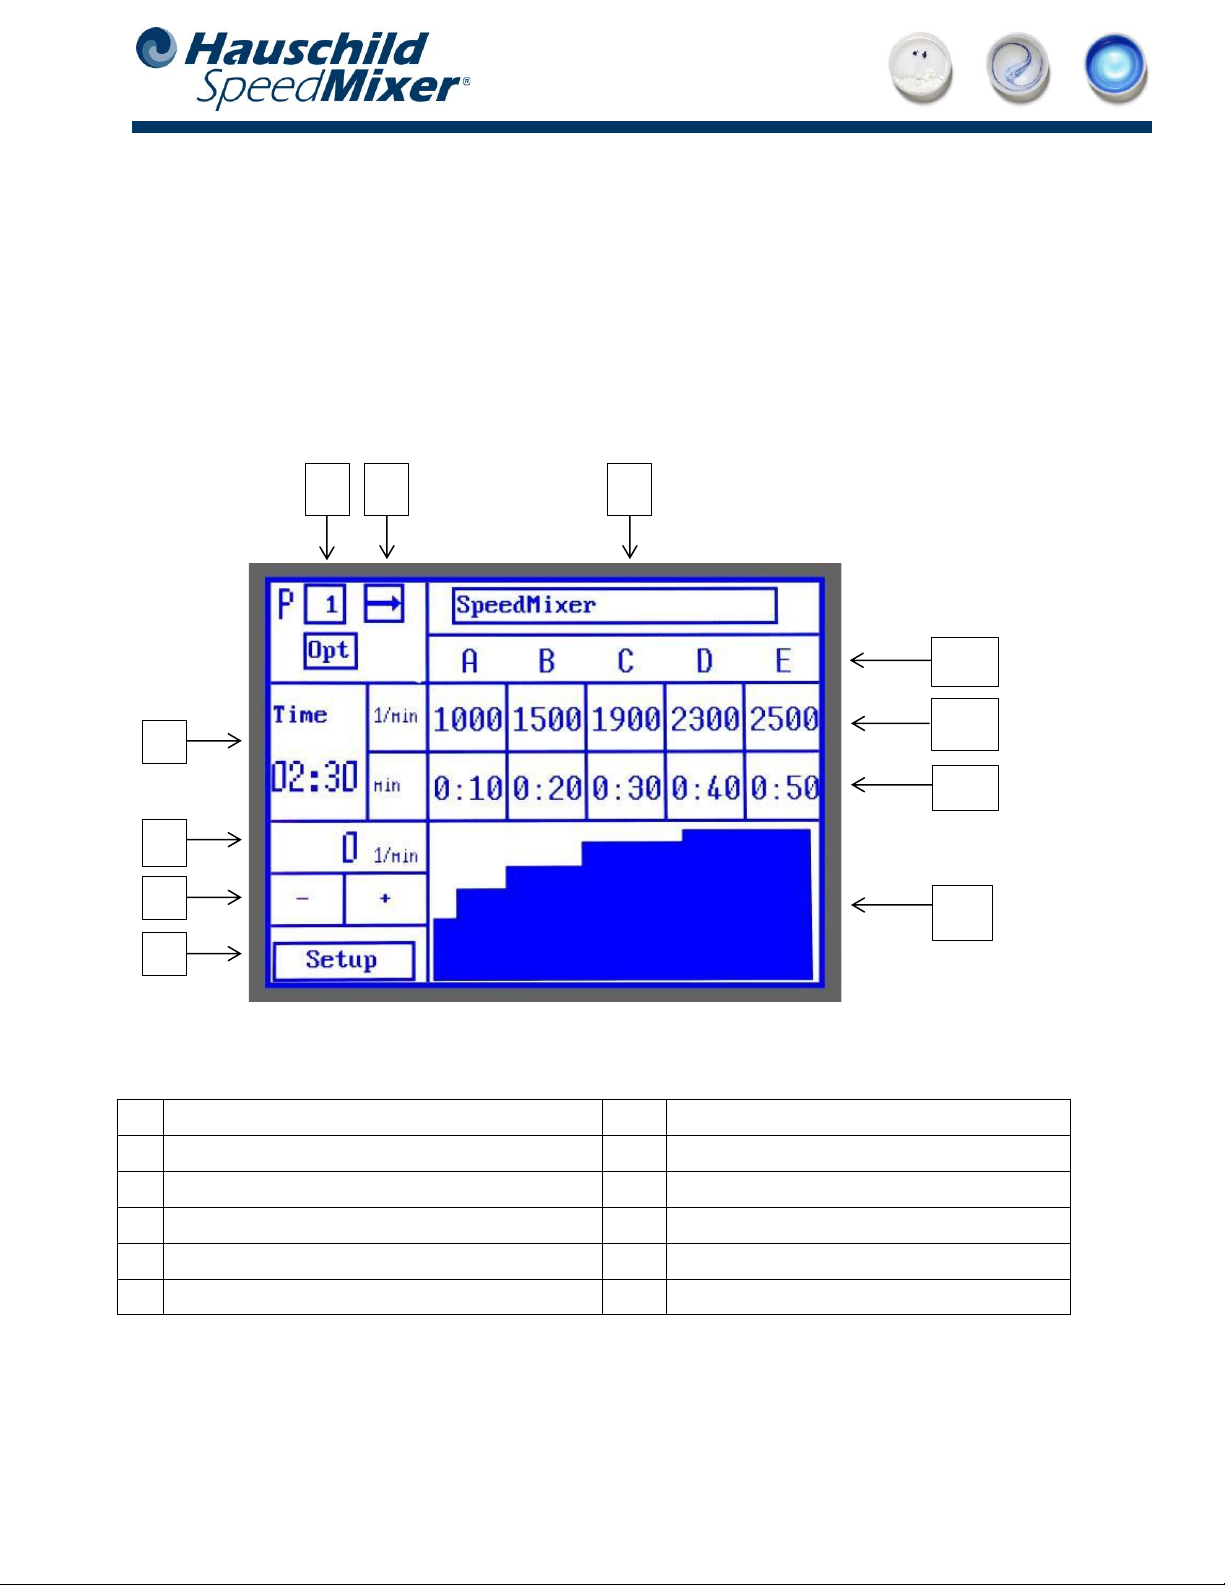
Home screen
The Hauschild SpeedMixer®provides a total of 20 program memory locations. The programs are shown in the
display with P1-P20. The speeds and mixing times can be freely selected in the individual mixing phases A, B, C, D
and E.
Home screen overview
1
Options menu
7
Singe or Multiphase mixing selection
2
Remaining mixing time
8
Program name
3
Current speed (RPM)
9
Mixing phases A-E
4
-/+ Value Buttons for speed (RPM) change
10
Speed (RPM) Input (A-E)
5
Setup Menu
11
Time input (A-E)
6
Program selection
12
Speed bar graph
Image 1: Description of the home screen functions
6
8
7
2
3
4
5
9
10
11
12
Home screen overview
Hauschild GmbH & Co. KG · Waterkamp 1 · 59075 Hamm
Tel: +49 2381 48205-0 · Fax: +49 2381 48205-17 · info@hauschild-speedmixer.com
When developing a formulation, only few components are mixed together, and additional ingredients are added
later. Please make sure to use a suitable cup and that the mixing weight range of the machine is observed.
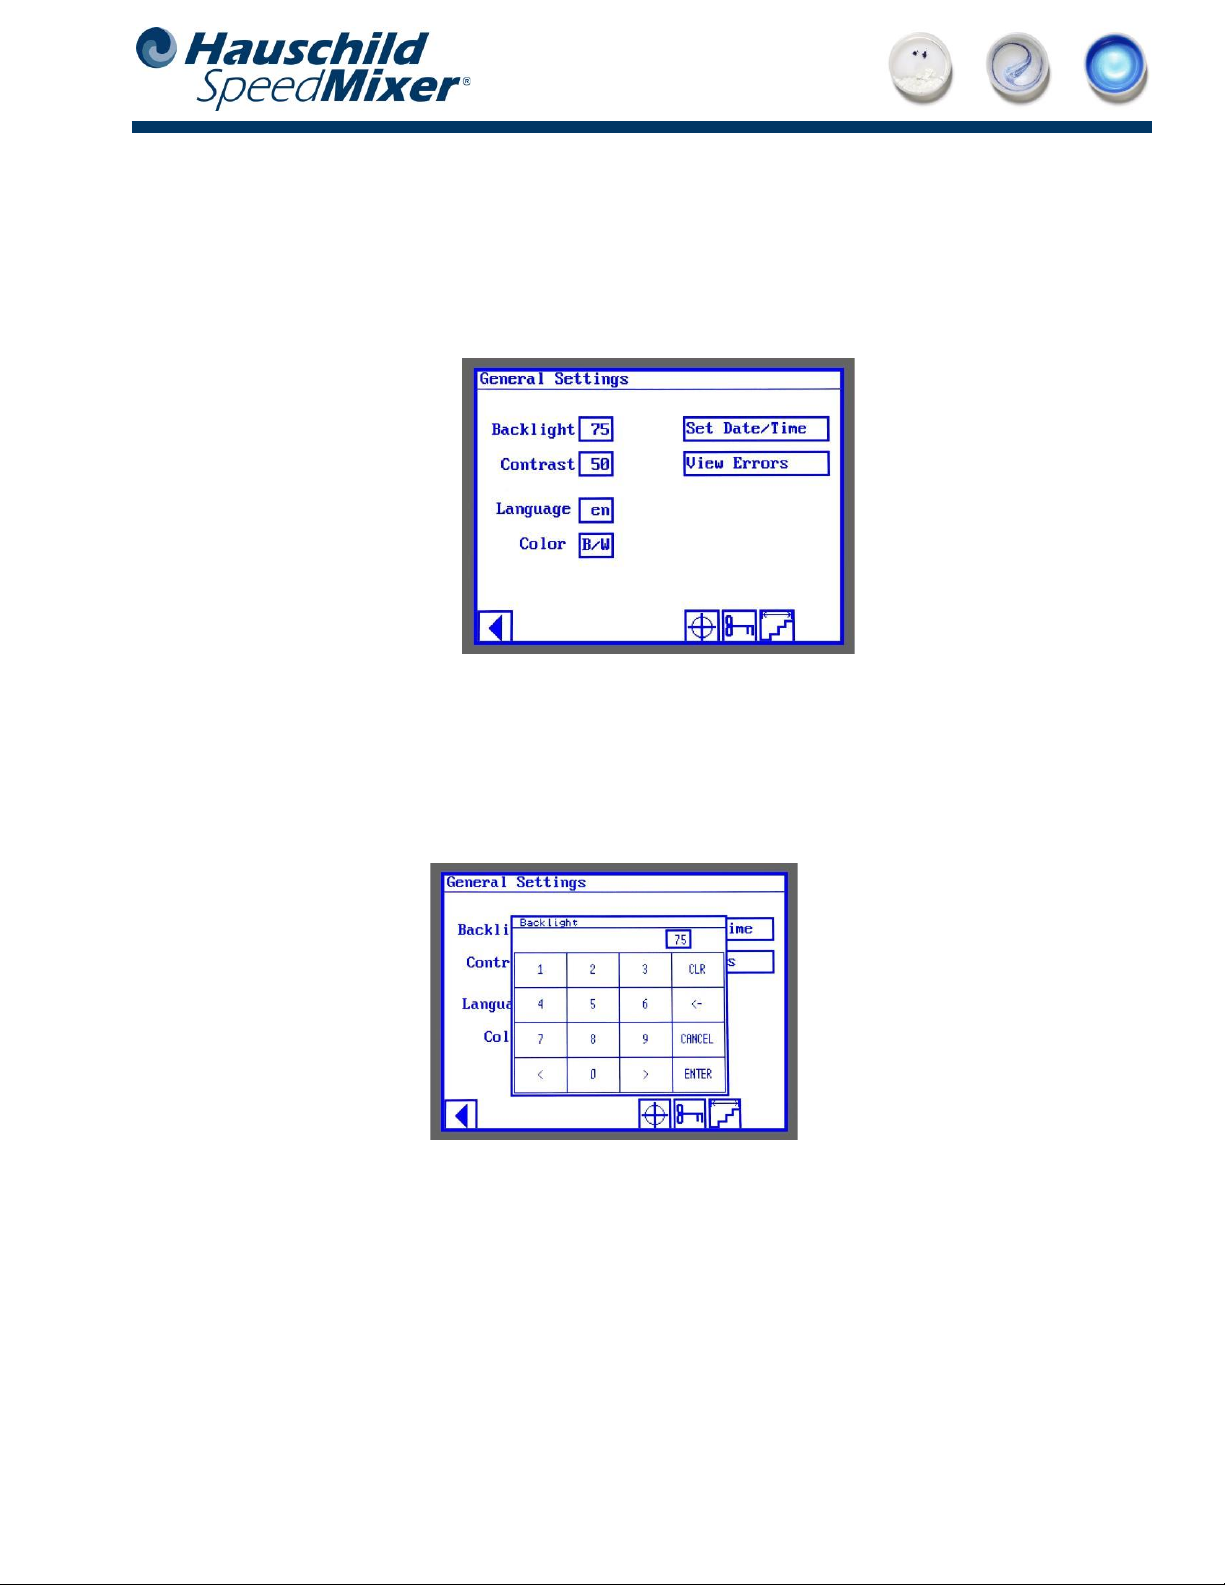
Setup Parameters
The "Setup" button is located in the lower left field of the display. When the button is touched, the following
screen opens on the display:
Adjust brightness and contrast
After touching the button next to the brightness, the following input window opens.
In this window you can enter the values for the desired brightness. The brightness value is displayed in the input
field in the top right corner. To confirm the selection touch "Enter", and the input field closes. Proceed in the same
way to set the contrast.
System Parameters
Adjusting brightness
Hauschild GmbH & Co. KG · Waterkamp 1 · 59075 Hamm
Tel: +49 2381 48205-0 · Fax: +49 2381 48205-17 · info@hauschild-speedmixer.com
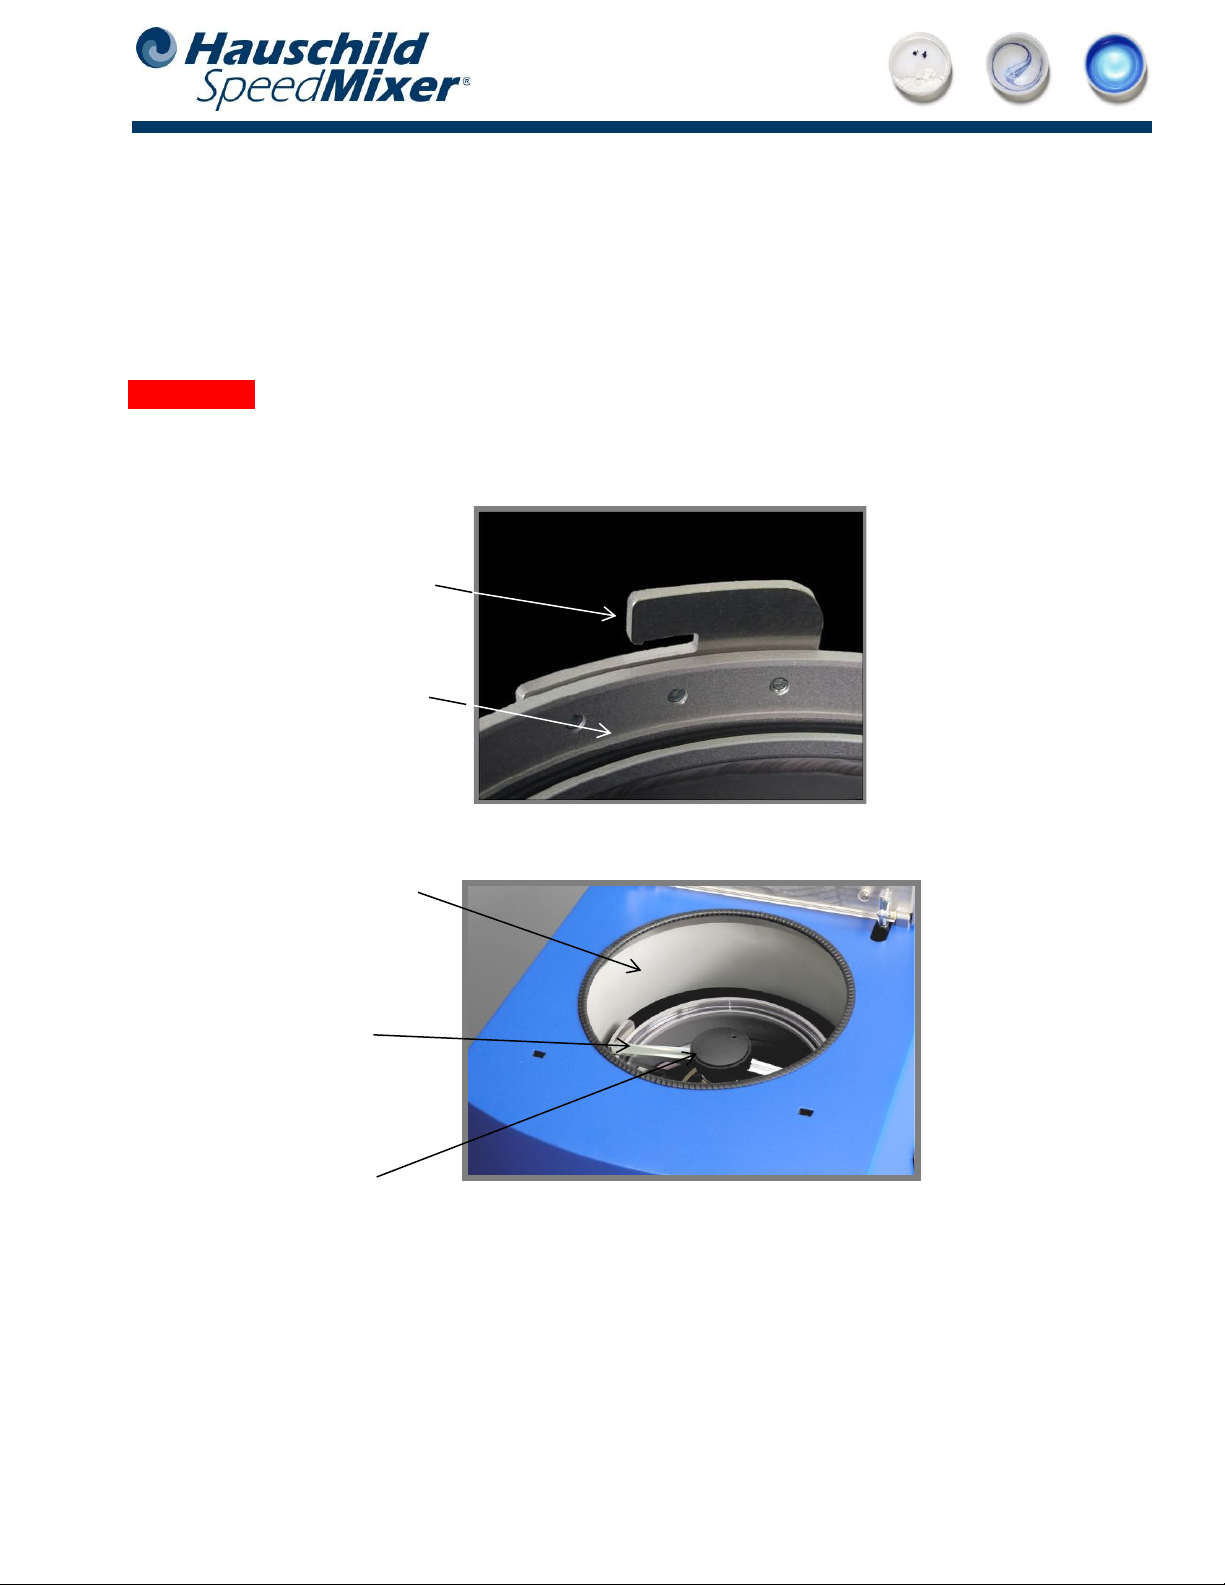
Closing the vacuum chamber lid
Close the vacuum chamber with the vacuum lid. Make sure that the sealing ring is clean and not damaged. Make
sure that the vacuum lid is not scratched and is clean, otherwise malfunctions may occur during operation (desired
vacuum value may not be attained). The swivel lock must engage in the latching tabs on the vacuum chamber and
then be tightened by turning the knob clockwise until sufficient resistance is felt. This is typically achieved after a
few rotations.
CAUTION
The knob does not have a stop. This means that it is possible to overtighten it and therefore
damage it When the vacuum lid has been sufficiently tightened, the machine lid can be
closed.
Latching tab
Sealing ring
Protective
Curtain
Knob
Swivel lock
Detail of the vacuum chamber lock
Inside view of the Vacuum Hauschild SpeedMixer®
Hauschild GmbH & Co. KG · Waterkamp 1 · 59075 Hamm
Tel: +49 2381 48205-0 · Fax: +49 2381 48205-17 · info@hauschild-speedmixer.com
Naming a program
The upper right field of the home screen shows the name of the current program.
To change the name, touch the button. An input field opens in which you can enter the desired name. The new
name of the program is displayed in the input field at the top right corner. Confirm the selection with "ENTER, and
the input field will close. With the key "CLR" (clear) the selection is deleted, with the key "<-" (backspace) a position
of the selection is deleted, with the key "->" the cursor jumps one position further, with the key "SHIFT" you can write
capital letters, with the key "_=-+0" spaces are entered, with the key "CANCEL" the process is aborted.
Starting a program
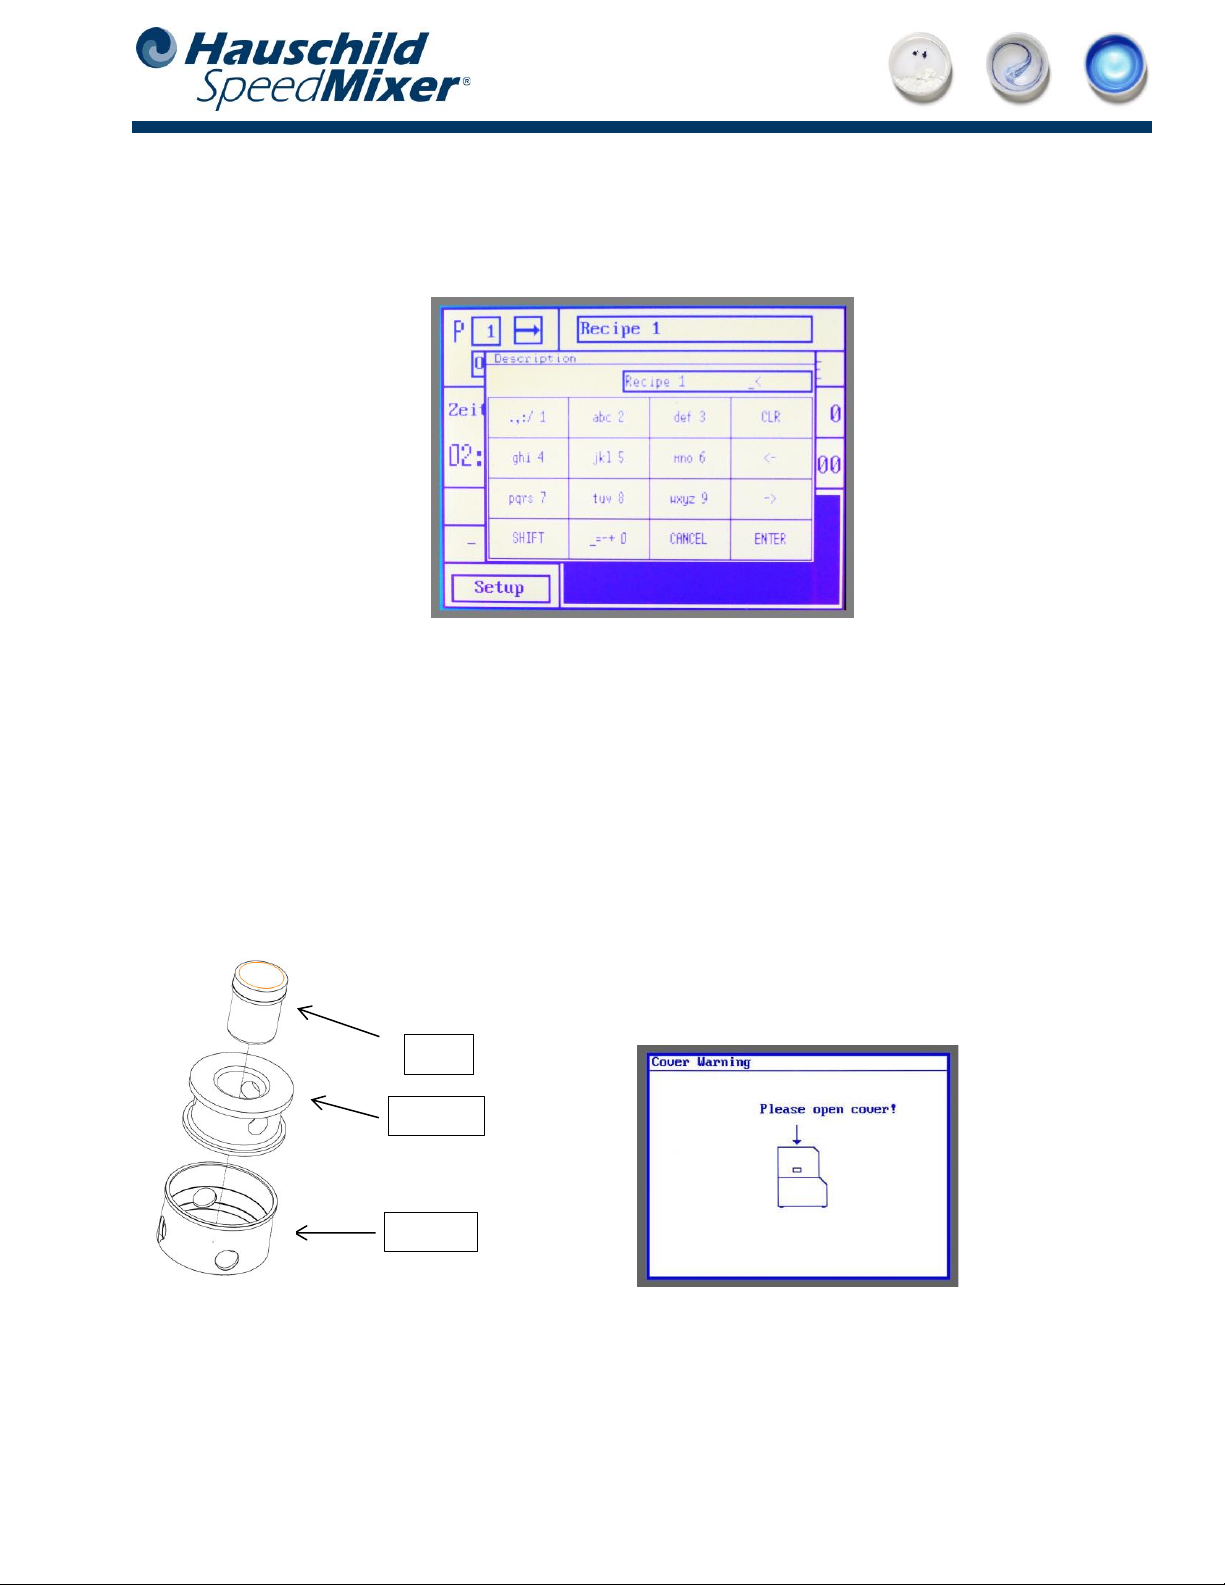
When the program setup has been completed, unlock the lid by pressing the "STOP/OPEN" key, and a
message appears on the display. Insert the mixing cup with the material and, if necessary, the holder into the
basket.
Please note that the lid of the Hauschild SpeedMixer®cannot be open if the device has no power.
Cup
Holder
Basket
Program name box
Exploded view Jar / Holder / Basket Open lid message

Hauschild GmbH & Co. KG · Waterkamp 1 · 59075 Hamm
Tel: +49 2381 48205-0 · Fax: +49 2381 48205-17 · info@hauschild-speedmixer.com
Troubleshooting
If the vacuum value is not reached...
-- Clean the sealing ring of the vacuum chamber.
-- Check the edge of the vacuum lid for damage (scratches).
Product Warranty
Hauschild GmbH & Co. KG traditionally sets high standards for the quality of its products.
Hauschild GmbH & Co. KG (hereinafter referred to as the "manufacturer") warrants to the end customer (hereinafter
referred to as the "customer") subject to the following provisions that the Hauschild SpeedMixer®(hereinafter
referred to as the "product") sold to the customer will be free of defects in material or workmanship for a period of
12 months from the date of delivery (warranty period). Defects claimed under this warranty will be remedied by the
manufacturer at its own discretion and at its own expense by repair or delivery of new or reconditioned parts. The
warranty does not cover normal wear and tear or consumables, such as:
oBall bearings,
oSealing rings,
oDrive belts,
oTension/ idler pulleys,
oMixing basket,
oEquipment lid.
Other claims of the customer against the manufacturer, i.e. damages, are excluded. However, the contractual or
statutory rights of the customer against the vendor concerned shall not be affected by this warranty.
Claims under this warranty are only valid if
- the product does not show any damage or signs of wear caused by improper use that deviates from its
intended purpose and the manufacturer's specifications (according to the user manual),
- the product does not have any signs which indicate that it has been repaired or otherwise modified by
workshops not authorized by the manufacturer,
- only accessories authorized by the manufacturer have been used in connection with the product,
- the serial number has not been removed or made illegible,
- when claiming warranty, the customer must demonstrate that the product has been regularly serviced by
an authorized technical service within the intervals specified in the user manual by submitting the relevant
maintenance records.
Claims under the warranty can only be asserted against the manufacturer within a period of two months after the
occurrence of the warranty case or, in case of defects that are not immediately recognizable, within two months
after their discovery, upon presentation of the original invoice with the date of purchase. The customer shall bear
the costs and the risk of sending and returning the product to the manufacturer. If warranty claims are filed and it
turns out during the inspection of the product by the manufacturer that there was no defect or that the warranty
claim does not exist for one of the reasons mentioned above, the manufacturer is entitled to charge an appropriate
service fee. This does not apply if the customer proves that under the circumstances, he could not have known that
the warranty claim did not exist. This warranty shall apply to any subsequent owner of the product within the scope
and subject to the conditions set forth above (including the presentation of proof of purchase in the event of resale).
This warranty is governed by the laws of the Federal Republic of Germany.
This manual suits for next models
5
Table of contents
Popular Laboratory Equipment manuals by other brands

Fisher Scientific
Fisher Scientific 1130049HP Operation manual

Selecta
Selecta 2000787 manual

New Era Pump Systems
New Era Pump Systems NE-1000 Multi-Phaser manual

Lake Shore
Lake Shore 370 user manual

3D Histech
3D Histech Pannoramic SCAN 150 user guide

PerkinElmer
PerkinElmer Caliper IVIS Spectrum Hardware manual

Star Lab
Star Lab ErgoOne user manual

Cooper Surgical
Cooper Surgical K-Systems T45 user manual

Thermo Forma
Thermo Forma 3911 Operating and maintenance manual

B+K precision
B+K precision 8600 Series Programming manual

PerkinElmer
PerkinElmer Panthera-Puncher 9 Instrument manual

PerkinElmer
PerkinElmer chemagic 360-D manual


