Hello Kitty KT2219MBY User manual
19” LED TELEVISION
USER MANUAL
KT2219MBY
CAUTION: THIS IS NOT A TOY!
Electrically Operated Product - Please use care when plugging into
A
C outlet.
STANDBY

SAFETY INSTRUCTIONS AND WARNINGS
TO PREVENT FIRE OR SHOCK HAZARD, DO NOT USE THE AC ADAPTER WITH AN
EXTENSION CORD, RECEPTACLE OR OTHER OUTLET UNLESS THE BLADES CAN BE
FULLY INSERTED TO PREVENT BLADE EXPOSURE. TO PREVENT FIRE OR SHOCK
HAZARD, DO NOT EXPOSE THIS APPLIANCE TO RAIN OR MOISTURE.
Caution Markings are located at rear enclosure of the apparatus
IMPORTANT SAFETY INSTRUCTIONS
1. Read these instructions.
2. Keep these instructions.
3. Heed all warnings.
4. Follow all instructions.
5. Do not use this apparatus near water.
6. Cleaning - Unplug this product from the wall outlet before cleaning. Do not use liquid cleaners or
aerosol cleaners. Clean only with dry cloth.
7. Do not block any ventilation openings. Install in accordance with the manufacturer’s instructions.
8. Do not place this product on an unstable cart, stand, tripod, bracket, or table.
The product may fall, causing serious injury to a child or adult, and serious
damage to the product. Use only with a stand, or bracket, recommended by the
manufacturer, or sold with the product. Any mounting of the product should
follow the manufacturer’s instructions, and should use a mounting accessory
recommended by the manufacturer. A product and cart combination should be
moved with care. Quick stops, excessive force and uneven surfaces may
cause the product and cart combination to overturn.
9. Do not install near any heat sources such as radiators, heat registers, stoves, or other apparatus
(including amplifiers) that produce heat.
10. Only use attachments/accessories specified by the manufacturer.
11. Unplug this apparatus during lightning storms or when unused for a long periods of time.
12. Refer all servicing to qualified service personnel. Servicing is required when the apparatus has
been damaged in any way, such as ac adapter is damaged, liquid has been spilled or objects
have fallen into the apparatus, the apparatus has been exposed to rain or moisture, does not
operate normally, or has been dropped.
1

13. This appliance shall not be exposed to dripping or splashing water and that no object filled with
liquids such as vases shall be placed on the apparatus.
14. AC adapter is used as disconnect device and it should remain readily operable during intended
use. In order to disconnect the apparatus from the mains completely, the AC adapter should be
disconnected from the mains socket outlet completely.
15. Batteries of the remote shall not be exposed to excessive heat such as sunshine, fire or the like.
Do not mix old and new or different types of batteries. Remove batteries when the unit is not used
for long time.
16. Do not overload wall outlet. Use only power source as indicated.
17. Use replacement parts as specified by the manufacturer.
18. The product may be mounted to a wall by following instructions from the manufacturer.
19. Upon completion of any service or repairs to this product, ask the service technician to perform
safety checks.
20. Power Sources - This product should be operated only from the type of power source indicated
on the marking label. If you are not sure of the type of power supply to your home, consult your
product dealer or local power company. For products intended to operate from battery power, or
other sources, refer to the operating instructions.
21. Object and Liquid Entry - Never push objects of any kind into this product through openings as
they may touch dangerous voltage points or short-out parts that could result in a fire or electric
shock. Never spill liquid of any kind on the product.
22. Damage Requiring Service - Unplug this product from the wall outlet and refer servicing to
qualified service personnel under the following conditions:
a) When the AC adapter is damaged,
b) If liquid has been spilled, or objects have fallen into the product,
c) If the product has been exposed to rain or water,
d) If the product does not operate normally by following the operating instructions. Adjust only
those controls that are covered by the operating instructions as an improper adjustment of
other controls may result in damage and will often require extensive work by a qualified
technician to restore the product to its normal operation.
e) If the product has been dropped or damaged in any way, and
f) When the product exhibits a distinct change in performance - this indicates a need for service.
23. Wall or Ceiling Mounting – The appliance should be mounted to a wall or ceiling only as
recommended by the manufacturer.
24. Power Lines – An outdoor antenna should be located away from the power lines.
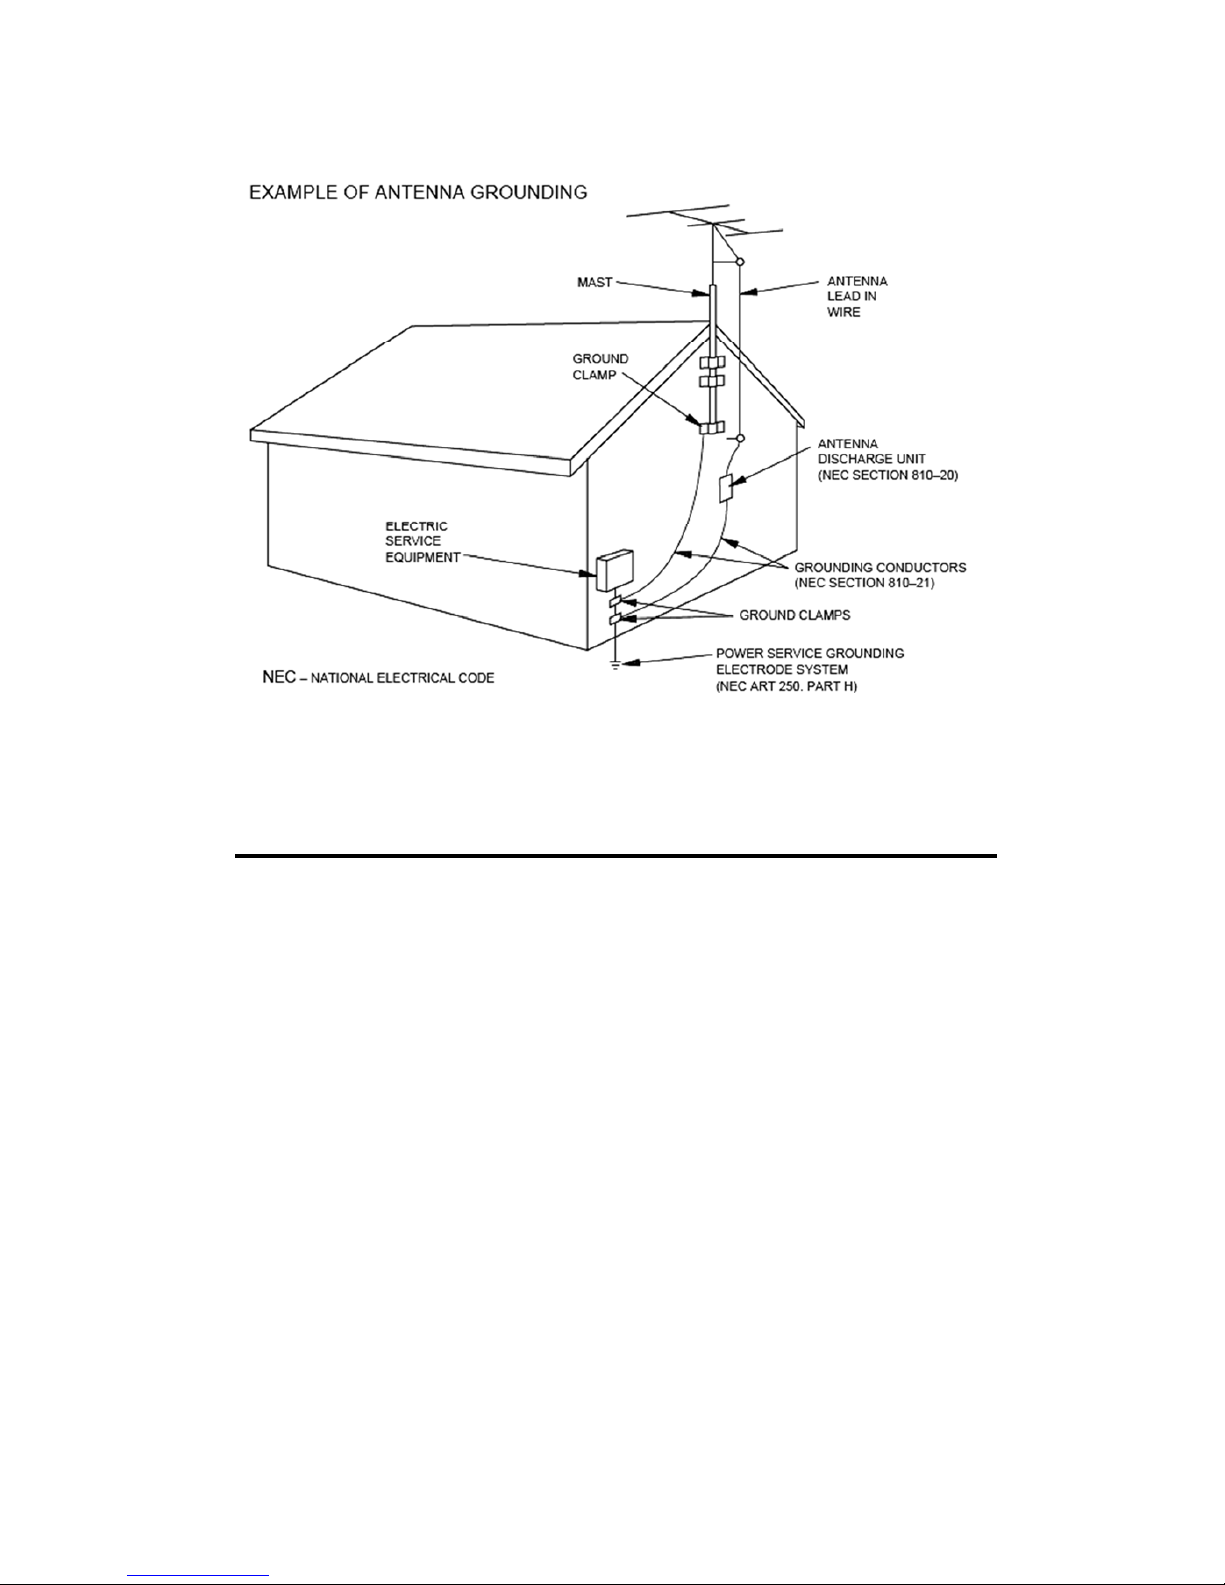
25. Outdoor Antenna Grounding – If an outside antenna is connected to the TV receiver, be sure the
antenna system is grounded so as to provide some protection against voltage surges and built up
static charges.
Section 810 of the National Electric Code, ANSI/NFPA No. 70-1984, provides information with
respect to proper grounding of the mast and supporting structure, grounding of the lead-in wire to
an antenna discharge unit, size of grounding connectors, location of antenna discharge unit,
connection to grounding electrodes and requirements for the grounding electrodes. See figure
below:
2
SAVE THESE INSTRUCTIONS
3

COMPLIANCE WITH FCC REGULATIONS
FCC Declaration of Conformity
Trade Name: Hello Kitty
Responsible Party: Spectra Merchandising International, Inc
4230 North Normandy Avenue
Chicago IL 60634, USA
Hotline: 1-800-777-5331
Declaration of Conformity for Products Marked with FCC Logo, United States Only
This device complies with Part 15 of the FCC Rules. Operation is subject to the following two conditions:
(1) This device may not cause harmful interference, and
(2) This device must accept any interference received, including interference that may cause undesired
operation.
This equipment has been tested and found to comply with the limits for a Class B digital device,
pursuant to Part 15 of the FCC Rules. These limits are designed to provide reasonable protection
against harmful interference in a residential installation. This equipment generates, uses and can
radiate radio frequency energy and, if not installed and used in accordance with the instructions, may
cause harmful interference to radio communications. However, there is no guarantee that interference
will not occur in a particular installation. If this equipment does cause harmful interference to radio or
television reception, which can be determined by turning the equipment off and on, the user is
encouraged to try to correct the interference by one or more of the following measures:
- Reorient or relocate the receiving antenna
- Increase the separation between the equipment and receiver.
- Connect the equipment into an outlet on a circuit different from that to which the receiver is
connected.
- Consult the dealer or an experienced radio technician for help.
WARNING:
Changes or modifications to this unit not expressly approved by the party responsible for compliance
could void the user's authority to operate the equipment.
Cables -
Connections to this device must be made with shielded cables with metallic RFI/EMI connector hoods
to maintain compliance with FCC Rules and Regulations.
Canadian notice -
This Class B digital apparatus meets all requirements of the Canadian Interference-Causing Equipment
Regulations.
Avis Canadien -
Cet appareil numérique de la classe B respecte toutes les exigences du Règlement sur le matériel
brouilleur du Canada.
4
PROTECT YOUR FURNITURE!!
This system is equipped with non-skid rubber ‘feet’ to prevent the product from moving when you operate the
controls. These ‘feet’ are made from non-migrating rubber material specially formulated to avoid leaving any
marks or stains on your furniture. However certain types of oil based furniture polishes, wood preservatives, or
cleaning sprays may cause the rubber ‘feet’ to soften, and leave marks or a rubber residue on the furniture.
To prevent any damage to your furniture we strongly recommend that you purchase small self-adhesive felt pads,
available at hardware stores and home improvement centers everywhere, and apply these pads to the bottom of
the rubber ‘feet’ before you place the product on fine wooden furniture.
WELCOME TO THE WORLD OF HELLO KITTY
We have taken great care to make sure that your Digital Television was in perfect working order when it left our
factory. It has been designed to give you many years of enjoyment and trouble free operation. Read this manual
before operating this unit to become familiar with its features and obtain the performance that will bring you
continued enjoyment for many years.
Customer's Record:
The serial number of this product is found on its back. You should note the serial number of this unit in the space
provided as a permanent record of your purchase to aid in identification in the event of theft of loss.
Model Number: KT2219MBY Serial Number: _______________________
Selecting fine audio equipment such as the item you’ve just purchased is only the start of your musical enjoyment. Now it’s
time to consider how you can maximize the fun and excitement your equipment offers. This manufacturer, the Consumer
Electronics Association (CEA)R and the American Speech-Language-Hearing Association (ASHA) want you to get the most
out of your equipment by playing it at a safe level – a level that lets the sound come through clearly without annoying blaring
or distortion and, most importantly, without damaging your sensitive hearing.
Sound can be deceiving. Over time, your hearing “comfort level” adapts to higher volumes of sound, so what sounds “normal”
can actually be loud and harmful to your hearing. Guard against this by setting your equipment at a safe level BEFORE your
hearing adapts.
TO ESTABLISH A SAFE LEVEL:
Set your volume control to the lowest level where you can hear the music
comfortably and clearly. Once the volume is set, leave it there. Prolonged
exposure to anything over 85 decibels can cause gradual hearing loss.
See if your music player has a volume limiter that allows you to set a safe
listening level by establishing a maximum volume level on your player. This is a
great solution for parents to ensure their children listen at a safe level.
Limit listening time to give your hearing “quiet breaks.”
BE SURE TO OBSERVE THE FOLLOWING GUIDELINES WHEN WEARING
YOUR HEADPHONES OR EARBUDS:
Do not turn up the volume so high that you can’t hear sounds around you.
Do not use headphones or earbuds while operating a motorized vehicle; it may create a traffic hazard and is illegal in many
areas.
5

CONTENTS
SAFETY INSTRUCTIONS AND WARNINGS 1
COMPLIANCE WITH FCC REGULATIONS 4
PROTECT YOUR FURNITURE 5
WELCOME TO THE WORLD OF HELLO KITTY 5
TABLE OF CONTENTS 6
CONTENTS OF YOUR BOX 7
SPECIAL NOTES 7
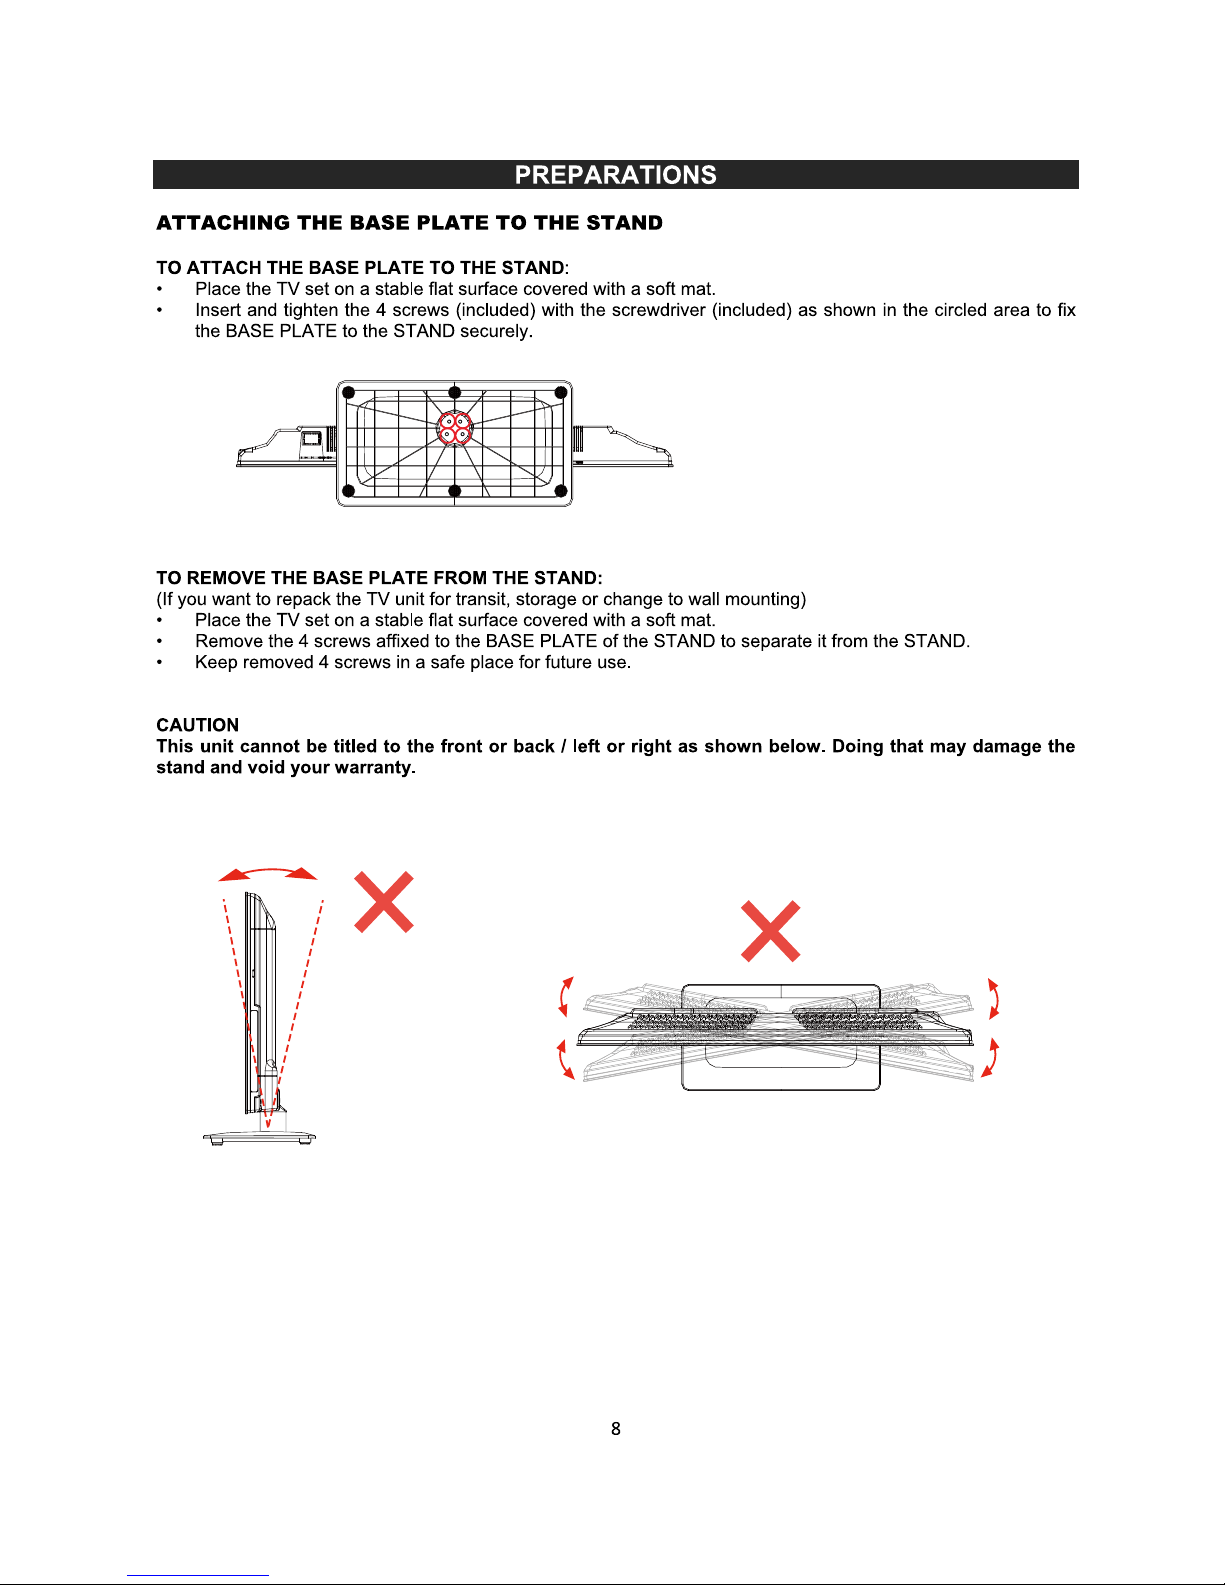
PREPARATIONS 8
CONTROL FUNCTIONS AND TERMINALS 11
GETTING STARTED 14
USING THE REMOTE CONTROL 14
CONNECTING THE TV TO AC POWER 15
ANTENNA CONNECTION 15
CONNECTING TO A DEVICE USING THE COMPOSITE VIDEO AND STEREO AUDIO INPUT TERMINALS 16
CONNECTING TO A DEVICE USING THE COMPONENT VIDEO AND STEREO AUDIO INPUT TERMINALS 17
CONNECTING TO A DEVICE USING THE HDMI INPUT TERMINAL 17
CONNECTING TO A PC USING THE PC VIDEO (VGA) AND PC AUDIO INPUT TERMINALS 18
CONNECTION TO A HOME THEATER AUDIO SYSTEM 19
PUTTING THE UNIT ON A PROPER SURFACE 20
TURNING THE TV ON FOR THE FIRST TIME 20
SOURCE SELECT 20
CHANNEL MENU 21
PICTURE MENU 22
SOUND MENU 23
TIME MENU 24
SETUP MENU 25
LOCK MENU 26
PLAYING MEDIA VIA USB 27
DISPLAY MODE 28
PC VIDEO FORMATS 28
CLEANING 29
TROUBLESHOOTIING 30
SPECIFICATIONS 30
V-CHIP TV RATING EXPLANATIONS 32
MPAA US MOVIE RATING EXPLANATIONS 33
GLOSSARY 34
WARRANTY INFORMATION 36
6

CONTENTS OF YOUR BOX
LED TV x 1 set
TV Stand x 1 set
Remote Control x 1 set
AAA Batteries x 2 pcs
AC Adapter x 1 pc
Hello Kitty Figure x 1 pc
Mounting Screws for the Base Plate of the TV Stand x 4 pcs
Mounting Screws for Hello Kitty Figure x 1pc
Screwdriver x 1 pc
Instruction Manual x 1 set
TV Stand & Hello Kitty Figure installation sheet x 1 pc
SPECIAL NOTES
CARE AND MAINTENANCE
Do not use in hot and cold rooms and/or locations.
xWhen the unit is used in rooms and/or locations with low temperature, the picture may leave trails or appear
slightly delayed. This is not a malfunction, and the unit will recover when the temperature returns to normal.
xDo not leave the unit in a hot or cold location. Also, do not leave the unit in a location exposed to direct
sunlight or near a heater, as this may cause the cabinet to deform and the TV to malfunction.
xRecommended storage temperature range : 32°Fto122°F.
xRecommended working temperature range : 41°Fto104°F
PANEL PROTECTION
The LED display panel used in this TV is made of glass.
Therefore, it can break when the product is harshly dropped or impacted upon by other hard objects.
Be careful not to be injured by broken glass pieces in case the display panel breaks.
ABOUT AFTER-IMAGE
The extended use of fixed image program material can cause a permanent after-image on the screen.
This background image is viewable on normal programs in the form of a stationary fixed image. This type of
irreversible screen deterioration can be limited by observing the following steps:
xReduce the brightness/contrast setting to a minimum viewing level.
xDo not display fixed images for extended periods of time.
xTurn the power off when not in actual use.
IMPORTANT INFORMATION REGARDING DISPLAY OF VIDEO GAMES, COMPUTERS, CAPTIONS OR
OTHER FIXED IMAGES.
xDo not allow a still picture to be displayed for an extended period, as this can cause a permanent after-image
to remain on the screen.
Examples of still pictures include station logos, video games, computer images, text and images displayed in
4:3 mode.
xThe permanent after-image on the screen resulting from abovementioned fixed images is not an operating
defect and as such is not covered by the warranty.
xThis TV is not designed to display fixed images for extended periods of time. Do not let images display in 4:3
mode for extended periods of time.
PIXEL DEFECT
The LED display panel is a high tech part capable of reproducing high definition images. In rare cases, a few
non-active pixels may appear on the screen as a fixed point of blue, green or red. Please note that this does not
affect the performance of your product.
7

INSTALLING THE HELLO KITTY FIGURE TO THE TV FRAME
.
Step 1
Align the hole in the center of
the back base of the Hello
Kitty figure to align with the
hole in the center of the top of
the TV frame.
Step 2
Secure the Hello Kitty figure to
the top of the TV as shown
below by using screw and
screwdriver provided.
Screw hole
Step 3
Installation completed.
Enjoy.
9

WALL MOUNTING
This unit is VESA-compliant, and is designed to be wall-mounted with a VESA-compliant (100 mm x 100 mm or 3-
15/16” x 3-15/16”) mounting kit designed for flat-panel TVs (not included). Mount the TV unit according to the
instructions included in the mounting kit.
Length of wall mounting screws affixing the TV set should not exceed 8 mm (0.3”).
NOTE
Remove the base stand before mounting the unit on the wall.
CAUTION:
- Do NOT fasten the screws too tight for this may damage the TV or cause the TV to fall,
resulting in personal injury.
- Do not use screws longer than 8mm (0.3”) as it will cause damage to the internal parts.
- Fit the wall bracket securely following the manufacturer’s instructions.
- Do NOT mount your TV at more than a 15 degree angle.
- ALWAYS use two people to mount the TV to a wall.
- Do NOT install your Wall Mount Kit while your TV is turned on. It may result in personal
injury due to electric shock.
10
100mm
(3-15/16”)
(3-15/16”)
100mm
Four mounting holes
(size M4 screw)

CONTROL FUNCTIONS AND TERMINALS
TV UNIT
FRONT PANEL CONTROL
NO.
CONTROL
BUTTON
FUNCTION DESCRIPTION
1 SOURCE To access the INPUT SOURCE menu.
2 MENU Press this button to access the main menu page.
3 CH+/- Press these two buttons to directly change the TV channel.
In menu operations, these buttons also serve as up/down buttons.
4 VOL+/- Press the VOL+ or VOL - button to directly increase or decrease the sound volume
level. In menu operations, these buttons also serve as right/left buttons.
5POWER /
STANDBY
Press this button to turn the unit ON from STANDBY mode. Press it again to turn the
set back to STANDBY.
6 POWER
INDICATOR
Indicates Power ON/Standby mode
7 INFRARED
SENSOR
Receives IR signal from remote control
NOTE:
Functions of CH+/-, VOL+/-, MENU, SOURCE and STANDBY are also provided on the remote control. This user
manual provides a description of remote control operating functions.
11
source STANDBY
1
2
3
4
5
6 7
Ź

BACK & SIDE PANEL CONNECTORS
NO. NAME OF
INPUT/OUTPUT
TYPE OF
CONNECTOR
FUNCTION DESCRIPTION
1. DC IN DC jack Connect to DC plug of AC adaptor.
2. USB PORT Type –A USB
connector
Connect to a USB flash drive for playing music and viewing picture files up to 4GB.
Only FAT16 or FAT32 formatted flash drives are supported.
3. HDMI INPUT HDMI female
connector
Connect to a device that uses HDMI cable, such as Blu-ray, HD cable / satellite box
or video cam. This connection port receives pure digital audio and high definition
video signals through one single cable. This port also can accept a HDCP video
device for video.
4. PC VIDEO INPUT
(VGA)
D-sub (15-pin) Connect to the VGA output from a PC or notebook using a VGA cable. Be sure to
connect your audio cable as well if you want to hear sound from the VGA source.
5. PC AUDIO INPUT 3.5mm stereo
jack
Connect to the audio output from a PC or a DVI video device.
COMPONENT VIDEO RCA jacks x 3 Connect to a device with the YPbProutput jack, such as a DVD or VCR.
Color codes: green for Y, blue for Pb & red for Pr.
6.
VIDEO INPUT
(COMPOSITE)
Share Y RCA
jack of
component
video
Connect to a device with the composite video output jack, such as a DVD or VCR.
Color code: yellow of your external device.
Green of your KT2219MBY
7. ANTENNA/CABLE 75-ohm F
connector
Connect to a 75-ohm coaxial cable to receive signal from an outdoor antenna, cable
or cable box.
8. HEADPHONE 3.5mm stereo
jack
Connect to a pair of stereo headphones with a 3.5mm stereo plug for private
listening.
9. DIGITAL AUDIO OUT
(COAXIAL)
RCA jack Connect to the coaxial digital audio input of an external AV amplifier with Dolby
Digital (AC3) decoding capacity.
Color code: orange
10. AUDIO INPUT FOR
COMPONENT &
COMPOSITE VIDEO
RCA jacks x 2 Audio input: Connect to the Video Audio output jack of DVD.
Color codes: white for LEFT and red for RIGHT
12
PC INPUT
AUDIO YANTENNA/ PHONES
CABLE
(75 OHMS)
COMPOSITE
VIDEO IN
COMPONENT VIDEO IN
Pb Pr
USB
INPUT
POWER IN
(DC 12V 3A)
DIGITAL R
AUDIO IN
L
(COAXIAL)
AUDIO OUT
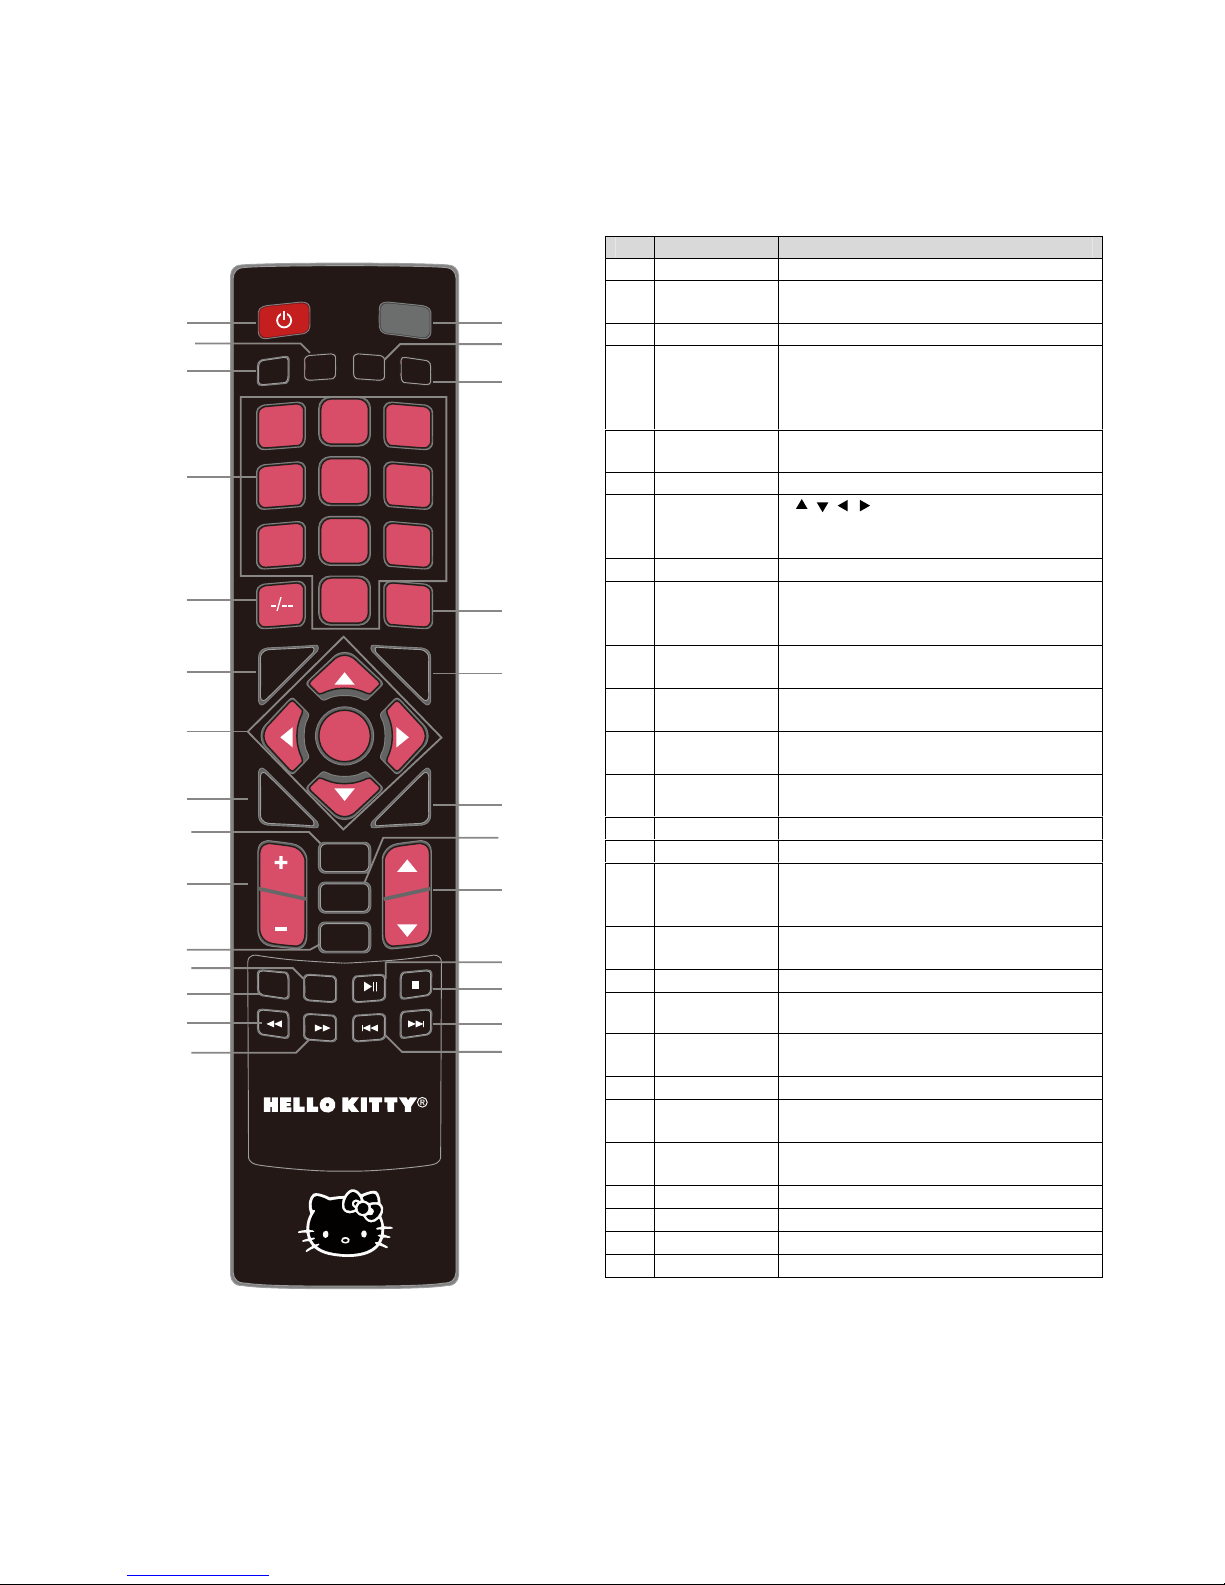
REMOTE CONTROL
No. FUNCTION DESCRIPTION
1 POWER/Standby Turn the TV on or put it on Standby
2 ASPECT
Select different viewing modes of the TV
and external video inputs.
3 PICTURE
Select various preset picture settings.
4 NUMBERS
Press 0-9 to select a TV channel directly
when you are watching TV. The channel
will change after 2 seconds.
5 -/--
Insert the dash for selecting digital
channels directly.
6 DISPLAY
Show the display information
7 THUMB STICK
( / / / / ENTER): Allows you to
navigate the on-screen menus and system
settings to your preference.
8 MENU
Bring up the main TV menu on the screen.
9 EPG In TV mode, press to enter the EPG
(Electronic Programming Guide)
menu directly
10 VOL +/-
Press the VOL buttons to increase or
decrease the sound level.
11 TV/USB Toggle select TV mode or Launch the USB
reader function for pictures
and music.
12
MTS
Select stereo/mono or second audio
programming.
13 CC
Cycle between different closed captioning
modes.
14 Fast Backward Fast forward MP3 playback in USB mode.
15 Fast Forward Fast backward MP3 playback in USB mode.
16 MUTE
Turn the sound off from the TV. To unmute
either
press VOL(+) or press the MUTE
button again.
17 SLEEP
Select amount of time to let your TV turn off
automatically.
18 SOUND Select
various preset sound settings.
19 LAST Go between current and last channel
selected.
20 SOURCE
Press this button to cycle through the
INPUT sources.
21 EXIT
Exit the main TV menu on the screen.
22 FAVORITE
(FAV)
Press to add or remove your favorite
channel.
23 CH +/-
Press the CH buttons to go through the
channel list.
24 Play/Pause Play/Pause media playback in USB mode
25 Stop Stop media playback in USB mode
26 Skip Next
Skip to next track/picture
27 Skip Previous
Skip to previous track/picture
13
PICTURE
ASPECT
SOUND
SLEEP
123
456
789
0
VOL CH
SOURCE
DISPLAY
EPG
STANDBY
MUTE
LAST
ENTER
TV/USB
FAV
MENU
CC MTS
EXIT
116
18
19
20
21
22
23
25
26
27
24
17
2
3
4
5
6
7
8
10
13
14
15
11
12
9

GETTING STARTED
USING THE REMOTE CONTROL
TO INSTALL BATTERIES
1. Open the battery door.
.2
Insert 2 "AAA" batteries.
BATTERY REPLACEMENT
When the batteries become weak, the operating distance of the remote control is greatly reduced and you will
need to replace the batteries.
BATTERY CARE
xBe sure that the batteries are installed correctly. Wrong polarity may damage the unit.
x(a) Do not mix old and new batteries.
(b) Do not mix alkaline, standard (carbon-zinc) or rechargeable (nickel-cadmium) batteries.
xIf the unit is not to be used for an extended period of time, remove the batteries. Old or leaking batteries can
cause damage to the unit and may void the warranty.
xNever attempt to recharge “Non-rechargeable” batteries.
xDo not dispose of batteries in fire, batteries may explode or leak.
xBatteries should be changed by adults.
Use the remote control by pointing it towards the remote sensor
window of the set. Objects between the remote control and sensor
window may prevent proper operation.
CARE OF REMOTE CONTROL
xDo not expose the remote control to shock. In addition, do not
expose the remote control to liquids, and do not place in an area
with high humidity.
xDo not place the remote control under direct sunlight. The heat
may cause deformation of the unit.
xThe remote control may not work properly if the remote sensor
window of the main unit is under direct sunlight or strong lighting.
In such a case, change the angle of the lighting or the TV set, or
operate the remote control closer to the remote sensor window.
14
5m
30° 30°

CONNECTING THE TV TO AC ADAPTER
Insert the AC ADAPTER (included) into a household 120V~ 60Hz AC socket outlet.
WARNINGS
Ensure that the AC ADAPTER is easily accessible.
Ensure the AC ADAPTER is securely connected to
prevent electric shock.
Do not touch the AC ADAPTER with a wet hand to
prevent an electric shock.
Do not change the AC ADAPTER other than that
provided with this TV to prevent fire or electric shock.
Do not damage the AC ADAPTER. A damaged AC
ADAPTER may cause fire or electric shock.
Do not move the TV with the AC ADAPTER plugged
in the power outlet.
Do not place the AC ADAPTER near a high
temperature object.
Do not twist, bend excessively or stretch the DC cord of the AC ADAPTER.
Do not pull on the DC cord. Always grip the AC ADAPTER body when disconnecting it from the power outlet.
Do not use a damaged AC ADAPTER or AC power outlet.
ANTENNA CONNECTION
INSTALL the unit in a room where direct light will not fall upon the screen. Total darkness or a reflection on the
picture screen may cause eyestrain. Soft and indirect lighting is recommended for comfortable viewing.
Optimum reception of color requires a good signal and will generally mean that an outdoor antenna must be used.
The exact type and position of the antenna will depend upon your particular area.
NOTE:
xIt is recommended that the 75-ohm coaxial cable be used to eliminate interference and noise which may
occur due to radio wave conditions.
xThe antenna cable should not be bundled with the power cord and the like.
xIf the antenna is not installed properly, contact your dealer for assistance.
15
AC ADAPTOR
120V~AC POWER OUTLET
PC INPUT
AUDIO YANTENNA/ PHONES
CABLE
(75 OHMS)
COMPOSITE
VIDEO IN
COMPONENT VIDEO IN
Pb Pr
USB
INPUT
POWER IN
(DC 12V 3A)

CONNECTING TO A DEVICE USING THE COMPOSITE VIDEO AND STEREO AUDIO
INPUT TERMINALS
How to connect:
Connect the AUDIO (L/R) jacks on TV to the corresponding color-coded output jacks on the device.
Connect Composite Video IN jack on TV (color coded green, share with Y RCA jack of component video ) to video
output jack of device, such as a VCR, using a good quality Audio/Video cable (not included) as shown below:
To play a videotape from a VCR:
1. Turn on your TV, then press SOURCE button. The INPUT SOURCE menu opens.
2. Press ϧor ϰto select AV, then press ENTER to confirm.
3. Turn on your VCR , insert a videotape and press the Play button.
Note: The component video and AV jacks are shared. This means you can connect only one component video or
AV device at a time. We suggest using HDMI if your device supports it.
16
PC INPUT
AUDIO YANTENNA/ PHONES
CABLE
(75 OHMS)
COMPOSITE
VIDEO IN
COMPONENT VIDEO IN
Pb Pr
USB
INPUT
POWER IN
(DC 12V 3A)
DIGITAL R
AUDIO IN
L
(COAXIAL)
AUDIO OUT
Connect the yellow video cable
connector to the green VIDEO IN(Y)jack
onthebackofyourTV.
AV cable option
AUDIO/ VID O
OU T
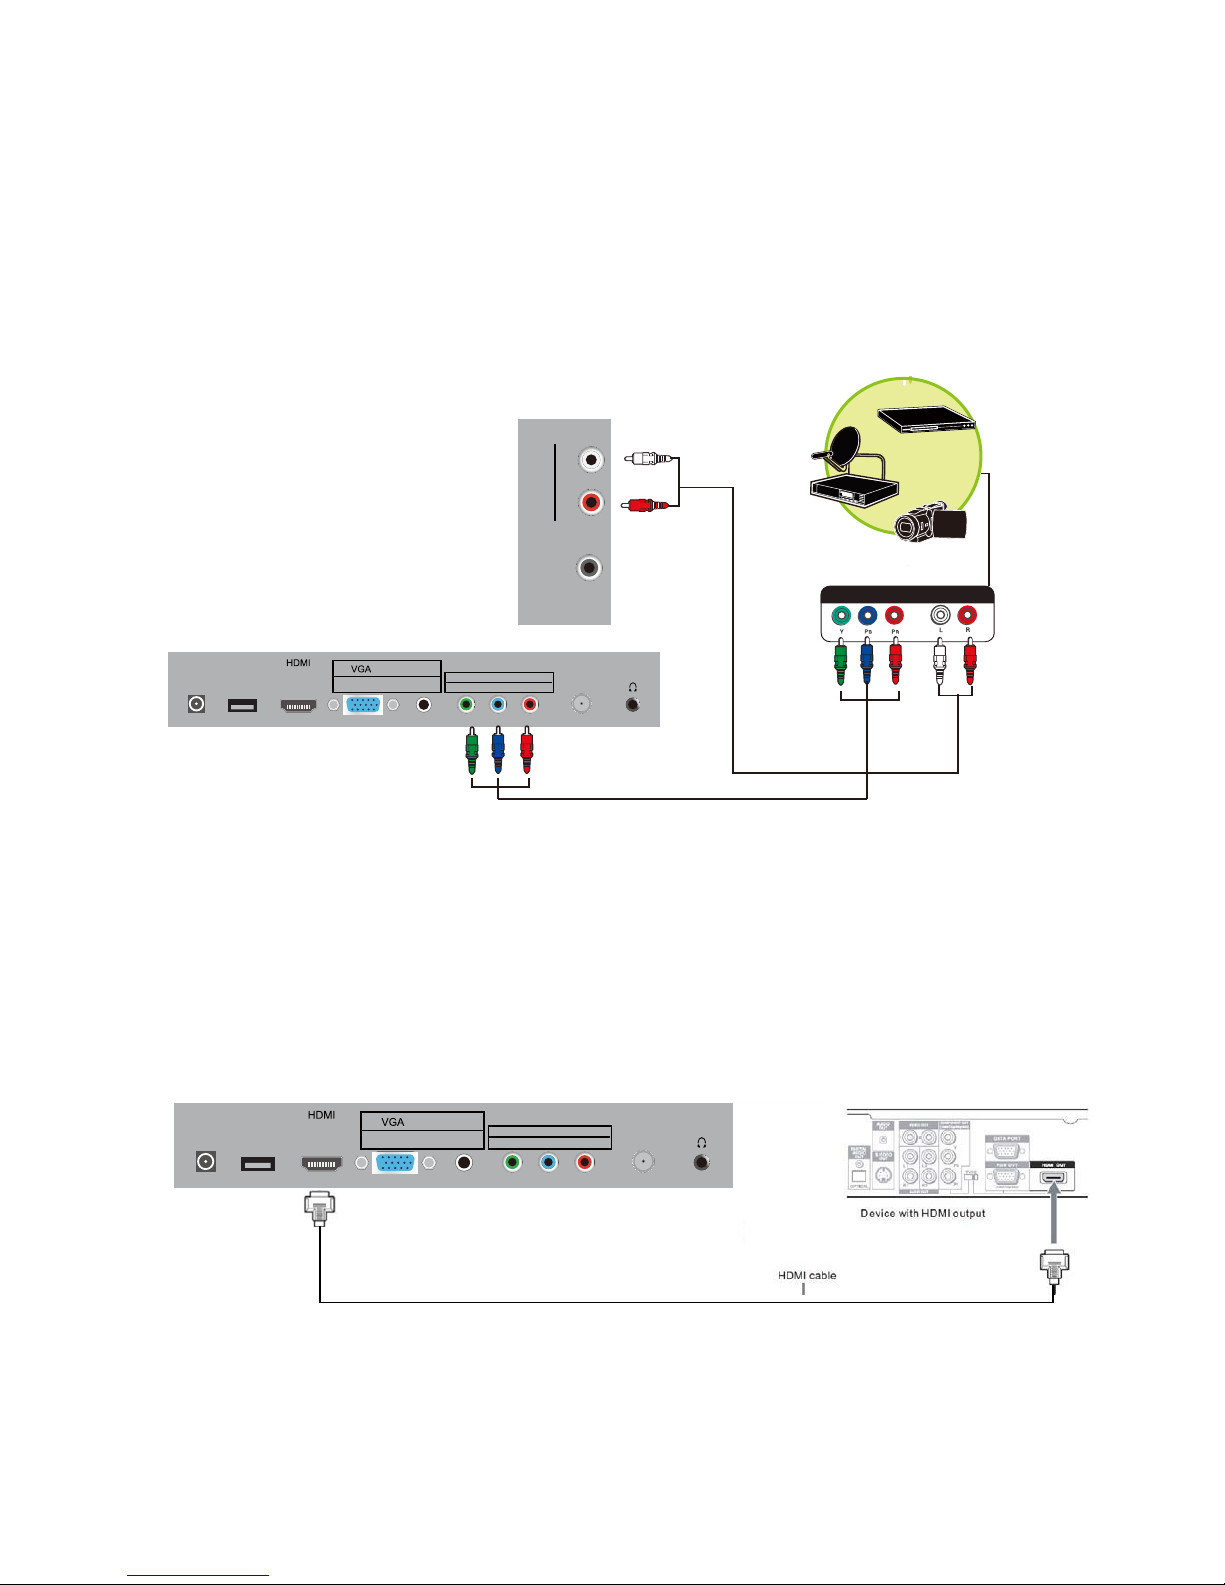
CONNECTING TO A DEVICE USING THE COMPONENT VIDEO AND STEREO AUDIO
INPUT TERMINALS
How to connect:
1. Connect the Y, Pb, Pr input jacks on the TV to the corresponding color coded output jacks on the device,
such as a DVD player, using a good quality Component Video cable (not included) as shown below.
2. Connect the AUDIO (L/R) input jacks on the TV to the corresponding color coded output jacks on the device
using a good quality audio cable (not included).
To play component video from a DVD player:
1. Turn on your TV, then press SOURCE button. The INPUT SOURCE menu opens.
2. Press ϧor ϰto select Component, then press ENTER to confirm.
3. Turn on your DVD player and set it to the correct video output mode. See the device's user guide for more
information.
CONNECTING TO A DEVICE USING THE HDMI INPUT TERMINAL
How to connect:
Connect the HDMI connector on the TV to the HDMI connector on the device, such as a Blu- ray disc player,
using a good quality HDMI cable (not included) as shown below:
To play a Blu-ray disc:
1. Turn on your TV, then press SOURCE button. The INPUT SOURCE menu opens.
17
PC INPUT
AUDIO YANTENNA/ PHONES
CABLE
(75 OHMS)
COMPOSITE
VIDEO IN
COMPONENT VIDEO IN
Pb Pr
USB
INPUT
POWER IN
(DC 12V 3A)
AUDIO/VIDEO OUT
DIGITAL R
AUDIO IN
L
(COAXIAL)
AUDIO OUT
PC INPUT
AUDIO YANTENNA/ PHONES
CABLE
(75 OHMS)
COMPOSITE
VIDEO IN
COMPONENT VIDEO IN
Pb Pr
USB
INPUT
POWER IN
(DC 12V 3A)

2. Press ϧor ϰto select HDMI, then press ENTER to confirm.
3. Turn on your Blu-ray disc player and set it to the correct video output mode. See the device's user guide for
more information.
CONNECTING TO A PC USING THE PC VIDEO (VGA) AND PC AUDIO INPUT
TERMINALS
How to connect:
1. In TV & your PC power off mode, connect the PC VIDEO (VGA) connector on the TV to the corresponding
VGA connector on the PC using a good quality VGA cable (not included) as shown below.
2. Connect the PC AUDIO input jack on the TV to the corresponding output jack on the PC using a good quality
audio cable with 3.5mm stereo plugs (not included).
To play video from a PC:
1. Turn on your TV, then press SOURCE button. The INPUT SOURCE menu opens.
2. Press ϧor ϰto select PC, then press ENTER to confirm.
3. Turn on your PC and adjust the display properties as required. Please also see the PC Video Format Table
under the DISPLAY MODE section for more information.
18
PC INPUT
AUDIO YANTENNA/ PHONES
CABLE
(75 OHMS)
COMPOSITE
VIDEO IN
COMPONENT VIDEO IN
Pb Pr
USB
INPUT
POWER IN
(DC 12V 3A)
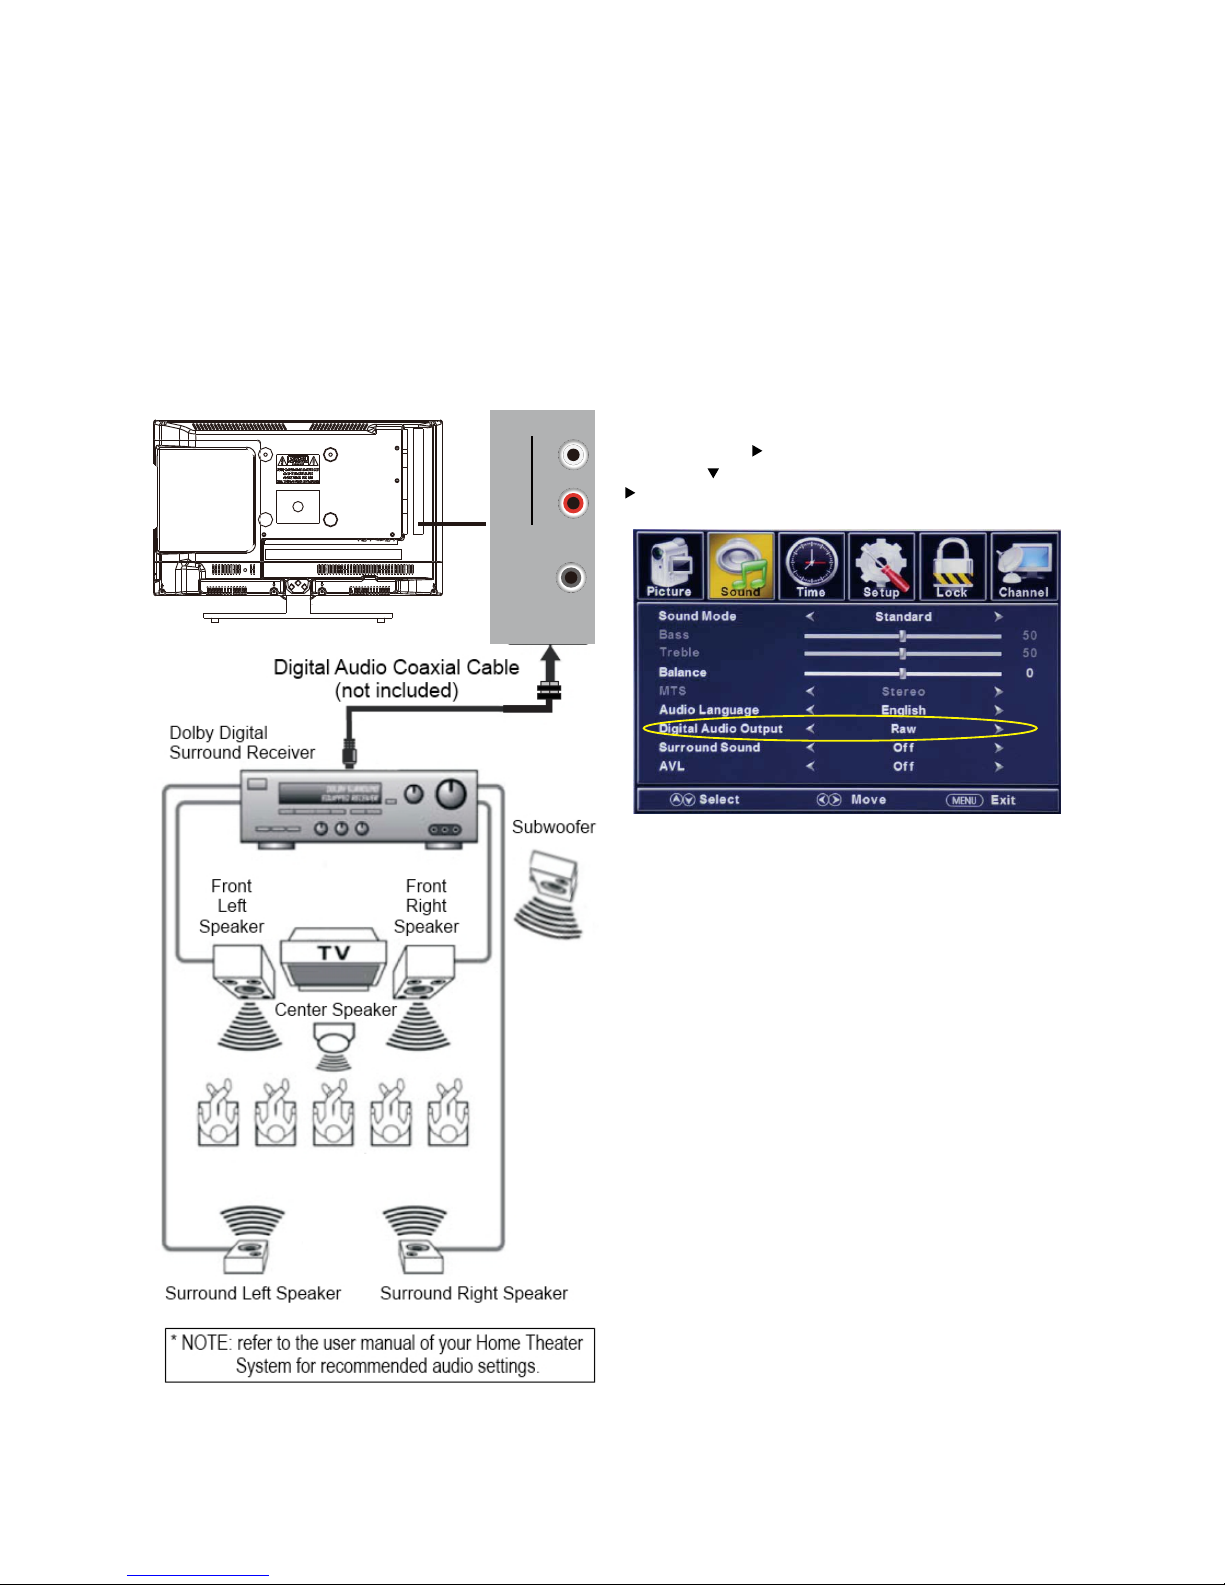
CONNECTION TO A HOME THEATER AUDIO SYSTEM
For BEST Audio Performance
Connecting to a Home Theater System:
Dolby Digital can deliver optimal 2 channel stereo or surround sound with five discrete full range channels plus a
sixth channel for a subwoofer.
Enjoy optimal sound reproduction from your system with a Dolby Digital amplifier that incorporates a digital
coaxial input. Connect an optional digital cable directly to the television’s coax audio output to listen through all
inputs except VGA.
NOTE: The VGA does not support digital audio.
How to Setup Digital Output
Press the MENU button on the remote control.
Press the right arrow button to select SOUND Press
the down arrow button to highlight SPDIF type right
RaworPCM.
19
DIGITAL R
AUDIO IN
L
(COAXIAL)
AUDIO OUT
Table of contents


