HemoCue Hb 301 User manual

Operating Manual
HemoCue®Hb 301

Table of Contents
HemoCue®Hb 301 System 1
Analyzer Overview 2
Components 3
Start-up 3
Set-up Audio signal 4
Printer and Connectivity 4
Measuring Capillary blood 5
Measuring Venous/Arterial blood 7
Quality Control 8
Maintenance Daily 8
Maintenance Optical parts 9
Troubleshooting 10
Performance, EMC and Electrical Safety 12
Symbols used 13
Technical Specifications 14

901814 200715 US
1
HemoCue®Hb 301 System
Intended Use for US only
The HemoCue Hb 301 System is intended for quantitative determination of hemoglobin in primary care or blood donation settings.
The HemoCue Hb 301 System is intended to be used to determine the hemoglobin concentration for adults, adolescents, children, and infants above 1 month old in primary care
setting. The HemoCue Hb 301 System is intended to be used to determine the hemoglobin concentration for adults in blood donation setting.
The HemoCue Hb 301 System is for professional in vitro diagnostic use only.
General
The HemoCue Hb 301 Analyzer is only to be used with HemoCue Hb 301 Microcuvettes. The HemoCue Hb 301 System may be used with capillary, venous or arterial blood.
The HemoCue Hb 301 System complies with the IVD Medical Device Directive 98/79/EC and carries the CE mark.
Further information may be obtained from the HemoCue distributor or HemoCue AB.
Warranty
The analyzer carries a 24-month warranty from the day of receipt. Any other use of the system than recommended by the manufacturer, including opening the cover of the
analyzer, will void the warranty.
Service and Disposal
Consult local environmental authorities for proper disposal. The analyzer should be cleaned prior to service or disposal.
Read and follow this operating manual and the HemoCue Hb 301 Microcuvettes package insert to attain optimum performance and safety. Any other use of the system than
recommended by the manufacturer may impair the safety.

2
901814 200715 US
Fig. 1A
On/O button
Fig. 4B
Power inlet
Fig. 4A
Serial port
Fig. 3
Measuring position
Fig. 2
Battery Compartment
Fig. 1C
Loading position
Fig. 1B
Cuvette Holder
Analyzer Overview

901814 200715 US
3
1 2 3
12
Components
Start-up
Always follow operating and storage conditions listed in section Technical Specifications. Allow the analyzer to reach operating temperature before use.
Place the analyzer on a horizontal and stable surface. Connect the power adapter to the power inlet or insert 4 batteries, see section Analyzer Overview, fig. 2.
Only use power adapter and batteries listed in section Technical Specifications.
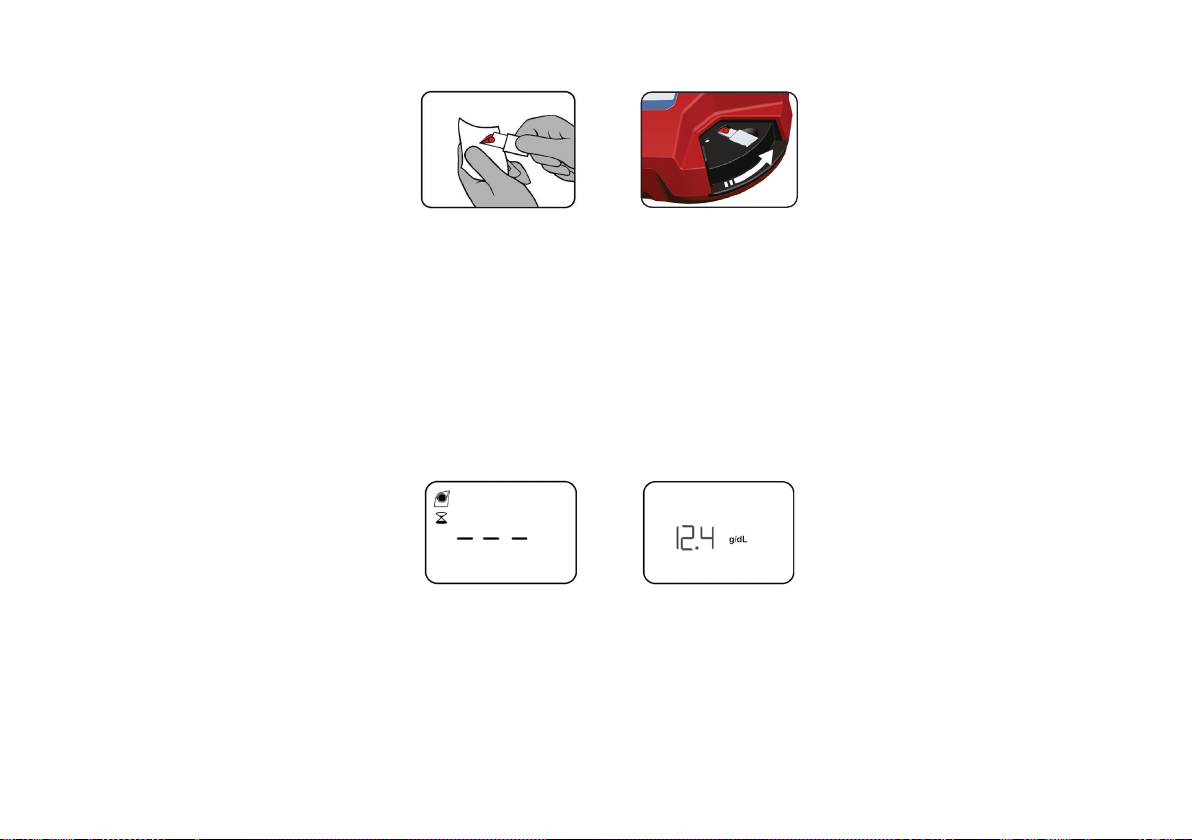
1. In Loading position (see also section Analyzer Overview, fig. 1C), press button until all symbols appear on the display.
2. The analyzer performs a self-test. Three flashing dashes indicate that the analyzer has passed the self-test and is ready for use.
To turn the analyzer o press button until OFF is displayed. When turned on again the most recent result is displayed if the cuvette holder is in Measuring position (see section Analyzer Overview,
fig. 3). If the power adapter had previously been disconnected for more than 5 minutes, and there are no batteries in the analyzer, “Hb” will be displayed instead of the most recent result.
Low battery is indicated with a battery symbol ” ”.
1. HemoCue Hb 301 Analyzer
2. Power adapter
3. HemoCue Hb 301 Operating Manual &
Quick Reference Guide
Materials required but not provided
HemoCue Hb 301 Microcuvettes
Lancet*
Pipette or other transfer device**
Lint-free wipe
Hydrophobic surface **
Optional items
Printer
Software applications
Cables for PC and printer connection
HemoCue Cleaner
Hard carrying case
HemoCue Lancet
Spare parts
Battery Lid
Power adapter***
Cuvette Holder
* For capillary samples
** For venous/arterial samples
*** not available in all countries

4
901814 200715 US
1 2 3
Set-up Audio signal
21
Printer and Connectivity
Only use ASCII printers recommended by HemoCue. Always follow instructions for use for the printer. Only the current result
can be transferred directly after the measurement.
1. Connect analyzer to printer or computer* via serial port.
2. When the result is shown on the display, it will be either automatically printed or transferred to the computer.
*The analyzer can be connected to HemoCue software or external software applications for transfer of data, using a serial
cable. For more information, contact the local distributor or HemoCue AB.
If the audible signal is activated, a signal will be heard when the measurement is completed, or if an error code is displayed.
1. Make sure that the analyzer is turned o. Press the On/O button for approximately 10 seconds.
2. The display now shows a flashing bell-symbol.
3. Press the button rapidly to change between signal on and o.
When the setting is completed, press the button for approximately 3 seconds until the bell stops flashing. The analyzer will
return to the ready mode.

901814 200715 US
5
1 2 3
4 5 6 7
. Sample at the side of the fingertip for best blood flow and comfort.
5. Press lightly towards fingertip and puncture using a lancet.
6. Wipe away the first 2 or 3 drops of blood. Press lightly towards fingertip until another drop of blood appears.
7. When the blood drop is large enough, fill the microcuvette completely in one step.
Do not refill. If a second sample is to be taken, it is important that this is done after the measurement of the first sample is complete.
Do not let more than 40 seconds pass between step 7 (filling) and step 9 (starting the measurement).
Measuring Capillary blood
Be aware that peripheral circulatory failure of the patient could aect the result of a capillary sample.
Always wear protective gloves. Handle blood with care, as it may be infectious.
Follow local safety procedures for disposal of used microcuvettes.
1. Make sure that the patient’s/blood donor's hand is warm and relaxed. Use the middle or ring finger for sampling. Avoid fingers with rings on.
2. Clean fingertip with disinfectant and allow to dry.
3. Using your thumb, lightly press the finger from the top of the knuckle towards fingertip to stimulate blood flow.
6
901814 200715 US
8 9 10 11
8. Wipe o specimen from the outside of the microcuvette, make sure no specimen is drawn out from the open end.
Visually inspect the microcuvette.
If the microcuvette is not completely filled with blood, or if there are air bubbles, discard and fill a new microcuvette. Small
bubbles around the edges can be ignored.
9. Place the microcuvette in the cuvette holder and start measurement by gently sliding the cuvette holder to Measuring position,
see section Analyzer Overview, fig. 3.
10. Whilst measuring, will be displayed.
11. After ≤3 seconds, the hemoglobin value is displayed. The result is displayed as long as the cuvette holder is in Measuring position.
Discard the microcuvette after measurement. Microcuvettes are for single use only. If needed, repeat the measurement with a new
microcuvette (see Repeat testing in section Performance).
If not in use, an analyzer operated on batteries will automatically turn o after 5 minutes.
8 9 10 11

901814 200715 US
7
1
23
1
2 3
Always wear protective gloves. Handle blood with care, as it may be infectious.
Follow local safety procedures for disposal of used microcuvettes.
Use anticoagulants (e.g. EDTA or heparin), preferably in solid form to avoid dilutional eects. Tubes containing fluoride should not
be used.
1. If refrigerated, allow sample to reach operating temperature before mixing. Mix thoroughly on a mixer for at least 2 minutes or
invert manually 8–10 times.
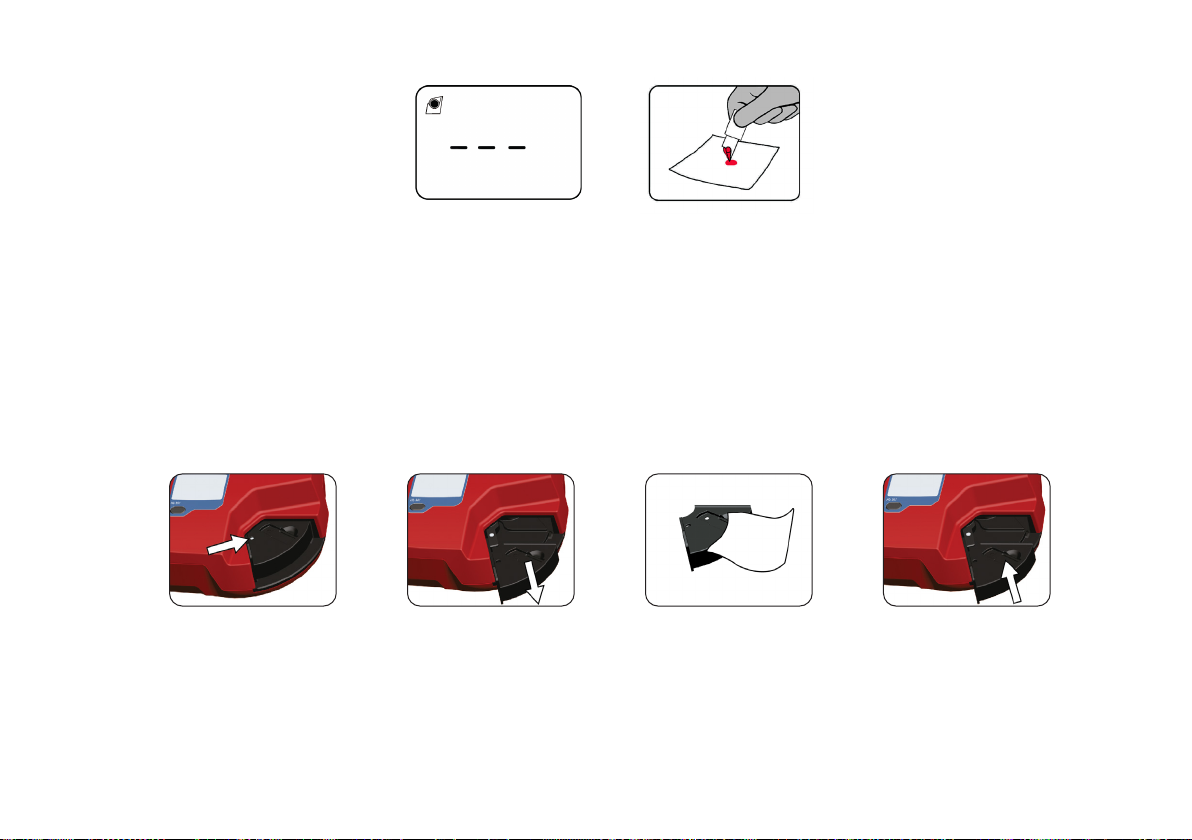
2. Place a drop of blood onto a hydrophobic surface using a transfer device.
3. Fill the microcuvette completely in one step. Do not refill. If a second sample is to be taken, it is important that this is done after
the measurement of the first sample is complete.
Follow immediately steps 8-11 in section Measuring Capillary blood, to perform the measurement.
Do not let more than 40 seconds pass between filling the microcuvette and starting the measurement.
Measuring Venous/Arterial blood
8
901814 200715 US
1 2
Quality Control
The analyzer has an internal quality control, the self-test. It automatically verifies the performance of the analyzer every time it is turned on and at regular
intervals if the analyzer remains switched on.
If in addition an external quality control is required by local or other regulation, only use controls recommended by HemoCue.
Perform External Quality Control
Always follow instructions for use for control solution.
1. Make sure that the Analyzer is in Loading position, see section Analyzer Overview, fig. 1C. Three flashing dashes indicate that the analyzer is ready for use.
2. Place a drop of control solution on a hydrophobic surface. Fill the microcuvette completely in one step. Do not refill.
Follow immediately steps 8-11 in section Measuring Capillary blood, to perform the measurement.
1 2 3 4
Maintenance Daily
The cuvette holder should be cleaned after each day of use.
Make sure that the analyzer is turned o and that the display is blank.
1. In Loading position (see section Analyzer Overview, fig. 1C) press the catch using a pointed object.
2. While pressing the catch, carefully pull out the cuvette holder.
3. Clean the cuvette holder with alcohol (20-70%) or mild detergent, using a lint-free wipe.
4. The cuvette holder must be completely dry before reattached. Allow minimum 15 minutes to dry. Make sure that the cuvette holder is locked into place
by the small catch.
The cover may be cleaned with alcohol (20-70%) or mild detergent.

901814 200715 US
9
Maintenance Optical parts
4 5
3
21
Clean optical parts when required in section Troubleshooting.
Follow instructions thoroughly to make sure the cleaner reaches both upper and lower cover glasses.
1. Turn o the analyzer. Follow steps 1-2 in section Maintenance Daily to remove the cuvette holder.
2. Push the HemoCue Cleaner as much as possible into the opening of the analyzer. Move from side to side 5-10 times.
3. Push the cleaner back and forth 5-10 times, cleaning the cover glasses. If the cleaner is stained, repeat 2) and 3) with a new cleaner.
4. Clean the black details of the cuvette holder housing, using a lint-free wipe.
5. The optical parts must be completely dry before cuvette holder is reattached. Allow minimum 15 minutes to dry. Make sure that the
cuvette holder is locked into place by the small catch.
For alternative to the HemoCue Cleaner contact the local distributor or HemoCue AB.

10
901814 200715 US
If problem remains after recommended actions below are taken, contact the HemoCue distributor or HemoCue AB. The analyzer should be cleaned prior to service, see
section Maintenance for instructions. If any spare parts are lost or damaged, see section Components.
Do not open the cover of the analyzer. Warranty is void if analyzer has been opened.
* Follow relevant section in this operating manual.
Error Code Explanation Action
Error code is displayed. May be a temporary fault or faulty electronics/optical parts. Turn analyzer o. Turn on after 30 seconds. If the problem continues, see specific error code
below or the analyzer needs service.
E00 1. Faulty microcuvette.
2. Internal error in analyzer.
1a. Check expiry date.
1b. Fill a new microcuvette and perform measurement. *
2. Clean optical parts. *
E01–E02 1. Dirty optical parts.
2. Analyzer too hot/cold.
1. Clean optical parts. *
2. Turn analyzer o, allow to reach operating temperature before use.
E03 1. Analyzer exposed to direct light. 1. Avoid direct light exposure.
E05, E06 1. Analyzer too hot/cold or exposed to direct light. 1a. Turn analyzer o, allow to reach operating temperature before use.
1b. Avoid direct light exposure.
E07 1. Battery power too low. 1a. Batteries need to be replaced. *
1b. Use power adapter.
E08 1a. The absorbance is too high.
1b. Faulty microcuvette or sample.
1c. Dirty or blocked optical parts.
1a and 1b. Ensure analyzer and microcuvettes are used according to operating manual and
relevant package insert.
1a and 1c. Clean optical parts. *
E10-E30 1. Internal error in analyzer. 1. Clean optical parts. *
Troubleshooting

901814 200715 US
11
Measuring Deviations Explanation Action
HHH 1. Result exceeds measuring range. 1a. Fill a new microcuvette and perform measurement. *
1b. Confirm result with laboratory method.
No characters displayed 1. Analyzer not receiving power.
2. Faulty display.
1a. Ensure power adapter is properly connected and cable not damaged.
1b. Batteries need to be replaced. *
2. Analyzer needs service.
Erroneous characters displayed 1. Faulty display/electronics. 1. Analyzer needs service.
The display shows "FIR" This function is for manufacturing use only. 1a. Replace all cables and/or batteries, and restart.
1b. Analyzer needs service.
is displayed 1. Low battery.
2. Faulty power adapter.
1. Batteries need to be replaced. *
2. Ensure power adapter is properly connected and cable not damaged.
and “Hb” continuously displayed 1. Faulty cuvette holder/analyzer. 1. Analyzer needs service.
Unexpected patient or control results Patient sample and control solution
1. Microcuvettes expired, damaged or improperly stored.
2. Microcuvette contaminated.
3. Dirty optical parts.
4. Air bubbles in filled microcuvette.
5. Faulty optical parts.
6. Incorrect sampling technique.
7. Measurement started later than 40 seconds after filling the microcuvette.
Control solution
8. Control solution not compatible.
9. Inproper handling of control solution.
10. Control solution expired or improperly stored.
Patient sample and control solution
1. Check expiry date and storage conditions.
2. Fill a new microcuvette and perform measurement. *
3. Clean optical parts. *
4. Fill a new microcuvette and perform measurement. *
5. The analyzer needs service.
6. Fill a new microcuvette and perform measurement. *
7. Start measurement no later than 40 seconds after filling the microcuvette.
Control solution
8. Only use control solutions recommended by HemoCue.
9. Always follow instructions for use for control solution.
10. Check expiry date and storage conditions.
Troubleshooting

12
901814 200715 US
Performance, EMC and Electrical Safety
Principle of the method and procedure
The microcuvette serves both as a pipette and as a measuring cuvette and is for single-use only.
A blood sample of approximately 10 µL is drawn into the cavity by capillary action. Measurement
takes place in the analyzer, which measures the absorbance of whole blood at a Hb/HbO2isobestic
point. Analyzer measures transmittance at two wavelengths to compensate for turbidity. The
hemoglobin level is calculated and presented. The system is factory calibrated against international
reference method for hemoglobin determination, ICSH. No further calibration is needed.
Repeat Testing
In case of peripheral circulatory failure, hemoglobin measurements from capillary samples may be
misleading. Confirmation of an unacceptable or unexpected laboratory result is considered as a
common, well established routine in the laboratory. Extracellular fluid present in capillary samples
due to individual physiology or the eects of unacceptable capillary sampling technique can cause
false hemoglobin results.
One of several pre-analytical factors associated with technique revolves around the size and action
mode of the lancet and how it is used. This and other factors associated with capillary sampling
technique can have an impact on the puncture, blood flow and ultimately on the results obtained.
Additional factors unrelated to sampling technique, such as an individual’s capillary circulation
status, must also be recognized as potential causes of false results. Therefore when testing for
hemoglobin using capillary blood as the sample, confirmation of an unacceptable or unexpected
result is needed to rule out potential pre-analytical factors as the cause. This is particularly help-
ful when a cut o value is used, i.e. when screening for nutritional status based on hemoglobin.
Since the individual performing the test may not always be aware of all the potential pre-analytical
factors, or even those that are directly or indirectly associated with sampling techniques, a second
finger stick should be performed when wanting to rule out pre-analytical factors as a cause of an
unacceptable or unexpected result. Performance of the second finger stick by a dierent individual
may aid in lessening the eect of the factors that could have been technique related.
EMC and Electrical Safety
The HemoCue Hb 301 System complies with following international standards:
• IEC 61010-2-101 including applicable parts of IEC 61010-1
• CSA C22.2 No. 61010-1-12 / UL 61010-1
• IEC 61326-2-6 including applicable parts of IEC 61326-1
This device complies with the emission and immunity requirements of IEC 61326-2-6, class B
product. The device can be used in an electromagnetic environment of IVD medical equipment
according to IEC 61326-2-6. It is recommended to evaluate the electromagnetic environment prior
to use of the system.
Do not use this system in close proximity to sources of strong electromagnetic radiation
(for example unshielded intentional RF sources), as these can interfere with the proper operation.
Should you suspect electromagnetic interference, make sure to:
• Place the device so that it is not adjacent to, or stacked with, other equipment.
• Place portable RF communications equipment (such as mobile phones and other wireless
communication devices) no closer than 30 cm (12 inches).
• Only use cables and accessories recommended by the manufacturer.
• Move the device away from possible causes of interference.
Note: It is the manufacturer's responsibility to provide equipment electromagnetic compatibility
information to the customer or user.
Note: It is the user's responsibility to ensure that a compatible electromagnetic environment for
the equipment can be maintained in order that the device will perform as intended.
Security Guidelines
• Only connect the analyzer to known and trusted devices
• Do not leave the analyzer exposed or unattended
HemoCue AB is not responsible for any threats related to cybersecurity originating from user’s IT
infrastructure or logistics. The user of the HemoCue Hb 301 System is responsible for the Physical
protection of the analyzer.
Patents
This product is covered by patents, for legal information see hemocue.com.
References
• HemoCue Hb 301 Microcuvettes package insert.
• Reference and Selected Procedures for the Quantitative Determination of Hemoglobin in
Blood; Approved Standard CLSI; Document H15-A.
HemoCue Distributor USA
HemoCue America
250 South Kraemer Boulevard
Brea, CA, 92821, USA
Phone (general): 800.881.1611
Orders: 800.323.1674
Tech. Support: 800.426.7256
Fax (cust. service): 800.333.7043
E-mail: info@hemocue.com
www.hemocue.com
For information regarding subjects below, refer to HemoCue Hb 301 Microcuvettes Package Insert
Limitations Expected Values
Composition Specific Performance Characteristics
Storage and Handling (HemoCue Hb 301 Microcuvettes)

901814 200715 US
13
Symbols used
Explanation
Caution
Consult instructions for use
CE mark
In Vitro Diagnostic medical device
Biological risk
Manufacturer
Serial number
Catalogue number
Temperature limitation
Humidity limitation
Only valid within the European Community. Indicates separate collection for waste of electrical and electronic equipment.
Serial port
DC inlet
Class II equipment on power adapter
For indoor use only on power adapter

901814 200715 US
Technical Specifications
Measuring range 0-25.6 g/dL (0-256 g/L, 0-15.9 mmol/L)
Measuring time ≤3 s
Sample volume 10 µL
Operating temperature 10-40 °C (50-104 °F)
Analyzer storage and transport temperature 0-50 °C (32-122 °F)
Analyzer operating and storage humidity (non-condensing) < 5% or > 90% RH
Altitude Up to 2000 m above sea level
Dimension 160x140x70 mm (6.29x5.51x2.76 in)
Weight (batteries included) 500 g (1.10 lbs)
Power adapter: CE marked. Only use power adapters recommended by HemoCue. Type FW7333SM/12, FW7660M/12, FW8002.1/12
Analyzer electrical rating 12 V , 1 W
Batteries 4 type AA, 1.5 V Alkaline
Pollution degree 2
Overvoltage category II
Analyzer mode: continuous -
HemoCue AB |Kuvettgatan 1 |SE-262 71 Ängelholm |Sweden | +46 77 570 02 10 | +46 77 570 02 12
Other manuals for Hb 301
1
Table of contents
Other HemoCue Medical Equipment manuals


Popular Medical Equipment manuals by other brands


IMP
IMP De Mayo Single Lever Clamp Instructions for use

Pari
Pari mini Instructions for use

Motion Concepts
Motion Concepts Invacare Matrx MX2 Back user manual

Otto Bock
Otto Bock Genium 3B1 Instructions for use

Ortho-Clinical Diagnostics
Ortho-Clinical Diagnostics VITROS ECi Site Specifications

Beurer
Beurer IH 60 Instructions for use