HIGH ONE 973807 User manual

973807
Barbecue
Barbecue
Barbecue
Barbacoa
CONSIGNES D'UTILISATION ....................02
INSTRUCTIONS FOR USE ....................08
GEBRUIKSAANWIJZINGEN ....................14
INSTRUCCIONES DE USO ....................20
2/2 04/2021-01
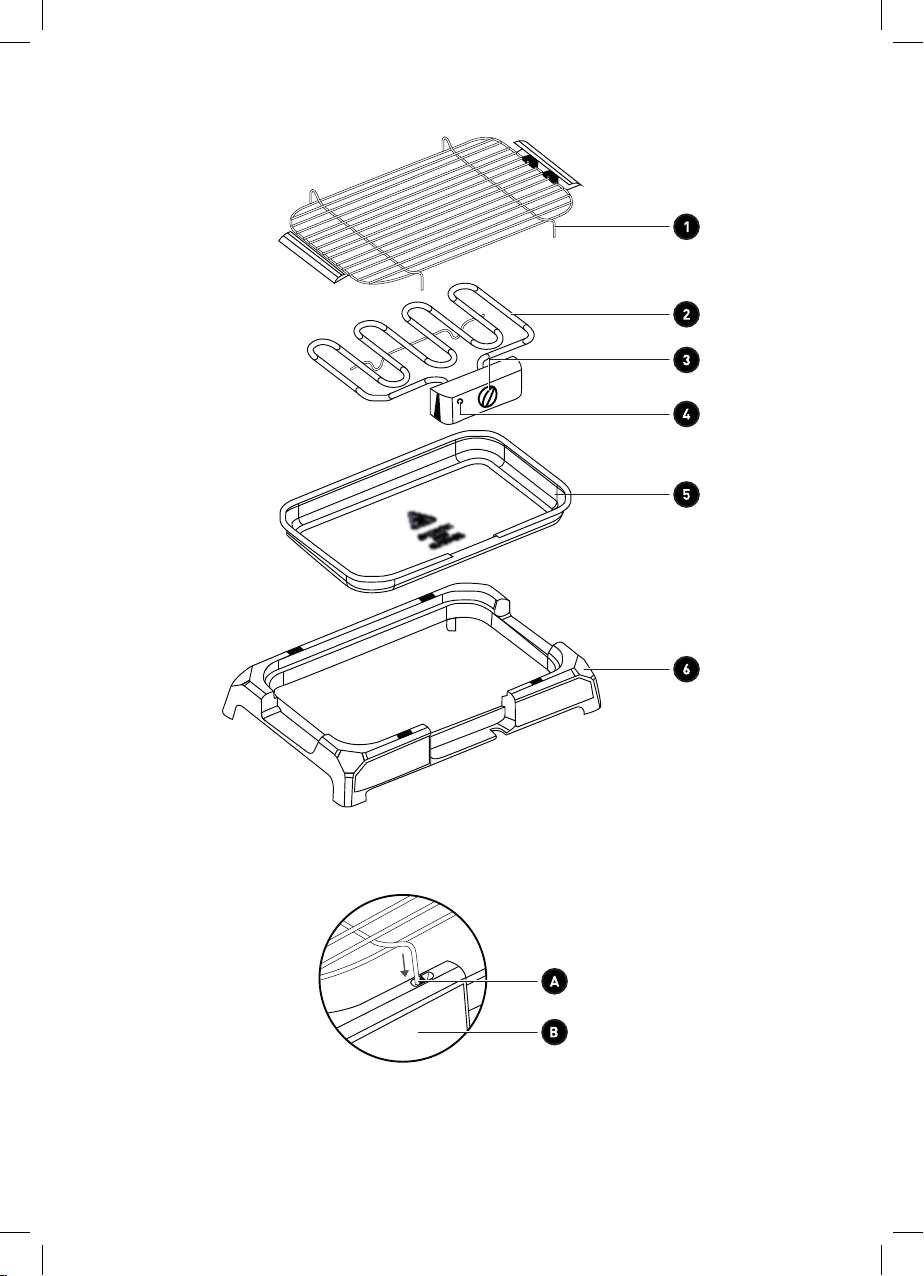
Fig. 1
Fig. 2

2
FR
Merci !
Merci d’avoir choisi ce produit HIGHONE.
Choisis, testés et recommandés par ELECTRO DEPOT,
les produits de la marque HIGHONE vous assurent
une utilisation simple, une performance fiable et
une qualité irréprochable.
Grâce à cet appareil, vous savez que chaque utilisation
vous apportera satisfaction.
Bienvenue chez ELECTRO DEPOT.
Visitez notre site Internet: www.electrodepot.fr
www.electrodepot.be
VOTRE AVIS COMPTE !
PARTAGEZ
VOTRE EXPERIENCE
SUR LES PRODUITS
Parce que votre satisfaction est notre priorité, nous vous proposons
de donner votre avis sur ce produit. Il sera transmis et analysé par
nos équipes afin d’améliorer continuellement le produit.
Donnez votre avis sur http://www.electrodepot.fr/avis-client

3
FR
Table des matières
Les notices sont aussi disponibles sur le site
http://www.electrodepot.fr/sav/notices/
http://www.electrodepot.be/fr/sav/notices
AAperçu de l’appareil
CNettoyage et
entretien
BUtilisation de
l’appareil
Opérations préalables
Utilisation
Nettoyage
Dépannage
Rangement
Description de l’appareil
Spécifications techniques
4
FR
Description de l’appareil
Aperçu de l’appareil
A
Spécifications techniques
Grille Témoin lumineux
Élément chauffant Bac de récupération des graisses
Thermostat Support en plastique
Tension d’alimentation : 220-240V
Fréquence : 50/60Hz
Puissance : 2000W
Classe de protection : I

5
FR
Utilisation de l’appareil
B
Opérations préalables
Veuillez vous reporter à l’illustration 1.
• Commencez par retirer l’élément chauffant (2).
• Ôtez tous matériaux d’emballage qui peuvent être présents.
• Nettoyez la grille (1) et le bac (5) à l’aide d’un chiffon humide.
• Retournez le bac (5).
• Assemblez la grille de la manière indiquée dans l’illustration 1.
• Versez 1,5 litre d’eau froide dans le bac, jusqu’à atteindre le repère « MAX ».
REMARQUE :
Versez de l’eau jusqu’à ce que la feuille métallique réfléchissante soit recouverte.
Le bain-marie et la feuille métallique évitent un rayonnement thermique excessif
au niveau de la surface de la grille.
Par conséquent, vous devez toujours faire cuire les aliments avec le bac rempli d’eau et la
feuille métallique réfléchissante en place.
Avant la première utilisation, remplissez le bac d’eau et faites chauffer l’appareil pendant 15
minutes pour retirer le film de protection de l’élément chauffant. Réglez le thermostat sur
la position MAX. Un dégagement de fumée est normal. Veillez à assurer un niveau suffisant
de ventilation.
Faites préchauffer l’appareil avant utilisation pendant environ 5 minutes.
Utilisation
• Insérez la fiche dans une prise avec contact de protection de 230 V/50 Hz correctement
installée.
• Versez 1,5 l d’eau froide dans le bac, jusqu’au repère «MAX».
MAX. : 1,5 L D’EAU FROIDE
•
Réglez le thermostat en fonction de l’utilisation souhaitée : une température basse ou
moyenne pour laisser refroidir ou réchauffer, MAX. pour faire griller et cuire rapidement.
Le voyant LED s’éteint une fois que la température requise est atteinte.
•
Placez les aliments directement sur la grille. N’utilisez jamais d’assiettes, de plaques
ou de papier d’aluminium sous les aliments. Le temps de cuisson dépend de l’épaisseur
des aliments et de la température réglée. Les aliments épais cuiront plus rapidement si
vous les percez de trous avec une brochette en métal. Retournez les aliments de temps
en temps.
• La hauteur de la grille peut être ajustée. Veuillez vous reporter à l’illustration 2.
•
Si le niveau d’eau passe sous le repère «MIN» après une utilisation continue, débranchez
la fiche de la prise et remplissez le bac d’eau jusqu’à atteindre le repère «MAX». Ne
versez pas d’eau froide sur l’élément chauffant lorsque celui-ci est chaud, vous risqueriez
de l’endommager.
Pour éteindre l’appareil : réglez le thermostat sur «0» et débranchez la fiche.

6
FR
Nettoyage et entretien
C
Nettoyage
•
Débranchez toujours la fiche de la prise de courant avant le
nettoyage et attendez que l’appareil ait refroidi.
•
Nettoyez l’appareil avec un chiffon légèrement humidifié. Ne
plongez jamais l’élément chauffant dans de l’eau !
• La grille, la feuille métallique réfléchissante et le bac peuvent
être lavés avec de l’eau savonneuse.
•
N’utilisez jamais une brosse en acier ou d’autres objets
susceptibles de rayer l’appareil.
•
Montez toutes les pièces de la manière indiquée dans le schéma.
Cet appareil a été testé conformément à toutes les directives
européennes en vigueur, notamment la directive basse tension
et celle concernant la compatibilité électromagnétique, et a été
fabriqué selon les règles de sécurité les plus récentes.
Sous réserve de modifications techniques, sans notification
préalable.
Dépannage
L’élément chauffant est équipé d’un interrupteur de sécurité, qui empêche l’élément chauffant
de fonctionner en dehors du bac. Si l’élément chauffant ne s’allume pas, vérifiez le branchement
au secteur et contrôlez si l’élément chauffant est correctement inséré dans le bac.
Rangement
•
Vérifiez toujours que l’appareil est débranché et complètement
refroidi avant de le ranger.
•
Rangez l’appareil dans un endroit propre, frais et sec. Évitez
toute exposition à la lumière directe du soleil.
•
Gardez l’appareil hors de portée des bébés, des enfants et des
animaux.
•
Conservez l’emballage d’origine pour ranger l’appareil lorsque
vous ne prévoyez pas de l’utiliser pendant une longue période.

7
FR

8
EN
Thank you!
Thank you for choosing this HIGHONE product.
HIGHONE products are chosen, tested, and recommended
by ELECTRO DEPOT, so you can be sure you are
getting a top-quality, easy-to-use product that won’t
let you down.
We’re confident your new device will be a pleasure
to use every day!
Welcome to ELECTRO DEPOT.

9
EN
Table of Contents
AProduct overview
CCleaning and
maintenance
BProduct usage Preliminary operations
Operation
Cleaning
Troubleshooting
Storage
Product description
Technical specifications

10
EN
Product description
Product overview
A
Technical specifications
Grill Indicator light
Heating element Drip tray
Thermostat Plastic stand
Operating voltage: 220-240 V
Frequency: 50/60 Hz
Power: 2000 W
Protection class: I

11
EN
Product usage
B
Preliminary operations
Please refer to Figure 1.
• Start by removing the heating element (2).
• Remove all the packaging material.
• Clean the grill (1) and tray (5) with a damp cloth.
• Turn the tray over (5).
• Assemble the grill as shown in Figure 1.
• Pour 1.5 litres of cold water into the tray, until the “MAX” mark is reached.
NOTE:
Don’t stop pouring water until the reflective metal foil is covered. The
bain-marie and metal foil prevent excessive heat radiation on the grill’s surface.
As a result, you should always cook food with the tray filled with water and the reflective
metal foil in place.
Before first use, fill the tray with water and heat the unit for 15 minutes to remove the protective
film around the heating element. Set the thermostat to the MAX position. It is normal for some
smoke to be generated. Make sure there is sufficient ventilation.
Preheat the unit for approx. 5 minutes before using it.
Operation
• Insert the plug into a socket with a properly installed 230 V/50 Hz shield contact.
• Pour 1.5 litres of cold water into the tray, up to the “MAX” mark.
MAX: 1.5 L OF COLD WATER
•
Adjust the thermostat according to the desired use: a low or medium temperature to cool
or reheat food, and MAX to grill and quickly cook food. The LED indicator will turn off once
the required temperature has been reached.
•
Place the food directly on the grill. Never use plates, baking trays or aluminium foil under
the food. The cooking time depends on the thickness of the food and the set temperature.
Thick pieces will cook faster if you pierce holes in them with a metal skewer. Occasionally
turn the food.
• The grill’s height can be adjusted. Please refer to Figure 2.
•
If the water level drops below the “MIN” mark after continuous use, unplug the plug
from the socket and refill the tray up to the “MAX” mark. Do not pour cold water onto the
heating element when it is hot, as this could cause damage.
To turn off the unit: set the thermostat to “0” and unplug the unit.

12
EN
Cleaning and maintenance
C
Cleaning
•
Always unplug the plug from the socket before carrying out any
cleaning operations and wait for the unit to cool down.
• Clean the unit with a soft, slightly damp cloth. Never immerse
the heating element in water!
•
The grill, reflective metal foil and tray can be washed with soapy
water.
•
Never use a steel brush or other objects that could scratch
the unit.
• Assemble all the parts as indicated in the diagram.
This unit has been tested in accordance with all applicable
European directives, in particular the Low Voltage Directive
and the Electromagnetic Compatibility Directive and has been
manufactured according to the latest safety regulations.
Subject to technical modifications without prior notice.
Troubleshooting
The heating element is fitted with a safety switch, which prevents the heating unit from operating
outside the tray. If the heating element does not turn on, check the mains connection and
whether the heating element has been correctly inserted in the tray.
Storage
•
Always check the unit is unplugged and has cooled completely
before putting it away.
• Store the unit in a clean, cool and dry place. Avoid exposure to
direct sunlight.
• Store the unit out of the reach of babies, children and pets.
• Keep the original packaging to store the unit when you are not
going to use it for a long period of time.
13
EN
Bedankt!
Proficiat met uw keuze voor een product van HIGHONE.
De selectie en de testen van de toestellen van HIGHONE
gebeuren volledig onder controle en supervisie van
ELECTRO DEPOT. We staan garant voor de kwaliteit
van de toestellen van HIGHONE, die uitmunten in
hun eenvoudig gebruik, hun betrouwbare werking
en hun onberispelijke kwaliteit.
ELECTRO DEPOT beveelt de HIGHONE toestellen aan
en is ervan overtuigd dat u uiterst tevreden zal zijn
bij elk gebruik van het toestel.
Welkom bij ELECTRO DEPOT.
Bezoek onze website: www.electrodepot.be
14
NL

Inhoudstafel
15
NL
AOverzicht van het
toestel
CReiniging en
onderhoud
BGebruik van het
toestel
Beschrijving van het toestel
Technische eigenschappen
Voorgaande handelingen
Gebruik
Reiniging
Probleemoplossing
Opslag

16
NL
Beschrijving van het toestel
Overzicht van het toestel
A
Technische eigenschappen
Rooster Licht indicator
Verwarmingselement Opvangbak voor vet
Thermostaat Steun in kunststof
Voedingsspanning: 220-240 V
Frequentie: 50/60 Hz
Vermogen: 2000 W
Klasse 1
17
NL
Gebruik van het toestel
B
Voorgaande handelingen
Raadpleeg afbeelding 1.
• Begin met het verwijderen van het verwarmingselement (2).
• Verwijder verpakkingsmateriaal dat nog aanwezig kan zijn.
• Maak het rooster (1) en de bak (5) schoon met een vochtige doek.
• Draai de bak om (5).
• Monteer het rooster zoals aangegeven in afbeelding 1.
• Giet 1,5 liter koud water in de bak, tot het streepje ‘MAX’ bereikt werd.
OPMERKING:
Giet het water erop zodat het reflecterende metalen blad bedekt wordt.
De bain-marie en metalen blad voorkomen overmatige warmtestraling ter
hoogte van het rooster.
U dient bijgevolg de voedingsmiddelen steeds te bakken met de bak gevuld met water en het
metalen reflecterend blad.
Vóór het eerste gebruik vult u de waterbak en laat u het toestel gedurende 15 minuten
verwarmen om de beschermingsfolie van het verwarmingselement te verwijderen. Stel de
thermostaat in op de maximale stand. Het vrijkomen van rook is normaal. Let erop voldoende
ruimte te laten om te ventileren.
Laat het toestel vóór gebruik gedurende 5 minuten voorverwarmen.
Gebruik
•
Steek de stekker in een stopcontact met een correct geïnstalleerde beveiliging van
230V/50Hz.
• Giet 1,5 l koud water in de bak, tot aan het streepje ‘MAX’.
MAX : 1,5 L KOUD WATER
•
Stel de thermostaat in volgens het gewenste gebruik: lage of gemiddelde temperatuur
om te laten afkoelen of op te warmen, MAX om te grillen en snel te bakken.Het ledlampje
dooft eens de vereiste temperatuur bereikt werd.
•
Plaats de voedingsmiddelen rechtstreeks op het rooster. Plaats nooit borden, schotels
of aluminiumfolie onder de voedingsmiddelen. De gaartijd hangt af van de dikte van de
voedingsmiddelen en de ingestelde temperatuur. Dikkere voedingsmiddelen worden
sneller gaar wanneer u ze doorprikt met een metalen spies. Draai de voedingsmiddelen
af en toe om.
• De hoogte van het rooster is verstelbaar. Raadpleeg afbeelding 2.
•
Indien het waterniveau onder de streepje ‘MIN’ zakt na een doorlopend gebruik, haal dan
de stekker uit het stopcontact en vul de bak opnieuw met water tot het streepje ‘MAX’
bereikt wordt. Giet geen koud water op het verwarmingselement wanneer dit warm is,
dit zou schade kunnen veroorzaken.
Om het toestel uit te schakelen: stel de thermostaat in op ‘0’ en haal de stekker uit het
stopcontact.

18
NL
Reiniging en onderhoud
C
Reiniging
•
Haal vóór de reiniging steeds de stekker uit het stopcontact en
wacht tot het toestel afgekoeld is.
• Reinig het toestel met een lichtjes bevochtigde doek. Dompel
het verwarmingselement nooit onder in water!
• Het rooster, het reflecterende metalen blad en de bak mogen
met zeepsop worden schoongemaakt.
•
Gebruik nooit een stalen borstel of andere voorwerpen die
krassen zouden kunnen veroorzaken op het toestel.
• Monteer alle onderdelen zoals aangegeven in het schema.
Dit toestel werd getest volgens alle Europese richtlijnen die van
kracht zijn, met name de richtlijn inzake laagspanning en die
inzake elektromagnetische compatibiliteit en werd gefabriceerd
volgens de meest recente regels van de kunst.
Onder voorbehoud van technische wijzigingen, zonder voorafgaande
melding.
Probleemoplossing
Het verwarmingselement is voorzien van veiligheidsschakelaar die verhindert dat het
verwarmingselement werkt buiten de bak. Wanneer het verwarmingselement niet brandt,
controleer dan de aansluiting op het net en controleer of het verwarmingselement goed in
de bak zit.
Opslag
•
Zorg dat de stekker uit het stopcontact is gehaald en het
apparaat volledig is afgekoeld voordat u het opbergt.
•
Berg het apparaat in een schone ruimte op. Vermijd elke
blootstelling aan direct zonlicht.
• Berg het product op buiten het bereik van baby‘s, kinderen en
dieren.
•
Bewaar de verpakking om het apparaat in op te bergen wanneer
u het langere tijd niet denkt te gebruiken.
Table of contents
Languages:
Other HIGH ONE Grill manuals

Popular Grill manuals by other brands


Kingsford
Kingsford Professional SC2263901-KF Series owner's manual

Broil King
Broil King IMPERIAL 590 Assembly manual & parts list

Bartscher
Bartscher e-8p-s2 Instructions for installation, use and maintenance

JML
JML Mighty Pro Grill Instructions and guarantee

Orbegozo
Orbegozo GR 3250 instruction manual

Cadac
Cadac skottel braai User instructions