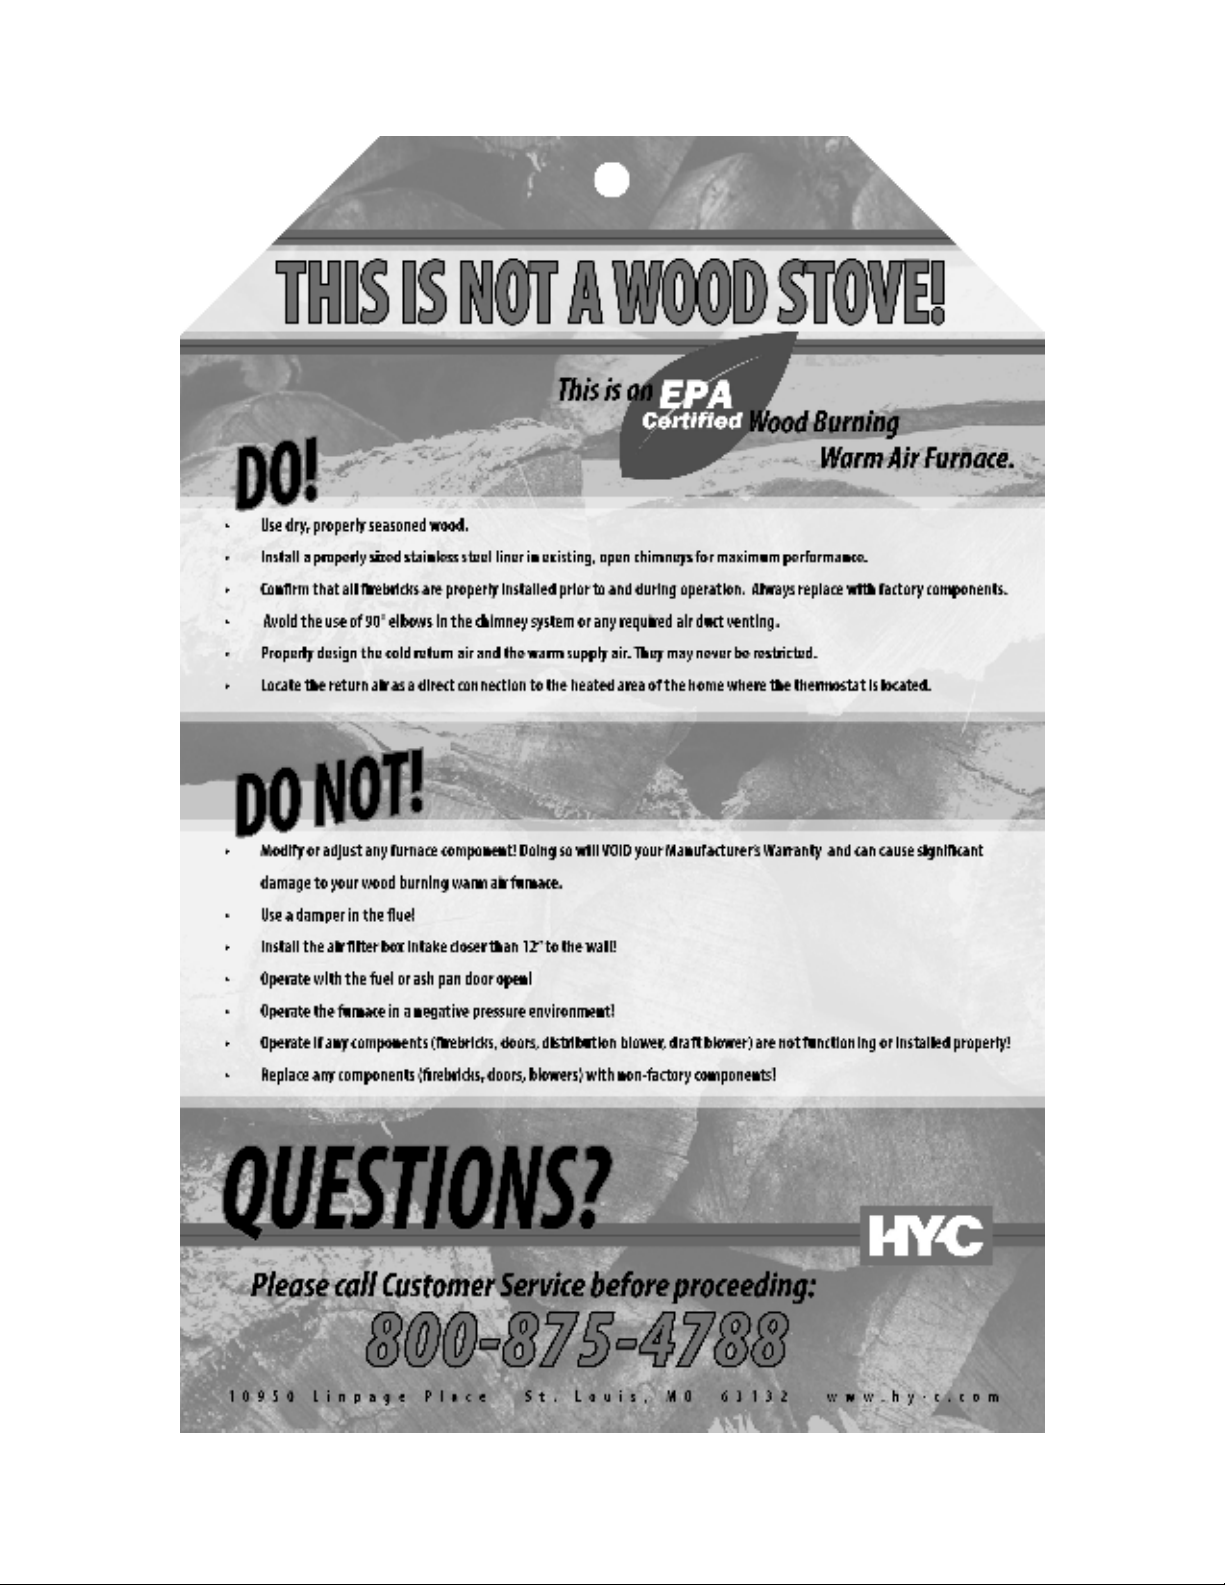
HYC Shelter SF1000E User manual


TABLE OF CONTENTS
Proper Burn Practices
Model SF1000E
General Information
Location and Installation
Assembly of Unit
Blower and Housing
Filter Box
Chimney Types and Recommendations
Installation of Ducting
General Operation
Types of Wood to Use
First Fire
Loading Wood
Disposal of Ashes
Draft Blower
C
Creosote Formation
reosote Prevention
C himney Fire Warning
Power Failure
Furnace Diagram with Parts List
Blower Motor Assembly Diagram
Wiring Diagram
Troubleshooting
2
3
4
5
6
7
8
10
11
13
13
13
14
14
14
14
14
16
17
18
19
Warranty Information 25
DOUBLE CHECK TO MAKE SURE YOU HAVE RECEIVED ALL OF THE
REQUIRED COMPONENTS. IF YOU FIND THAT THERE IS A PART
MISSING, CALL 1-800-875-4788 IMMEDIATELY. PLEASE DO NOT
RETURN THE UNIT TO THE STORE OR TO THE DEALER.

PROPER BURN PRACTICES
FOR MAXIMUM EFFICIENCY AND SAFETY!
• The chimney is one of the most important elements of the furnace. If the chimney is not
connected properly and installed according to manufacturer’s specication and national and
local codes, the unit is not safe and will not burn efciently. Lack of proper chimney installation
will cause unit to produce more smoke and less heat output. See Pages 5-10 of this manual to
ensure proper installation.
• Proper use of all electrical components is essential. The wall thermostat must be hooked up to
the furnace and located within the heated area of the home.
• To maximize the performance of the furnace, the draft blower may not be adjusted or altered in
any manner.
• Wood that is properly cut and stored to dry will produce more BTUs and higher heat output
than wood that has a higher moisture content. Wood with higher moisture content will create
creosote in the chimney and cause ue res.
• There should be no alteration of the Shelter furnace in any way, as this will void the UL391 safety
listing and affect the operation of the furnace. This will also void the warranty of the unit.
• Shelter makes two types of units, indoor as well as outdoor furnaces. The indoor units are
manufactured and tested for indoor applications only. They are not meant to go outside the
house but must be placed indoors in a basement or utility room. Any indoor unit placed
outside the home in a shed or building will void warranty, violate the safety listing, and will not
produce the maximum efciency possible with this unit. For outdoor applications please use
model SF4200.
• Indoor units many not be installed in mobile homes.
2

SHELTER INDOOR FURNACE MANUAL
MODEL: SF1000E
EPA Certied to the NSPS
2020
Warm
Air Furnace
Requirements.
SAVE THESE INSTRUCTIONS
Congratulations! You have selected the nest quality wood burning indoor furnace, manufactured with pride in the USA.
Please take a few moments to carefully read the owner’s manual. By taking the time to familiarize yourself with your new
Shelter Furnace, you will be able to look forward to years of trouble-free, dependable service.
Installation:
First: Check local codes. The installation must comply with all local rules and requirements.
Furnace installation is to be performed by a qualied installer. This furnace must not be installed in trailers or mobile homes.
Always have a properly installed and functioning smoke detector in your home. To prevent accidental injury, do not allow
anyone who is unfamiliar with the furnace to operate it. Spend time familiarizing yourself with your Shelter Furnace.
It is impossible to predict how the furnace will perform due to variations in installation, fuel, and environmental factors.
Understanding that furnace performance can be impacted based upon wood species, wood quality, wood length, and wood
reloading levels will improve your overall experience.
Transportation Damage:
Every effort has been made to ensure that your Shelter Furnace will arrive in perfect condition. Any visible damage should
be noted on the freight bill at the time of delivery. If upon unpacking your Shelter Furnace you nd that damage has occurred
during transit, notify your dealer immediately. Your dealer will advise you what actions must be taken to address the problem.
Disclaimer Notice:
The listed BTU rating for your new Shelter Furnace was obtained using laboratory calculations. The actual BTU output you
experience may vary somewhat depending on the type, condition, and moisture content of the fuel used, chimney
type, and other factors. Therefore, the manufacturer disclaims any guarantee as to the BTU output or capacity. Shelter
Industries disclaims any responsibility for the following: installation of a furnace that has been altered or modied in any
way; installation of the furnace other than as instructed in this manual; installation and/or use of any component or part not
approved by Shelter Industries for use with this furnace. Be sure to complete your warranty registration within 30 days
of purchase in order to activate warranty coverage on your furnace. Register on-line: www.hy-c.com/warranty-serial.
Manufacturer’s Notice:
Please be advised that we periodically make changes to improve our products, therefore the information in this manual may
not be completely applicable to your Shelter Furnace. Please refer to markings on the appliance for additional information.
THIS IS A WOOD BURNING FURNACE ONLY AND SHOULD NOT
BE ALTERED IN ANY WAY.
3

General Information
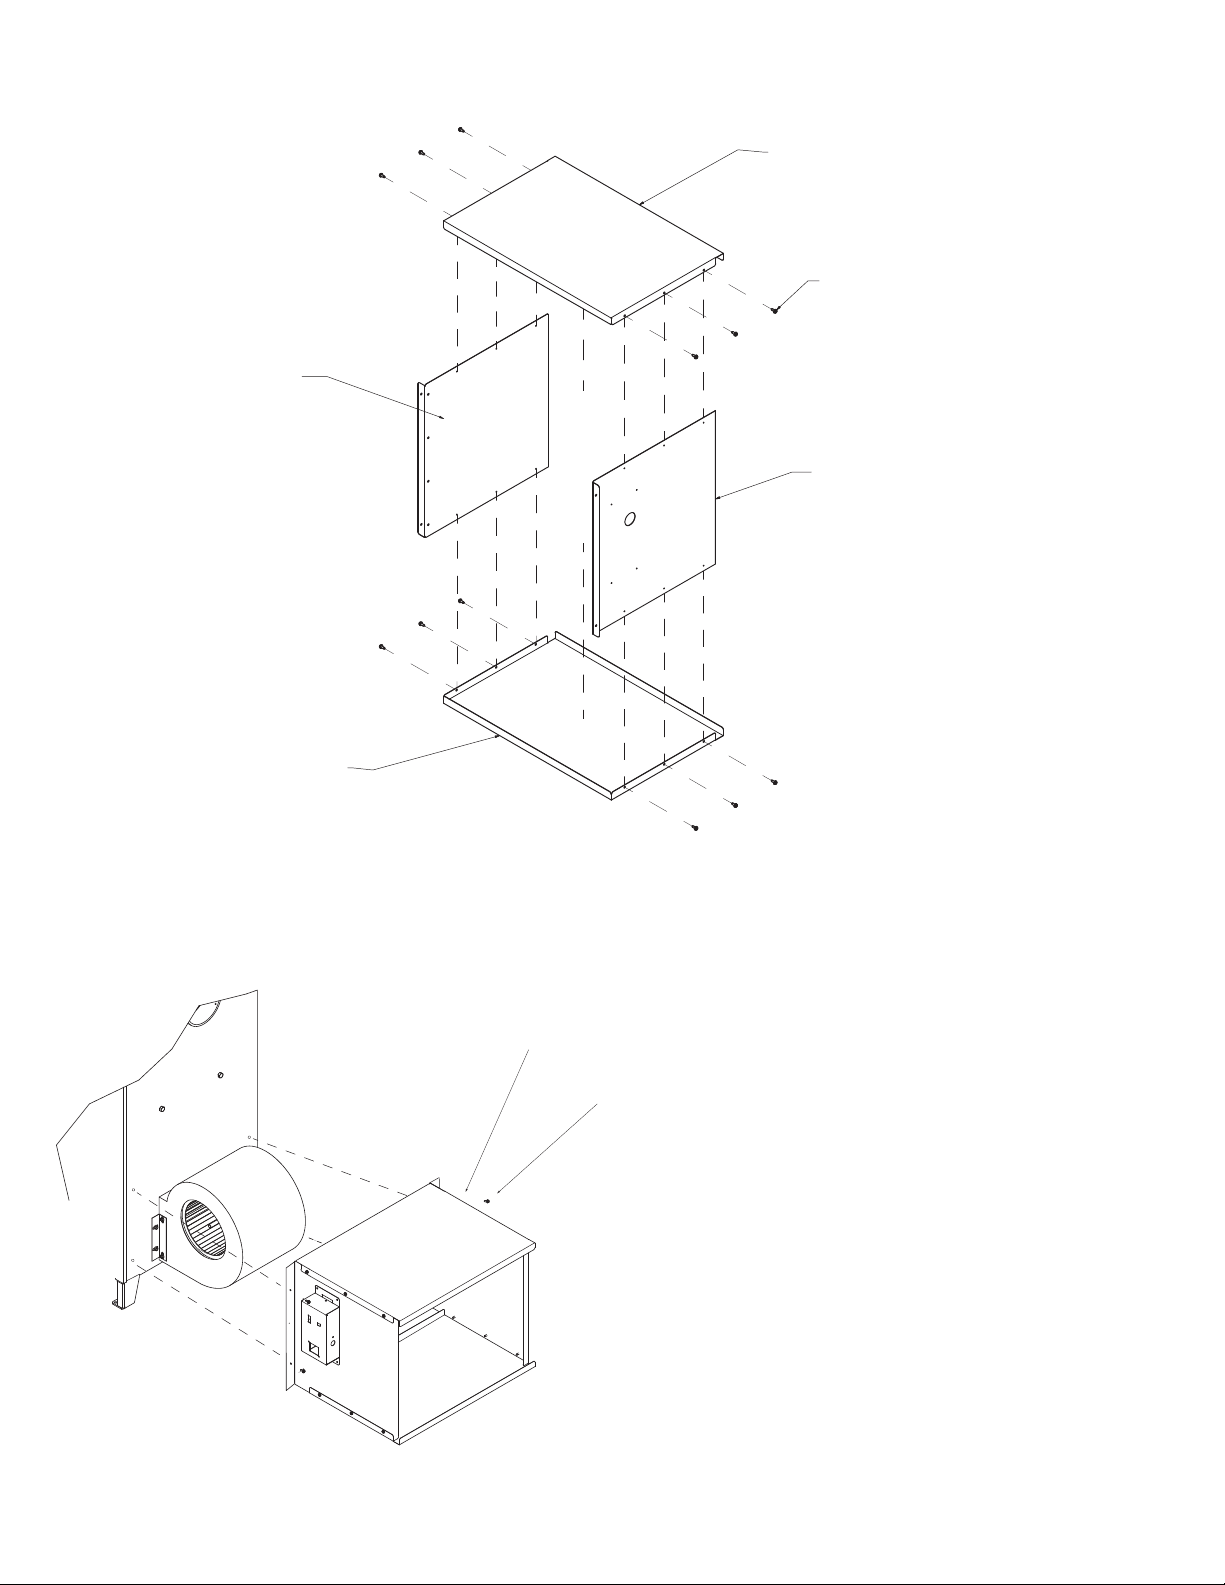
The Shelter 2020 EPA-Certied Furnace has been engineered to accommodate the heating requirements of the average sized
home, even during winter’s coldest months. It is constructed with high grade, heavy gauge steel and is continuously welded to
assure the highest structural strength. In addition, the rebox is lined with insulated stainless steel panels to ensure many years of
energy efcient service. The design of the secondary combustion chamber increases fuel efciency by creating a “secondary burn”
of smoke and wood gases before they are vented up the chimney. The cast iron doors are custom tted to provide an airtight seal,
greatly extending the burn time and ensuring maximum efciency in fuel consumption. The heavy-gage cast iron grate allows for
convenient ash removal and reduced maintenance.
For total comfort and convenience, a thermostatically-controlled Draft Blower and fan-limit-controlled Circulation Blower are
included. These fully automatic components provide heat disbursement throughout your home, minimizing recovery time when
the wall thermostat demands heat.
All of these features are standard, offering you the most efcient, durable, and affordable indoor wood burning furnace.
Efciency was determined using the higher heating value of the fuel per B415.1-10 testing requirements. Dry seasoned wood will
develop greater BTU output. A well-insulated dwelling will always lead to better results and overall improved fuel usage efciency.
Your Shelter Furnace is designed to be either a supplemental or central heating source for your home. This wood burning furnace
may be installed in parallel with a properly operating electric, gas or oil-red central furnace, listed or certied in accordance with a
nationally recognized safety standard, and within clearances specied on the nameplate. When in a parallel installation, the static
pressure of the central furnace plenum may not exceed 0.15 water column inches, and the maximum setting on the central furnace
limit switch is 182°F. With the Shelter Furnace in an “Interconnection Arrangement,” your furnace should be upstream of the central
furnace. The Shelter Furnace warm air supply should never be connected to return air for the central furnace. A qualied installer
should perform the installation.
Forced Hot Air Circulation:
The plenum size of your Shelter Furnace must not be reduced to less than 100 square inches, and must provide a minimum of 18
inches between the top of your Shelter Furnace and the main trunk connection. Do not modify the outer shell of the furnace at any
time. The plenum attached to the furnace must be constructed of metal. The warm air supply duct system should be constructed of
materials with a minimum temperature rating of 250°F.
Clearances:
Unit must be placed on a non-combustible oor. This oor must extend at least 16 inches in front of, and 8 inches on either side of,
the fuel loading and ash removal doors; underneath the chimney connector; and 2 inches on either side of the chimney connector.
The furnace must maintain the following clearances to combustibles:
• Heat plenum = 2 inches
• Chimney connector = 18 inches
• Front = 48 inches
• Rear = 12 inches
• Sides = 6 inches
• Main furnace = 12 inches
These are minimum clearances and should be strictly followed. In the case of a power outage, a dangerous level of heat
accumulation may develop. Do not store fuel or other combustible materials within installation clearances.
4
IMPORTANT: FOR TECHNICAL SUPPORT OR CUSTOMER SERVICE
ISSUES, DO NOT RETURN TO THE STORE OR TO THE DEALER.
CALL 1-800-875-4788.

Return Air Duct
Supply Duct
Back Draft
Dampers
Location and Installation
NOTE: Before beginning installation, consult proper local authorities regarding local codes governing all such applications and
installations.
DO NOT CONNECT THIS UNIT TO A CHIMNEY FLUE SERVING ANOTHER APPLIANCE. Your furnace must be placed on a non-
combustible oor. Position the furnace as close to the chimney as possible. Air for combustion must be provided into the room where
the furnace is located. Allow air free access to the furnace for combustion and ventilation.
In negative pressure situations, Shelter recommends the installation of a Fresh Air Kit (WAF-FAK10).
The installation of a warm air furnace within an attached garage is prohibited by building codes and regulations.
RECOMMENDATION: Smoke detectors and carbon monoxide detectors should be installed on all levels of your home. Having a re
extinguisher within close proximity is strongly recommended.
5

Mounting Screw
Blower Assembly
1/4 - 20 Nut
1/4 - 20 Bolt
Angle Bracket
2. Line up the blower with the pre-drilled holes on the backside
of the furnace and rmly attach with the screws provided.
Please review the parts list and diagrams contained on pages 16-17 of this manual.
NOTE: For your convenience your Shelter Furnace has been factory assembled and the electrical control assembly pre-wired.
1. Fasten the right and left side angle brackets to the circulation blower using (4) 1⁄4 - 20 bolts and nuts.
6
DOUBLE CHECK TO MAKE SURE YOU HAVE RECEIVED ALL OF THE REQUIRED
COMPONENTS. IF YOU FIND THAT THERE IS A PART MISSING, CALL
1-800-875-4788 IMMEDIATELY. PLEASE DO NOT RETURN THE UNIT TO THE
STORE OR TO THE DEALER.
Assembly of Unit

#8 Sheet Metal Screw
Panel A
Panel B
Panel C
Panel A
Filter Box
1/4” Bolts
3. Assemble the following parts using 6 #8 sheet metal screws. Both “B” and “C” panels should t inside the bottom “A” panel anges.
Attach “B” and “C” (side panels) to “A” (bottom panel). After the bottom and sides are assembled, attach “A” (top panel) using 6 #8
sheet metal screws provided.
4. Position the assembled lter box on rear of furnace, supporting it rmly up to electrical enclosure, covering the rear distribution blower.
Make sure the lter box is tightly pressed to the back of the furnace. Use 4 1/4” bolts (included) to rmly attach the lter box to sides of
furnace.
The lter box requires one 20” x 20” x 1” lter (not included, but
available at most hardware and home centers).
For maximum furnace efciency, inspect your lter regularly
and replace the lter when airow is restricted and the lter
appears dirty. Some environments may require more frequent
changing of the lter. Failure to replace the lter will result
in excessive temperatures causing poor performance and
damage to the furnace. It is strongly recommended to use less
restrictive, low cost lters.
7

Thermostat Terminals
Attach the two wall thermostat
wires to the terminals shown.
Chimney Types and Recommendations
See Diagram on page 9.
The chimney system is a critical element in the overall performance of the furnace. An improperly sized chimney, poor drafting chimney,
unlined chimney, or chimney failure may result in unacceptable performance of the system, product failure, and/or re and signicant
loss. Shelter strongly recommends the chimney system be professionally cleaned and inspected prior to installation. Check with local
regulations to conrm whether or not inspection is required prior to installation.
This furnace should only be connected to a clay-lined masonry chimney, masonry chimney with a properly installed SS 6” liner, or metal
all-fuel Class A HT2100 chimney system. Refer to the installation instructions from the chimney manufacturer for proper installation
methods and required clearances. Regardless of your chimney type, a minimum 6” diameter ue is required and at no time may
the chimney be greater than 12” in diameter or exceed a .08 WCI of draft. The ue draft should be conrmed using a draft gauge or
manometer. NEVER CONNECT THE FURNACE TO AN UNLINED CHIMNEY. We strongly recommend the installation of a 6” stainless
steel liner for all systems to maintain a higher ue temperature which minimizes the accumulation of creosote and improves overall
performance.
The connection of the furnace to the existing chimney may be completed using a minimum of 24-gauge single wall black stove pipe or
stainless-steel pipe. NEVER USE GALVANIZED PIPE WHICH WILL GENERATE DEADLY, POISONOUS GASES. The connection
of the furnace to the chimney may never exceed a 60” (5’) horizontal run and must maintain a minimum rise of 2 inches per foot. Never
install more than two (2) elbows when connecting to the existing chimney and the use of 45-degree elbows over one 90-degree elbow is
recommended. For easy cleaning of the chimney system, install a clean-out “T” on the rear of the furnace and never operate the furnace
without a cap installed on the clean-out access.
All piping sections should be fastened together with the proper locking bands or a minimum of three (3) screws per section. The crimped
or male end of all chimney sections should install pointing downward, towards the furnace, to form drip-free connections.
8
B
9. Plug distribution blower into the back of the electrical
control center.
10. Connect the 28-gauge thermostat wire (not included) to
the two (2) posts located on the side of the control center. For
convenience, you might consider locating the wall thermostat
next to your existing thermostat in your home. The thermostat
MUST be installed for the furnace to operate.
11. Plug the 3-pronged grounded plug into a grounded
electrical outlet.
12. With the connection of your chimney pipe and ductwork,
your installation is complete.
5. Mount the forced draft blower to the front of the unit with three 1/4-20 x 3/4” bolts (provided).
6. To install the fan limit control, remove cover, attach with three (3) #8 screws in pre-
drilled holes and replace cover.
7. Mount the electrical control center with four (4) #8 screws (provided).
8. Secure the ex conduit to the side of the furnace using the brackets with #8 screws
(provided).
Attach with three (3) 1/4-20 x 3/4” bolts (provided)
DETAIL
Fan Limit Control
Electrical Control
Center

CHIMNEY HEIGHT REQUIREMENTS
The chimney must extend at least three feet above the highest
point where it passes through the roof surface and at least
two feet higher than any part of the building within a horizontal
distance of ten feet.
• When installing into an unlined brick chimney, lining the
entire chimney with stainless steel chimney liner is strongly
recommended. The liner must be 6” for the SF1000E.
• The diameter of the chimney stack should be consistent
throughout the length of the chimney.
• The chimney size should be at least as large as the exhaust
stack on the furnace, but not more than twice its size.
• The chimney stack should have a built-in airtight clean-out.
• Do not operate the furnace with the clean-out uncapped.
The termination cap should be designed to
inhibit down-drafting without restricting
the exhaust discharge.
WARNING - RISK OF FIRE:
• Do not operate with ue draft exceeding .08 water column inches (19.9 Pa).
• Do not operate with fuel loading or ash removal doors open.
• Do not store fuel or other combustible materials within marked installation clearances.
• Inspect and clean ues and chimney regularly.
DANGER - Risk of Fire and Explosion:
• Do not burn garbage, gasoline, naphtha, engine oil, or other ammable liquids/inappropriate materials.
WARNING:
•NEVER use galvanized pipe in your chimney connection, it produces poisonous gases when subjected to extreme
temperatures.
•USE only lined masonry or manufactured Class “A” HT2100 All Fuel Chimney for your furnace.
•INSPECT chimney system periodically for structural integrity.
•CLEAN the chimney system regularly to prevent creosote accumulation.
•NEVER leave the ash pan in your furnace during operation.
•DO NOT CONNECT THIS UNIT TO A CHIMNEY FLUE SERVING ANOTHER APPLIANCE.
9

Installation of Ducting
• Proper ducting of the Cold Air Return and Warm Distribution Air is critical to ensure comfort throughout your home.
• Consult a local HVAC contractor for assistance with the design and installation of effective ducting.
• The furnace may be installed as a Dedicated System with separate cold/warm air ducting or an In-line System sharing the ducting of
an existing central furnace. Careful consideration is required for both installations.
• All duct connections should be properly supported, fastened, and sealed to maximize air ow.
• The installation of the furnace within the basement may increase the negative pressure in the basement, especially if there are other
appliances (i.e. dryers, central vac systems) operating in the basement. In these cases, it may be necessary to provide fresh air to the
basement by installing a Fresh Air Kit (WAF-FAK10) to ensure proper performance. Please contact your dealer or call 1-800-875-4788.
Warm Distribution Air Ducting: Ducting off the Top of the Furnace with Two (2) 8” Collars
• All ducting materials must be approved and listed for 250°F.
• All ductwork should be designed to allow a maximum external static pressure of .20 water column inches.
• Do not install a damper which may reduce the airow of the distribution air.
• Never alter the top of the furnace by enlarging the 8” duct connection collars. If installing a plenum to the top of the furnace, the
existing openings must remain.
• Never connect the warm air of the wood furnace with the return air of an In-line furnace. The high heat output of the furnace may
overheat the components of the central furnace.
Cold Air Return Ducting: Ducting to Filter Box on Rear of Furnace
• This 2020 EPA-Certied Warm Air Furnace is engineered to perform as a whole home heating solution with the Cold Air Return
connected directly to the heated living area. This can be accomplished by connecting directly to the existing return air ducting or by
installing a properly sized, unrestricted, independent return air system. Failure to do so will impact the comfort level, performance and
efciency of the overall system.
• The Cold Air Return must be a minimum of 10% larger than the size of the warm air distribution outlets. The minimum size of the
return air must be 110 sq. inches. Failure to provide adequate return air will result in poor performance and overheating of the furnace.
• Connections of ductwork to the rear of the lter box should allow a minimum space of 6” clearance from the lter. Be sure to maintain
required clearances and at no time should the ducting be closer than 6” to an adjacent foundation wall.
• Minimize the use of elbows to maximize airow and reduce resistance.
•IMPORTANT: When direct connecting the return air to the central furnace return air it is necessary to install a back-draft damper on
the warm air side of the central furnace to eliminate pulling the warm distribution air from the wood furnace through the central furnace
and back into the Cold Air Return ducting of the wood furnace.
• Passive Cold Air Return ducting is not recommended but may be accomplished by installing open oor grates, louvers in basement
doors, and registers in existing return air ducting. It is critical to provide adequate return air as described above.
Canadian Requirements for Supplemental/Add-On Furnaces
•DO NOT USE DUCT ELBOWS HAVING AN INSIDE RADIUS OF LESS THAN 6 INCHES (150mm) ON OIL, ELECTRIC, OR GAS
FURNACES.
• DO NOT CONNECT TO A DOWN-FLOW FURNACE.
• DO NOT CONNECT DUCTWORK SO THAT A REVERSE FLOW IS POSSIBLE.
• OPERATE THE GAS/OIL/ELECTRIC/ FURNACE PERIODICALLY TO ENSURE THAT IT WILL OPERATE SATISFACTORILY
WHEN NEEDED.
• CERTIFIED FOR INSTALLATION WITH APPROPRIATE DUCTWORK CONFIGURATIONS ONLY.
• DO NOT RELOCATE OR BYPASS ANY OF THE SAFETY CONTROLS IN THE ORIGINAL GAS/OIL/ELECTRIC FURNACE
INSTALLATION.
• DO NOT CONNECT TO ANY GAS FURNACE THAT HAS NOT BEEN CERTIFIED INITIALLY AS COMPLYING WITH
CAN/CGA-2.3.
• THE OPERATION OF THE GAS FURNACE MUST BE VERIFIED FOR ACCEPTABLE OPERATION BEFORE AND AFTER
INSTALLATION OF THE ADD-ON APPLIANCE BY A GAS FITTER WHO IS RECOGNIZED BY THE
REGULATORY AUTHORITY.
• DO NOT CONNECT TO ANY GAS FURNACE THAT IS NOT EQUIPPED WITH AN AIR-CIRCULATION BLOWER, OR TO A
CHIMNEY OR VENT SERVICING A GAS FURNACE OR GAS APPLIANCE.
10

The add-on unit should only be installed on a furnace duct system and chimney that are in good operating condition.
If exhaust fans are installed in the storage area they should not create negative pressures in the room where the solid fuel-burning appliance
is located.
On a belt-driven system, blower and motor pulleys may be changed but the electrical current owing through the motor cannot exceed the
nameplate rating. On a direct-drive system, the motor should not be changed, however, the speed of the motor may be increased. The
blower cannot be changed. This equipment should be installed, acceptable to regulatory authority, by experienced licensed personnel.
Establish a routine for the storage of fuel, care of the appliance, and ring techniques.
Check daily for creosote build-up until experience shows how often cleaning is necessary.
Be aware that the hotter the re, the less creosote is deposited, and that weekly cleaning may be necessary in mild weather, even though
monthly cleaning may be enough in the coldest months. A small intense re is preferable to a large smoldering re to reduce the amount of
creosote deposition.
The installation should comply with requirements of CAN/CSA-B365, and changes to the installation should comply with CSA-B139 (for oil-
red), C22.1 (for electric), or CAN/CGA-B149.1 or CAN/CGA-B149.2 (for gas-red).
BURN WOOD ONLY!
General Operation
Types of Wood to Use:
We advise using only dry, seasoned hardwoods in your Shelter Furnace rather than high resin woods such as pine. Firewood
should be cut at least one full season prior to the time of its intended use for optimum heat output. Firewood should be stacked to
provide a free ow of air between the logs, thus allowing more rapid seasoning of the wood. Proper seasoning of wood requires
exposure to sun and wind, and shelter from all precipitation. For strategies to best achieve this, please visit www.link.hy-c.com/
EPABurnWise1 and www.link.hy-c.com/EPABurnWise2.
FUEL RECOMMENDATIONS: SF1000E – 20-inch maximum log length
Follow instructions included with the moisture meter that was supplied with this unit to make sure that you are using seasoned wood to
achieve the cleanest burn and highest efciency possible. When using the moisture meter, in addition to following the manufacturer’s
instructions, look for readings under 25% moisture content. Seasoned wood will be a noticeably lighter weight than green wood, and
generally has ends with visible cracks. For strategies to best store and season your wood, please visit www.link.hy-c.com/
EPABurnWise1 and www.link.hy-c.com/EPABurnWise2.
Use extreme caution when opening the door during operation; temperatures are extreme. Wait at least 10 seconds after releasing the latch,
and then proceed to the fully open position. Opening the door in this manner is designed to eliminate the possibility of gaseous ignition.
Heat resistant gloves are recommended when opening the fuel door or emptying the ash pan.
CAUTION: HOT SURFACES. KEEP CHILDREN AWAY. DO NOT TOUCH DURING OPERATION.
This wood heater needs periodic inspection and repair for proper operation. If you observe excessive smoke, check to be sure you are
burning properly seasoned cordwood and that there are no gaps in the gaskets on the door of the unit. When it becomes necessary to
replace the gaskets:
• Order part number FCGSKT58 (fuel door) and/or FCGSKT12 (ash door)
• Remove old gasket
• Install new gasket in gasket channel of door
• Cut off excess gasket, ensure that there is no gap where the ends of the gasket material meet
11

CAUTION:
•INSPECT FLUE PIPES, JOINTS, AND SEALS REGULARLY TO ENSURE THAT SMOKE AND FLUE GASES ARE NOT
DRAWING INTO, AND ARE NOT BEING CIRCULATED BY THE AIR-CIRCULATION SYSTEM.
•CLEANING OF THE HEAT EXCHANGER, FLUE PIPE, CHIMNEY, AND DRAFT INDUCER (IF USED), IS ESPECIALLY
IMPORTANT AT THE END OF THE HEATING SEASON TO MINIMIZE CORROSION DURING THE SUMMER MONTHS
CAUSED BY THE ACCUMULATED ASH.
• Never use chemicals or gasoline to start or maintain your re.
•DO NOT burn oil, garbage, trash, plastic, or any fuel other than wood in your furnace. Doing so will void the warranty.
•DO NOT leave the ash pan inside your furnace during operation.
WARNING: RISK OF FIRE
•DO NOT operate with ue draft exceeding .08 water column inches (19.9 Pa).
•DO NOT store fuel or other combustible materials within marked installation clearances.
• Inspect and clean ues and chimney regularly.
•DO NOT operate your furnace with the fuel or ash doors open.
WARNING:
NEVER fuel your furnace with wet, unseasoned wood or wood that has been exposed to a recent rainfall. Burning wood with
high moisture content will cause a rapid accumulation of hazardous creosote, which has been proven to be the most common
cause of ue res. NEVER burn plastics, any wood product containing glue, or wood treated with chemical preservatives in
your furnace. The combustion of these substances may release harmful, toxic gases.
Do Not Burn:
• Garbage;
• Lawn clippings or yard waste;
• Materials containing rubber, including tires;
• Materials containing plastic;
• Waste petroleum products, paints or paint thinners, or asphalt products;
• Materials containing asbestos;
• Construction or demolition debris;
• Railroad ties or pressure-treated wood;
• Manure or animal remains;
• Salt water driftwood or other previously salt water saturated materials;
• Unseasoned wood; or
• Paper products, cardboard, plywood, or particleboard. The prohibition against burning these materials does not
prohibit the use of re starters made from paper, cardboard, saw dust, wax, or similar substances for the purpose of
starting a re in a wood heater.
DANGER: RISK OF FIRE OR EXPLOSION: Do not burn garbage, gasoline, naphtha, engine oil, or other ammable liquids/inappropriate
materials.
Supplemental Outside Combustion air may be necessary if:
• The solid-fuel-red appliance does not draw steadily, smells, experiences smoke roll-out, burns poorly, or back-drafts whether or
not there is combustion present. Opening a window slightly on a calm day may alleviate these symptoms.
• The house is equipped with a well-sealed vapor barrier and tight tting windows, and/or has any powered devices which ex-
haust house air.
• There is excessive condensation on windows in the winter.
• A ventilation system is installed in the house.
12
BURN WOOD ONLY!

NEVER operate the furnace with the fuel door or ash door open!
NEVER operate the furnace with the ash pan left inside of the unit!
First Fire:
Set the wall thermostat to 90°F.
Place several crumpled newspapers on the grate with some dry kindling layered on top of the papers, then ignite the newspaper
and close the fuel door. After approximately 5 minutes, open the fuel door, add several small pieces of wood and then close the
door. After about 20 minutes the re should be established, allowing you to load the rebox and set the wall thermostat to the
desired home temperature.
Do not over-re the furnace. Over-ring by overloading/over-fueling the furnace causes the metal to superheat and expand, then cool
rapidly, which causes cracking, therefore voiding the warranty. Over-ring, or abuse, can easily be determined upon inspection.
The ash pan must remain out of furnace during operation.
NOTE: Your new Shelter Furnace is capable of producing a very high BTU output. Do not fuel your furnace to capacity upon initial ring.
It’s recommended that you become thoroughly familiar with your Shelter Furnace before operating at full capacity.
The new steel and metal components of the furnace have a protective coating of paint on the surface which could produce an odor during
the break in period. Adequate ventilation within the home and furnace room or area is recommended during the initial ring and break in
period to accommodate this possibility. Your new Shelter Furnace is classied as having airtight construction. This type of design should
enable you to experience up to 12 hours of burn time per full load of fuel (dry, seasoned hardwood). However, abnormally cold weather
may reduce the burn time somewhat, but if your burn cycle is signicantly less (for instance 2 to 4 hours), this type of occurrence is usually
symptomatic of heat demands in excess of furnace capacity. Contact an authorized professional to determine if your Shelter Furnace has
been improperly sized for your home. The heat output range, according to B415.1-10 testing, is 18,000 to 45,000 BTUs per hour.
Loading Wood:
When opening the fuel door during operation, always wait 10 seconds after releasing the rst latch, then open the door the rest of the way.
The dual latch system has been incorporated as a safety feature, designed to eliminate the possibility of gaseous ignition. Laboratory
testing has determined that when incomplete combustion occurs the partially spent fuel sometimes concentrates large amounts of
potentially hazardous gases within the re chamber. If the door is opened suddenly under these conditions, the oxygen may combine with
these gases and cause ignition referred to as “back ash.” Use EXTREME CAUTION when opening the fuel door.
When reloading the furnace, spread embers evenly over the grate. Place smaller pieces of wood on the hot embers and layer larger pieces
on top of them. Finally, due to the wide variety of temperature ranges during the winter, you may experience periods when it is
not necessary to fully load the re chamber in order to maintain an overnight burn. Your Shelter Furnace will operate at the highest
efciency by adding fuel in amounts needed to maintain comfortable temperatures in your home.
BURN WOOD ONLY!
Disposal of Ashes:
Heat resistant gloves are recommended. In order to remove ashes from your Shelter Furnace, open the ash door and slide the ash pan to
the rear of the furnace. Remove the ash pan from the furnace and dump the ashes into a metal container with a tight tting lid. The closed
container of ashes should be placed on a non-combustible oor or on the ground, well away from all combustible materials, pending nal
disposal. If the ashes are disposed of by burial in soil or otherwise locally dispersed, they should be retained in the closed metal container
until all cinders have thoroughly cooled.
The ash pan must be removed from your Shelter Furnace during operation. This precautionary measure is recommended
13

because if the ash pan is allowed to remain inside the furnace during operation, it will become dangerously hot to touch, block
the ow of air under the grates and reduce the efciency of the furnace.
Remove the ashes from your Shelter Furnace at least once a day, or as often as necessary to ensure the ashes do not accumulate
to the height of the grates. If ash build-up occurs at grate level, it will cause premature failure of the grate system, voiding the warranty
on the grates. Unacceptably high temperatures will result because the ashes have restricted the ow of cooling air beneath the grates.
This ow of air was designed to not only cool the grates, but to also provide warmed air for better combustion. If the ash level is
improperly maintained the rebox will be starved of combustion air, greatly reducing the efciency and heat output of your
Shelter Furnace.
CAUTION: HOT SURFACES. KEEP CHILDREN AWAY. DO NOT TOUCH DURING OPERATION.
Draft Blower:
The draft blower plays an important role in the operation of your Shelter Furnace. When the wall thermostat calls for heat, the draft motor
turns on and supplies fresh air into the rebox producing a hotter re, which in turns provides more heat in the heat chamber. The heat is
then sent through the duct system throughout your home. When the wall thermostat temperature is met, the draft blower shuts off until the
thermostat calls for heat, beginning the cycle again. Do not alter or adjust the draft blower in any manner.
Creosote Formation and Need for Removal:
When wood is burned slowly, it produces compounds in exhaust smoke which combine with expelled moisture to form creosote.
The creosote vapors condense in the relatively cooled chimney ue of a slow burning re. As a result, creosote residue
accumulates on the ue lining. When ignited, this creosote makes an extremely dangerous re in the chimney. The chimney connector
and the chimney should be inspected at least twice monthly during the heating season to determine if a creosote build-up has occurred. If
creosote has accumulated it should be removed to reduce risk of a chimney re.
Creosote Prevention:
To help reduce the formation of creosote within the ue, ALWAYS BURN DRY, SEASONED WOOD. Dry wood burns hotter,
allowing ue gases to maintain temperatures above 212°F which should reduce the quantity of creosote in the chimney. If the ue
gas temperature falls below 212°F, condensation occurs causing creosote formation and accumulation within the chimney.
As an added precaution, periodic chimney inspections are recommended during the heating season to determine if creosote formation has
occurred. For safety and efciency, it is recommended that the chimney system be inspected and cleaned prior to each heating season.
Chimney Fire Warning:
In the event of a chimney re, take the following actions immediately:
• DO NOT unplug the furnace.
• Close the ash door, the fuel door, and slide the cover on the draft motor to Power Fail setting.
• Alert entire household and prepare to evacuate if necessary.
• Call your local re department.
Power Failure:
In case of power failure, to prevent your Shelter Furnace from over-heating and causing damage to the electrical components,
do NOT add more fuel to the rebox. Remove air lter and position cover on draft motor to Power Fail setting (see diagram on pg.15).
There is no warranty on electrical components damaged due to power failure.
14
IMPORTANT: FOR TECHNICAL SUPPORT OR CUSTOMER SERVICE
ISSUES, DO NOT RETURN TO THE STORE OR TO THE DEALER.
CALL 1-800-875-4788.

NOTE: OVER-HEATING OR DELIBERATE ABUSE CAN EASILY BE DETERMINED UPON INSPECTION AND WILL VOID THE
WARRANTY.
Always burn seasoned wood. Dry wood will produce a higher BTU output and a longer burn time. Refer to the nameplate
on furnace for additional information. For strategies to best store and season your wood, please visit www.link.hy-c.com/
EPABurnWise1 and www.link.hy-c.com/EPABurnWise2.
WARNING: RISK OF FIRE
•DO NOT operate with the ue draft exceeding .08 water column inches (19.9 Pa).
•DO NOT operate with fuel loading or ash removal doors open.
•DO NOT not store fuel or other combustible material within marked installation clearances.
• Inspect and clean ues and chimney regularly.
THIS IS A WOOD BURNING FURNACE AND SHOULD NOT BE ALTERED IN ANY WAY.
15
Draft Blower Modes
Power Fail (PF) Mode
Normal (N) Mode

1
2
3
4
8
9
10
4
12
7
6
Furnace Diagram
16
PARTS LIST
ITEM QTY PART DESCRIPTION SF1000E PART NUMBER
1 1 ASH DOOR HANDLE ASSEMBLY WAF-ADHD
2 1 FUEL DOOR HANDLE ASSEMBLY WAF-FDHD
3 1 FURNACE SHELL N/A
4 2 SIDE PANEL ASSEMBLY SFE-10SPA
5 1 BLOWER ASSEMBLY COMPLETE (NOT PICTURED) WAF-MK
6 1 BLOWER MOTOR FC3SPMK
7 1 BLOWER HOUSING ASSEMBLY FCBH
8 1 FILTER BOX KIT WAF-10FBK
9 1 TOP PANEL SFE-10TP
10 2 STARTER COLLAR SNGCLR08
11 1 GRATE (NOT PICTURED) WAF-10CG
12 1 ASH PAN WAF-10AP
13 1 SECONDARY BAFFLE KIT (NOT PICTURED) WAF-10SBK
14 1 FIREBOX BRICK KIT (NOT PICTURED) WAF-10BK

Blower Motor Assembly Diagram
17
Heat Exchange Firebrick Kit
A A
A A
A A
A A
B B
PARTS LIST
ITEM QTY PART DESCRIPTION PART NUMBER
A 8 9” x 4-1/2” x 1-1/4” FIREBRICKS HTVB
B29” x 2-1/4” x 1-1/4” FIREBRICKS HTVB2
PARTS LIST
ITEM QTY PART DESCRIPTION PART NUMBER
1 1 BLOWER HOUSING ASSEMBLY FCBH
21MOTOR CAPACITOR FC3610J370
3 1 BLOWER MOTOR FC3SPMK
2
3
1

Wiring Diagram
WALL
THERMOSTAT
(FCTHERM)
FCTRAN-E
120V AC
POWER SUPPLY
WHITE
BLACK
GREEN
ORANGE
FAN LIMIT CONTROL (FCFLC)
RED
120V AC/24V AC
TRANSFORMER
RED
BLACK
FCRELAY-E
RELAY
BLACK
YELLOW
RED
WHITE
DRAFT BLOWER
MOTOR (FCDB)
BLOWER
MOTOR
(FC3SPMOTOR)
18
Table of contents
Other HYC Furnace manuals
Popular Furnace manuals by other brands

Carrier
Carrier OBL098 installation instructions

Coleman
Coleman DGAA installation manual

Empire Heating Systems
Empire Heating Systems GWT-50-2 SG Installation instructions and owner's manual

Lennox
Lennox G24-200 User's information manual

Carrier
Carrier DELUXE 58SXC Installation, start-up, and operating instructions

MORTEX
MORTEX E30 SERIES User's information manual

ICP
ICP N9MP2 Installation insrtuctions

VERDER
VERDER Carbolite Gero RHF 16/15 Installation, operation and maintenance instructions

Goodman
Goodman AMVS96U Service and Troubleshooting

ICP
ICP F9MXE0801716A1 installation instructions

Carrier
Carrier 58SC0B operating instructions

Lennox
Lennox Elite series installation instructions