manuals.online logo
Brands
  1. Home
  2. •
  3. Brands
  4. •
  5. ILVE
  6. •
  7. Microwave Oven
  8. •
  9. ILVE WD900ESL28-5Slll User manual

ILVE WD900ESL28-5Slll User manual

CILVE
MODEL: WD9ffiESL28-sSlll
Microwove Oven Owner's Monuo!
Please read these instructions carefully before installing and operating the oven.
Record in the space below the SERIAL NO. found on the nameplate'on your oven and retain
this information for future reference.
SERIAL NO.
t
j.
15
f
T
o.o-
3=-i
t-G&
Oi
-4. -g-
EXCESSIVE
1. Do not attempt to operate this oven with the door open since open door operation
can result in harmful exposure to microwave energy. lt is important not to defeat or
tamper with the salety interlocks.
2. Do not place any object between the oven front face and the door or allow soil or
cleaner residue to accumulate on sealing surfaces.
3. Do not operate the oven if it is damaged. lt is particularly important that the oven
door close properly and thal there is no damage to the
a. Door (bent),
b. Hinges and laiches (broken or loosened),
c. Door seals and sealing surfaces.
4. The oven should not be adjusted or repaired by anyone except properly qualilied
service personnel.
CONTENT'
PRECAUTIONS TO AVOID POSSIBLE EXPOSURE TO EXCESSIVE MICROWAVE
ENERGY ---.--.1
SPECTFTCAT|ONS --------- -------------*2
BEFORE YOU CALL FOR SERVTCE-------------- ----*------------2
EABTHTNG TNSTRUCTTONS ------------ -----------------3
RADTO |NTERFEBE|.ICE ---------- --------3
IMPOBTANT SAFETY TNSTBUCTTONS------------ -----------------3
MICROWAVE COOKING PRINCIPLES .-------..----4
UTENSILS GUIDE.--.-. ----------------5
Auto Cook ------------------ I
Child Lock --------------- 9
Special Feature -------9
CLEANING AND CARE
il
SPECIFICATIONS
Power Consumption: 230V-240V,50H2,
1400W(Microwave)
230V-240V, 1 OO0W(Heater)
Output: 900w
Operation Frequency: 245OMHz
Outside Dimensions: 305mm(H)x525mm(W)x460mm(D)
Oven Cavity Dimensions: 21 9mm(H)x350mm(W)x35smm(D)
Oven Capacity: 23Litres
Cooking Uniformity: Turntable System{ o 31 4mm}
Net Weight: Approx.l9kg
BEFORE YOU CALL FOR SERVICE
lf the oven fails to operate:
1. Check to ensure that the oven is plugged in securely. lf it is not, remove the plug from the outlet, wait
10 seconds, and plug it in again securely.
2. Check for a blown circuit fuse or a tripped main circuit breaker. lf these seem to be operating properly,
test the outlet with another appliance.
3. Check to ensure that the control panel is programmed correctly and the timer is set.
4. Check to ensure that the door is securely closed engaging the door safety lock system. Otherwise, the
microwave energy will not llow into the oven.
IF NONE OF THE ABOVE FIECTIFY THE SITUATION, THEN CONTACT A QUALIFIED TECHNICIAN. DO
NOT TRY TO ADJUST OR REPAIH THE OVEN YOURSELF.
INSTALLATION
1. Make sure that all the packing materials are removed from the inside of the door.
2. WARNING: Check the oven for any damage, such as misaligned or bent door, damaged door seals
and sealing surface, broken or loose door hinges and latches and dents inside the cavity or on the
door. ll there is any damage, do not operate the oven and contact qualified service personnel.
3. This microwave oven must be placed on a flat, stable surface to hold its weight and the heaviest food
likely to be cooked in the oven.
4. Do not place the oven where heat, moisture, or high humidity are generated, or near combustible
materials.
5. For correct operation, the oven must have sufficient airflow. Allow 20cm of space above the oven,
10cm at back and 5cm at both sides. Do not cover or block any openings on the appliance. Do nol
remove feet.
6. Do not operale the oven without glass tray, roller support. and shaft in their proper positions.
7. Make sure that the power supply cord is undamaged and does not run under the oven or over any hot
or sharp surface.
E
8. The socket must be readily accessible so that it can be easily unplugged in an emergency.
9. Do not usethe oven outdoors.
EARTHING INSTRUCTIONS
This appliance must be earthed. This oven is equipped with a cord having an earthed wire with an earthed
plug. lt must be plugged into a wall receptacle that is properly installed and earthed. ln the event ol an
electrical short circuit, earthing reduces risk ol electric shock by providing an escape wire for the electric
current. lt is recommended that a separate circuit serving only the oven be provided. Using a high voltage
is dangerous and mhy resull in a fire or other accident causing oven damage.
WARNTNG lmproper use of the earthing plug can result in a risk of electric shock.
Note
1. lf you have any questions about the earthing or electrical instructions, consult a qualified electrician or
service person.
2. Neither the manufacturer nor the dealer can accept any liability for damage to lhe oven or personal
injury resulting from failure to observe the electricalconnection procedures.
The wires in this cable main are colored in accordance with the following code:
Green and Yellow = EARTH
Blue = NEUTRAL
Brown = LIVE
RADIO INTERFERENCE
Operation of the microwave oven can cause interference to your radio, TV, or similar equipment.
When there is interference, it may be reduced or eliminated by taking the following measures:
1. Clean door and sealing surface of the oven.
2. Reorient the receiving antenna of radio or television.
3. Relocate the microwave oven with respect to the receiver.
4. Move the microwave oven away from the receiver.
5. Plug the microwave oven into a different outlet so thai microwave oven and receiver are on different
branch circuits.
IMPORTANT SAFETY INSTRUCTIONS
When using electricalappliance basic safety precautions should be followed, including the lollowing:
WARNING: To reduce the risk ol burns, electric shock, lire, injury lo persons or exposure to excessive
microwave energy:
1. Read all instructions before using the appliance.
2. Use this appliance only for its intended use as described in this manual. Do not use corrosive
chemicals or vapors in this appliance. This type ol oven is specilically designed to heat, cook or dry
food. lt is not designed for industrialor laboratory use.
g
3. Do not operate the oven when empty'
4. Do not operate this appliance if it has a damaged cord or plug, if it is not working properly or il it has
beendamagedordropped'lfthesupplycord.rsdamaged,itmustbereplacedbythemanulactureror
its service agent or a similarly qualilied person in order to avoid a hazard.
5. wARNING: Only allow children to use the oven without supervision when adequate instructions have
been given so that the child is able to use the oven in a sale way and understands the hazards of
improPer use.
6. To reduce the risk of fire in the oven cavity:
a. When heating food in plastic or paper container, check the oven frequently to the'possibility of
ignition.
b.Bemovewiretwist{iesfrompaperorplasticbagsbeforeplacingbaginoven.
c.lfsmokeisobserved,switchofforunplugtheapplianceandkeepthedoorclosedinordertostifle
any flames.
d. Do not use the cavity for storage purposes. Do not leave paper products' cooking utensils or food
in the cavitY when not in use'
l. WARNING: Liquid or other food must not be heated in sealed containers sincd they are liable to
explode.
8. Microwave heating of beverage can result in delayed eruptive boiling, therefore care has to be taken
when handle the container.
g. Do not fry food in the oven. Hot oil can damage oven parts and utensils and even result in skin burns'
10. Eggs in their shell and whole hard-boiled eggs should not be heated in microwave ovens since they
rnay explode even after microwave heating has ended'
11. Pierce foods with heavy skins such as potatoes, whole squashes, apples and chestnuts belore
cooking.
12. The contents of leeding bottles and baby jars should be slirred orshaken and thetemperature should
be checked before serving in order to avoid burns'
13. Cooking utensils may become hot because of heat transferred from the heated food' Potholders may
be needed to handle the utensil'
14. Utensils should be checked to ensure that they are suitable for use in microwave oven'
15. WARNING: lr is hazardous for anyone other than a trained person to carry out any service or repair
operation which involves the removal of any cover which gives protection against exposure to
microwave energy.
MICROWAVE COOKING PRINCIPLES
1. Arrange food carefully. Place thickesl areas towards outside of dish.
2. Watch cooking time. Cook for the shortest amount of time indicated and add more as needed' Food
severely overcooked can smoke or ignite'
3. cover foods while cooking. covers prevent spattering and help foods to cook evenly'
4. Turn foods over once during microwaving to speed cooking of such foods as chicken and hamburgers'
Large items like roasts must be turned over at least once'
5. Rearrange foods such as meatballs halfway through cooking both from top to bottom and from the
center of the dish to the outside.
E
UTENSILS GUIDE
1. The ideal material for a microwave utensil is transparent to microwave, it allows energy to pass
through the container and heat the food'
2. Microwave can not penetrate metal, so metal utensils or dishes with metallic trim should not be used'
3. Do not use recycled paper products when microwave cooking; as they may contain small melal
lragments which may cause sparks and/or fires'
4. Round /Oval dishes rather than square/oblong ones are recommend, as food in corners tends to
overcook.
5. Narrow strips of aluminum foil may be used to prevent overcooking of exposed areas' But be careful
don,t use too much and keep a distance of 'l inch (2.54cm) between loil and cavity'
The list below is a general guide to help you select the "otte"t ,.,t"*'ls.
COOKWARE MICROWAVE GRILL COMBINATION
Heat-Resistant Glass Yes Yes Yes
Non Heat-Resistant Glass No No No
Heat-Resistant Ceramics Yes Yes Yes
Microwave-Safe Plastic Dish Yes No No
Kitchen PaPer Yes No No
MetalTray No Yes No
Metal Rack No Yes No
Aluminum Foil & Foil Containers No Yes No
PART NAMES
1. Door SafetY Lock SYstem
2. Oven Window
3. Oven Air Vent
4. Shaft
5. Roller Ring
6. Glass TraY
7. Control Panel
8. GrillHeater
9. Metal Rack
E
E
ii: -
iEn
(_)i
.lt -9
CONTROL PANEL
o MENU ACTTON SCREEN
) Cooking time, power, action indicators, and clock time
are displayed.
. POWER
) Touch this button a number of times to set microwave
cooking power level.
o GRILUCOMB|.
) Press this button a number of times to access grill
cooking mode or one of two combination cooking settingi.
O TIME/'WETGHT
) Turn the dial to set the oven clock time or input cooking
time.
) Turn the TIMEMEIGHT diatto specify weight.
o AUTO COOX
) Press a number of times for quick settings to cook
popular foods. You need to specify weight.
o cLoGK
) Touch to set the digital clock..
o START/QUICK START
) Touch to start a cooking program.
> Simply touch it a number of times to set cooking time and
the oven willcook immediately at full power level.
o SToP/GANCEL
) Press to cancel setting or reset the oven before setting a
cooking program.
) Press once to temporarily stop cooking, or twice to
cancel cooking altogether.
) lt is also used for setting child lock.
(/
ffiGrtrrcodl
()
Ocoa
a)
Acle Coot
0
o
Oflorc
Fffi
0
,s
I sD r, o*rporp
CI e"'-----n-
-Er g--.se.ct.t!
@ 4---. EG-
$ s. er,lrr,rn
G t--.----- a1
@ z---- qra.n
fu a.m*m,
fr e.*1rfl
.)
SfBr€oood
E
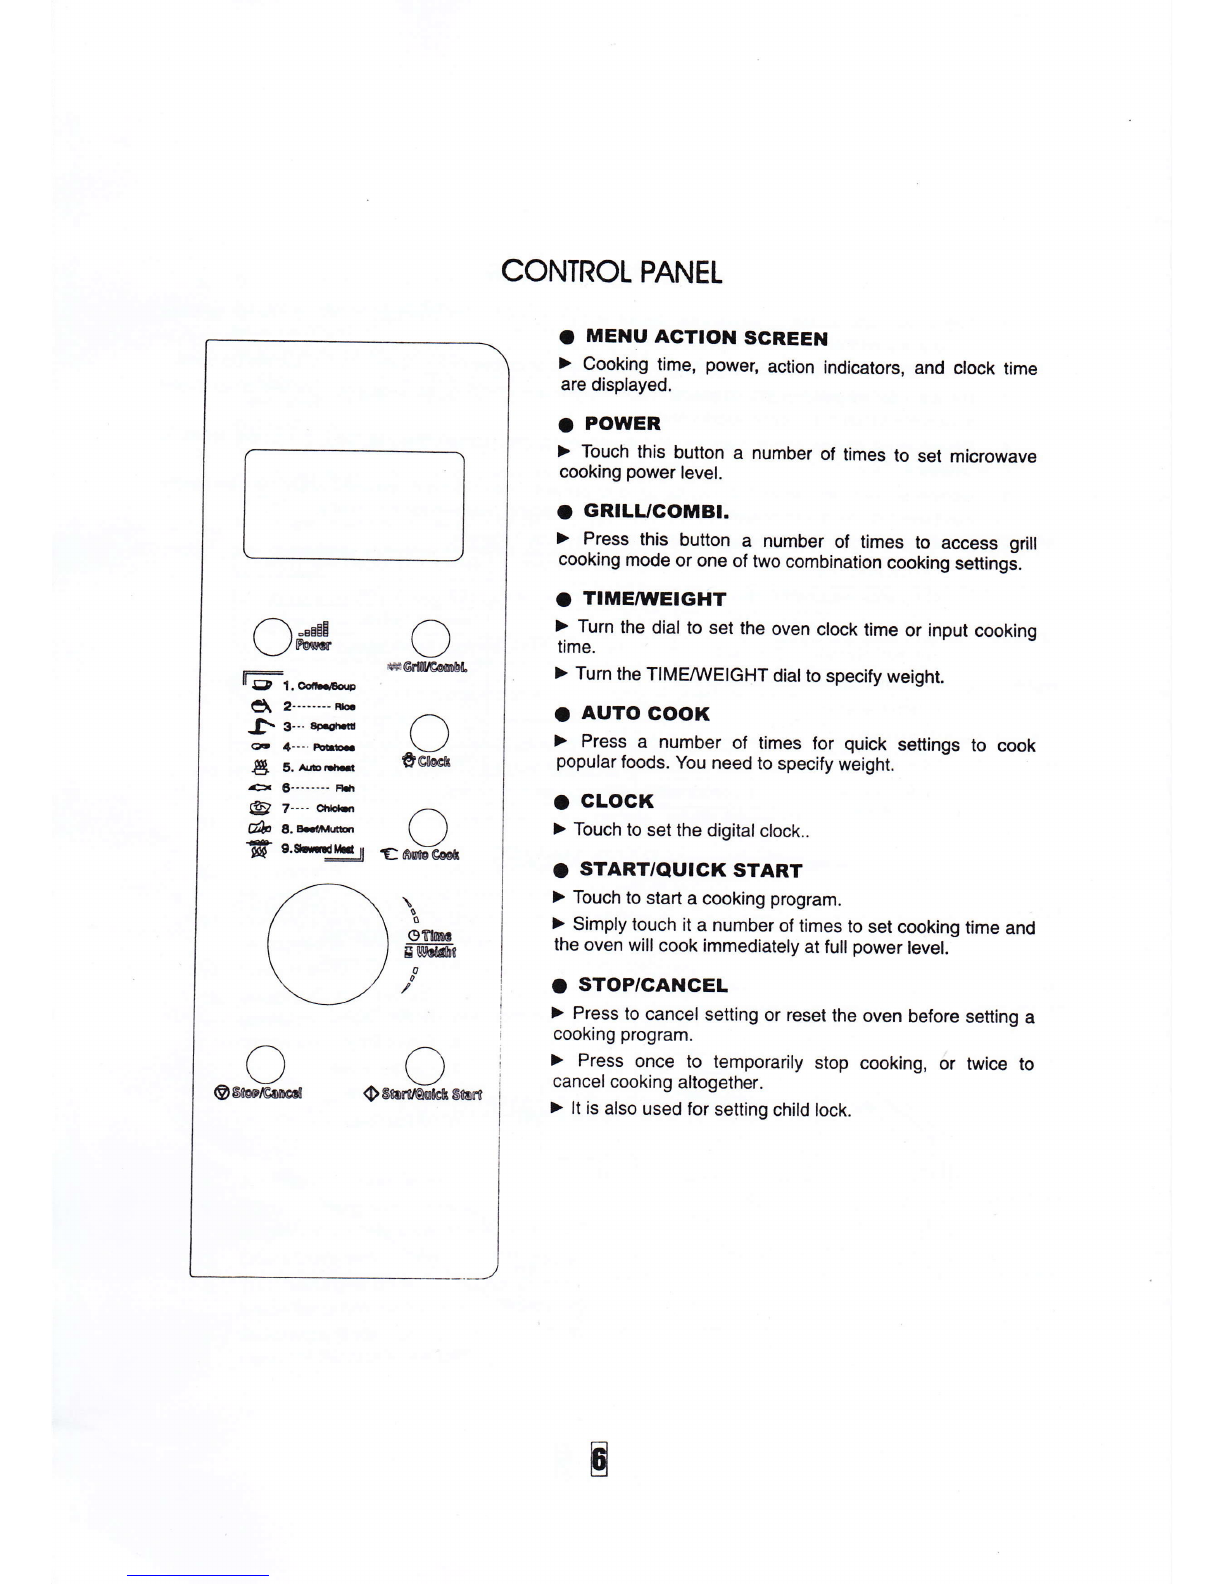
HOW TO SET THE OVEN CONTROLS
Each time a button is touched, a beep will sound to acknowledge the touch.
Setting digital clock
With the oven ready for input, touch the
CLOCK button once or twice to set the digital
clock in 12 or 24 hours cycle.
FOR EXAMPLE: Suppose you want to set the
oven clock time to 8:30.
1. Press CLOCK button once.
2. Turn TIMEMEIGHT to indicate the hour
digit 8.
3. Press CLOCK button.
4. Turn TIMEMEIGHT dial to indicate the
minute digits until the screen shows 8:
30.
5. Press CLOCK to confirm the setting.
To check clock time during cooking, press the
CLOCK button once, the time will be
displayed for 5 seconds.
Microwave cooking
To cook with microwave power alone, press
the POWER bulton a number of times to
select a cooking power level, and then use
the TIMEAIVEIGHT dial to set a desired
cooking time. The longest cooking time is 60
minutes.
Select power level by pressing the POWER
button:
minute at 60% of microwave power.
1. Press POWER button 3 times.
2. Turn TIMEMEIGHT to 1:00.
3. Press START/QUICK START button.
Grill
The longest cooking time is 60 minutes. The
grill cooking is particularly uselul for thin
slices of meat, steaks, choPs, kebabs,
sausages of piece of chicken. lt is also
suitable for hot sandwiches and au gratin
dishes.
For example, suppose you want to grillfor 12
minutes.
1. Press GRILUCOMBI button once.
2. TurntheTIME/WEIGHTto 12:00.
3. Press START/QUICK START button.
Gombination {
The longest cooking time is 60 minutes.
30% time for microwave cooking, 70% for grill
cooking. Use for lish, potatoes or au gratin.
FOR EXAMPLE: Suppose You want to set
combination 1 cooking for 25 minutes.
1. Press GRILUCOMBI. button twice.
2. Turn TIMEMEIGHT to 25:00.
3. Press START/QUICK START button.
Gombination 2
The longest cooking time is 60 minutes.
55% time for microwave cooking,45% lor grilt
cooking. Use for puddings omelettes, baked
potatoes and poultry.
FOR EXAMPLE: SupPose You want to set
combination 2 cooking for 12 minutes.
1. Press GRILUCOMBI. button three times.
2. Turn TIMEAAIEIGHT to 12:00.
w
1 009/a.i.,,'',. :'\ ., .
IIX
60% r... i::lrif.jr.tii
kffi
20o/o ' ,::'. '"
m
U
. once
i'13 times-
For example, suppose you want to cook for 1
3. Press STABT/QUICK START butlon.
Auto Gook
Forfoodorthefollowingcookingmode,itisnotneceSsarytoprogramtrreou@
power. lt is sufficient to indicate the type of food that you wish to cook as we1 as the weight of thii
food' ln order to do this, press the AUTO COOK button a number of times to select a category of
food/cooking mode. then turn the TIMEMEIGHT dial to indicate weight ol food to be cooked. The
oven begins cooking once he START/QUCK START button is engaged.
You may need to turn food over at the middle of cooking time to obtain uniform cooking.
For example, to cook 4009 of fish.
1. Press the AUTO COOK button 6 times.
2. Turn TIMEMEIGHT diat to indicate a weight of 4009.
3. Press START/QUICK START button.
Auto Cook Menu
1Coffee/Soup(unit) 123
2Rice (g) 100 200 400 600 800 1000
3Spaghefti(g) 100 200 300
4Potatoes (g) 150 300 450 600
5Auto reheat (g) 100 200 300 400 500 600 700 800 1000
6Fish {g) 100 200 400 600 800 1000
7Chicken (g) 800 1000 1200 1300 1400
8Beef/Mutton (g) 300 500 800 1000 1200 1300
ISkewered Meat (ql 100 200 300 400 s00 600 700
The result of auto cooking depends on lactors such as the shape and size of food, your personal
preference as to the doneness of certain foods and even how well you happen to place food in the
oven. lf you find the result at any rate not quite satisfactory please adjust the cooking time a litfle bit
accordingly.
Auto Defrost
3. Press START/QUICK START button.
Quick start
This feature allows you to start the oven
quickly.
Press the START/QUICK START button a
number of times to set the cooking time, the
oven starts work at full power level
immediately.
The oven allows the defrosting of meat,
poultry, and seafood. The time and the
defrosting power are adjusted automatically
once the weight is programmed.
FOR EXAMPLE: Suppose you want to
defrost 6009 of shrimp.
1. Place the shrimp to b'e defrosted into the
oven.
2. Turn the dial to choose a weight.600g.
E
For example, to sel the oven to cook for 2
minutes using this feature:.
Press START/QUICK START button 4 times,
the oven starts working immediately at full
microwave power.
Child Lock
Use to prevent unsupervised operation of the
oven by little children. The CHILD LOCK
indicator will show up on display screen' and
the oven can not be operated while the
CHILD LOCK is set.
1.
2.
3.
4.
5.
6.
7.
8.
To set the CHILD LOCK: Press and hold the
STOP/CANCEL button for 3 seconds, a beep
sounds and LOCK indicator lights.
To cancel the CHILD LOCK: Press and hold
the STOP/CANCEL button lor 3 seconds until
lock indicator on display goes off.
Special Feature
AUTO REMINDER
After a cooking or defrosting program has
completed, the oven will automatically
continue to sound beeps every two minutes
until the oven door is oPened or the
STOP/CANCEL button is Pressed.
W
I
W
I
CLEANING AND CARE
Turn off the oven and remove the power plug from the wall socket before cleaning.
Keep the inside of the oven clean. When food splatters or spilled liquids adhere to oven walls,
wipe with a damp cloth. Mild detergent may be used if the oven gets very dirty. Avoid the use of
spray and other harsh cleaners as they may stain, streak or dull the door surface.
The outside surfaces should be cleaned with a damp cloth. To prevent damage !o the operating
parts inside the oven, water should not be allowed to seep inlo the ventilation openings.
Wipe the door and window on both sides, the door seals and adjacent parts frequently with a
damp cloth to remove any spills or spatters. Do not use abrasivecleaner.
Do not allow the control panel to become wet. Clean with a soft, damp cloth. When cleaning the
control panel, leave oven door open to prevent oven from accidentally turning on.
lf steam accumulates inside or around the outside of the oven door, wipe with a soft cloth' This
may occur when the microwave oven is operated under high humidity condition. And it is normal.
It is occasionally necessary to remove the glass tray for cleaning. Wash the tray in warm sudsy
water or in a dishwasher.
The roller ring and oven floor should be cleaned regularly to avoid excessive noise. Simply wipe
the bottom surface of the oven with mild detergent. The roller ring may be washed in mild sudsy
water or dishwasher. When removing the roller ring from cavity floor for cleaning, be sure to
replace in the proPer Position.
Remove odors from your oven by combining a cup of water with the juice and skin of one lemon
in a deep microwaveable bowl, microwave for 5 minutes. Wipe thoroughly and dry with a soft
cloth.
.10. When it becomes necessary to replace the oven light, please consult a dealer to have it
replaced.
E

Other ILVE Microwave Oven manuals

ILVE IV603BIM Installation instructions manual

ILVE

ILVE IV603BIM Installation instructions manual

ILVE IVFSCM34X Setup guide

ILVE

ILVE IVFSCM34X Setup guide

ILVE IV603BIM Manual

ILVE

ILVE IV603BIM Manual

ILVE IVFSM643X User manual

ILVE

ILVE IVFSM643X User manual

ILVE IV605WV User manual

ILVE

ILVE IV605WV User manual

ILVE D 900 ESL User manual

ILVE

ILVE D 900 ESL User manual

ILVE 645LTKCW User manual

ILVE

ILVE 645LTKCW User manual

ILVE ILCM45X Specification sheet

ILVE

ILVE ILCM45X Specification sheet

ILVE IV600FBI Installation instructions manual

ILVE

ILVE IV600FBI Installation instructions manual

ILVE IV605BV Installation instructions manual

ILVE

ILVE IV605BV Installation instructions manual

Popular Microwave Oven manuals by other brands

HELLER HMW25B user manual

HELLER

HELLER HMW25B user manual

AEG KMF768080M user manual

AEG

AEG KMF768080M user manual

Candy CMW20MSS-UK owner's manual

Candy

Candy CMW20MSS-UK owner's manual

Vivax MWO-2075BL user manual

Vivax

Vivax MWO-2075BL user manual

Sharp R-82FBSTM Operation manual with cookbook

Sharp

Sharp R-82FBSTM Operation manual with cookbook

Electrolux Micromat ML 7.60 operating instructions

Electrolux

Electrolux Micromat ML 7.60 operating instructions

AEG MSB2547D user manual

AEG

AEG MSB2547D user manual

Royal Sovereign RMW1000-38SS owner's manual

Royal Sovereign

Royal Sovereign RMW1000-38SS owner's manual

MPM MPE-01 user manual

MPM

MPM MPE-01 user manual

Sharp R-9380 Service manual

Sharp

Sharp R-9380 Service manual

Sears 669933 - 1.1 cu. ft. Countertop Microwave troubleshooting guide

Sears

Sears 669933 - 1.1 cu. ft. Countertop Microwave troubleshooting guide

Dawlance DW-162 HZP Owner's guidebook

Dawlance

Dawlance DW-162 HZP Owner's guidebook

LG LMVM2075SB Service manual

LG

LG LMVM2075SB Service manual

LG LMV1650SW Service manual

LG

LG LMV1650SW Service manual

Midea TF044EU6-SH0DK0 user manual

Midea

Midea TF044EU6-SH0DK0 user manual

Atag MA3611F Instructions for use

Atag

Atag MA3611F Instructions for use

Blodgett Combi HOODINI BLCT-6E-H Installation operation & maintenance

Blodgett Combi

Blodgett Combi HOODINI BLCT-6E-H Installation operation & maintenance

Sharp R-310B Service manual

Sharp

Sharp R-310B Service manual

manuals.online logo
manuals.online logoBrands
  • About & Mission
  • Contact us
  • Privacy Policy
  • Terms and Conditions

Copyright 2025 Manuals.Online. All Rights Reserved.