Ingco PLM5002 User manual

PLM5002 UPLM5002 PLM5002-4 PLM5002-6
PLM5002S PLM5002-8 PLM5002-9
Laminate Trimmer
EN
Rematador de Fórmica
ES
Laminate Trimmer
produced & marketed
ingcoglobal
INGCO GLOBAL

The symbols in instruction manual and the label on the tool
Double insulated for additional protection.
Read the instruction manual before using.
CE conformity.
Wear safety glasses, hearing protection and dust mask.
Waste electrical products should not be disposed of with household waste.
Please recycle where facilities exist. Check with your Local Authority or
retailer for recycling advice.
Safety alert.
Please only use the accessories supported by the manufacture.
2|English

GENERAL POWER TOOL SAFETY WARNINGS
WARNING Read all safety warnings and all instructions.Failure to
follow the warnings and instructions may result in electric shock, fire and/or
serious injury.
Save all warnings and instructions for future reference.
The term "power tool" in the warnings refers to your mains-operated (corded)
power tool or battery-operated (cordless) power tool.
1) Work area safety
a) Keep work area clean and well lit. Cluttered and dark areas invite
accidents.
b) Do not operate power tools in explosive atmospheres, such as
in the presence of flammable liquids, gases or dust. Power tools
create sparks which may ignite the dust or fumes.
c) Keep children and bystanders away while operating a power
tool. Distractions can cause you to lose control.
2) Electrical safety
a) Power tool plugs must match the outlet. Never modify the plug
in any way. Do not use any adapter plugs with earthed
(grounded) power tools. Unmodified plugs and matching outlets will
reduce risk of electric shock.
b) Avoid body contact with earthed or grounded surfaces such as
pipes, radiators, ranges and refrigerators. There is an increased
risk of electric shock if your body is earthed or grounded.
c) Do not expose power tools to rain or wet conditions. Water
entering a power tool will increase the risk of electric shock.
d) Do not abuse the cord. Never use the cord for carrying, pulling
or unplugging the power tool. Keep cord away from heat, oil,
sharp edges or moving parts. Damaged or entangled cords
increase the risk of electric shock.
e) When operating a power tool outdoors, use an extension cord
suitable for outdoor use. Use of a cord suitable for outdoor use
reduces the risk of electric shock.
f) If operating a power tools in a damp location is unavoidable, use
3|English

a residual current device (RCD) protected supply. Use of an RCD
reduces the risk of electric shock.
3) Personal safety
a) Stay alert, watch what you are doing and use common sense
when operating a power tool. Do not use a power tool while you
are tired or under the influence of drugs, alcohol or medication.
A moment of inattention while operating power tools may result in
serious personal injury.
b) Use personal protective equipment. Always wear eye protection.
Protective equipment such as dust mask, non-skid safety shoes,
hard hat, or hearing protection used for appropriate conditions will
reduce personal injuries.
c) Prevent unintentional starting. Ensure the switch is in the off-
position before connecting to power source and/or battery pack,
picking up or carrying the tool. Carrying power tools with your
finger on the switch or energizing power tools that have the switch on
invites accidents.
d) Remove any adjusting key or wrench before turning the power
tool on. A wrench or a key left attached to a rotating part of the
power tool may result in personal injury.
e) Do not overreach. Keep proper footing and balance at all times.
This enables better control of the power tool in unexpected
situations.
f) Dress properly. Do not wear loose clothing or jewellery. Keep
your hair, clothing and gloves away from moving parts. Loose
clothes, jewellery or long hair can be caught in moving parts.
g) If devices are provided for the connection of dust extraction and
collection facilities, ensure these are connected and properly
used. Use of dust collection can reduce dust-related hazards.
4) Power tool use and care
a) Do not force the power tool. Use the correct power tool for your
application. The correct power tool will do the job better and safer at
the rate for which it was designed.
b) Do not use the power tool if the switch does not turn it on and off.
Any power tool that cannot be controlled with the switch is dangerous
4|English

and must be repaired.
c) Disconnect the plug from the power source and/or the battery
pack from the power tool before making any adjustments,
changing accessories, or storing power tools. Such preventive
safety measures reduce the risk of starting the power tool accidentally.
d) Store idle power tools out of the reach of children and do not allow
persons unfamiliar with the power tool or these instructions to
operate the power tool. Power tools are dangerous in the hands of
untrained users.
e) Maintain power tools. Check for misalignment or binding of
moving parts, breakage of parts and any other condition that may
affect the power tools operation. If damaged, have the power tool
repaired before use. Many accidents are caused by poorly maintained
power tools.
f) Keep cutting tools sharp and clean. Properly maintained cutting tools
with sharp cutting edges are less likely to bind and are easier to control.
g) Use the power tool, accessories and tool bits etc. in accordance
with these instructions, taking into account the working
conditions and the work to be performed. Use of the power tool for
operations different from those intended could result in a hazardous
situation.
5) Service
a) Have your power tool serviced by a qualified repair person using
only identical.
Additional Safety Warnings
Hold power tool by insulated gripping surfaces, because the cutter may contact its own
cord. Cutting a "live" wire may make exposed metal parts of the power tool "live" and shock the
operator.
Use clamps or another practical way to secure and support the workpiece to a stable
platform. Holding the work by your hand or against the body leaves it unstable and may lead to
loss of control.
Use clamps or another practical way to secure and support the workpiece to a stable
platform. Holding the work by your hand or against the body leaves it unstable and may lead to
loss of control.
This will ensure that the safety of the power tool is
maintained.
5|English
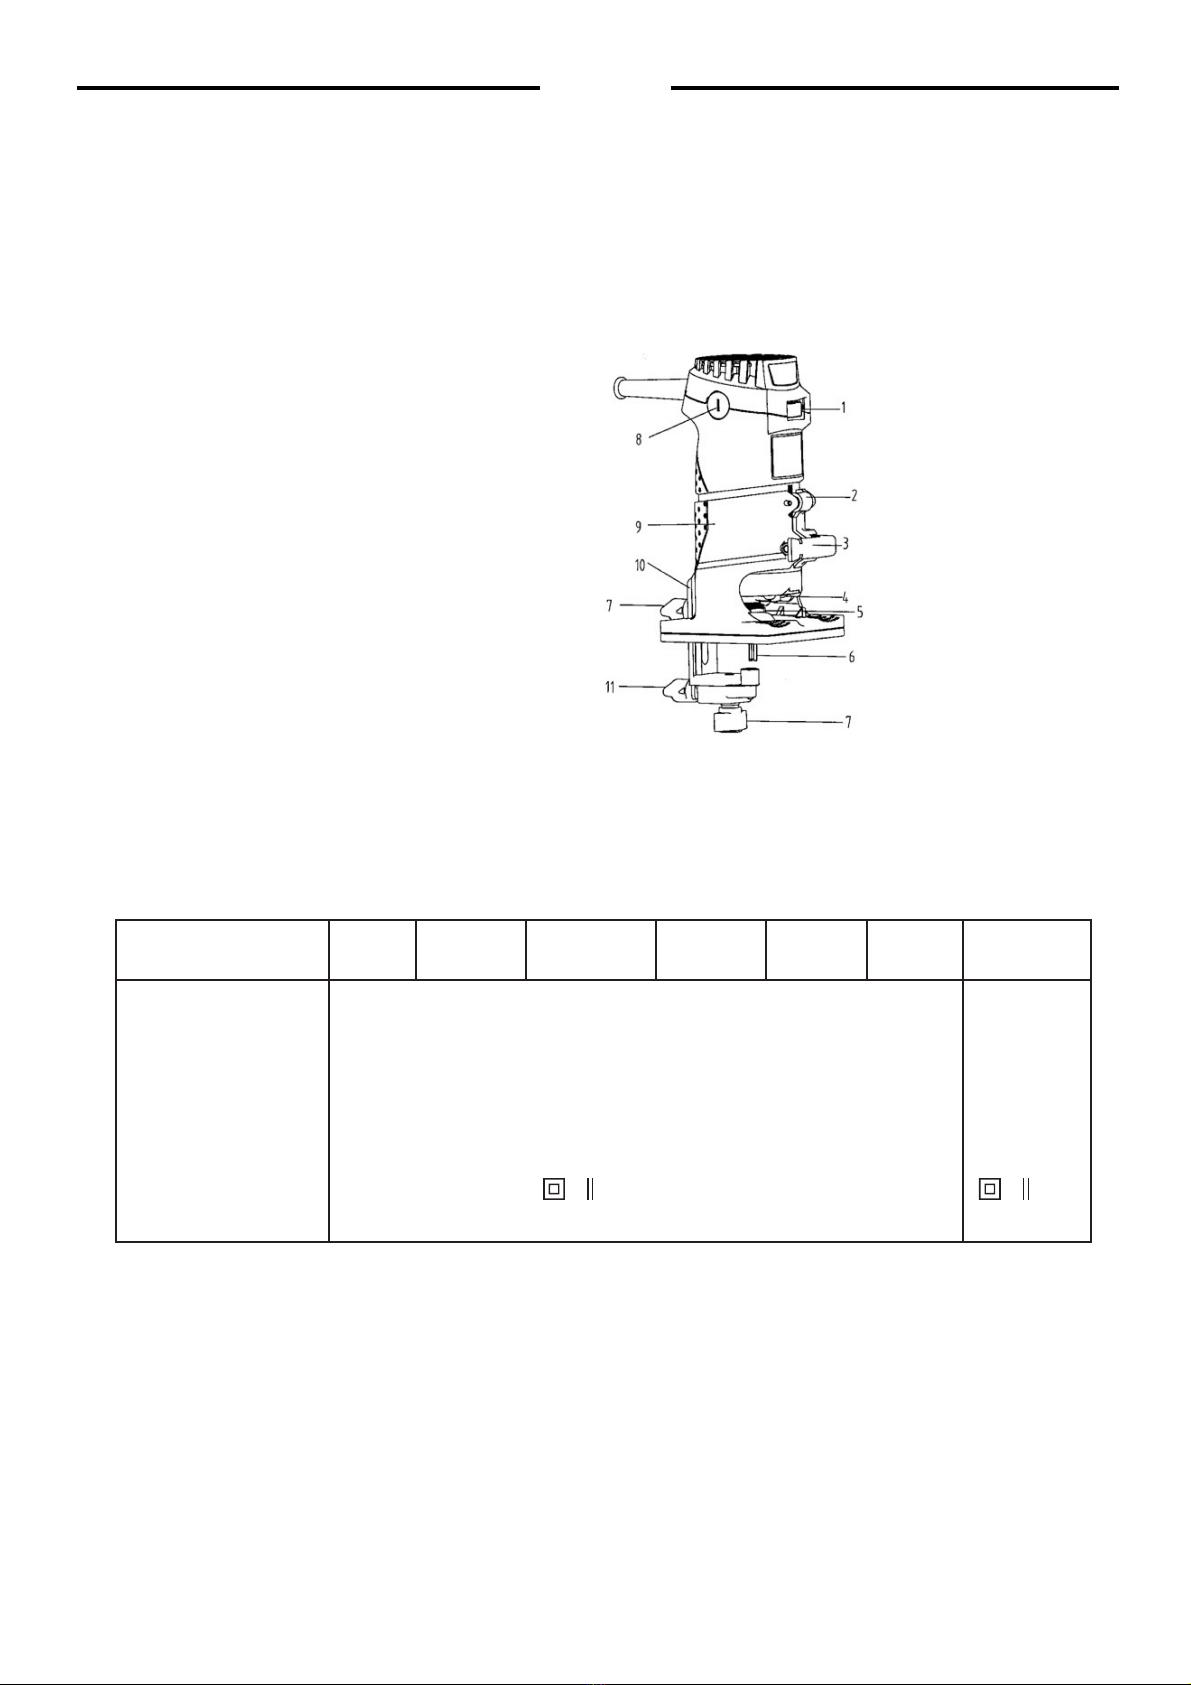
DESCRIPTION OF THE TOOL
△ WARNING: Read, understand and follow all safety rules and instructions before using this
tool. Please keep this manual for future reference.
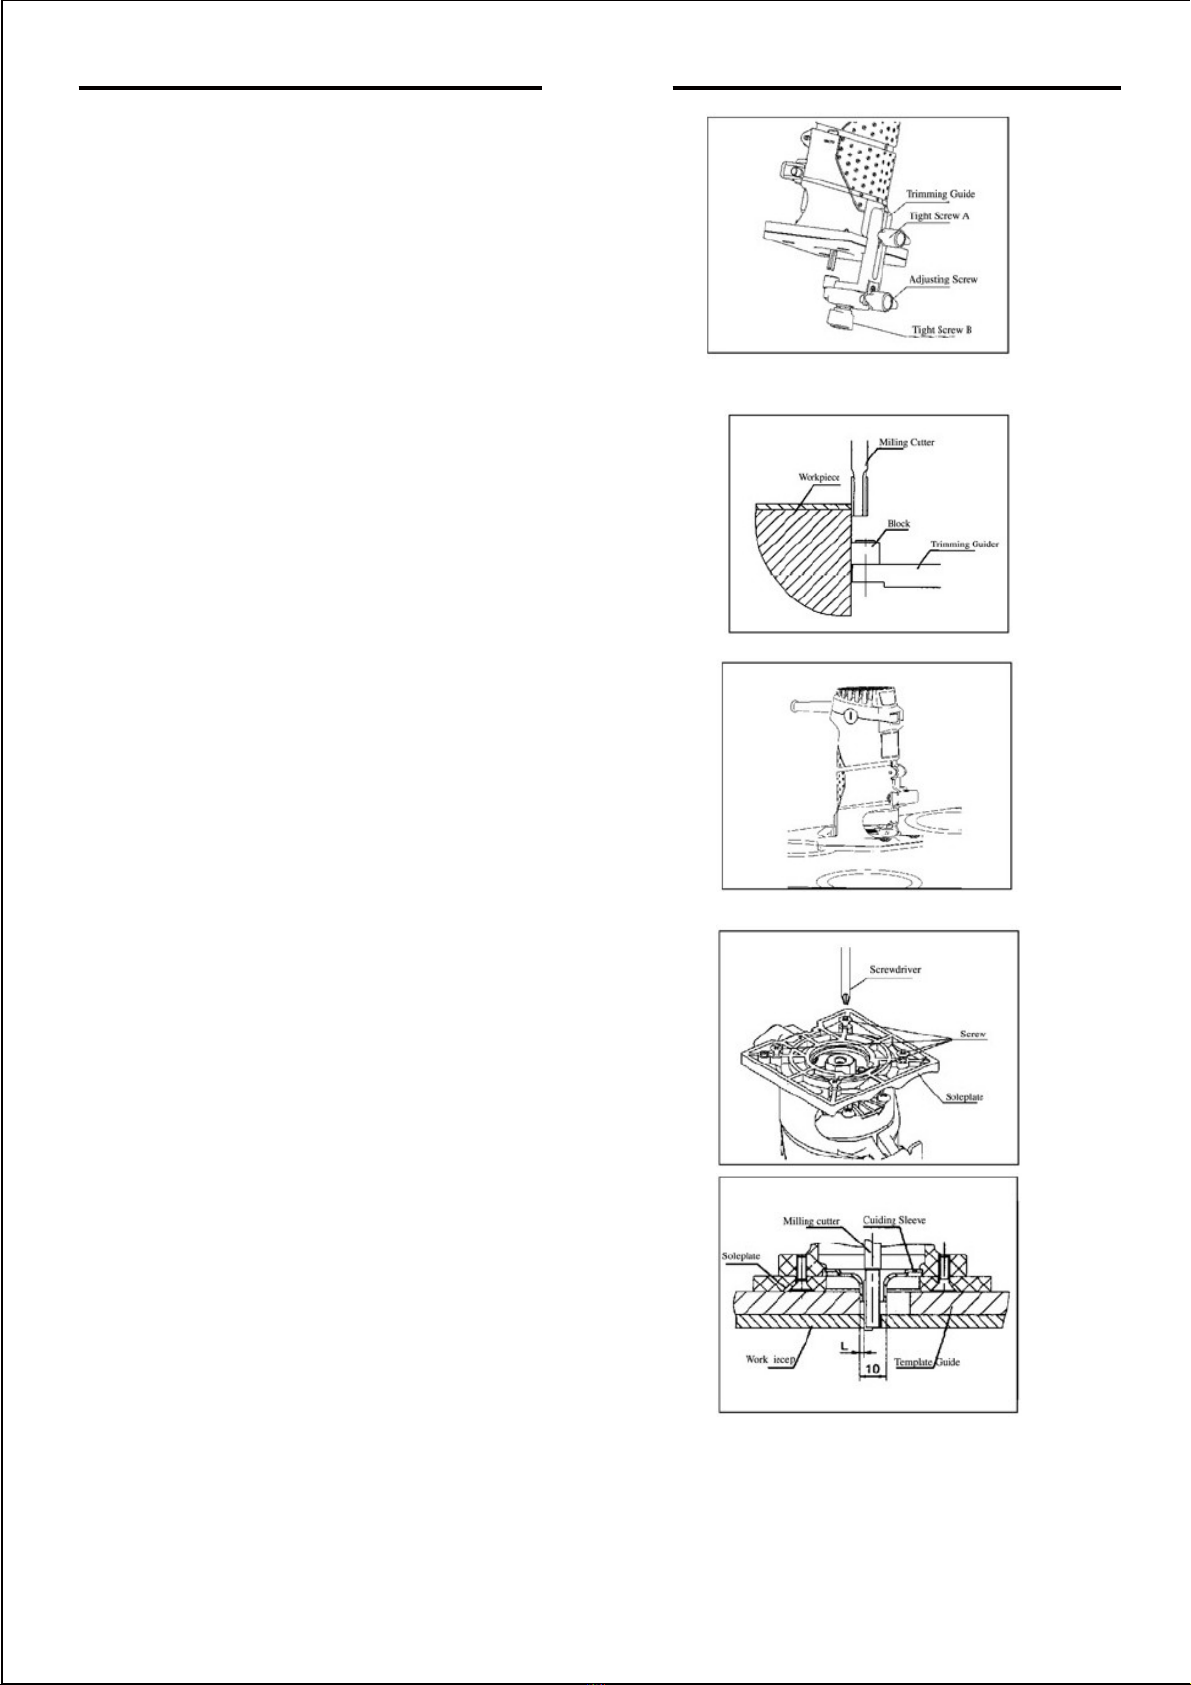
1. MAIN PARTS
1. Switch
Rubber roller
2.
3. Lock handle
4. Lock button
5. Lock nut
6. Milling cutter
7. Clamp screw
8. Brush cap
9. Transparent guard
10. Base guide
11. Adjusting screw
2. TOOL SPECIFICATIONS
Ra
Model No.
ted voltage 220-240V~ 110-120V~
PLM5002-6
PLM5002-4
(ISRAEL Plug)
PLM5002-8
(BS Plug)
PLM5002-9 PLM5002S
(SAA Plug)
PLM5002 UPLM5002
Rated frequency 50/60Hz 60Hz
Rated input power 500W 500W
No-load speed 33500/min 33500/min
Milling cutter diameter 6 mm(1/4˝ ) 1/4˝
Weight 2.0 Kg 2.0 Kg
Protect grade
Insulated grade E E
/ /
(INMENTRO
Plug)
(IRAM Plug)
6|English

7|English
GENERAL SAFETY RULES
△WARNING: Read and understand all instructions.Failure to follow all instructions listed
bellowed may result in electric shock, tire,and/or seriouspersonal injury.
1. KEEP GUARDS IN PLACE and in working order.
2. REMOVE ADJUSTING KEYS AND WRENCHES. Form habit of checking to see that
keys and adjusting wrenches are removed from tool before turning it on.
3. KEEP WORK ARES CLEAN AND DRY. Cluttered areas and benches invite accidents
Don't use power tools in damp yr wet locations or espore themto rain
4. KEEP CHILDREN AWAY. All visitors should be kept safe distance from work area.
5. USE RIGHT TOOL .Don't force tool or attachment to do a job for which it was not
designed.
6. USE PROPER EXTENSIONCORD. Make sure your extension cord isin good condition.
7. WEAR PROPER EXTENSION. Do not wear loose clothing, neckties, ringsbracelets, or
other jewelry whitch may getcaught in moving parts. Wear protective hair covering to
contain Iong hair.
8. ALWAYS USE SAFETY GLASSES. Also use fact or dust mask if cutting operation is
dusty.
9. DON'T OVERREACH. Keep proper footing and balance at all times.
10.MAINTAIN TOOLS WITHCARE Keep tools sharp and clean for bestand safest
Performance. Follow instructions for lubricating and changing accessories.
l 1. DISCONNECT TOOLS before servicing, when changing accessories, such as blades, bit,
cutters, and the like.
12. REDUCE THE RISK OF UNINTENTIONAL STARTING. Make sure switch is in off
position before plugging in.
13.CHECK DAMAGED PARTS. Beforefurther use of the tool, a guard or other past that is
damaged should be carefully checked and performits intended function-check for alignment
of moving parts, binding of moving parts, breakage of parts, mounting, and any other
conditions that may affect its operation
14. DO NOToperate tool if you are under the influence of any drugsi alcohol or medication that
could affect your ability use the tool properly
15.NEVER use the power curd to pull theplug out of the pulg out of the electrical socket.
16. ALWAYS keep the power cord aways from sharp objects or any other obstacle that may
cause damage to the cord
SPECIFIC SAFETY RULES
1 Inspect for and remove allnails from lumber beforeoperation. Following this rule will
reduce the risk of serious personal injury.
2. Wear earprotection in continuous working time
3. Make sure the transparent guard secure installed before operation.
4. When operation, keep hands awayfrom the rotating parts and hold the trimmer firmly still.
5. Running the tool no loaded for least 1 minute in a protection area when using the new cutter
for the first time.
6. Save these instruction. Refer to them frequently and use them to instruct others who may use
this tool.

8|English
△WARNING: Some dust created by power drilling contains chemicals known to causecancer
birth defects or other reproductive harm. Some examples of these chemicals are:
■lead from lead-based paints
■arsenics and chromium from chemically reacted lumbe
Your risk romthese exposures varies, depends on howoften you dothis type of work. To
reduce your exposure to these chemicaIs: work in a well ventilated area, and work with
approved safety equipment.
STANDARD ACCESSORIES
Straight guide: a set
Extension guide: a set
Transparent guard: a set
Wrench: a set
Template guide: a set
Base guide: a set
Be sure to check the accessoriesas it is subject to change by areas and models.
OPERATION
1) POWER SUPPLY
Power tool plugs must match the outlet. Do not use any adapter plugs with earthed power
tools, Check the power supply, operation power should be a little less than rated power says
on the name plate.
2) CHANGING OF MILLING CUTTER
△WARNING: To reduce the risk of injury, always unplug the tool and make sure switch is
turned off before any assembly and assembly and adjustment.
△WARNING: Do not screw the lock nut too tighten to result in a bad effect on the chuck
inner wallof spindle.
(1) Loosen the lock handle, discharge the transparentguard carefully.
△WARNING: When selecting a milling cutter, use the right type for your job. For best
performance, always use sharp cutter
NOTE: The highest speed of milling cutter fitfor this edge trimmer should notless than
33000rpm
(2) Push the spindle lock button to lock the spindle. And then insert the milling cutter
directly into collet.
(3) Firmly tighten the lock nut to secure the milling cutter in place by a wrench. And then
attach the transparent guard back
NOTE: Ensure the correct collet is installed for the milling cutter to be used. Always
choose to right size collet fit your milling cutter.
(4) To remove the milling cutter just operate the reverse steps.
△WARNING: Do not tighten the lock nut without a milling cutter in place or you may break
the center piece of the collet.
9|English
3) CUTTING DEPTH ADJUSTMENT
Loosen the lock handle, and then push the rubber roller
slightly to the desired depth. Make sure that tighten the
lock handle after each adjustment
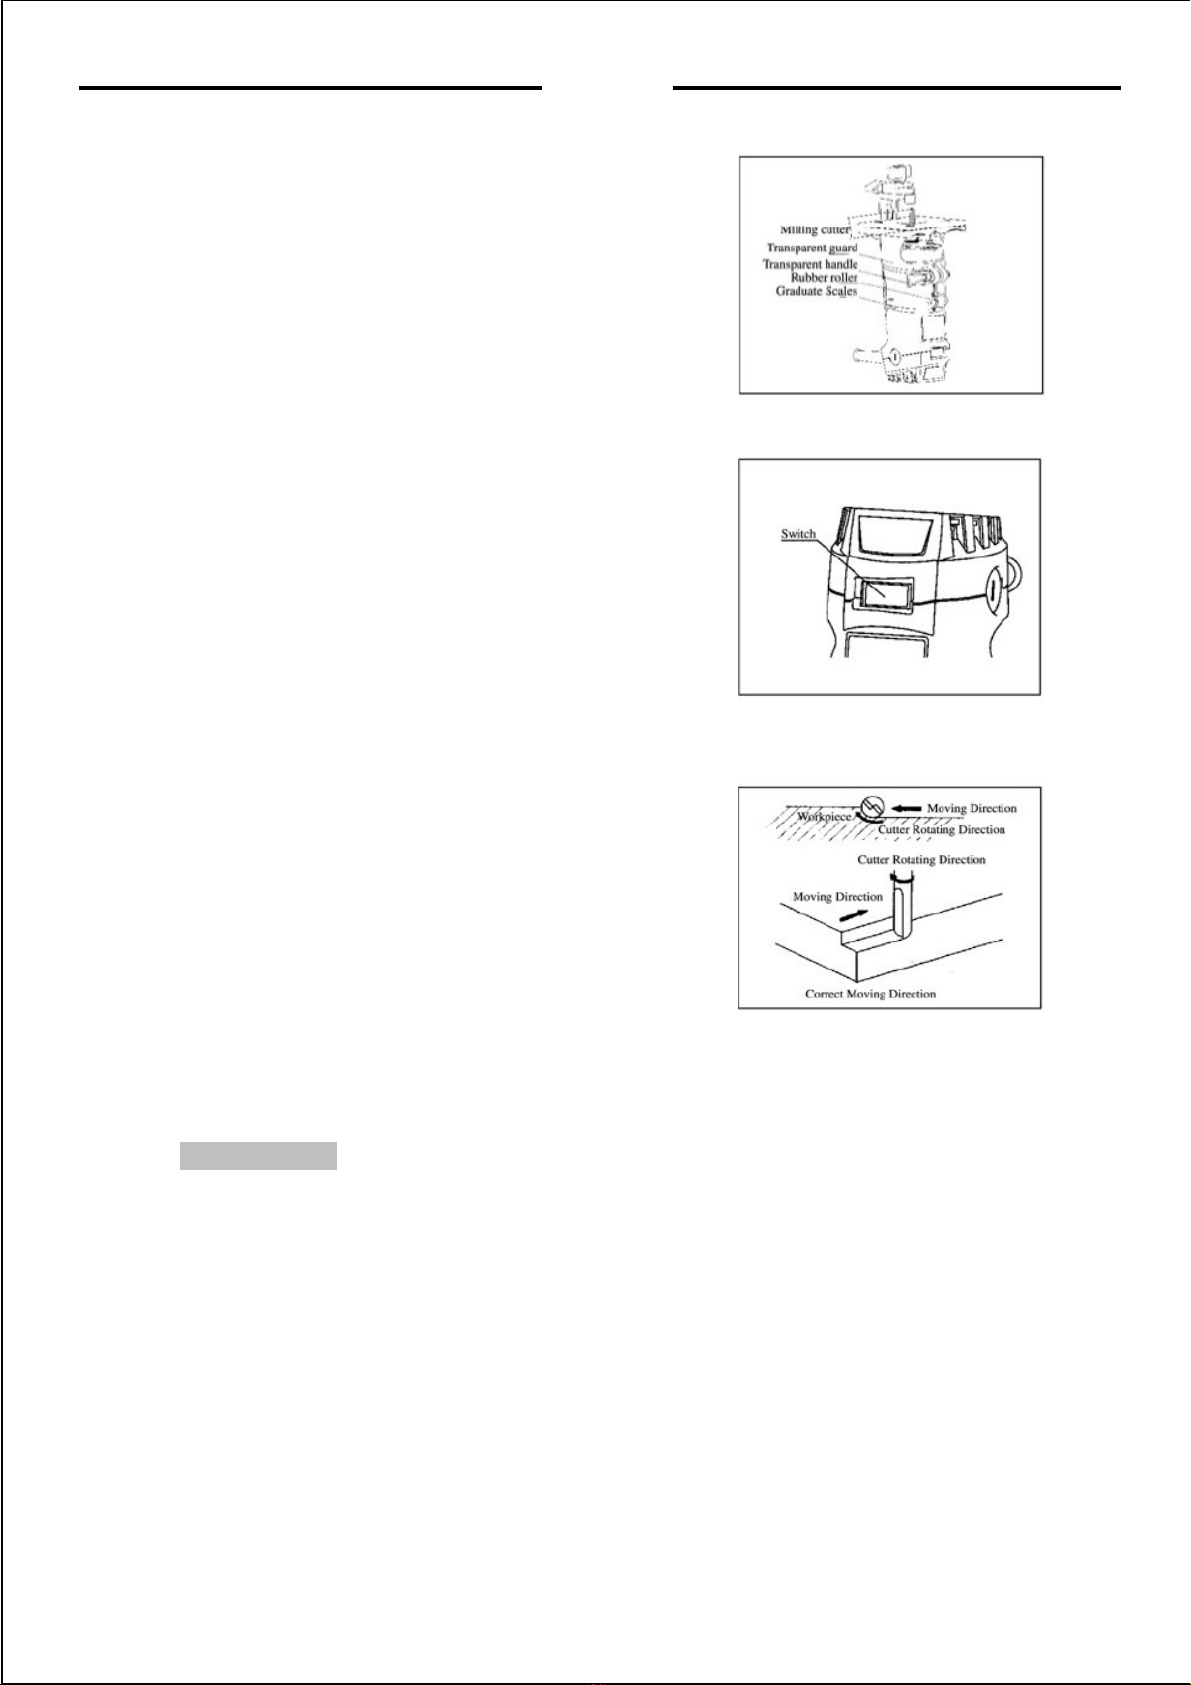
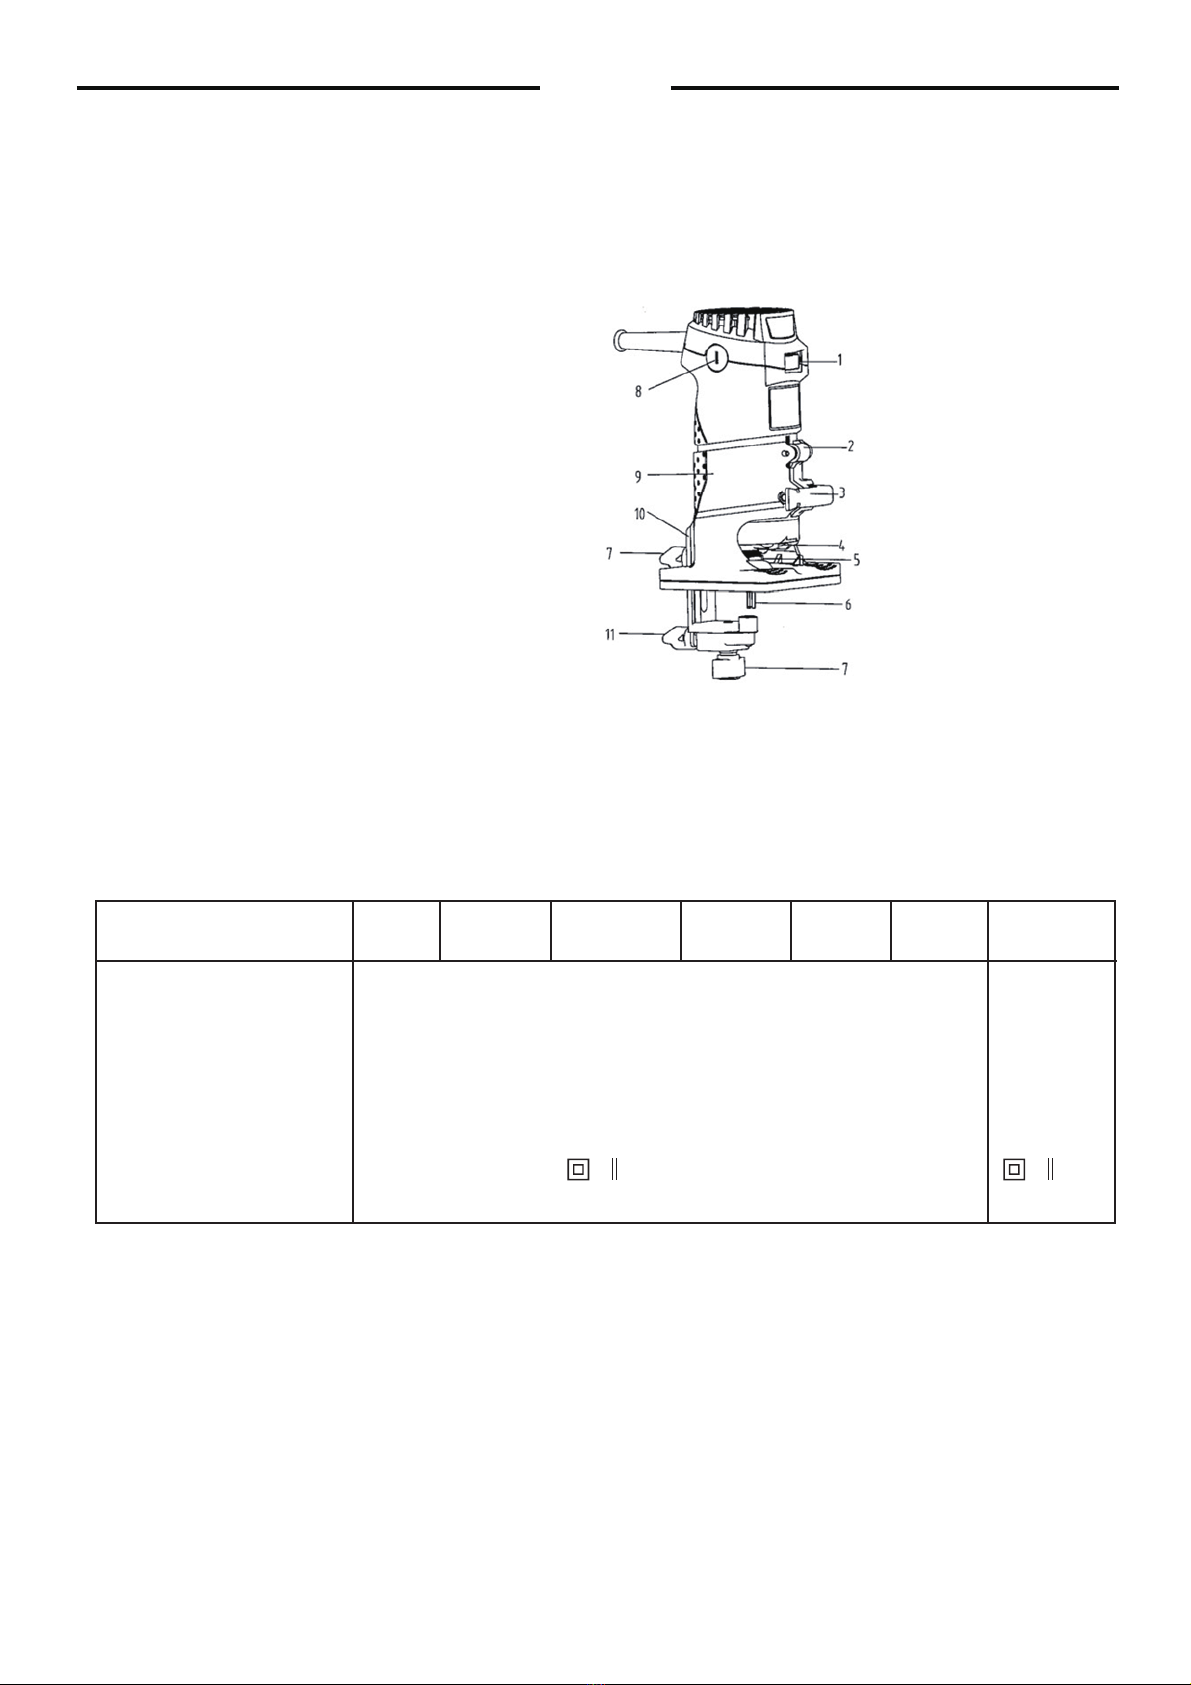
4 ) SWITCHING ON AND OFF
△WARNING: To reduce the risk of injury, to make sure you
can control the switch freely and keep it off before plugging the
trimmer. To switch on, turn ii at "1 "position, and to switch
off, push it at "O" position.
5) EDGE TRIMMER
(1) Place the base plate on the work piece ensuring that milling cutter is not in contact
with the material to be cut.
(2) Connect the trimmer to the power supply. And
then turn it on .Ensure you have a firm grip on
both handles. Wait for milling cutter to attain
full speed.
(3) Lower the trimmer and mope it move the work
piece surface, keeping the base plate flush and
advancing smoothly until cutting is complete.
(4) Keep the cutting pressure constant, taking care motorto slow excessively.
(5) To turn the trimmer off, release the switch.
△WARNING: Always use two hands to hold the trimmer, Where possible, clamp the work piece
to the bench.
APPLICATIONS
△WARNING: To reduce the risk of injury, never touch the milling cutter to clean the debris until
it has already stopped and cooled down
1, APPLICATION HINTS
1) When cutting flat panels suchas kitchen work surfaces, before joining please ensure that you
use an appropriatejig together with the corret guide bush, DO NOT use thecurved partof
the trimmer
2) Always apply pressure in line with the cutter. Use enough pressure to keepcutting, but do not
push hard enough to stall the motor.
10|English
3) On very hard woods or problem materials it may be
necessary to make more than one pass at progressive
cutting depths until the desired depth of cut is
achieved. When cutting groove, the recommended
cutting depth should no more than 3mm.
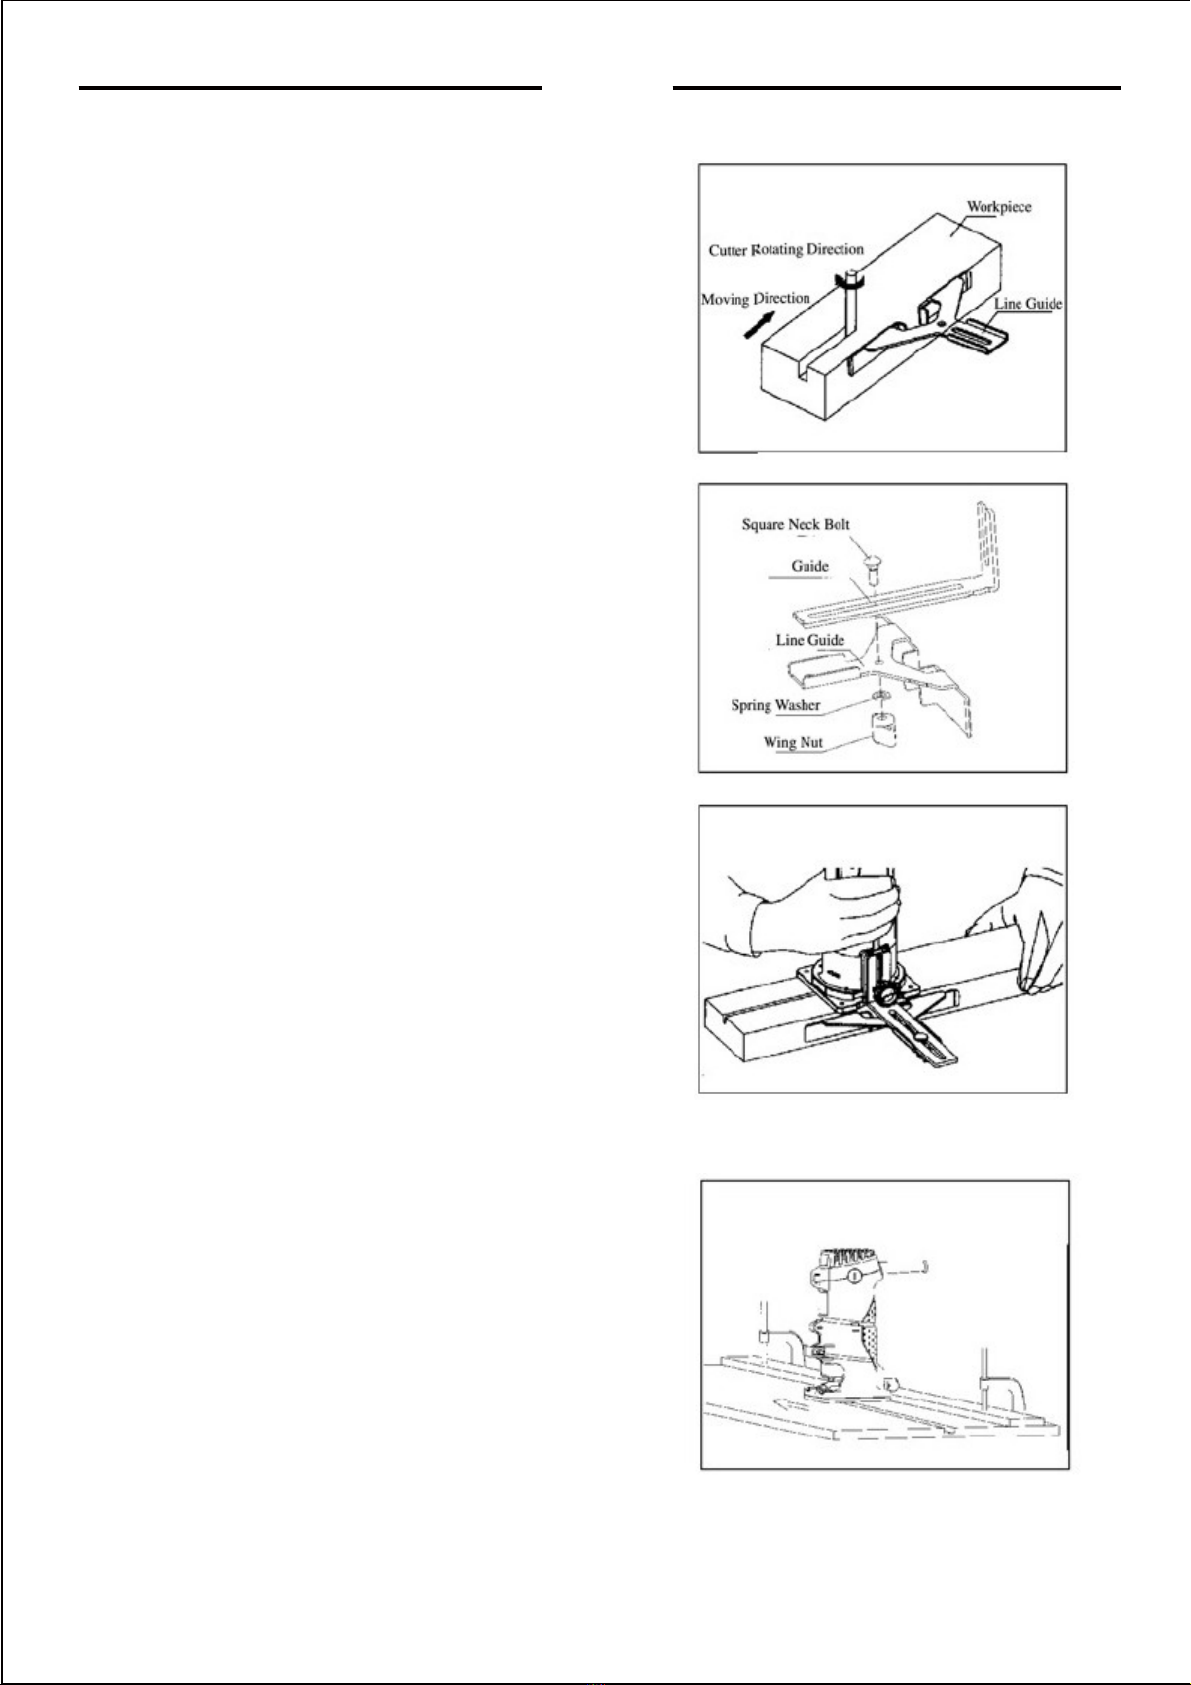
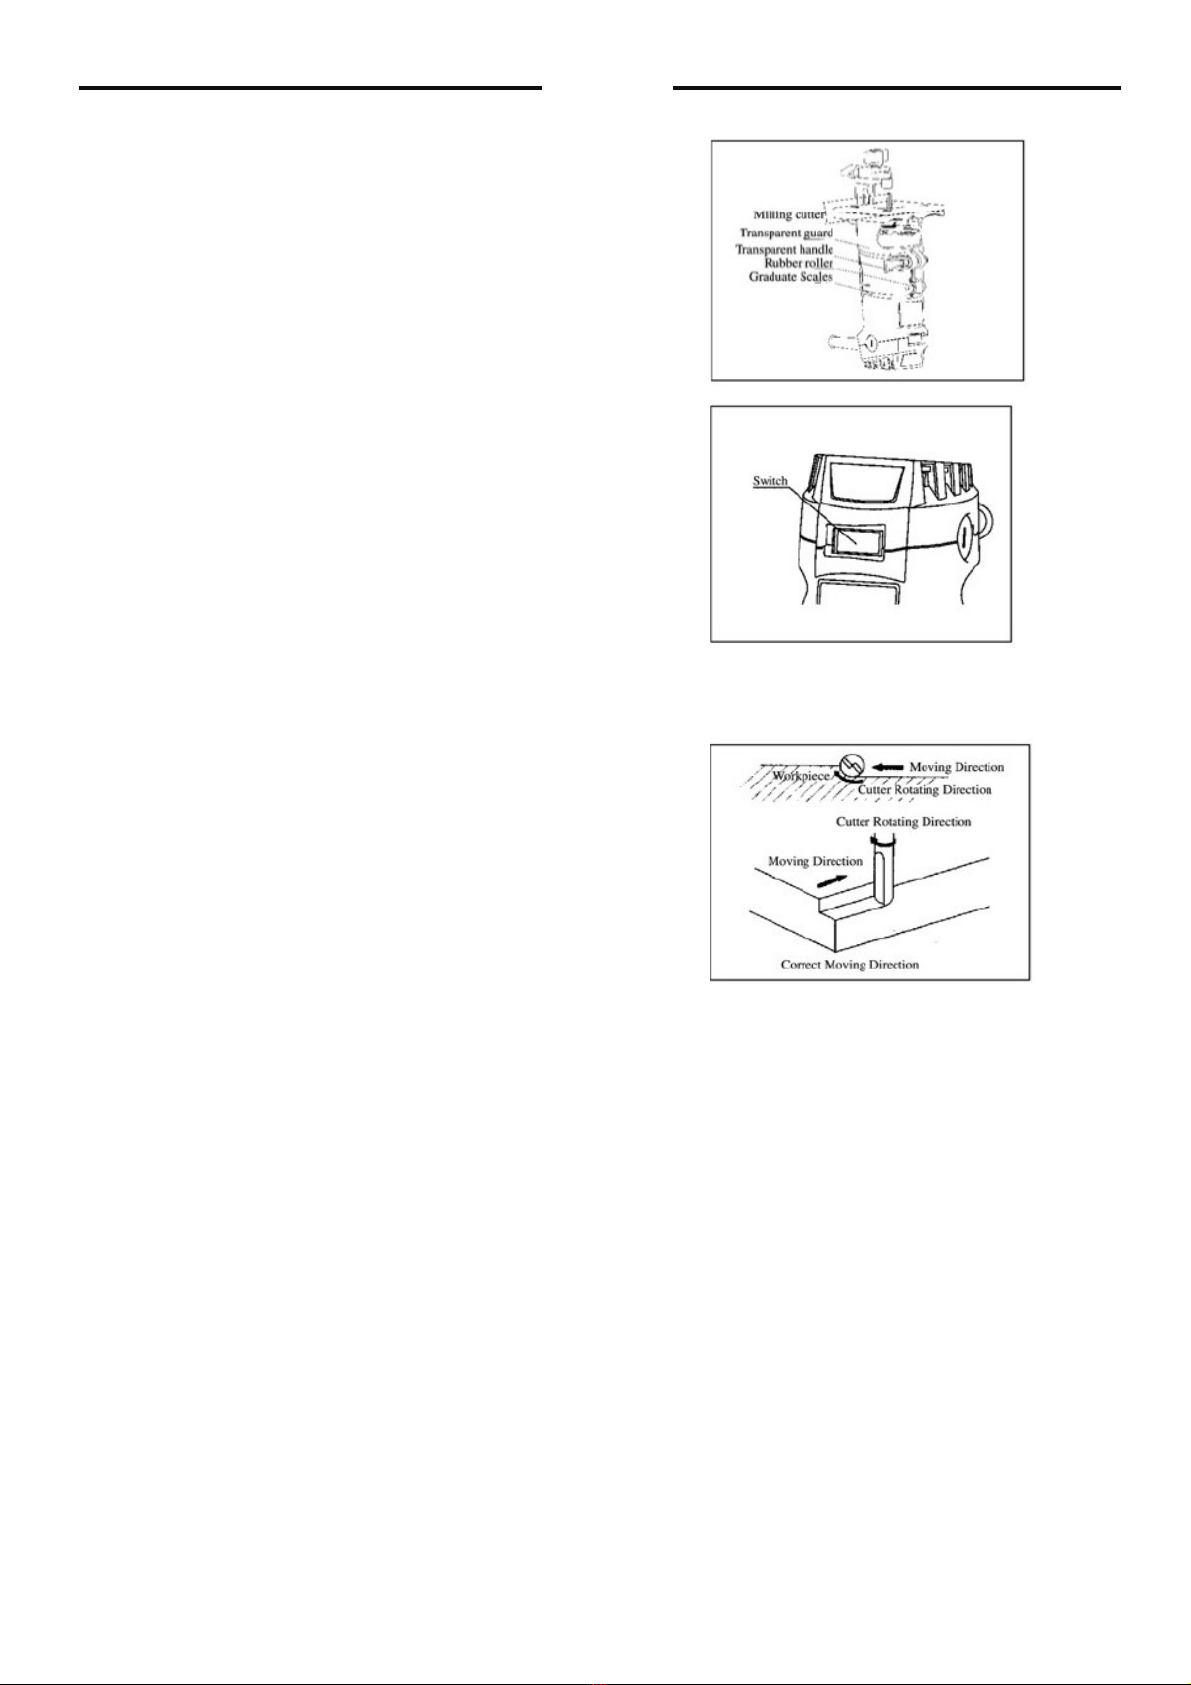
4) When edge cutting, the work piece surface should be
on theleft side of the milling cutter in the feed
direction.
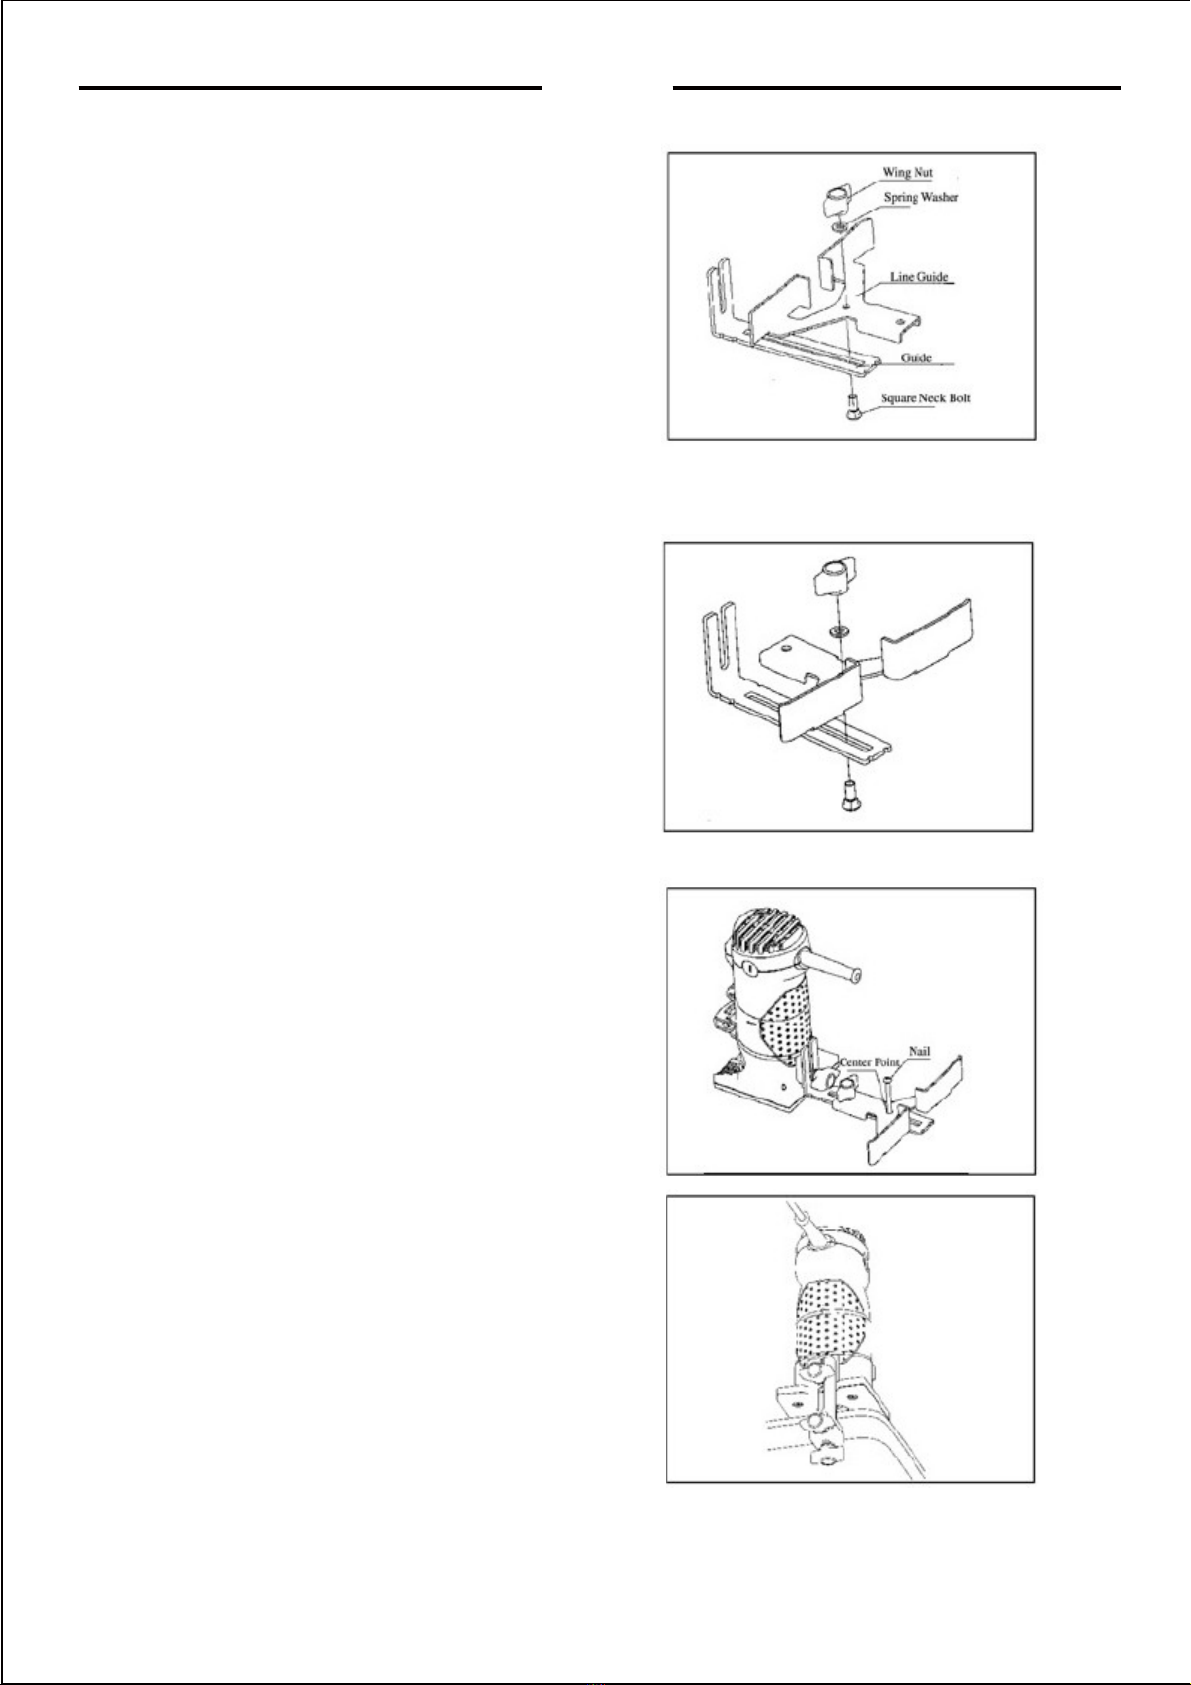
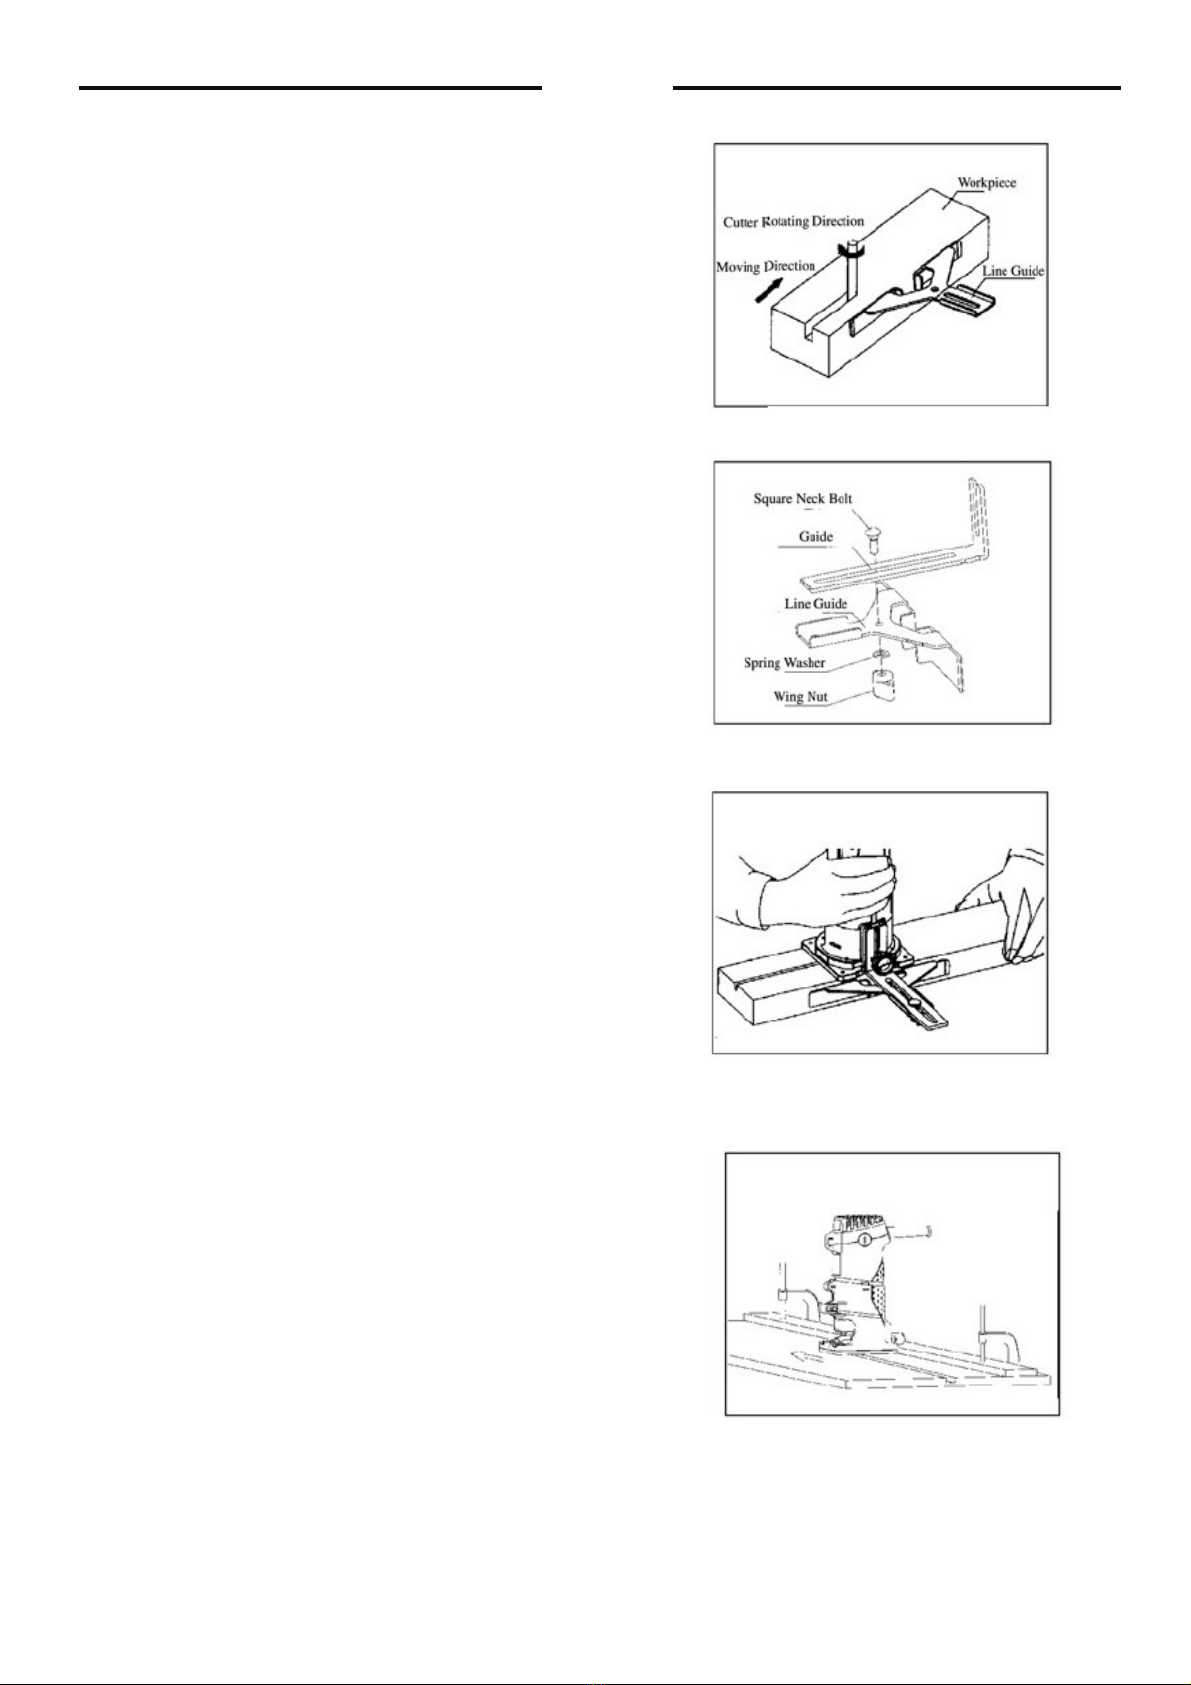
2, USING THE PARALLEL GUIDE
The parallel guide isan effective aid to cutting in a
straight line when chamfering yr grooving
1) Discharge the base guide.
2) Assembly the straight guide with extension guide
with screw, washer and nut as Follow.
3) Loosen the clip knob and tighten it to lock the
extension guide as follow. This will assist in keeping
the guide flush with the side of the work piece.
4) Loosen the string nut adjusting distance between straight guide and milling cutter until it is
at the desired distance.
5) Tighten the string nut to hold it in position.
NOTE: If the distance between the side of the work piece
andthe cutting position is too wide,or the side of the
work piece is notstraight, firmly clamp astraight hoard to
the work pieceand use it asa guide against the tri, er
base.
11|English
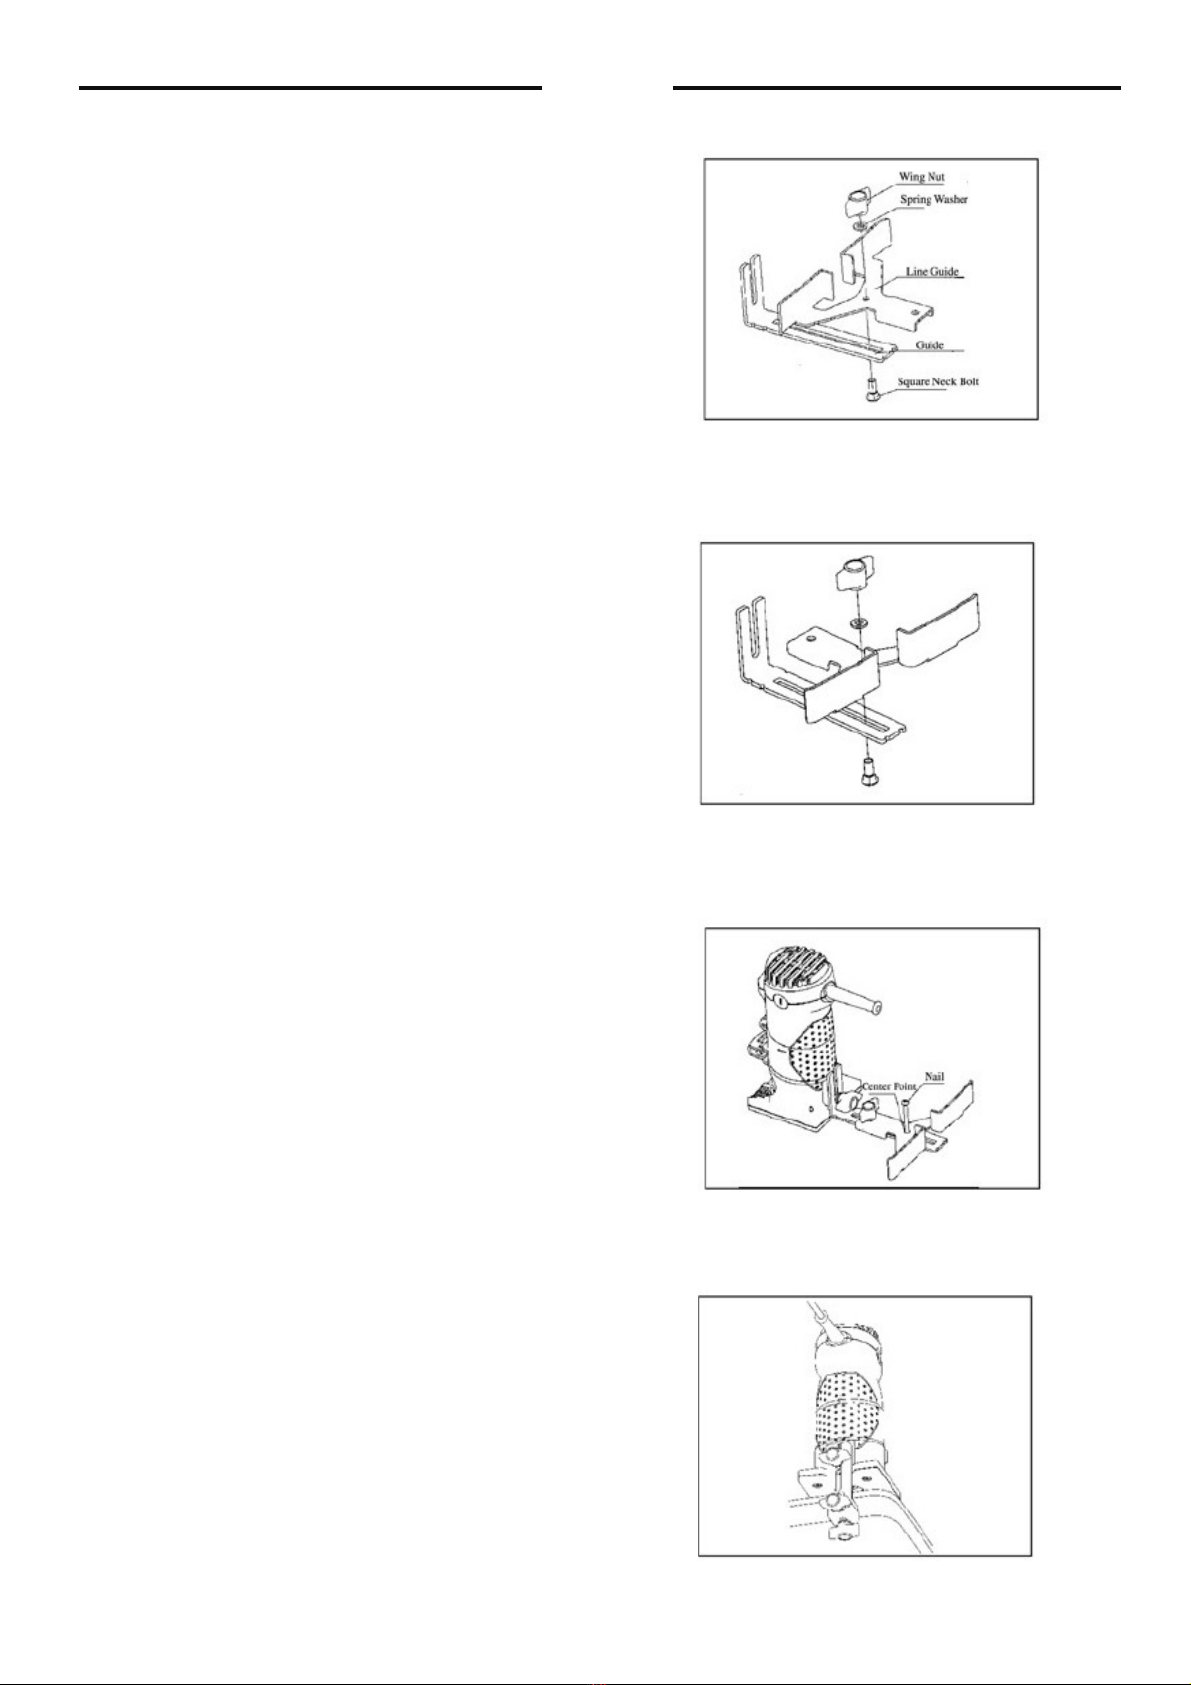
3. USING THE CENTRE LOCALIZER
1) Assembly the straight guide with extension
guide as follow.
2) Mark the center point of thecircle on the work piece,and align the center hole
with the cut center point, and then fix a screw(diameter less than 6mm)into it to
keep them stable.
3) Adjust the cutting diameter by adjusting the
connection and direction of straight guide and
extension guide.
■Cutting radius:80~217mm as below.
■Cutting radius:103~221 mm as below.
4) Hold the trimmer closely to operate the trimmer
in acircle as defined by the screwas below.
4. USING THE BASE GUIIDE
1) Loosen the clip knob A to install the hale guide
on the base plate of the trimmer.
2) Loosen the clip knob B and adjusting knob to
get the desired distance between the base guide
and milling cutter.
12|English
3) Tighten clip knob B to secure the hale guide in
place.
4) Hold the trimmer as below.
5) During cutting, make sure the rubberblack on
base guide keep flush and advancing smoothly
along the edge of work piece
5. USING THE TEMPLATE GUIDE
The template guide can be used in various ways:
■Producing duplicates of a particular design of
an original shape.
■Producing decorative features.
■Repetitive cutting shapes.
1) Ta attach the template guide turn the trimmer upside
down and removethe screws as follow.
2) Insertthe template guide into the base of the trimmer
and secure using the fixing screws.

13|English
NOTE: The finished cutting sire gets different fromthe template guide sixeas there is a
distance L from milling cutter to outer edge of template guide,
Equation as below:
TOOL MAINTRINANCE
△WARNING: For your safety, turn off switch and unplug the trimmer from the power source
before performing any cleaning or maintenance. Periodic maintenance allows for long life and
trouble-free operation. A cleaning, lubricationand maintenanceschedule should he maintained
1) Replace the milling cutter if damaged nr worn-out:
2) Inspect tool cords periodically and, if damaged, have repaired at your nearest
Authorized ServiceCenter.
3) Keep the trimmer free from oil and grease and store in dry place. Clean all parts of
the trimmer, clean dust and debrisfromvents.Keep the body clean, dry and free of
oilor grease.
4) Inspect and change the brush periodically to
ensuresafety operation and long use
life. Firstly, screw the brush cap by a
screwdriver. Change the worn brush only change
with Devon's brush, And then tighten the brush
cap.
TROUBLE SHOOTING
△WARNING: For you safety, turn "ONIOFF" switch OFF and unplug drill from the power
sourcebefore performing troubleshooting procedures.
1. MOTOR STOPS TURNING
1) Verify plugs fully connect
2) Check power source voltage
3) Check the switch
4) Return the tool for repair when problem remain unsolved after the above checks.
2. COMMUTATOR SPARKLE
1) Armature short circle
2) If the brush is worn-nut, please replace it with a new one
3) Cnmmutator surface not smooth
ENVIRNMENT ROTECTION
I. Tool, accessories and packaging should be sorted for environment friendly recycling.
2. Some dust created by working contains harmful chemicals must be collected by special
garbage recycle site.
14|Español
DESCRIPCIÓN DE LA HERRAMIENTA
△ADVERTENCIA: Lea, entienda y siga todas las reglas de seguridad e instrucciones antes de
usar esta herramienta. Guarde este manual para referencia futura.
1. PARTES PRINCIPALES
1. Interruptor
2. Rodillo de goma
3. Manilla de bloqueo
4. Botón de bloqueo
5. Tuerca de bloqueo
6. Fresa
7. Tornillo de fijación
8. Tapa del cepillo
9. Protector transparente
10. Base guía
11. Tornillo de ajuste
2. ESPECIFICACIONES DE LA HERRAMIENTA
Model No.
220-240V~ 110-120V~
PLM5002-6
PLM5002-4
(ISRAEL Plug)
PLM5002-8
(BS Plug)
PLM5002-9 PLM5002S
(SAA Plug)
PLM5002 UPLM5002
50/60Hz 60Hz
500W 500W
33500/min 33500/min
6 mm(1/4˝ ) 1/4˝
2.0 Kg 2.0 Kg
E E
/ /
(INMENTRO
Plug)
(IRAM Plug)
Voltaje
Frecuencia
Potencia nominal de entrad
Sin carga
Diámetro de la fresa
Peso
Grado de protección
Grado de aislamiento

15|Español
REGLAS GENERALES DE SEGURIDAD
ADVERTENCIA: Lea y comprenda todas las instrucciones. El incumplimiento de las
instrucciones señaladas abajo puede causar descargas eléctricas y / o lesiones personales graves.
1. MANTENGA LOS PROTECTORES EN SU LUGAR y en buenas condiciones.
2. RETIRE LAS LLAVES DE AJUSTE. Forme el hábito de verificar que las llaves de
ajuste han sido retiradas de la herramienta antes de encenderla.
3. MANTENGA EL AREA DE TRABAJO LIMPIA Y SECA. Áreas y mesas desordenadas
propician los accidentes. No utilice las herramientas eléctricas en lugares húmedos o mojados o
expuestos a la lluvia.
4. MANTENGA LOS NIÑOS ALEJADOS. Todos los visitantes deben mantenerse a una
distancia segura del área de trabajo.
5. UTILICE LA HERRAMIENTA ADECUADA. No forzar la herramienta o accesorio para
hacer un trabajo para el cual no fue diseñado.
6. UTILICE CABLES DE EXTENSIÓN ADECUADO. Asegúrese de que su cable de extensión
esté en buenas condiciones.
7. UTILICE VESTIMENTA ADECUADA. No use ropa suelta, corbatas, pulseras, anillos u
otras joyas que podrían engancharse en las piezas móviles. Use una malla para el cabello
largo.
8. SIEMPRE USE GAFAS DE SEGURIDAD. También utilice una máscara anti polvo si la
operación de corte produce polvo.
9. NO SE EXTRALIMITE. Mantenga una postura firme y buen equilibrio en todo momento.
10. MANTENGA LAS HERRAMIENTAS CON CUIDADO. Mantenga las herramientas afiladas y
limpias para un mejor y más seguro rendimiento. Siga las instrucciones para la lubricación y cambio
de accesorios.
l 1. DESCONECTE LAS HERRAMIENTAS. Antes de dar servicio, al cambiar accesorios, como
cuchillas, puntas, cortadoras o similares.
12. REDUCIR EL RIESGO DE UN ARRANQUE ACCIDENTAL. Asegúrese de que el
interruptor esté en posición de apagado antes de enchufar.
13. REVISE LAS PARTES DAÑADAS. Antes de seguir utilizando la herramienta, un protector u
otra pieza que esté dañada debe ser revisada cuidadosamente y llevar a cabo su función de
verificación prevista de alineación de las partes móviles de las piezas móviles, rotura de piezas,
el montaje y cualquier otra condición que pueda afectar su operación.
14. NO use la herramienta si usted está bajo la influencia de cualquier droga, alcohol o medicación
que pueda afectar su capacidad de utilizar la herramienta adecuadamente
15. NUNCA use el cable de alimentación para extraer el enchufe de la toma de corriente.
16. SIEMPRE mantenga el cable de alimentación alejado de objetos afilados o cualquier otro
obstáculo que pueda causar daños en el cable.
NORMAS ESPECÍFICAS DE SEGURIDAD
1 Inspeccione y saque todos los clavos de la madera antes de la operación. Siguiendo esta regla se
reduce el riesgo de lesiones personales graves.
2. Use protección para los oídos en tiempo de trabajo continuo.
3. Asegúrese de que el protector transparente esté bien instalado antes de la operación.
4. Cuando opérela herramienta, mantenga las manos alejadas de las partes giratorias y sostenga la
cortadora firmemente inmóvil.
5. Ejecute la herramienta sin carga al menos durante 1 minuto en una zona de protección cuando se
utiliza por primera vez una nueva cuchilla.
6. Guarde estas instrucciones. Consúltelas con frecuencia y úselas para instruir a otras personas que
puedan utilizar esta herramienta.

16|Español
ADVERTENCIA: Parte del polvo creado por la perforación contiene productos químicos que se
sabe, pueden causan cáncer, defectos de nacimiento u otros daños reproductivos. Algunos
ejemplos de estos productos químicos son:
■
Pinturas a base de plomo
■
Arsénicos y cromo de la madera reaccionan químicamente
El riesgo de estas exposiciones varía, dependerá de con cuánta frecuencia realice este tipo
de trabajo. Para reducir su exposición a estos químicos, trabaje en un área bien ventilada y
trabaje con equipo de seguridad apropiado.
ACCESORIOS ESTÁNDAR
Guía recta: un juego
Guía de extensión: un juego
Protector transparente: un juego
Llave: un juego
Guía de plantilla: un juego
Base guía: un juego
Asegúrese de revisar los accesorios, ya que está sujeto a cambios por áreas y modelos.
OPERACIÓN
1) FUENTE DE ALIMENTACIÓN
El enchufe del aparato debe corresponder a la toma de corriente. No utilice enchufes adaptadores con
herramientas eléctricas puestas a tierra, Compruebe la fuente de alimentación, la operación debe ser
un poco menor que la potencia nominal, dice en la placa de características.
2) CHANGING OF MILLING CUTTER
ADVERTENCIA: Atornillar demasiado la tuerca de seguridad puede dar lugar a un efecto
negativo en la pared interior del eje.
ADVERTENCIA: Para reducir el riesgo de lesiones, desconecté siempre su herramienta y
asegúrese de que el interruptor esté apagado antes de cualquier montaje o ajuste.
(1) Afloje el mango de bloqueo, descargue el protector transparente con cuidado.
ADVERTENCIA: Cuando se selecciona una fresa, utilice el tipo correcto para el
trabajo. Para un mejor rendimiento, utilice siempre una cuchilla afilada.
NOTA: La mayor velocidad de ajuste de la fresa para esta herramienta no debe menor de
33000rpm
(2) Pulse el botón de bloqueo del eje para bloquear el eje. Y a continuación, inserte la
fresa directamente en la boquilla.
(3) Apriete firmemente la tuerca de bloqueo para asegurar la fresa en su lugar con una llave.
Y a continuación, coloque el protector transparente de nuevo.
NOTA: Asegúrese de que la boquilla correcta está instalada en el cortador para ser utilizado.
Elija siempre la boquilla del tamaño adecuado.
(4) Para extraer la fresa sólo realice los pasos a la inversa.
ADVERTENCIA: No apriete la tuerca de seguridad sin una fresa en su lugar ya que puede
romper la pieza central de la pinza.
17|Español
3) AJUSTE DE LA PROFUNDIDAD DE CORTE
Afloje el mango de bloqueo y, a continuación, empuje el
rodillo de goma ligeramente a la profundidad deseada.
Asegúrese de que apriete el mango de bloqueo después
de cada ajuste.
4 ) ENCENDIDO Y APAGADO
ADVERTENCIA: Para reducir el riesgo de lesiones,
asegúrese de que puede controlar el interruptor libremente y
mantenerlo apagado antes de conectar la herramienta.
Para encender, colóquelo en posición "1", y para apagarlo,
presione la posición "O".
5) CORTAR BORDES
(1) Colocar la placa base en la pieza de trabajo asegurando que la fresa no está en
contacto con el material a cortar.
(2) Conecte la herramienta a la fuente de
alimentación. Y luego enciéndala. Asegúrese
de que tiene un firme control sobre ambos
mangos. Espere a que la fresa alcance la
máxima velocidad.
(3) Baje la herramienta sobre la superficie de la
pieza, manteniendo la placa base rasante y
avance suavemente hasta que el corte se haya
completado.
(4) Mantenga una presión constante de corte,
teniendo cuidado de no desacelerar el motor
excesivamente.
(5) Para apagar la herramienta, suelte el interruptor.
ADVERTENCIA: Utilice siempre las dos manos para sujetar la recortadora, cuando sea posible,
sujete la pieza de trabajo en el banco.
A
ADVERTENCIA: Para reducir el riesgo de lesiones, no toque la fresa para limpiar los desechos
hasta que haya parado y enfriado.
PLICACIONES
1, CONSEJOS DE APLICACIÓN
1) Al cortar los paneles planos como superficies de cocina, asegúrese de utilizar una plantilla
adecuada junto con el tope de guía correcto, NO use la parte curva de la recortadora.
2) Aplique siempre presión en línea con la cortadora. Haga suficiente presión para mantener el
corte, pero no tanta como para ahogar el motor.
18|Español
3) En maderas muy duras o materiales problemáticos,
puede ser necesario hacer más de una pasada a
progresivas profundidades de corte hasta conseguir
la profundidad de corte deseada. Al cortar surco,
la profundidad de corte recomendada no debe ser
mayor de 3 mm.
4) Cuando se corte un filo, la superficie de la pieza
de trabajo debe estar en el lado izquierdo de la fresa
en la dirección de alimentación.
2, USO DE LA GUÍA PARALELA
La guía paralela es una ayuda eficaz para cortar en
línea recta cuando hay biselado o ranura.
1) Descargue la guía base.
2) Ensamble la guía recta con la guía de
extensión con el tornillo, arandela y tuerca
de la siguiente manera.
3) Afloje la perilla de fijación y apriételo para fijar la
guía de la extensión de la siguiente manera. Esto
ayudará a mantener la guía al ras con el lado de la
pieza de trabajo.
4) Afloje la tuerca y ajuste la distancia entre la guía recta y la fresa hasta que esté a
la distancia deseada.
5) Apretar la tuerca para mantenerlo en su posición.
NOTA: Si la distancia entre el lado de la pieza de trabajo y
la posición de corte es muy amplia, o el lado de la pieza de
trabajo no es recto, sujete firmemente una tabla recta a la
pieza de trabajo y utilícela como una guía contra la base de
la recortadora.
19|Español
3. USO DEL LOCALIZADOR CENTRAL
1) Ensamble la guía recta con la guía de
extensión de la siguiente manera.
2) Marque el punto central del círculo en la pieza de trabajo, y alinee el agujero
central con el punto de corte central, y luego fije un tornillo (diámetro inferior a 6
mm) en él para mantenerlos estables.
3) Ajustar el diámetro de corte mediante el ajuste
de la conexión y la dirección de guía recta y la
extensión de la guía.
■
Radio de corte: 80~217mm como debajo.
■
Radio de corte: 103~221 mm como debajo.
4) Sujete la recortadora de cerca para operar el
aparato en un círculo definido por el tornillo
de la siguiente manera.
4. USO DE LA BASE GUÍA
1) Afloje la perilla de fijación A. Instale la guía
en la placa base de la recortadora.
2) Afloje la perilla de fijación B y ajuste para
obtener la distancia deseada entre la base y
la guía de la fresa.

20|Español
3) Apriete la perilla de fijación B para fijar la
guía en su lugar.
4) Sujete la recortadora de la siguiente manera.
4) Durante el corte, asegúrese de que la goma negra
en la guía de la base esté al ras y siga avanzando
suavemente a lo largo del borde de la pieza de
trabajo.
5. USO DE LA GUÍA DE PLANTILLA
La guía de la plantilla se puede utilizar de varias maneras:
■producir duplicados de un diseño particular de una
forma original.
■La producción de elementos decorativos.
■formas de corte repetitivos.
1) Para colocar la guía de plantilla coloque la
herramienta al revés y quite los tornillos de
la siguiente manera.
2) Inserte la guía de plantilla en la base de la
recortadora y fíjela con los tornillos.
This manual suits for next models
6
Table of contents
Languages:
Other Ingco Trimmer manuals

Popular Trimmer manuals by other brands

BaByliss PRO
BaByliss PRO FX787GBP operating instructions

FLORABEST
FLORABEST FHEHS 900 A1 translation of original operation manual

EarthWise
EarthWise CST00012 Operator's manual

FLORABEST
FLORABEST FHEHS 900 A1 original operation manual

Yard Works
Yard Works 060-2359-2 instruction manual

BaByliss PRO
BaByliss PRO 4rtists BOOST+ FX7870GBPE manual


