JDW CE124 Installation manual

Petrol 99cc Lawn Mower
Model: CE124
SAFETY AND OPERATING MANUAL
ASSEMBLY REQUIRED
Please read & understand this manual, paying particular attention to the safety instructions before use.
We reserve the right to change the product specification & livery according to continued product improvements.
1938108001 10-08-16

CONTENTS
SPECIFICATION
COMPONENT
SAFETY INSTRUCTIONS
ASSEMBLY
OPERATION
MAINTENANCE
TROUBLE SHOOTING
GUARANTEE
DECLARATION OF CONFORMITY
SPECIFICATION
Model
CE124
Product No.
1938108001
Engine
T100 4-stroke OHV 99cc
Engine Power
1.5kw
Engine Speed
3000rpm
Cutting Width
398mm (16”)
Height of Cut
25-75mm
Height Adjustments
6
Grassbox Capacity
40L
Sound Pressure Level
81.2dB(A)
Guaranteed Sound Power Level
96dB(A)
Vibration
2.33m/s2
Weight
G.W 21.7kg –N.W 19.7kg

COMPONENTS
1. OPC Operating Lever
2. Handle Knob
3. Fuel Filler Cap
4. Air Filter
5. Primer Bulb
6. Spark Plug
7. Exhaust
8. Oil Filler Cap/Dipstick
9. Height Adjuster Handle
10. Grassbox
11. Recoil Handle
Carefully remove the machine from its packaging and check that you have all the components. If
parts are missing or damaged, please contact our
Customer Service Team on 0871 231 2000
1
11
10
9
8
7
6
5
4
3
2

SAFETY INSTRUCTIONS - SAVE THESE INSTRUCTIONS FOR FUTURE USE
WARNING
Read this instruction carefully before operating this lawn mower. Make sure that you are familiar with
the controls and properly operate the machine. Following these instructions can reduce the risk of fire,
electric shock and personal injury.
If not used properly this lawn mower can be dangerous!
This lawn mower can cause serious injury to the operator and others, the warning and safety
instructions must be followed to ensure reasonable safety and efficiency in using this lawn mower. The
operator is responsible for following the warning and safety instructions in this manual and on the
lawn mower. Never use the lawn mower unless the grass box or guards are correctly positioned.
SYMBOLS
Read the instruction handbook before
operating this machine.
Keep bystanders away.
DANGER - Beware, the cutting blade will
continue to rotate after the motor is
switched off. The blade continues to rotate
after the machine is switched off.
WARNING –Keep hands and feet clear of
the cutting deck when the machine is
running.
Before working on undertaking any servicing
or cleaning of the machine, ensure the spark
plug is removed from the machine.
Remove all objects that could be thrown
by the blade in the working area.
Be careful when using on slopes. It is advised
to cut across the incline to prevent the
machine rolling back onto the user.
Safety alert symbol. Used to alert you to
potential personal injury hazards. Obey
all safety messages that follow this symbol
to avoid possible injury.
DANGER
Indicates an imminently hazardous situation
which, if not avoided, will result in serious
injury.
WARNING
Indicates a potentially hazardous
situation which, if not avoided, could
result in serious injury.
CAUTION
Indicates a potentially hazardous situation
which, if not avoided, may result in minor or
moderate injury.
CAUTION
Used without the safety alert symbol
indicates a potentially hazardous
situation which, if not avoided, may result
in property damage.

INTENDED USE
THE LAWN MOWER IS DESIGNED FOR DOMESTIC USE ONLY.
Lawn mowers for domestic use are mowers whose annual use does not generally exceed 50 hours
and that are primarily used for tending GRASS OR LAWN AREAS, but not in public facilities, parks or
sports grounds and not for agricultural or forestry use.
Compliance with the operating manual supplied by the manufacturer is a prerequisite for the proper
usage of the lawn mower. The operating manual contains servicing and maintenance instructions as
well as directions for use.
IMPORTANT
The lawn mower must not be used to trim bushes, hedges and shrubs, to cut or shred climbing plants
or lawns on roof gardens or in balcony boxes or to clean footpaths, nor must it be used as a chopper
for shredding tree or hedge cuttings.
Furthermore, the lawn mower must not be used as a cultivator or to level off uneven areas of ground,
e.g. molehills.
TRAINING
Read the instructions carefully: Be familiar with the controls and the proper use of the equipment.
Never allow children or people unfamiliar with these instructions to use the lawnmower. Local
regulations can restrict the age of the operator.
Never operate the mower while people, especially children, or pets are nearby.
Keep in mind that the operator or user is responsible for accidents or hazards involving the
lawnmower that occur to other people or their property.
PREPARATION
Always wear appropriate footwear, such as work boots, and trousers when operating the mower.
Do not operate the equipment when barefoot or wearing open sandals.
Thoroughly inspect the area where the equipment is to be used and remove all objects which can
be thrown by the machine.
WARNING - Petrol is highly flammable.
-
Store fuel in containers specifically designed for this purpose.
-
Refuel outdoors only and do not smoke while refueling.
-
Add fuel before starting the engine. Never remove the fuel tank cap or add petrol while the engine
is running or when the engine is hot.
-
If petrol is spilled, do not attempt to start the engine but move the machine away from the area of
spillage and avoid creating any source of ignition until petrol vapors have dissipated.
-
Replace all fuel tanks and container caps securely.
Replace faulty silencers.
Before using, always visually inspect to see that the blades, blade bolts and cutter assembly are
not worn or damaged. Replace worn or damaged blades and bolts in sets to preserve balance.
Only use accessories approved by the manufacturer.
Do not operate the machine while under the influence of alcohol or drugs.
Never operate the machine in wet grass. This could cause you to slip while mowing.
Always wear safety goggles or safety glasses with side shields when operating the mower.

OPERATION
Do not operate the engine in a confined space where dangerous carbon monoxide fumes can
collect.
Only operate the mower in daylight or in good artificial light.
Avoid operating the equipment in wet grass.
Always be sure of your footing on slopes.
Never run while using the mower, always walk.
For wheeled rotary machines, mow across the face of slopes, never up and down.
Exercise extreme caution when changing direction on slopes.
Do not mow excessively steep slopes.
Do not pull the mower backwards unless absolutely necessary. Use extreme caution when
reversing or pulling the lawnmower towards you.
Stop the blade(s) if the lawnmower has to be tilted for transportation when crossing surfaces
other than grass (such as gravel drives, walks, or roads) and when transporting the lawnmower to
and from the area to be mowed.
Never operate the lawnmower with defective guards, or without safety devices, for example
deflectors and/or grass catchers, in place.
Do not change the engine governor settings or over speed the engine.
Disengage all blade and drive clutches before starting the engine.
Start the engine or switch on the motor carefully according to instructions and with feet well away
from the blade(s).
Do not tilt the lawnmower when starting the engine or switching on the motor.
Do not start the engine when standing in front of the discharge chute.
Do not put hands or feet near or under rotating parts. Keep clear of the discharge opening at all
times.
Never pick up or carry a lawnmower while the engine is running.
Stop the engine and disconnect the spark plug wire:
before clearing blockages or unclogging the chute;
before checking, cleaning or working on the lawnmower;
after striking a foreign object inspect the lawnmower for damage and make repairs before
restarting and operating the lawnmower,
if lawnmower starts to vibrate abnormally (check immediately).
Stop the engine:
whenever you leave the lawnmower,
before refueling.
Reduce the throttle setting during engine shut down.
Shut the engine off and wait until the engine and the blade comes to complete stop before
removing the grass catcher.
Watch for holes, ruts, or bumps. Tall grass can hide obstacles.
Do not mow near drop-offs, ditches or embankments. The operator could lose footing or
balance.
Be alert and turn the machine off if children enter the area.
Never tamper with safety devices. Check their proper operation regularly.
Never attempt to make wheel height adjustments while the engine is running.

MAINTENANCE AND STORAGE
Keep all nuts, bolts and screws tight to be sure the equipment is in safe working condition.
Never store the equipment with petrol in the tank inside a building where fumes can reach an
open flame or spark.
Allow the engine to cool before storing in any enclosure.
To reduce the fire hazard, keep the engine, silencer, battery compartment and petrol storage area
free of grass, leaves, or excessive grease.
Replace worn or damaged parts for safety.
If the fuel tank has to be drained, this should be done outdoors.
Keep the machine free of grass, leaves, or other debris build-up. Clean oil or fuel spillage
immediately. Allow the machine to cool before storing.
Grass catcher components are subject to wear, damage, and deterioration, which could expose
moving parts or allow objects to be thrown. Frequently check components and replace them with
the manufacturer’s recommended parts, when necessary.
Mower blades are sharp and can be dangerous. Wrap the blade(s) or wear gloves, and use extra
caution when servicing them.

ASSEMBLY
ASSEMBLY/PRE-OPERATION
Read these instructions in its entirety before you attempt to assemble and operate your new
lawnmower.
IMPORTANT: The lawn mower is shipped WITHOUT OIL OR PETROL in the engine. Your new lawn mower
has been assembled and tested at the factory and therefore a very small residue of oil could be
noted. Following the engine instructions, to fill the machine with oil & petrol.
REMOVE LAWN MOWER FROM CARTON
Roll the lawn mower out of the carton and check thoroughly for additional loose parts. Please ensure
that you have all the necessary parts.
BRAKE CABLE
To avoid damage during the transport process, the brake cable for your machine may not be fitted
to the handle bar and may need to be fitted before assembling the handle.
ATTACH LOWER HANDLES
The first step when assembling the mower, is to attach the lower handles to the body of the machine
using the small screws supplied.
Ensure that the fixing hole within the lower handle is positioned on the outside so that it accepts the
screw (Fig. 1). After fitting both lower handles, attach the upper handle to the lower handles using the
square neck bolt and handle knob (Fig. 2). Make sure the wing nut is located on the inside of the
handle assembly.

You may now need to fit the clutch/brake cable to the brake handle. Remove the brake handle
from the left side of the main handle (Fig. 3) by applying pressure to the brake handle. You will now
be able to fit the clutch/brake cable to the hole of the brake handle (Fig. 4).
Next feed the recoil starter rope and handle into the pigtail holder, located on the right side of the
handle assembly (Fig. 5, 6 and 7).
3
4
5
6
7
To fit the front and rear wheels remove the nut and outer washer from the front axle. Put the smaller
front wheel, washer and locking nut onto the front axle and tighten the nut with a spanner, Do not
over tighten, this may stop the wheel rotating (Fig. 8).
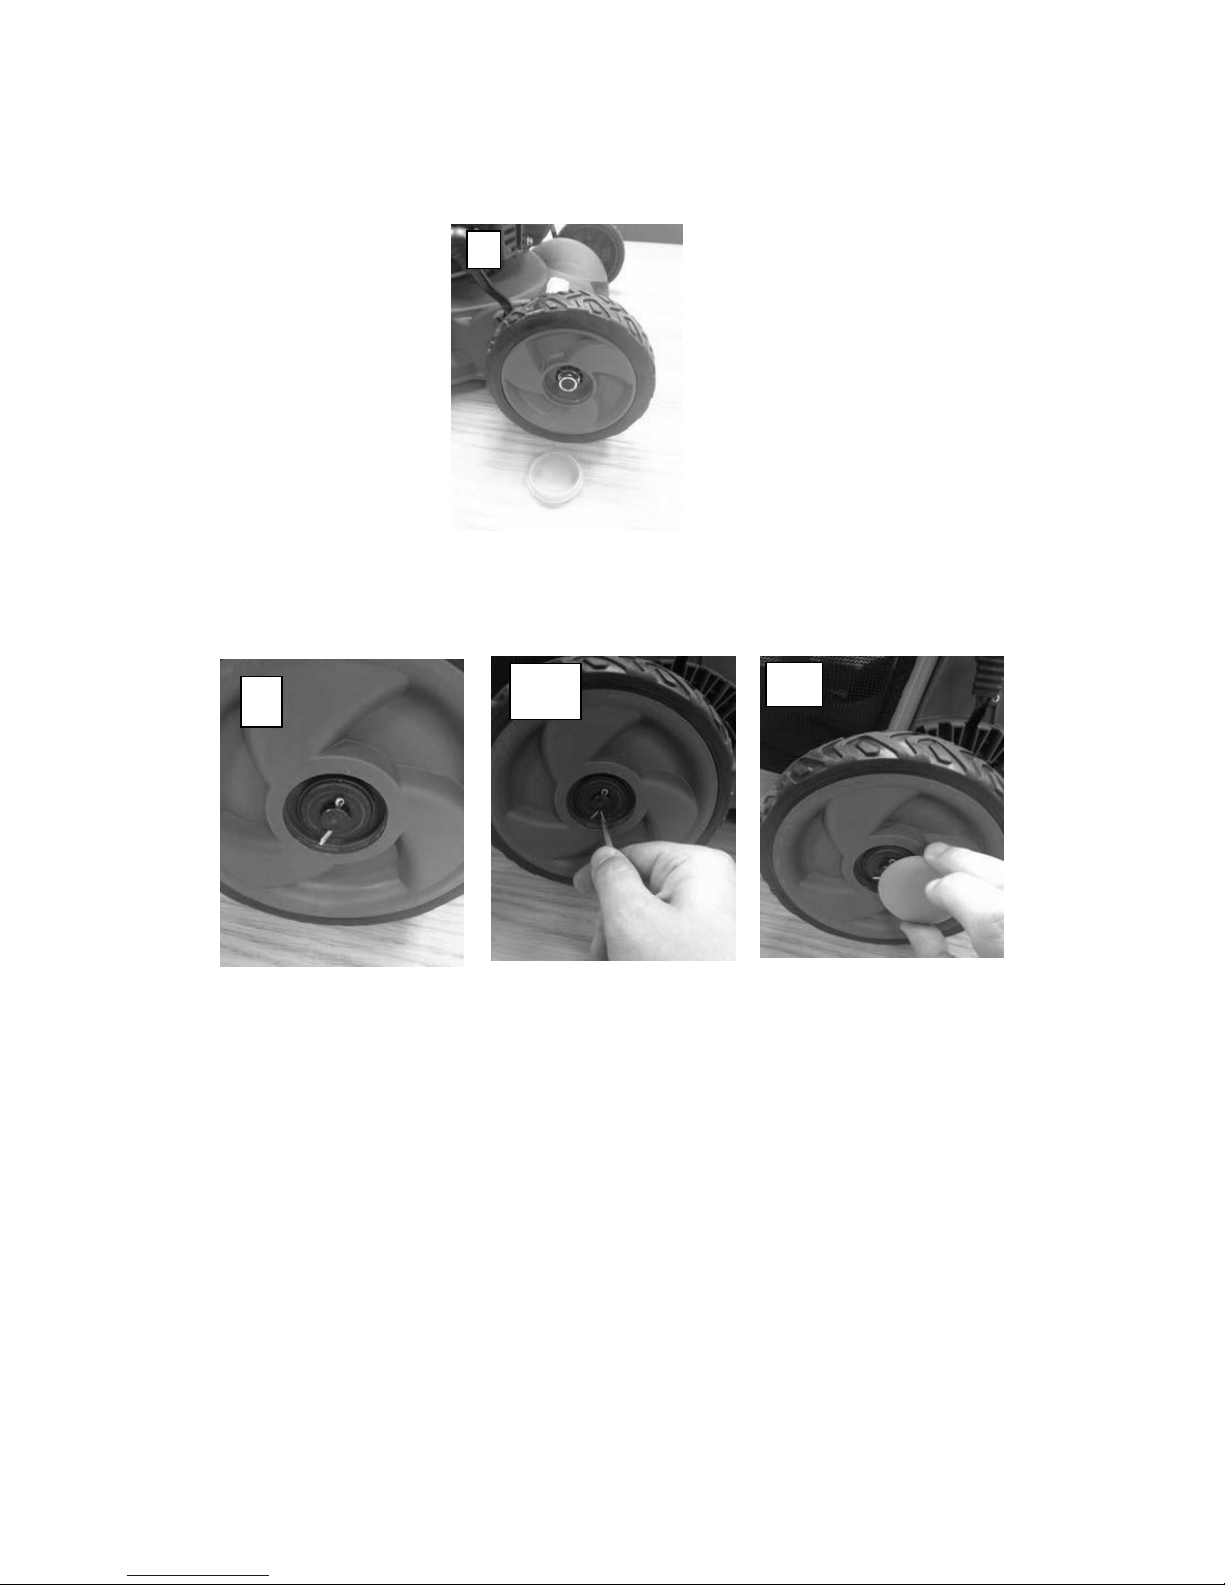
Place the larger rear wheel onto the rear axle and put a split pin into the hole in the rear axle (Fig. 9).
With a screwdriver, split the two legs on the split pin to secure the wheel (Fig. 10). Fit the centre wheel
trim to all four wheels (Fig. 11). Your machine is now complete.
INSTALL ATTACHMENTS
Please note your lawn mower may have been shipped with the mulching plug already fitted under
the rear grassbox flap. The mower has three different operating modes.
COLLECTING:
Fit the grassbox by lifting the rear flap on the mower and hook the front of the box to the shaft on the
mower. Lower the flap to lock the grassbox in position.
When the box is full, the grass will be visible through the viewing window in the top of the box.
Stop the engine before emptying the grassbox.
REAR DISCHARGE:
With the grassbox removed and the rear flap in the down position, the mower will cut and discharge
the grass from the rear of the machine.
MULCHING:
Fit the mulch plug to the rear discharge opening of the mower and close the rear flap.
The mower will now recycle the chopped grass into the lawn surface.
To mulch efficiently only cut one third of the length of the grass.
8
9
10
11

OPERATION
CAUTION - YOUR LAWNMOWER IS SHIPPED WITHOUT OIL IN THE ENGINE
BEFORE STARTING THE ENGINE, ADD OIL
Before each use the oil level must be checked and if necessary the machine should be topped up
with SAE30 4-stroke lawnmower engine oil. The oil level must be between the upper and lower limit
marks of the dipstick as shown below.
WARNING
Insufficient oil can cause catastrophic engine failure, not covered under the manufacturer’s warranty.
DO NOT overfill the engine with oil, or it will smoke heavily from the exhaust on startup.
1.
Be sure that the lawnmower is on a level surface.
2.
Remove the oil dipstick from the oil fill spout and check that the oil level is between the upper and
lower limit marks on the dipstick.
3.
Insert and tighten the dipstick.
NOTE: Change the oil after every 25 hours of operation or each season. You may need to change the
oil more often under dusty, dirty conditions. See “TO CHANGE ENGINE OIL” in the Maintenance
section of this engine manual.
ADD PETROL
Fill fuel tank to bottom of tank filler neck. Do not overfill. Use fresh, clean, regular unleaded petrol. Do
not mix oil with petrol. Purchase fuel in quantities that can be used within 30 days, to ensure fuel
freshness. Old or stale fuel can cause damage to the engine carburetor which would not be covered
under the manufacturer’s warranty.
CAUTION
Wipe off any spilled oil or fuel immediately. Do not store, spill or use petrol near an open flame.
The fuel system should be emptied before storing for 30 days or longer. Empty the fuel tank, start the
engine & let it run until the fuel lines & carburetor are empty. Use fresh fuel next season. Never use
engine or carburetor cleaner products in the fuel tank, permanent damage may occur.

Primer
STARTING THE ENGINE
To start the engine, first make sure that the spark plug is in place, spark plug cap is secure and the
machine is filled with sufficient oil and petrol.
NOTE: Due to the protective coating on the engine, a small amount of smoke may be present during
the initial use of the product and should be considered normal.
For a cold start, press the primer bulb on the front of the engine 5-6 times.
Pull the OPC/Brake lever to the handle and pull the recoil starter handle quickly.
DO NOT ALLOW the starter rope to snap back and hit the mower.
If the engine does not start on the first pull, try again until the engine does start.
If you are returning to a hot/warm engine, it may be necessary to press the primer bulb, 2-3 times if
the engine does not initially start.
If your engine still does not start, please consult the troubleshooting pages at the back of this
instruction manual.
STOP THE ENGINE
To stop the engine, release the OPC/brake lever.
MOWING TIPS
Under certain conditions, such as very tall grass, it may be necessary to raise the height of cut to
reduce pushing effort, prevent overloading of the engine and leaving clumps of grass clippings.
It may also be necessary to reduce ground speed and/or push the lawn mower over the area a
second time.
For extremely heavy cutting, reduce the width of cut by overlapping the previously cut path and
mow slowly.
Pores in the grassbox can become filled with dirt and dust, during use and will collect less grass. To
prevent this, regularly hose the catcher off with water and let dry before using.
Keep the top of the engine around the starter assembly clear and clean of grass clippings & dust. This
will assist engine air flow and extend engine life.

MAINTENANCE
IMPORTANT - Regular, careful maintenance is essential for keeping the safety level and original
performance of the machine unchanged over time.
1. Keep all nuts, bolts and screws tight to be sure the equipment is in safe working condition. Regular
maintenance is essential for safety and performance.
2. Never store the equipment with fuel in the tank inside a building where vapour may reach a
flame, spark or a source of extreme heat.
3. Allow the engine to cool before storing in an enclosed space.
4. To reduce the risk of fire, keep the engine, exhaust silencer, battery compartment and fuel
storage area free of grass, leaves, or excessive grease. Do not store containers full of grass
cuttings.
5. Do not use the equipment with worn or damaged parts, this can be dangerous. Parts are to be
replaced and not repaired. Use genuine spare parts. Parts that are not of the same quality can
damage the equipment and create safety hazards.
6. If the fuel tank has to be drained, this should be done outdoors and when the engine is cool.
7. Wear strong work gloves when removing and reassembling the blade.
8. Check the blade’s balance after sharpening.
9. Check the self-closing guard and grass-catcher frequently for wear and deterioration.
10. Whenever the machine is to be handled, transported or tilted you must:
11. Wear strong working gloves;
12. Grasp the machine at the points that offer a safe grip, taking account of the blades, the mower’s
weight and its distribution.
BLADE MAINTENANCE
Empty the oil & fuel tanks before removing the blade.
Use the following procedure to remove and replace the blade.
Hold the blade using gardening gloves (not provided) and spanner wrench (provided) rotating the
spanner anti-clockwise.
Remove the bolt, washer and blade.
Attach a new blade, fastening with the washer and blade bolt. Ensure that the blade is correctly
positioned on the blade boss and then firmly tighten the bolt, clockwise. Tightening torque 45 Nm.

CHANGE OIL
1.
Let the engine run out of petrol, and wait until the engine has stopped and cooled down.
2.
Disconnect the spark plug cap and remove the spark plug.
3.
When the engine is still warm, remove the oil drain plug (A). Drain the oil into an appropriate
container.
4.
Clean the oil drain plug before putting it back.
5.
Place the engine level. Remove the dipstick. Add about 0.5L of new SAE30 oil slowly to the upper
limit on the dipstick, do not overfill.
6.
Replace dipstick.
WARNING: Prevent skin contact with used engine oil. Wash your skin with soap and water after
changing the oil.
CAUTION: Used oil is a hazardous waste product. We recommend that you take used oil to your local
recycling centre in a properly sealed container. Do not discard with household waste.
SPARK PLUG
Once the engine has cooled, remove the spark plug cap and spark plug. Clean the plug with a wire
brush. Using a feeler gauge set the gap to 0.75 mm (0.030”). Refit the spark plug taking care not to
overtighten.

AIR FILTER
Unclip the air filter cover and remove the sponge filter element, inspect the filter for cleanliness and
damage, if necessary please replace.
DRAINING THE FUEL TANK AND CARBURETTOR
1.
Place an approved petrol container below the carburetor, and use a funnel to avoid spilling fuel.
2.
Remove the drain bolt then move the fuel valve lever to the ON position.
3.
After all the fuel has drained into the container; reinstall the drain bolt and washer. Tighten the
drain bolt securely.
CLEANING
Carefully clean the underside of the deck with a stiff brush after each cut; remove the grass debris
and mud accumulated inside the deck to prevent it drying. Remove the belt casing by removing the
screws and clean around the transmission and drive belts with a brush or compressed air once or
twice a year.
Once every season, the drive wheels should be cleaned internally. Remove both wheels. Clean the
gear wheel and the wheel gear rim of grass and dirt using a stiff brush or compressed air.

MAINTENANCE SCHEDULE
REGULAR SERVICE PERIOD
Perform at every indicated month
or operating hour interval,
whichever comes first.
Before
Each
Use
First
Month
or
5hrs Use
Every 3
Months or
25hrs Use
Every 6
Months
or
50hrs Use
Every
Year or
100hrs
Use
Every
Two
Years or
250hrs
Use
Engine oil
Check
O
Replace
O
O
Air cleaner
Check
O
Replace
O
Spark plug
Check or Adjust
O
Replace
O
Fuel tank & filter
Clean
O
Fuel tube
Check
Every 2 years (Replace if necessary)
Valve clearance
Check or Adjust
O
Combustion
chamber
Clean
After every 200 hours
TUNE UP SPECIFICATIONS
ITEM
SPECIFICATION
MAINTENANCE
Spark plug gap
0.028-0.031in (0.7-0.8 mm)
See Manual
Valve clearance (cold)
IN:0.06±0.02mm
EX;0.08±0.02mm
See your authorised dealer
Other specifications
No other adjustments needed.
STORAGE
For trouble free service, make sure the machine is clean and dry before storing.
Please ensure the machine is stored away from direct sunlight, especially if fuel is kept in the
machine.
Store indoors or in a safe, locked protected area during severe weather and winter months.
DO NOT STORE in an enclosed area, where fuel vapors can reach an open hot flame.
DO NOT STORE fuel in the machine. Ensure fuel is removed from the fuel tank and carburetor.
If storing for an extended period, inspect, clean and repair the machine if necessary. Remove all fuel
from the fuel tank. Start the engine, run until the fuel tank, line and carburetor are clear of fuel.
Remove the spark plug cap and spark plug, pour a small quantity of 4-stroke oil into the spark plug
hole of the engine cylinder and re-seat the spark plug. Store in a clean, dry, dust free area.
Ensure the machine is stored in a position, where any persons cannot step on to attempt to reach
items up high, due to risk of movement.

TROUBLE SHOOTING
ENGINE WILL NOT START
POSSIBLE CAUSE
CORRECTION
1. Check fuel.
Out of fuel.
Refuel
Bad fuel; engine stored without
treating, draining petrol or
refueled with bad petrol
Drain the fuel tank and carburetor.
Refuel with fresh petrol.
2. Remove and inspect the
spark plug.
Spark plug faulty, fouled, or
improperly gapped.
Replace the spark plug.
Spark plug wet with fuel
(flooded engine).
Dry and reinstall spark plug.
3. Take the engine to an
authorised servicing dealer, or
refer to the engine manual.
Fuel filter clogged, carburetor
malfunction, ignition
malfunction, valves stuck, etc.
Replace or repair faulty
components as necessary.
4. Push the primer button
Cold start
Push the primer button 5-6 times.
ENGINE LACKS POWER
POSSIBLE CAUSE
CORRECTION
1.Check air cleaner
Air cleaner elements clogged.
Clean or replace air cleaner
elements
2. Check fuel
Bad fuel; engine stored without
treating, draining petrol, or
refueled with bad petrol.
Drain the fuel tank and carburetor.
Refuel with fresh petrol.
3. Take engine to an authorised
servicing dealer, or refer to the
engine manual.
Fuel filter clogged, carburetor
malfunction, ignition
malfunction, valves stuck, etc.
Replaceor repair faulty
components as necessary.

GUARANTEE
JDW guarantees this product against manufacturing defects. We will repair (or replace at our
option), if a manufacturing defect occurs within the guarantee period as long as it has only
been subjected to domestic use.
For the purpose of this guarantee, domestic use means any use of the product on the property
belonging to the purchaser and forming part of the garden area of his/her dwelling.
The guarantee period is 12 months from the original date of purchase.
To obtain a repair or replacement under this guarantee:
Contact our Customer Service Team on 0871 231 2000
The guarantee does not apply if:
I You cannot provide dated proof at purchase.
II The product has been resold by the original purchaser or has been used under hire.
III The product has been modified to change the manufacturers specifications, or if
non-genuine replacement parts have been fitted.
IV Any previous repair was undertaken by anyone who is unauthorised.
V The fault is due to maladjustment, abuse, neglect or accidental damage
VI The fault is due to lack of lubrication or maintenance
VII Damage to any part, particularly the drive or cutting mechanism, which has been caused
by allowing the product to strike solid objects.
VIII The product develops a fault due to abnormal use.
IX Failure is due to normal wear,
The following parts are considered as wear & tear components, which are dependent on
regular servicing and they are not therefore, normally covered by the guarantee:
Blades
Bearings
Cables
The cost of routine maintenance of the product is not covered by the guarantee
It is in your best interest to follow the Operating Instructions for your machine, a correctly cared
for product should give many years of excellent service.
Should you require replacement parts, always insist on genuine replacement parts. Any damage
caused to the product through the fitting of parts not made by the manufacturer is not covered
by the guarantee
Your statutory rights are not affected by this guarantee.

CONFORMS TO EUROPEAN STANDARDS
Machine type: Petrol Lawn Mower
Machine model: CE124
Mass in kg: 21.8 kg
Cutting Diameter: 398mm
Rated Power: 1.5KW
This machine conforms to EU Machinery-Directive 2006/42/EC, to which this declaration relates &
corresponds to the relevant basic safety and health requirements of Directive:
- 2006/42/EC (Machinery-Directive),
For the relevant implementation of the safety and health requirements mentioned in the Directives,
the following standards and/or technical specification(s) have been respected:
EN ISO 5395-1 :2013
EN ISO 5395-2 :2013
ZEK 01.4-08/11.11
Measured Sound Power Level 81.2dB(A)
Guaranteed Sound Power Level 96.0dB(A)
Conformity assessment method to Annex VI/Directive 2000/14/EC
Measure Vibration Value 2.33m/s²
The notified body involved: TÜV Rheinland LGA Products GmbH
Contact:_
J.D.Williams & Company Ltd._
Griffin House, 40 Lever Street, Manchester M60 6ES._
Telephone: 0161 238 2000. Fax: 0161 238 2075_

Customer Service Team: 0871 231 2000
Correct Disposal of this product
This marking indicates that this product should not be disposed with
other household wastes throughout the EU. To prevent possible harm to
the environment or human health from uncontrolled waste disposal,
recycle it responsibly to promote the sustainable reuse of material
resources. To return your used device, please use the return and
collection systems or contact the retailer where the product was
purchased. They can take this product for environmental safe recycling.
Table of contents
Other JDW Lawn Mower manuals


