H@
Table
of
Contents
@
Before
Using
Your
Keyboard...
ccc
cccceseteeeeee
M@
>
Trouble-Shooting.............0.ccccccceece
cece
@
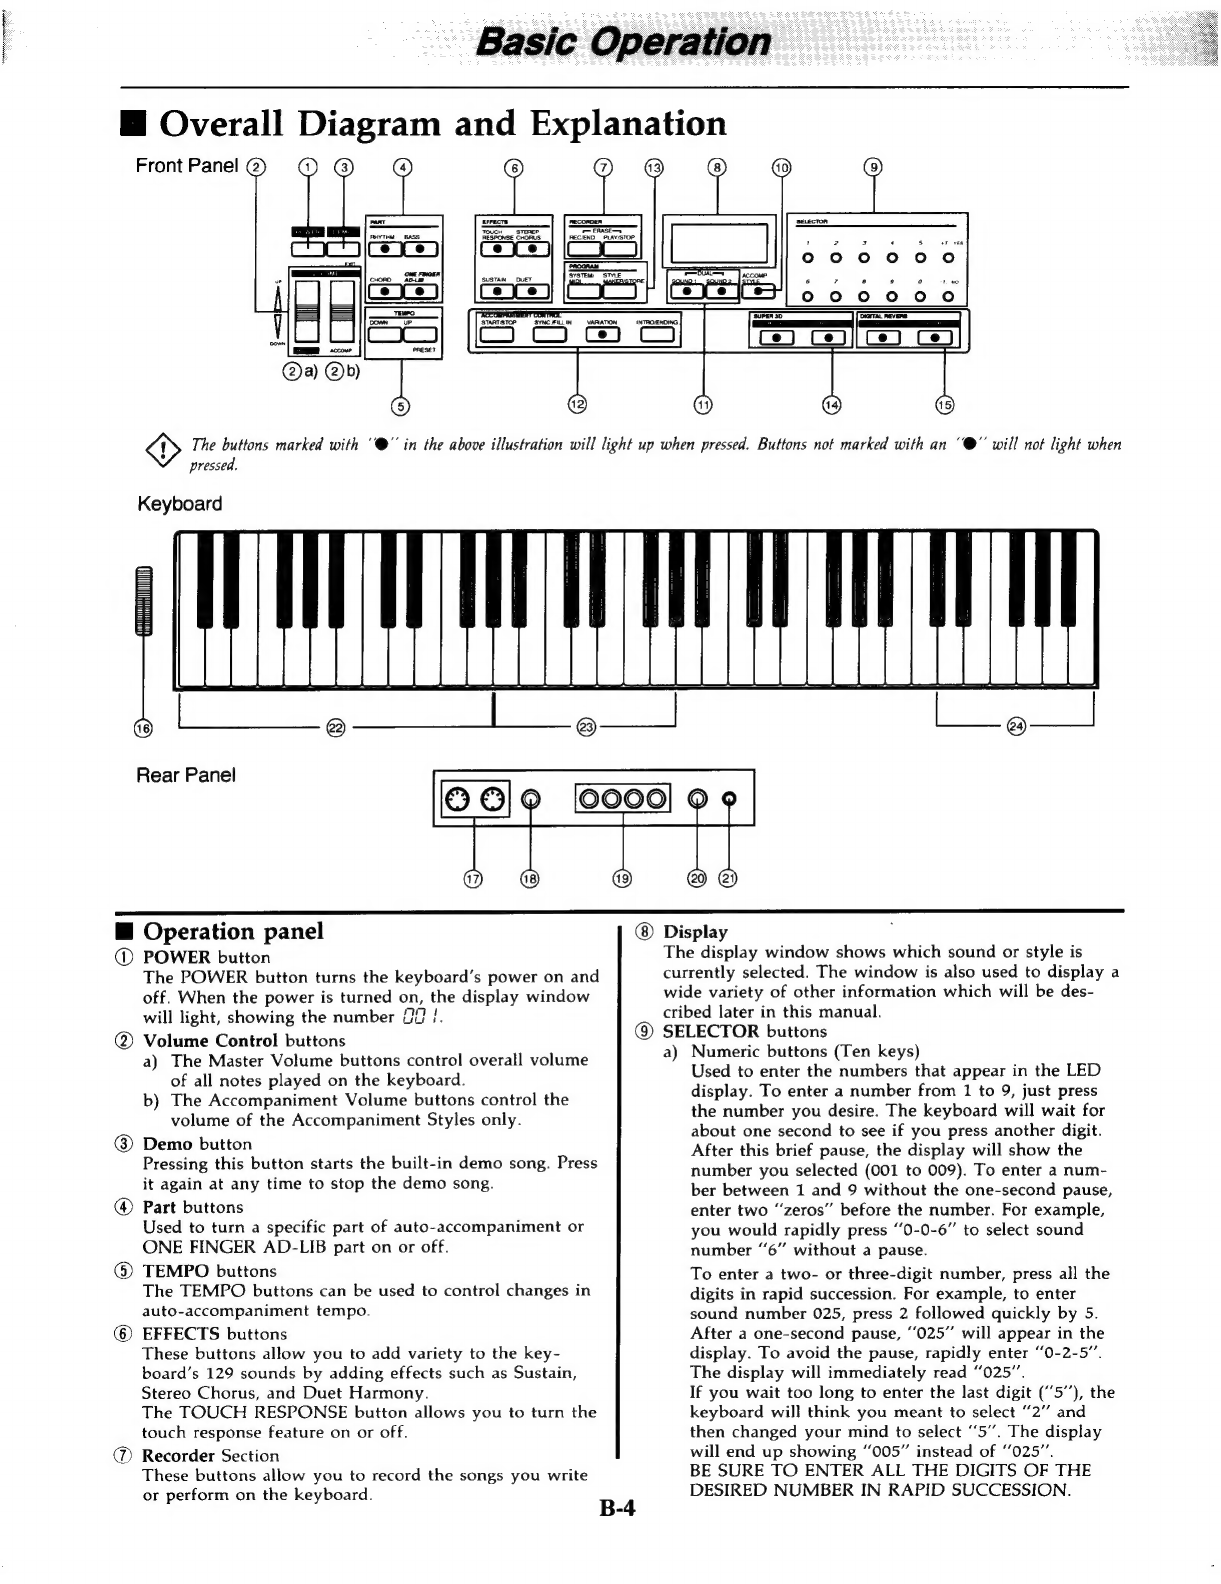
Overall
Diagram
and
Explanation
BASIC
OPERATION
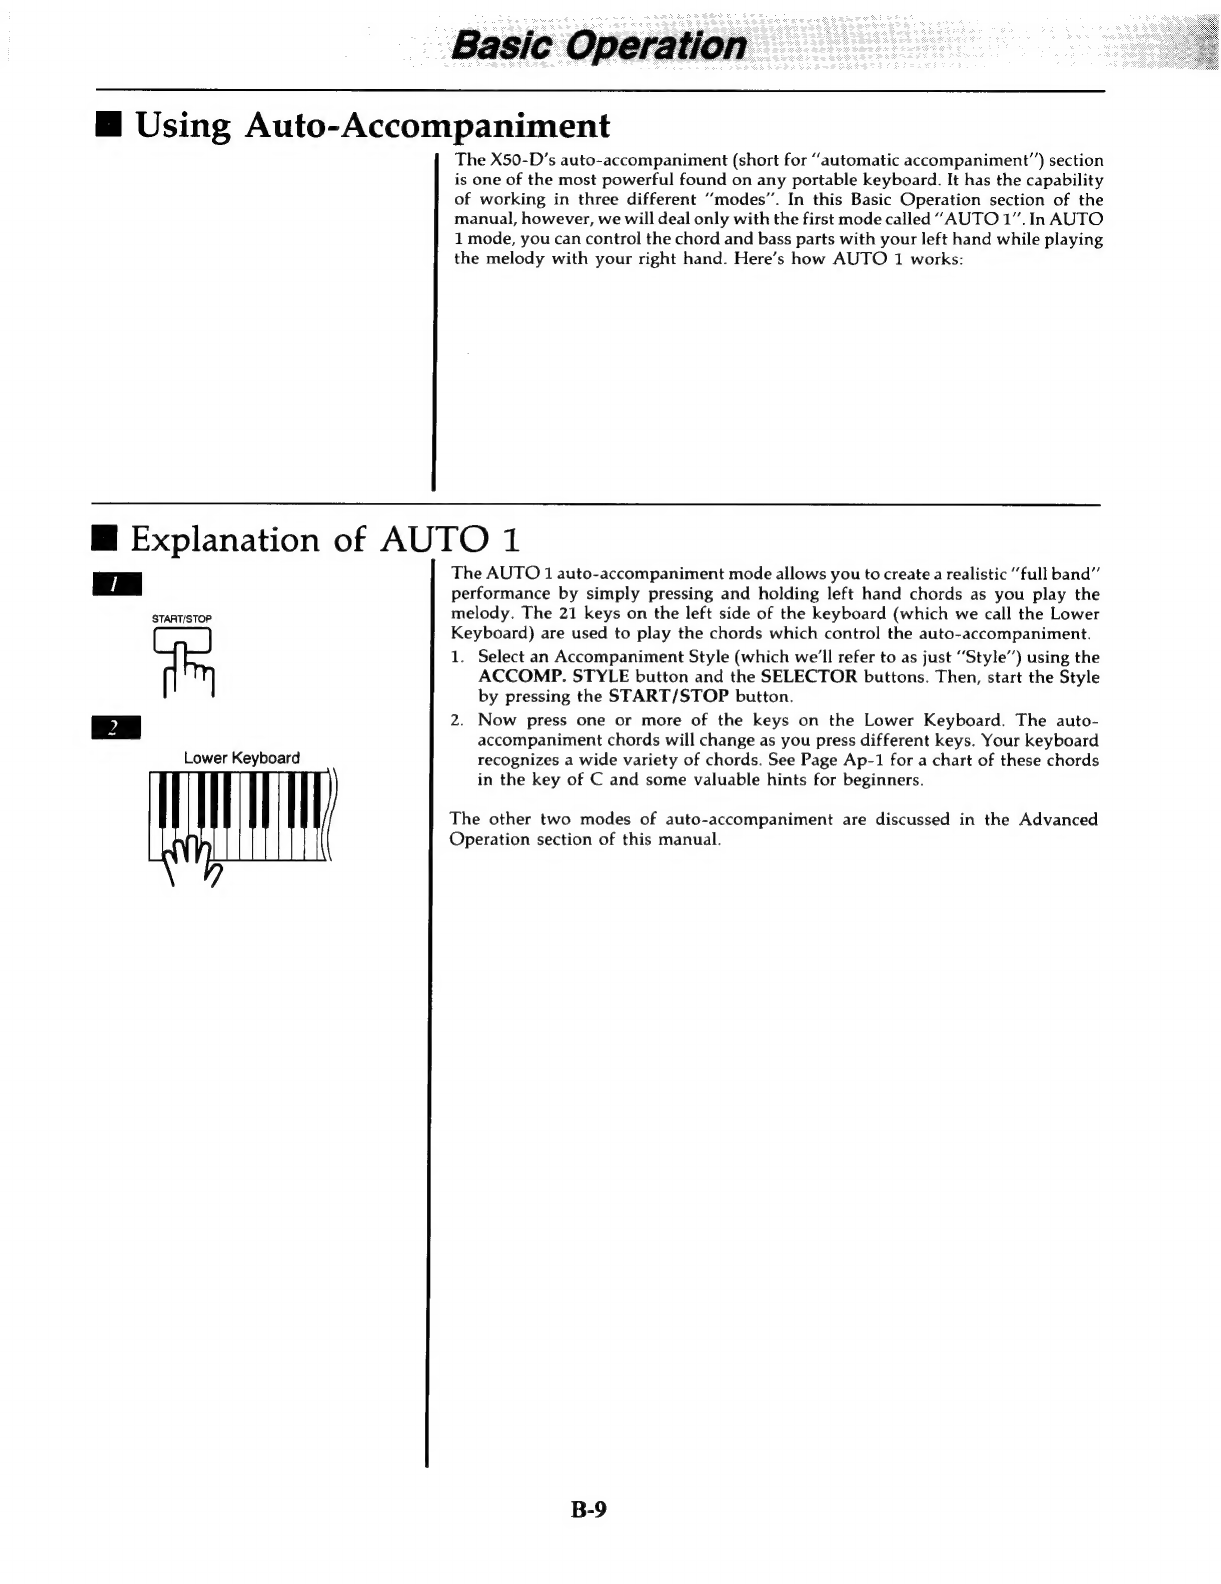
M
Selecting
Sounds
.0.....c
ccc
ccccccsecsseesseeccescesessecssenseees
M@
Getting
Started
with
Accompaniment
Styles:
@
Selecting
Accompaniment
Styles
...........ccee
@
Changing
Accompaniment
Tempo
@
Using
the
VARIATION
button..........
Using
ONE
FINGER
AD-LIB
To
Play
Like
a
“Pro”:..
B-11
Using
the
Real-Time
Recorder
............0..00..ccccccceseeees
B-13
ADVANCED
OPERATION
M
Advanced
Use
of
Sounds:
..0.....0.ccccccccecesceeeceetceseees
A-1
@
Combining
Two
Sounds...
ccccccecceceeeeeees
A-1
@
Adding
Effects
oo...
cc
ccccccccsececesscsseesectseeessrens
A-1
M
Advanced
Use
of
the
Auto-Accompaniment
SeCHION
Sisnecieehnccesctie
slice
Behe
ie
ie
esdd
atl
eebeoe,
chet
eiadeoes
A-2
@
Explanation
of
AUTO
2.0...
esesesesesees
A-3
@
Explanation
of
AUTO
3.0...
cceceeeeceeeeeee
A-4
Creating
Accompaniment
Styles..........0..0.000cccccccees
A-5
@
Creating
BASIC
Patterns
........00.cc
ccc
cece
eee
A-5
@
Creating
ENDING,
INTRO
and
FILL-IN
Patterns
isis:
cevcsices
cise
secticecdayent
cal
isen-ostesaccassiouspevester
cat
@
Storing
the
Newly
Created
Styles
Programmable
ONE
FINGER
AD-LIB.........
@
Creating
Phrases
00.00.0000...
cccccceeteteees
@
Storing
Phrases
.0..0...0.0.0
cee
Using
the
SYSTEM
Functions
............
Using
the
MIDI
Functions:
.................
@
Setting
General
MIDI
On/Off
.....
Setting
Local
Control
On/Off
.......0..0.0c
“ss
Creating
Songs
........ccccecccecsesssecsseseseeeesecsesevssseescunees
Sending
Automatic
Functions
Via
MIDI
Control
Wheel
Assign
Functions.......0....0..00.0000
Creating
Accompaniment
Styles.............0c0cc
Creating
ONE
FINGER
AD-LIB
Phrases
cee
Using
Other
Functions........0....0.cccccccecsseeeeeeeeeeees
OOOO
MULTIMEDIA
OPERATION
Multimedia
Setup
00.0...
ccccesceseseesetscscseeseneeseeeeseues
M-1
Appendices.
cs:...0i
accosteesesiatlags
sceeescti
ate
a
aed
Specifications
.................
axe
DRUM
Assignments
MIDI
Implementation
Chart
™@
Before
Using
Your
Keyboard
1.
Cautions
@
Do
not
subject
the
keyboard
to
severe
shocks.
@
Do
not
expose
the
keyboard
to
direct
sunlight,
or
high
temperatures
(such
as
inside
your
car
on
a
warm
day).
@
Do
not
use
the
keyboard
where
there
is
excessive
moisture
or
dust.
@
Do
not
disassemble
or
attempt
to
modify
the
keyboard.
@
Should
the
keyboard
become
soiled,
clean
it
using
a
soft,
dry
cloth.
If
this
does
not
remove
the
stain,
wet
the
cloth
slightly
before
wiping.
Never
use
alcohol
or
thinner
to
clean
your
keyboard.
@
Do
not
allow
foreign
matter
to
enter
the
gaps
between
the
keys
or
around
the
buttons.
2.
Connecting
the
Power
Supply
Your
keyboard
can
use
either
your
home
AC
power
outlet
or
dry
cell
batteries
as
a
power
source.
@
To
insert
batteries:
1.
Turn
the
unit
over
and
remove
the
battery
cover.
2.
Insert
six
Size
C
dry
cell
batteries.
Be
sure
they
are
aligned
in
the
proper
direction.
ge
EE
3.
Replace
the
battery
cover.
As
the
batteries
begin
to
run
down,
the
volume
of
the
keyboard
will
decrease
and
the
sound
quality
will
begin
to
change
or
deteriorate.
The
unit
may
begin
to
malfunction.
At
that
time,
you
should
replace
all
six
batteries.
Do
not
mix
battery
types
(or
new
batteries
with
old
ones),
as
this
may
cause
problems
such
as
battery
fluid
leakage.
Remove
the
batteries
when
not
using
the
keyboard
for
long
periods
of
time.
M@
To
Use
An
AC
Power
Outlet:
Connect
a
PS-102
or
PS-101
adaptor
(available
separately)
to
the
adaptor
terminal
on
the
rear
panel
of
the
keyboard.
Then,
connect
the
adaptor
to
a
wall
socket.
>
We
recommend
that
you
use
a
KAWAI
AC
adaptor
(10-volt/1
Amp)
with
the
X50-D.
If
you
decide
to
use
a
universal
adaptor
from
another
manufacturer,
please
be
sure
of
the
following:
(1)
The
voltage
selector
should
be
set
at
10
volts.
(2)
The
polarity
selector
must
be
set
to
“negative”
(—)
polarity,
otherwise
the
keyboard
will
not
operate
(or
will
run
on
batteries
until
the
batteries
are
drained).
(3)
The
adaptor
must
be
rated
at
1
Amp
(A).
B-1