Lesco 708688 User manual

HydroWalk-Behind
Commercial
RotaryMowers
36" • 48" • 52"
OPERATOR'S MANUAL
Standard andWide-Track (WT)
Models:708686/708687/708688

2
LESCO
TheLESCOHydroWalk-Behind CommercialRotary Mowerhas beendeveloped foruse by
professionallandscapers,commerciallawnservicecompanies,professionalturfmanagersandgolf
coursesuperintendents.Themachineincorporatesmanysafetyfeaturesthatshouldbestudiedby
alloperators andmaintenance personnelbefore use.Thelistofsafetyprecautionsshouldreceive
particularattention.Thismanualpresentstheoperatingandmaintenanceinstructionsnecessaryto
keepyourLESCOmoweratpeakefficiency.Ifproperlyoperatedandmaintained,yourLESCOmower
willgivedependableandtrouble-freeservice.
Althoughhazardcontrolandaccidentpreventionarepartiallydependentuponthedesignand
configuration of the equipment, these factors are also dependent upon the awareness, concern,
prudence,andpropertrainingofthepersonnelinvolvedintheoperation,transport,maintenanceand
storageof theequipment.
TABLE OF CONTENTS
FOREWORD
Foreword ..................................................................... 2
Safety Precautions ..................................................... 3
A.General................................................................ 3
B.RelatedtoFuel .................................................... 3
C.WhenMowing ...................................................... 3
Specifications ............................................................. 4
OperatingInstructions................................................. 4
A.Controls............................................................... 4
1. Ignition and Start Switch................................. 4
2. Fuel Shutoff Valve.......................................... 4
3.Engine Throttle ............................................... 4
4. Blade Clutch................................................... 4
5.GroundSpeedControlLevers......................... 4
6.Traction/SteeringLevers................................. 4
7.NeutralLatch Levers ...................................... 5
8.OperatorPresenceLevers.............................. 5
9.FreewheelingValves ...................................... 5
10.HourMeter ..................................................... 5
B.Initial Adjustments............................................... 5
C.Break-lnandOperation ........................................ 6
CuttingHeightAdjustmentTable................................. 7
Maintenance ............................................................... 8
A. GeneralMaintenance......................................... 8
B. DailyMaintenanceAfterMowing ....................... 8
C. MaintenanceEvery40Hours ............................ 8
D. LubricationChart ............................................... 8
E. EngineMaintenance .......................................... 8
F. HydraulicSystemMaintenance ......................... 8
F. MowerMaintenance .......................................... 9
1. ToChangeaBlade ....................................... 9
2. ToSharpenaBlade...................................... 9
3. To Change the Blade Drive Belts .................. 9
4. Installation/RemovalFloatDeck ................. 10
5. To Change the Pump Drive Belt ................. 11
6. ToChangea Spindle Assembly.................. 11
7. ToChangeSpindleBearings ...................... 11
ReplacementParts-Spindle..................................... 13
SuggestedReplacementParts-Mower .................... 13
SuggestedReplacementParts-Engine.................... 13
Warranty .....................................................Back Cover
CAUTION
TheLESCOHydroWalk-BehindCommercialRotaryMower
should only be operated and maintained by thoroughly
trained individuals. The machine could cause serious
injurytoanyonewhomisusesitordoesnotunderstandits
operation. All operators and maintenance personnel are
urged to read this entire manual for their personal safety.
NOTE: The engine manufacturer is responsible for all engine-related issues with regards
to performance, power-rating, specifications, warranty and service. Please refer to
the engine manufacturer’s owner’s/operator’s manual, packed seperately with
your unit, for more information.

3LESCO
5. Watchfor holes,sprinkler heads andother hidden
hazards.
6. Reducespeedwhenmakingsharpturns.
7. Always have proper footing on slopes and hill
sidesandneveroperatewhenconditionsare
slippery. Be very careful on wet grass.
8. Always keep both hands on the handles. Always
walk, never run.
9. Neverengage the blade clutch whentheengineis
running unless you are on grass that you intend
tomow.
10. Becareful when crossing gravelpathsorroad-
ways. Always disengage the blade clutch and wait
until the blades stop rotating.
11. Neverleavethemowerunattendedwithout disen-
gagingtheblade clutch,placingthe groundspeed
control levers in neutral, placing the neutral latch
levers in the neutral lock position, shutting off the
engine, taking the key from the ignition switch and
closing the fuel shutoff valve.
12. Always park the mower and start the engine on a
level surface with the ground speed control levers
in neutral, the blade clutch disengaged and the
neutral latch levers in the neutral lock position.
13. Shut off the engine and wait for the blades to stop
rotatingbeforeremoving the grasscatcher.
14. If you hit a solid object while mowing, disengage
the blade clutch, place the ground speed control
levers in neutral, place the neutral latch levers in
the neutral lock position and stop the engine.
Disconnect the spark plug wire and inspect for
damage.Repair anydamage andmake surethe
blades are in good condition and the blade bolts
aretightbeforerestartingtheengine.
15. Do not mow excessively steep slopes. Mow
across the slope, not up and down the slope.
16. Never raise the mower deck while the blades are
rotating.
17. Never walk or stand on the discharge side of a
mowerwiththeenginerunning.Disengagethe
bladeclutchifanotherpersonapproacheswhile
youareoperatingamower.
18. Always disconnect the spark plug wire to prevent
theenginefromaccidentally starting before
performinganymaintenanceonthismower.
19. Keepthemowerandespeciallythe engine/pump
area clean and free of grease, grass and leaves to
reduce the chance of fire and to permit proper
cooling.
20. Theoperatorpresencecontrol leverslocated at
each handle are designed for your safety. Do not
try to defeat their operation. If the blade clutch is
engagedoreitherofthegroundspeedcontrol
levers are out of the neutral position, releasing
both handles will shut off the mower’s engine.
SAFETY PRECAUTIONS
A.General:
1. ReadthisOperator’s Manualbeforestartingthe
mower.Studythe controls andlearnthe proper
sequenceofoperation.
2. Do not allow anyone to operate or maintain this
machinewhohasnotreadthemanual.Never
permit children to operate this machine.
3. Always have your feet and hands clear of the
cutter deck when starting the engine.
4. Do not remove any shields, guards, decals or
safety devices. If a shield, guard, decal or safety
device is damaged or does not function, repair or
replaceitbeforeoperatingthemower.
5. Always wear safety glasses, long pants and
safety shoes when operating or maintaining this
mower.Do not wearloose-fitting clothing.
6. Neverruntheengineindoorswithoutadequate
ventilation.Exhaust fumes are deadly.
7. To avoid serious burns, do not touch the engine
or muffler while the engine is running or until it
has cooled after it has been shut off.
8. The liquid in the battery is dilute sulfuric acid.
Always wear safety glasses (or goggles) and
rubber gloves when workingon the battery. Do not
overfillthebattery.
9. Lead-acidbatteriesgeneratehydrogenandoxygen
gases which form an explosive mixture. Keep
sparks and flames away at all times.
10. When looking for oil leaks, never run your hand
over hydraulic hoses, lines or fittings. (High-
pressure oil can easily penetrate the skin.) Never
tighten or adjust hydraulic hoses or fittings while
the system is under pressure.
B. Related to Fuel:
1. Gasoline is highly flammable. Respect it.
2. Do not smoke or permit others to smoke while
handlinggasoline.
3. Alwaysuse approved containersforgasoline.
4. Always shut off the engine and permit it to cool
before removing the cap of the fuel tank.
5. If the fuel container spout will not fit inside the
fuel tank opening, use a funnel.
6. When filling the fuel tank, stop when the gasoline
reaches one inch from the top. This space must
be left for expansion. Do not overfill.
7. Wipe up any spilled gasoline.
C. When Mowing:
1. Keep adults, children and pets away from the area
tobe mowed.
2. Never use this mower without the grasscatcher or
discharge chute installed and set in the down
position.
3. Mow only in daylight.
4. Always check the area to be mowed and remove
debris and other objects prior to mowing.

4
LESCO
SPECIFICATIONS
OPERATING INSTRUCTIONS
3. EngineThrottle:
Located on the far right side of the control panel
betweenthehandles.Moving the throttle lever
from the front to the rear will increase the engine
speed from slow to fast. To start the engine, set
the throttle all the way to the rear in the “Choke”
position. After the engine starts, move the throttle
halfway between slow and fast.
4. BladeClutch:
Located on the left handle just below the control
panel. This is an over-center belt clutch and when
the handle is pushed forward until it snaps to rest,
it forces the idler pulley into the blade drive
belt which causes the blades to rotate. When the
handle is pulled back, the pressure on the belt is
relieved and the blades will stop rotating.
5. GroundSpeedControlLevers:
Located on the right side of the control panel.
These two levers control the maximum output of
the two hydraulic pumps to the two wheel drive
motors and thus the ground speed of the mower
independentof theenginespeed. Movingthe right
lever forward increases the output of the right side
pump and moving the left lever forward increases
the output of the left side pump. Normally these
levers are moved in unison. In order to start the
engine both levers must be pulled back to the
neutralposition.
6. Traction/SteeringLevers:
Thereis a right-handlever locatedbeneaththe
outer end of the right handle and a left-hand lever
located beneath the outer end of the left handle.
Eachleveroperatesindependentlyandwhen
A.Controls.
1. Ignition and Start Switch:
Located in the center of the control panel between
the handles. This switch is an automotive key-type
ignition switch and a clockwise 45º turn closes the
ignition circuit. Turning the switch further against
spring pressure starts the engine if the neutral
latch levers are in the neutral lock position, the
groundspeed control leversare in neutraland the
blade clutch is disengaged.
2. FuelShutoffValve:
Located on top of the tank in the opening of the
handlemountframe.Thehandle turns90degrees.
When the handle is in a horizontal position, it will
shut off the flow of fuel to the engine. When it is
turned to a vertical position, it will open and allow
fuel to flow to the engine. Anytime the mower is
being trailered or, if the mower will not be in use
for 30 minutes or more, close the fuel shutoff valve
toprevent floodingtheengine.
Model: 15/36 17/48 19/52
Engine Mfg: <– – – – – Kawasaki – – – – –>
HP: 15 17 19
Type: <– – – – – 4 Cycle Twin – – – – –>
Starter: <– Recoil –> <– – – – – Electric – – – – –>
Air Cleaner: <– Dual Element Dry –> <– – – – – Heavy Duty Canister – – – – –>
Lube: <– – – – – Pressurized w/Filter – – – – –>
Fuel Capacity: <– – – – – 5 Gallon – – – – –>
Traction Drive: <– – – – – Two variable displacement pumps, two wheel motors – – – – –>
Hydraulic Oil Capacity: <– – – – – 6 Quarts – – – – –>
Hydraulic Filtration: <– – – – – 30 Micron – – – – –>
Ground Speed: <– – – – – 0-6 mph – – – – –>
Wheels: <– – – – – 16 x 6.50-8 – – – – –>
Cut Deck: <– – – – – Fixed – – – – –>
Cut Width: 36" 48" 52"
Overall Width: 47" 59" 63"
No. Blades: 2 3 3
Cut Height: <– – – – – 2"-4" – – – – –>
Deck Material: <– – – – – 10/7 Gauge – – – – –>
Caster Wheels: <– – – – – 9 x 3.5-4 – – – – –>

5LESCO
squeezedagainstspringtension, freed from the
neutral lock position (see Neutral Latch Levers
below) and released, permits the pump to send oil
to the wheel drive motor at the rate set by the
groundspeedcontrollever.Whenbothtraction/
steeringleversare released, the mower willmove
ahead in a straight line if the engine is running and
theground speed controllevers havebeenmoved
forward out of the neutral position. Steering is
accomplishedby squeezingthe traction/steering
lever on the side to which the turn is to be made. If
both traction/steering levers are squeezed at the
same time, the mower will stop and then backup.
The mower can then be steered in reverse by
squeezing one of the traction/steering levers closer
to the handle than the other.
7. NeutralLatchLevers:
Pivoted inside each handle there is a neutral latch
lever which works with each of the traction/steering
levers. When either of the traction/steering levers
is squeezed and its neutral latch lever pushed
forwardand engagedinthe neutrallock position,
the traction/steering lever is held in a position
where its pump should not be sending any oil to
the wheel drive motor. (If this is not the case, see
Initial Adjustments 6 and 7.) The neutral latch
levers should be engaged in the neutral lock
positionbeforestartingtheengine.Thehardware
for the neutral latch should be "snug" to retain the
latch in the "on" or "off"positions.
8. OperatorPresenceLevers:
Located above the outer ends of the right and left
handles, these levers must be held down on the
handlesagainstspringpressurewhentheengine
isrunningin order to movetheground speed
selector levers out of neutral or engage the blade
clutch.Releasingtheoperatorpresencelevers
with the ground speed selector levers in any
position other than neutral or the blade clutch
engaged will shut off the engine.
9. Freewheeling(pumprelief)Valves:
A “T” valve located on the side of each hydraulic
OPERATING INSTRUCTIONS
pumpwhen openedwill permitthemower tobe
pushedforwardor pulledinreversewithoutthe
enginerunning.Tooverridethe brakingforceof
the hydraulic system, turn each valve counter-
clockwise two turns, move the mower as you wish
and then turn each valve clockwise two turns to
shut the valves.
10. HourMeter andTachometer:
Located at the lower left edge of the control panel.
Whenthe machineis runningthe tachometer
displays engine rpm. When the machine is off it
displaysrunningtime.
B. Initial Adjustments.
1. Disconnect the spark plug wire.
2. Check the tire pressure. Caster Wheels should be
inflated to 25 psi. Drive Wheels should be inflated
to 15 psi. Note: New tires are overinflated in order
to properly seat the bead to the rim.
3. Check that all nuts, bolts and screws are tight.
4. Check the tension of the deck drive belts:
a.Remove the deck cover shield and engage the
blade clutch.
b.Make sure the belts clear the belt guides by
1/8" to 1/4".
c.The tension of the deck drive belts should be
adjustedsothat a ten-pound pullbetweentwo
pulleys deflects each belt about 1/2". Do not
overtightenthese belts.Theblade clutch
shouldengagewithonlymoderateforce.
d.Replace the deck cover shield and disengage
the blade clutch.
5. The tension of the pump drive belt should be
adjusted so that a five-pound pull between the
engine traction drive pulley and the pump drive
pulley opposite the idler pulley deflects the belt
about3/16".
6. Thelongtraction/steeringcontrolrodswhichrun
down to the pump control levers on each side of
the handle assembly should initially be adjusted so
that when the ground speed control levers are in
neutralandthetraction/steeringleversarereleased
from the neutral lock position, the mower stands
still with the engine running. If the mower starts to
creep forward or to the rear in this situation, then
Thelefttraction/steering levershown
in the neutral lock position.

6
LESCO
the turnbuckle at the top of the long control rod on
the side of the mower which seemed to creep must
be adjusted. Loosen the top and bottom nut on the
turnbuckle and adjust until the drive wheel stops
moving. Then retighten the top nuts.
7. Theshort traction/steeringcontrolrods whichrun
down from the traction/steering levers on each side
of the handle assembly should initially be adjusted
so that when the ground speed control levers are in
neutral and the traction/steering levers are in the
neutral lock position, the mower stands still with
the engine running. If the mower starts to creep
forward or to the rear in this situation, then the rod
end bearing at the bottom of the short control rod
on the side of the mower which seemed to creep
must be adjusted. Remove the hairpin holding the
long control rod in place in the rod end bearing,
remove the flat washer and pull the long control rod
from the rod end bearing. Loosen the lock nut and
adjust the rod end bearing ½ turn clockwise if the
creep was forward or ½ turn counter-clockwise if
the creep was to the rear. Tighten the lock nut,
replacethelong control rodinthe rod endbearing,
replace the flat washer and the hairpin.
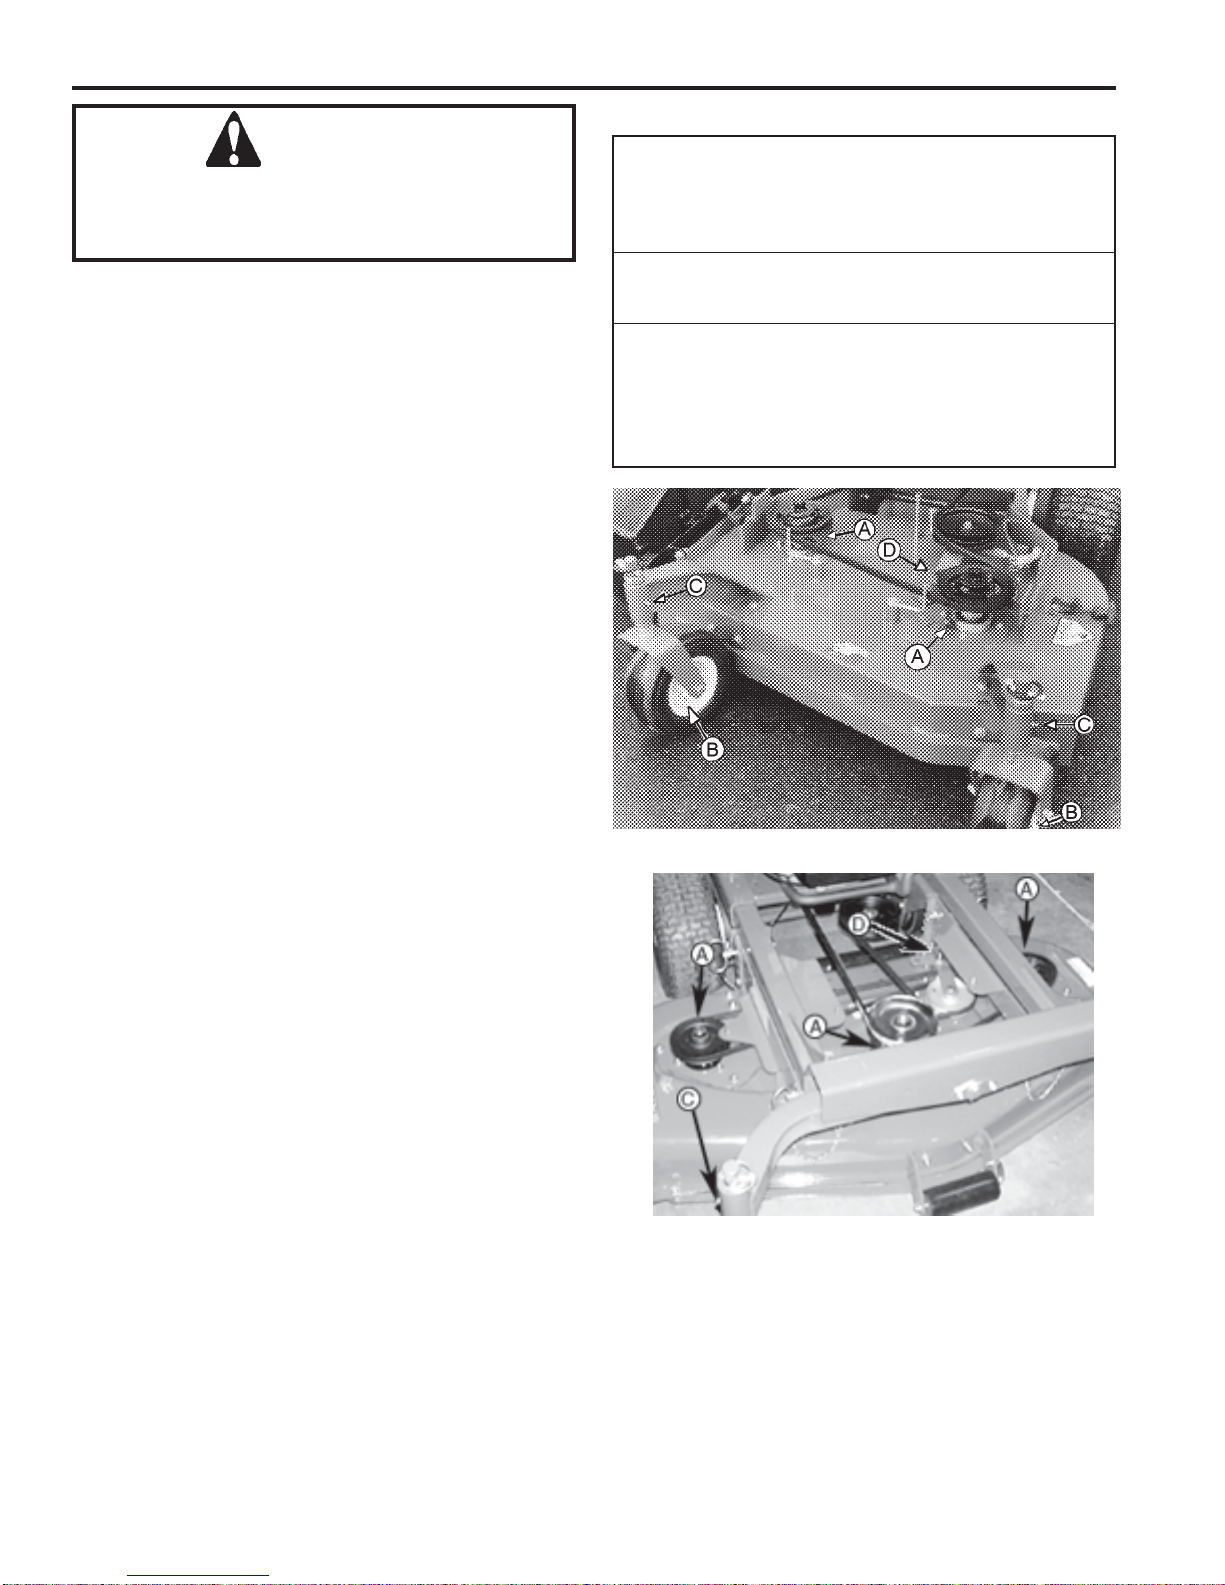
8. Adjusting the cutting height: The mower is shipped
with the cutting height set at 3 inches
±1/4 inch depending on the air pressure in the
tires. To change the cutting height, blade spacers
and/or caster spacers must be moved according to
the table on page 6.
9. Lubricate all fittings listed in the maintenance
section.
C.Break-lnandOperation.
1. Make certain you thoroughly understand all of the
safety precautions before you attempt to operate
this machine.
2. Check the engine oil level. Fill to the proper level
with10W40or10W30engineoilratedforserviceSEorSF.
3. Check the hydraulic oil level. Remove the fill cap
and make sure the oil level is up to the bottom of
the strainer screen. Leave this air space for
expansion. If the oil level is low, fill with a good
grade of SAE 20W50 engine oil.
3. Movethe mower outdoors.Checkthe engine
gasoline level. When filling the tank, stop when the
gasoline reaches one inch from the top. This space
must be left for expansion. Use fresh, clean,
unleaded,regulargasoline.
4. Move the mower to a “test area” where you can
operatethe mowerforabouthalfan hourwithout
beingdisturbed.
5. To start the engine:
a.Move the ground speed control levers back to
theneutralposition.
b.Disengagetheblade clutch.
c.Place the neutral latch levers in the neutral lock
position.
d.Connect the spark plug wire.
e.Open the fuel shutoff valve.
f. Move the throttle lever to the “Choke” position.
g.Put the key in the ignition switch and turn the
switch to “Start”. (Do not hold the key in the
start position for more than 10 seconds or you
maydamagethestarter.)
h.Set the throttle at 50% of full engine RPM and
allow the engine to warm up. Then, adjust the
throttle to 75% of full engine RPM.
6. After the engine has warmed up, shut off the
ignition and check the operation of the safety
switches. Make certain that the engine will not
start unless the ground speed control levers are in
neutral and the blade clutch is disengaged. If the
engine will start with either of the ground speed
control levers in any position other than neutral,
immediately shut off the engine and replace the
neutral safety switch operated by that lever under
the control panel. If the engine will start with the
blade clutch engaged, immediately shut off the
engine and adjust or replace, if necessary, the
blade safety switch mounted on the engine deck.
Starttheengine and holdtheleft operator presence
lever down against the left handle and move the
left ground speed control lever out of neutral. Now
takeyourhand off the operator presenceleverand
the engine should die. If it does not, immediately
shut off the engine and adjust or replace, if neces-
sary,theoperatorpresence switch under the
controlpanel. Repeatthis proceduremoving the
right ground speed control lever out of neutral. If
the engine does not die, immediately shut off the
engine and adjust or replace, if necessary, the
operatorpresenceswitchunderthecontrolpanel.
Movebothground speedcontrollevers into neutral,
restartthe engine, holdthe leftoperatorpresence
controldown againstthe lefthandleandengage
the blade clutch. Now take your hand off of the
operatorpresenceleverandtheengineshoulddie.
If it does not, immediately shut off the engine and
adjust or replace, if necessary, the operator
presenceswitch underthecontrolpanel.Disen-
gage the blade clutch.
7. Restarttheengine.
8. Push the blade clutch lever forward until it engages
and the cutter blades start rotating.
9. Movethe ground speed contol levers forwardto
about one third of full speed.
OPERATING INSTRUCTIONS
CAUTION
Set the ground speed control levers at no
more than one third full speed until you are
fully familiar with the operation of the mower.

7LESCO
10. Squeezebothtraction/steeringlevers with both
hands and release the neutral latch levers from the
neutral lock position.
11. Slowly release the traction/steering levers and the
mower will move ahead in a straight line. To turn
themower,squeeze thetraction/steeringlever on
the side to which you want to turn.
12. To stop the mower’s forward motion, squeeze both
traction/steering levers until the mower stops and
place the neutral latch levers into the neutral lock
position.
13. Beforemovinginto reverse,themower’sforward
motionshouldbe completely stopped.
14. Practice operating the mower and as you gain
confidence,movetheground speed selector levers
forward to two thirds full speed. Mow until comfort-
able and confident with the controls and then return
the mower to the shop.
15. To stop and shut off the mower, squeeze both
traction/steering levers and place the neutral latch
levers into the neutral lock position, disengage the
blade clutch, move the ground speed control levers
into neutral, turn off the ignition to stop the engine,
close the fuel shutoff valve and disconnect the
sparkplugwire.
16. Check, and adjust if necessary, the tension of the
deck drive belts and the pump drive belt as
described in items 4 and 5 of the Initial Adjustment
section.
17. Readjustthetraction/steering controlrods.These
adjustments are described in item 6 of the Initial
Adjustment section.
18. After the first full day of mowing, all nuts, bolt and
screwsshouldbe rechecked for proper tightness
and the belts should be rechecked for proper
tension.
EngineDeck
boltedto
lowerholeson
CuttingDeck.
CUTTING HEIGHT ADJUSTMENTTABLE
Note: The front edge of the cutting deck should be 1/8" - 1/4" below the rear edge of the deck so that the blades are
cutting grass in only the front half of their circular path. This decreases friction and reduces the drive power required.
1/4" Blade Spacers 1/2" Caster Spacers
Approximate AboveandBelow the AboveandBelow the
Cutting Height SpindleAssemblies Caster Brackets
Inches Above Below Above Below
2 0 5 3 1
2-1/8 1 4 3 1
2-3/8 2 3 3 1
2-1/2 1 4 2 2
2-3/4 2 3 2 2
3 3 2 2 2
3-1/4 4 1 2 2
3-1/2 5 0 2 2
2-3/4 0 5 2 2
3 1 4 2 2
3-1/4 2 3 2 2
3-1/2 3 2 2 2
3-3/4 4 1 2 2
3-1/4 0 5 1 3
3-1/2 1 4 1 3
3-3/4 2 3 1 3
4 3 2 1 3
OPERATING INSTRUCTIONS
WARNING
Do not mow at full speed. Set the ground speed
control levers at full speed for transport only.
EngineDeck
boltedto
upperholeson
CuttingDeck.

8
LESCO
MAINTENANCE
Figure 1
E.ENGINEMAINTENANCE:Fordetailedmaintenance
instructions for the engine on your mower, see the
EngineManualpackedwithyourmower.
F.HYDRAULICSYSTEMMAINTENANCE:The
hydraulicsystem shouldnot requiremaintenance
other than the changing of the hydraulic oil and the
oil filter at 100 hours and every 500 hours
thereafter.The pumpsand wheeldrive motorsare
WARNING
Disconnectthe sparkplug wireto prevent
theenginefromaccidentallystartingbefore
performing any maintenance on this mower.
A.GENERALMAINTENANCE:
1. If the mower must be tipped on its side for
maintenance, first drain the fuel from the fuel tank,
the oil from the engine’s crankcase and the hydrau-
lic oil from the supply tank.
2. Be careful not to spill oil on any of the belts.
3. Do not tamper with the engine’s governor settings.
Theyareadjusted to providetheproper maximum
enginespeed.
4.
Ifthemoweristobeinstorageformorethan30days,drain
thefueltank,runtheenginetodrainthecarburetordry,
changetheoil,removethesparkplugandpourateaspoonful
ofoilintothecylinder.Runthestarterbrieflytocrankthe
engineanddistributetheoilthenreplacethesparkplug.
B.DAILYMAINTENANCEAFTERMOWING:
1. Park the mower outside the storage facility with the
engine shut off.
2. Close the fuel shutoff valve.
3. Permit the mower to cool.
4. Disconnect the spark plug wire.
5. Wash the mower off with a water hose. Be sure to
clean out grass clippings from under the cutter
deck and also under the deck cover. Allow the
mowertodry before storing.
6. Check that the blade mounting bolts are tight.
7. Check that the blades are sharp. NOTE: Never
mowwithdull blades.
8. Check the fuel level, the engine oil level and clean
thecooling-air intake(the rotatingscreen).
9. Cleantheaircleanerelements(foamandpaper).
10. After the first 5 hours of use, change the engine oil.
(Changetheoilevery40 hoursthereafter.)
11. Follow the lubrication chart at the top of the page.
12. Place the mower in locked storage to avoid tamper-
ingor usebyan untrainedoperator.
13.
Checkconditionandoperationofallsafetyswitches
C.MAINTENANCEEVERY100HOURS:
1. Change the engine oil and replace the oil filter.
(Changetheengineoilmorefrequentlyunder
severeoperatingconditions.)
2. Change the hydraulic oil and the oil filter after the
first 100 hours and every 500 hours thereafter.
2. Check that all nuts, bolts and screws are tight.
3. Check the condition and tension of all belts.
4.
Cleanthesparkplugandcheckthesparkpluggap.
5. Follow the lubrication chart at the top of the page.
D.LUBRICATIONCHART
NUMBER OF GREASING POSITIONS
(See Figure 1 and 1a below for Item Locations.)
48" Item Description
DAILYLUBRICATIONCHART
3 A CutterBladeSpindleBearings
40HOURLUBRICATIONCHART
2 B CasterWheelBearing
2 C Caster Wheel Pivot Shafts
2 D Deck ldler Pulley Pivot Arms
1 Blade Clutch Bellcrank Pivot
Figure1a

9LESCO
not owner repairable. If you have a problem with a
pump or wheel drive motor, call the LESCO
Service Hotline for a replacement. Do not
disassemble the pump or wheel drive motor.
G.MOWERMAINTENANCE:
1. TOCHANGEABLADE:(SeeFigure2.)
a. Remove the deck cover.
b. Tip the mower back and block up the front of
the deck.
c. Place one wrench on the hex head bolt under
the blade. Use a second wrench to remove the
nut on top of the spindle pulley.
d. Rememberthenumber ofblade spacersboth
aboveand belowthespindle.
e. Remove the long blade bolt (5/8" x 9-1/2" for
fixed and 3/4" x 9" for float), the flat
washer, the blade and the blade spacers. (Note:
torque the 5/8"bolt 70-80 ft.lbs. and the 3/4" bolt 90-
115 ft.lbs.)
f. Toreplace theblade,reverse the aboveproce-
dure. Be careful to replace the blade spacers
correctlyaboveand belowthespindle.
2. TOSHARPENABLADE:
a. Tosharpen a blade, use LESCO’s Rotary
MAINTENANCE
Figure 2 Figure 4
BladeGrinder, No.050655,or clampthe blade
in a vise and, using a flat mill file, carefully file
the cutting surface on each end of the blade to
asharpedge.
b. Blades with severe nicks or dents that cannot
be removed by filing should be replaced.
c. After sharpening, check the balance of the
blade by placing the blade on the LESCO
BladeBalancerfulcrumdevice, No. 050532.
d. If the blade dips on one end, file stock off of
the cutting surface on that end. NOTE: If a
blade cannot be easily balanced, replace it.
3. TOCHANGETHE BLADEDRIVEBELTS:
a. Make sure the blade clutch is disengaged.
b. Remove the deck cover.
c. Remove the nut and the cap screw which
serves as a belt guide and is mounted in the
idler pulley arm. (Item J, Figure 3.)
d. Loosenthe two beltguidesunder the engine
deck and rotate them out of the way.
e. Slip the long blade drive belt off of the pulleys.
f. Loosen the idler pull rod which holds the idler
pulley tight against the short blade drive belt.
(Item K, Figure 4.)
g. Remove the short blade drive belt from the
pulleys.
Figure 5
Figure 3

10
LESCO
removingtwo large wingnuts.
b. With the mower deck positioned in front of the
power unit, visually align mower deck channels
with power unit frame tubes.
c. Pushdownon power unit handlebarto bring the
front caster wheels to a level above top of the
mowerdeck.
d. Push the power unit over the mower deck. Align
the power unit frame tubes with the mower deck
channels.
e. Slowly reduce force on the handle bar to lower
the front caster wheels until they rest on the
surface with the frame tubes inside the mower
deck channels.
f. Push the power unit forward until the rear stop
tabs of the frame contact the mower deck
channels.
INSTALLINGTHEMOWERDECK
WARNING:DisengagethePTO,stopengineand
remove key to avoid accidental starting and injury.
WARNING:Whenhandlingthemowerdeck,be
careful not to cut yourself on the sharp blades.
a. Lift one side of the mower deck to achieve the
desiredcuttingheight.
b. Push the button in the center of the handle of
each of the retaining pins to insert the retaining
pinsthroughtheappropriatefrontandrearheight
adjustment holes in the mower deck channel.
Select the lowest holes that allow insertion of the
pins just above the bottom inside edge of the
power unit frame U-brackets inside the brackets.
NOTE: The same height adjustment hole must
be used for both front and rear pin installation.
c. Releasethemowerdeck.
d. Repeatthe above proceduretoinstall the other
side of the mower deck.
NOTE: The same height adjustment hole must
be used for all four pin installations.
e. Adjust the mower deck as required. Refer to
"Adjustments"inyourOperator's Manual.
f. Install the PTO belt by executing the following
procedures:
1. Remove center mower deck cover by first
removingtwo large wingnuts.
2. Push against idler arm to release tension on
the PTO belt. For increased leverage, a 3/8-
inch square drive of a breaker bar can be
placed in the 3/8-inch hole of the idler arm.
Thebreaker barhandlecanbepushedto
release tension on the PTO belt.
NOTE: Be sure the narrow side of the belt is in
the bottom of the pulley grooves.
3. Carefully remove old PTO belt, and replace it
with a new belt.
4. Release force on the idler arm to restore
h. Place a new short blade drive belt back on the
pulleys and tighten the idler pull rod to hold the
idler pulley tight against the belt.
i. Place a new long blade drive belt through the
beltguideandloop it around the engine pulley
and then around the two deck pulleys. The
belt’s back side should ride on the idler pulley.
j. Replace the cap screw and nut in the idler
pulley arm. Readjust and tighten the two belt
guidesunder theenginedeck.
k. The idler pulleys should be adjusted so that
whentheblade clutchisengaged, aten-pound
pull between two pulleys deflects either belt
about 1/2". Do not overtighten these belts. The
bladeclutch shouldengage withonlymoderate
force.
l. Replace the deck cover.
4. INSTALLATIONANDREMOVALOF MOWER
FLOATDECK
1. Power Unit Frame Tube
2. Stop Tabs
3. MowerDeckChannel
4. Retaining Pin
5. U-Bracket
Preparation
Place the mower in front of the power unit on a
level surface. Turn off power take-off (PTO), turn
off engine and remove key from ignition switch.
CAUTION: Themower deckand powerunit must
be placed on a hard, level surface.
WARNING:DisengagethePTO,stopengineand
remove key to avoid accidental starting and injury.
WARNING:Whenhandlingthemowerdeck,be
careful not to cut yourself on the sharp blades.
a. Remove center mower deck cover by first
MAINTENANCE

11 LESCO
MAINTENANCE
tension to new PTO belt. If used, remove
breakerbarfromidlerarm.
5. Replacecenter mower deck coverandsecure
it in place with two large wing nuts.
NOTE:Ensurethat the centermowerdeckcover
is replaced and secured with the two large wing
nuts.
REMOVINGTHEMOWERDECK
WARNING:DisengagethePTO,stopengineand
remove key to avoid accidental starting and injury.
WARNING:Whenhandlingthemowerdeck,be
careful not to cut yourself on the sharp blades.
a. Remove the center mower deck cover by first
removing the two large wing nuts.
b. Remove the PTO belt.
c. Lift one side of the mower deck.
d. Push the button in the center of the handle of
each of the two retaining pins supporting this side
of the mower deck. Remove the pins.
e. Lower this side of the mower deck until the ball
wheels rest on the surface.
f. Repeat steps 3 through 5 for the other side of the
mowerdeck
g. Push down on the power unit handle bar to bring
the front caster wheels to a level above the top of
the mower deck.
h. Pull the power unit rearward, free of the mower
deck.
i. Slowly reduce force on the handle bar to lower
the front caster wheels until they rest on the
surface.
5.
TO CHANGE THE PUMP DRIVE BELT:
(SeeFigure5.)
a. Make sure the blade clutch is disengaged.
b. Working under the engine deck, take the long
blade drive belt off of the engine pulley.
c. Loosen the locknut holding the pump drive belt
idler pulley in place and slide the pulley away
from the pump drive belt.
d. Remove the old belt and mount a new belt on
the pulleys.
e. Slide the idler pulley back onto the belt and
tighten the locknut holding it in place. The idler
pulley should be adjusted so that a five-pound
pull on the belt between the engine pulley and
the pump pulleys deflects the belt about 3/16".
f. Replacethe long blade drive belt on theengine
pulley.
6 TOCHANGE ASPINDLE ASSEMBLY:
a. Make sure the blade clutch is disengaged.
b. Remove the deck cover.
c. Remove the blade. (See paragraph 1. To Change
a Blade.)
d. Remove the blade drive belts. (See paragraph 3.
To Change the Blade Drive Belts.)
e. Remove the two bolts which hold the pulley
bushing tight in the spindle pulley and thread the
bolts into the other two holes in the bushing.
f. Alternately turn each bolt 1/2 turn clockwise until
the bolts force the pulley off of the
bushing.
g. Remove the bushing by tapping a large screw
driver into the slot in the side of the bushing.
h. Remove the key fom the spindle.
i. Tip the mower back and block up the front of the
deck.
j. Remove the four bolts and locknuts holding the
spindle assembly to the deck.
k. Remove the spindle assembly.

12
LESCO
MAINTENANCE
SUGGESTED MOWER REPLACEMENT PARTS
LESCO # Description 36" fixed 48" fixed 52" fixed
021871 Rotary Blade, 16-1/2" fixed 0 3 0
707591 Blade Bolt, 5/8" x 9" 2 3 3
011807 BladeNut, 5/8" 2 3 3
707577 Blade Spacer, .63 x 1.5 x 1.85 2 3 3
021924 Blade Spacer, 5/8" 10 15 15
021947 Long Drive Belt, 48" fixed 0 1 0
050480 Short Drive Belt, 48" fixed 0 1 0
068079 V-Belt 52" long 0 0 1
068093 V-Belt 52" Short 0 0 1
050441 V-Belt 36" 1 0 0
707579 Pump Drive Belt 1 0 0
707333 Pump Drive Belt 0 1 1
018969 Cartridge, Hydraulic Oil Filter 1 1 0
050125 Blade 18" 2 0 3
SUGGESTED ENGINE REPLACEMENT PARTS
Air Filter
Engine Oil Filter Air Filter Foam Wrap Spark Plug
707291 Kawasaki, 15.0 HP 014888 703306 061660 703308
706565 Kawasaki, 17.0 HP 014888 703306 061660 703308
708519 Kawasaki, 19.0 HP 014888 084204 084203 704399

13 LESCO
This Page Intentionally Left Blank

14
LESCO
This Page Intentionally Left Blank

15 LESCO
This Page Intentionally Left Blank

HOW TO ORDER PARTS
Contact your LESCO Salesperson, OR phone us (use the numbers above), OR write us (use the address above). We will need the following
information:
1. Your account number if available.
2. Your name and address and the address where you want the parts to be shipped.
3. The Model/Serial No. of the equipment.
4. The LESCO Part No. and the quantity desired. (Please do not use reference numbers.)
NOTE: Inspect all shipments on receipt for damage or missing parts. File a claim with the carrier before accepting a damaged shipment.
36", 48", 52", 54" & 60": Hydro Commercial Rotary Mower Two-Year Limited Warranty
1. What Is Covered By This Warranty. LESCO, Inc. warrants, to the original purchaser only, that the Equipment that is the subject of this
sale (a) conforms to LESCO’s published specifications, and (b) is free from defects under normal service, for a two-year period from the original
date of delivery. This warranty does not include damage to the Equipment resulting from occurrences set forth hereinafter in (2). If the purchaser
discovers within this period a failure of the Equipment to conform to specifications or a defect in material or workmanship, they must promptly
notify LESCO in writing of such claim. Any claims under this warranty must be received in writing by LESCO within 25 months from the date
of original delivery. Within a reasonable time after such notification, LESCO will replace any defective component of the Equipment or part
thereof. LESCO will provide the components or parts at LESCO’s expense. Labor is to be performed by the original purchaser. (LESCO will
provide purchaser a labor allowance at LESCO’s current flat rate schedule.) LESCO will make the final determination as to the amount of hours
to be reimbursed to the purchaser for labor. All defective parts shall be returned to LESCO if requested. These remedies are the original purchaser’s
exclusive remedies for breach of warranty.
2. What Is Not Covered By This Warranty. LESCO does not warrant (a) any product, components or parts not manufactured by LESCO;
(b) defects caused by failure to provide a suitable installation environment for the Equipment; (c) damage caused by use of the Equipment for
purposes other than those for which it was designed; (d) damage caused by accident or disasters such as fire, flood, wind and lightning; (e) damage
caused by unauthorized attachments or modification; or (f) any other abuse or misuse of the Equipment.
3. EXCLUSIVE WARRANTY. THE FOREGOING WARRANTY IS EXCLUSIVE AND IN LIEU OF ALL OTHER WARRANTIES OR
REMEDIES, WHETHER WRITTEN, ORAL OR IMPLIED. ANY AND ALL IMPLIED WARRANTIES OF MERCHANTABILITY, FITNESS
FOR A PARTICULAR PURPOSE, COURSE OF DEALING OR USAGE OF TRADE ARE HEREBY EXPRESSLY DISCLAIMED AND
EXCLUDED.
4. LIMITATION OF REMEDIES. UNDER NO CIRCUMSTANCES, EXCEPT TO THE EXTENT PROHIBITED BY APPLICABLE LAW,
SHALL LESCO BE LIABLE FOR ANY LOSS OR DAMAGE, DIRECT OR INDIRECT, SPECIAL, INCIDENTAL OR CONSEQUENTIAL
ARISING OUT OF THE USE OF OR INABILITY TO USE THIS EQUIPMENT INCLUDING BUT NOT LIMITED TO ANY CLAIM FOR LOSS
OF PROFITS, LOSS OF SAVINGS OR REVENUE, LOSS OF USE OF THE EQUIPMENT OR ANY ASSOCIATED EQUIPMENT, FACILITIES
OR SERVICE, DOWNTIME, THE CLAIMS OR COSTS OF THIRD PARTIES INCLUDING CUSTOMERS, AND INJURY TO PROPERTY.
Some states do not allow limitations on how long an implied warranty lasts or the exclusion or limitation of incidental or consequential damages,
so the above limitations or exclusion may not apply to you. This warranty gives you specific legal rights, and you may also have other rights
which vary from state to state.
5. Time Limit For Claims. Any claim for breach of warranty or claims under this warranty must be received by LESCO within 25 months
following delivery of the equipment.
6. No Other Warranties. Unless modified in writing signed by both parties, this agreement is understood to be the complete and exclusive
agreement between the parties, superceding all prior agreements, oral or written, and all other communications between the parties relating to
the subject matter of this agreement. No employee or representative of LESCO or any other party is authorized to make any other Warranty or
to assume any other liability in connection with the sale of its Equipment.
7. Future Changes. LESCO reserves the right to reserve, change or modify the construction and design of its Equipment or any component
part or parts thereof without incurring the obligations to make such changes or modifications in present equipment.
8. Allocation Of Risks. This agreement allocates the risks of equipment failure between LESCO and the original purchaser. This allocation
is recognized by both parties and is reflected in the price of the goods. THE PURCHASER ACKNOWLEDGES THAT IT HAS READ THIS
AGREEMENT, UNDERSTANDS IT, AND IS BOUND BY ITS TERMS.
9. How To Contact LESCO. If during the warranty period, the LESCO Hydro Commercial Rotary Mower does not function properly due
to defect, simply contact the LESCO Service Department:
LESCO, Inc. (216) 706-9250 Cleveland
Technical Service Department (800) 321-5325 Toll Free
1301 East 9th Street Suite 1300
Cleveland, OH 44114-1849
Form#709335 Rev.05-0AA 7/21/2005 © Copyright2005LESCO,Inc. LESCOisaregistered trademarkofLESCOTechnologies,LLC
We reserve the right to change designs, specifications and equipment at any time without notice and without incurring any obligations.
LESCO, Inc., 1301 East 9th Street Suite 1300, Cleveland, Ohio 44114-1849
Toll Free (800) 321-5325 • In the Cleveland Area (216) 706-9250
This manual suits for next models
2
Table of contents
Popular Lawn Mower manuals by other brands

Craftsman
Craftsman 917.371813 owner's manual

Craftsman
Craftsman 917.271553 owner's manual

Craftsman
Craftsman R1500 Series Operator's manual

COX
COX 3500 Series Owner/operator's manual & parts list

Snapper
Snapper ESZT18336BVE Safety instructions & operator's manual

Snapper
Snapper 7800918-00 Operator's manual