Linja Kopenhagen User manual
assembly Instructions
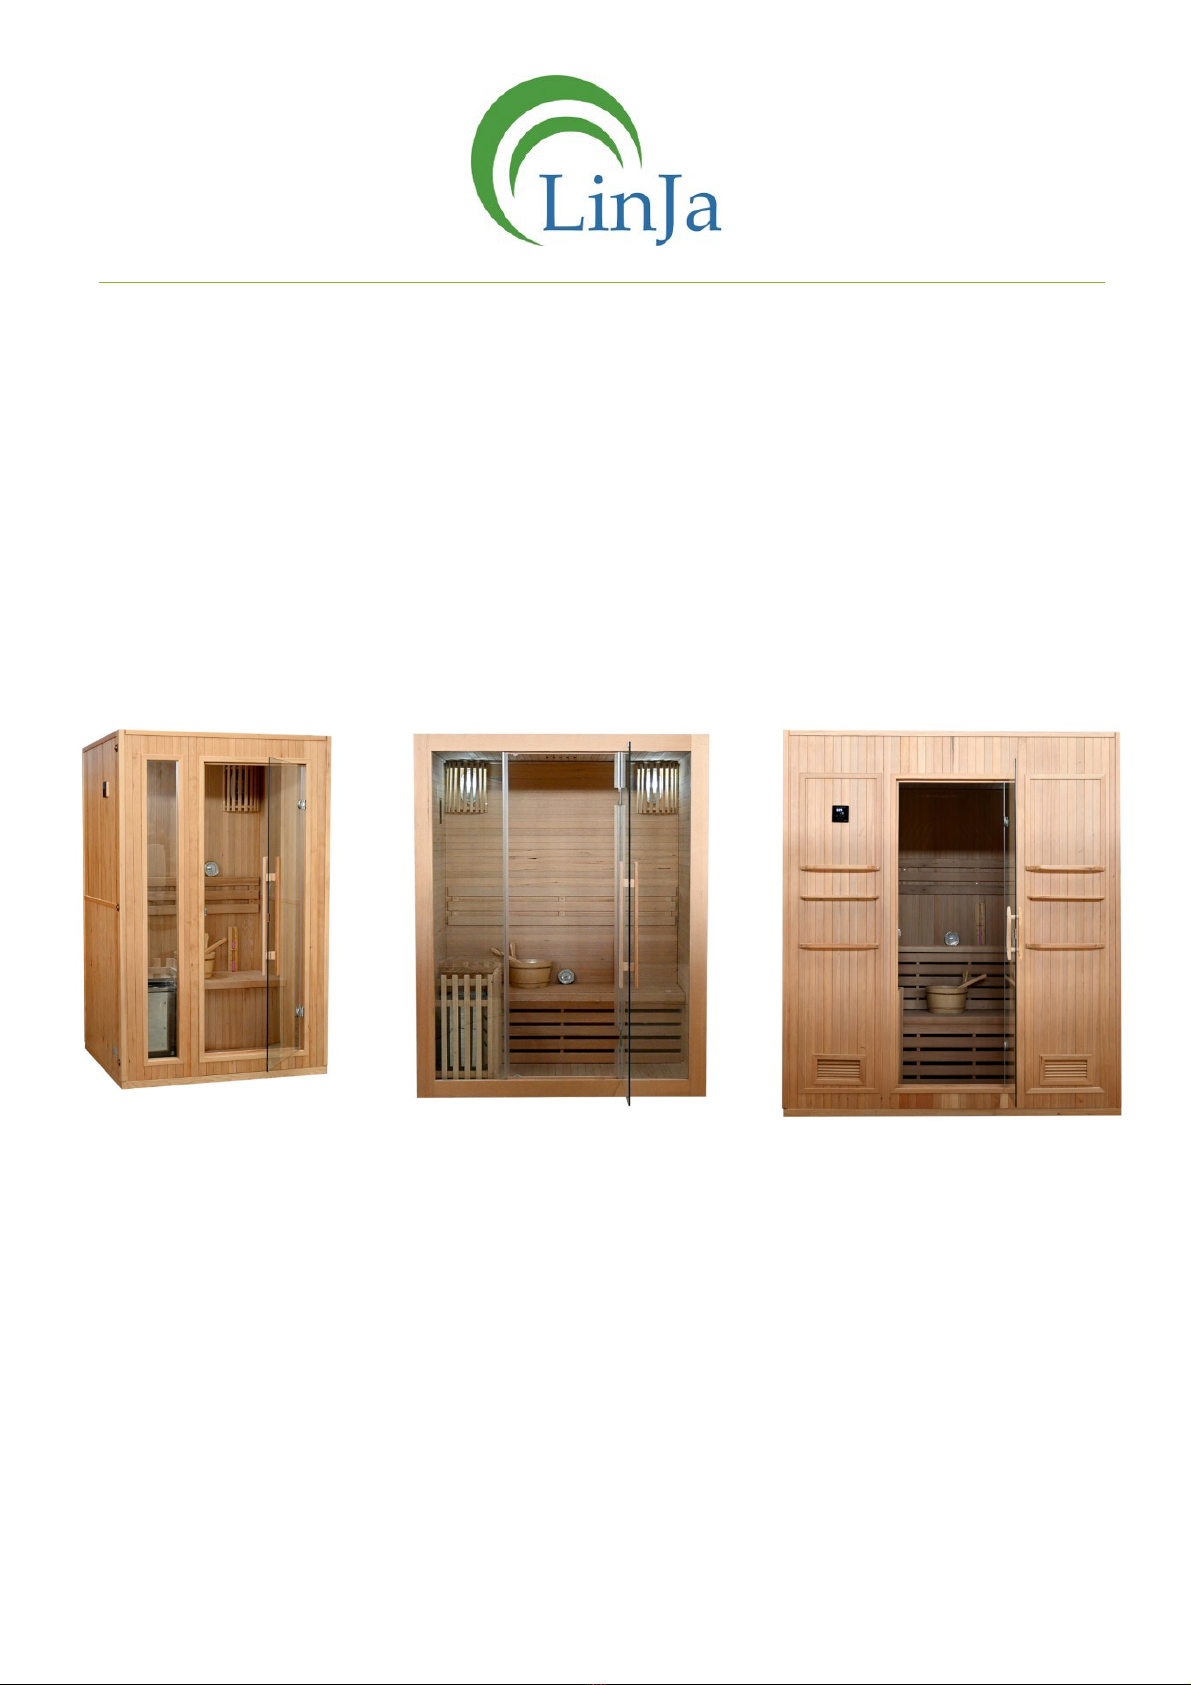
For the models:
LinJa GmbH & Co. KG
Unterdürrbacherstr. 222
97080 Würzburg
Tel: +49 931 453 24 350
•Kopenhagen / EN2
•Larvik / E2
•Lillehammer / EA2
•Brevik / EN3
•Verdal / E3
•Oulu / EA3
•Molde / EN4
•Ruka / EA4

Table of contents
Foreword.................................................................................................................................................... 3
Important Instructions............................................................................................................................... 3
Safety Instructions ..................................................................................................................................... 4
Usage tips................................................................................................................................................... 4
Scope of delivery........................................................................................................................................ 4
Assembly .................................................................................................................................................... 5
Step 1: Floor ........................................................................................................................................... 5
Step 2: Back- and Sidewalls.................................................................................................................... 5
Step 3: Bench ......................................................................................................................................... 5
Step: Front ............................................................................................................................................. 5
Step 5: Roof............................................................................................................................................ 6
Step 6: Lamps......................................................................................................................................... 6
Step 7: Sauna Stove ............................................................................................................................... 6
Transport.................................................................................................................................................... 6
Assembly Controller................................................................................................................................... 7
Manual Controller...................................................................................................................................... 9
DO-T ..................................................................................................................................................... 11
Installation ....................................................................................................................................... 11
Function ........................................................................................................................................... 11
Connecting the cables tot he control box................................................................................................ 13
Connecting the Sauna-Controller / Display ............................................................................................. 14
Connecting the temperature sensor........................................................................................................ 15
Connecting the sauna stove..................................................................................................................... 15

Foreword
Dear Customer,
We are pleased that you have chosen one of our products.
Before unpacking the sauna, check the packaging for any damage!
Before assembly, all parts must also be checked for damage and completeness.
Before assembling and using this product, please read all the instructions and strictly follow the
procedure.
This sauna was designed in terms of design and functionality for private use.
We are not liable for improper use of our products.
Our products are subject to constant development.
Therefore, there may be changes in the design and use of other components.
Do you have questions regarding the product?
Important Instructions
Damage found when unpacking must be reported to us immediately with photos.
Two people (or three, depending on the size of the cabin) should set up the sauna, taking these
assembly instructions into account.
The power connection for the sauna must be carried out by a certified electrician.
He must also ensure sufficient grounding to avoid accidents and malfunctions. Please have an
electrician check the operation of the GFCI (if fitted)..
When it comes to the statics of the floor, it must be ensured that it can withstand the total weight of
the sauna and the people intended for it.
Please note:
The product is designed exclusively for private use.
Please read the assembly instructions carefully first!
If you still have questions about the construction, we will be happy to help you.
Complaints arising from incorrect assembly or use are excluded from the warranty!
Note: The photos are for your reference only and may contain some variations.
Safety Instructions
•Never attach a door lock to the sauna!
•Never touch the oven and lamps with your hands when they are switched on!
•Make sure the sauna is adequately ventilated!
•Do not use the sauna if you have open wounds or burns!
•Do not use the sauna if you are pregnant!
•Consult a doctor before use if you suffer from any of the following problems:
oyou are elderly or ill
ohyperthermalgesia
oobesity
odiabetes
ohigh blood pressure
oHeart & circulatory problems
Usage tips
•recommended temperature: 60 – 75°C
•The temperature displayed on the controller may differ from the temperature on the
thermometer.
•Drink enough water
•Shower before use
•Do not go to the sauna immediately after eating or strenuous activities (e.g. sport)..
Scope of delivery
Count
Element
1
Floor element
1
Ceiling element
1
Rear wall element
1
Front element with glass door
2
Side panel
1
Oven
1
Ladle with bucket
1
Hourglass
1
Thermometer
1
Accessories (screws, door handles and depending on the model 1-2 benches)

Assembly
Step 1: Floor
Please align the floor in the desired location to start assembling the rear and side walls.
Step 2: Back- and Sidewalls
Please connect the side panels with the back wall panel and the floor panel by placing them on the
grooves of the floor panel. Please align the buckles and then tighten them.
Step 3: Bench
Depending on the model, please install the front bench panel for one or two benches. To do this, slide
it along the horizontal guide on the side panels. Be careful not to scratch the side panels.
Then please install the seat by mounting it on the bench panel.
Step: Front
Now please mount the front panel by placing it on the grooves of the bottom panel. Again, please
align the buckles and then tighten them.
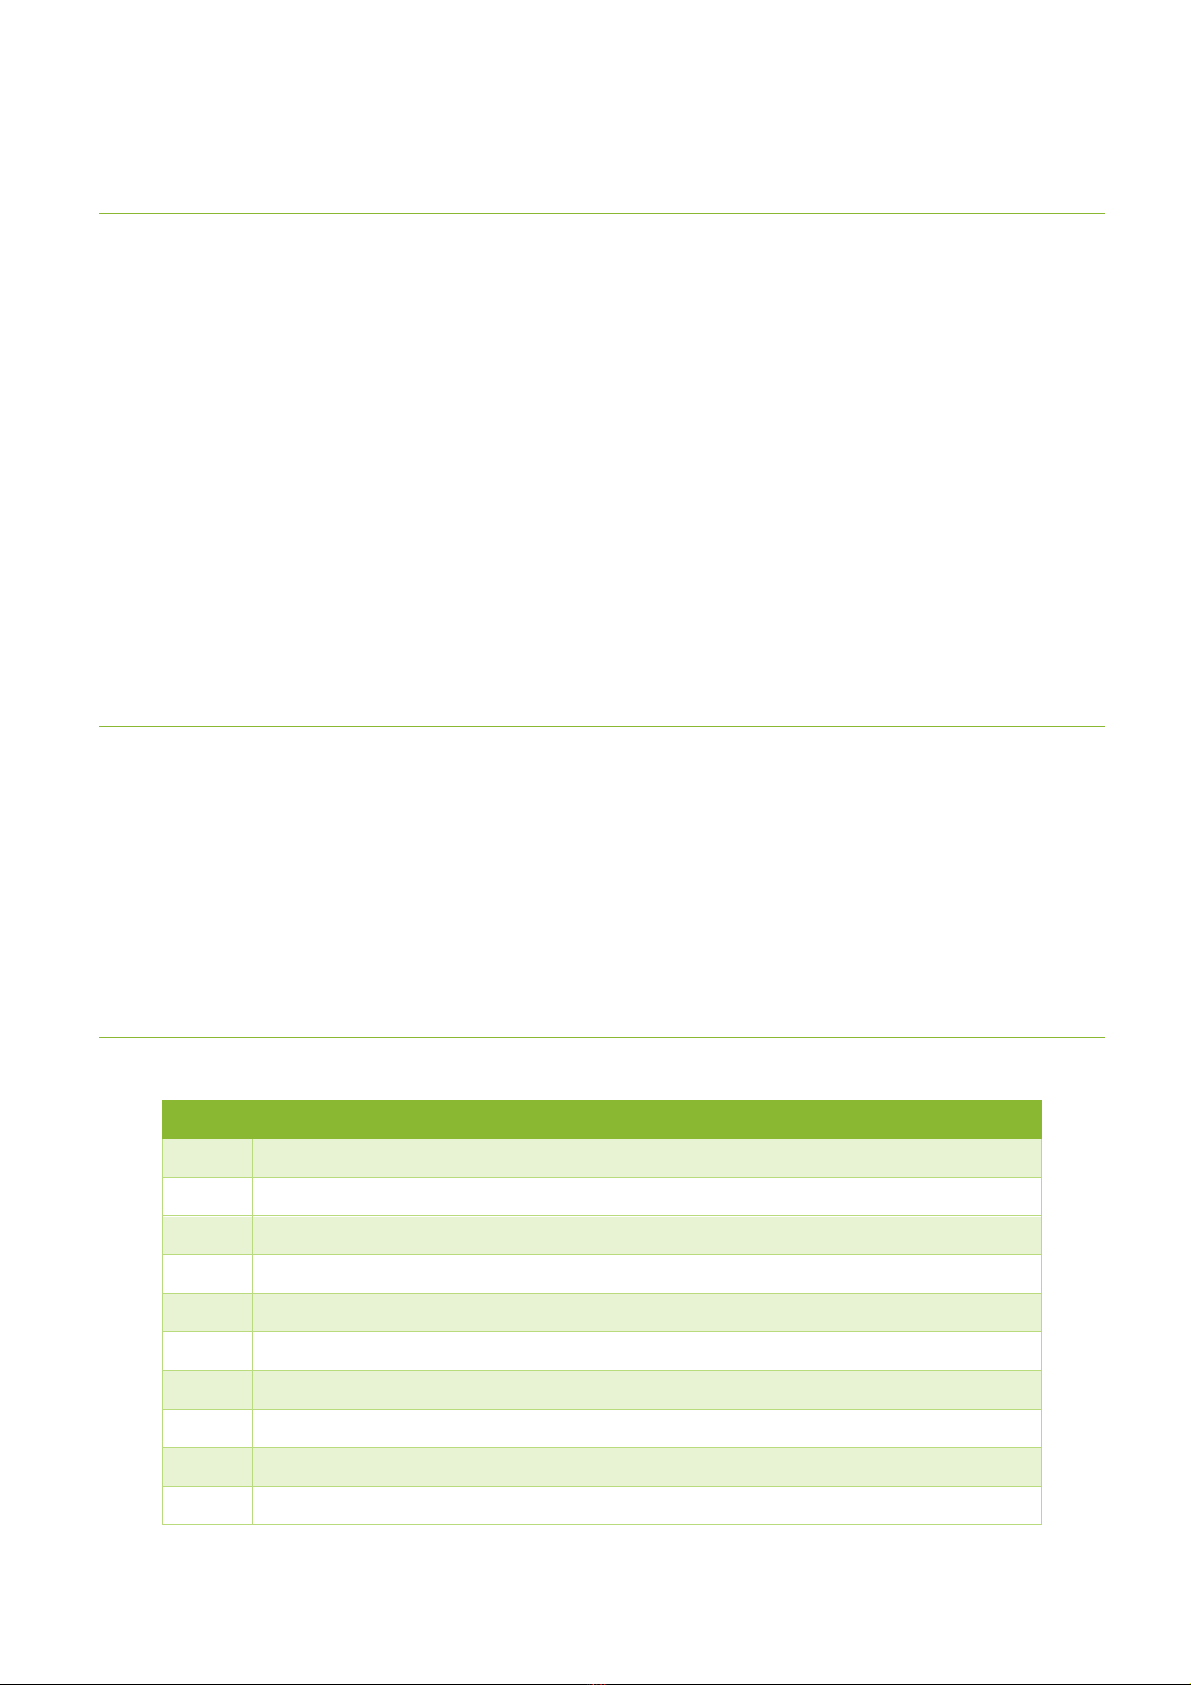
Step 5: Roof
Now please put the roof on the sauna. Carefully lift the roof panel and place it on the four side walls.
Once you have placed all four corners in the correct spot, gently press the roof down so that it is flush
with all four corners.
Step 6: Lamps
Finally, to connect the lights for your sauna, please pull the cables through the small holes in the roof
panel. The further cabling, as well as the power connection, takes place directly on the roof panel.
Step 7: Sauna Stove
Please pull the cable of the sauna heater from the inside to the outside through the small hole in the
side wall. Although it is a 220-230V power supply, we recommend having the connection done by a
professional.
Transport
Make sure the boxes are not exposed to moisture.
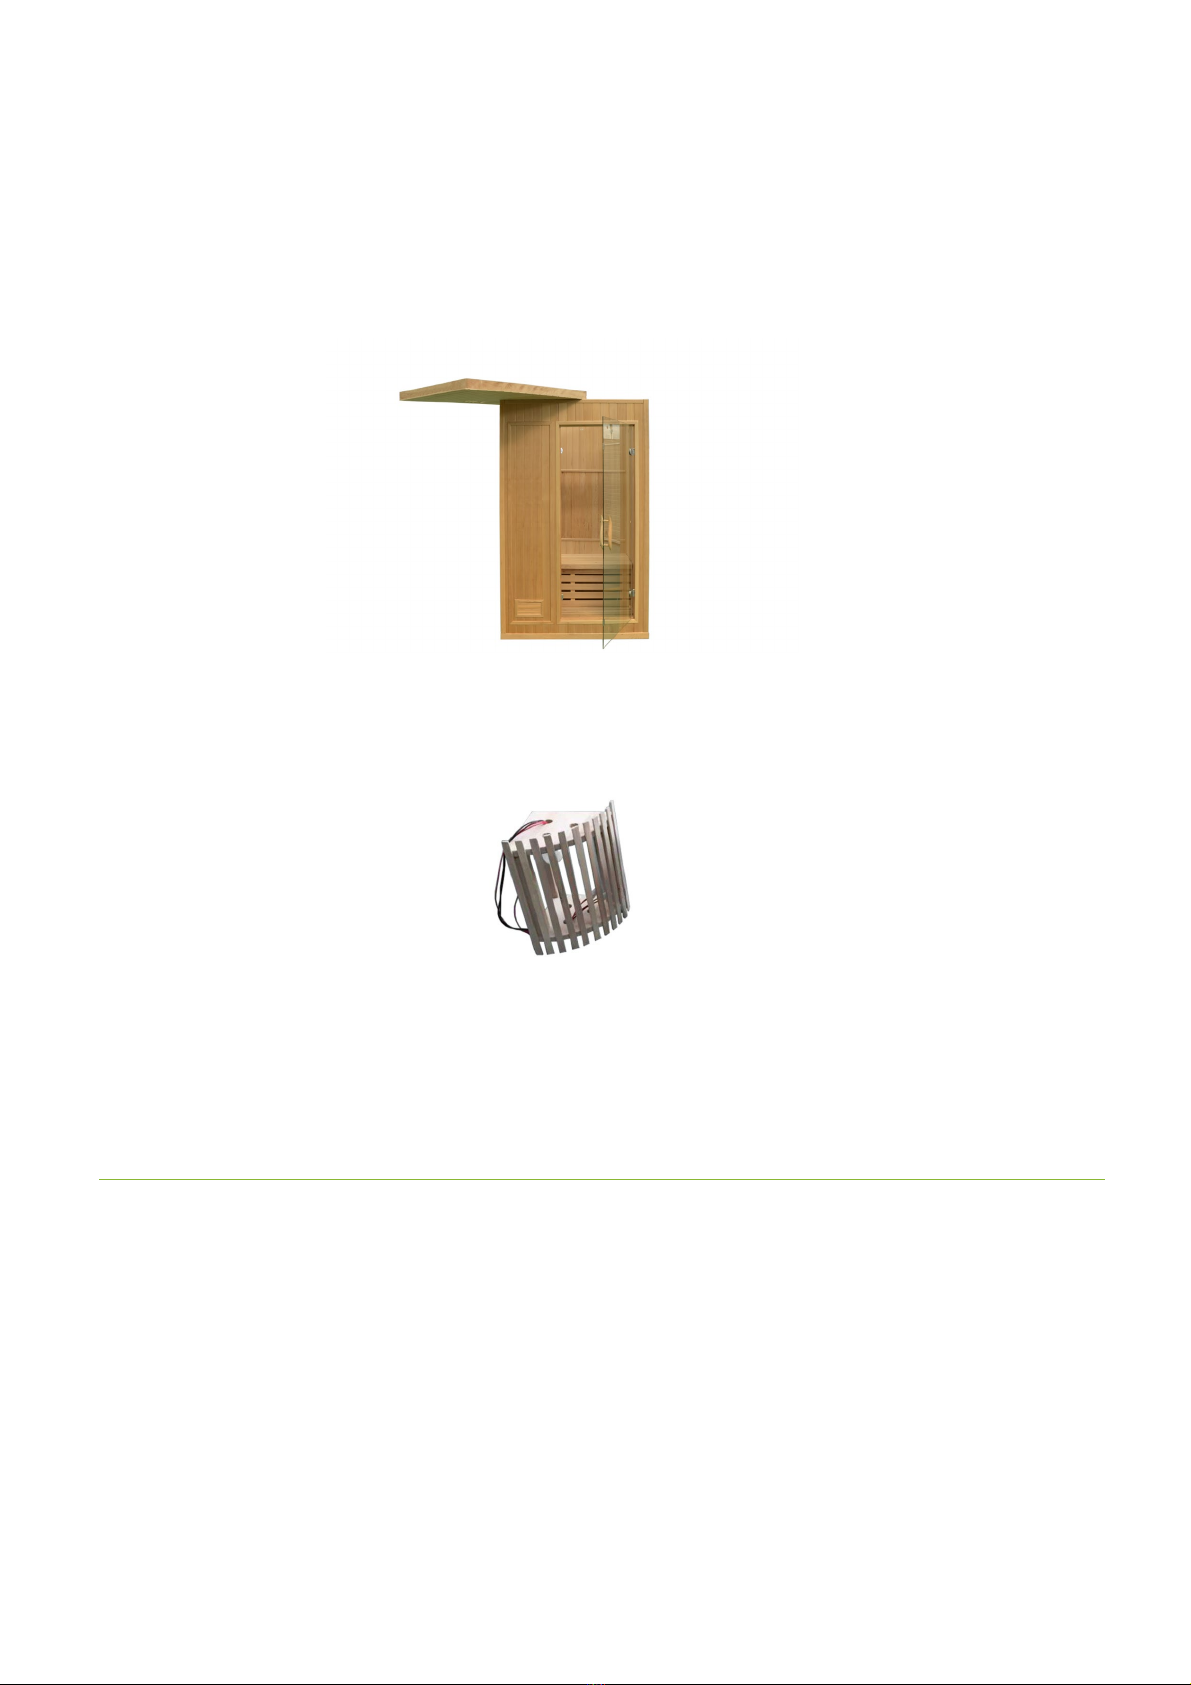
Assembly Controller
The display was built into the side wall for safe transport of the sauna.
This must be removed to use the sauna.
To do this, first remove the display surface by applying pressure to the clip on the top.
Remove the 2 temperature sensor wires, black jacketed, and 5 connectors, white jacketed (7 wires
total) from the controller.
Warning: Be careful not to remove the flat white cable from the display!
Instead of the display, the wooden bracket is built into the sauna wall.
To do this, first pull all cables through the opening in the back of the holder.
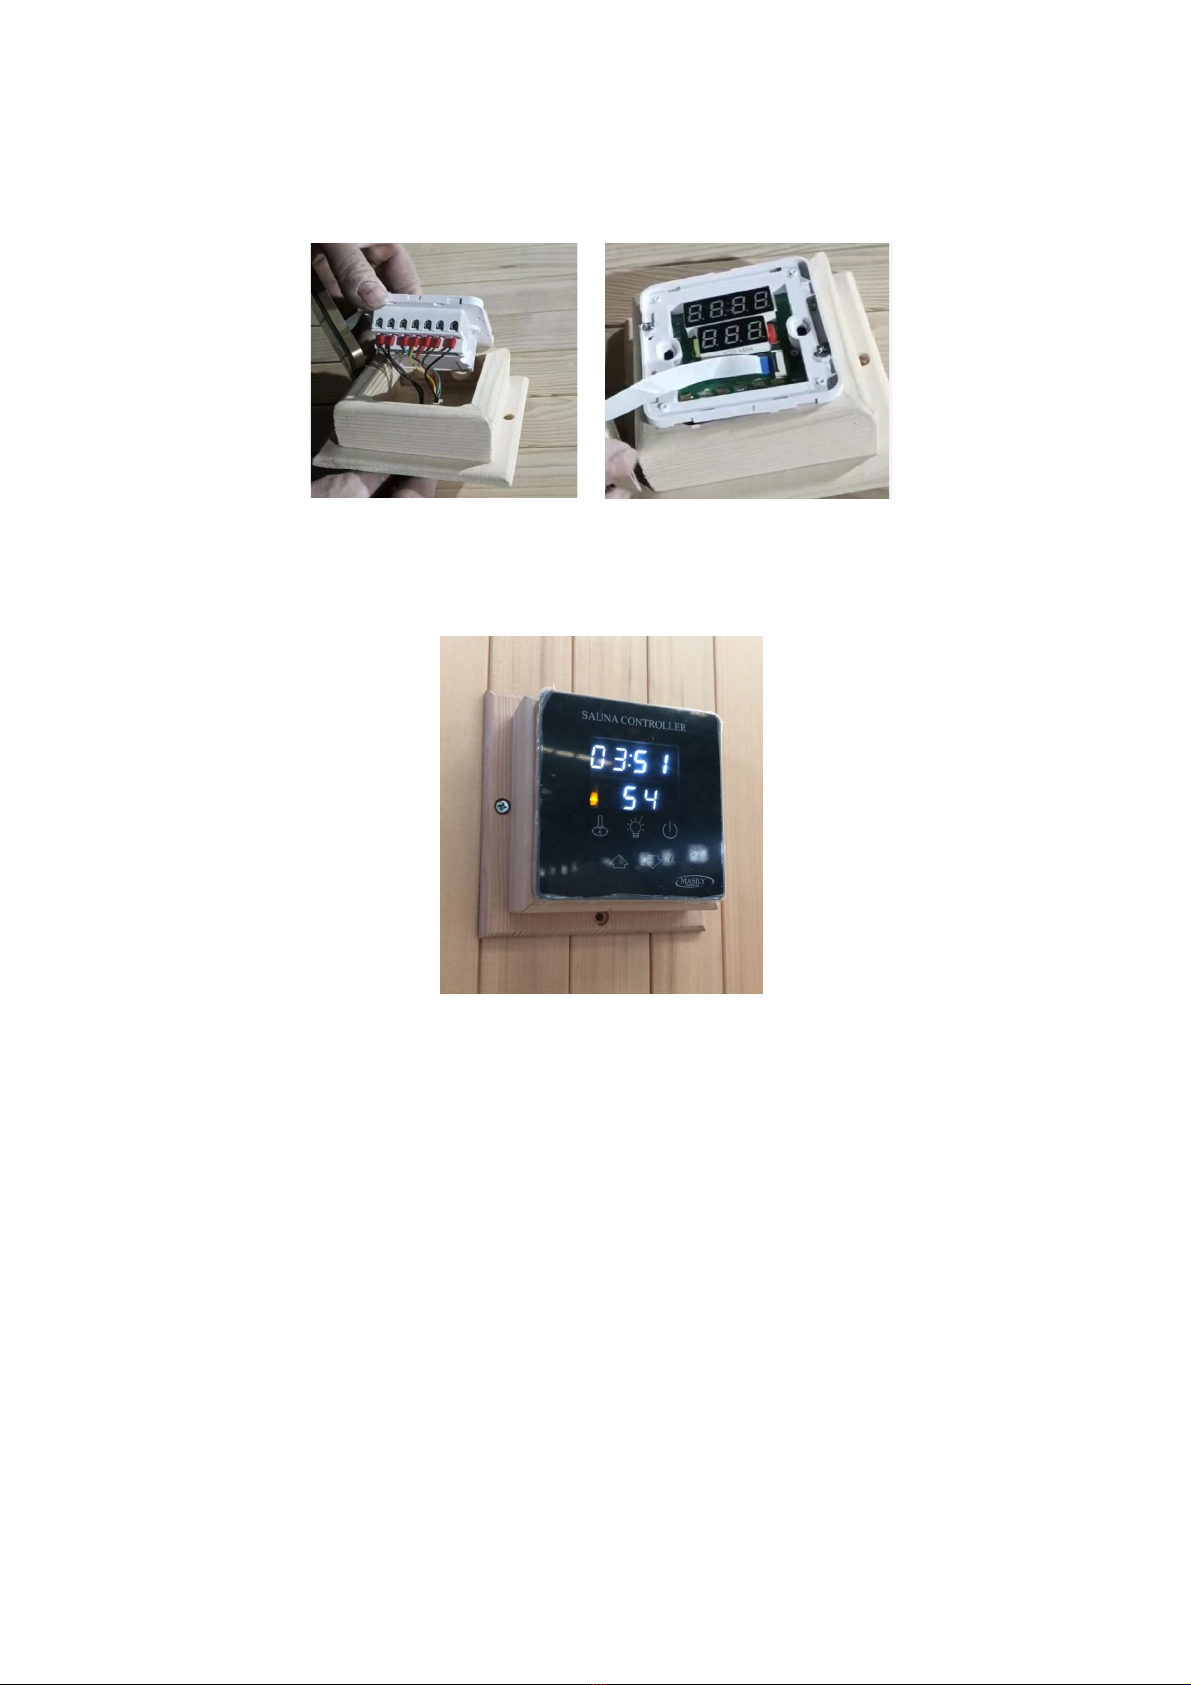
Reattach the cables to the controller and attach the controller to the bracket.
Make sure the holes in the bracket are facing up to allow warm air to escape upwards.
Reattach the display surface.
Then screw the holder into the sauna wall in place of the controller's old position.
Make sure the holes in the bracket are facing up to allow warm air to escape upwards.

Manual Controller
Temperature / duration setting: Pressing this button takes you to the setting of the desired
temperature. The temperature display starts flashing and can be adjusted using the arrow buttons.
By pressing the button again you switch to the setting for the duration of the sauna session. The time
display starts flashing and can be set.
Press the button again to exit settings. Alternatively, the last step happens automatically after 15
seconds.
If the temperature in the sauna is higher than the set temperature, the LED lights up red and the
heater switches off. If the temperature drops to 2°C below the set temperature, the oven switches on
again and the LED lights up orange.
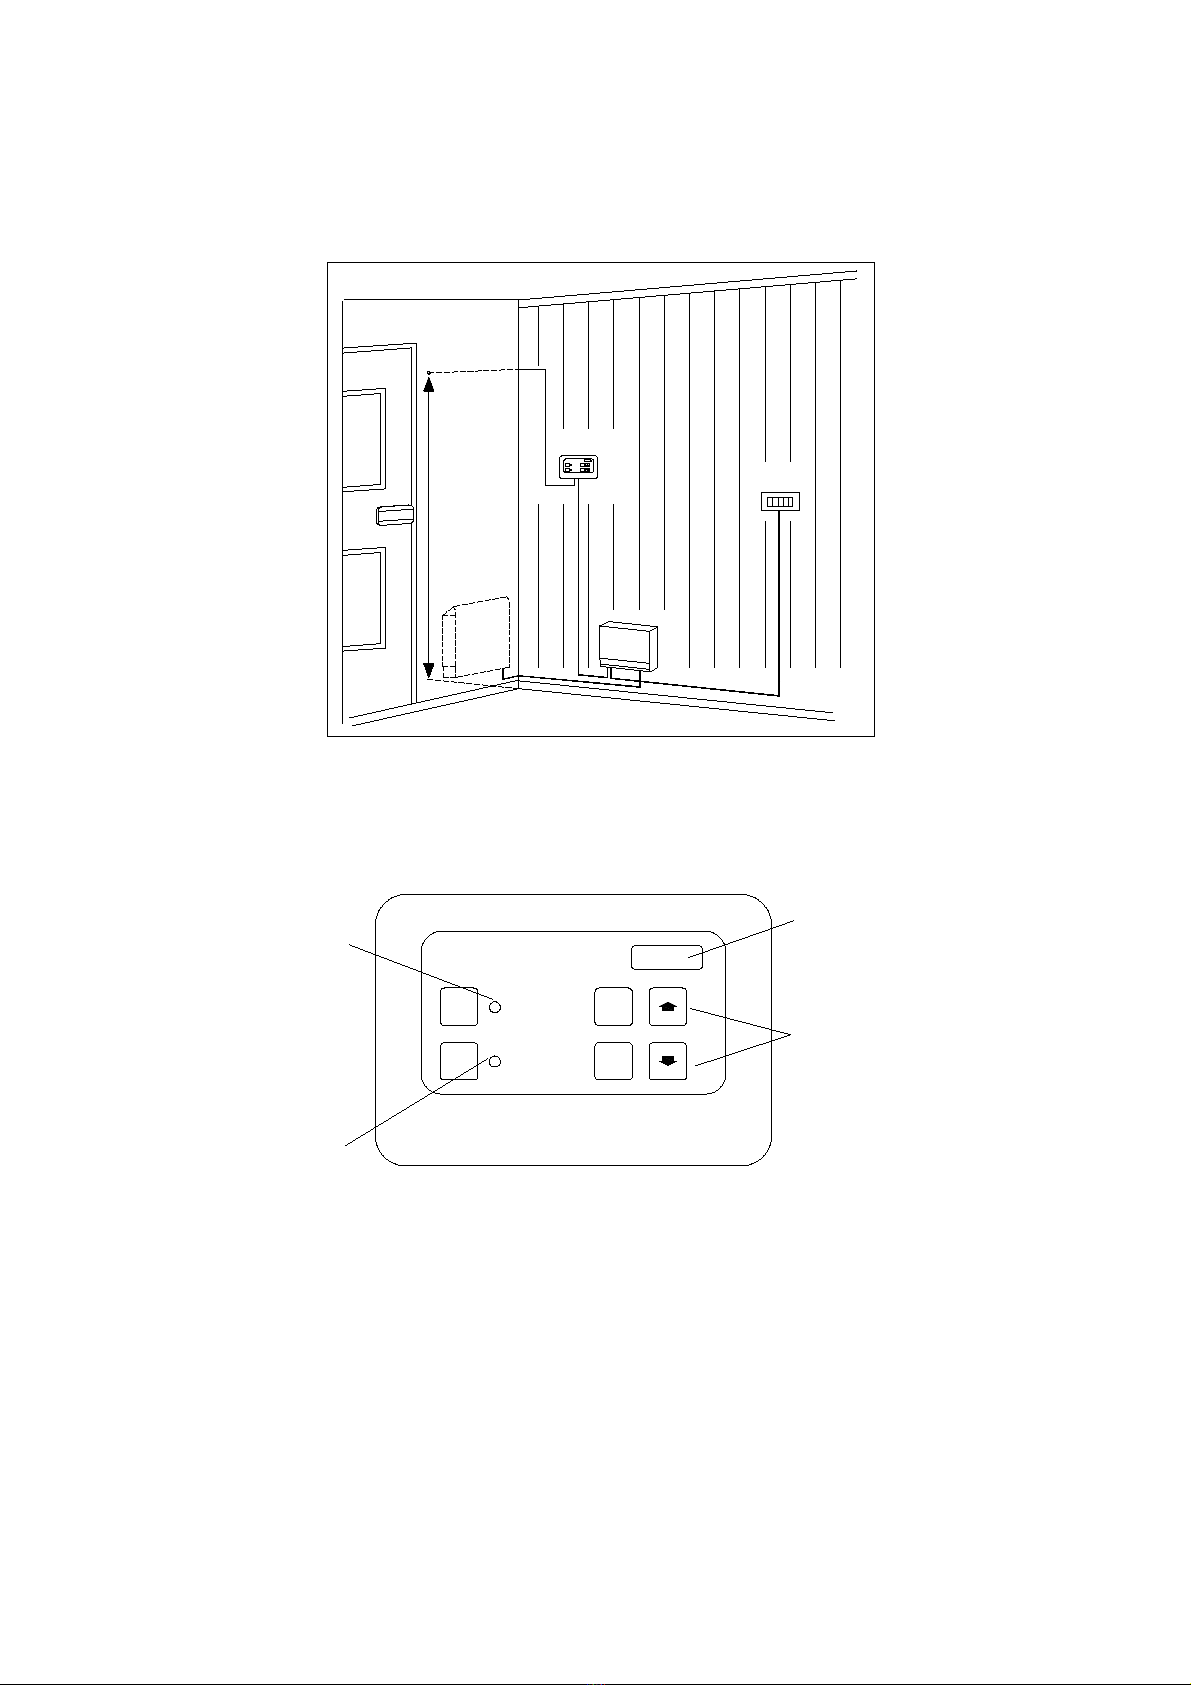
DO-T
Installation
Function
ON / OFF:
Starts or stops the steam generator. After switching on, the "Work" lamp lights up and the
temperature display shows the temperature. Pressing it again switches the steam generator off again.
LIGHT:
Turns the lights on or off in the steam room. When the lights are on, the LIGHT indicator lamp will be
lit.
TEMP:
Opens the temperature setting. The temperature can be set between 35°C and 55°C by pressing the
arrow keys.
TIME
TEMP
ON/
OFF
LIGHT
1700
mm
Power
Control
Sensor
Work
indicator
up and down key
Lighting
indicator
Temperature
display
TIME
TEMP
ON/
OFF
LIGHT
TIME:
Opens the duration setting. The duration can be set between 1 and 60 minutes using the arrow keys.
If the temperature in the cabin is higher than the set temperature, steam production is stopped.
If the temperature falls below 2°C less than the set temperature, the steam generator is switched on
again.
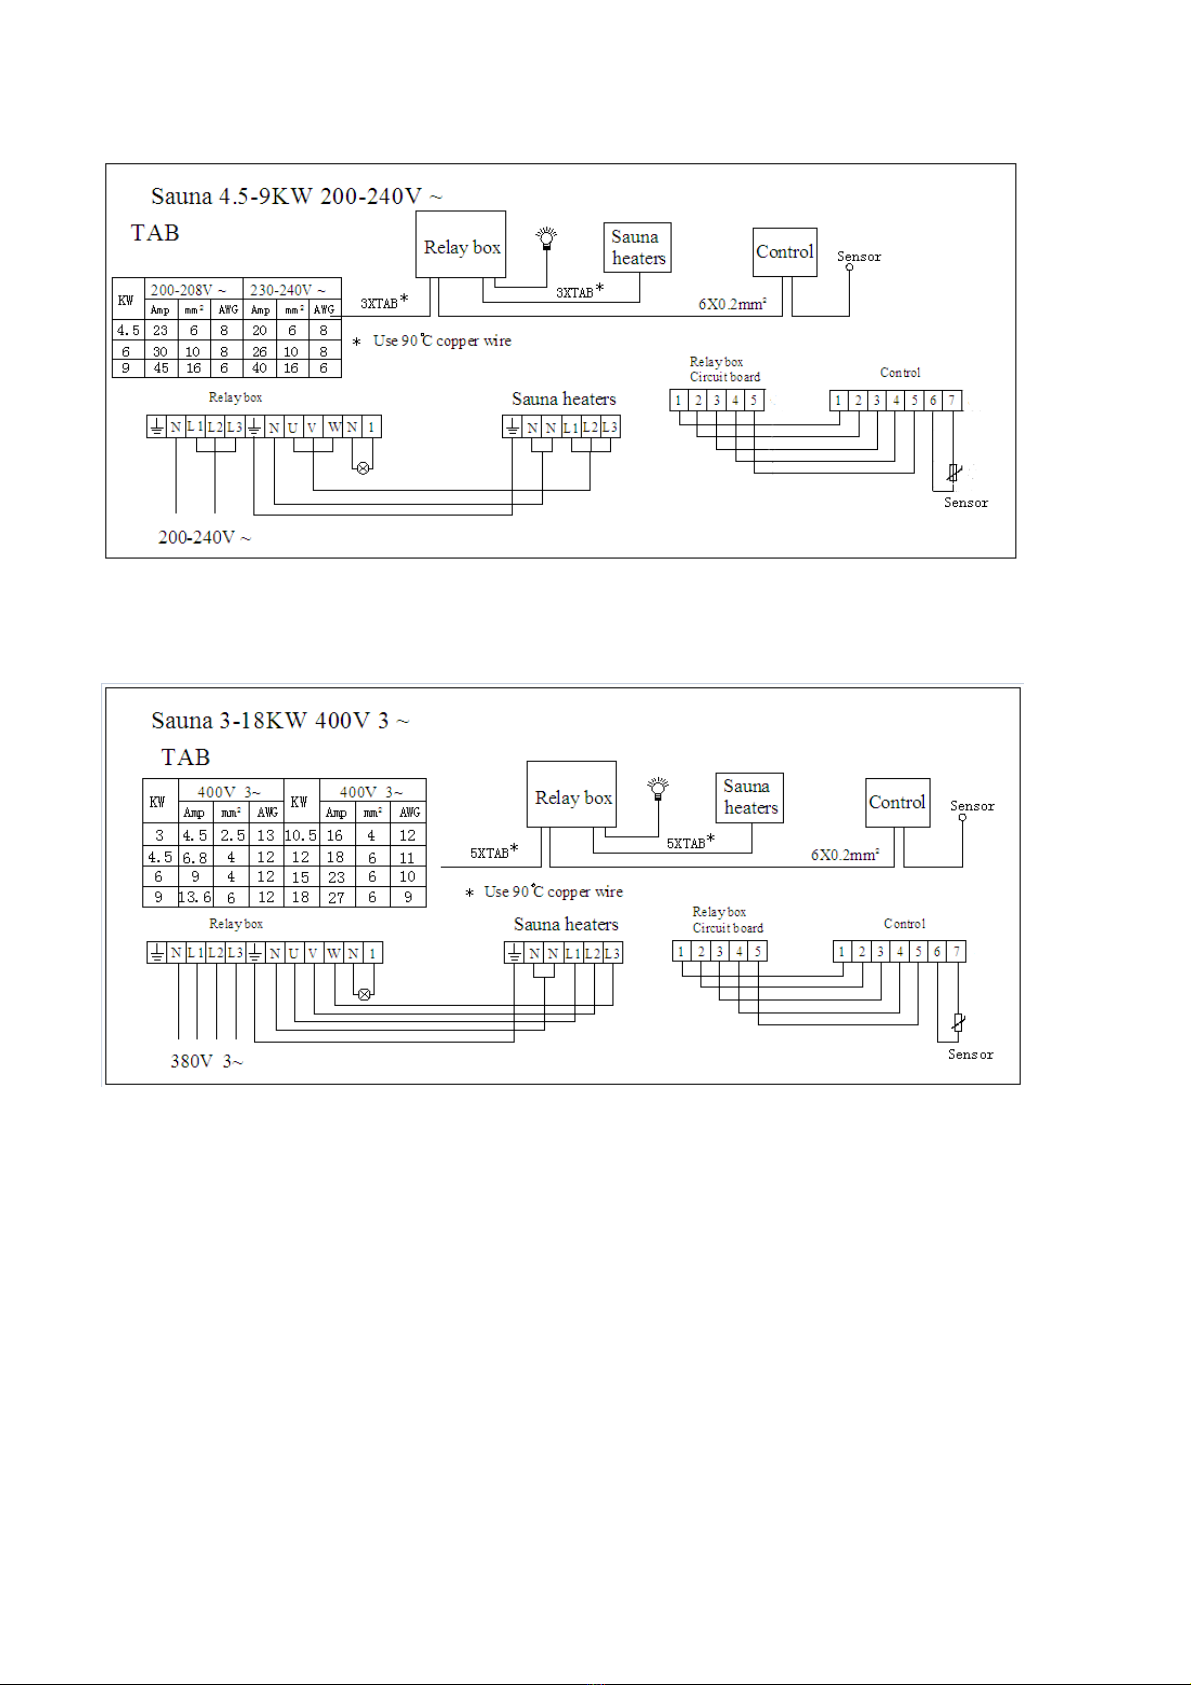
Sauna 3-18KW 400V 3 ~
Relay box Control Sensor
TAB
KW
4.5
6
Amp mm AWG
2
400V 3~
6.8 412
9412
Sauna
heaters
5XTAB *
Sauna heaters
34.5 2.5 13
862086234.5
Sauna heaters
L3L2
L1NN
1NW
VUN
*
3XTAB
Sauna
heaters
6164061645
8102681030
230-240V ~200-208V ~
AWGmm
22
AmpAWGmmAmp
9
6
KW
TAB
Sensor
Control
Relay box
Sauna 4.5-9KW 200-240V ~
200-240V ~
L3
Sensor
654321 7 8
1 2 3 4 5 6
L1 L2
N
*Use 90 C copper wire
*
3XTAB
Relay box Relay box
Circuit board Control
6X0.2mm2
NL2
L1 L3
380V 3~
N U V W N 1 N N L1 L2 L3
654321 871 2 3 4 5 6
Sensor
400V 3~
KW
Amp
2
AWGmm
1241610.5
106
23
116
15
12
18 27 6 9
18
12
6
13.6
9
2
6X0.2mm
Control
Relay box
Circuit board
Relay box
5XTAB *
Use 90 C copper wire
*
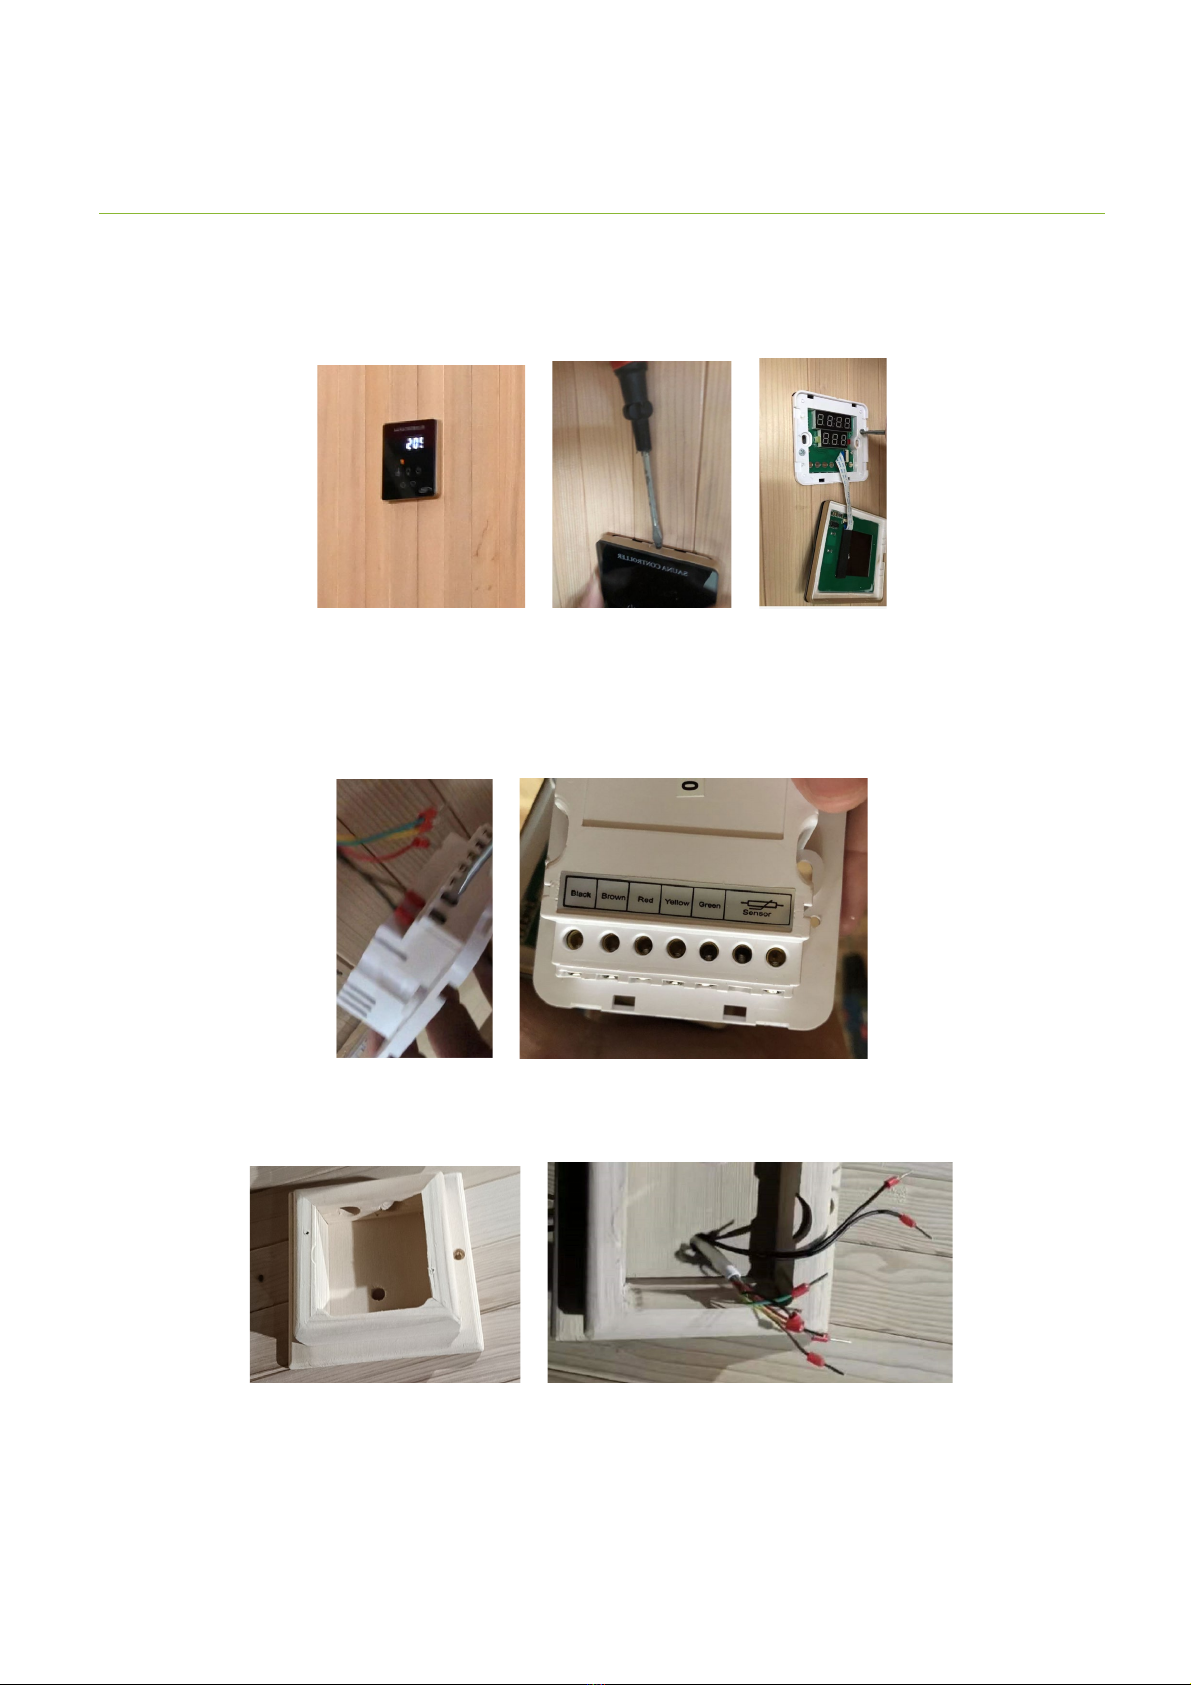
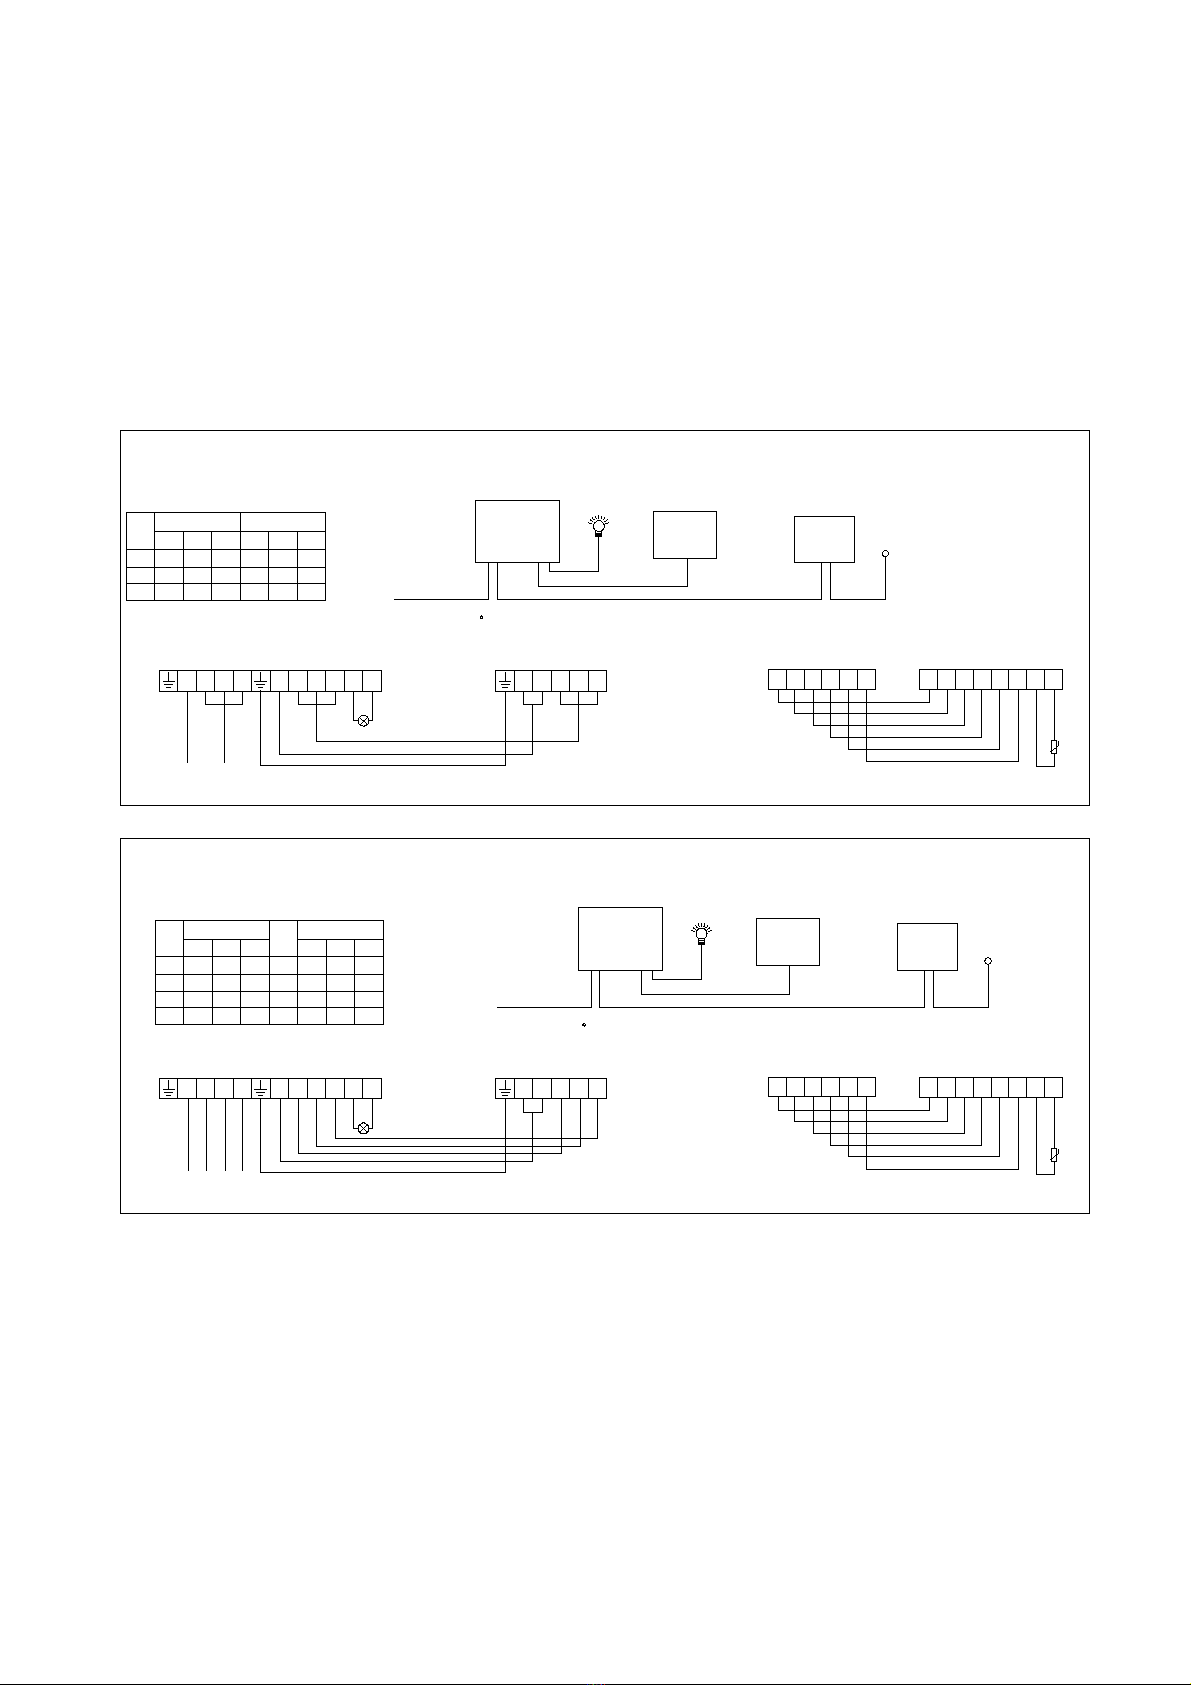
Connecting the cables tot he control box
After setting up your sauna cabin, the cables from the control display, temperature sensor and sauna
heater must be connected to the silver control box on the roof of the sauna.
This should only be carried out by a specialist!
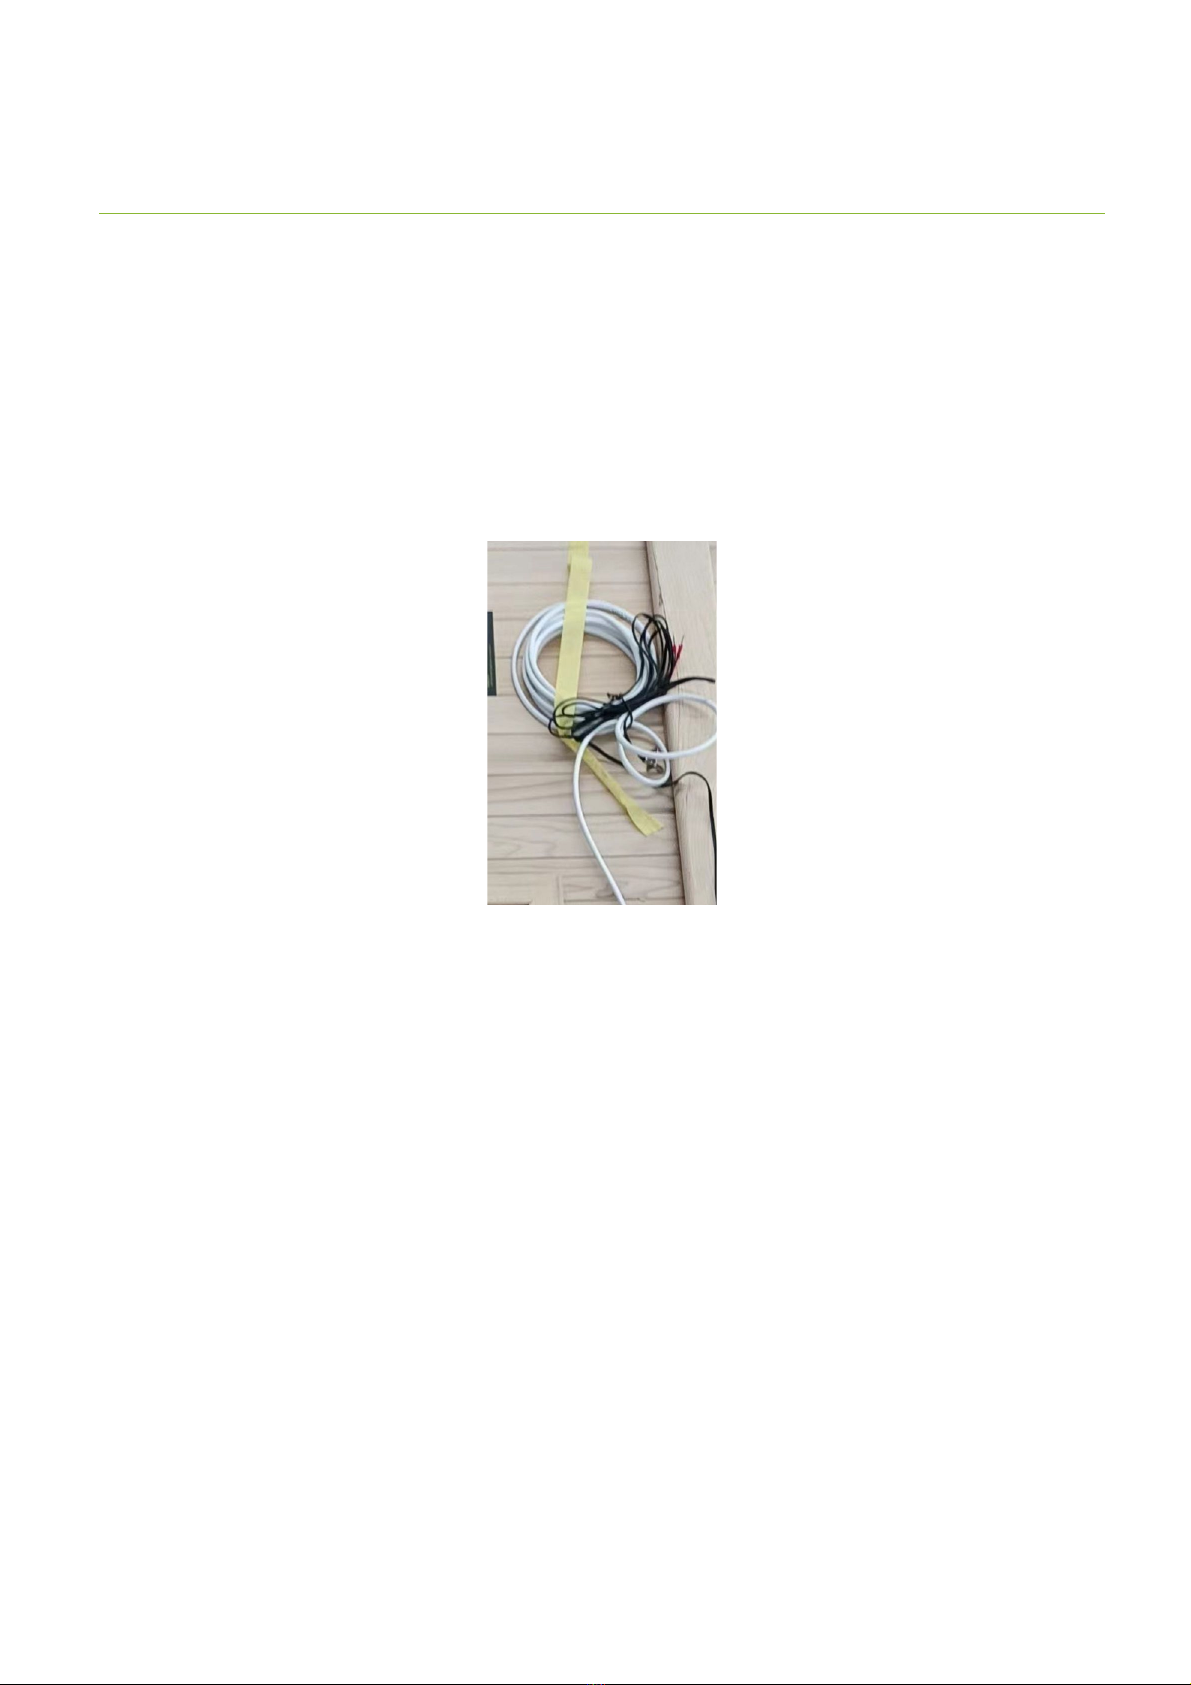
The necessary cables are on the side of the cables where the control box is located, taped to a side
panel.
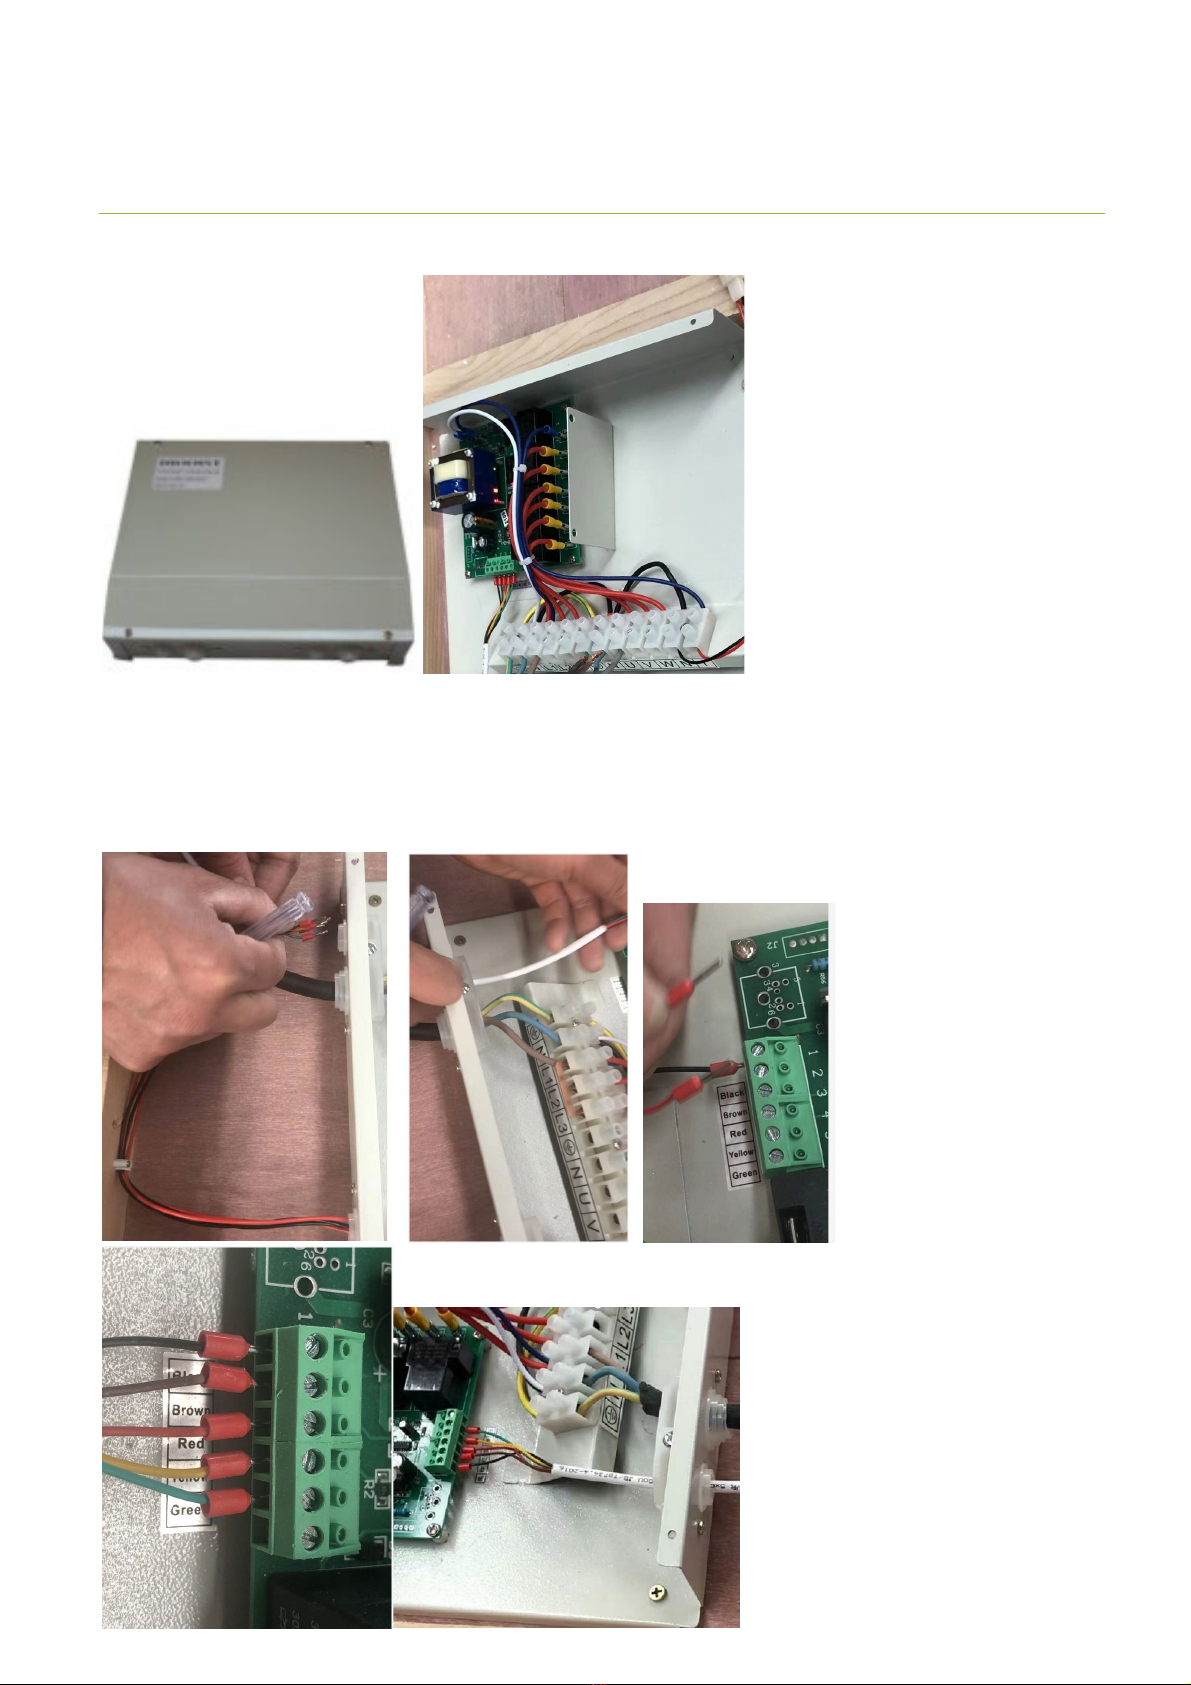
Connecting the Sauna-Controller / Display
Open the control box on the roof by unscrewing it.
The white wire must be connected to the green circuit board.
Pull the cable through the hole on the far left.
Attach the connectors to the circuit board as follows:
Left to right: Black, Brown, Red, Yellow, Green
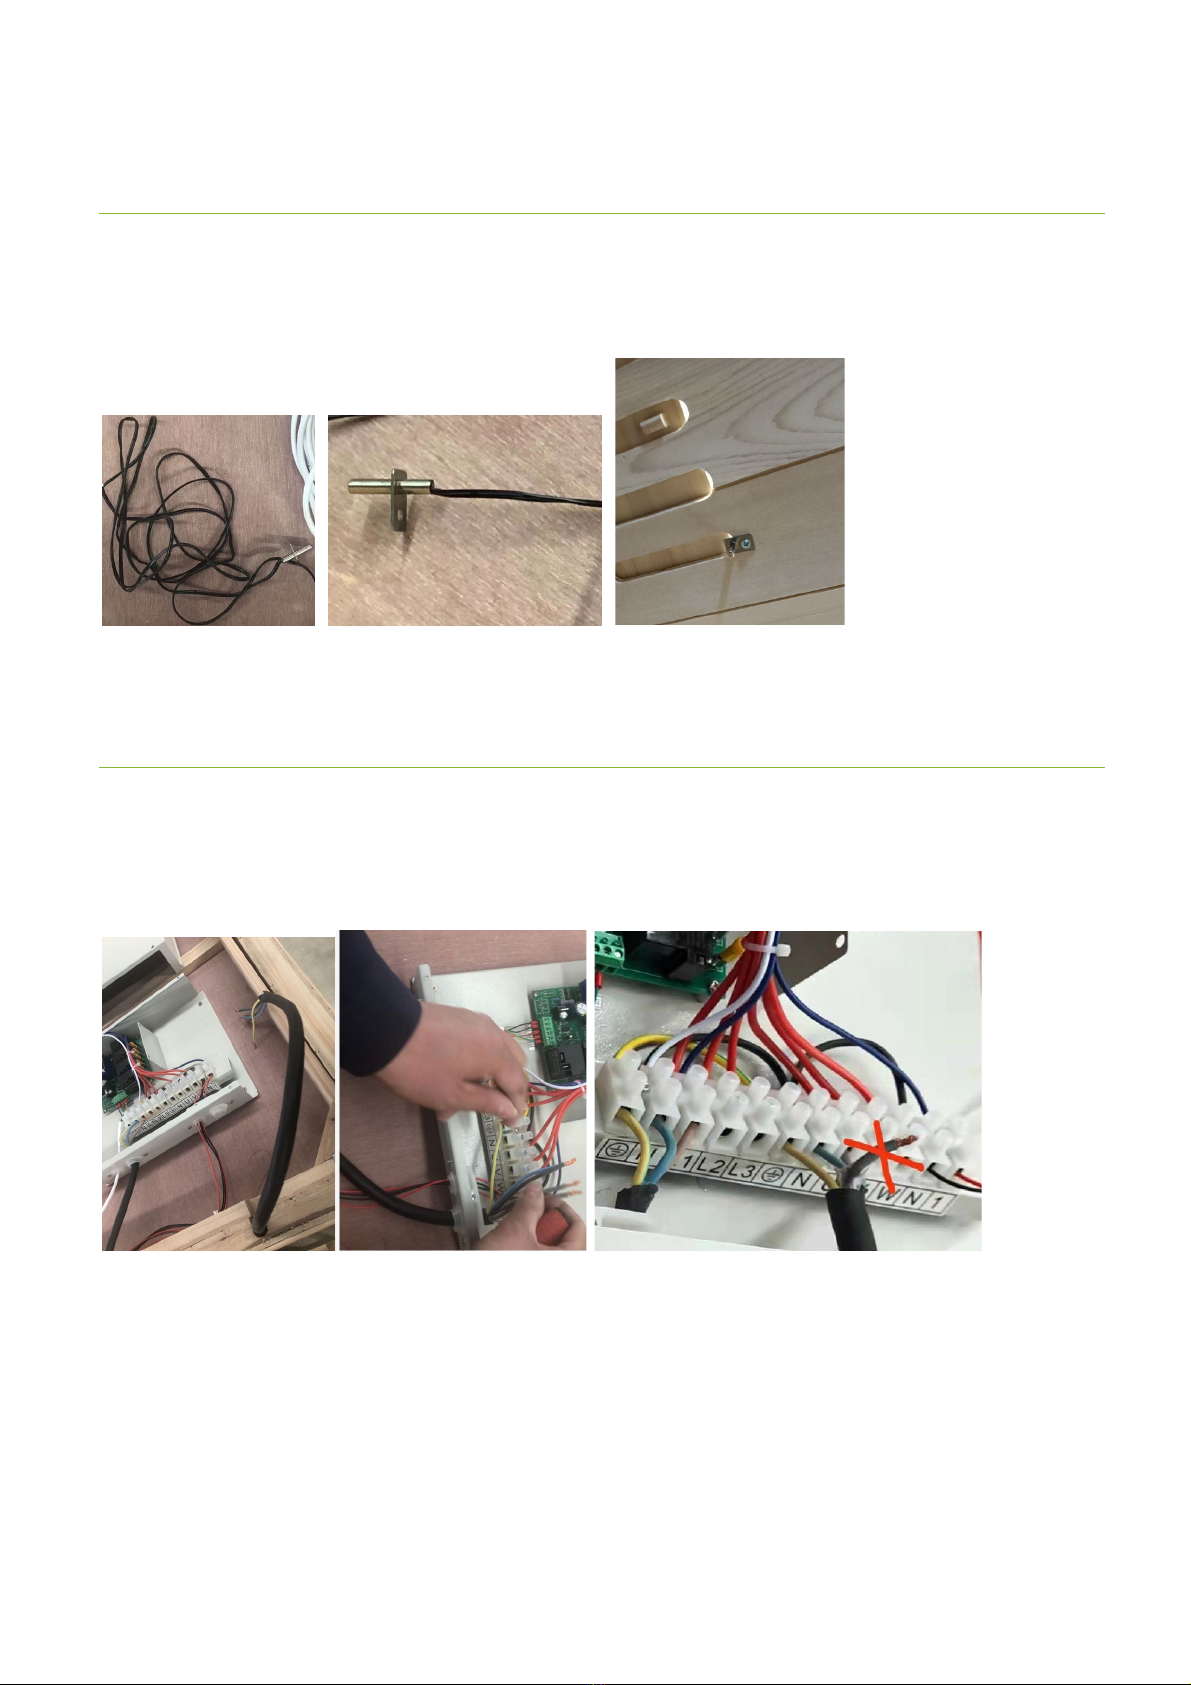
Connecting the temperature sensor
Pull the temperature sensor cable through the ventilation opening in the ceiling and attach it to the
ceiling with the bracket.
Connecting the sauna stove
The sauna stove must also be connected to the control box on the roof.
3-core cables are used for 3kw, 4.5kw or 6kw ovens.
Pull the wire through the right hand opening in the control box and connect both the ground and all
wires as shown in the picture:
This manual suits for next models
7
Table of contents
Other Linja Plumbing Product manuals


Popular Plumbing Product manuals by other brands


Sterling Plumbing
Sterling Plumbing 62044106 Specification sheet

WATERGUARD
WATERGUARD Solo user guide

Kraus
Kraus Britt KPF-1690 installation manual

Carimali
Carimali MyDream Installation

Hans Grohe
Hans Grohe Metropol Classic 31307 1 Series Installation/User Instructions/Warranty

enware
enware EMW803A-150 Installation and maintenance instructions

Clou
Clou Kaldur CL/06.05.001.20 installation instructions

Hans Grohe
Hans Grohe Metris Series Instructions for use/assembly instructions

Omnires
Omnires Y1236/KROCR Installation and Maintenance

Britex
Britex TP6R installation guide

Sanipex
Sanipex AQUAECO AQE-ECO-512R-XX installation guide

newform
newform DAYTIME 69054 instructions