List Premier Education i-LIST Parts list manual

Contents of the Accessory Bagġįįįįįįįįįįįįįįįįįįįįįįįįįįįįįįįįįįįįįįįįįįįįįįįįįįįįįįįįįįįįįįįįįįįįįįįįįįi
Accessories Introductionįįįįįįįįįįįįįįįįįįįįįįįįįįįįįįįįįįįįįįįįįįįįįįįįįįįįįįįįįįįįįįįįįįįįįįįįįįįįįįįįįįįįii
Operation Guide for Windows OSġįįįįįįįįįįįįįįįįįįįįįįįįįįįįįįįįįįįįįįįįįįįįįįįįįįįįįįįįįįįįįįįįįį1
Operation Guide for Mac.........................................................................27
Operation Guide for Linux-SPdriver......................................................35
Troubleshootingġįįįįįįįįįįįįįįįįįįįįįįįįįįįįįįįįįįįįįįįįįįįįįįįįįįįįįįįįįįįįįįįįįįįįįįįįįįįįįįįįįįįįįįįįįįįįįįįįįį37
INTERACTIVE FUNCTION
MANUAL
i-LIST
i-LIST
The i-LIST Interactive Projector!

i
Contents of the Accessory Bag
Please make sure that following items are included in the Accessory Bag.
If any items are missing, contact your dealer.
1.ġAccessory Bag 2.ġPointer
3.ġLight Pen 4.ġBatteries (AAA)

ii
⋘ⴇ宇㔶㐤㯮⒔婬㾔✽
Accessories Introduction
Function Key on the "Pointer Body"
Before using the Pointer.
Screw the Rod part into the pointer
body firmly please.
How to use this
While pressing the button IR is
emitted from the tip of the rod and
the CMOS sensor in the projector
detects the position of it. While the
signal is emitted, the LED Lamp also
lights orange.
1) Position the tip of pointer on the
screen.
2) Push the button to click the target
as a mouse or push and hold the
button to draw a line as a pen.
LED Lamp
Button: Mouse Left Key
IR
Power switch

iii
⋘ⴇ宇㔶㐤㯮⒔婬㾔✽
Accessories Introduction
Function Key on the "Light Pen"
Pen tip with touch sensor
Power switch
How to use this
While the tip of pen is pressed to the
hard screen, IR is emitted from it and the
projector detects the position of it.
1) Position the tip of the pen on the screen.
2) Press and hold the tip of the pen to the
hard screen and you can draw a line as a
pen.
CAUTION
Touch sensor is located in the tip of the
pen therefore, the Battery is consumes if
the tip is pressed . If the pen is not used,
please store it in off position of Power
switch to avoid the consumption of the
battery.
(Please confirm the "off position" as
below; LED lamp of the pen tip does not
light when the tip is pressed.)
Back side Front side

1
Operation Guide for Windows OS
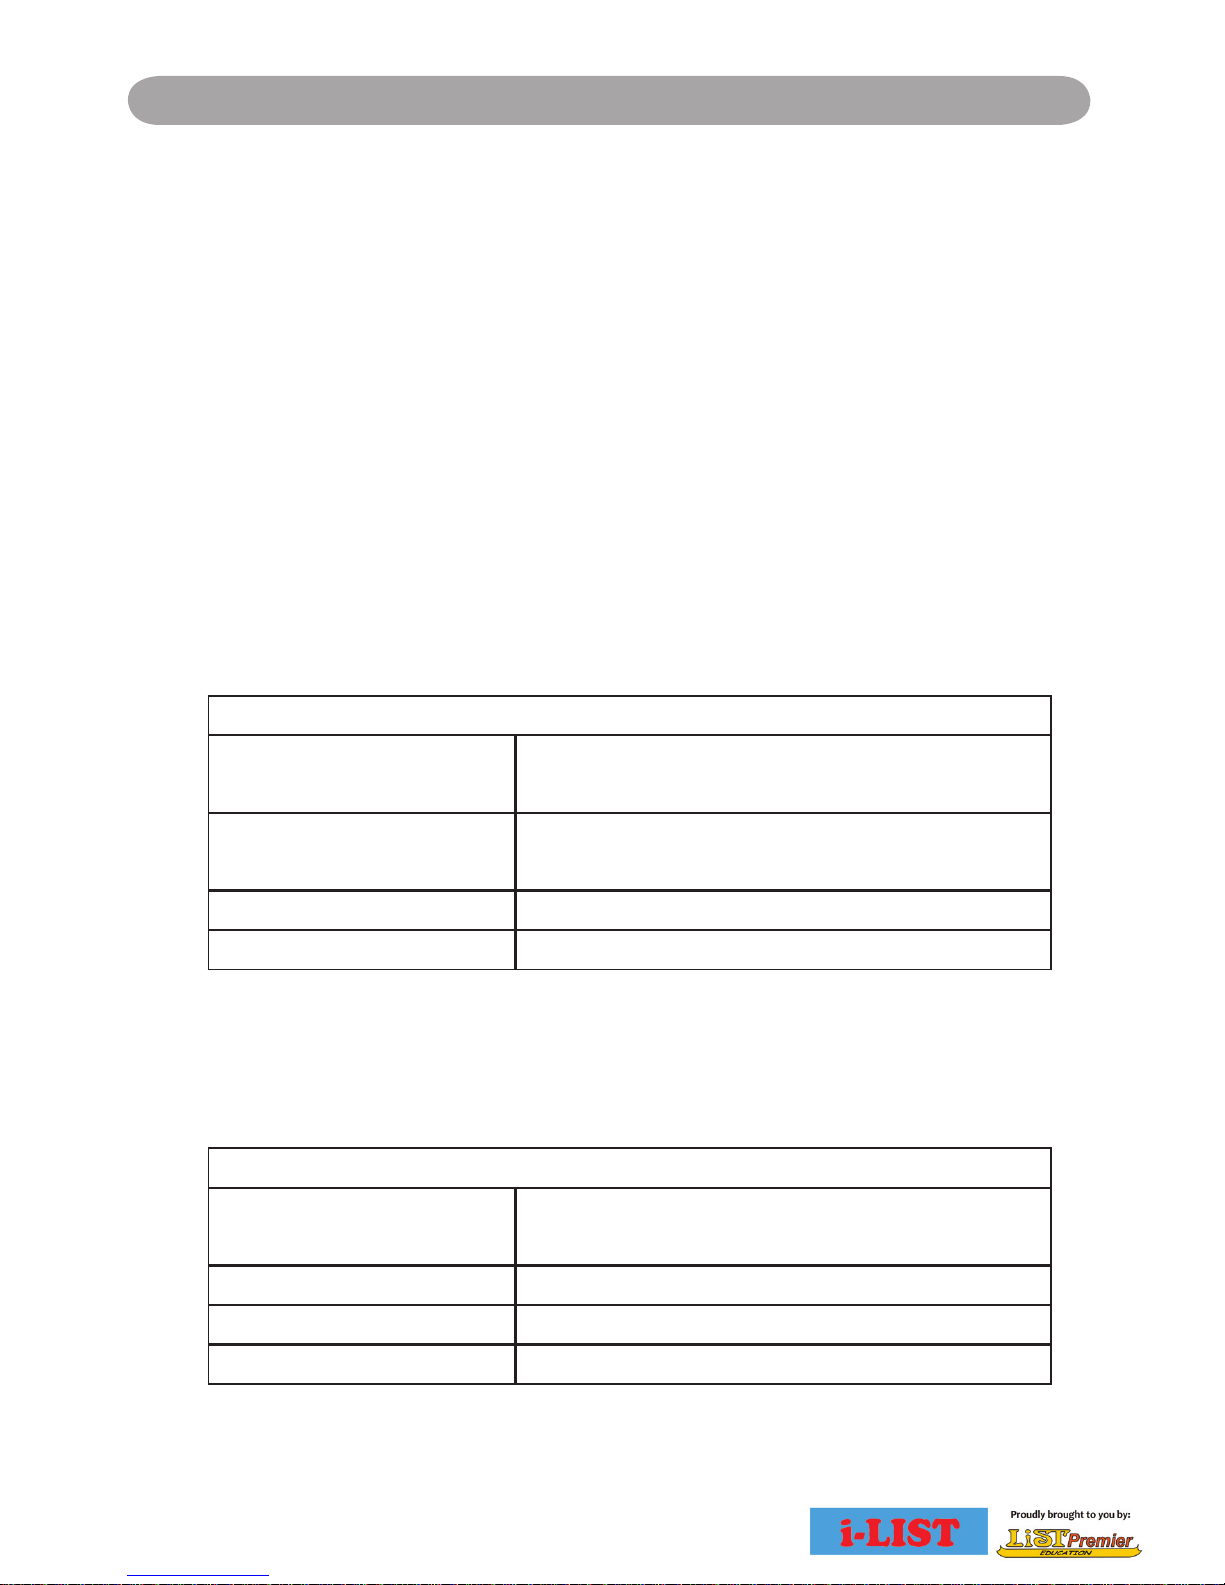
1. System Requirements
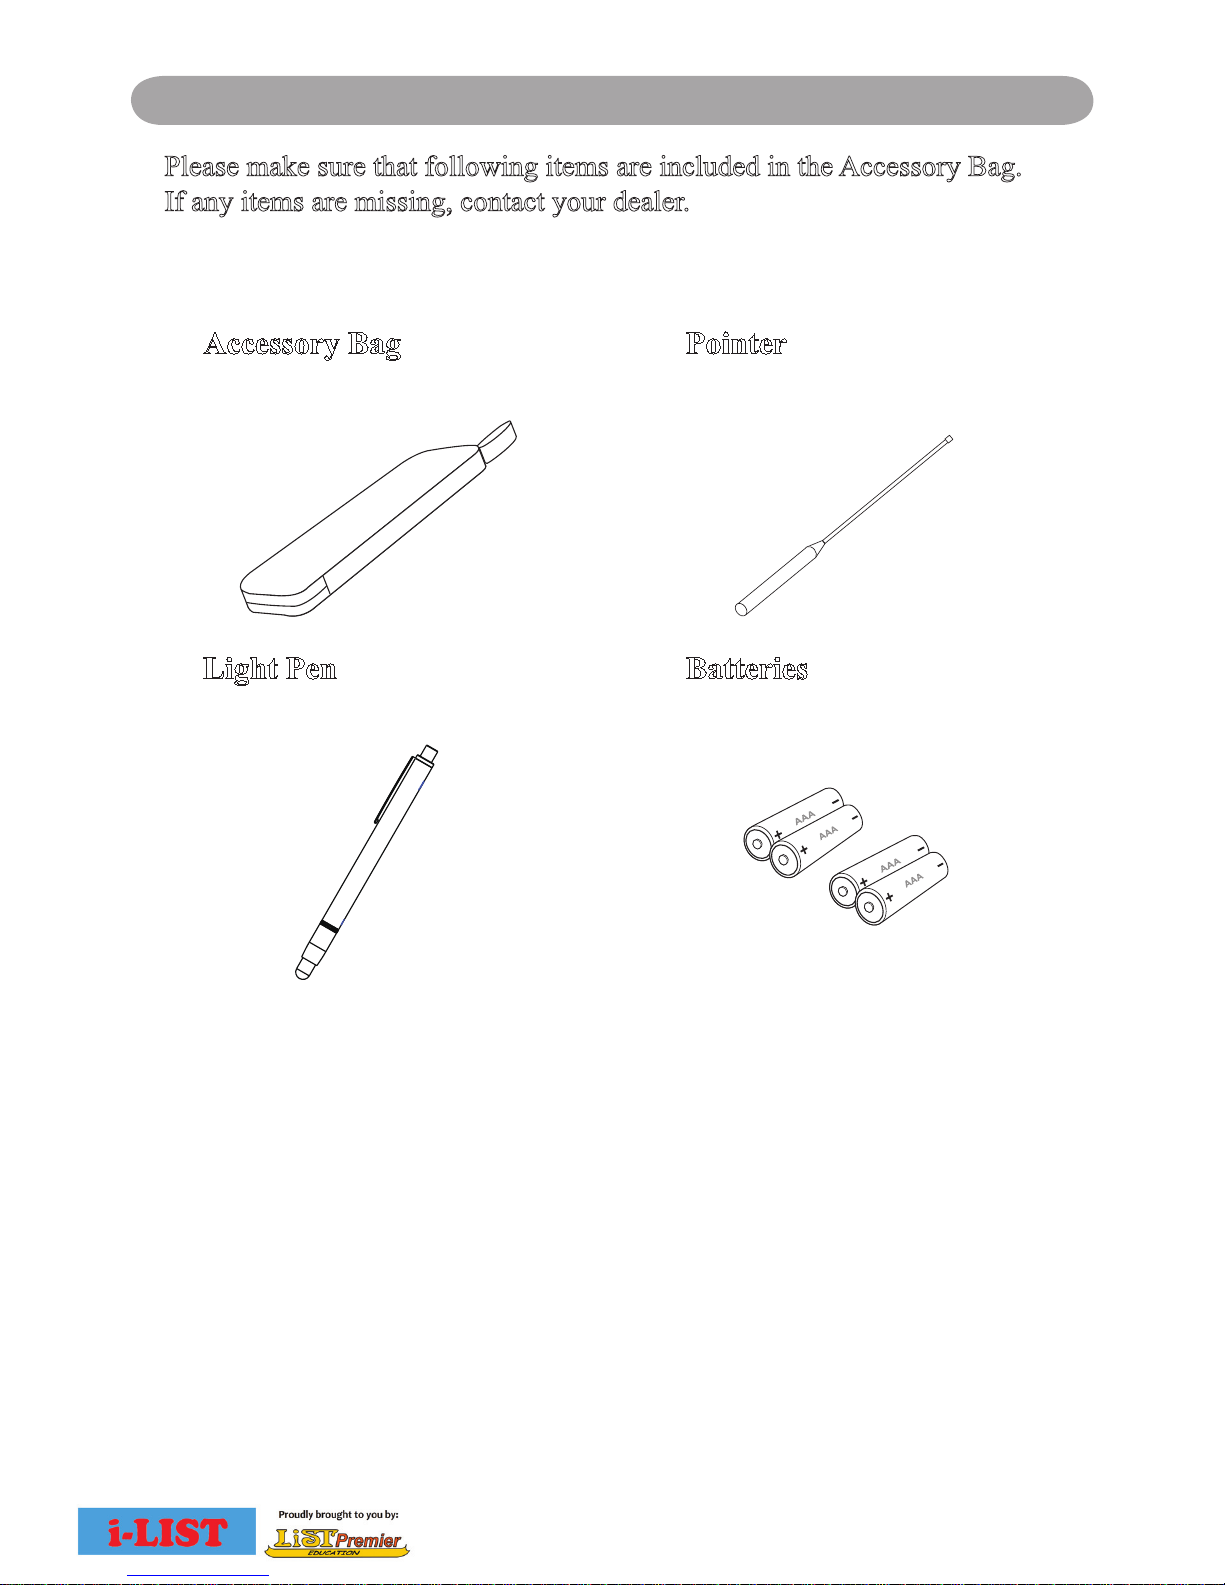
To ensure the interactive function work properly, please check
your computer system to see if it meets the following conditions.
ġġġLightPen3
System Requirements
OS Required Microsoft Windows XP(SP2)(32bit) /
Vista (32bit)/Windows 7 (32bit/64bit)
Processor Type Intel Pentium-4 2.0GHz or above
(dedicated GPU is recommended)
RAM 512 MB above
Min. Free disk space 100 MB
Multi-touch function is available for LightPen3 on Windows 7
Home Premium edition and above.
ġġġLightPen3_LitŦ
System Requirements
OS Required Microsoft Windows XP(SP2)(32bit) /
Vista (32bit) /Windows 7 (32bit/64bit)
Processor Type Intel Pentium-M 1.5GHz or above
RAM 512 MB above
Min. Free disk space 100 MB
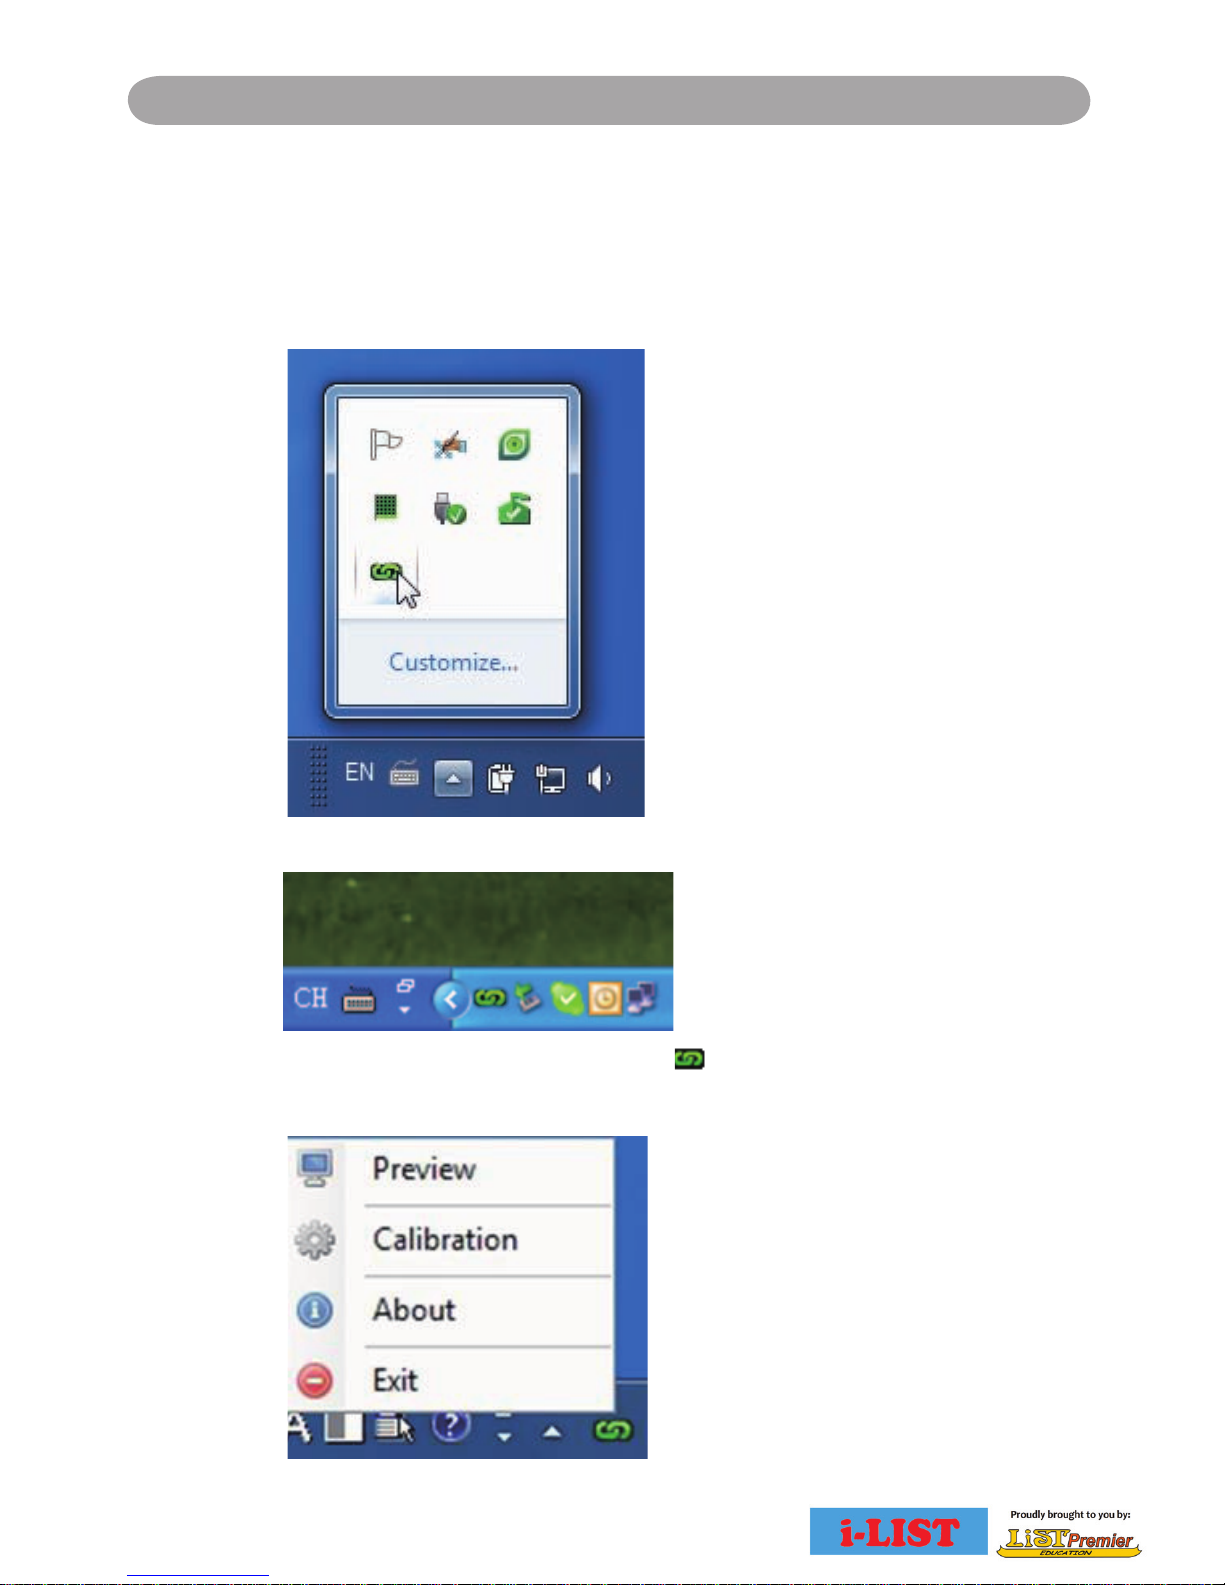
Interactive function is provided by "LightPen3" software.
If "LightPen3" can not run smoothly in your computer, please use
"LightPen3_Lite".
Please note there is a limit in the function of "LightPen3_Lite" and
see the Comparison Table of "LightPen3" and "LightPen3_Lite" on
page 2.

2
Operation Guide for Windows OS
* If you use Windows 7, it is available to use Ink Tools of MicrosoftġOfficeġ
ġġġby using mouse function of LightPen3 and LightPen3_Lite.
For detail, please refer Microsoft Office support.
Comparison Table of LightPen3 and LightPen3_Lite
Interactive software LP3 LP3-Lite
Function List
of
Intaractive
Software
1 Red pen o o
2 Green pen o o
3 Blue pen o o
4 Marker pen o o
5 Drawing tools o o
6 Eraser o o
7 Clear all o o
8 Save screen o o
9 White board o o
10 Page-up o o
11 Page-down o o
12 Print out o o
13 Redraw o x
14 Redo o x
15 Undo o one step
16 Select object o x
17 Rotate object o x
18 Scale object o x
19 Move object o x
20 On Screen Key Board o(exc/v) o(exc/v)
21 Writing on flash or movie o x
22 Anti-alias o o
23 Smooth o o
24 Spotlight o x
25 Curtain o x
Note: o :Include this function x :Not include this function o(exc/v) :Except Vista

3
Operation Guide for Windows OS
2. LightPen Software Installation
Step 1. Insert the "Owner's Manual" CD-ROM into the CD drive.
Step 2. Open the "LightPen Software for Windows" folder in the
CD-ROM.
Step 3.
(1) Double click " Setup.exe" by mouse.
And then "Setup Wizard" window will appear as below.
Click "Next" to install.
(2) You can choose to install folder depend on your
requirements, or use the default folder. Then click "Next" to
continue.
-LightPen3

4
Operation Guide for Windows OS
(3) Confirm the information listed and select "Install".
(4) Please wait for a while for the installation
(5) Installation is finished. Click "Finish" to exit setup.
-LightPen3

5
Operation Guide for Windows OS
3. Initial Setup for Interactive Function
3.1 Connect supplied USB cable between projector and your PC
which show below icon.
(WIN7/VISTA)
(Win XP)
3.2 Click the mouse left key on the icon in the task bar to show
the menu.
-LightPen3

6
Operation Guide for Windows OS
3.3 Select the "Calibration" to enter the calibration process. Use
your pen or pointer to touch the circle shown on the screen.
Then another circle appear, repeat this process until the 4th
circle is fininshed.
3.4 After calibration by 4 points on the screen, PC system will save
data, as shown as below, please wait.
3.5 After you have finished calibration, you can use either pen or
pointer as a mouse on the projection board or wall.
-LightPen3

7
Operation Guide for Windows OS
4. How To Use Interactive Function in LightPen3
4.1 LightPen3 Function
When you complete the installtion of LightPen3 and start it, you
see the tool bar in the right side as shown below.
-LightPen3

8
Operation Guide for Windows OS
4.2 Function of each icon in the Tool bar
-LightPen3
Icon Description
Mouse Change function to Computer Mouse.
Red pen Change function to red pen.
Green pen Change function to green pen.
Blue pen Change function to blue pen.
Marker pen Change function to marker pen.
Drawing tool Draw a circle, a square, a triangle or a straight
line.
Fineness and
color of pen Select the fineness and color of pen.
Eraser Erase drawning.
Clean all Erase drawning on the screen all at once.
Save file Save the current page into file in computer.
White Board Change function to white board.
Page up Go to last page.
Page down Go to next page.
Edit tool Edit drawing.
Keyboard On screen keyboard.
Spotlight Spotlight function
Curtain Curtain function
Exit Exit the application.

9
Operation Guide for Windows OS
4.3 Advanced function in Tool bar
(1) Drawing Tool
Select , then Drawing Tool function menu will be shown on
the screen as below. Plese select the icon you want to use.
(2) Whiteboard Mode
Select , screen will change to white color background.
Original Page up and Page down function icon on Toolbar
also change to import background icon and import
whiteboard icon.
i. Select , you can see the below interface. You can select any
picture you want to be used on background.
-LightPen3

10
Operation Guide for Windows OS
ii. Select , background will turn to White board mode.
If you want to exit White board mode, just click again.
(3). Edit Tool
Select , edit tool bar is shown as blow. Please select the function
you want to use.
Icon Description
Select drawing line as an
object. An object can enlarge,
decrease, or move .
Rotate the drawing object you
choice.
Print the current page you are
seeing.
Undo the last operation.
Redo the last operation.
-LightPen3

11
Operation Guide for Windows OS
4.4 Mouse Mode
Mouse pointer can be replaced by the Pointer or Light Pen.
The left click or double click can be done by pressing the
button when using Pointer or the tip of the Light Pen on the
screen.
If mouse pointer stays at the same position for 2-3 seconds,
then it can be automatically changed to mouse right key
function.
-LightPen3

12
Operation Guide for Windows OS
!!!4.5
Switch to Mouse or Pen mode
Mouse mode or Pen mode can be changed by clicking the tip of
the Pointer or the Pen on the top or bottom edge slightly outside
of the projected image.
In case of the Mouse mode, icon is shown in the task bar.
In case of the Red Pen mode, icon is shown in the task bar.
Menu icon with yellow square mark is shown in the tool bar therefore,
it is convenience to confirm the present situation.
-LightPen3

13
Operation Guide for Windows OS
4.6
Change Toolbar Location
There is a quick way to change the position of the tool bar or
hide/show it. Place the tip of "Pointer" or "Light Pen" on the left
or right edge slightly outside the projected image, then press the
button of the pointer or the tip of the pen to the screen.
4.7
How to excute driver again
If you exit SPdriver and you want to excute it again, you can start
the driver from "Start Manu / LightPen3 / SPdriver".
-LightPen3

14
Operation Guide for Windows OS
5. LightPen Software Installation
Before you begin installation of LightPen3_Lite, please uninstall
LightPen3.
Step 1. Insert the "Owner's Manual" CD-ROM into the CD drive.
Step 2. Open the "LightPen Software for Windows" folder in the
CD-ROM.
Step 3.
(1) Double click " Setup_Lite.exe" by mouse.
And then "Setup Wizard" window will appear as below.
Click "Next" to install.
(2) You can choose to install folder depend on your requirements, or
use the default folder. Then click "Next" to continue.
-LightPen3_Lite

15
Operation Guide for Windows OS
(3) Confirm the information listed and select "Install".
(4) Please wait for a while for the installation
(5) Installation is finished. Click "Finish" to exit setup.
-LightPen3_Lite

16
Operation Guide for Windows OS
6. Initial Setup for Interactive Function
6.1 Connect supplied USB cable between projector and your PC
which show below icon.
(WIN7/VISTA)
(Win XP)
6.2 Click the mouse left key on the icon in the task bar to show
the menu.
-LightPen3_Lite
Table of contents