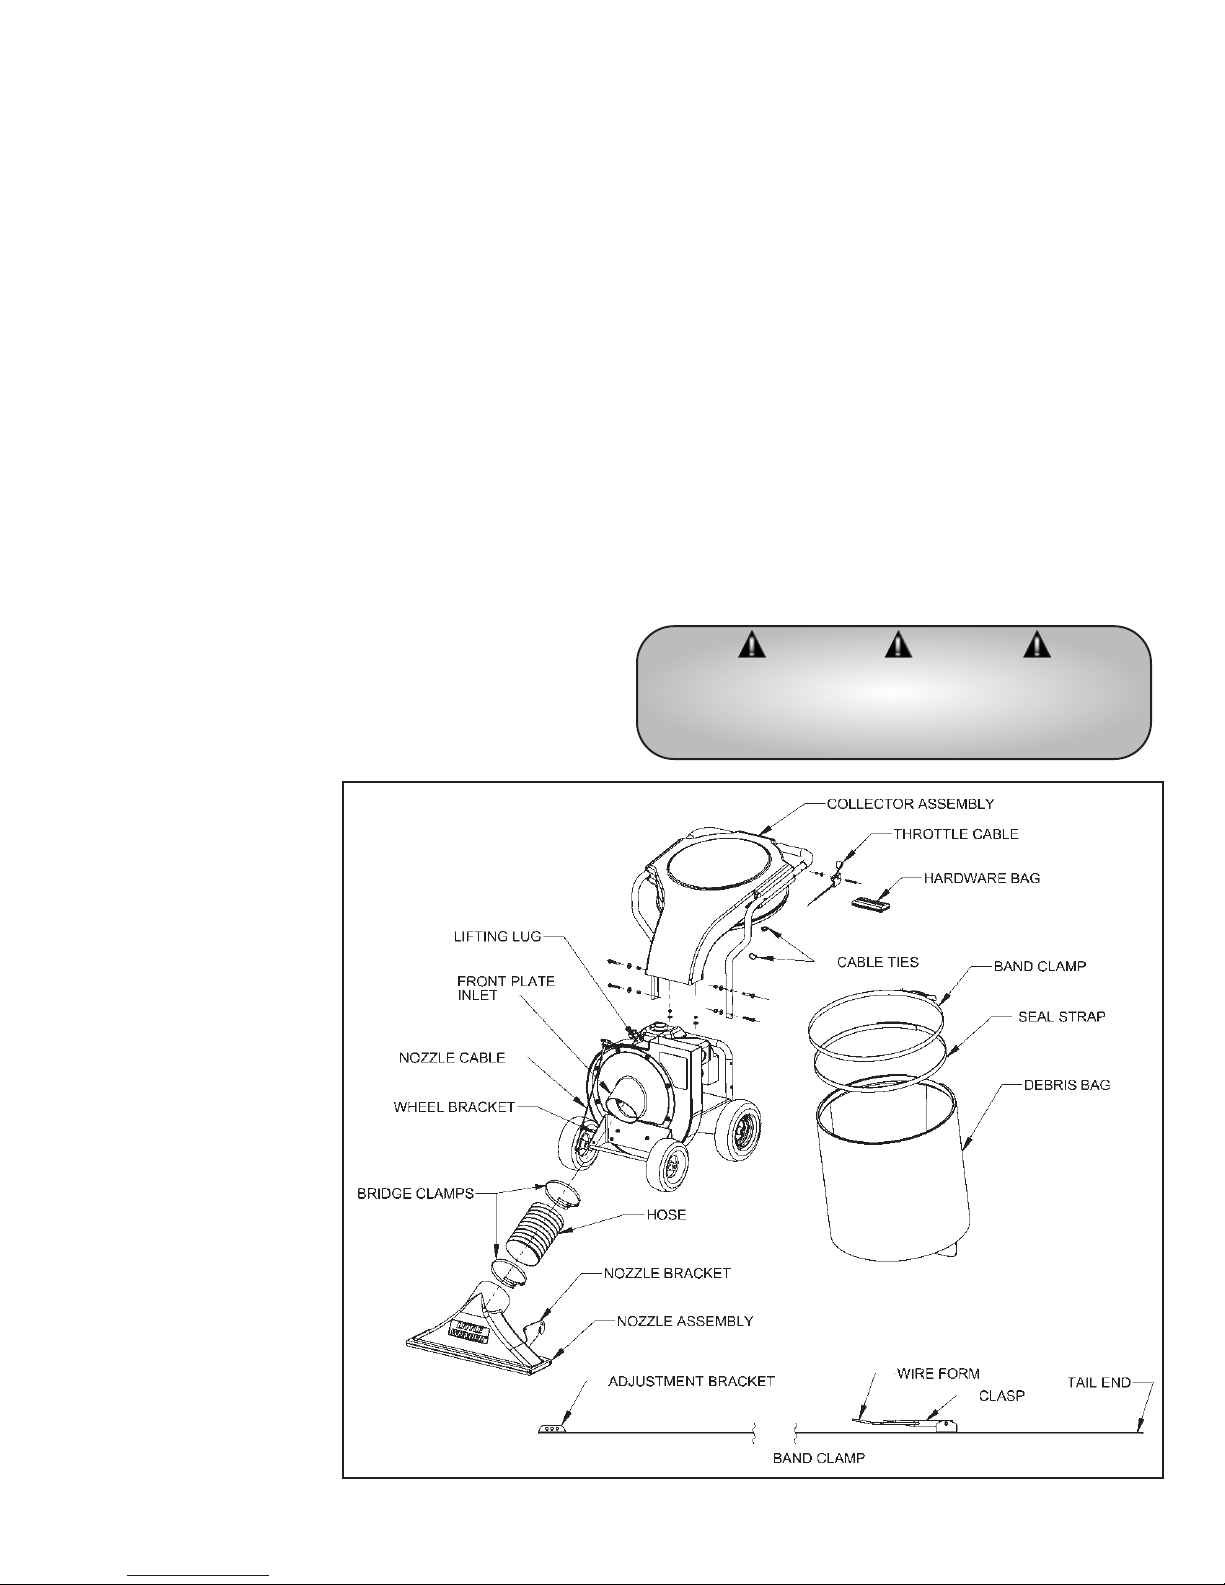
Little Wonder 5601 User manual

© 2004 Little Wonder, Div. of Schiller-Pfeiffer Inc. All Rights Reserved.
ASPIRADORA DE ALTO RENDIMIENTO
ASPIRATEUR HAUTE PERFORMANCE
© 2004 Little Wonder, Division de Schiller Pfeiffer Inc. Tous droits réservés.
© 2004 Little Wonder, División de Schiller - Pfeiffer, Inc. Todos los Derechos Reservados.
Models 5601 and 5611
Modèles 5601 et 5611
Modelos 5601 y 5611


1
Table of Contents Important Information
A. Introduction
On behalf of everyone at
Little Wonder
, we would like to
thank you for your purchase of a
Little Wonder
High
Performance Vac. This professional debris handling machine
was designed to the highest standards to ensure you many
hours of uninterrupted service.
This manual provides the information necessary for safe and
efficient operation and service. For your safety, it is critically
important that you read and understand this entire manual
before operating your High Performance Vac.
Specifications:
Model Dry Weight Max Rpm
5601 182 lbs. 3400
5611 184 lbs. 3400
B. Service Information
High Performance Vac Unit
Contact your local
Little Wonder
dealer.
Engine
Contact an authorized Briggs & Stratton dealer. Dealers are
listed in the Yellow Pages under “Lawn and Garden Equipment
Supplies”, “Lawn Maintenance” or “Lawn Mowers”. Your
dealer will need to know the model and serial number of your
engine. For their location, please consult the operator’s manual
provided with your engine.
C. Special Safety Information
WARNING DANGER
ATTENTION: THIS SYMBOL POINTS OUT
IMPORTANT SAFETY INSTRUCTIONS
WHEN YOU SEE THIS SYMBOL
HEED ITS WARNING! STAY ALERT!
WARNING DANGER
TO REDUCE THE POTENTIAL FOR ACCIDENTS,
COMPLY WITH THE SAFETY INSTRUCTIONS IN
THIS MANUAL. FAILURE TO COMPLY MAY RESULT
IN SERIOUS PERSONAL INJURY AND OR
EQUIPMENT AND PROPERTY DAMAGE.
WARNING DANGER
THE ENGINE EXHAUST FROM THIS PRODUCT
CONTAINS CHEMICALS KNOWN TO THE STATE OF
CALIFORNIA TO CAUSE CANCER, BIRTH DEFECTS
OR OTHER REPRODUCTIVE HARM.
Important Information
Introduction . . . . . . . . . . . . . . . . . . . . . . . . . . . .1
Service Information . . . . . . . . . . . . . . . . . . . . .1
Special Safety Information . . . . . . . . . . . . . . . .1
Unpackaging
Unpackaging Information . . . . . . . . . . . . . . . . .2
Safety and Warnings
Safety Decals . . . . . . . . . . . . . . . . . . . . . . . . .2-3
General Safety Rules
Warnings - "Don’ts" . . . . . . . . . . . . . . . . . . . . .4
Warnings - "Do’s" . . . . . . . . . . . . . . . . . . . . .4-5
Engine/ Fuel Warnings - "Don’ts" . . . . . . . . . .5
Engine/ Fuel Warnings - "Do’s" . . . . . . . . . . . .5
Assembly Instructions
Assembly . . . . . . . . . . . . . . . . . . . . . . . . . . . . . .6
Put Oil and Gasoline in Engine
Before Starting . . . . . . . . . . . . . . . . . . . . . . . . .7
Use of Lifting Lug . . . . . . . . . . . . . . . . . . . . . .7
Operation
Start Engine . . . . . . . . . . . . . . . . . . . . . . . . . . . .7
Vacuuming . . . . . . . . . . . . . . . . . . . . . . . . . . . .7
Empty Debris Bag . . . . . . . . . . . . . . . . . . . . . . .7
Refueling the Engine . . . . . . . . . . . . . . . . . . . .7
Storage and Maintenance
Storage . . . . . . . . . . . . . . . . . . . . . . . . . . . . . . .8
Maintenance . . . . . . . . . . . . . . . . . . . . . . . . . . .8
Removing Blockage in Moving Parts . . . . . . . .9
Removing the Fan . . . . . . . . . . . . . . . . . . . . . . .9
Part Numbers
HPV Assembly Part Numbers . . . . . . . . . . . .10
HPV Subassembly Part Numbers . . . . . . .11-12
Warranties
Warranty . . . . . . . . . . . . . . . . . . . . . .Back cover

2
Unpacking
1. Remove Collector assembly, Nozzle assembly, and
Debris bag from the top section of the package.
2. Remove cardboard insert.
3. Cut away short side of box and fold down.
4. Roll HPV base unit out of box.
P/N 600602
Warning Label
P/N 600605
Warning Label
Caution:
Thrown
objects.
Keep
bystanders
away.
Always wear
eye, ear and
breathing
protection.
Before
performing
any service or
maintenance,
disconnect spark
plug wire. Make
sure throttle is in
STOP position.
Read and
understand the
Owners Manual.
Store your
Owners Manual
in a safe place.
Keep hands and
feet away from
air discharge
areas. Rotating
fan will cause
serious injury.
Safety and Warnings
A. Safety Decals
An important part of the safety system incorporated in this
High Performance Vac are the warnings and informational
decals (labels) found on various parts of the unit.
These decals (labels) must be replaced if they become illegible
due to abrasion, etc.
It is your responsibility to replace the decals (labels) when they
become hard to read. The location of these decals and their
part numbers for ordering are shown on page 3.
WARNING DANGER
IMPROPER USE OR CARE OF THIS HIGH
PERFORMANCE VAC, OR FAILURE TO WEAR PROPER
PROTECTION CAN RESULT IN SERIOUS INJURY.
READ AND UNDERSTAND THE RULES FOR
SAFE OPERATION AND ALL INSTRUCTIONS
IN THIS MANUAL.
WEAR HEARING, EYE, AND BREATHING
PROTECTION.
P/N 600604

3
P/N 600604
Safety and Warnings
P/N 600602
Warning Label
P/N 600605
Warning Label

4
General Safety Rules
1. Read and understand manual.
2. Wear eye, hearing, and breathing protection, proper
clothing and footwear.
3. While operating the machine always be sure of a safe and
secure operating position, maintain a firm footing and
good balance at all times.
4. Keep area clear of children, pets and bystanders.
5. Never attempt to use an incomplete machine or one fitted
with an unauthorized modification.
6. Avoid contact with and inhalation of harmful fluids, gases,
mists, fumes, and dust.
7. Do not allow children to operate machine.
8. Do not override or remove any safety devices.
12. Keep hands away from hose inlet and discharge chute.
13. Disconnect spark plug before doing any cleaning or
maintenance.
14. Wear gloves to protect your hands.
15. Beware that the machine is loud and, during normal
operation; may interfere with speech communication.
A. Warnings - "Don’ts"
Don’t attempt to remove materials from intake or discharge
when High Performance Vac is running, or fan is rotating.
Don’t install or remove components while High Performance
Vac is running. Turn off engine to make changeover. Be sure
throttle is in the stop position, and the High Performance Vac
has come to a complete stop. Remove the spark plug wire
from the spark plug before removing material.
Don’t attempt to repair High Performance Vac. Have repairs
made by qualified Little Wonder dealer or repairman. See that
only Little Wonder and recommended engine manufacturers
replacement parts are used.
Don’t leave the engine running while the High Performance
Vac is unattended.
Don’t store, spill, or use gasoline near flames or spark
B. Warnings - "Do’s"
Always dress properly. Do not wear loose clothing or jewelry.
They can be caught in moving parts. Use of sturdy gloves,
non-skid footwear and safety glasses are recommended.
Always wear ear protectors where possible. Use face filter to
avoid breathing dust.
Always stay alert. Watch what you are doing and use common
sense. Do not operate High Performance Vac when fatigued.
Always keep hands away from air intake and air outlet chute.
Keep both hands on handles when power is on.
Always maintain and examine High Performance Vac with
care. Follow maintenance instructions given in manual.
WARNING DANGER
9. FAN COASTS AFTER THE ENGINE IS TURNED OFF.
WARNING DANGER
DO NOT SMOKE WHEN FILLING FUEL TANK
WARNING DANGER
10. ROTATING FAN. DON’T ATTEMPT TO REMOVE
MATERIALS FROM INTAKE OR DISCHARGE WHEN
UNIT IS RUNNING, OR FAN IS ROTATING.
WARNING DANGER
DO NOT USE THE HIGH PERFORMANCE VAC IF THE
MUFFLER IS DEFECTIVE OR MISSING.
WARNING DANGER
11. DO NOT OPERATE UNIT IF EXCESSIVE VIBRATION
OCCURS; SHUT ENGINE OFF IMMEDIATELY!
REMOVE SPARK PLUG WIRES AND CHECK FOR
DAMAGED IMPELLER, LOOSE IMPELLER BOLT,
LOOSE IMPELLER KEY, OR LODGED
FOREIGN OBJECTS.

5
WARNING DANGER
IF THE HIGH PERFORMANCE VAC IS USED
IMPROPERLY OR SAFETY PRECAUTIONS ARE NOT
FOLLOWED, THE USER RISKS SERIOUS INJURY TO
THEMSELVES AND OTHERS.
READ AND UNDERSTAND THE FOLLOWING
BEFORE ATTEMPTING TO OPERATE THIS
HIGH PERFORMANCE VAC.
WARNING DANGER
HANDLE FUEL WITH CARE. IT IS HIGHLY
FLAMMABLE. FUELING A HOT ENGINE OR NEAR
AN IGNITION SOURCE CAN CAUSE A FIRE AND
RESULT IN SERIOUS PERSONAL INJURY AND/ OR
PROPERTY DAMAGE.
D. Engine/ Fuel Warnings - "Do’s"
Always use fresh gasoline. Stale gasoline can cause
leakage.
Always pull starter cord slowly until resistance is felt.
Then pull cord rapidly to avoid kickback and prevent
arm or hand injury.
The use of spark arrestor mufflers is required by law in
the state of California (Section 4442 of the California
Public Resources Code), as well as in other states or
municipalities. Federal laws apply on federal lands.
Always handle fuel with care; it is highly flammable.
Never add fuel to a machine with a running or hot
engine. Do not inhale fuel fumes as they are toxic.
The spark ignition system meets all requirements of
the Canadian Interference Causing Equipment
Regulations.
monoxide and other gasses are emitted.
Don’t run engine when electrical system causes spark
outside the cylinder. During periodical checks of the
spark plug, keep plug a safe distance from cylinder to
avoid burning of evaporated fuel from cylinder.
Don’t check for spark with spark plug or plug wire
removed and grounded. Use an approved tester. Sparks
can ignite fumes.
Don’t run engine when the odor of gasoline is present
or other explosive conditions exist.
Don’t operate the unit if gasoline is spilled. Clean up
spill completely before starting engine.
Don’t refuel indoors or in an improperly ventilated
area.
Don’t operate your High Performance Vac if there is
an accumulation of debris around the muffler and
cooling fins.
Don’t touch hot mufflers, cylinders or cooling fins as
contact may cause serious burns.
B. Warnings - "Do’s" Continued
Always store High Performance Vac indoors. When not in use,
store High Performance Vac indoors in a sheltered area
(a dry place) where it’s not accessible to children. The High
Performance Vac, as well as fuel, should not be stored in a
house. Keep throttle in the stop position.
Always be sure High Performance Vac is fully assembled.
Never operate High Performance Vac without all guards and
deflectors in place. Ensure that all nuts, bolts, screws are
installed and properly tightened.
Always keep the throttle in the “stop” position when not in use.
Always keep a safe distance between two or more operators
when working together simultaneously.
C. Engine/ Fuel Warnings - "Don’ts"
Don’t fuel, refuel or check fuel while smoking or near
an open flame or other ignition source. Stop engine and
be sure it is cool before refueling.
Don’t leave the engine running while the High
Performance Vac is unattended. Stop engine before
transporting High Performance Vac from one place to
another.
Don’t start or run this High Performance Vac indoors,
or in an improperly ventilated area as poisonous carbon

6
A. Assembly
1. Attach the collector assembly to the base unit:
• Bolt the collector assembly to the frame with 4 sets of
bolts, washer, and nuts
• Slide the rectangular end of the collector over the housing
and mount the flange with 2 sets of washers and nuts
2. Attach the throttle control cable to the handle on the
collector assembly:
• Bolt throttle control lever to handle with washer and nut
• Secure throttle cable to handle with cable ties in 2 places
3. Install the band clamp into the debris bag (wear gloves
when handling band clamp):
• Slide the bracket end of the band clamp through the left
side opening of the sleeve on the debris bag until it
emerges from the right side
• Feed the tail end of the band (on the clasp side) behind
the bracket in the sleeve
• Pinch the wire form on the clasp together and connect it
through 2 holes in the adjustment bracket such that it will
close tightly over the collector
4. Connect the debris bag by placing it over the bottom lip of
the collector and closing the clasp to secure the bag. Adjust
the clasp wire form to the appropriate hole position on the
bracket to insure a tight fit. If the bag will not fit tight within
the range of the 3 adjustment holes, insert the bag seal strap:
• Unhook the wire form from the bracket
• Pull the tail end of the
band back out from
behind the bracket
• Feed one end of the seal
strap behind the metal
band and through the
channel to the other side
• Tuck the other end of
the seal strap behind
the bracket
(overlapping the lead
end of the seal strap)
• Feed the tail end of the
band clamp behind the
bracket (overlap the
seal strap)
• Connect the wire form
to the appropriate holes
in the bracket and
secure the debris bag to
the collector
5. Attach nozzle assembly to
base unit:
• Attach one end of the
hose to the nozzle
assembly with the
bridge clamp
• Slide the other end of
Assembly Instructions
the hose over the edge of the inlet on the front plate
• Hook one side of the nozzle bracket over the front axle
• Bend the other end of the nozzle bracket inward to
hook it over the axle and engage the pins on the wheel
bracket with the slots on the nozzle bracket
• Secure the hose to front plate inlet with the bridge
clamp
• Attach the nozzle cable end fitting through the hole in
the nozzle bracket
6. To remove nozzle assembly (for purposes of storage, or
clearing blockages):
• Turn engine off and disconnect spark plug
• Loosen hose clamp on the front plate with flathead
screwdriver or 5/16 wrench
• Slide hose off of front plate inlet
• Bend one side of nozzle bracket inward and twist the
assembly to remove the hook from the axle
• Twist back and lift to remove the other side of nozzle
bracket from the axle
WARNING DANGER
NEVER RUN OR OPERATE YOUR MACHINE
UNLESS DISCHARGE BAG IS ATTACHED,
AND THE INTAKE NOZZLE IS INSTALLED.

7
C. Empty Debris Bag
1. Turn off engine and let it come to a complete stop before
removing the debris bag.
2. Roll vacuum to the desired unloading location
(compost pile, curb-side, wooded area, tarp, etc.).
3. Open clasp on band clamp to release bag to the ground.
Avoid dragging bag on surface to prolong bag life.
4. Empty contents of debris bag (handle straps are provided
on the under side of the bag for aid in dumping contents).
5. Reconnect bag to collector.
D. Refueling the Engine
1. Stop engine and allow it to cool for a few minutes before
refueling.
Operation
WARNING DANGER
THE OPERATOR OF THIS HIGH PERFORMANCE
VAC IS RESPONSIBLE FOR ACCIDENTS OR
HAZARDS OCCURRING TO HIMSELF, OTHER
PEOPLE OR THEIR PROPERTY.
B. Vacuuming
1. Adjust nozzle to desired height by turning the nozzle
control knob, secure position with wing nut.
2. Vacuum debris from lawn or paved surfaces. Vacuum the
following: leaves, small twigs and sticks, acorns, thistles,
seed pods, grass clippings, straw, wood chips, dry mulch,
litter, small cans & bottles, paper products, styrofoam
products.
3. Avoid the following: excessively wet surfaces and debris,
gravel surfaces, large hard objects, rocks, long fibrous
materials (vines, rope, string etc). Do not force anything
into vacuum.
WARNING DANGER
ENGINE EMITS CARBON MONOXIDE. DO NOT
OPERATE OR REFUEL IN ENCLOSED AREA.
A. Start Engine
1. Open fuel valve.
2. Open choke.
3. Set throttle to run.
4. Pull starter rope 1 – 3 times.
5. Allow engine to turn over.
6. Close choke.
7. Set throttle speed to max - Always operate vacuum
at full throttle.
WARNING DANGER
KEEP RECOIL STARTER SCREEN AND ENTIRE
ENGINE CLEAR OF ALL DEBRIS. DO NOT
OPERATE ENGINE WITH AN ACCUMULATION OF
GRASS, DIRT, LEAVES OR OTHER
COMBUSTIBLE MATERIAL NEAR MUFFLER.
WARNING DANGER
DO NOT OPERATE UNIT IF EXCESSIVE
VIBRATION OCCURS; SHUT ENGINE OFF
IMMEDIATELY! REMOVE SPARK PLUG WIRES
AND CHECK FOR DAMAGED IMPELLER,
LOOSE IMPELLER BOLT, LOOSE IMPELLER KEY,
OR LODGED FOREIGN OBJECTS.
B. Put Oil and Gasoline in Engine
Before Starting
1. Little Wonder recommends using SAE 30 Oil. The use of
multi-viscosity oil will result in high oil consumption and
possible engine damage.
2. Add gasoline to the fuel tank, and you are ready to start.
3. See Engine Operating & Maintenance instructions for
more detail description of type and amount of oil and
gasoline used.
C. Use of Lifting Lug
Little Wonder High Performance Vac is supplied with convenient
Lifting Lug that can be used when you need to move the unit.
This Lug can hold weight up to a total of 250 lbs.
WARNING DANGER
HANDLE FUEL WITH CARE. IT IS HIGHLY
FLAMMABLE. FUELING A HOT ENGINE OR NEAR
AN IGNITION SOURCE CAN CAUSE A FIRE AND
RESULT IN SERIOUS PERSONAL INJURY AND/ OR
PROPERTY DAMAGE.
WARNING DANGER
DO NOT USE OR SERVICE THE UNIT WHEN IT’S
SUSPENDED FROM THE LIFTING LUG.
WARNING DANGER
FUEL IS EXTREMELY FLAMMABLE. HANDLE IT
WITH CARE. KEEP AWAY FROM IGNITION
SOURCES. DO NOT SMOKE WHILE FUELING
YOUR EQUIPMENT.

8
A. Storage
1. After each use, run HPV with the empty bag attached to help clear out any loose material in the housing.
2. When not in use store High Performance Vac in sheltered area (a dry place) not accessible to children. Keep throttle in the
“Stop” position.
3. The High Performance Vac, as well as fuel, should not be stored in a house or poorly ventilated areas.
4. Do not store fuel in the engine’s gas tank longer then
30 days.
Storage and Maintenance
After First
8 Hrs of Use
✔
Every
Use
✔
✔
✔
✔
Every
5 Hrs
✔
✔
Every
25 Hours
✔
Every
50 Hours
✔
✔
B. Maintenance
Area
*Engine
Check muffler area for
accumulation of debris
Check for excessive vibration
Inspect for loose or damaged parts
Inspect for clean intake nozzle
Inspect labels condition
Check oil level
**Oil change
Service air cleaner
Clean and inspect spark plus
arrester
See Engine Manual
* See Engine Operating & Maintenance instructions for more detail maintenance and service schedule
** Change oil every 25 Hrs if operating under heavy load or high ambient temperature

9
D. Directions for removing the Fan
and reinstallation
1. Remove spark plug wire from spark plug.
2. Remove nozzle assembly.
3 Remove front plate assembly.
4. Remove the bolt that secures the fan to the engine
crankshaft.
5. The fan has a 3/4-16 nut welded on the fan hub. Insert a
3/4-16 x 5" long grade 5 (or better) bolt and jack or push
the fan off the engine. (Little Wonder P/N 910505 pressure
screw is recommended.)
6. Replace damaged or worn fan with a new one. If during
fan removal the key (#915) was removed from the keyway,
reinstall it by applying a few drops of the Loctite 380
instant adhesive (“Black Max” P/N 38050) on the key, and
load the key in the keyway of the shaft. (Cure time is
approx. 1 min.)
7. Use a new bolt (#600524) (add Loctite 242 to new bolt)
and washer (#910527) and complete fan installation.
Insure a secure fit upon re-assembling. Torque bolt to
39-51 Ft. lbs.
WARNING DANGER
TURN OFF ENGINE BEFORE YOU DISCONNECT
HOSE, AND MAKE SURE ALL MOVING PARTS
COME TO A COMPLETE STOP.
WARNING DANGER
BE SURE THROTTLE IS IN “STOP” POSITION, AND
FAN HAS COME TO A COMPLETE STOP.
WARNING DANGER
DISCONNECT THE SPARK PLUG WIRES BEFORE
ANY CLEANING OR MAINTENANCE!
WARNING DANGER
WEAR GLOVES, THE CLOG MAY CONTAIN
SHARP MATERIALS.
C. Removing Blockage in Moving Parts
1. Support the housing with 2x4 lumber such that front wheel
are 1” above the ground.
2. Chock the rear wheels with blocks.
3. Remove the nozzle assembly from the front plate.
(See Assembly Instruction 6.)
4. Remove the front wheel assembly.
5. Remove the front plate.
6. Wear gloves and clear out debris from around the impeller
and housing.

10
KEY NO.PART NO.DESCRIPTION QTY.
1 910914 ENGINE, 6 HP INTEK 1
2 600180 DECK, HPV, 6 HP 1
3 600184 HANDLE MOUNT 1
4 600186 HOUSING - WITH OUT LINER HOLES 1
5 600187 HOUSING - WITH LINER HOLES 1
6 600114 IMPELLER-BALANCED 1
7 600198 FRONT PLATE, VER. 2 1
8 600182 BRACKET, FRONT WHEELS 1
9 600188 AXLE, FRONT 1
10 600192 AXLE, REAR 1
11 600137 SPACER, WHEEL 4
12 934 WHEEL, 10" 2
13 920300 WHEEL, 12" 2
14 312 SNAP RING, 5/8" D 4
15 600102 HOSE, NOZZLE, 7" D x 10" LG 1
16 720420 BRIDGE CLAMP, HOSE, 7" D 2
17 600162 KNOB, 5/16-18, FEMALE 1
18 600104 CABLE, NOZZLE CONTROL 1
19 600103 THROTTLE CABLE CONTROL 1
20 600176 BAND CLAMP 1
21 600196 BAG SEAL STRAP 1
22 600177 DEBRIS BAG 1
23 915 KEY, 1/4" SQ x 2" LG 1
24 600524 BOLT, 3/8-24 x 1.75" LG 1
25 600504 BOLT, CARRIAGE, 3/8-16 x 2-1/4 4
KEY NO.PART NO.DESCRIPTION QTY.
26 600525 BOLT, CARRIAGE, 3/8-16 x 2" LG 4
27 942 BOLT, HEX, 5/16-18 x 1-3/4" LG 4
28 910503 BOLT, SERRATED FLANGE,
5/16-24 x 3/4" LG 4
29 600505 BOLT, HEX, 1/4-20 x 2-1/4 1
30 720518 NUT, NYLOCK, 3/8-16 4
31 720594 NUT, SERRATED FLANGE, 3/8-16 4
32 114C NUT, NYLOCK, 5/16-18 9
33 114B NUT, SERRATED FLANGE, 5/16-18 10
34 600507 NUT, WING, 5/16-18 1
35 600506 NUT, NYLOCK, 1/4-20 1
36 910527 WASHER, FAN, FLANGED 1
37 600523 WASHER, 5/16 ID x 3/16 TH 2
38 720516 WASHER, FLAT, 3/8, USS 4
39 720511 WASHER, FLAT, 5/16, USS 8
40 129D WASHER, SPLIT LOCK, 5/16 4
41 720510 WASHER, FLAT, 1/4, USS 1
42 720411 CABLE TIE, 7.5" 2
43 600500 HARDWARE BAG 1
44 16-102 WARRANTY CARD 1
45 600708 OWNERS MANUAL 1
46 N/A ENGINE MANUAL 1
47 SEE DETAIL COLLECTOR ASSEMBLY 1
48 SEE DETAIL NOZZLE ASSEMBLY 1
HPV Parts Assembly

11
KEY NO. PART NO. DESCRIPTION QTY.
1 600130 HANDLE 1
2 600142 FLANGE CLAMP PLATE 1
3 114B NUT, SERRATED FLANGE, 5/16-18 2
4 600138 FLANGE ANGLE, COLLECTOR 1
5 600518 WASHER, 1/4", COLLECTOR 6
6 600101 DISCHARGE COLLECTOR 1
7 600153 GRIP 2
8 600509 BOLT, BUTTON SHCS, 1/4-20 X 2" LG 6
9 600506 NUT, NYLOCK, 1/4-20 6
10 600161 HOOK STRIP 1
11 600605 WARNING LABEL, DEBRIS BAG 1
HPV Collector Assembly
KEY NO. PART NO. DESCRIPTION QTY.
1 600187 HOUSING ASSEMBLY, WITH LINER HOLES 1
2 600175 LINER 1
3 720592 FLANGE BOLT, 5/16-18 X 1" LG 10
4 720511 WASHER, FLAT, 5/16, USS 10
5 114C NUTS, NYLOCK, 5/16-18 10
HPV Liner Assembly

12
KEY NO. PART NO. DESCRIPTION QTY.
1 600100 NOZZLE 1
2 600133 NOZZLE CLAMP PLATE ASSEMBLY 1
3 600183 NOZZLE BRACKET, VER. 2" 1
4 114B NUT, SERRATED FLANGE, 5/16-18 3
HPV Nozzle Assembly

LITTLE WONDER®
DIVISION OF SCHILLER-PFEIFFER, INCORPORATED
1028 STREET ROAD, P.O. BOX 38
SOUTHAMPTON, PA 18966
PHONE 877-596-6337 • FAX 215-357-8045
www.littlewonder.com
Specifications, descriptions, and illustrative material in this literature are as accurate as known at the time of publication, but are subject to change without notice.
1 YEAR LIMITED SERVICE & WARRANTY POLICY
FOR HIGH PERFORMANCE VAC
The
Little Wonder
High Performance Vac is guaranteed against defects in material
and workmanship for a period of ONE YEAR from date of purchase, when used for
RESIDENTIAL SERVICE, or COMMERCIAL SERVICE. Any
Little Wonder
High
Performance Vac or part found to be defective within the warranty period is to be returned
to any registered Little Wonder Dealer.
Engines for all gasoline powered products are warranted separately by the engine
manufacture for a period of one year. Therefore, there are no warranties made, expressed or
implied, for engines of gasoline powered products by
Little Wonder
.
Transportation charges for parts and units submitted for replacement under this warranty
must be borne by the purchaser.
THIS WARRANTY shall not be effective if the product has been subject to misuse,
negligence or accident, or if the product has been repaired or altered outside of our
Southampton factory in any respect which affects its condition or operation.
Little Wonder
shall not be liable for any special indirect or consequential damages
arising from defective equipment. Any implied warranty, including merchantability of
fitness for a particular purpose, shall not extend beyond the written warranty period.
THIS WARRANTY shall only be effective if the enclosed Warranty/Registration card is
properly filled out and returned to
Little Wonder
, Div. of Schiller-Pfeiffer, Inc. at time
of purchase.
877-LWONDER
WARNING DANGER
THE ENGINE EXHAUST FROM THIS PRODUCT
CONTAINS CHEMICALS KNOWN TO THE STATE OF
CALIFORNIA TO CAUSE CANCER, BIRTH DEFECTS
OR OTHER REPRODUCTIVE HARM.


1
Table des matières Informations importantes
A. Introduction
De la part de tout le personnel de
Little Wonder
, nous
tenons à vous remercier de votre achat d’un aspirateur haute
performance
Little Wonder
. Cet appareil de ramassage
des déchets a été conçu suivant les normes les plus strictes afin
de vous assurer de nombreuses heures d’utilisation sans
incident.
Ce manuel contient les informations nécessaires à une
utilisation et un entretien sûrs et efficaces. Pour votre sécurité,
il est extrêmement important que vous lisiez et compreniez le
manuel dans son intégralité avant d’utiliser l’appareil.
Caractéristiques techniques :
Modèle Poids à sec Rotation maxi.
5601 182 lbs. (82,500 kg) 3400
5611 184 lbs. (83,400 kg) 3400
B. Informations sur l’entretien
Aspirateur haute performance
Faire appel au revendeur local
Little Wonder
.
Moteur
sous les rubriques « Fournitures de matériel de pelouses et
jardins », « Entretien des pelouses » ou « Tondeuses à
gazon ». Le revendeur aura besoin de connaître le modèle et le
numéro de série de votre moteur. Pour leur emplacement,
veuillez consulter le manuel d’utilisation fourni avec votre
moteur. Faire appel à un revendeur agréé Briggs & Stratton.
Vous trouverez une liste des revendeurs dans les Pages jaunes,
C. Informations particulières sur la sécurité
AVERTISSEMENT DANGER
ATTENTION : CE SYMBOLE ATTIRE VOTRE ATTENTION
SUR D’IMPORTANTES CONSIGNES DE SÉCURITÉ.
LORSQUE VOUS VOYEZ CE SYMBOLE,
TENEZ COMPTE DE L’AVERTISSEMENT ! SOYEZ
VIGILANT !
AVERTISSEMENT DANGER
POUR RÉDUIRE LES RISQUES D’ACCIDENTS,
RESPECTER LES CONSIGNES DE SÉCURITÉ
FIGURANT DANS CE MANUEL. LE NON-RESPECT DE
CES CONSIGNES PEUT ENTRAÎNER DES DOMMAGES
CORPORELS ET MATÉRIELS GRAVES.
AVERTISSEMENT DANGER
L’ÉCHAPPEMENT DU MOTEUR DE CE PRODUIT
CONTIENT DES PRODUITS CHIMIQUES DÉCLARÉS
PAR L’ÉTAT DE LA CALIFORNIE RESPONSABLES DE
CANCER, MALFORMATIONS CONGÉNITALES OU
AUTRES ANOMALIES DE LA REPRODUCTION.
Informations importantes
Introduction . . . . . . . . . . . . . . . . . . . . . . . . . . . .1
Informations sur l’entretien . . . . . . . . . . . . . . .1
Informations particulières sur la sécurité . . . . .1
Déballage
Informations sur le déballage . . . . . . . . . . . . . .2
Sécurité et avertissements
Décalcomanies de sécurité . . . . . . . . . . . . . .2-3
Consignes générales de sécurité
Avertissements – Ce qu’il ne faut pas faire . . .4
Avertissements – Ce qu’il faut faire . . . . . . .4-5
Avertissements concernant le moteur et le
carburant – Ce qu’il ne faut pas faire . . . . . . . .5
Avertissements concernant le moteur et le
carburant – Ce qu’il faut faire . . . . . . . . . . . . . .5
Consignes d’assemblage
Assemblage . . . . . . . . . . . . . . . . . . . . . . . . . . . .6
Plein d’huile et d’essence avant le démarrage .7
Utilisation de l’oreille de levage . . . . . . . . . . . .7
Consignes d’utilisation
Démarrage du moteur . . . . . . . . . . . . . . . . . . . .7
Passage de l’aspirateur . . . . . . . . . . . . . . . . . . .7
Vidage de sac à déchets . . . . . . . . . . . . . . . . . .7
Remplissage du réservoir de carburant . . . . . . .7
Rangement et entretien
Rangement . . . . . . . . . . . . . . . . . . . . . . . . . . . .8
Entretien . . . . . . . . . . . . . . . . . . . . . . . . . . . . . .8
Élimination des blocages dans les pièces
mobiles . . . . . . . . . . . . . . . . . . . . . . . . . . . . . . .9
Démontage du ventilateur . . . . . . . . . . . . . . . . .9
Nomenclature des pièces
Nomenclature des assemblages . . . . . . . . . . .10
Nomenclature des sous-ensembles HPV . . . .11
Garanties
Garantie . . . . . . . . . . . . . . . . .Couverture arrière

2
Déballage
1. Enlever le collecteur, la tête d’aspiration et le sac à déchets
de la partie supérieure de l’emballage.
2. Enlever le séparateur en carton.
3. Découper et replier vers le bas la paroi latérale courte de la
boîte.
4. Faire rouler la base de l’aspirateur hors de la boîte.
N° de référence 600602
Décalcomanie
d’avertissement
N° de référence 600605
Décalcomanie d’avertissement
Attention :
Projection
d’objets.
Garder les
spectateurs à
l'écart.
Toujours
porter des
éléments de
protection de
la vision, de
l’ouïe et de la
respiration.
Avant d'effectuer
quelque
intervention de
service ou
d'entretien que ce
soit, débrancher le
fil de bougie.
S'assurer que
l'accélérateur est à
la position d'arrêt.
Il importe de lire
et de
comprendre le
manuel
d’utilisation.
Garder le
manuel
d’utilisation en
lieu sûr.
Garder les
mains et les
pieds à l'écart
des décharges
d’air. Le
ventilateur
rotatif cause des
blessures graves.
Sécurité et avertissements
A. Décalcomanies de sécurité
Les décalcomanies d'avertissement et d'information qu'on
trouve sur différentes parties de cet aspirateur constituent une
partie importante du système de sécurité.
Ces décalcomanies (ou étiquettes) doivent être remplacées si
elles deviennent illisibles par suite d’abrasion ou pour toute
autre raison.
Vous devez les remplacer lorsqu’elles deviennent difficiles à
lire. Leur emplacement et leur numéro de référence pour la
commande sont indiqués à la page 3.
AVERTISSEMENT DANGER
POUR ÉCARTER LES RISQUES DE BLESSURE GRAVE,
UTILISER ET ENTRETENIR CET ASPIRATEUR DE FAÇON
APPROPRIÉE ET PORTER UNE PROTECTION ADAPTÉE.
LIRE ET COMPRENDRE LES CONSIGNES DE SÉCURITÉ ET
TOUTES LES INSTRUCTIONS CONTENUES DANS CE
MANUEL.
PORTER DES ÉLÉMENTS DE PROTECTION DE L’OUÏE, DE
LA VISION ET DE LA RESPIRATION.
N° de référence
600604
NE PAS FAIRE FONCTIONNER L’APPAREIL
LORSQUE SON SAC N’EST PAS EN
PLACE.
ARRÊTER LE MOTEUR ET LE LAISSER S’IMMOBILISER
COMPLÈTEMENT AVANT DE RETIRER LE SAC.
ASPIRATEUR HAUTE PERFORMANCE
LA ROTATION DES LAMES PEUT
PROVOQUER DES BLESSURES
GRAVES. MAINTENIR TOUTES LES
PARTIES DU CORPS À L’ÉCART.
EMPÊCHER LES OBJETS GROS OU
DURS D’ENTRER DANS L’APPAREIL.
À UTILISER POUR LE RAMASSAGE DE
L’HERBE, DES FEUILLES ET DES
DÉCHETS.
NE PAS UTILISER L’APPAREIL
SANS SA TÊTE D’ASPIRATION
ET DISPOSITIF DE MISE EN SAC
OU SANS SON TUYAU
D’ASPIRATION ET TUYAU DE
REFOULEMENT.

3
N° de référence
600604
Sécurité et avertissements
N° de référence
600602
Décalcomanie
d’avertissement
N° de référence 600605
Décalcomanie d’avertissement
ASPIRATEUR HAUTE PERFORMANCE

4
Consignes générales de sécurité
1. Prendre le temps de lire et de comprendre ce manuel.
2. Porter des éléments. de protection de la vision, de l’ouïe et
de la respiration, ainsi que des chaussures et vêtements
adaptés
3. Pendant le fonctionnement de l’appareil, veiller à toujours
se trouver dans une position sure en conservant à tout
moment une posture ferme et un bon équilibre.
4. Éviter de travailler en présence d’enfants, d’animaux
domestiques et de curieux.
5. Ne jamais tenter d’utiliser un appareil qui est incomplet ou
qui a fait l’objet d’une modification non autorisée.
6. Éviter le contact et l’inhalation des liquides, brouillards,
poussières et gaz dangereux.
7. Ne pas autoriser les enfants à utiliser l’appareil.
8. Ne pas contourner ni enlever les dispositifs de sécurité.
12. Maintenir les mains à l’écart de l’orifice d’entrée du tuyau
et de la goulotte d’éjection.
13. Débrancher la bougie avant tout nettoyage ou entretien.
14. Porter dans gants pour la protection des mains.
15. Être conscient du fait que l’appareil est bruyant et peut
empêcher la communication de la parole pendant son
fonctionnement normal.
A. Avertissements – Ce qu’il ne faut pas faire
Ne pas essayer d’enlever des matières prises dans le collecteur
ou l’éjecteur lorsque l’appareil est en fonctionnement ou
lorsque le ventilateur tourne.
Ne pas installer de constituants, ni en enlever, pendant le
fonctionnement de l’appareil. Ne pas oublier d’arrêter le
moteur avant tout changement de configuration. S'assurer que
l'accélérateur est en position d'arrêt et que l’appareil est
complètement arrêté. Débrancher le fil de bougie avant
d’enlever toute matière.
Ne pas essayer de réparer cet appareil. Confier les réparations
à un revendeur Little Wonder ou technicien qualifié. S'assurer
que seules des pièces de rechange Little Wonder et des pièces
de rechange recommandées par le constructeur du moteur sont
utilisées.
Ne pas laisser le moteur en marche pendant que l’appareil est
sans surveillance.
Ne pas stocker, renverser ni utiliser d’essence à proximité
d’une flamme ou d’une source d’étincelles.
B. Avertissements – Ce qu’il faut faire
S’habiller adéquatement. Ne pas porter de vêtements flottants
ni de bijoux. Ils peuvent être happés par les pièces en
mouvement. L'utilisation de gants robustes, de chaussures
antidérapantes et de lunettes de sécurité est recommandée.
Toujours porter des protecteurs auditifs lorsque cela est
possible. Utiliser un filtre facial pour ne pas respirer la
poussière.
Rester toujours vigilant. Faire attention à ce que l’on fait et
faire preuve de discernement. Ne pas utiliser l’appareil
lorsqu’on est fatigué.
Maintenir en toutes circonstances les mains à l’écart de la prise
d’air et de la goulotte d’éjection. Maintenir les deux mains sur
le guidon lorsque l’appareil est en marche.
Entretenir et examiner systématiquement l’appareil avec
beaucoup de soin. Suivre les instructions d’entretien données
dans le manuel.
AVERTISSEMENT DANGER
9. LE VENTILATEUR CONTINUE À TOURNER PENDANT
UN MOMENT APRÈS L’ARRÊT DU MOTEUR.
AVERTISSEMENT DANGER
NE PAS FUMER PENDANT LE REMPLISSAGE DU
RÉSERVOIR DE CARBURANT.
AVERTISSEMENT DANGER
10. VENTILATEUR TOURNANT. NE PAS ESSAYER
D’ENLEVER DES MATIÈRES PRISES DANS LE
COLLECTEUR OU L’ÉCHAPPEMENT LORSQUE
L’APPAREIL EST EN FONCTIONNEMENT OU
LORSQUE LE VENTILATEUR TOURNE.
AVERTISSEMENT DANGER
NE PAS UTILISER L’APPAREIL SI LE SILENCIEUX EST
ENDOMMAGÉ OU ABSENT.
AVERTISSEMENT DANGER
11. NE PAS FAIRE FONCTIONNER L’APPAREIL S’IL
VIBRE DE MANIÈRE EXCESSIVE ; ARRÊTER
IMMÉDIATEMENT LE MOTEUR ! DÉBRANCHER LE FIL
DE BOUGIE ET DÉTERMINER SI LE ROTOR EST
ENDOMMAGÉ, SI UN DE SES BOULONS EST
DESSERRÉ, SI SA CLAVETTE EST LÂCHE OU SI UN
CORPS ÉTRANGER S’EST LOGÉ DANS L’APPAREIL.
This manual suits for next models
2
Table of contents
Languages:
Other Little Wonder Yard Vacuum manuals