Luxeon D512PF User manual


Copyright
This publication, including all photographs, illustrations and software, is protected under international copy-
right laws, with all rights reserved. Neither this manual, nor any of the material contained herein, may be
reproduced without written consent of the author.
© Copyright June, 2004
Disclaimer
The information in this document is subject to change without notice. The manufacturer makes no repre-
sentations or warranties with respect to the contents hereof and specifically disclaims any implied
warranties of merchantability or fitness for any particular purpose. The manufacturer reserves the right to
revise this publication and to make changes from time to time in the content hereof without obligation of
the manufacturer to notify any person of such revision or changes.
Trademark Recognition
Microsoft, Windows CE, Windows XP Professional, Windows XP Home, Windows ME, Windows 2000,
and Windows 98 are trademarks of Microsoft Corporation.
All other product names used in this manual are the properties of their respective owners and are ac-
knowledged.

P
P
PC
C
C
F
F
Fr
r
re
e
ee
e
e—
—
—U
U
Us
s
se
e
er
r
r
M
M
Ma
a
an
n
nu
u
ua
a
al
l
l
— ii —
Important Safety Information
Congratulations on purchasing the D512PF PC Free!
Important:
It is strongly recommended that you read this section carefully before using the PC Free. These
safety and usage instructions will ensure that you enjoy many years safe use of the PC Free. Keep
this manual for future reference.
Symbols Used
Warning symbols are used on the unit and in this manual to alert you of hazardous situations.
The following boxes are used in this manual to alert you to important information.
Note:
Provides additional information on the topic at hand.
Important:
Provides additional information that should not be overlooked.
Caution:
Alerts you to situations that may damage the unit.
Warning:
Alerts you to situations that may damage the unit, create a hazardous environment, or cause per-
sonal injury.
Throughout this manual, component parts and items in the OSD menus are denoted in bold font as
in this example:
“Push the Menu button on the remote control to open the Main menu.”
General Safety Information
Do not open the unit case. Aside from the projection lamp, there are no user-serviceable parts in
the unit. For servicing, contact qualified service personnel.
Follow all warnings and cautions in this manual and on the unit case.
The projection lamp is extremely bright by design. To avoid damage to eyes, do not look into the
lens when the lamp is on.
Do not place the unit on an unstable surface, cart, or stand.
Avoid using the system near water, in direct sunlight, or near a heating device.
Do not place heavy objects such as books or bags on the unit.
Power Safety
Only use the supplied power adapter.
Do not place anything on the power cord. Place the power cord where it will not be in the way of
foot traffic.
Remove the batteries from the remote control when storing or not in use for a prolonged period.

P
P
Pr
r
re
e
ef
f
fa
a
ac
c
ce
e
e
–iii –
Base Battery Safety
Dispose of used batteries according to local ordinance regulations.
Use only the specified charger that ships with the battery.
To prevent injury or burns do not allow metal objects to contact the battery terminals.
Replacing the Lamp
Replacing the lamp can be hazardous if done incorrectly. Refer to “Replacing the Projection Lamp”
on page 40 for clear and safe instructions for this procedure.
Unplug the power cord.
Allow the lamp sufficient time to cool.
Cleaning the Projector
Disconnect the power plug before cleaning. Refer to “Cleaning the Projector” on page 42.
Allow the lamp sufficient time to cool.
Regulatory Warnings
Before installing and using the projector, read the regulatory notices in the “Regulatory Compli-
ance” section on page 50.
About this manual
This manual is intended for end users and describes how to install and operate the PC Free. Wherever
possible, relevant information—such as an illustration and its description—has been kept on one page.
This printer-friendly format is both for your convenience and to help save paper and thereby protect the
environment. It is suggested that you only print sections that are relevant to your needs.

P
P
PC
C
C
F
F
Fr
r
re
e
ee
e
e—
—
—U
U
Us
s
se
e
er
r
r
M
M
Ma
a
an
n
nu
u
ua
a
al
l
l
— iv —
Table of contents
GETTING STARTED...............................................................................................................................................................1
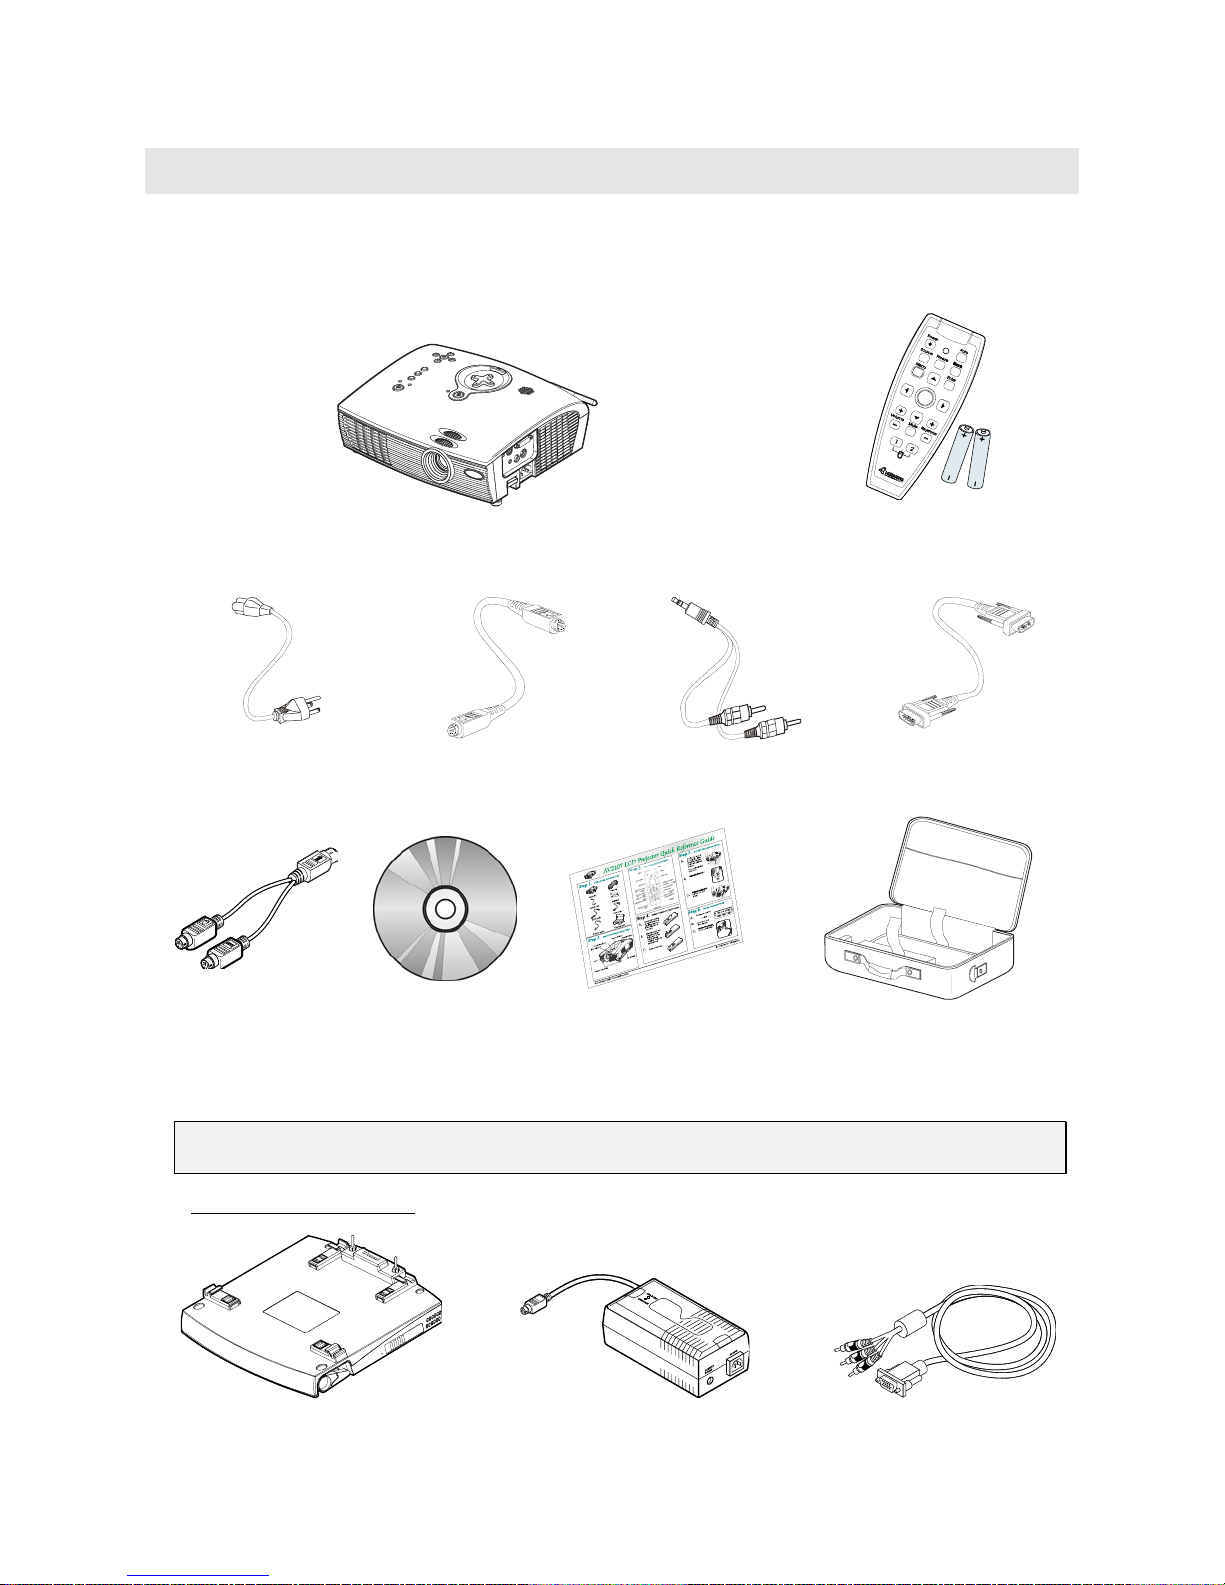
PACKING CHECKLIST................................................................................................................................................................1
Optional Accessories...........................................................................................................................................................1
VIEWS OF PC FREE PARTS .......................................................................................................................................................2
Front-right view...................................................................................................................................................................2
Rear-right view ....................................................................................................................................................................3
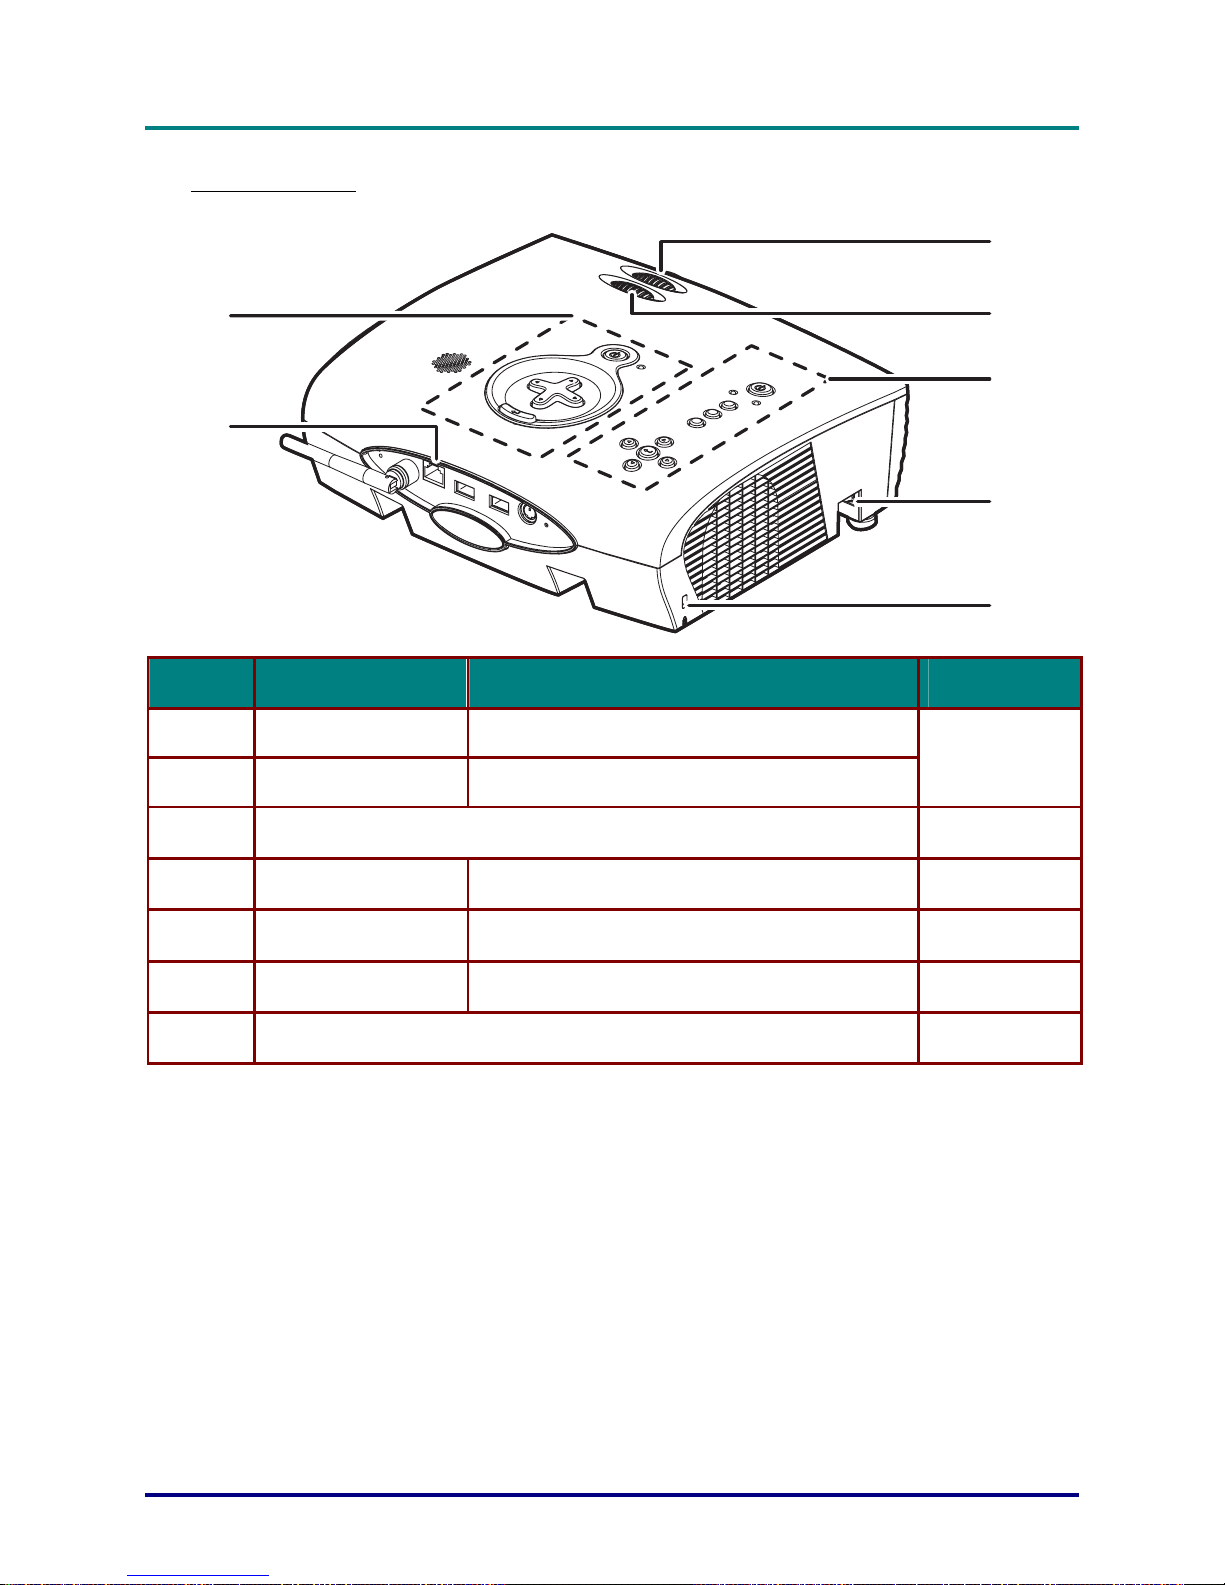
Top view buttons..................................................................................................................................................................4
Rear-connectors view ..........................................................................................................................................................6
Side-connectors view ...........................................................................................................................................................7
Bottom view .........................................................................................................................................................................8
Base Battery (Optional).......................................................................................................................................................9
REMOTE CONTROL PARTS..................................................................................................................................................... 10
SETUP AND OPERATION .................................................................................................................................................. 12
THE BASE BATTERY (OPTIONAL) ......................................................................................................................................... 12
Installing the PC Free on the Base Battery ..................................................................................................................... 12
Charging the Base Battery ............................................................................................................................................... 13
Charging the Base Battery while Operating the PC Free............................................................................................... 14
Removing the PC Free from the Base Battery................................................................................................................. 15
Checking the Base Battery Charge Level ........................................................................................................................ 15
THE REMOTE CONTROL ........................................................................................................................................................ 16
Inserting the Remote Control Battery .............................................................................................................................. 16
Remote Control Operating Range.................................................................................................................................... 16
CONNECTING INPUT DEVICES ............................................................................................................................................... 17
RJ-45 Connector............................................................................................................................................................... 18
USB Connectors ............................................................................................................................................................... 18
PS2 Connector (Connecting a Mouse and Keyboard with the Y-cable)......................................................................... 18
Audio In Connector .......................................................................................................................................................... 18
RS-232 Connector............................................................................................................................................................. 18
DVI Connector.................................................................................................................................................................. 18
Audio Out Connector........................................................................................................................................................ 18
Video Connector............................................................................................................................................................... 18
S-Video Connector............................................................................................................................................................ 18
BASIC OPERATION................................................................................................................................................................. 19
Starting and Shutting down the PC Free ......................................................................................................................... 19
Using a Flash Drive with the PC Free ............................................................................................................................ 20
Windows CE .NET File Viewing Restrictions.................................................................................................................. 20
Adjusting the front Height of the PC Free ....................................................................................................................... 21
Adjust the Zoom, Focus (Hardware), and Keystone........................................................................................................ 23
Digital Zoom and Pan Controls....................................................................................................................................... 24
REMOTE PROJECTION ..................................................................................................................................................... 25
CONFIGURING NETWORK SETTINGS ..................................................................................................................................... 25
Checking IP Addresses ..................................................................................................................................................... 25
REMOTE PC OPERATION FOR WINDOWS XP PROFESSIONAL (REMOTE DESKTOP CONNECTION) ..................................................................... 26
Setting it up....................................................................................................................................................................... 26
Accessing the Remote PC from PC Free ......................................................................................................................... 27
Peer-to-peer (Ad Hoc) Connection .................................................................................................................................. 28
Wired LAN Connection .................................................................................................................................................... 29
Wireless LAN Connection ................................................................................................................................................ 30
ON-SCREEN DISPLAY MENU SETTINGS ..................................................................................................................... 33
ON-SCREEN DISPLAY MENU CONTROLS .............................................................................................................................. 33
Setting the OSD Language ............................................................................................................................................... 33
Main Menu........................................................................................................................................................................ 34
Setup Menu ....................................................................................................................................................................... 35
ColorMgr Menu................................................................................................................................................................ 36
Language Menu ................................................................................................................................................................ 37

P
P
Pr
r
re
e
ef
f
fa
a
ac
c
ce
e
e
–v –
Utility Menu ...................................................................................................................................................................... 38
Status Menu ...................................................................................................................................................................... 39
MAINTENANCE AND SECURITY.................................................................................................................................... 40
REPLACING THE PROJECTION LAMP...................................................................................................................................... 40
Resetting the Lamp ........................................................................................................................................................... 41
CLEANING THE PC FREE ....................................................................................................................................................... 42
Cleaning the Lens ............................................................................................................................................................. 42
Cleaning the Case............................................................................................................................................................. 42
USING THE KENSINGTON LOCK............................................................................................................................................. 42
TROUBLESHOOTING......................................................................................................................................................... 43
COMMON PROBLEMS AND SOLUTIONS .................................................................................................................................. 43
TIPS FOR TROUBLESHOOTING ............................................................................................................................................... 43
LED ERROR MESSAGES ........................................................................................................................................................ 44
IMAGE PROBLEMS ................................................................................................................................................................. 44
LAMP PROBLEMS................................................................................................................................................................... 45
REMOTE CONTROL PROBLEMS.............................................................................................................................................. 45
AUDIO PROBLEMS ................................................................................................................................................................. 45
HAVING THE PC FREE SERVICED.......................................................................................................................................... 46
SPECIFICATIONS ................................................................................................................................................................ 47
SPECIFICATIONS .................................................................................................................................................................... 47
Projector ........................................................................................................................................................................... 47
PC ..................................................................................................................................................................................... 48
DIMENSIONS .......................................................................................................................................................................... 49
REGULATORY COMPLIANCE ........................................................................................................................................ 50
FCC WARNING...................................................................................................................................................................... 50
CANADA ................................................................................................................................................................................ 50
SAFETY CERTIFICATIONS ...................................................................................................................................................... 50
EN 55022 WARNING............................................................................................................................................................. 50


GETTING STARTED
Packing Checklist
Carefully unpack the PC Free and check that the following items are included:
PC FREE REMOTE CONTROL
TWO AAA BATTERIES
POWER CORD S-VIDEO CABLE AUDIO CABLE
(MINI JACK-TO-RCA X 2)
COMPUTER CABLE
(DVI-DB15)
Y-splitter cable CD-ROM (This
User’s manual)
Multi-language Quick
start guide
Carrying case
Contact your dealer immediately if any items are missing, appear damaged, or if the unit does not work.
Caution:
Avoid using the PC Free in dusty environments.
Optional Accessories
BASE BATTERY B
ATTERY CHARGER
(WITH POWER CORD AND CAR LIGHTER POWER ADAPTER)
DVI TO RCA

P
P
PC
C
C
F
F
Fr
r
re
e
ee
e
e—
—
—U
U
Us
s
se
e
er
r
r
M
M
Ma
a
an
n
nu
u
ua
a
al
l
l
– 2 –
Views of PC Free Parts
Front-right view
6
2
5
4
1
3
ITEM LABEL DESCRIPTION SEE PAGE:
1. Lens Manual zoom and focus lens 23
2. IR receiver Receiver for IR signal from remote control 16
3. Height adjuster Adjusts level of PC Free 20
4. AC socket Socket for power cord 18
5. Side connectors Connect input/output devices 7
6. Speaker Built-in mono speaker —
Important:
Grill openings on the PC Free allow for good air circulation, which keeps the PC Free lamp cool. Do
not obstruct any of the grill openings.

P
P
Pr
r
re
e
ef
f
fa
a
ac
c
ce
e
e-
-
-v
v
vi
i
ie
e
ew
w
ws
s
s
o
o
of
f
f
P
P
PC
C
C
F
F
Fr
r
re
e
ee
e
e
p
p
pa
a
ar
r
rt
t
ts
s
s
–3 –
Rear-right view
1
2
3
4
5
6
7
ITEM LABEL DESCRIPTION SEE PAGE:
1. Focus Use to focus
2. Zoom Use to zoom in or out
23
3. Projector controls 4
4. Height adjuster Adjusts level of PC Free 20
5. Kensington lock Security lock 42
6. Rear connectors Connect input/output devices 6
7. PC controls 4

P
P
PC
C
C
F
F
Fr
r
re
e
ee
e
e—
—
—U
U
Us
s
se
e
er
r
r
M
M
Ma
a
an
n
nu
u
ua
a
al
l
l
– 4 –
Top view buttons
SOURCE
AUTO
MENU
+ KEYSTONE
- KEYSTONE
+ VOL.-VOL.
ENTER
POWER
PC
PROJECTOR
READYPOWER
1
2
3
4
5
6
7
8
9
10
11
12
13
ITEM LABEL DESCRIPTION SEE PAGE:
1. Power (projector) Turns the PC Free on or off 18
Green Unit is powered on and working correctly
Off Unit is powered off
2. Power (LED)
Flashing Operational error code
(refer to “LED Error Messages” on page 44)
Orange Lamp ready—you can safely turn on or off the
PC Free
3. Ready (LED)
Flashing Lamp not ready—do not press the power button
4. Source Detects the input device 18
5. Auto Optimizes image size, position, and resolution —
6. Menu Opens the On-Screen Display (OSD) 33
7. + Keystone Keystone correction/move up in OSD menus 23
8. -VOL / +VOL Decreases/increase volume;
navigate and change settings in the OSD 33

P
P
Pr
r
re
e
ef
f
fa
a
ac
c
ce
e
e-
-
-v
v
vi
i
ie
e
ew
w
ws
s
s
o
o
of
f
f
P
P
PC
C
C
F
F
Fr
r
re
e
ee
e
e
p
p
pa
a
ar
r
rt
t
ts
s
s
–5 –
ITEM LABEL DESCRIPTION SEE PAGE:
9. Enter Changes settings in the OSD —
10. - Keystone Keystone correction/move down in OSD menus 23
11. Enter (PC) Confirm menus in Windows CE —
12. Cursor buttons (PC) Navigate in Windows CE —
13. Power (PC) Turn the PC on or off 19

P
P
PC
C
C
F
F
Fr
r
re
e
ee
e
e—
—
—U
U
Us
s
se
e
er
r
r
M
M
Ma
a
an
n
nu
u
ua
a
al
l
l
– 6 –
Rear-connectors view
RJ45
USB USB
PS2 RESET
1
5
2 3 42
6
ITEM LABEL DESCRIPTION SEE PAGE:
1 RJ-45 Connect a LAN cable for wired connections 25
2 USB Connect USB devices
3 PS2 Connect a PS2 keyboard. To connect a PS2 mouse, you
must first connect the supplied Y-splitter cable.
17
4 Reset Insert a pin to reset the Windows CE.net OS to its default
settings.
—
5 IR receiver Receiver for IR signal from remote control 16
6 Wireless antenna Rotate clockwise for wireless operation 25
Important:
Some USB devices may not be compatible with Windows CE. Check the system requirements of
USB devices before connecting them to the PC Free.

P
P
Pr
r
re
e
ef
f
fa
a
ac
c
ce
e
e-
-
-v
v
vi
i
ie
e
ew
w
ws
s
s
o
o
of
f
f
P
P
PC
C
C
F
F
Fr
r
re
e
ee
e
e
p
p
pa
a
ar
r
rt
t
ts
s
s
–7 –
Side-connectors view
VIDEO
RS-232 DVI
AUDIO
OUT S-VIDEO
AUDIO
IN
1 2 3
4
56
7
ITEM LABEL DESCRIPTION SEE PAGE:
1 Audio-in Connect the audio cable (supplied) from an input device
such as a DVD player
17
2 RS-232 Reserved service port for firmware upgrades
3 DVI-I Connect a DVI cable from a computer. An optional cable
can also be used to connect to the component output of a
DVD player or set-top box.
4 S-video Connect the supplied S-video cable from a video device
17
5 Power Connect the supplied power cord 18
6 Video Connect a composite video cable from a video device
7 Audio-out Connect to external audio devices such as speakers or an
amplifier
17

P
P
PC
C
C
F
F
Fr
r
re
e
ee
e
e—
—
—U
U
Us
s
se
e
er
r
r
M
M
Ma
a
an
n
nu
u
ua
a
al
l
l
– 8 –
Bottom view
ITEM LABEL DESCRIPTION SEE PAGE:
1 Projection lamp cover Remove when changing the lamp 40
2 Height adjuster Adjust the level of the PC Free 20
3 Ceiling support holes Contact your dealer for information on mounting the PC Free on
a ceiling.

P
P
Pr
r
re
e
ef
f
fa
a
ac
c
ce
e
e-
-
-v
v
vi
i
ie
e
ew
w
ws
s
s
o
o
of
f
f
P
P
PC
C
C
F
F
Fr
r
re
e
ee
e
e
p
p
pa
a
ar
r
rt
t
ts
s
s
–9 –
Base Battery (Optional)
ITEM LABEL DESCRIPTION SEE PAGE:
1 Battery gauge Press to check remaining batter power 12
2 Height adjuster Adjust level of the PC Free 22
3 Base locks Secure PC Free to base battery 12
4 Base battery
power switch
Turn the base battery power on/off
5 Base battery
power connector
Connect the base battery charger here
12

P
P
PC
C
C
F
F
Fr
r
re
e
ee
e
e—
—
—U
U
Us
s
se
e
er
r
r
M
M
Ma
a
an
n
nu
u
ua
a
al
l
l
– 10 –
Remote Control Parts
Important:
1. Avoid using the PC Free with bright fluorescent lighting turned on. Certain high-frequency fluo-
rescent lights can disrupt remote control operation.
2. Be sure nothing obstructs the path between the remote control and the PC Free. If the path be-
tween remote and PC Free is obstructed, you can bounce the remote signal off certain reflective
surfaces such as projector screens.
3. The buttons and keys on the PC Free have the same functions as the corresponding buttons on
the remote control. This user’s manual describes the functions based on the remote control. (The
onscreen cursor can not be controlled with the PC Free buttons; use the remote control cursor pad
or connect a mouse to the PC Free.)

P
P
Pr
r
re
e
ef
f
fa
a
ac
c
ce
e
e-
-
-v
v
vi
i
ie
e
ew
w
ws
s
s
o
o
of
f
f
P
P
PC
C
C
F
F
Fr
r
re
e
ee
e
e
p
p
pa
a
ar
r
rt
t
ts
s
s
–11 –
ITEM LABEL DESCRIPTION SEE PAGE:
1 Laser Use as on-screen pointer. DO NOT POINT IN EYES.
2 IR transmitter Transmits signals to projector
3 Status LED Lights when the remote is used
4 Auto Optimizes image size, position, and resolution
5 Blank Makes the screen blank 38
6 Enter Changes settings in the OSD
7 Up cursor Navigates and changes settings in the OSD
8 Right cursor Navigates and changes settings in the OSD
33
9 Cursor pad Moves the on-screen cursor when connected to a PC
10 Keystone top Corrects image-trapezoid (narrower top) effect
11 Keystone bottom Corrects image-trapezoid (narrower bottom) effect
23
12 Mute Mutes the built-in speaker
13 Right mouse Functions as right mouse button when connected to a PC
14 Left mouse Functions as left mouse button when connected to a PC
15 Volume down
16 Volume up
Adjusts volume
17 Down cursor
18 Left cursor
Navigates and changes settings in the OSD
19 Menu Opens the On-Screen Display (OSD)
33
20 Freeze Freeze/unfreezes the on-screen picture
21 Source Detects the input device
22 Power Turns the projector on or off
18

SETUP AND OPERATION
The Base Battery (Optional)
An optional base battery can be purchased to allow greater mobility with the PC Free. The PC Free
can be used in places where no electrical outlet is available and even for outdoor presentations.
When fully charged, the base battery supplies power to the projector for up to 1.5 hours.
Important:
When using the projector with the base battery, ensure the temperature is between minus 20 de-
grees and plus 60 degrees centigrade. The humidity should be 80% RH.
Avoid storing the projector in temperatures above 45 degrees centigrade, for example on the seat
of a car in direct sunlight. Refer to the temperature and humidity specifications on page 47.
Installing the PC Free on the Base Battery
The PC Free can be installed on the base battery without turning off or disconnecting power to the
base battery. However, when charging the base battery, the power switch on the base battery should
be turned off.
1.
Slide the base battery latches to the open
position.
2.
Align the PC Free with the connector
pins on the base battery.
3.
Lower the PC Free evenly onto the base
battery.
4.
Push the base battery latches as shown to
lock the projector in place.
Caution:
1. Dispose of used batteries according to local ordinance regulations
2. Use only the specified charger that ships with the battery.
3. To prevent injury, burns, or damage to the battery, do not allow metal objects such as keys touch
the battery terminals

S
S
Se
e
et
t
tu
u
up
p
p
a
a
an
n
nd
d
d
O
O
Op
p
pe
e
er
r
ra
a
at
t
ti
i
io
o
on
n
n
–13 –
Charging the Base Battery
Refer to the following when charging the base battery:
1
.
Connect the base battery ac adapter to
the power connector on the base battery.
2
.
Connect the base battery to an electrical
outlet.
The red CHARGING LED on the bat-
tery charger lights while charging. When
the battery is charged, the CHARGING
LED turns off and the green
CHARGED LED lights.
Table of contents
Other Luxeon Projector manuals