MAGNON duomatic DX80 User manual

MAGNON
duomatic
DX80/DX82/DX85/DX87
û.:

INSTRUCTIONS FOR MAGNON duOmatiC 8MM PROJECTOB
INSTRUCTIONS POUR LE PROJECTEIIR MAGNON duomatiC
BEDIENUNGSANLEITUNG FUR DEN M^AGNON duomatiC 8MM
INSTRUCCIONES PARA EL PROYECTOR MAGNON duOMAtiC
1. SPINDLE ADAPTER
2. SIIPPLY SPINDLE
3. REEL LOCK LEVER
4. FILM SUPPLY ARM
5. FILM GÀTE
6. FOCUSINC KNOB
7. ZOOM LENS
8. FILM SELECTOR LEVER
9. TRIMMING KNOB
IO. ELEVATION WHEEL
11. STILL LEVER
12. FILM TYPE INDICATOR
13. VARIABLE SPEED CONTROL DIÂL
14. REAR LEG
15. ROTARY SELECTOR
16. TÀKE-UP SPINDLE
17. FILM REWIND GUIDE
18. GRIP
19. MECHÀNISM COVER
20. FRAMER
21. LOOP FORMER
22. BACK COVER
23. BACK COVER SCREIY
24. SOCKET
25. BACK COVER PLÀTE
26. TRI-MOTION LEVER
I
1. ADÀPTATLUR D]] L'ÀXE
2. AXE D'APPROVISIONNIMENT
3. LI]VI[R DU BLOCAGL DE LA BOBINE
4. tsRAS D'APPROVISIONNEMENT DU FILM
5. COULOIR DU FILM
6. BOUTON DI] MISI AU POINT
7. OBJECTIF A FOCALIT VARIABLE
8 I,FVTFR DIJ SI]T,I]CTIiT]R D]i FII-M
9. BOUTON DE DECOUPAGI]
IO. ROUE D'ELEVATION
II. LEVIÈR D'IMAGÈ FIXE
12. INDICATLUR DU TYPL DE FILM
r3. CADRAN DE COMMANDE DE VITÈSSE VÀRIABLI
14. PIDD ARRIERE
15. SLLECTEUR ROTATIII
16. AXE D'INROULEMENT
17. GUIDE DI REBOBINAGE DU FILM
18. POIGNEE
19. COUVERCLE DU MECANISMI
20. CADREUR
21. FORMEUR DE BOUCLE
22. COUVLRCLE ARRII]RtJ
23. VIS DU COUVERCLI] ARRIIRE
24. PRISE
25. PLAQUE DU COUVtsRCLE ARRIÈRE
26. LEVIER A TROIS MOUVEMENTS

1 AJI]STADOR DELCARRETI]L
2 CARRF,TF,L ALIMETÀDOR
3. PALANCÀ DE CILRRE DEL CARRETI]
4. BRAZO ALIMLNTADOR D]- LA PI]LICULA
5, ]]NTRADA DI] LA PILICULÀ
6 (]ONTROL DEL FOCO
7. OBJUTTVO ZOOM
8, PALANCA SELBCTORA D]- LA PÈLICULA
9, PÉ]RILLA DF]L RIBÈ]TI.]ADOR
IO. MANDO DI] ALTURA
I1, PALÀNCA DD PARADA DL] I]\IAGI]N
I2. INDICADOR DIjL TIPO DF] PELICULA
13- DISCO DL CONTROL DL VELOCIDAD VARIABLE
14. PI]] POSTLRIOR
15. SELICTOR GIRATORIO
16. CARRETEL RIBOBINADOR
17. GT]IA PARA REBOBIN,{R LA PELICULA
]8 ÀSA
I9. CUBIIRTA DLL APARATO
20. ENCUADRII D! LA IMAGEN
? ] ITORMADOR DF BUCL]]
22. CUBIÈRTA POSTF]RIOR
23. TORNILLO DIi LA CUBIIIRTA POSTERIOR
24. ENCHUFE HEMBRA
25. PLACA DL LA CUBIERTA POSTIRIOR
26. PALANCA DT.: TRES NIOVIMII]NTOS
il
ll***
ll,, ,*u
I 2. ATJFNAHMESPTNDEL
I r spr rr.rNppstsrElLHEBEL
ll +. spULrN,c.R.[4 r üR AUFNAHMESPTNDEL
ll s. r'rurlrruteuxeNer
ll r-porussrenuNcsKNoPF
ll r. zoor'.r-oure xrrv
[ 8. FILMWAHLHEBEL
ll s Frr M-aNscHNEtDER
ll lo. HôHENETNSTELLRAD
I rr. srrLrsr,q.NoPRoJEKTtoN
I r I prr.ltponulrÀNzF.tcF
I r.l. vlnraalr.cEscHWNDtGKElrsKoNTRoLLwAHLSCHEtBE
I 14. HINTERSTUTZE
I I5. DREHKNOPF FÜR BILDFREQUENZEN
I t6- ATJFFANGSPULE
I 17. FrLMRüCKLAUFFüHRUNG
I 18. HANDGRIFF
I t9. MF.CHANISMUS-ÀBDECKUNG
I zo- srLosrnrcuvERsrELLUNG
I -zt. scgLaupeNponr4En
I 22 RtlcKwAND
I ii. BBFir.l "r*csscHRAUBEN FùR RüCKWAND
I 25.RÜCKENABDECKPLATTE
| .ze . srlonnrqueNzuerel
I

:
I
I
i
I
SETTING UP
INSTALTATION
AUFBAU
MONTAJE
Place the projector on a table of suitable height so that the
projection lens is opposite the center of the süeen.
C'heck the voltage shovm on the BÀCK COVER PLATE (#1).
To change the voltage, rcmove the BACK COVER. Pull out
the clamp aûd insert it into the tap of the voltage desired.
This machine may be operated on all voltages from l00V to
250V (#2). - Not for U.S.A. and Canada.
Placez le proiecteul sur une tâble d'une hauteur appropriée
de laçon que I'objectif de projection soit face au cenlte de
l'écran.
VÉrifiez Ie tension indiquée sur la Plaque du Couver..le
Arrière (no. l).
Pour changer la tension, enlevez lâ Plaque Arrière. Retirez
làttache et insérczlâ dans lâ prise de la tension désirée. Cet
appareil peut fonctioflner sur toutes les tensions de 100V à
250V (no.2).
Den Projêktor so auf einen Tisch stellen, da13 sich die
ProjektioNlinse gegenüber der Mitte der Leinwand befindet.
Die âuf der Rückenabdeckplatte angegebene Slromspannung
überpdfen (Nr. 1).
Zwecks VerZinderung der Stromspannung die Rückwand
entfemen, Die Klemme herausziehen und in den Zapfen der
gewünschten Stromspannung stecken. Dieses Gerât kann mit
allen Stromspannungen von 100V bis 250V betrieben werden
(Nr. 2).
Coloque el proyector sobre una mesa de ùna altura apropiadâ
de modo que el objetivo poryector se encuentre enfrente del
centro de lâ pântalla.
Compruebe el voltaje indicado en la PLACA DE LA
CUBIERTA POST]]RIOR (#1).
Parâ câmbiâr el vollâie. quile lâ PLACA POSTERIOR. Tire de
la dbra/adera e inlrodü,,cala en la Iomâ del vollaje deseâdo.
I.te apâralo puede funcionar con lodos los voltxjes desde
l00v â 250V (+2).

lnseft the cable plug into the SOCKET and then the other
end into an etectrical outlet (#3).
Raise the FILM SUPPLY ARM fully until it stop (#4).
Insérez la fiche du cordon dans la Prise et ensuite l'âutre
e\rrémirê d.rns une pri\e de couranr electrique (no.3t.
fl(ve/ le Bris d App roüsion nemen l du film à lond iu<qu à
ce qu'ii s'arrête (no.4).
Netzkâbel ir den SockelaNchlu8 stecken und ilann dâs
andere Ende mit der Steckdose veôinden (Nr. 3).
Den Spulenarm fiiI die Aufnahmespindel bis zum Anscl ag
nach obeî ziehen (Nt 4).
Introduzca cl eùchufe macho del cable en el ENCHUFE
HEMBRA y luego el otro extremo en la tomâ de cordente.
(+3)
Levante eI BRAZO ALIMENTADOR DL PILICULA hastâ
4

ADJUSTING FOR FIIM TYPE
REGIAGE POLTR LE TYPE DE FIL}I
FItM FORM ATETNSTELLUNG
REGT]I,ADOR PARA EL TIPO DE PELICULA
Press down the FILM SELECTOR LEVER lor Super 8 or
Single 8.
Lift it for Regular 8 and remove the SPINDLE ADAPTER.
Gauge for use is automatically shown by the FILM TYPE
INDICATOR in the illuminated pânel (#5).
The SUPPLY SPINDLE accepts reels of all 8mm film
formâts. For Super 8 film slide the spindle adaptor on the
spindle (#6).
\ppuy.r sur i. Lcvier du Sélectcur dc l,ilnl pour le ibrmlt
Su|cr 8 ou le Sirrgle 8.
I evcTlc Iour le format Régulier E et e.lcvcz l'Adnptrteur de
Lc lonnal pour I'utilisation est indiqué autornatiquement prtr
llndic.rtcur dLr Type dc I.ilm dâns lc prnncâu illuminé (no.
L ^\c d'Approvisionnemeni acccptc lcs bobincs dc tous lcs
tl)nnat\ dc films dc 8mm. l'our les tllms cn Sufer B. fritcs
.oulisser l'adrptrteur dc l J\c \ur l'r\e (no.6).
Den Filmwâhlhebel lù Super 8 oder Sing.le 8 heruntcr-
dlücken. Bei Regular 8 den Wâhlhebel nâch oben schieben
und den Spindel-Adapter abnehmen.
Im e euchteten Anzeigefenster erscheint automâtisch das
verwendete Format (Nr. 5).
Die Aufnâhmespindel kânn alle 8mm-Filmlormate auf-
nehmen. Für Super 8 Filme, den Spindel-Adapter âuf die
Spindel setzen (Nr. 6).
APrietc hâcjâ âbâjo la PALANC^ Stil-t,lCTORA I)l.l
PI.LICULA pâra Supcr B ô Singlc 8.
Lcvlntela para Rcsular 8 y retire eL AJUSTADOR Dlil-
(,.\RltLTLL.
L.r medida para el uso es indicada automiticamentc por cl
INIIIC^DOR Dl,L TIPO l)ll PIl.lctiLA en el cuâdro dc
mrndos ilumin.'do. ( $5)
l1 aAIiltl..TIrL ^LIÀll.NTAI)Olt âdmitc carrctcs dr todos
[,\ modclos dc pelicuhs de Bmm- Pârâ pcliculas Super 8
corrx.l .rjustxdor dcl carrciel sol)re c1 carrctel (:j6).

THREADING FIIM
CHARGEMENT DU FIIM
FITMEINEADELUNG
ENHEBRAMIENTO DE tA PETICULA
7
With the teeth of the hub lacing towards you, place the
ÀUTOMATIC TAKE UP REEL supplied with the projector,
on the TAKE-UP SPINDLE. Push and rotate the reel until
the keys of the spindle fit into the slits in the reel (#7).
Mth the perforated edge of the film facing towards you,
place a reel of film on the SUPPLY SPINDLE. Push and
rotâte the reel until ihe keys of the spindle fit into the slits in
the reel. Tum the REEL LOCK LEVER dor n io lock the
reel in position (#7).
Plâce the end of the film in the trimmer slot ând push-dovr'n
the timming knob (#8).
Avec les dcnts Llu mrnchon làce à vou\. placeT l! Bobinr
d'linroulcmcnt Automatiquc l_ournic rvec lc projcctcur sur
l'A\e d'Unroulenrcnt. Poussùz et tournez h bobine iLrsqu'à ce
que les touchcs dc I'r\c .rillent dâns les fcnrcs de h bobine
(no.7).
Avec lc bord pert-oré du rilln lucc ù vous. phccz un roulcxu
de lilm sur l'A)ie d'Approvisionnemcnl. Pous\cz el tournrz le
roulcau iLrsqu'à ce quc lcs touchcs do Iâ\c âillcnt d.rrs lcs
fcntes du roulcau. Tourncz lc L.vicr dc Blocage dc h Bobinc
poLrr bloqucr la boLrire en position (no. 7).
Placcz l'c\trémité du film dâns I'c Liorrchc dc dÉcoup.rgc È1
poussez le boutor dc découpagr (Ilo.8).
Wâhrcnd die Fùhrungsnasen in Ihre Richtung zeigen, die
mitgelieferte automatische Àuffangspule auf die Auffang_
spindel setzen. Die Spule solânge drehen, bis die Führungs_
nasen der Spindel genau in die Spulenschlitze passen (Nr. 7).
Wâhrend die perforierte Seite des Filmes zu lhnen zeigt, eine
Filmspule auf die Aufnâhmespindel setzen. Die Spule solange
drehen, bis die Fûhrungsnâsen der Spindel genau in die
Spulenschlitze passen- Den Spulenfeststellhebel herunter-
drücken, um die Spule lestzustellen (Nr. 7).
Das Ende des Films in den Anschneideschlitz legen und den
Schneideknopf ddcken (Nr. 8).
( on los dirnl.\ dr Li rltrcz.r mirrndo lrrciâ ustcd..oloquc el
(.\RRl Tl Itl,BOlllN.\l)Ol{ AtrTO\{^l'lCO. provisio con cl
rro\'.ctor. \obr. .1 aARRITTI,L IiIIBOBINADOR. I,mIuje y
hx!r girxr .l .xrr.tL'hlslr qur los rrrbldores dcl crrrctll
rncij.rr .r lir\ inJi\i.n.! d.l clrrct. (:7)
Con el lrrlo f.ri)r.L(lo d. li pcliculLr lnirrndo hir.iir usicrl.
colo(lù. un .rrr.'r. d. p.1i.ul.r rn cl (,\RRt,T1,L .\l_tl\tfN-
lAI)OR lrntLrir \ hr!.r !irLrr cl clrrcr. h.rstr qLr. los
llxbuilorc\ d.l currr'tr.l Ùrcrlcn (]n h\ irr!lsiLrn!s d.1 ..rrr.t..
Ilajc l,r I'\Ll\C.\ Dl Cll RItl DIfl- ('\Rlti Il prrr filill cl
ùrI.tL' L'r !'lir fonri6n (=l).
( '' rr,. ." r\t,. r' . J.. l. 1,. tr . . , ,t r. . ., ...1
Ll ..., r \ . " t. .t. .,... r' ..1,. r. .. I I I . 1 . . . . 1 . , . l . ri ,

Remove the LENS COVER and center the light beam on the
screen. The beam is centered vertica[y by tuming the
ELEVATION WHEEL.
Turn the ROTARY SELECTOR to "F" and inset the
trinmed end of the film into the FILM GATE (#9).
Tum the ROTARY SELECTOR to "L" and you are ready
for projection.
fnleveT le Couvercle de l'Obiecril el cenlre/ le fâisceau de lâ
lumière 'ur l'êcran. Le faiscèau est (enrré verlicalemenl cn
tournant la Roue d'E]évâtion.
Tournez Ie Sélecteur Rotatif sü "F" et insérez l'extrémité
coupée du film dans 1€ Couloir du Film (no. 9).
Tournez le Sélecteur Rotâtif sur "L" et vous êtes prêt à faire
une projeciion-
Den Objektivdeckel entfernen und den Lichtstlahl auf die
Mitte der Leinwand richten. Dutch Drehen des Hôheneinstell-
râdes wird der Strahl vertikal zentriert.
Den Drehknopf fù BildfrequerEen auf "F" stellen und den
angeschnittenen Filmanfang in den Filmeinlaufkanal ein-
lûhren (Nr. 9).
Den Drehknopf lifi Bildfrequenzen auf t" stellenl das Gerât
ist nunfl ehr projektionsbereit.
Quite la TAPA DEL OBJETIVO y centre el rayo de luz sobre
la pantalla.
El rayo de luz se centra ÿerticalmente hâciendo girar eI
MANDO DE ALTURA. Hâga girdr el SELECTOR GIRÂ-
TORIO hacia "F" e introduzca el extremo fbeteado de lâ
pelfcula en la ENTRADA DE LÀ PELICULA (#9).
Haga girar el SELECTOR GIRATORIO hacia "L" y estâ listo
para proyectar.

PROJECTION
PROJECTION
PROJEKTION
PROYECCION
For forward projection, turn the ROTARY SELECTOR to
"F" and then to "L".
For rcverse projection, turn the ROTARY SELECTOR to
"R" and thei tô "L". To stop the motor and lamp, turn it to
*oFF" (#10).
TUIN thè VÀRIABLE SPEED CONTROL DIAL tO "FAST"
to increâse the soeed or lo "SLOW" lo reduce it. Normally
the sDeed conlJdl should be sel hâl-fway between "|AST"
ând -'sl,ow" (#10,.
DX80&DX85:AS soon as the film has âttached itself to the
AUTOMÀTIC TAKE-UP REEL, depress "F" of the LOOP
FORMER (#11).
Dx82 & DX87:A built-in looper will form and size the loop
automatically.
If the toop slips dudng projection, the picture will start
iumping on the iûeen ând a Chattering noise wilt be noticed.
Should this happen, press down a fe\i/ times "F" of the
LOOP IORMER during forward projection. ând "R" du ng
reverse projection until ihe picture becomes sleady once
again (#11).
Pour une plojection avant, tournez Ie Sélecteur Rotâtif sui
''I , puis sur "L".
Poui iaire une protectron arrière, Iournez Ie Sêlecteur Rolatil
sur "R", puis sur "L". Pour ârrêter le moteur et la lampe,
tournez-.le sw ..OFF,, (Arrét) (no. 10).
Tou.nez le Câdran de Commande de Vitesse varialbe sul
"l'ast" (Rapide) pour augmenter la vitesse ou sur "Slow"
(Ralenlr) pour la diminuer. Normalemenl lâ commlnde de lâ
vrle\se doil ètre rêglée à mi-chemh enlr( 'FâsI (Rrpide) el
"Slow" (Râlent) (no. 10).
Dx80 & Dx85: Dès que le film s'est fixé de lui-même sur Ia
Bobine d'Erûoulement Automatique, appuyez sul "F" du
Formeur de Boucle (no. l l).
DXR) & DX87:t n boucleur in(orDoré lormerd el dimension-
nera âutomatiquement la boucle,
Si la Lroucle gli."e durant la projeclion, limage commencela à
s.,Driller sur l'écran eL un clioueli\ 'c lerr enlendre. Si cela
.lcvârt se Drodrlre. aoour.) olu'tr-ur' fol. .ur "l du
Formeur de Boucle penàant la broiecrion,jranl! et \ur'R'
penddnl lâ projectiôn âfli(re ltr'qL à .e qtre limage re-
devienne stablc (no. 11).
Fiir Vorw:irtsprojektion den Dtehknopf für Bildfrcquenzen
ent auf "F" und dann auf"L" stellen.
F\ir Rückw:irlsprojektion. den Dlehknopf fiir Bildfrequenzen
ersl auf *R" ünd dann auÎ"L" stellen. Um den Motor und
die Lampe anzuhalten, auf 'OFF" Position (AUS) stellen
(Nr. 10).
Die variable Geschwindiskeitskontrollwât §cheibe âuf "Fast"
r Schnell, zur Erhôhuni oder âuf *SLOW" (Landsam) zur
Herabselzunq der Cesihwindigkeit §tellen. Nomâlerweise
sollte die " Gesch \À indipkei ts[on lrolle zwischen Fast"
(Schnell) und "Slow" (la;gsâm) stehen (Nr' I0).
DX80 &DX85: Sobald sich der Film in die automatische
Auffangspule eingef:idelt hat, die "F'lseite des Schlaufen-
folme$ &iicken (Nr. 1 I ).
Dx82 & Dx87: Ein eingebâuter Schlaufenfornel sorgt auto-
mârisch lür Bilduns und richtiÈe CrôRe der Schlaufe.
tôst sich die Schliufe *iihrenî der Projektion. f:dngl das Bild
auf der Leinwand an zu wackeln und ein Rattem ist zn
hôrcn. In diesem Fall einige Male die "F'lseite des Schlauf-
enformers wiihrend der Vdrwiùtsprojektion fuiicken, und bei
der Rückÿ:ùtsprojektion die "R"-Seite, bis das Bild ÿieder
stetig ist (Nr. l1).

Pâr.r pro!,ecci6n hrci.r âd.1ântc hagr grar .1 SI.LIICTOR
r;lk\lURlO., : I \ru,lul,,r., l'
l)JL IJ ...i n lr "r - J., lr.,-., 4 , .i :l ll{ IOk
(;lRÀTOltlo hâcia R" y luego hâcia 'L". Para parar cl
rnotor y la 1r pâr!. pôngalo en OIl." (+10).
Hxsa sirilr cl DISCO DU CONfttOI- ,)il VI|LOCID^D
VAltl^BLU hecià 'FAST'(ripido) par.r aumentâr la velo,
cidad o Iacir "Sl-OW" (lento) par.r diSIninuirla. Normal-
mentc cI conlrol de velocidid dclre dc colocarse en una
posiclôn media entrc liAST" y 'SLOW-'(+10).
DX80 & DXt5: Ten pronto como lâ pclicula sc cnhcbre en ri
(lAl{ltllTL RLBOBINAIIOIt ALiT()À,IATlCO. apriete l)'
dcl l'ORMADOII I)1. BUCLTj (tll).
llx82 & DX87:Un blrclcâdor incorporado lbnnard y dari cl
lamâfro dsbido al bucle de un modo automiltico.
Sr .l L,u.l. .e LIr.lil- durrnr. la proyccirôn, l: im-rrn
Si esto llcga a suceder, apriete unas pocas veces "F"'dc1
IORMÀDOR DF. BUCLL durante la proyecci6n hacia
adelante, y "R" durânte la proyecci6n hacia atrds hrsta quc
lâ imagen ÿuelva a permancccr fijr unâ vez mis. (#11)
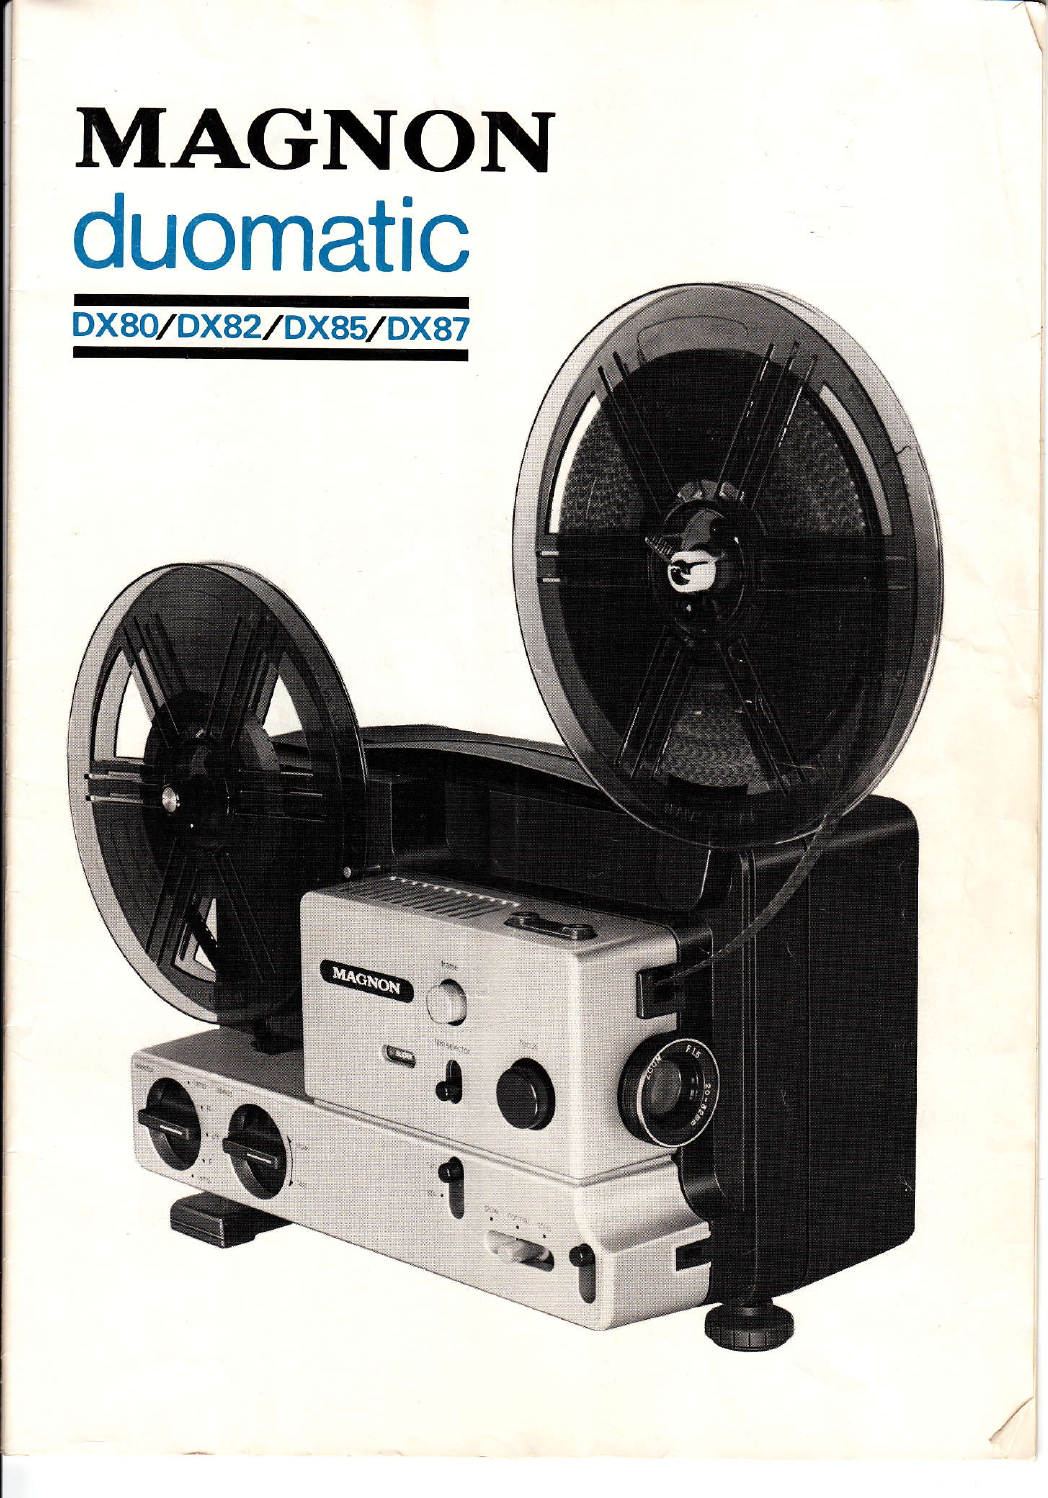
To zoom the lens, turn the ZOOM RING (in case of Models
Dx80 & DxB2 stide the lens-barret back and forth) unril rhe
pictue tills the screen ro the desired image size. To focus the
picture, rotate the FOCUSING KNOB until the projected
image is sharp and clear (#12).
lfthe picture is- hig]| ôr low on the screen during projection.
rotale the FRAMFR untillhe picture is properllicènrired on
the screen (#t2).
For singie lrame projeclion, press lhe STILL L]VER
completely down to "SflLL"._Keep your llnger on lhe
ST-ILI LEVER. bul nor for more l han 60 seconds'i+t l.t.
DX82&DX87: AÎrer slill proiection retease the SfILL
LEVER.
DX80 & DX85:After slill proiection, tifr rhe STILL LEVER
fully back to "RUM'.
Pour régler I'objectif à distance focale, tournez la llaque du
Zoom (d,n. r cr' de, iUod:l.sD\S0&D\82.r.ür.\ c;tlt,s,er
I( ,)lindrc dc Iobie.lil ver. Irrriêrc cl t"vd l,. ju.qLr'; c.
que l'image remplisse l'écrân à la dimension ile limage
désirée. Pour mettre I'image au point, faites tourner ie
Bo_uron dr Vi.e au Porn jL,qu J ,,c quê t 'm"ee prolcré(,u,l
pre(r\e et ncttc (no. I2).
Si I imâge cs{ haulL ou ba\\e sur ''i..rrl pcnda l lJ
nroi<.liun. falle\ Lourn.r le ( JdJeur iusqu'r L,e àue limatse
\orr corr(clemenl cenrree,,rr l'éiran rrio. i2r.
Po rr une proiccrion à .rmple cadrc. rfpuye/ \ur le levier
. lmàgc lrxe à tond 'ur "sritl (tmiga I i\er. tdi(\c,, tolre
dùigl .u. l(. l-\r. r d lmJgc I rxc. mJi, fJ, plu., di ô0 (pconde.
( no. I.l ).
DX82 & DX87: Après la projcction d'imâge flxe, relâchez le
Levier d'lmage lfixe.
D\80& D)'8 §:Aprc. L proiect'on d'i-nJA. I,\e...lc! c,, l( LÊvicr
d lmJe. li\ealJ o'uJ Rrr r\,1:J.hc,.
Z_ur Brcnnweiienverstellung den Objekrivring tbei den
lllodellen DX80&DX82 den Objektivkôrpèr vor- und
zurülkschieben) solange drehen. bis dii gewünsôhte Büdgrô8e
ereicht ist. Mit dem Pokussierungsknopf wird die Schârfe
eingestelt (Nr. 12).
Isl_das B_ild vr;ihrend der Projeklton zu hoch oder zu niedrig
auf der Leinwand. die Bild5l chverstellung solange drehen:
bis das Bild wieder optimal iustiert âu:f der Leinwand
erscheint (Nr. 12).
Für die stillstandsproiektion den stillsrandsDroiekrionshebel
ganz nach unten auf Position "STILL" dnic'keri und fe\lhat-
ten, jedoch nicht l:inger als 60 Sekunden (Nr. l3).
DX82 & DX87:Nach der Stillsrandsproiekrion den StiIsrândÿ
projektjonshebel loslassen.
DX80 & DX85:Nach der Stillstandsprojektion,den Stillstandÿ
projektionshebel wieder ganz nach oben aufPosition "RUN"
diiicken.

Prrll centrar cl objetivo. hagâ girâr el ANILLO ZOOM (en
orso dc los Modclos IIXB0 & DX82corrâ para atrrs y p.rru
,'r(l Inr( (l cil,ndro d I ol,jrrvo, rra.r:, Ju< l. im.j(n ll. n( l-
|J 'rr.llJ \. pun . I r"îdfro d..cado d, ltr imrgrn.
Prira entbcar Ia imâgcn. déle vueltâs al CONTROL Dlll-
IrOCO lrasta quc la imagcn proyeot1tda seâ nitida y clara
(+12).
Si lir imagcn queda alta o baja en lx pantalla durante la
proyccci6n. délc vucltas al F-NCUADRII DII L^ IMAGLN
hasla que la imagen quede correctamente centrad.L en la
pantalla (+I2).
Prrx la proyccciôn dc un solo lbtogrâma, aprretc la
PALANCA DI: PARADA DI.l IllAGllN conrpletamentc hacia
abàjo hrstâ "STILL". Mantenga su dedo er la P^LANCA Dla
PÀRADÀ. pero no mâs de 60 scgundos (#13).
l)XB2 & DX87: Dcspués de la proyecci6n parada sucllc la
PALANCA DL PARÀDA,
DXBo & DXB-s: Después de la proyccciôn parada levante lâ
PALANCA I)I PARADA volviéndolâ complelamentc a su
po\ici6n original cn 'RUN".
DX82 & DX87: For normal projection, set the TRI-MOTION
LEVER to NORMAL.
For slow and step motion projection, move the lever to
SLOW or STEP (#14). The 18 fps film speed v/ill be rednced
to 6 fps at SLOW and 2 fps at STEP. These SLOW and STEP
motion speeds operate eveo duriltg reverse projection.
To reverse the dûection of the Iilm in order to see a portion
of it that has been projected or for a special effect, tum the
ROTARY SELECTOR to "R" ând "L". To make the picture
steady, ÿhere necessary, press do\rn "R" of the LOOP
FORMER (#15).
DX82 & DX87:Pour une projcction normale. placc/ le T eÿier
x Trois Mouvements sur Normal.
Pour une projection à mouvement râlenti et en décomposi-
rron, melre/ le Levier sur Slo\r (Rdenri) ou Srep (Succe.,ion)
rno. l4). LJ vire..e du film de ,8 fps sere réduit{'; ô lps à
Slou tRxlenti) er d 2 lp' a Stcn (Decompo\rtion). Ce. viles\e'
de mouvement Slow (Râlenti) et Step (Décomposition)
mbrchenr mème pendanr une proj(clion arrèr<.
Pour inve'ser le 'en' du filn afin d( revoir une paflie qui a
été projetée ou pour obteni. un effet spéciâl, tourncz le
Sélecteur Rotatif sur "R" et "L". Pour stabiliser l'jmage si
cela est nécessàire. appuyez sur "R" du Formeur de Boucle
(no. l5).
DX82 & DX87: Ftu die Nomalprojektion den Bildfrequenz-
hebel auf "Normal" Position stellen. Bei der zeitlupen- und
Step-Projektion vrird dieser Hebel auf die Position "SLOW"
bzw. "STEP" geslellt (Nr. l4). Bei Position SLOW (Zeitlupel
wird die Bildfrequenz auf 6 B/sec. und bei STEP auf 2 B/sec.
reduziert; SLOW- und STEP-Projektion kônnen âuch bei der
Rückw:ttsprojektion angewandt werden.
Zul Wiederholung eines bestimmten Filmabschnittes oder zur
Rückrtrtutsprojektion den Drehknopf lûr Bildfrequenzen auf
"R" und "L" stellen. Fâlls der Bildstând unruhig ist, die
"R"-Seite des Schlaufenfomers drücken (Nr. 15).
Dx82&DX87: Para una proyccci6n corricntc, ponga Ia
PALANCA Dh TRlrS MOVIMItiNTOS en NORMAL. Para
una proteccion lenta o c'('Jlonad:r, mue!a là palânca \acir
SLO'[ o STFP (-14). lâ vcl.,üdJd de la pelrculz dc l8 pp'
(pies por segundo) se reduci u 6 pps en SLOW y 2 pps en
STEP. Esias velocidades dc SLOW (lenta) y STIP (escalo
nadr, fun( ionan a.rn dur.rnle lr provc' .,lôn hr.'a al r-'
Parâ rnvertir la direccion de lc pelicula con el lln u. rc r-ii
fragmento que ha sido proye,lado ya o parâ urr .ltcto
especial, haga girar et SIILECTOR GIRATORIO hacru "R' r'
"L". Parâ conseguir una imagcn iiia, cuando se necesitc,
âpriete haciâ abjo "R" dcl FORillADOR DII BUCLL (#15).
l0

RE\ryINDING
REBOBTNAGE
RUCKSPULUNG
REBOBINADO
After atl of the film has reached the AUTOMATIC TAKE-UP
REEL, tUrN thE ROTÀRY SELECTOR tO "OFF". ÀttAch
the end of the film to the SUPPLY REEL, pâssing over the
FILM REWIND GUIDE, by stiding the ftlm into the slit in
the side of the rcel and by giüng a few turns tightly
connter-clockwise. Tum the ROTARY SELECTOR to "R"
and adjust the speed control to the mâximum (#16).
Àprès que toul lc tlln .r atleint la Bobine d l:nroulenlent
AulJnrilr.lrri. lo..rrr\,/ l( Scl(iliur R.JIxtll \ur"Oli i \rI:rr
\rr-(l'cl l'r\lrômrl,idu 'rlm .ur h Bohinc d'\pprrrr.,onn,-
nlent, en le passant au-dessus du Guidc de Rébobinage du
liilnr. .'n faisant coulisser ie film dans lâ fente sur Ie !'ôrlr de la
bobine ct cn donnanl quelques tours serrés dans lc \ens
contraire des âiguilles d'une montre. Tournez ]e Sél.cIeur
Rotatil sur "R" et réslez la commande de Iâ vilesse iirr l.'
mr\imum (no- l6).
Hat der gesamte Film die automatische Auffangspule er-
reicht, den Drehknopf fù Bildfrcquenzen auf "OFF" (-{u!,
stellen. Das Filmende über die Filmrücklauflührung an der
Aufnahmespule befestigen, indem der Film in den seidiche,
Spulenschlitz geschoben und einige Male enlgegeû dem
Uhrzeige$inn gedreht wird. Den Drehknopf lùr Bilè
froquenzen auf "R" stellen und die Geschwindigkeit oplimal
einstellen (Nr. 16).
llespués de quc lâ pelicula hâya pasado al CÀRRIT:
ItIItIOBINADOR AIITOMATICO, ponga el SFLECTO,q
GIRATOIiIO cn "Ol.li". Sujcte el extremo de Iâ peli.ur' -i-
c^Rl(lTl Al l\'ll NTADOR, pa.rndo pJr cncima i
GUIA PARA RtrllOIllNAR LÀ PILICULA, deslizanJ: ]:
pelicul dentro dc 1â incisiôn en e1 lado del carrete y din;.i:
unas cuântâs vucltâs rpretâdâs er1 lâ direcci6n contrarie .r .!
.rsuius del rcloi. PoDgâ el SILLCTOR GIRATORIO en R- :.
.riustc el control de velocidad al mâximo (#16).
16
11

LAMP REPLACEMENT
REMPLACEMENT DE LA LAMPE
LAMPEN\TECHSEI
SUSTITUCION DE tA LAMPARA
Tum the ROTARY SELECTOR to "OFF" and disconnect
the AC power source. Retnove the MECHANISM COVER by
pulüng it tovards you (#17).
DX85 & DX87
These models accept Philips tungsten halogen lamp l2V
l00W or its equivalents readily available evqywhere. Plug the
two pins of the lamp base into the socket and insert the lamp
into the lâmpholder so that the key ot the dm of the
reflector fits into the recess of the lampholder. If ûecessary,
the position of the lamp may be adjusted laterally by dint of
the plus-sqev'/. When handling the lâmp, use a clean cloth or
paper, but should the lamp be accidentalty touched it may be
cleaned with a grease solvent such as methylated spfuits.
When hot the lamp retains a pinkish glare. When cool, it
becomes clear. To remove the lamp, hold the socket and push
back the retaining spdngs (#18).
Tournez Ie Sélecteur Rotatif sur "Ofl' (Arêt) et débranchez
la source de courânt ÀC. Enlevez le Mécanisme Couvercle du
en le tirant vers vous (no. l7).
DX85 & DX87
Ces modèles acceptent la lampe halogène tungstène de 12V
100W de Philips ou son équivalent qu€ l'on peut fâcilement
se procurer partout. Insérez les deux fiches de la base de la
lâmpe dans la prise el inlrodui\ez la lampe dâns le rupporl. de
làçon que la louche sur le bord du réflecleur aille dans le
logement du supporl. Si cela e5t néce§{arre. on peul rétsler lâ
po(ilion de la lampe laréralement en urÜsant un lourne'ÿis
positif. Lorsque vous mânipulez la lampe, utilisez un chiffon
propre ou du papier, mais si vous touchez par accident la
lampe, il faut 1a nottoyer avec un solvant gras tel qu'un alcool
dénaturé. Lorsque la lampe est chande, elle retient une lueur
rosâtre. Lorsqu'elle refroidit, elle devient claire. Pour enlever
la lampe, tenez la douille et repoussez les ressofis de rctenue
(no. 18).
Den Drehknopf lür Bildfrequenzen auf "OFF" (Aus) stellen
und das Netzkabel herausziehen. Die Mechanismusabdeckung
entfemen, indem Sie sie in Ihre Richtung ziehen (Nr. 17).
DX85 & DX87
Diese Modelle sind fiir eine Philips Tungsten Halogen-Laflpe
ÿon 12V l00W oder geichi{e ige Laûpen, die überall
erh:ütlich sind, ausgedstet. Die zwei Haltestifte der Lampe in
den Lampensockel einfiihren und die Lâmpe so in den
Larnpenhalter einsetzen, daB die Führungsnase am Rand des
ReflektoN in die Ausspân ng des Lampenhalters pa$t. Falls
eforderlich, kann die Stellung der Laflpe seitw?ûts mittels
Verwendung der Zusatzscfuaube ûachjustiert weldeo. Die
Ldnpe Sollte nul mit einem sauberen Tuch oder Papier
angefasst werden; sollte man jedoch versehentlich damit in
Bedhrung kommen, kaûn sie mit einem fettlôslichen Mittel
wie Methylalkohol gercinigt \rerden. Brennt die Laflpe,
strahlt sie ein rosafarbenes Licht aus; eikaltet sie, wiid sie
durchsichtig klâr. Zwecks E[tfemung de! Lampe deû Sockel
festhalten und die Andruckfedem zurûckschieben (Nr. 18).

Ponrr cl Sl,Lli( TOIt GIRATORIO ell Ol,t:" r- des.o,rcclc
la tonra ds encrgir dr: ( A. Quitr lx ('t BIIRT^ Dl L
^P^RATO tirando de él lracra u\red (:ll).
DX85 & DX87
I n cslos ùlodelos se pucde usar b limplrrâ de halôseno
Irr:.r.|lo dc Pl rlrn\ dc Ll\ lI0\\ o,u, r,1uir:.terrre, qr.L ..
t,.r..1., , ni"r'rJt t-:(.'m(.nr( .r cr,JloJr(r lu_-r I n.t,u " t.,,
r.,' llvrtr, Jr la L,aic oc l" Lmp--, ,:n rr,.Ilch.rre llcnrL,r ,.
Ir udu,,.J lI l,mf.,rr,r ,l pJ rt:rnnJrJ. J. rnrd^ tr. .i
rr, .,do ." cl .ilr.nr.. dcl .cil«,or ci.,r, .t..rrrro ocl ,-.,,
,l l r.,,r'-ljmp.,r",. Sr $ I,.(,..,I-ro. tJ pos.rrJ d(,1 LimD., "
fr. .1. rtr''lJr\r r'Jnd. ..n t. nrillu m.,.. , u:,,.0" rrr,,,rput"
lirprr.r. .,r. ,rn t..ri,' o t).,pcl hr-t1rJ. u<rù .i l,
..',r.,1 rl.,Ll rù.J.:, lJ lJ.rt,.,rJ t,.(ttL trnrp|rr,. .orr rI o,..,i
v,. rl! .i.. : rJ\.r , o tJ t...,t ., ..ùI t.ulJ. Cutr d. l1 Ixr ,. I
'r. .',1r."r..(. I\(r\ L.I , tt. ru..,d,, ('u., Ju.*rr Èrr \.
.,.Jr..r.. l'.,r.,.rrr.,, 1... .ll r . , .1r,. t.r,.r..r. 1-18,
DX80 & DX82
To.remove the lamp from the socket, hold lamp securely
while pushing do.,ir'n, totate countetclockwise, thên üfr thè
lamp oul of the socket. To replace the new lamp reverse the
above procedure (#19r.
r)x80 & Dxli2
l\)ur démo tcr h lirrrpc dc h doui1l.. lcncz ii,ror.ûr.ni la
lnInpc lout cn l.r l)ous\.rnt vrr\ lc lrrs. lournrz drn\ lL'i!'ns
L. rrrJirr Ll(\ -r,'L.rll,, J I , rJI||.. t,r {,oulrv./ L Lnrp(
,1, 1. dulL'l l'u.ll r,,Irl'r( . rr '.rvr'ttr llrnn(. .<Ircr.c,, t:,
nrarchr a suiÿrc ci-dcssLrs (no. i9).
DX80 & DX82
Um die Lampe aus ihrer Fassung zu entfemen. die Lamp€ gut
festhalten. indem man nâch unlen drückr, entgegeri dèm
Uhzeigersinn drchen und sie aus der Fassung ne-hnfen. Soll
eine neue Lampe eingesetzt werden. in umgekihrler Reihen.
lolge verfahren (Nr- I9).
DXu0 & Dx82
Irrt'' ,1u,r.rr lrr l"mD:rrr ,l.r ..rtrrrl,,'. ront( L lcnrpa ri.n,..
rr.rrr. rl r.ll..Ir, lh mr,J 1u. Jt,ri,.L.r h:t..iJ rb"ru. h:js"L !r,r,
rrt l.r dr_.^Lrorr . ^lltrJflr Jr ,.\ ""utJs del ret"r. tu".o,r,ti. l,
r.,J,,,'.,r, J.l .r-;uil,o Pu,:r .u.1ir.,ir t1 t.jmpJid ,rg,:t rrir.r,"
proc..li]nicnto intcrior x l.r invcrsl(:t9).
13

REMOYING FILM IN MID.PBOJECTTON
ENLEVEMENT DU FILM À MI.PBOJECTION
ENTFERNUNG DES FITMS wÂunnNo DER PROJEKTION
QUITAR LA PELICUTA A MEDIA PROYECCION
If the film is broken or jammed during projection, tum the
ROTARY SELECTOR to "R". In the event of fùrther
tlouble, remove the power cord from the poqTer supply.
Rernove the MECHANISM COVER, take the CHANNEL
GUIDE off, lift the LO1VER SPROCKET SHOE and remove
the film from the sprocket teeth (#20).
Then open the pressure plate holdei, twist the film gently to
lhe right. and disengage ir from the lilm gale I #21).
Press down rhe LJPPER SPROCKET SHOE and remove rhe
film.
Si Ic lil'n esl ca.sé ou 61oOr. Orrurr lâ projection, rourncT le
Sêle.Lcur Rol3til \ur 'R". Dans le câs d'une xulre pdnn(,
rcllre/ le cordon de \ecteur d( l alimentâtron.
Llnlevez lc Couvercle du Mécanisme, retirez le guide de la
dircction, soulevez le Sabot du Tambou Inférieur et enlevez
le illm des dents du tambour (no.20).
fI\uitc ouvrez le .upp61 6, plaquc dc fres'ion, lordc,,
l(:gôremerir I( iilm ven la dr^irc et rclirez.lè du coulo du
film (no.2l).
Appuyez sur le Sabot du Tâmbour Supérieur et enlevez lc
film.
Ist der FiIm gerissen oder hat er sich wâhrend der Projektion
verivickelt, den Drchknopf fùr Bildfrequenzen auf "R"
stellen.
Sollte dies nichts nützen, das Netzkabel herausziehen-
Die Mechânismus-Abdeckung abnehmen, den Filmlettkanal
herausnehmen. den unteren Tran sporll rom m el bügel anheben
und den Film âus der Zahntrommel nehmen (Nr. 20).
Dânach die Andruckplâttenhalterung ôffnen, den Film leichl
nach rechts akehen und ihn dann âus dem Filmleitkânâl
hemusziehen (Nr. 2l).
Den oberen Transporttrommelbûgel herunteralriicken und den
Film herausnehmen.
Si la pelicula se pârte o se enreda durante la proyecci6n,
ponsa el SELECTOR GIRATORIO en "R". En el caso de
una complicaci6n mayor, quite el cordôn de energia de la
toma de energia.
Quite Iâ CUBIùRTA DIIL APÀRATO, retire el cânâl guiâ,
levânte el CALZO DE LA RUDDA DINTADA y quite la
pclicula de los dientes de la rueda dentada (+20).
Luego abra el asidcro dc la placa de presiôn, doble suave-
mente Ia pelicula hacia lâ derecha y desenginchelâ de la
entrada de la pelicula (#21).
Apiete hacia âbaio el CALZO SUPLRIOR DL LÀ RUITDA
DFINTADA y retire lâ pelicula.

SPEED ADJUSTMENT
REGTAGE DE LA YITESSE
JUSTIERUNG DER BILDFREQUENZ
AJUSTE DE LA YETOCIDAD
lf the speed is too slow ot fâst êven when the dial is turned
fully to "FAST" or *SLOW", disconnect the machine from
the AC supply. Loosen the setsctews on tle SPEED
ADJUSTING RING and tum rhe RHEOSTÀT SHAFT
clockwise to increase the speed or counterclockwise lo
decrease the speed and then lighten the RINC SETSCREWS
when rhe proper speed is obtained (-22).
Si lâ vitesse est trop lente ou trop râpide même lorsque le
câdran est tourné à fond sur "Fast" (Rapide) ou "SIo$,"
(Ràlenti), débranchez le courant de l'appireil de lâ sou.ce
ÀC. Déserrcz les ÿis de fixation sur lâ Bagie de Réglage de la
Vitesse et toumez LArbre du Rhéostat dâns le sens des
aiguilles d'une montre poul augmenter la vitesse, ou dâns le
scns contraùe poul la diminuer. el ensuite serrez les Vis dc
Irixation de 1a Bague lorsque vous avez obtenu lâ ütcsse
correcte (no. 22).
Sollte die Geschwindigkeil auch bei Slellung des Drehknopfes
für Bildfrequenzen gànz auf 'Fasl' (schiellt oder ..Slàw"
fI angsâm) zu hoch bz\À/. zu niedrig sein, das Neukâbel
herausziehen. Die Festsrell5chrauben -âuf dem Ceschwindig-
keitsjuÿierdng lockern und den Stift des Regulieruid;
standes entweder im Uhrzeigersinn drehen, um djè Ge\ch\rr'in-
digkeit zu erhôhen oder geg?n den Uhrzeigeninn drehen, um
die Geschwindigkeit zu- -verrinqem. Naih Erreichen der
richligen Ceschwindigkeil, dje-fesl\tellschrauben wieder
anziehen (Nr. 22).
Si la velocidad es demasiâdo lentâ o tâpida aun cuando el
disco erta compleramente en la posicl(;r dc ..1,ÀST o
"SLOW'. desconecre el aparàro deliumini\rro de CA. Àl'loje
los lornillos de \ujeciôn del ANIt LO RtCI LADOR Dt
VLLOCIDcD y hasa sirar el EJI Dt-l RFOSI ATO en ld
direcciôn de las âguja\ del reloi para aumenlar la velocldad o
en Ia direccjôn conlraria d las aguj.rs del reloj para di\millUir
la velocidad, luego apricre Io,1ôRNtLIO§ôt St JL.tO\
DEL ANILLO cuando se hâ\a Lon'esuido lâ veto.id"d
apropiada. {.21)
15

CABE AND CLEANTNG
ENTRETIEN ET NETTOYAGE
PFTEGE UND REINIGUNG
CUIDÀDO Y LTMPIEZA
The film gate should be cleaned occasionally. Open the
MÈCHANISM COVER and remove the dust on the film gate
with the brush supplied (#23).
To remove the lens, pull the lens stmight out while pulling
hard the FocusING KNoB towards you. First blow any
dust particles from the lerN surfaces and then gendy æmove
fufiher dirt q/ith a soft lens tissue.
To replace the lens, align the slot on the lens barrel vrith the
center of the FOCUSING KNOB. In case of Models DX80 &
DX82it is unnecessaiy to line up u.ith the slot. While pulling
the FOCUSING KNOB towaids you, insert the lens fully
back iûto the housing until it tocks into position (#24).
11 faut nettoyer de temps en temps Ie couloir du film. Ouvrez
le Couvercle du Mécanisme et;nlevez la poussièrc sur le
couloir du film âvec la brosse qui est fournie (no. 23).
Pour démonter l'objectif, letirez-le droit vers vous tout en
tirant fortement le Bouton de Mise au Point. Soufflez
d'abord sur les surfaces de l'objectif poul ôter 1es pa.ticules
de poussière, puis enlevez doucement toute salissure avec un
chiffon doux poul objectif.
Pour remplac€. l'objectif, alignez la fente sur Ie cylindre de
Iobiecdf dvec le centre du Bouton de Mi\e au PoinL Dâns le
cas ïes Modèles D\80& DX82.ll n'est pas nécessaire d aligner
avec la fente. Tout en tirânt le Bouton de Misc au Point vers
vous, insérez l'objectif à fond à sa plâce dans son logement,
jusqu'à ce qu'il se bloque en position (no. 24).
Der Filmleitkanâl sollte hin und wieder gereidgt werden. Die
Mechanismusabdecknng ôffnen und den Staub, der sich auf
dem Filnleitkanal angesâmmelt hat, ûit der mitgelieferten
Bürste entfemen (Nr. 23).
Das Objeküv kann nach Ànziehen des Fokussierungsknoples
heraussèzosen werden. zunâchst eventuelle Stâubkôrner von
den Li;sen;berllâchen herunterblâsen und elwâigen weitercn
Schmutz mit einem .,veichen Tuch entfenen.
Beim Wiedereinsetzen des Objektivs den Fiihrungsnut auf
dem Objektivkôrper auf das Zentrum des Fokussierungs-
kûopfes ausrichten. Bei den Modellen DX80&DX82 ist eine
Ausrichtung der Führungsnul nicht erforderlich. Beim
Anziehen ales Fokussierungsknopfes das Objektiv bis zum
Anschlag wieder in das Cehâuse einfiihren (Nr. 24).
La entrada de la pelicula debe limpiarse de vez en cuando.
Àbra la CUBIERTA DËL APARATO y quite el polvo de la
entrada de la pelicula con el cepillo que se suministra (#23).
Para qùitar ei objetivo, tire dei objetivo en direcci6n recta
hacia afuera mientras tirâ con fuerzâ del CONTROL DEL
IOCO hacia usted. Primero sople cualquier particulâ de
polvo de la superllcie del objelivo y luego qurte cualquier
olra porquer iâ suavementc con una delicâdâ gâ\â de lentcs,
Para volvèr a poner el obietivo, ponga en lfneâ lâ rnuesca del
cilindro del objetivo con el centro del CONTROL DL,L
FOCO. En caso de los Modelos DX80&llX82no es necesârio
poner en linea con lâ muesca. Mientras tira del CONTROL
DFIL FOCO hacia usted, introduzca el objetivo completâ-
mente al fondo del hueco hâsta que enüje en su posiciôn
(#24).

SPECIFICATIONS
SPECTFTCAîIONS
TECHNISCHE DATEN
ESPECIFICACIONES
MODÊL DX87
'Onê touch ch.nge-ov€r for âll 8mm film formats with
doubl€ stâg6d sprockot
. t/I.2 15.5mm to 3omm zoom lên§
.12V 100W Halog€n Lâmp
' Supêr low noiiê opsratlon
. Rôvôr.€,5till, slow and 3tep motion
. Automatic real-to-rê€l threading
' Builtln âutomatic loopêr
' Variabl€ sp€od control
'Multi-voltag€ lOOV to 25OV (Not for U.S.A. and Cânada)
. 40O ft. êuromatic take-up re€l
MODEL OxSssatn€ sÊ Modgl DX87 but wirhout dow ând step
MODELDXa2 3am€ 6B Mod€l DX87 but wlth f/|.5 2omm to
32.hm zoom lsni snd 8V 50W low voltagê lamp.
MODEL DXaO.amo as Model DX82 but without slow aird stsp
' Spêcificationr and oxternâl dêtall. àre sublsct to 6ltsrâtion
foÿ improvêmsnt without notics.
Modèle DX87
'Changemsnt €n une ssule louche pour tous les formâÎs de
film 8mm avec tambour à doubls étagê
* objêctif dê zoom f/1.2 15,5mm à 3omm
r Lâmpê halogènê 12V lOOW
' Fônctionnêmênt avec bruit extrêmêmênt bas
* Mouvemsnl inv€rss, fixê, ralênti êt décomposé
' Charsêm€nt du film bobino à bobinê âutomatiquo
* Formsur ds boucl€ âutomatiquê incorporé
'Commandê variablê d€ la vit€sss
',Muhi-tênsion I OOV à 25OV
I Bobing d'enroulêment 6utomatique dê 4OO It-
Modèlê DX85 identiquo au Modèle DX87 sauf qu'il n'6 Pas de
mouvsment râlenti êt décomposé.
Modèl€ OX82 identique au Modèle DX87 saul qu'il a un
otriecti, ds zoom ?1.5 2omm à 32mm €t un€ lampê à basse
tension de aV sOW.
Modèle DXaO idenlique au Modèle DXS2sauï qu'il n'â pas de
mouvement ralenti et décompo§e.
'Sous rés€rvê ds modification sans pré.vls, aux fins d'âmélio-
ration, des câractéri§tiquê§ et dê la présentation,
11

MODELL DX87
. Einr$tên-Wêch3€l for âllê 8mm Filmformatê mlt Oopp.l-
transportzâhntrommol
. Zoom-Objêktiv€: 1.2/15.5mm bir SOmm
'12V l OOW Hâlogenlamp€
. c.râuschàrmar Bgtrieb
. Ruckwâris-,Stillstand', Zêitlupên- und slop-Proiektion
. Auromâtilchê Spul.n-zuSpul6n Film.inrëd.lung
. Eingebâut r automâtÈchêr Schlautênïorm€r
* Vâriâble Go3chwindigkoiiikontroll€
' Trato: l(x) - 25OV
. 4OO FuB aurom€tischê auff€ng.pul€
Des Modoll Dx85 ist idêntlsch mit d.m Mod6ll Ox87;.. hat
jedoch kêino zâillupen- und st€p-Projektlon.
Dai Modell Dx82 i3t ld.nlisch mit dem Mod6ll ox87; 6s
vorfugt isdoch übe. 1.5120 bi3 32mm zoom-obiêktivê und
sin€ 8V sOW Nlsd.ig3pannung6_Lâmpê.
Dàs Mod€ll DXSO lsl id6ntilch lrlit d3m Mod€ll DXa2; ê! vêrfugt
jodoch obêr kain€ Z€itlupen- und SÉp-Proiêction.
.. Bêl don têchni3ch€n Dstên und ëuBêrlichsn Mâtkmalên sin
/ verb€$erndo Andorung€n ohn6 Vorankundigung vorbs_
hàlÉn.
MODELO DX87
'Cambio sumâmsnt€ facil pàra todos los tormatos dé
psliculâ de amm con doble nivel d€ ruêda dêntada
' Obietivo zoom de f/l.2 15.5mm hastâ 3omm
' Lémpara halôgêna ds t2v 1OOW
' Funcionâ con .uido minimo
'Movirhiento invêco, parado.lsnto y sradual
* Enhebrami€nto àutomético de carrête a carrete
' Bucleador autorrlético incorporado
-'Control d€ vêlocidad vàriable
' Multivoltaje dê lOOV é 2sOV
* Calrete rsbobinador âutomético de 4OO pis
MODELO DXas igual quê Modêlo Dx87 poro sin movimi€nto
lênto ni gradual.
MODELO OX82 igusl qu6 DXaT pero con obiêtivo zoom de
1.5 20n\n hasta 32mm y lémpâra clê bâio vollaiê 8v sow.
MoDELO oXaO isuâl que Modelo DX82 pero sin movimianto
lento ni sraduâ1.
'Los dâtos técnicos y d€lâll€s êxtêriors§ quedan suj€tos a
posiblæ modiflcacionês por meiorâs sin prsvio avito.
i
l8

5.
6.
IMPORTANT SAFEGUARDS
When using your projector, basic safety precautions should
always be followed, including the following:
1. Read and understand all instructions.
2. Close supervision is necessary when your projector is
used by or near children. Do not leave your proiector
unattended while in use.
Care must be taken as burns can occur from touching
hot parts.
Do not operate your projector with a damaged cord or if
the projector has been dropped or damaged - until it
has been examined by a qualified serviceman.
Do not let cord hang over edge ol table or counter or
touch hot surfaces.
lf an extension cord is necessary, a cord with a suitable
current rating should be used. Cords rated for less
amperage than the projector may overheat. Care
should be taken to arrange the cord so that it will not
tripped over or pulled.
Always unplug projector from electrical outlet when
not in use. Never yank cord to pull plug from outlet.
Grasp plug and pull to disconnect.
Let your proiector cool completely before putting away.
To protect against electrical shock hazards, do not
immerse this projector in water or other liquids.
To avoid electric shock hazard, do not disassemble this
projector, but take it to a qualified serviceman when
some seryice or repair work is required. lncorrect re-
assembly can cause electric shock hazard when the
projector is used subsequently.
SAVE THESE INSTRUCTIONS
7.
8.
9.
10.
PHNTED INJAPAN
This manual suits for next models
3
Table of contents