LCDracks.com
Marshall Electronics
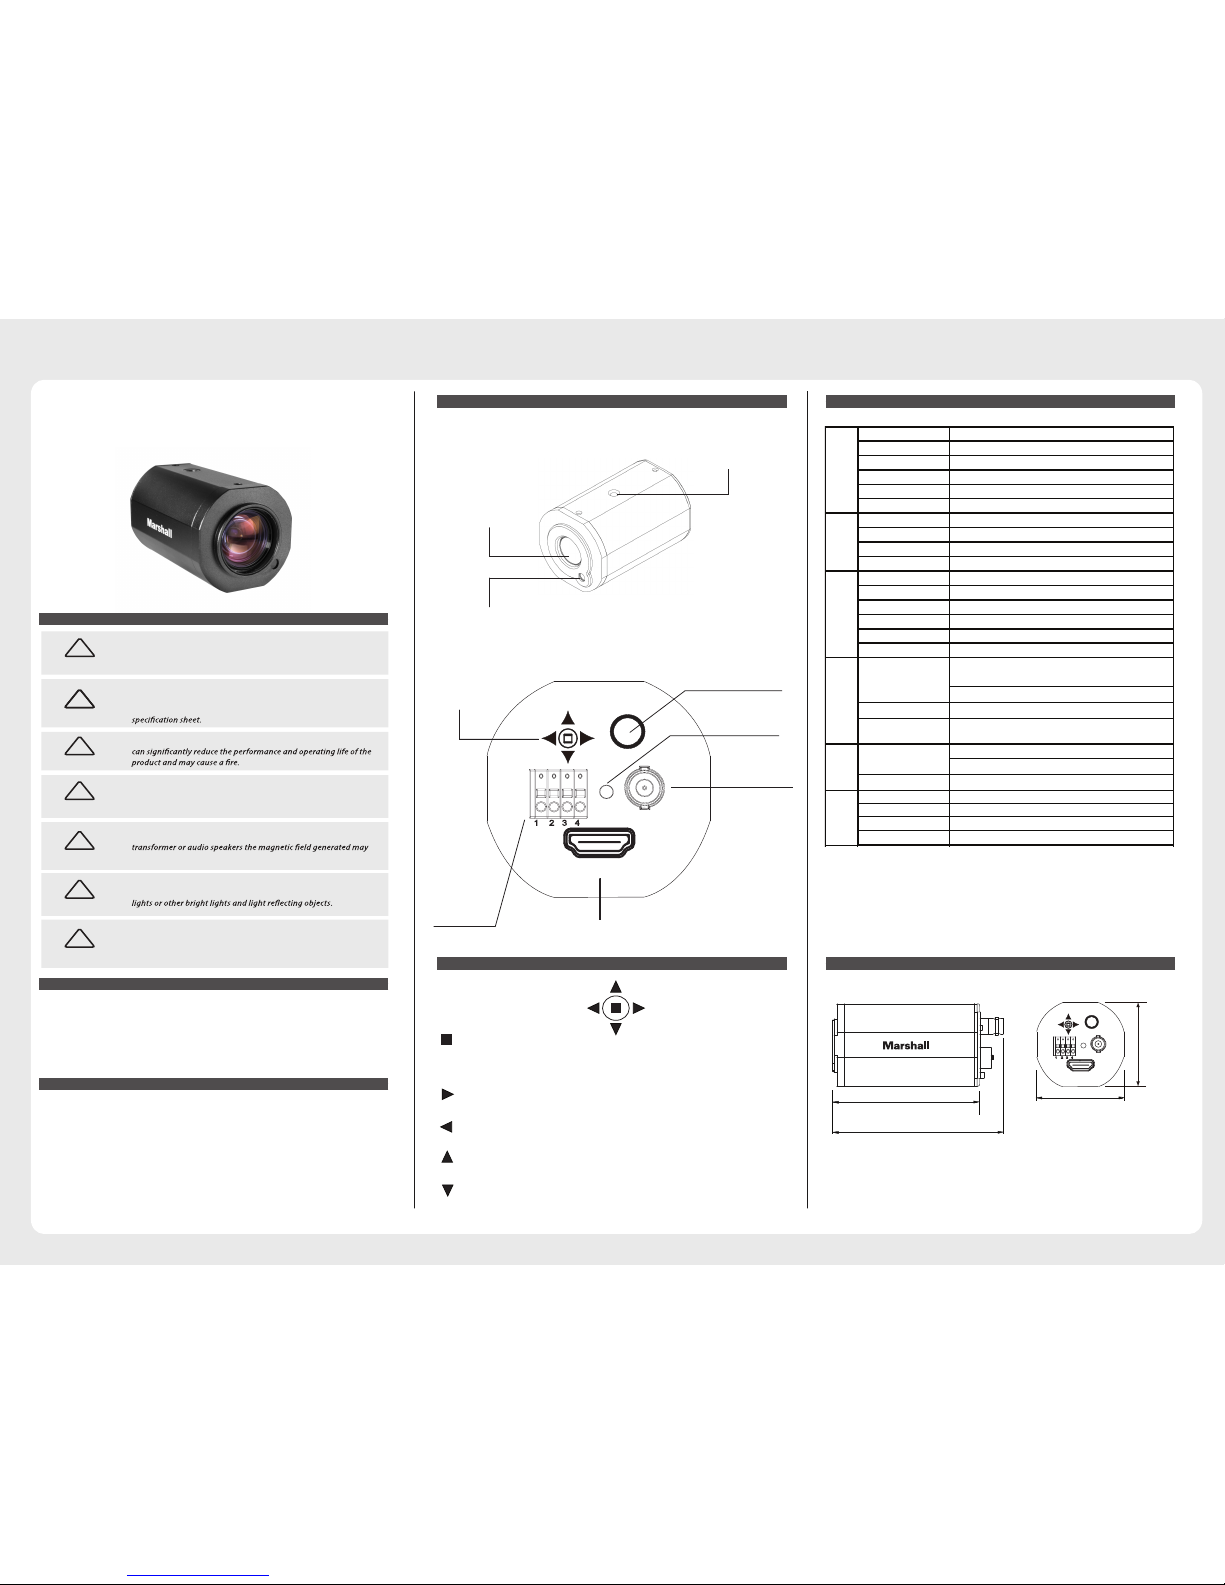
Design and specifications are subject to change without notice.
SETUP SUB MENU SUB MENU DESCRIPTION
AWB Controls the automac adjustment of the light source's color temperature to 3,000°K ~ 8,000°K.
ATW
Connuously adjusts camera color balance in accordance with any change in color temperature. Compensates for color temperature changes within the range of
1900K to 11000K.
Color temperature will be manually adjusted by pushing the OSD buon. Place the white paper in front of the camera when OSD buon is pressed to obtain the
opmum result.
INDOOR Select this when the color temperature is between 4500K and 8500K.
OUTDOOR Select this when the color temperature is between 1700K and 11000K (Ex. Sodium light inclusion)
MANUAL BLUE, RED
Select this to ne-tune White Balance manually. You can adjust the blue and red tone level manually.
BLUE: Adjust the blue tone of the image (0~31). RED: Adjust the red tone of the image (0~31).
Select one according to the locaon of camera installaon. Then, select one sub-mode from AUTO, MANUAL, SHUTTER, PRIORITY, IRIS PRIORITY, and BRIGHT.
IRIS and SHUTTER are controlled automacally.
IRIS, GAIN, and SHUTTERf are controlled manually.
Manual SHUTTER and GAIN control with automac IRIS control.
Manual IRIS and GAIN control with automac SHUTTER control.
IRIS and GAIN can be controlled by control of BRIGHTNESS.
0~20: Adjust the screen brightness. MANUAL: BRIGHTNESS control is xed, and give the exposure control priority to other resources.
0~17: Adjust the IRIS screen brightness. AUTO: IRIS controls exposure automacally but SHUTTER is xed. MANUAL: IRIS control is xed, and give the exposure
control priority to other resources.
AGC LIMIT 0~20 A funcon which controls the amplicaon/gain process automacally if the illuminaon falls under the usable level.
SHUTTER AUTO, MANUAL, 1/2~40K
1/2~40K: Adjust the SHUTTER speed. (1/2, 4, 8, 15, 30, 60, 90, 120, 150, 180, 250, 350, 500, 725, 1000, 1500, 2K, 3K, 4K, 6K, 10K, 20K, 30K, 40K)
DSS(SENS-UP) MANUAL, OFF~1/1
OFF~1/1: Adjust the level of DSS. (OFF, 1/30, 1/15, 1/8, 1/4, 1/2) When it is in low luminance condion, DSS can adjust the picture quality by maintaining the light
level.
Use this funcon when you experience picture icker, this happens when there is a conict with the installed lighng frequency.
Automacally adjusts the focus posion.
Manually adjusts the focus posion when zoom is changed.
When this mode is enabled, it will automacally adjusts the focus posion only when the zoom is changed.
Set the limit of the tele.
Set the limit of the wide.
FAR END INFINITY, 2, 3, 5, 10M Set the distance limit for the far focusing. The lens moves to adjust the focus from the distance.
NEAR END 30CM, 1, 1.5, 2, 3, 5, 10M Set the priority distance limit for near focusing.
LENS INITIAL OFF, AUTO, ONE PUSH
AUTO: The focus is automacally adjusted at the pre-set interval (01~07). ONE PUSH: The focus is re-adjusted when the OSD buon is pushed over ONE PUSH.
This funcon is to set user dened zoom and focus posion. Up to 32 preset posion can be set with sub menu, USER PRESET, ACTIVE, SAVE, RESET.
WDR Enable user to view both object and background more clearly when background is too bright. Set the WDR-LEVEL (0~4).
BLC Enable a back light compensaon feature.
SPOT Enables a user to select a desired area on a picture and view that area more clearly when background is too bright.
ACE GAIN Brightness correcon of the dark image area. Adjust the GAIN level (LOW, MIDDLE, HIGH).
LEVEL Highlight the bright area with a masking box with a selected color. Adjust the masking level (0~20).
COLOR Select the color for masking (GRN, MAG, RED, BLUE, BLK, WHT, YEL, CYN)
D/N LEVEL
The camera will stay in DAY in a normal environment, but switched to NIGHT mode when ambient illuminaon become this pre-set level.
This level is threshold for switching day to night. It is same as the exposure gain level.
MARGIN Set the margin between Day Night switching level and Night Day switching level. Dierent exposure gain level is needed to avoid malfuncons.
DWELL TIME Select the checking me of light condion to conrm to chage from the day mode to the night mode.
NIGHT BURST Night burst OFF makes that the color burst is removed when ICR switches to black/white.
DAY The picture is always displayed in color.
NIGHT NIGHT BURST The picture is always displayed in black/white.
D/N LEVEL The camera will stay in DAY in a normal environment, but switched to NIGHT mode when ambient illuminaon become this pre-set level.
DWELL TIME Select the interval me from the day mode to the night mode.
NIGHT BURST Alters the color burst informaon passed to the video monitor.
COLOR LEVEL 0~20 Adjust the color level value for a ne color tune.
SHARPNESS 0~20 As you increase this value, the picture outline becomes stronger and clearer.
IMAGE FLIP Video output will be ipped (MIRROR-HORIZONTALLY, FLIP-VERTICALLY, ROTATION).
DEFOG AUTO, MANUAL This feature will help increase visibility in extreme weather condions, such as fog, rain or in a very strong luminous intensity.
3D-DNR OFF, LOW, MIDDLE, HIGH This feature will reduce the video noise at low ambient light.
MOTION
This feature will observe the object movement by moon zone and sensivity that are pre-set with sub menu, DET. SIZE, SENSITIVITY, MASK ACTIVE, WIDTH,
HEIGHT, MOVE HOR, MOVE VER.
SHADING This feature will correct the inconsistent brightness level in the image.
GAMMA This feature will adjust video output brightness (STANDARD, STRAIGHT, LOW, MIDDLE, HIGH).
RESOLUTION
Change video output specicaon. CV350-10X: 1080P25/30, 1080i50/60, 720P50/60, 1080P50/60. CV350-5XB: 1080P29.97, 1080i59.94, 1080P59.94, 720P59.94
USER TITLE The camera tle can be entered and it will appear over the video output.
ZOOM MAGNIFICATION Turn On or oof the zoom scale display.
PRIVACY
Mask an area you want to hide on the screen with sub menu, MASK NO, MASK ACTIVE, MASK COLOR, WIDTH, HEIGHT, MOVE HOR, MOVE VER, TRANS, RESET
MASK, RESET ALL.
ADDRESS 01~255 Select the camera ID number.
ADDRESS DISPLAY OFF, ON Select the display of camera ID.
BAUDRATE Set the baudrate of RS-485 communicaon (2400, 4800, 9600, 19200, 38400, 57600, 115200).
LANGUAGE You can select the menu language according to your requirements. ( ENGLISH, 簡体, FRANÇAIS, DEUTSCH, ESPAÑOL, PORTUGUÊS, )
DEFECT ADJ Defecve pixels can be corrected.
VER. Display the rmware version.
RESET Reset the camera sengs to the factory defaults.
WB
CONTROL
EXT
IMAGE
CONTROL
DISPLAY
CONTROL
AE
CONTROL
(EXPOSURE)
FOCUS MODE
FOCUS
CONTROL
WDR/BLC
ECLIPSE
BACK LIGHT
AUTO
CV350-10XB/10X Setup Menu