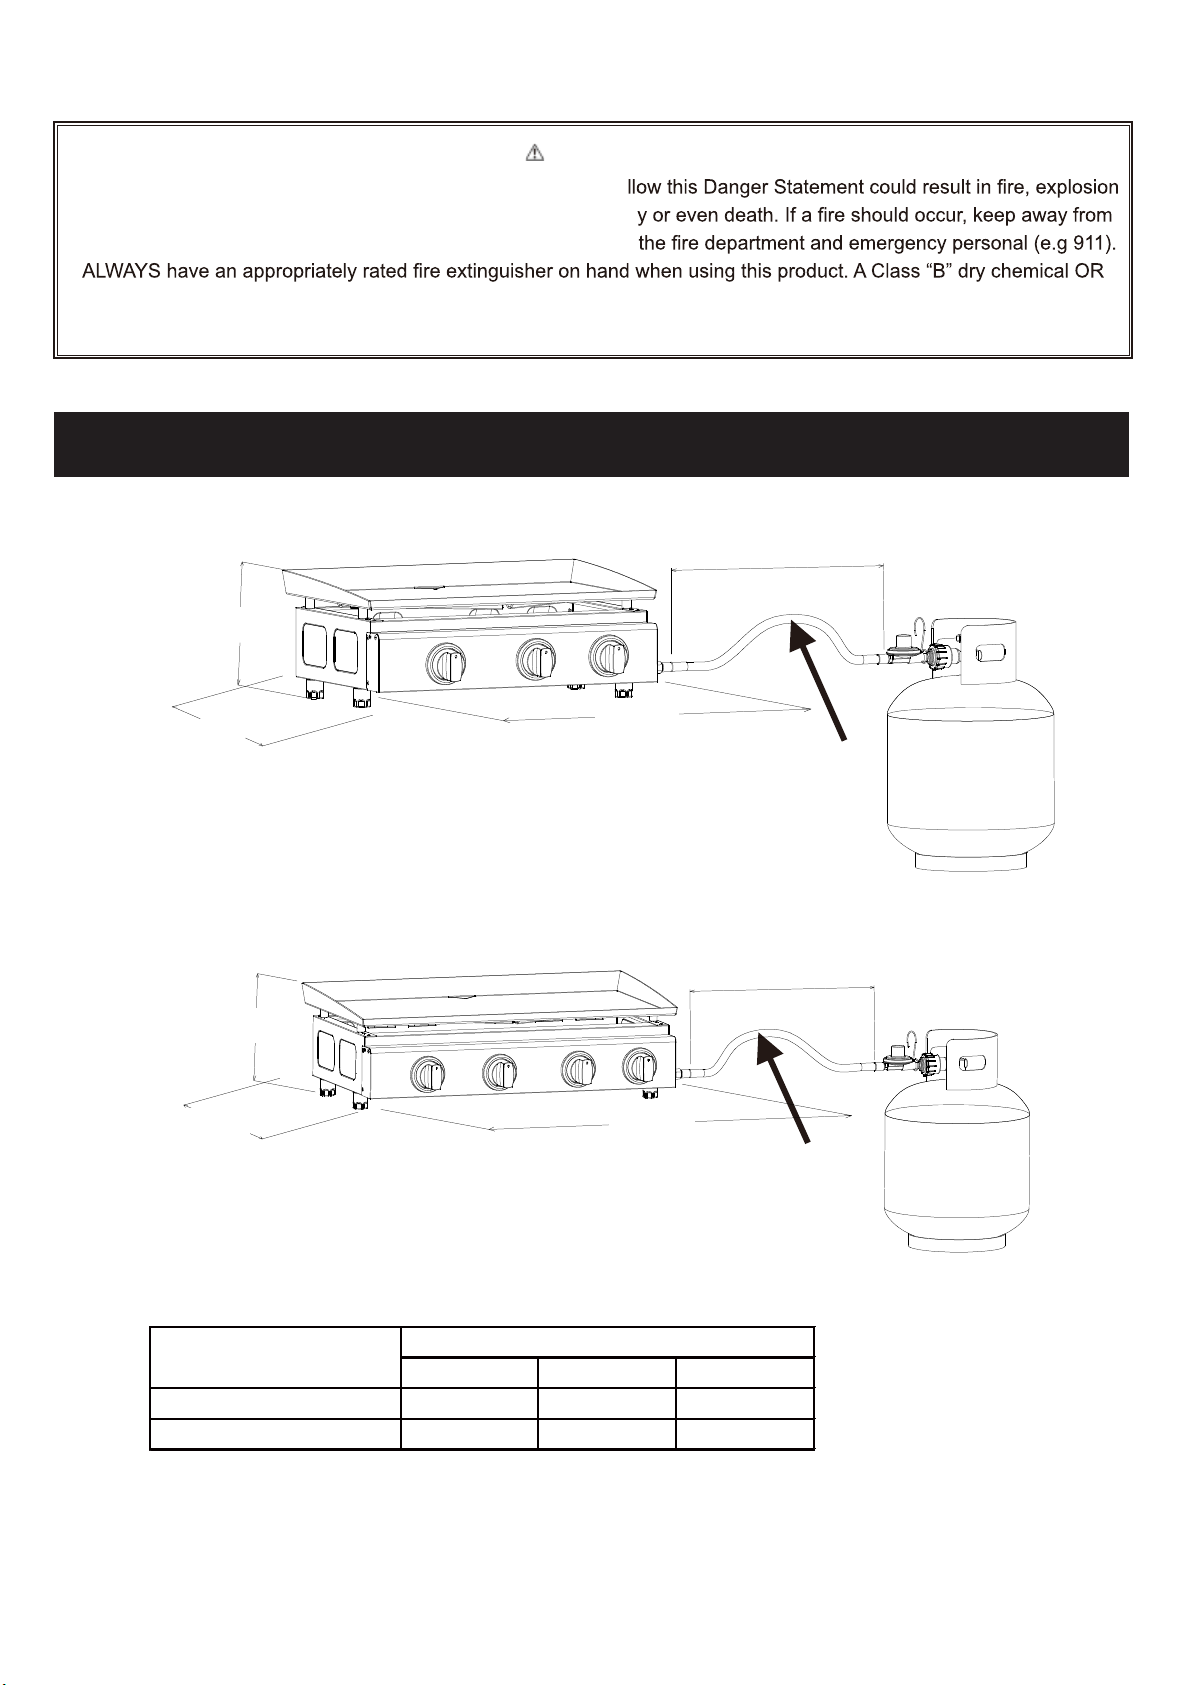
Martin MGP-23 Owner's manual

Keep this manual for future reference
READ INSTRUCTION MANUAL BEFORE ATTEMPTING TO ASSEMBLE OR
OPERATE THIS PRODUCT.
Adult assembly required. Keep screws and parts out of reach of children.
DO NOT RETURN YOUR DEVICE TO THE POINT OF PURCHASE
For assistance, contact our customer service at 1-800-266-1414
Monday to Friday from 8am to 5pm or by email at [email protected]
Bismar inc. - 9 De Montgolfier St, Boucherville, Quebec J4B 8C4 Canada
Warning
MGP-23
MGP-24
Assembly Instructions & User’s Manual
PROPANE GAS COOKING PLATE
Model # MGP-23 & MGP-24
MGP-23 : 665-023
MGP-24 : 665-024
Certified under ANSI Z21.89 - CSA 1.18 - 2017
Outdoor Cooking Specialty Gas Appliance

WARNINGS
DANGER
• NEVER operate this appliance unattended.
•le liquid.
•
department. Do not attempt to extinguish an oil or a grease fire with water.
fire, explosion or burn hazard which
could cause property damage, personal injury or death.
When using this appliance, basic safety precautions should always be observed. Read and
understand the meaning of these symbols before assembling and using this appliance.
SAFETY SYMBOLS:
DANGER
Indicates a hazardous situation, which if not avoided, will result in death or serious injury.
WARNING
Be alert to the possibility of serious personal injury if the instructions are not followed.
CAUTION
Indicates a potentially hazardous situation, which if not avoided, could result in moderate injury.
CAUTION
This instruction manual contains important information necessary for the proper assembly and
saf using the appliance. Follow all warnings and instructions when using the appliance.
e use of the appliance. Read and follow all warnings and instructions before assembling and
DANGER
If you smell gas:
• Shut off gas to the appliance.
•
•If odor continues, keep away from the appliance and immediately department.
losion which could cause
property damage, personal injury or death.
5
2

TABLE OF CONTENTS
Warnings............................................................................................. 2, 4-8
Parts List...................................................................................................11
Assembly Instructions................................................................................12
Troubleshooting.........................................................................................15
Care and Maintenance.........................................................................13-14
Warranty....................................................................................................16
NOTE: Before beginning assembly of product, make sure all parts are present.
Compare parts with package content list and hardware contents.
If any part is missing or damaged do not attempt to assemble the unit.
Contact customer service for replacement parts.
Exploded View..........................................................................................10
Operating Instructions................................................................................ 8
Product Dimension......................................................................................9
3

WARNINGS
DANGER
Failure to follow these instructions and warnings could result
cause property damage, personal injury or even death. Using an LP appliance has a degree of risk that
you are assuming. Properly following these instructions and warnings will help minimize that risk.
• DO NOT USE ON wood, asphalt or plastic. These surfaces are combustible
• Hot cooking liquids can remain dangerously hot long after cooking. NEVER handle the cooking
appliance until the cooking liquid has cooled to less than 115˚F (45˚C).
Equipped for use on: Propane. Main Max. Input Rating: 25,500 BTU/H (SRGG31706)
34,000 BTU/H (SRGG41620)
Outdoor Cooking Specialty Gas Appliance
WARNING: FOR OUTDOOR USE ONLY. If stored indoors, detach and leave cylinder outdoors.
Minimum clearance from sides and back of unit to combustible construction: 24 inches from sides and
36 inches from back.
The appliance shall not be located or used under overhead unprotected combustible construction.
WARNING: This appliance comes with a supplied CSA approved regulator which must
be used with this appliance. Replace only with regulator Model No. JY70-011 or RY0505.
CAUTION: The instruction manual contains important information necessary for the proper
assembly and safe use of the appliance. Read and follow all warnings and instructions before
assembling and using the appliance. Follow all warnings and instructions when using the appliance.
If instructions or parts are missing contact customer service.
.esu laicremmoc rof dednetni ron dengised ton si ecnailppa sihT
KEEP THESE INSTRUCTIONS
Read and understand all instructions before assembling and using this unit. Follow all
warnings when you use this device. Failure to follow these instructions may
Cause a fire or explosion that can damage property, injury or death.
DANGER
If you feel the gas: If possible, immediately close the gas supply to the appliance by turning the gas
tank valve clockwise (right). If this does not can not be done safely, get away from the device
immediately and contact the service fire (e.g., 91). Extinguish any open flame, use an approved fire
extinguisher. A fire extinguisher certified Class "B" or a CO2 extinguisher or, preferably, a Class "K"
extinguisher. (Special care must be taken to understand the manufacturer’s instructions and be ready
to use the appropriate extinguisher before using this appliance). If you continue to smell the gas,
contact immediately to the fire department (e.g. 911) and do not approach the aircraft.
4
Certified under ANSI Z21.89 - CSA 1.18 - 2017

WARNINGS
5
• Hot cooking liquids can remain dangerously hot long after cooking. NEVER handle the cooking
appliance until the cooking liquid has cooled below 115 F (45 C).
• DO NOT move the device when in use.
• This device will be hot during and after use. Use insulated gloves or insulated gloves to protect you
from hot surfaces or splashes of cooking fluids. Closed shoes should always be worn during
operation of this unit.
• Keep children and pets away from the cooking appliance at all times.
• The use of alcohol, prescription drugs, or non-prescription medications may affect the ability of the
consumer to assemble or operate the device safely. Do not operate under the influence.
• The minimum outside operating temperature of this unit is 0 C (32 F). NEVER use this device
when the temperature is below these minimums.
• Take precautions near the device. A fall or trip in the vicinity of the gas appliance may cause
splashing or ignition of hot cooking fluids and possibly cause injury or property damage.
• This device is NOT intended for commercial use.
• The facility must comply with local codes or, in the absence of local codes, the National Fuel Gas
Code, ANSI Z223.1 / NFPA 54, Storage and Handling of Liquefied Petroleum Gases, ANSI /NFPA
58; or Natural Gas and Propane Installation Code, CSA B149.1; Propane Storage and Handling,
CSA B149.2.
• NEVER use this unit indoors or in a closed area. This unit should ONLY be used outdoors. The
device must not be used in a building, garage or other enclosed area.
• NEVER install or use this device on boats or other recreational vehicles.
• This product is NOT intended to be used as a heater. Never use this device as a heat source.
• The introduction of water or ice from any source into the oil/grease can cause serious spillage and
burns from hot oil and water splashes.
• When cooking, the appliance must always be on a flat, stable, non-combustible surface, such as
brick, concrete or earth. NEVER use this device on surfaces such as asphalt, wood, dry grass or
sheets, vinyl or plastic.
• Keep the fuel hose away from the hot gas appliance when it is running.
• NEVER attempt to attach this device to the autonomous LPG system of a motorhome, trailer or
motorhome. The pressure regulator and hose provided with the unit MUST BE USED. The
replacement hose must be JY70A11A or RYQP01.
• Check and clean the burner/venturi tubes for insects and insect nests. A blocked tube may cause a
fire under the unit.
• Ensure that there is no impediment to combustion flow or air ventilation.
• Maintain appropriate clearances of combustible construction. Minimum distance between the sides
and the rear of the unit and fuel constructions: 24 inches from the sides and 36 inches from the rear.
• Do not leave the appliance unattended. Keep children and pets away from the appliance at all
times.
• When cooking with oil or grease, have a BC or ABC type fire extinguisher readily available.
• In the event of an oil or grease fire, do not attempt to extinguish it with water. Call the fire
department immediately. A type BC or ABC fire extinguisher may, under certain circumstances,
contain the fire.

WARNINGS: LP TANK
LP TANK REMOVAL, TRANSPORT AND STORAGE:
1. Turn control knobs OFF and L
1. Do not store a spare LP gas cylinder under or near this appliance.
2. NEVER fill the cylinder beyond 80 percent full.
3. If the instructions in 1 and 2 are not followed exactly, a fire causing death or serious injury may occur.
4. The safety release valve on the LP tank could activate the leaking of gas and cause a severe fire
and increase the risk of serious injury or death.
5. If you smell, see or hear leaking gas IMMEDIATELY get away from the LP tank and contact your
FIRE DEPARTMENT.
P tank valve. Turn coupling nut counterclockwise by hand only.
NEVER use tools to disconnect.
2. Place dust cap on cylinder valve outlet whenever the cylinder is not in use. Only install the type
of dust cap on the cylinder valve outlet that is provided with the cylinder valve. Other types of
caps or plugs may result in leakage of propane.
3. A disconnected LP tank in storage or being transported must have a safety cap installed.
NEVER leave an LP tank in a car that can become overheated by the sun.
4. The cylinder must be stored outdoors out of the reach of children. NEVER store the cylinder in
enclosed spaces such as a garage, carport, covered porch or any other structure.
5.
6. Storage of an appliance indoors is permissible only if the cylinder is disconnected and removed
from the appliance.
When the appliance is not in use, the gas must be turned off at the supply cylinder.
LP TANK:
The LP tank must meet the following requirements in order to be used with your appliance:
• Measurements must be 12” (30.5cm) in diameter by 18” (45.7cm) high with 20lb. (9.1kg)
maximum capacity.
• The LP gas supply cylinder must be constructed and marked in accordance with the
National Standard of Canada (CAN/CSA-B339), Cylinders, Spheres and Tubes for the
Transportation of Dangerous Goods.
The LP tank must include the following:
• QCC Type 1 outlet compatible with regulator or appliance.
• Safety relief valve.
•
hand wheel. Only use tanks equipped with this type of valve.
• LP tank must be arranged for vapor withdrawal and include collar that protects LP tank valve.
• LP gas is odorless, non-toxic, and colorless when produced. For your safety, LP gas has been
given an odor (similar to rotten eggs) so you can smell if there is any leaking.
•
DANGER
Indicates a hazardous situation, which if not avoided, will result in death or serious injury.
6
!
WARNING: This product can expose you to chemicals including lead, which is known to the State
of California to cause cancer, and carbon monoxide, which is known to the State of California to cause
birth defects or other reproductive harm. For more information, go to www.P65Warnings.ca.gov.

WARNINGS: LP TANK
CONNECTING REGULATOR TO LP TANK:
1. Make sure cylinder valve is turned OFF
(turning clockwise).
2. Check cylinder valve to ensure it has proper external
male threads as illustration(type 1 ANSI Z21.81).
3. Make sure all burner valves are in the OFF positions.
4. Inspect valve connections, port and regulator
assembly. Look for any damage or debris. Remove any debris. Inspect hose for damage.
Never attempt to use damaged or obstructed equipment. See your local LP gas dealer for repair.
5. When connecting hose regulator assembly to the cylinder valve, do so manually, do not use a
tool. Tighten firmly clockwise by hand only. The use
of a tool will damage the seal and cause a serious
risk of gas leak.
6. SLOWLY - Open the cylinder valve fully. Proceed
to a leak test (see LEAK TESTING section).
LEAK TESTING VALVES, HOSE AND REGULATOR
•
• DO NOT smoke or have anything nearby that can easily ignite, such as lighters or matches.
•
• Appliance must be leak checked outdoors in a well-ventilated ar
sparks.
STEPS TO LEAK TEST:
WARNING
If growing bubbles begin to appear there is a leak. IMMEDIATELY turn off LP tank valve. If bubbles
continue, IMMEDIATELY get away from the LP tank and contact your FIRE DEPARTMENT (e.g. 911)
External threads
(type 1 ANSI Z21.81)
OPD triangular
handle
Shut off gas supply by rotating valve of gas cylinder clockwise.
Gas cylinder
Fix regulator
by rotating it
clockwise
7
1. Use a clean brush and a 50/50 soap and water solution.
NOTE: Use mild soap and water. DO NOT use household cleaners. This could result in gas
damage to the train components.
2. Brush the soapy solution on all metal joints and the entire surface of the valve. Slowly turn the
LPG tank valve counter-clockwise to the open position. At the first sign of bubbles around the tank
connection. Immediately turn the valve off by turning clockwise. After 10 seconds, turn the propane
tank to the off position and continue to monitor any bubbles. UNDER NO CIRCUMSTANCES
SHALL THE VALVE REMAIN IN POSITION FOR MORE THAN 12 SECONDS.
3. If bubbles are observed at the valve attachment,
You can try tightening the valve and repeat the test after 5 minutes.
4. Apply a soap solution to the indicated connections,
as indicated.
5. If "increasing" bubbles appear, there is a leak. Immediately close the LPG tank valve and tighten
the connections. If leaks cannot be stopped, do not try to repair. Call for spare parts.
6. For assistance with any malfunction related to the liquid propane tank, regulator or hose, contact
your propane dealer or Chard International.

WARNINGS: LP TANK
INSTRUCTIONS FOR LIGHTING BURNER:
OPERATING INSTRUCTIONS
1. Read all instructions before lighting.
2. Make sure all control knobs are in the OFF position. Turn
on the cylinder valve.
3. Select the burner to be lit. Push and turn the control knob
of that burner counter-clockwise to HIGH. Hold the control
knob pushed down for 2-3 seconds. It will light the burner.
4. Adjust the flame by turning control knob between HIGH
and LOW.
5. Repeat step 3 for lighting other burners.
6. If ignition does not occur in 5 seconds, turn the burner control(s)
OFF, wait 5 minutes, and repeat the lighting procedure.
MANUAL LIGHTING
1. Make sure all control knobs are in the OFF position. Turn on the cylinder valve.
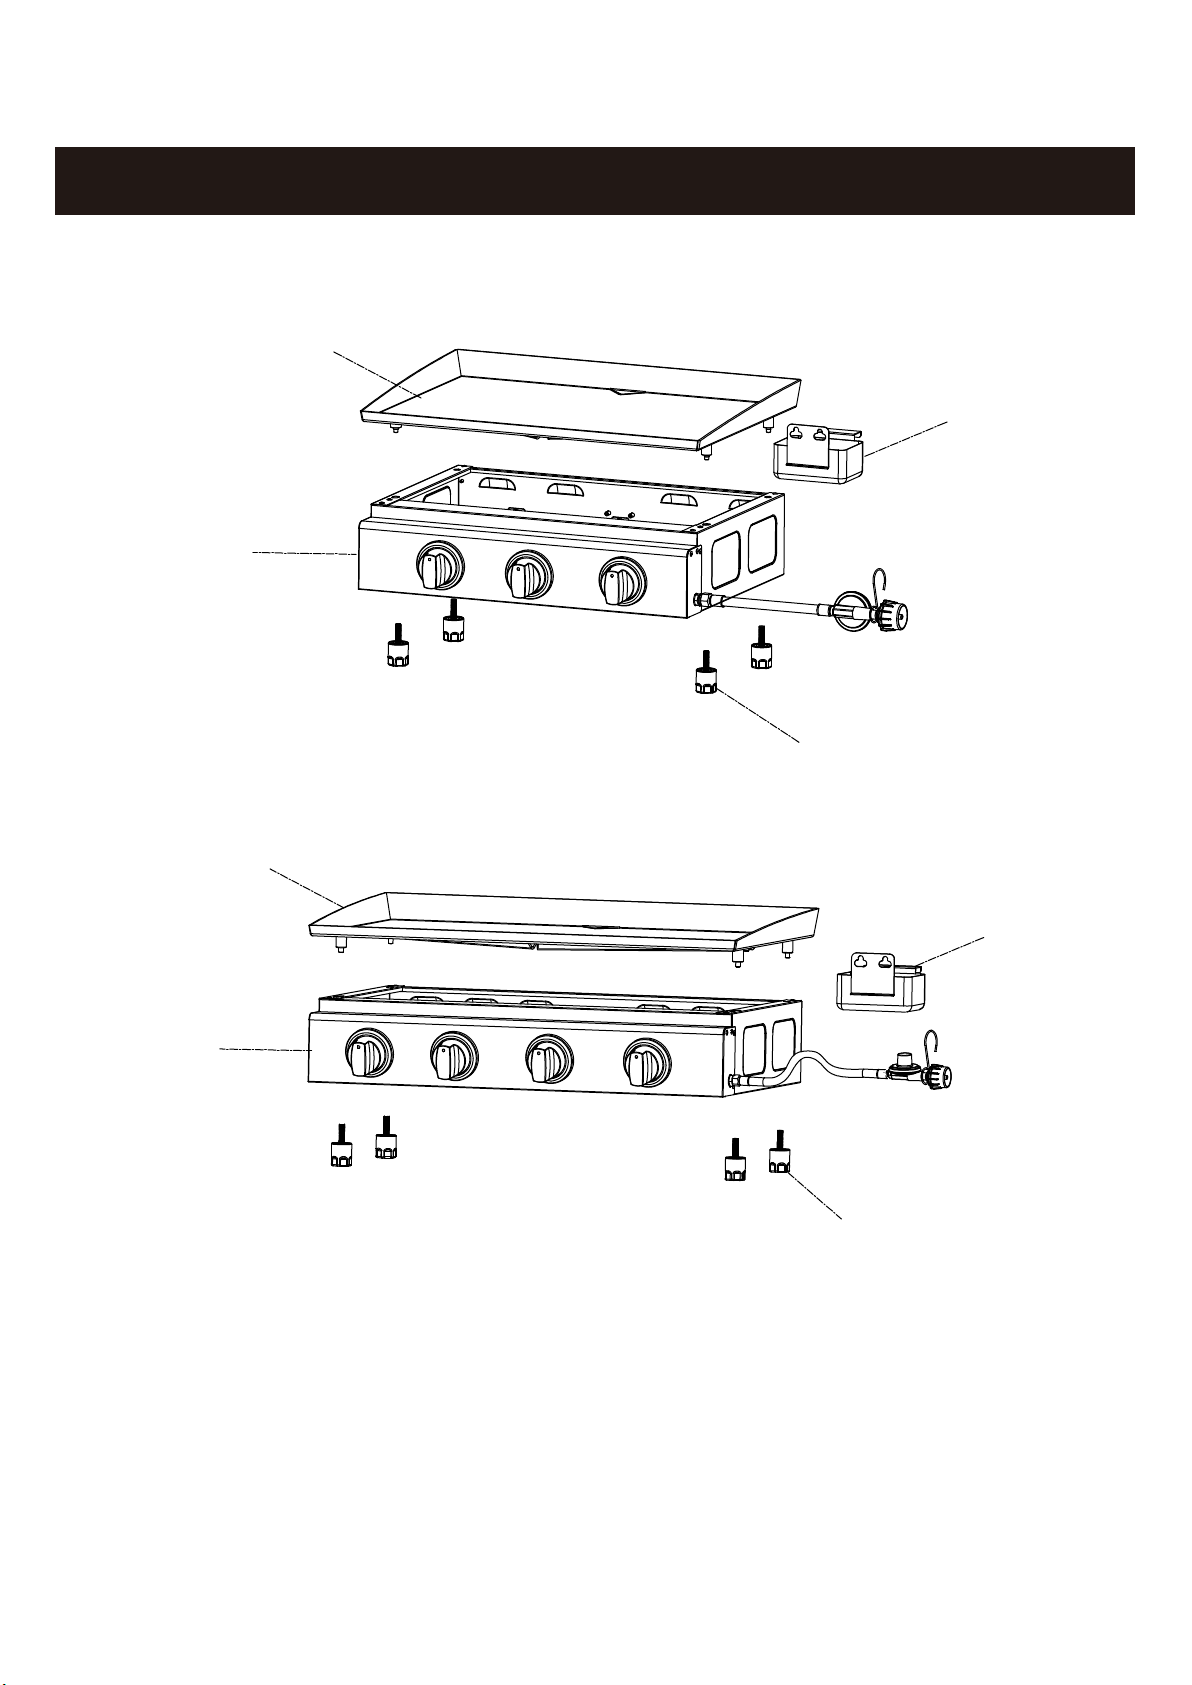
2.Remove the cooking plate. Insert a match into the match lighter. Strike the
match and place near the gas outlet openings on the burner. Push and
turn the control knob of that burner counter-clockwise to HIGH. Hold
the control knob pushed down for 2-3 seconds. It will light the burner.
3.Adjust the flame by turning control knob between HIGH and LOW.
4. Repeat step 2 for lighting other burners.
5. If ignition does not occur in 5 seconds, turn the burner control(s)
OFF, wait 5 minutes, and repeat the lighting procedure.
6.Place the cooking plate back onto the plancha body.
Note: Match lighter is attached to the main valve tube at the bottom of gas plancha
by the manufacturer. Place the match lighter on the platform of the control panel after use.
.
SHUT DOWN INSTRUCTIONS
2. Turn LP cylinder gas valve clockwise to OFF position when plancha is not in use.
1. Push and turn control knob clockwise to OFF position.
WHEN THE BURNER FLAME IS ACCIDENTALLY EXTINGUISHED
1. Close the LP tank valve.
2. Push and turn control knob clockwise to OFF position.
3. Inspect if the hose etc. connections are good, wait 5 minutes. After waiting 5 minutes, re-start the
appliance following the lighting instructions.
REGULATOR HOSE ASSEMBLY CHECK:
WARNING
Before each use, check to see if there is evidence of abrasion, wear, cuts or leaks on the hose. If
damage is evident, the hose must be replaced prior to appliance use.
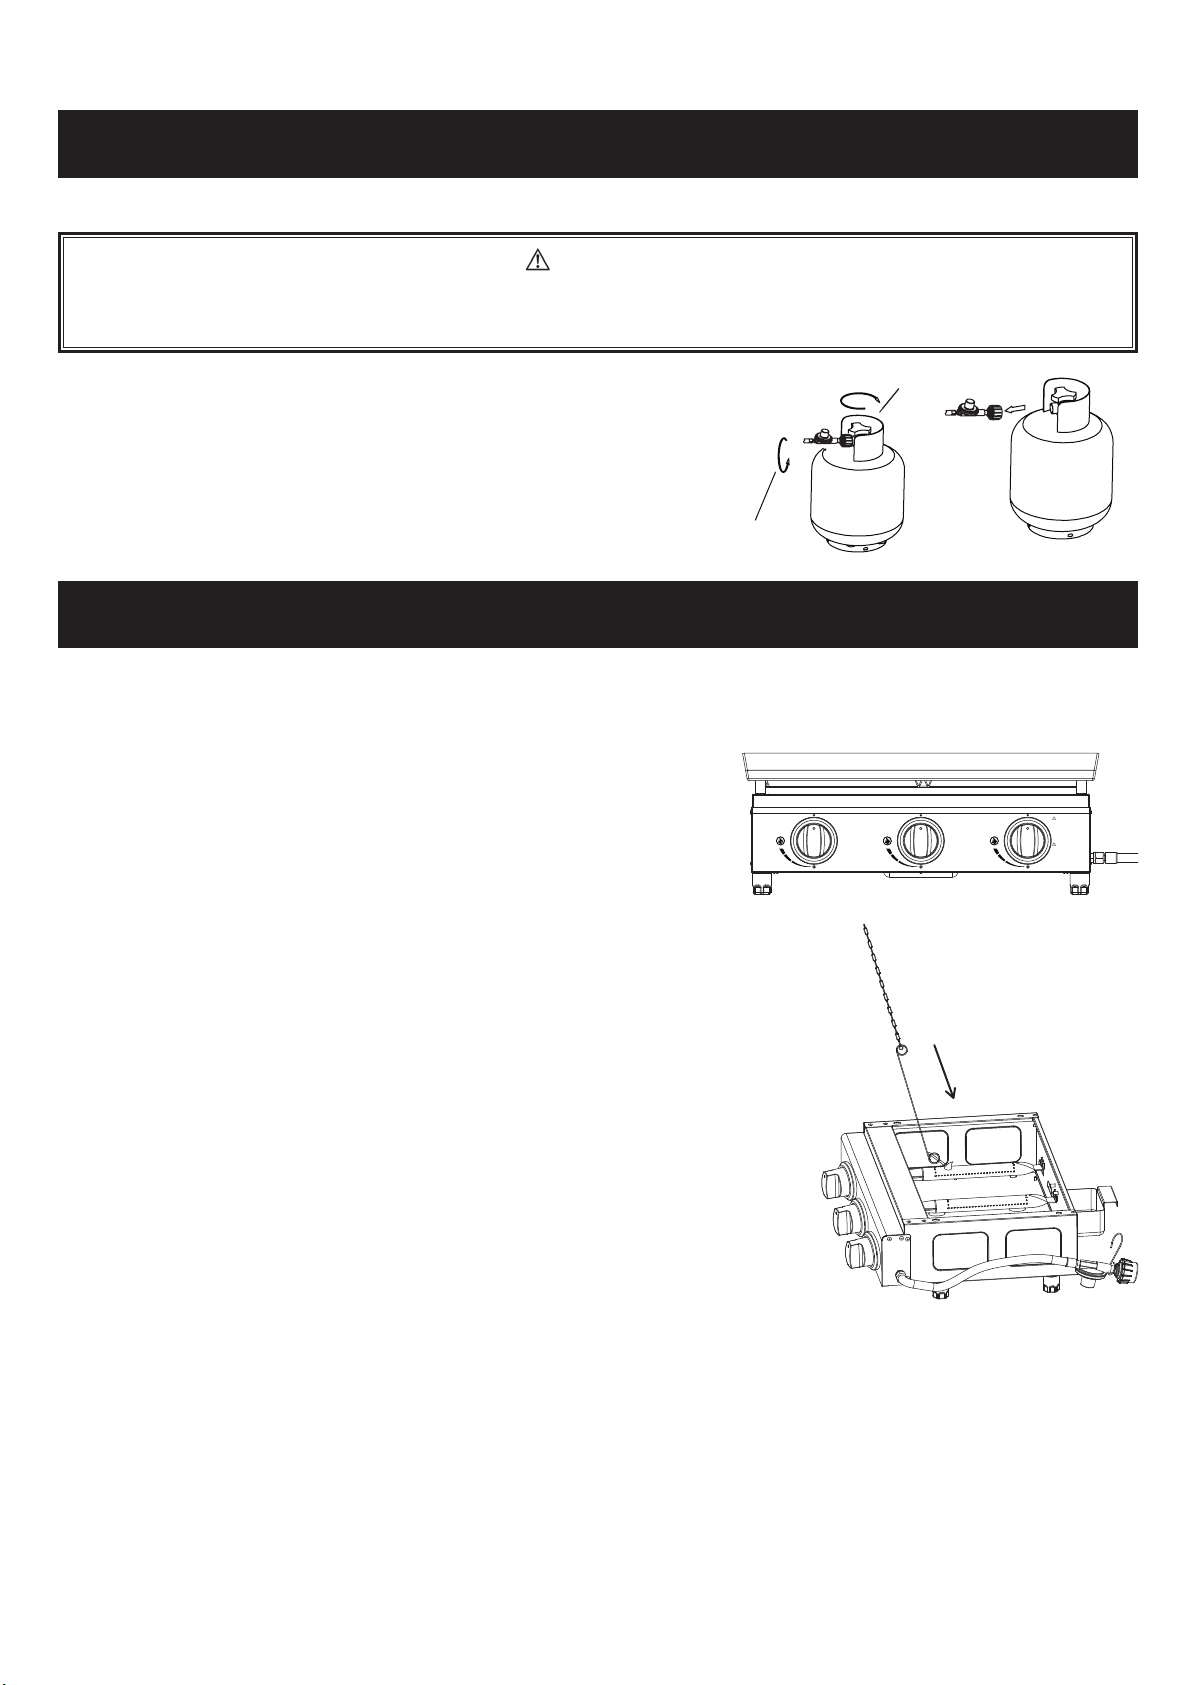
DISCONNECTING REGULATOR FROM THE LP TANK:
1. Turn control knob to the OFF position.
2. Turn the cylinder valve off fully (turn clockwise to stop).
Detach the regulator assembly from the cylinder valve
by turning the quick coupling nut counterclockwise.
NOTE: Loosen by hand only. DO NOT use tools.
8
Shut off gas supply by rotating valve of gas cylinder clockwise.
Gas cylinder
Detach regulator
by rotating it
counterclockwise
OFF/ARRÊT LIGHTING INSTRUCTIONS:
1. READ ALL INSTRUCTIONS BEFORE LIGHTING.
2. MAKE SURE ALL CONTROL KNOBS ARE IN THE OFF
POSITION. TURN ON THE CYLINDER VALVE.
3. SELECT THE BURNER TO BE LIT. PUSH AND TURN
THE CONTROL KNOB OF THAT BURNER COUNTER-
CLOCKWISE TO HIGH. HOLD THE CONTROL KNOB
PUSHED DOWN FOR 2-3 SECONDS.
IT WILL LIGHT THE BURNER.
4. ADJUST THE FLAME BY TURNING
CONTROL KNOB BETWEEN HIGH AND
LOW.
5. REPEAT STEP 3 FOR LIGHTING
OTHER BURNERS.
6. IF IGNITION DOES NOT OCCUR IN 5
SECONDS, TURN THE BURNER
CONTROL(S) OFF, WAIT 5 MINUTES, AND
REPEAT THE LIGHTING PROCEDURE.
7. TO TURN OFF, PUSH AND TURN EACH
CONTROL KNOB CLOCKWISE UNTIL IT LOCKS
IN THE OFF POSITION.
DIRECTIVES D'ALLUMAGE:
1.LISEZ LES INSTRUCTIONS ADVANTD’ALLUMERL’APPAREIL.
2.ASSUREZ - VOUSQUE TOUS LES BOUTONSDE
COMMANDE SONTDANS LE OFF POSITION.TOURNER
LEROBINET.
3.SÉLECTIONNEZLE BRÛLEURÀ ÊTRE ALLUMÉ.
POUSSE ET TOUR LEBOUTON DE COMMANDEDU
BRÛLEUREN SENSINVERSE À ÉLEVÉ.
LEBOUTON DE CONTRÔLEPOUSSÉ
POUR2 À 3 SECONDES.ONVA
ALLUMER LE BRÛLEUR.
4.RÉGLER LA FLAMMEÀ TOURNERLE
BOUTON DE COMMANDEENTRE LA
HAUTEETLA BASSE.
5.RÉPÉTER L'ÉTAPE3 DE L'ÉCLAIRAGE
AUTREBRÛLEUR.
6.SI L’APPAREILNE S’ALLUMEPAS EN 5
SECONDES, FERMEZLE ROBINETDU BRÛLEUR,
ATTENDEZ5 MINUTES,ET PROCÉDEZDE NOUVEAU
ÀL’ALLUMAGE.
7.COUPER, POUSSEET TRANSFORMECHAQUEBOUTON DE
COMMANDE DANSLE SENS DES AIGUILLESJUSQU'ÀCE
QU'ILSE BLOQUEEN POSITIONOFF.
OFF/ARRÊTOFF/ARRÊT
WARNING:
USE OUTDOORS ONLY.
ACCESSIBLE PARTS MAY BE VERY
HOT.
KEEP YOUNG CHILDREN AWAY.
DISCONNECT REGULATOR FROM
CYLINDER WHEN THIS APPLIANCE
NOT USE IN A LONG TIME.
AVERTISSEMENT:
POURUSAGE A L’EXTÉRIEUR
SEULEMENT.
LESPIECES ACCESSIBLES PEUVENT
ETRETRES CHAUDS.
TENIRA DISTANCEDES ENFANTS.
COUPERL’ALIMENTATION EN GAZ
PLÀ LA BOUTEILLESI L’APPAREIL
N’ESTPAS UTILISÉ.

DANGER
NEVER allow this appliance to operate unattended. Failure to fo
or burn hazard that could cause property damage, personal injur
the appliance, move everyone to safety and immediately contact
CO2 extinguisher or preferably a Class “K” extinguisher. Special care must be taken to understand the manufacturers
instructions and be prepared to operate the appropriate extinguisher prior to using this appliance.
PRODUCT DIMENSIONS
Length Width Height
MGP-24
MGP-23
23.2 21.2 9
27.9 21.2 9
Dimension
Model
9
WARNING
MGP-23
MGP-24
Hose is a trip hazard.
WARNING
Hose is a trip hazard.
35"
H=9"
W=21.2"
35"
H=9"
W=21.2" L=27.9"
L=23.2"

EXPLODED VIEW
4
4
3
3
2
2
1
1
MGP-23
MGP-24
10

PARTS LIST
Part # Description Image Qty
1Plate body
SRGG31706
SRGG41620
1
12
3
Cooking Plate
NOTE: Wash all parts that will come in contact with food or water with
warm soapy water, rinse and towel dry.
4 Adjustable feet 4
Grease Box 1
11

ASSEMBLY INSTRUCTIONS
STEP 1
Choose a good, cleared assembly area, lay a
cardboard down to protect gas plate finish and
assembly area.
Place the plate body (1) upside down. Screw 4
adjustable feet (4) into the plate body (1). Turn
the gas plancha body (1) over after this step
finished.
STEP 2
Place the cooking plate(2) onto the plate
body(1).
STEP 3
Hang the grease box(3) on the two bolts
at the back side of plate body(1).
Refer to page 7 of CONNECTING
REGLATOR TO LP TANK 20LB
STEP 4
Connect to LP tank.
4
2
3
1
1
1
12

HOW TO CLEAN:
Proper care and appliance maintenance will keep your product operating smoothl
Keep appliance area clear and free from combustible materials, gasoline, and other flammable vapors
and liquids.
Keep the ventilation opening(s) of the cylinder enclosure free and clear from debris.
NOT obstruct the flow of combustion and ventilation air.
Check for proper burner flame characteristics. Each burner is adjusted prior to shipment; however,
variations in the local gas supply may take minor adjustments.
Burner flames should be blue and stable with no
yellow tips, excessive noise, or lifting. Slight yellow
tipping is normal for LP gas.If the flame is yellow, it
indicates insufficient air. If the flame is noisy and
tends to lift away from the burner, it indicates too
much air.
Visually check the burner flames prior to each use,
the flames should look like this picture, if flames do not, call our customer service line.
BURNER FLAME CHECK
y.
CLEAN THOROUGHLY AFTER EVERY USE.
NOTE: Clean the entire appliance each year and tighten all hardware on a regular basis (1-2 times
a year or more depending on amount of use).
1. Before cleaning turn off the appliance at the gas cylinder. Check that there is no flame, gas smell
and the valves are in off position. Next, make sure unit is properly disconnected from propane tank
prior to any cleaning.
2. Everything that was in contact with the food must be hand washed with warm soapy water and
nylon pad. DO NOT spray oven cleaner on cooking plate to remove grease or soot. It will cause
the finish to become dull. If food remains stuck to the cooking plate, add hot water and let it soak,
after cooling, scrub with steel wool.
3. lacing in storage.
4. We recommend that the unit be thoroughly cleaned prior to every use.
5. Store all components in a dry location when not in use.
For replacement parts, call our customer service department at 1-800-266-1414, Monday to Friday from
8:00 am to 5:00 pm.
The regulator should be hung on the gas plate to prevent it from being damaged.
CAUTION
Allow unit to fully cool (115˚F or 45˚C) before performing any cleaning.
CARE AND MAINTENANCE
2 in.
1 in.
0 in.
1 inch
13

CARE AND MAINTENANCE
SUGGESTED CLEANING MATERIALS:
• Hot water
• Mild dishwashing liquid detergent
• Soft, nylon cleaning pad
CLEANING BURNERS
14

TROUBIESHOOTING
15
Problems Causes possibles Solutions
Burners cannot be switched
on by existing ignition system
1/ LPG gas cylinder is empty
2/ Defective regulator
3 / Obstructions in the burners
4 / Obstruction in the line or the
gas hose.
1/ Replace with a full bottle
2/ Check or replace regulator
3/ Clean burners
4/ Clean the gas hose or hose
1/ Replace with a full bottle
2/ Check or replace regulator
3/ Clean burners
4/ Clean the gas rod or hose
1/ Use a larger bottle
2/ Clean burners
3/ Clean the gas rod or hose
4/ Place the plate in one place
more protected.
Burners cannot be lit by a
match 1/ LPG gas cylinder is empty
2/ Defective regulator
3 / Obstructions in the burners
4 / Obstruction in the line or the
gas hose.
Low flame or return of flames
(fire inside the burner - you
may hear whistling or rust)
1/ LPG gas cylinder is too small
2/ Obstructions in burners
3/ Obstruction in the pipe or the
gas pipe
4/ Windy weather

Bismar Company (1991) incorporated (cited “Bismar” in this document) guarantees your new patio
heater.
MARTIN Propane gas cooking plate MGP-23 and MGP-24 are guaranteed for a (1) against any
material and manufacturing defect applicable from the date of purchase and applies only to the
original purchaser of the appliance provided that it has been purchased from an authorized
representative or reseller of MARTIN gas appliances.
7KLV PDQXIDFWXUHU¶V ZDUUDQW\ LV QRQWUDQVIHUDEOH DQG FDQQRW EH H[WHQGHG E\ DQ\ RI RXU
UHSUHVHQWDWLYHV 8VH PXVW FRPSO\ ZLWK WKH RSHUDWLQJ DQG VDIHW\ LQVWUXFWLRQV OLVWHG LQ WKLV PDQXDO
SURYLGHGZLWKWKH'HYLFH7KLV/LPLWHG:DUUDQW\GRHVQRWFRYHUGDPDJHRUPDOIXQFWLRQVFDXVHGE\
DFFLGHQWDEXVHGHYLFHPRGLILFDWLRQQHJOLJHQFHLPSURSHURULPSURSHULQVWDOODWLRQRUXVHRUIDLOXUHWR
SHUIRUPQRUPDOPDLQWHQDQFH
7KLV ZDUUDQW\ LV OLPLWHG WR WKH UHSDLU RU UHSODFHPHQW RI SDUWV DW QR FRVW RQO\ DIWHU VDWLVIDFWRU\
H[DPLQDWLRQ DQG ILQGLQJ E\ %LVPDUWKDWWKH\ DUHGHIHFWLYHLQQRUPDOXVH7KHUHDUHQRZDUUDQWLHV
RWKHUWKDQWKRVHH[SUHVVHGGHWHUPLQHGDQGZULWWHQLQWKLV³/LPLWHG:DUUDQW\´
%LVPDUZLOOQRWEHUHVSRQVLEOHIRUWKHLQVWDOODWLRQODERXUDQGDQ\RWKHUFRVWVDQGH[SHQVHVUHODWHGWR
WKHUHLQVWDOODWLRQRIZDUUDQW\SDUWVWKHVHFRVWVDUHQRWFRYHUHGE\WKLVH[SUHVVHGZDUUDQW\
%LVPDUVKDOOQRWEHOLDEOHIRUDQ\FDXVHRUFRQVHTXHQFHUHODWHGWRWKHVDOHLQVWDOODWLRQXVHGDPDJH
UHWXUQRUUHSODFHPHQWRILWVHTXLSPHQWDQGVXFKUHSUHVHQWDWLRQVVKDOOQRWEHOLDEOHWR%LVPDU
6RPHSURYLQFHVVWDWHVDQGMXULVGLFWLRQVGR QRWDOORZWKHH[FOXVLRQRUOLPLWDWLRQRIGLUHFWRULQGLUHFW
GDPDJHVRUOLPLWDWLRQVRYHUWKHWHUPRIDQLPSOLHGZDUUDQW\VRWKHDERYHOLPLWDWLRQVRUH[FOXVLRQV
PD\QRWDSSO\
7KLVJXDUDQWHHJLYHV\RXVSHFLILFULJKWVDQG\RXPD\DOVRKDYHRWKHUULJKWVWKDWPD\YDU\IURPRQH
SURYLQFHRUVWDWHWRDQRWKHU
,PSRUWHGDQGGLVWULEXWHGE\
%LVPDU,QF
'H0RQWJROILHU6W
%RXFKHUYLOOH4XHEHF
&DQDGD-%&
VDOHV#ELVPDUFRP
ZZZELVPDUFRP
ONE-YEAR LIMITED WARRANTY
16
This manual suits for next models
1
Table of contents