manuals.online logo
Brands
  1. Home
  2. •
  3. Brands
  4. •
  5. Maximum
  6. •
  7. Drill
  8. •
  9. Maximum 054-1349-8 User manual

Maximum 054-1349-8 User manual

Other Maximum Drill manuals

Maximum 3129 User manual

Maximum

Maximum 3129 User manual

Maximum 054-2016-4 User manual

Maximum

Maximum 054-2016-4 User manual

Maximum 054-1359-4 User manual

Maximum

Maximum 054-1359-4 User manual

Maximum 054-2109-4 User manual

Maximum

Maximum 054-2109-4 User manual

Popular Drill manuals by other brands

Stanley FatMax FME140 Original instructions

Stanley

Stanley FatMax FME140 Original instructions

Black & Decker MATRIX BDCDMT120C instruction manual

Black & Decker

Black & Decker MATRIX BDCDMT120C instruction manual

DeWalt D25134 manual

DeWalt

DeWalt D25134 manual

Skil 2431 Original instructions

Skil

Skil 2431 Original instructions

Bort 93728410 user manual

Bort

Bort 93728410 user manual

GreenWorks DDG407 Operator's manual

GreenWorks

GreenWorks DDG407 Operator's manual

Panasonic EY7460 - DRILL DRIVER 21.6V operating instructions

Panasonic

Panasonic EY7460 - DRILL DRIVER 21.6V operating instructions

Mueller E-5 operating instructions

Mueller

Mueller E-5 operating instructions

Bosch GSB Professional 18-2 RE Original instructions

Bosch

Bosch GSB Professional 18-2 RE Original instructions

Clarke CON18LI Operation & maintenance instructions

Clarke

Clarke CON18LI Operation & maintenance instructions

Makita 8280D technical information

Makita

Makita 8280D technical information

Stanley SCH20 user manual

Stanley

Stanley SCH20 user manual

Makita BDF456 instruction manual

Makita

Makita BDF456 instruction manual

Makita LXFD01 instruction manual

Makita

Makita LXFD01 instruction manual

Black & Decker LDX220 instruction manual

Black & Decker

Black & Decker LDX220 instruction manual

GMC HD1400K instruction manual

GMC

GMC HD1400K instruction manual

POWERBOR PB1000E owner's manual

POWERBOR

POWERBOR PB1000E owner's manual

Festool T18+3 instructions

Festool

Festool T18+3 instructions

manuals.online logo
manuals.online logoBrands
  • About & Mission
  • Contact us
  • Privacy Policy
  • Terms and Conditions

Copyright 2025 Manuals.Online. All Rights Reserved.

3
TM
NOTE: If any parts are missing or damaged, or if you have any
questions, please call our toll-free helpline at 1-888-670-6682.
SAVE THESE INSTRUCTIONS
This manual contains important safety and
operating instructions. Read all instructions and
follow them with use of this product.
TECHNICAL SPECIFICATIONS 4
SAFETY INSTRUCTIONS 5
IMPORTANT INFORMATION 9
PARTS LIST 10
KNOW YOUR TOOL 11
OPERATING INSTRUCTIONS 12
MAINTENANCE 20
WARRANTY 22
TABLE OF CONTENTS
TABLE OF CONTENTS
4
model no. 054-1349-8 | contact us 1-888-670-6682
5
TM
SAFETY INSTRUCTIONS
MOTOR 18V DC
KEYLESS CHUCK 1/2” METAL, single-sleeve
VARIABLE SPEED RANGES 0–450 / 0–1550 RPM (no load)
TORQUE CLUTCH POSITION 16 including drilling mode
MAX. TORQUE 450 in-lb
ON BOARD WORK LIGHT LED
BATTERY 20V max* (2.0 Ah) lithium-ion
COMPATIBLE MAXIMUM BATTERY 054-3203-2; 054-3206-6
CHARGER 35-minute, diagnostic
COMPATIBLE MAXIMUM CHARGER 054-3204-0
OPTIMUM CHARGING
TEMPERATURE
50 to 86°F (10 to 30°C)
DIMENSIONS 7 1/4 x 7 5/8 x 2 11/16” (184 x 193 x 68 mm)
WEIGHT 2 lb 11 oz (1.22 kg) without battery
*Maximum battery voltage without workload; with workload nominal voltage is 18V.
TECHNICAL SPECIFICATIONS
• Beforeoperatingthistool,carefullyreadthis
Instruction Manual and all of the labels affixed to the
tool. Failure to follow all warnings and instructions may
result in electric shock, fire and/or serious injury.
• Theterm“powertool”inthewarningsrefersto
your main operated (corded) power tool or battery
operated (cordless) power tool.
• Saveallwarningsandinstructionsforfuturereference.
TECHNICAL SPECIFICATIONS
WARNING!
• Beforeoperatingthistool,carefullyreadthis
Instruction Manual and all of the labels affixed to the
tool. Failure to follow all warnings and instructions may
result in electric shock, fire and/or serious injury.
• Theterm“powertool”inthewarningsrefersto
your main operated (corded) power tool or battery
operated (cordless) power tool.
• Saveallwarningsandinstructionsforfuturereference.
WORK AREA SAFETY
• Keep work area clean and well lit. Cluttered or dark areas invite accidents. Rags,
clothes, cords, strings and similar items should never be left around the work area.
• Donotoperatepowertoolsinexplosiveenvironments,suchasinthepresence
offlammableliquids,gases,ordust. Power tools create sparks, which may ignite
dust or fumes.
• Keepchildrenandbystandersawaywhileoperatingapowertool.Distractions
can cause the operator to lose control.
ELECTRICAL SAFETY
• Powertoolplugsmustmatchtheoutlet.Nevermodifythepluginanyway.Do
notuseanyadaptorplugswithgroundedpowertools. Unmodified plugs and
matching outlets will reduce risk of electric shock.
• Avoidbodycontactwithgroundedsurfacessuchaspipes,radiators,ranges
andrefrigerators.
There is an increased risk of electric shock if your body is grounded.
• Donotexposepowertoolstorainorwetconditions.Water entering a power tool
will increase the risk of electric shock.
• Donotabusethecord.Neverusethecordforcarrying,pullingorunplugging
thepowertool.Keepthecordawayfromheat,oil,sharpedgesormovingparts.
Replace damaged cords immediately. Damaged or tangled cords increase the risk of
electric shock.
• Whenoperatingapowertooloutdoors,useanextensioncordsuitablefor
outdooruse.
Use of a cord suitable for outdoor use reduces the risk of electric shock.
• Ifoperatingapowertoolinadamplocationisunavoidable,usearesidual
currentdevice(RCD)orgroundfaultcircuitinterrupter(GFCI)protectedsupply.
Use of an RCD or GFCI reduces the risk of electric shock.
PERSONAL SAFETY
• Stayalert,watchwhatyouaredoingandusecommonsensewhenoperatinga
powertool.DONOTuseapowertoolwhileyouaretiredorundertheinfluence
ofdrugs,alcoholormedication.A moment of inattention while operating power
tools may result in serious personal injury.
model no. 054-1349-8 | contact us 1-888-670-6682
6 7
TM
• Usepersonalprotectiveequipment.Alwaysweareyeprotection.Protective
equipment such as a dust mask, non-skid safety shoes, a hard hat, or hearing
protection will reduce personal injuries.
• Avoidaccidentalstarting.Ensuretheswitchisinthe“off”positionbefore
connecting to a power source and/or battery pack, or picking up or carrying the
tool. Carrying power tools with your finger on the switch or plugging in power tools
thathavetheswitch“on”invitesaccidents.
• Removeanyadjustingkeyorwrenchbeforeturningthepowertoolon. A
wrench or key left attached to a rotating part of the power tool may result in
personal injury.
• Donotoverreach.Keepproperfootingandbalanceatalltimes. This enables
better control of the power tool in unexpected situations.
• Dressproperly.Do not wear loose clothing or jewellery. Always wear eye and ear
protection and use a dust mask. Keep your hair, clothing and gloves away from
moving parts. Loose clothes, jewellery or long hair can be caught in moving parts.
• Ifdevicesareusedfordustextractionandcollection,ensurethesedevicesare
connectedandusedproperly. Use of dust collection devices can reduce dust-
related hazards.
• Donotuseonaladderorunstablesupport. Stable footing on a solid surface
allows for better control of the power tool in unexpected situations.
POWER TOOL USE AND CARE
• Donotforcethepowertool.Usethecorrectpowertoolforyourapplication.
The correct power tool will do a better and safer job if used for the function it was
designed for.
• Donotusethepowertooliftheswitchdoesnotturnitonandoff. Any power
tool that cannot be controlled with the switch is dangerous and must be repaired.
• Disconnecttheplugfromthepowersourceand/orthebatterypackfromthe
powertoolbeforemakinganyadjustments,changingaccessories,orstoring
thepowertool. Such preventive safety measures reduce the risk of starting the
power tool accidentally.
• Storeidlepowertoolsoutofthereachofchildrenanddonotallowpersons
unfamiliarwiththepowertoolortheseinstructionstooperatethepowertool.
Power tools are dangerous in the hands of untrained users.
• Maintainpowertoolswithcare.Checkformisalignmentorbindingofmoving
parts,breakageofpartsandanyotherconditionthatmayaffectthepower
tool’soperation.Ifdamaged,havethepowertoolrepairedbeforeuse. Many
accidents are caused by poorly maintained power tools.
• Keepcuttingtoolssharpandclean. Properly maintained cutting tools with sharp
cutting edges are less likely to bind and are easier to control.
• Usethepowertool,accessories,toolbits,etc.,inaccordancewiththese
instructions,takingintoaccounttheworkingconditionsandtheworktobe
performed. Use of the power tool for operations different from those intended
could result in a hazardous situation.
BATTERY TOOL USE AND CARE
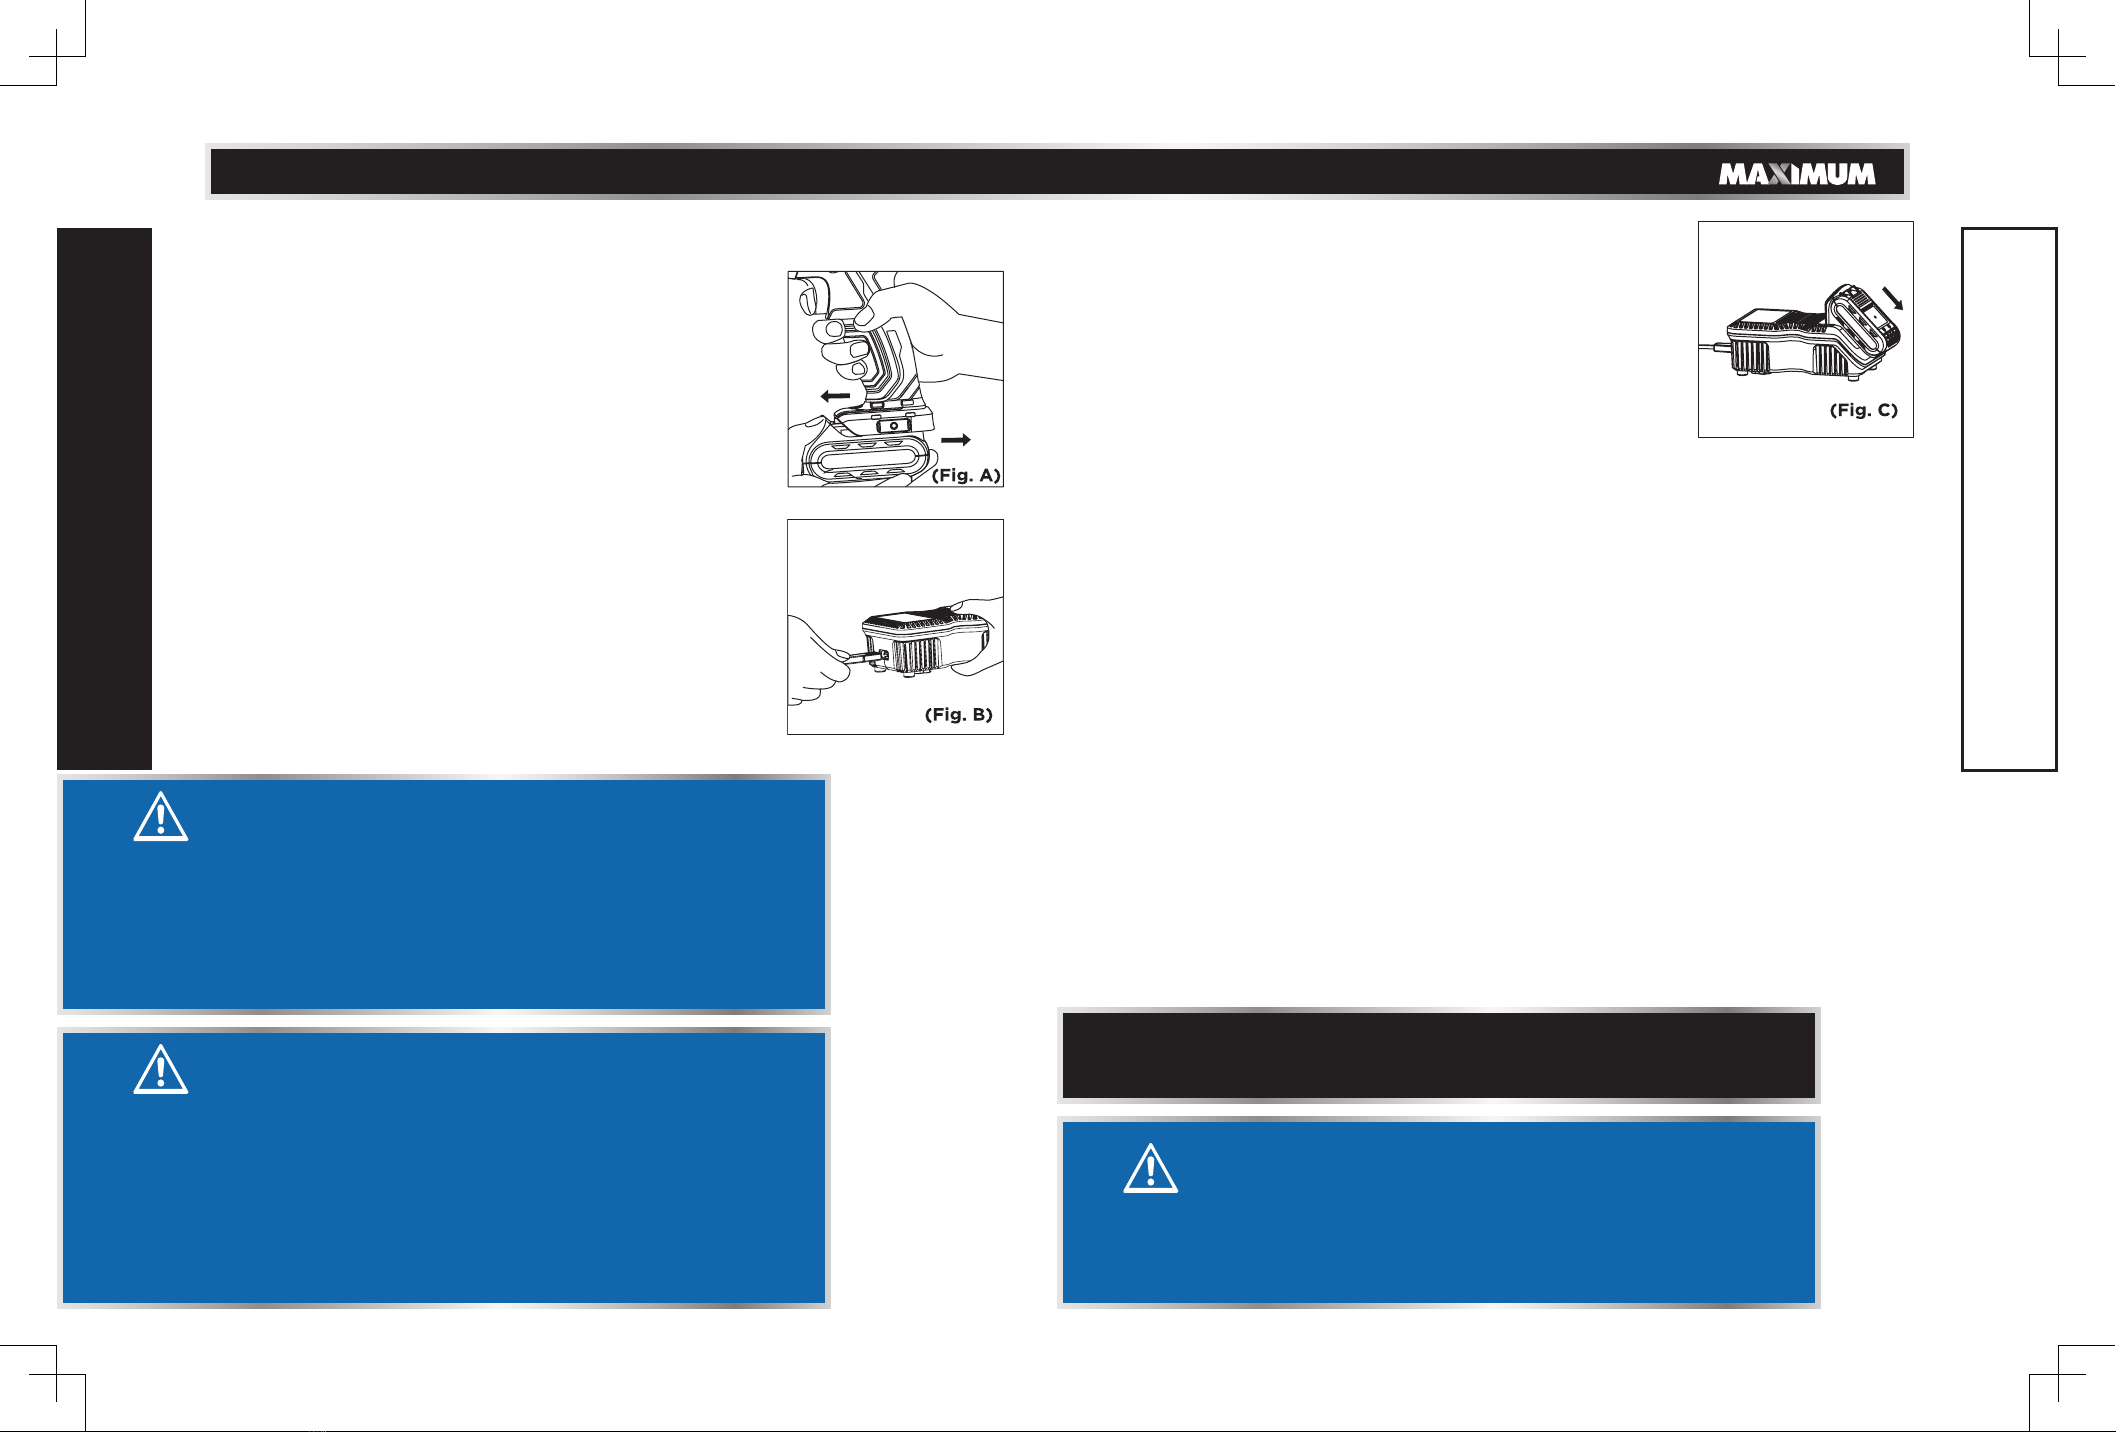
• Ensuretheswitchisinthe“off”positionbeforeinsertingthebatterypack.
Insertingthebatterypackintopowertoolsthathavetheswitch“on”invitesaccidents.
• Whenrecharging,useonlythechargerthatisspecifiedbythemanufacturer.
A charger that is suitable for one type of battery pack may create a risk of fire when
used with another battery pack.
• Useonlyspecificallydesignatedbatterypackswithpowertools.The use of any
other battery pack may create a risk of injury or fire.
• Whenthebatterypackisnotinuse,keepitawayfromobjectsthatcancreate
aconnectionbetweentheterminals,suchaspaperclips,coins,keys,nails,
screwsorothersmallmetalobjects. Short-circuiting the battery terminals may
cause burns or a fire.
• Underabusiveconditions,liquidmaybeejectedfromthebattery;avoid
contact. If contact accidentally occurs, flush with water. If liquid contacts eyes,
seek medical help. Liquid ejected from the battery may cause irritation or burns.
SERVICE
• Haveyourpowertoolservicedbyaqualifiedrepairpersonusingonlyidentical
replacementparts.This will ensure that the safety of the power tool is maintained.
• Whenservicingatool,useonlyidenticalreplacementparts. Follow the
instructions in the MAINTENANCE section of this manual. The use of unauthorized
parts or failure to follow maintenance instructions may create a risk of electric
shock or injury.
SPECIFIC SAFETY RULES FOR CORDLESS DRILL/DRIVER
• Holdpowertoolbyinsulatedgrippingsurfacewhen performing an operation
where the cutting tool may contact hidden wiring or its own cord. Contact with
a“live”wirewillalsomakeexposedmetalpartsonthetool“live”andshockthe
operator.
• Wearhearingprotectionduringextendedperiodsofoperation.Exposure to
noise can cause hearing loss.
• Useauxiliaryhandle(s),ifsuppliedwiththetool. Loss of control can cause
personal injury.
• Wearsafetygogglesorothereyeprotection.Hammering and drilling operations
cause chips to fly. Flying particles can cause permanent eye damage.
• Useadustmaskorrespiratorforapplicationsiftheoperationisdusty.
• Securetheworkpiece. Clamping devices or a vise will hold the workpiece in place
better and more safely than holding it by hand.
• Beawarethatthistoolisalwaysinanoperatingcondition,since it does not
have to be plugged into an electrical outlet.
• Accessoriesandtoolmaygethotduringoperation.Wear gloves when handling
them if performing heat producing applications such as drilling metals.
SAFETY INSTRUCTIONS
SAFETY INSTRUCTIONS
model no. 054-1349-8 | contact us 1-888-670-6682
8 9
TM
SAFETY RULES FOR BATTERY PACK AND CHARGER
•Ifthebatterypackcasingiscrackedordamaged,donotinsertintocharger.
There is a danger of electric shock or electrocution.
•Don,tallowanyliquidtogetinsidecharger.Electricshockmayresult.To
facilitate cooling of the battery pack after use, avoid placing the charger or
battery pack in a warm environment such as in a metal shed, or a trailer that is not
insulated.
•Thischargerisnotintendedforanyusesotherthanchargingrechargeable
batteries. Any other use may result in risk of fire, electric shock or electrocution.
•Donotplaceanyobjectontopofthechargerorplacethechargeronasoft
surfacethatmayresultinexcessiveinternalheat. Do not place the charger near
any heat source.
•Toreducethepotentialriskofdamagetotheelectricplugandcord,pull by
the plug rather than the cord when disconnecting the charger from the power
supply.
•Makesurethecordislocatedsoitwillnotbesteppedon,trippedover,or
otherwisesubjectedtodamageorstress.
•Anextensioncordshouldnotbeusedunlessabsolutelynecessary.Use of an
improper extension cord could result in a risk of fire, electric shock or electrocution.
•Donotoperatethechargerifithasreceivedasharpblow,beendroppedor
otherwisedamagedinanyway.
•Donotdisassemblecharger.Take it to a Service Agent when service or repair is
required. Incorrect reassembly may result in a risk of electric shock, electrocution
or fire.
•Topreventtheriskofelectricshock,unplugthechargerfromtheoutletbefore
attemptingtocleanit.Only removing the battery pack from the charger will not
reduce this risk.
•DONOTstoreorusethetoolandbatterypackinlocationswherethe
temperaturemayreachorexceed122°F(50°C),which can lead to deterioration
of the storage battery.
•Thechargerisdesignedtooperateonstandardhouseholdelectricalpower
(120VAC).Do not attempt to use it on any other voltage.
ADDITIONAL INFORMATION ON BATTERY AND CHARGER
•Thebatterypackisnotfullychargedoutofthecarton.Firstreadthesafety
instructions and then follow the charging notes and procedures.
•Thelongestlifeandbestperformancecanbeobtainedifthebatterypackis
charged when the air temperature is 59-77 °F (15-25 °C). Do not charge the battery
pack where the air temperature is below 32 °F (0 °C) or above 113 °F (45 °C). This is
important and will prevent damage to the battery pack.
•Donotincineratethebatterypackevenifitisseriouslydamagedoriscompletely
worn out. The battery can explode in a fire.
•Neverattempttoopenthebatterypackforanyreason.Iftheplastichousingofthe
battery pack breaks or cracks, immediately discontinue use and do not recharge.
•Thelengthofservicefromyourbatterywilldependonthetypeofworkyou
are doing. The battery has been designed to provide maximum trouble-free life.
However, like all batteries, it will eventually wear out.
•Toobtainthelongestpossiblebatterylife,wesuggestthefollowing:
- Store and charge your battery in a cool area. Temperatures above or below
normal room temperature will shorten battery life.
- Never store the battery in a discharged condition. Recharge it immediately after
it has been discharged.
•Allbatteriesgraduallylosetheircharge.Thehigherthetemperature,thequicker
they lose their charge. If you store your tool for long periods of time without use,
recharge the battery every month or two. This practice will prolong battery life.
BATTERY PACK REMOVAL AND PREPARATION FOR RECYCLING
To preserve natural resources, please recycle or dispose of batteries properly. This
product contains a lithium-ion battery. Local, provincial or federal laws may prohibit
disposal of lithium-ion batteries in ordinary trash. Consult your local waste authority for
information regarding available recycling and/or disposal options.
SAFETY INSTRUCTIONS
IMPORTANT INFORMATION
WARNING!
This manual contains important safety and operating
instructions for your battery and charger. Before using the
charger, read all instructions and warnings on the charger,
the battery pack and the tool.
WARNING!
Upon removal, cover the battery pack’s terminals with
heavy-duty adhesive tape. Do not attempt to destroy or
disassemble.
10
model no. 054-1349-8 | contact us 1-888-670-6682
11
TM
PARTS LIST
No. Description
1 Keyless chuck
2 Torque clutch
3 LED worklight
4 Forward & reverse lever
5 Trigger switch
6 High/low speed range selector
No. Description
7 Remaining power indicator
8 Battery release button
9 Rechargeable battery pack
10 Charging indicator
11 Charger
12 Detachable cable & plug
KNOW YOUR TOOL
WARNING!
• Removetheproductandanyaccessoriesfromthe
package. Inspect the tool carefully to make sure no
breakage or damage occurred during shipping.
•Donotdiscardthecartonoranypackagingmaterial
until all parts have been examined.
NO. DESCRIPTION
1 SCREW
2 CHUCK
3 TORQUE SLEEVE
4 PRINTING RING
5 FRONT HOUSING
6 GEAR BOX ASSY
7 RIGHT HOUSING
8 SCREW
9 REAR COVER
10 LED COVER
NO. DESCRIPTION
11 FORWARD & REVERSE LEVER
12 LED LABEL
13 POWER INDICATION COVER
14 SWITCH & PCB ASSY
15 LEFT HOUSING
16 NUT
17 BATTERY PACK
18 CHARGER
19 DETACHABLE CABLE & PLUG
20 SPEED SELECTOR
7
1
9
4
6
2
3
5
10
8
12
11
1
2
4
5
36
78
9
13 14
15
16
18
17
19
10
11
12
20
12
model no. 054-1349-8 | contact us 1-888-670-6682
13
TM
FITTING AND REMOVING THE BATTERY PACK TO THE
DRILL DRIVER
•Toinstallthebatterypacktothetool,aligntheraised
portion of the battery pack with the grooves on the
bottom of the tool handle, and slide it firmly into the
handle until you hear the lock snap into place. (Fig. A)
•Toremovethebatterypackfromthetool,pressthe
battery pack release button and slide the battery pack
completely out of the tool handle.
CHARGING PROCEDURE
•Connecttheplugcabletothecharger,andthenplugintoan
appropriate outlet before inserting battery pack (Fig. B).
All three charging lights will be on for two seconds and
then off.
•Insertthebatterypackintothecharger,makingsurethe
pack is fully seated in the charger (Fig. C). During the
charging process, the charging lights will indicate the
chargingstatusasfollows:
-Lessthan30%charged:allthreecharginglightswill
blink in sequence.
-Lessthan60%charged:onelightwillstayon,while
OPERATING INSTRUCTIONS
the other two lights will blink in sequence.
-Over60%charged:twolightswillstayon,whilethe
remaining light will blink continuously.
-Fullycharged:allthreelightswillremainon
continuously.
•Thechargingprocesswillbelastapproximately35minutes
and permanent lighting of all three charging lights will
indicate charging is complete.
CHARGER DIAGNOSTICS
The charger is designed to detect certain problems that can arise with battery packs.
•Whenthechargerdetectsabatterypackthatisoverheated,allthreecharging
lights will blink at the same time. Please remove the battery and allow it to cool
down for 15–30 minutes and re-insert.
•Whenthechargerdetectsamalfunctioninthebattery,twocharginglightswillblink
at the same time. Please remove the battery and allow it to cool down for 15–30
minutes. Then re-insert the battery pack into the charger. If two charging lights still
flash, the battery may require service.
•Whenthechargerdetectsamalfunctionofthechargeritself,threecharginglights
will blink at the same time. Please remove the battery pack and unplug the charger
for at least 2 minutes. After 2 minutes, plug charger back in and re-insert the pack
into the charger. If all three charging lights still blink at the same time, the charger
may require service.
ON/OFF TRIGGER SWITCH
To turn the tool on, squeeze the trigger switch. To turn the tool off, release the trigger
switch.
VARIABLE SPEED
The variable speed trigger switch delivers higher speed with increased trigger pressure
and lower speed with decreased trigger pressure. For maximum tool life, use variable
speed only for starting holes or fasteners.
OPERATING INSTRUCTIONS
WARNING!
•Donotallowfamiliaritywithtoolstomakeyoucareless.
Remember that a careless fraction of a second is enough to
cause serve injury.
•Beforeattemptingtousethiscordlesstool,becomefamiliar
with all of its operating features and safety requirements.
•Toreducetheriskofseriouspersonalinjury,turntooloff
and disconnect battery pack before making any adjustments
or removing/installing attachments or accessories.
CAUTION!
•Beforeattemptingtochargethebattery,checkthecharger
and the battery to ensure the charging equipment matches
the battery supplied. The components are all labeled with
component numbers.
•Therechargeablebatteryisnotfullychargedonleavingthe
factory. Charge the rechargeable battery before first use.
•Rechargedischargedbatteriesassoonaspossibleafteruse
or battery life may be greatly diminished. For longest battery
life, do not discharge batteries fully.
•
The working temperature of the charger is 0-45°C (32-113°F).
NOTE:Charging times may be longer depending on the
surrounding temperature and battery conditions.
CAUTION!
The variable speed control function is not intended to be used
for long periods of time during the operation of the task being
performed. Use the variable speed to start drilling and screwing
tasks, and then fully press the once the trigger switch task has
started.
model no. 054-1349-8 | contact us 1-888-670-6682
14 15
TM
FORWARD AND REVERSE
The direction of bit rotation is reversible and is controlled by a
selector located above the trigger switch. (Fig. D)
Drilling uses the forward mode. The reverse mode is intended
for the removal of screws and assisting with the removal of
jammed drill bits.
Withthedrillheldinnormaloperatingpositions:
•Positioningtheforward/reverseselectortotheleftofthe
tool for forward.
•Positioningtheforward/reverseselectortotherightofthe
tool for reverse.
•Positioningtheforward/reverseselectorinthecentrewill
lock the switch trigger to help reduce the possibility of
accidental starting when not in use.
TWO-SPEED GEAR CONTROL
The high/low speed range selector allows you to select
the gear with the optimum speed and torque to suit the
application. (Fig. E)
To select the low speed, high torque setting, turn the tool off
and allow it to stop. Slide the gear selector forward (towards
the chuck). The word 1 will be displayed.
To select the high speed, low torque setting, turn the tool off
and allow it to stop. Slide the gear shifter back (away from
chuck).The word 2 will be displayed.
OPERATING INSTRUCTIONS
ADJUSTABLE TORQUE CONTROL
This drill is equipped with 16 torque clutch positions, including
one drill mode, which are controlled by the torque clutch. All of
the torque settings are clearly identified on the torque collar.
To adjust the torque settings, rotate the torque collar. The
higher the number, the higher the torque setting. (Fig. F)
Controlling the torque allows for better control when using the
drill on specific screwing tasks and prevents over-fastening
and over-tightening.
For drilling, always use the drill mode by aligning the drill icon
with the triangular indicator on the front face of the drill near
the torque collar.
The proper setting will depend on the type of material and the
size of the screw that is being used. Select the option that best
matches the type of bit, the fastener, and the type of material.
DRILL MODE
Select the drill mode for drilling and other heavy-duty
applications, especially for hardwood and metal. To select the
drill mode, rotate the torque clutch until the drill icon is aligned
with the triangular indicator on the front face of the drill near
the torque clutch.
KEYLESS CHUCK
The arrows on the chuck indicate the direction of rotation of
the body of the chuck to grip or release the drill bit. (Fig. G)
OPERATING INSTRUCTIONS
CAUTION!
To prevent gear damage, always allow the chuck to come to a
complete stop before changing the direction of rotation.
CAUTION!
Do not change between low speed and high speed while the tool
is running. Failure to obey this caution could result in serious
damage to the drill.
WARNING!
Do not hold the body of the chuck with one hand while using the
power of the drill to tighten the jaws of the chuck on the drill bit.
The body of the chuck could slip in your hand, or your hand could
slip and come into contact with the rotating bit. This could cause
an accident and result in serious personal injury.
NOTE:The drill will not run unless the direction of forward/reverse
selector is engaged fully to the left or right.
NOTE:This device is fitted with a spindle lock and the chuck is a
one-handed operation.
model no. 054-1349-8 | contact us 1-888-670-6682
16 17
TM
OPERATING INSTRUCTIONS
BELT HOOK
The belt hook is used to hang the tool on your waist belt while
working. Install the belt hook securely in the groove of the drill
and tighten the screw to fix the hook firmly. (Fig. I)
ACCESSORY HOLDER
Install the accessory holder securely in the groove of the drill
and tighten the screw to fix the holder firmly. (Fig. J) A bit may
be stored on the accessory holder by snapping it into place.
OVERLOAD PROTECTION
This drill is fitted with an overload protection. If the drill is
excessively forced, or the task being performed is too great for
the drill, the drill will automatically go into an overload mode.
When the drill goes into overload, the drill will automatically
and suddenly stop. To reset the overload, simply release the
trigger switch. When the trigger switch is pressed again,
the drill will restart. Resume work after the overload has
been reset, but reduce the load by using a smaller drill bit or
re-sharpen the existing drill bit and reduce the amount of force
placed on the drill. If the drill is set to high speed on the gear
selector, consider changing to low speed selection.
OPERATING INSTRUCTIONS
INSTALLING AND REMOVING BITS
•Openthechuckbyunscrewingitinacounter-clockwise
direction while holding the drill. Do this sufficiently to
allow the drill bit to enter the jaws of the chuck.
•Ensurethedrillbitisfullyinserted,sothatthechuckjaws
grip the straight section of the bit.
•Rotatethechuckclockwiseuntilthejawstightenonthe
drill bit. The collar of the chuck needs to be tightened
firmly to ensure the drill bit is held securely. (Fig. H)
•Toremovethedrillbit,rotatethechuckinacounter-
clockwise direction sufficiently to allow the drill bit to be
removed.
LED WORKLIGHT
When the unit is switched on, the LED worklight also comes on to
ensure better vision and to make working in dark areas safer. LED
work light remains on for 15 seconds after the trigger switch is
released.
REMAINING POWER INDICATOR
If the trigger switch is pressed, the remaining power indicator lights
for 5 seconds and the battery’s remaining power can be checked.
LED INDICATOR REMAINING POWER STATUS
1 0–25 %
2 25–50 %
3 50–75 %
4 75–100 %
WARNING!
Do not insert and remove bits while the tool is activated. Make
sure the battery pack is removed or the forward/reverse selector
is in the centre locking position when inserting and removing bits.
WARNING!
Be sure to insert the drill bit straight into the jaws of the chuck.
Do not tighten the jaws of the chuck with the drill bit inserted at
an angle. Doing so could cause the drill bit to be thrown from the
drill, which could result in serious personal injury or damage to
the chuck.
CAUTION!
Do not continue to overload the drill and constantly reset the
overload. Doing this will cause the battery cells to overheat.
CAUTION!
•Whenusingthebelthook,hangthepowertoolfirmlysoas
not to drop it accidentally. If the power tool is dropped, it
may lead to an accident.
•Whencarryingthetoolhookedtoyourwaistbelt,donot
fit any bit to the top of the power tool, as this may lead to
accidental injury.
NOTE:
• Thedrill/driverwillnotrestartuntilthebatterypackhascooled.
• Donotforcecoolthepackinanyway.Donotplaceinrefrigerator
or freezer. To reduce the temperature of the cells remove the
battery pack from the drill and place the battery pack in a free air
environment, out of direct sunlight or any other heat source.
model no. 054-1349-8 | contact us 1-888-670-6682
18 19
TM
TEMPERATURE CUT OUT
If the drill is constantly overloaded, or the drill is used constantly at maximum rating in
high ambient temperatures, the battery cells may overheat causing the battery pack to
shut down. When this occurs you will need to immediately stop drilling and allow the
battery cells to cool down.
LOW VOLTAGE CUT OUT
The battery pack used on this tool is fitted with a low voltage cut out feature within the
circuitry. The low voltage cut out feature operates when the voltage drops below a pre-
set value. This feature automatically stops the tool from operating (similar to that of the
overload condition). When this condition occurs you will need to either insert another
battery pack into the tool or recharge the existing battery pack.
DRILLING METALS
• Alwaysclampsheetmetal.
• Supportthinmetalwithablockofwoodtoavoiddistortingit.
• Useapunchtomarkthecentreofthehole.
• Useasuitablelubricantforthematerialyouareworkingon.
USE: FOR:
Oil Steel
Turpentine or paraffin Aluminum
Do not lubricate Brass, copper or cast iron
OPERATING INSTRUCTIONS
DRILLING PLASTICS AND PLASTIC COATED CHIPBOARD
•Usehigh-speeddrillbits
•See“Drillingwood”below
DRILLING MASONRY
This drill is not designed for drilling masonry. Purchase or rent a hammer drill.
DRILLING WOOD
•Clampapieceofscrapwoodtothebackofyourworktopreventsplintering.
ALL DRILLING OPERATIONS
•Markoffthecentreoftheholeusingacentrepunchornail.
•Don’tforcethedrill;letitworkatitsownpace.
•Keepthedrillbitsharp.
•Reducepressureasthedrillisabouttobreakthroughtheitembeingdrilled.
OPERATING INSTRUCTIONS
NOTE: Attempting to restart the tool without either recharging
the battery or installing another battery (with charge) will lead to
drill restarting and then stopping again, after only a few seconds of
operation.
WARNING!
Be prepared for binding when the bit breaks through the
workpiece, because the drill has a tendency to grab and kick
opposite to the direction of rotation, which could cause a loss of
control. If the operator is not prepared, this loss of control could
result in serious injury.