Meauro APT01 User manual


01
*Safety Instructions
• For the best effects, please use the projector in a darker room or with the
curtains closed.
• Please use the projector with caution, as dropping or collision may damage the
components or cause blurred images and abnormal display.
Please carefully read this user manual before using the projector and keep it
properly for future reference.
1.To ensure a steady power supply for the projector, please use the power supply
circuit that meets your national electricity standard. Please use a grounded power
outlet.
2.Use the type of power source indicated on the projector for power supply.
3.Do not directly lookinto the lens oftheprojector while theprojector isoperating,
as intense light may hurt your eyes.
4.Do not place theprojector on objects (such as cloths, blankets, etc.) that may
cause blockage on the air vents.
5.The product is not waterproof and should be prevented from water drenching or
splashing. It’s recommended not to put items with liquid (such as vases, water
glasses, etc.) near the projector.
6.Never let the projector get wet or let water get inside of the projector to prevent
an electric shock.
7.Unplug the power cord if the product is not going to be used for a long time.
8.Use the original foam when transporting the product.
void.
10.Do not attempt to repair the projector by yourself if it is found to be faulty, and
please contact our customer service.
The device is only applicable for safe use in an environment with the altitude less
than 2000m. When used in an environment with the altitude above 2000m, there
may be a safety hazard.
EN

02
*What’s in the Box
1 x Projector
1 x 19VDC Adapter
1 x Remote Controller (2xAAA batteries not included)
1 x User Manual
03
*Product Introduction
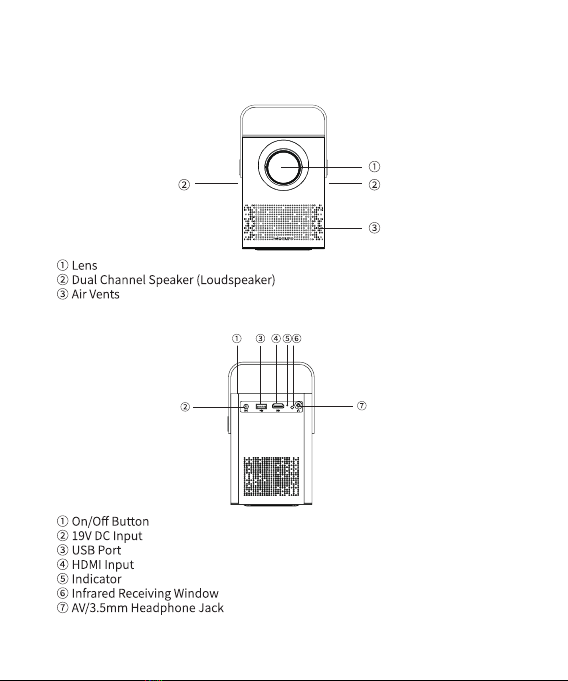
1.Front View
2.Back View

04
3.Top View
4.Bottom View
05
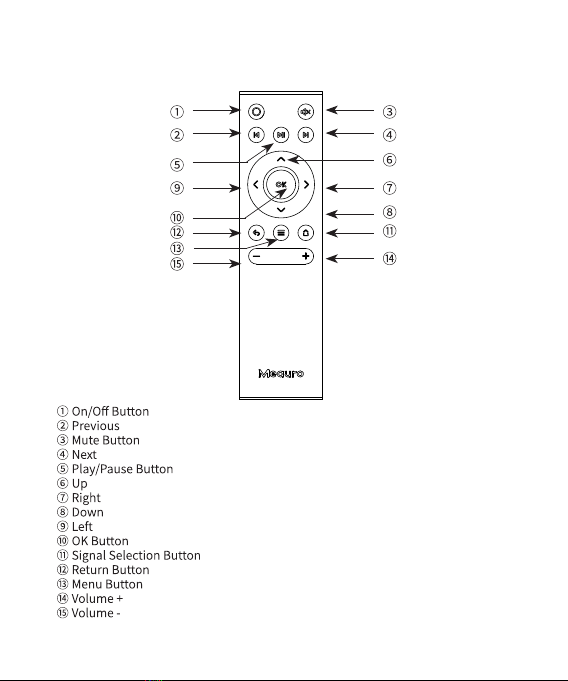
Infrared Remote Controller Features

06
*Operation Descriptions
Installing the Projector
When installing the projector, you can either place it on a solid and stable desktop
or hang it to the ceiling via a mounting bracket. Ensure good ventilation around
the projector and that no objects cover or block the air vents. There shouldn’t be
surface should be white and even.
By reference to the data in the following table and based on the preset projection
sizes, you can put the projector in a place that maintains the best distance to the
projection screen. To achieve 40-200inch projection image, the minimum distance
and maximum distance of the projector to the projection surface should be 1.2m
and 7m respectively.
Projection size
(inch)
Screen length
(cm)
Screen width
(cm)
Distance between
lens and screen
(cm)
40 89 50 119
50 111 62 148
60 133 75 178
70 155 87 208
80 177 100 237
90 199 112 267
100 221 125 297
110 244 137 326
120 266 149 356
Note: The above data are for reference only, and please take actual measurement
as standard.
properties, and then install it. Doing so will help you find the most suitable
position for installation.
The device is built in with an automatic vertical keystone correction function,
which is used for correcting the projection image.
07
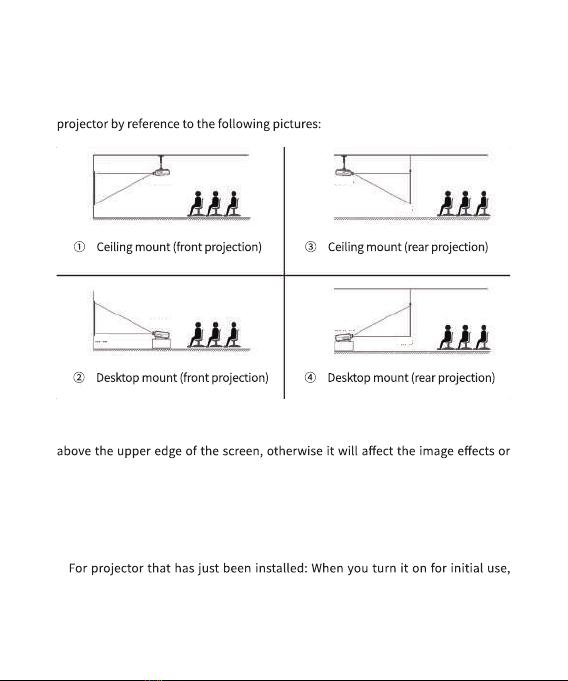
Installation Method
Based on your using environment and need, you can either hang this projector to
the ceiling via a special mounting bracket, or place it on a stable desktop for front
projection to the screen. Of course, you can also use other methods to install the
Projector Projector
Projector
Projector
Screen
Screen
Screen
Screen
Notes:
• When using a mounting bracket for installation, the projector shouldn’t be
the keystone correction function.
• Be sure to install the projector at the symmetry axis of the left and right of the
screen, so as to avoid keystone distortion on the left and right of the image.
Ensure good ventilation around the projector after installation. There shouldn’t
be any object that covers or blocks the air vents of the projector.
• Do not connect the projector to a power source during installation, otherwise it
may cause an electric shock or projector circuit fault.
•
keystone distortion and blurring may appear on the upper and lower edges of the
image, please wait for automatic keystone correction and use the focus wheel for
manual focus.
08
1.Power On
selected the advanced version, then it doesn’t have a built-in battery.)
projector will then start working.
about 1 minute before any operation.
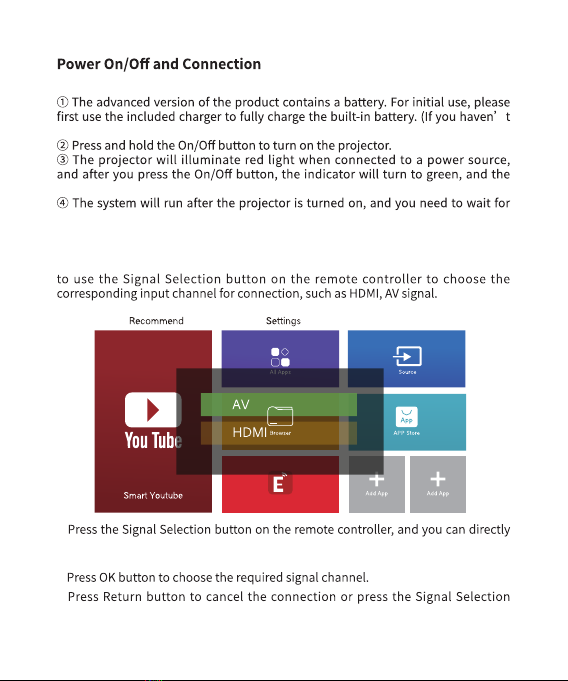
2.Selecting Signal Source Input
When the projector is to be connected to different device interfaces, you need
•
call up the signal channel menu in any interface, then use Up or Down direction
key to switch the signal channel.
•
•
button again to choose other channel.
EShare
09
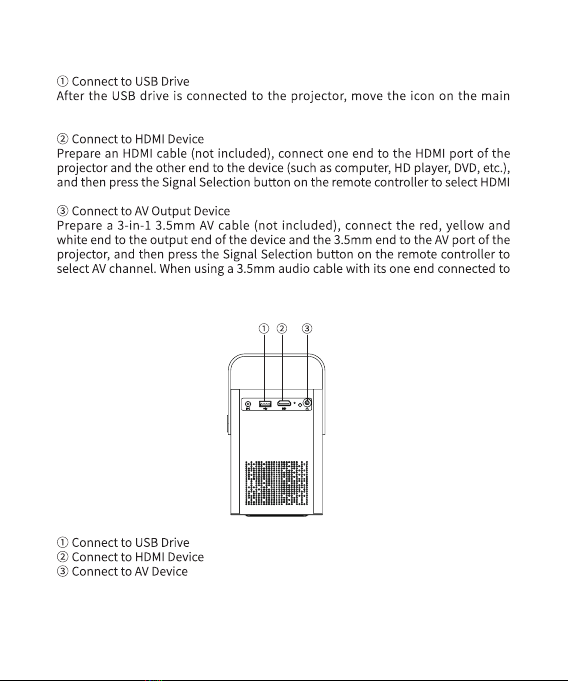
3.Projector Connection Settings
interface to corresponding option, then you can open files like videos, audios,
documents, images, etc.
channel.
the projector and the other end connected to a speaker, you can output audio to
the acoustic equipment for playback.

10
*Android Interface
1. Overview
projector.
2. All Apps
EShare
Netflix Prime Vid
iMirror
FileBrows
prime
video
SpotifySmart You Wirelessl
EShare
11
3. Browser
Due to Dolby patents and copyrights, this machine currently doesn’t
support any Dolby-related audio decoding.
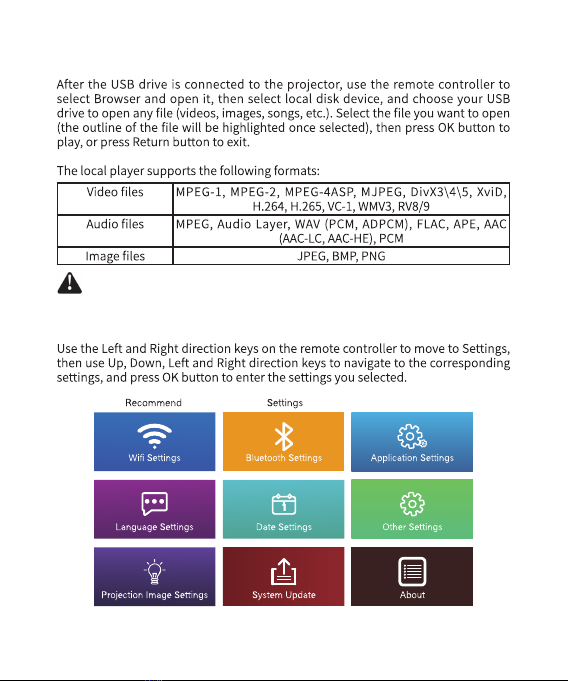
4. Android Settings
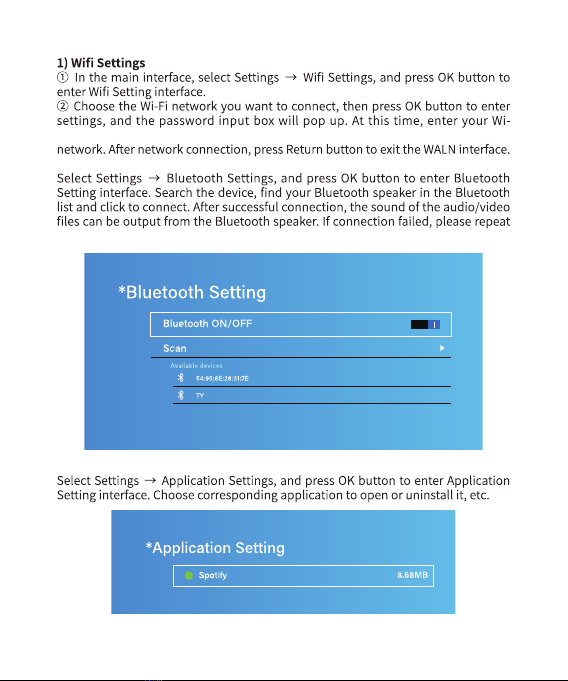
12
Fi password and click to connect, and your projector will be connected to the
2) Bluetooth Settings
above steps.
3) Application Settings
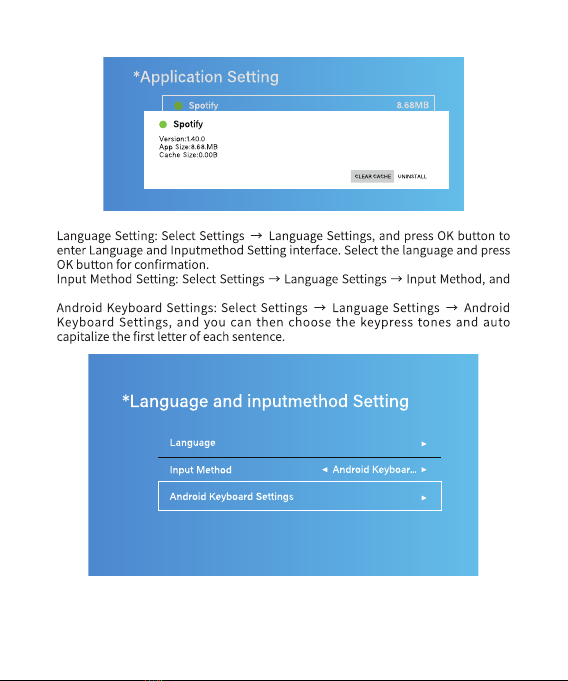
13
4) Language Settings
select system input method or the downloaded input method.
14
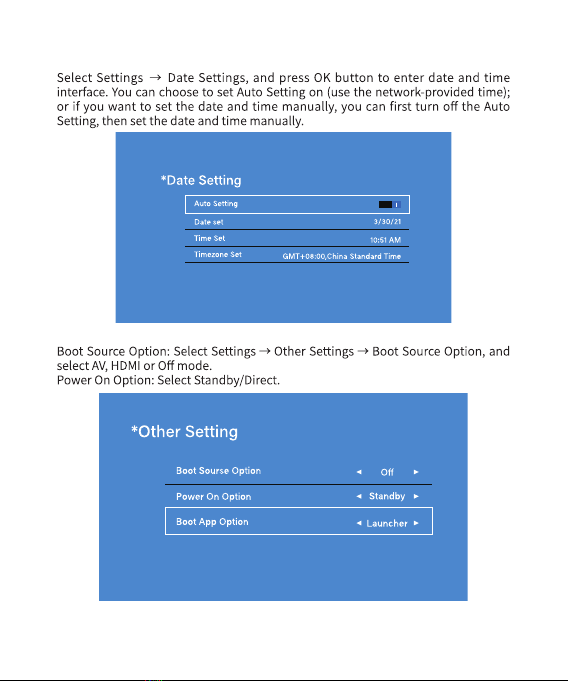
5) Date Settings
6) Other Settings
15
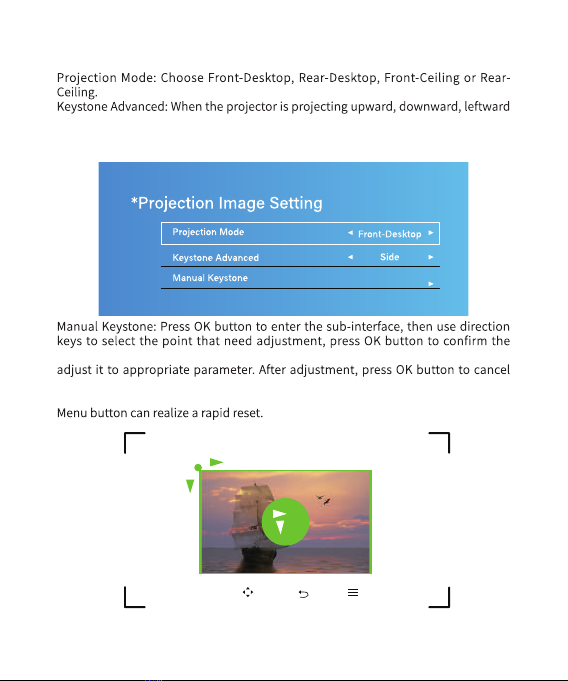
7) Projection Image Setting
or rightward, you need to open the 4-point keystone correction to adjust the
image to normal state. This technology uses electronic technology to realize
normalization of the projection image.
selected point, and after the selected point is confirmed, use direction keys to
the selected point, and use direction keys to move to other points that need
adjustment, then repeat the operation procedures mentioned above. Pressing
When the centercircle for the roundness image best proportion.
“OK”Select“ ”Adjust“ ”Back“ ”Menu
0
0
16
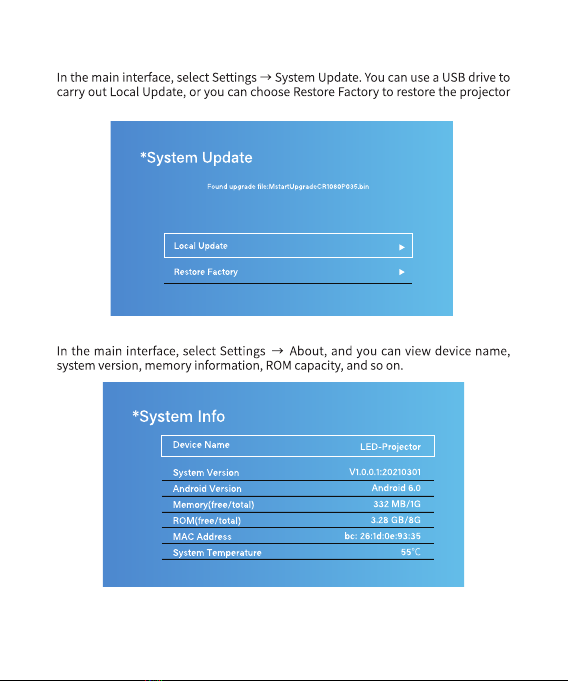
8) System Update
to its factory settings.
9) About
17
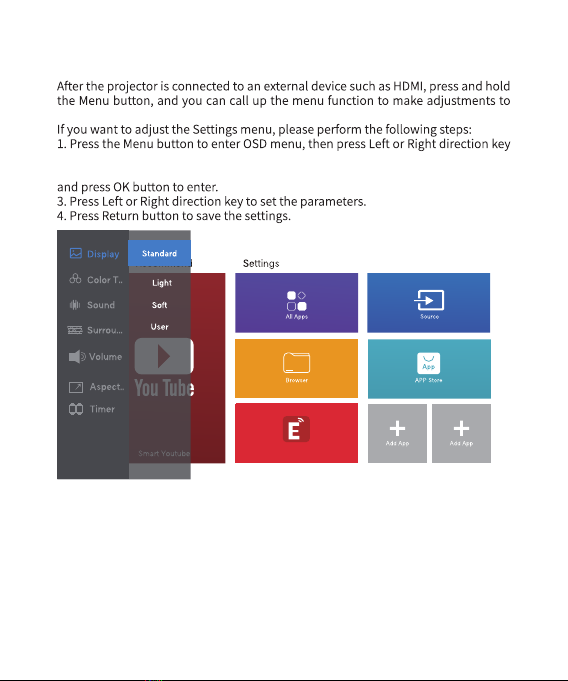
*External Channel OSD Menu Settings
the sound and image.
to select the menu that needs to be set.
2. Press Up or Down direction key to move to the item that needs to be adjusted,
EShare

18
Main Items for Adjustment
Item Description
Image mode
display to different setting (Normal,
*Troubleshooting
Problem Possible cause Solution
T h e p ower i ndi c ato r
doesn’t light up.
The power plug is not
properly inserted.
Insert the power plug
into an electrical outlet
properly.
Failed to turn on the
projector by pressing
remote controller.
controller has run out of
battery.
If so, please replace it with
light directly shining upon
the infrared receiving
window on the projector.
If so, please draw your
curtains or move the light
source away.
The projected image is
not clear.
You didn’t turn the focus
wheel to a chie v e the
Turn the focus wheel to a
proper position to achieve
the clearest focu sin g
*Troubleshooting
The power indicator doesn’t light up.
Failed to turn on the projector by
pressing the On/Off button on the remote
controller.
The projected image is not clear.
The projected image has a white screen.
The automatic keystone correction
function doesn’t work.
There is no sound when playing the
Dolby sound effect.
The mobile phone cannot connect to
Eshare.
Copyrighted contents from Netflix
cannot be screencast and played by
mobile phone (for both iOS and Android).
You cannot perform Up / Down / Left / Right
operations on the interface of Netflix or
Amazon prime video via the remote
controller.
The power plug is not properly inserted.
The remote controller has run out of
battery.
There is strong light directly shining upon
the infrared receiving window on the projector.
You didn’t turn the focus wheel to achieve the
clearest focusing effect.
It is caused by electrostatic interference.
The automatic keystone correction function is
off in the settings.
The device doesn’t support Dolby sound effect.
Your phone is in a weak Wi-Fi signal coverage.
There may be a connection problem if the
Wi-Fi signal is weak.
Due to Netflix copyrights, the third-party device
doesn’t support to play.
The remote controller doesn’t support to
swipe the interface of Netflix or Amazon prime
video.
Insert the power plug into an electrical
outlet properly.
Please replace it with 2xAAA batteries.
Please draw your curtains or move the
light source away.
Turn the focus wheel to a proper position
to achieve the clearest focusing effect.
Press and hold the On/Off button for 5
seconds to make it normal.
Turn the automatic keystone correction
function on in the settings.
Make sure the Wi-Fi signal is strong and
try to connect to Eshare again.
You can screencast videos of other video
platforms.
You need to swipe or click to enter the
interface via the Mouse function of
Eshare.
Problem Possible cause Solution
19
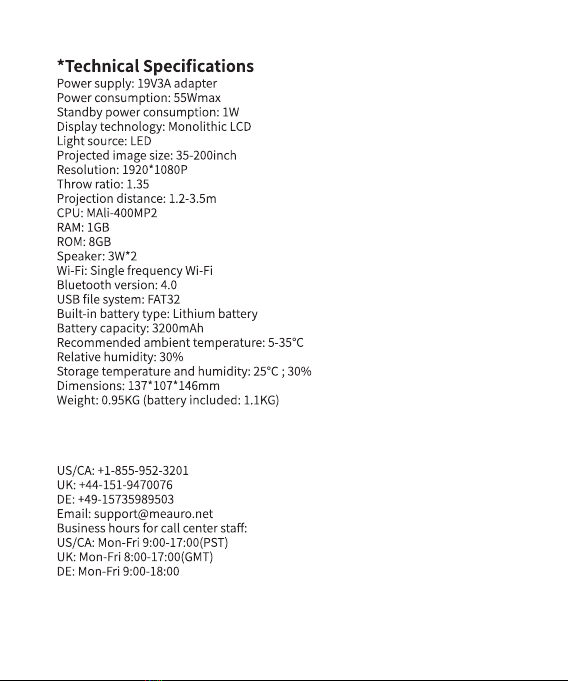
*After-sales Contact Information
Disclaimer: Our company reserves the right to modify any content in the user
manual without prior notice.
Table of contents
Popular Projector manuals by other brands

Barco
Barco DP-1200 Specifications

Sanyo
Sanyo PLV-HD100 - 5500 Lumens owner's manual

3M
3M Overhead Projector 2660 operating instructions

Linear Technologie
Linear Technologie LINEARLEDS LTL.LYA200 Operation manual

Hitachi
Hitachi CP-EW5001WN User's manual and operating guide

Epson
Epson 7900p - PowerLite XGA LCD Projector Product information


