MEDC DB1PUL User manual

© Eaton MEDC Ltd 2017 07/17
Tec nical Manual for t e
Horn - DB1PUL
DB1HP UL
Please note t at every care as been taken to ensure t e accuracy of our tec nical manual. We do not, owever, accept
responsibility for damage, loss or expense resulting from any error or omission. We reserve t e rig t to make alterations
in line wit tec nical advances and industry standards.

1. INTRODUCTION
These horn units have been designed for use in harsh environmental conditions.
2. INSTALLATION
General
When installing and operating explosion-protected electrical equipment, require-
ments for selection, installation and operation should be referred to eg. IEC
60079-14 worldwide and the ‘National Electrical Code’ in North America.
Additional national and/or local requirements may apply.
Ensure that all nuts, bolts and fixings are secure.
Ensure that only the correct UL listed stopping plugs are used to blank off unused
gland entry points and that the NEMA/IP rating of the unit is maintained.
The unit is mounted via 2 x Ø 0.31” (8 mm) fixing holes in the base. The fixing
holes have been designed to accept an M6 screw or bolt. MEDC recommend the
use of stainless steel screws.
Cable Termination
CAUTION: Before removing the cover assembly, ensure that the power to the
unit is isolated.
Unscrew and remove the 4 off screws holding the cover assembly to the base.
Keep in a safe, accessible location.
Twist the cover gently clockwise and anti-clockwise, whilst pulling it away from the
unit. Remove to gain access to the interior of the base.
Cable termination should be in accordance with specifications applying to the
application. MEDC recommend that all cables and cores should be fully identified.
Ensure that only correct UL Listed cable glands are used and that the assembly is
shrouded and correctly earthed.
All cable glands should be of an equivalent NEMA/IP rating to that of the unit
and integrated with the unit such that this rating is maintained.
The internal earth terminal (where fitted), must be used for the equipment ground-
ing connection and the external terminal is for a supplementary bonding connec-
tion where local codes or authorities permit or require such a connection.
Once termination is complete, carefully push the cover back onto the unit, avoid-
ing damage to the mating surfaces. Replace & tighten the 4 off cover screws
evenly, to ensure maintenance of the required gap between the cover and enclo-
sure.
07/17 © Eaton MEDC Ltd 2017

GENERALARRANGEMENT
2- HOLES 5/16"/ 8mm
5 1/2" / 140mm FIXING CRS
3 1/8" / 79mm
6 7/8" / 175mm DIA
3 1/8" / 79mm
5 1/2" / 140mm FIXING CRS
6 3/4" / 171mm DIA
6 5/8" (81/2") / 168mm (216mm)
4 1/8" (6") / 105mm (152mm)
13/16"
30mm
ALL DIMENSIONS IN INCHES AND MILLIMETERS
© Eaton MEDC Ltd 2017 07/17

07/17 © Eaton MEDC Ltd 2017
SWITCH TONE
TONEFREQ/DESCRIPTION SETTING DESCRIPTION
12345
1 Alt Tones 800/970 Hz at 1/4 sec 11111
2 Sweeping 800/970 Hz at 7Hz 11110 Fast Sweep(LF)
3 Sweeping 800/970 Hz at 1 Hz 11101 Med Sweep(LF)
4 Continuous at 2850 Hz 11100
5 Sweeping 2400-2850 Hz at 7 Hz 11011 Fast Sweep
6 Sweeping 2400-2850 Hz at 1 Hz 11010
7 Slow Whoop 11001 Slow Whoop
8 Sweep 1200-500 Hz at 1 Hz 11000 Din Tone
9 Alt Tones 2400/2850 Hz at 2 Hz 10111
10 Int Tone of 970 Hz at 1 Hz 10110 Back-Up Alarm(LF)
11 Alt Tones 800/970 Hz at 7/8 Hz 10101
12 Int Tone at 2850 Hz at 1Hz 10100 Back Up Alarm(HF)
13 970Hz at 1/4 sec on 1 sec off 10011
14 Continuous at 970 Hz 10010
15 554Hz for 100mS / 440 Hz for 400mS 10001 French Fire Sound
16 Int 660 Hz 150 mS on 150 mS off 10000 Swedish Fire Alarm
17 Int 660 Hz 1.8 sec on 1.8 sec off 01111 Swedish Fire Alarm
18 Int 660 Hz 6.5 sec on 13 sec off 01110 Swedish Fire Alarm
19 Continuous 660 Hz 01101 Swedish Fire Alarm
20 Alt 554/440 Hz at 1 Hz 01100 Swedish Fire Alarm
21 Int 660 Hz at 7/8 Hz 01011 Swedish Fire Alarm
22 Int 2850 Hz 150 mS on 100 mS off 01010 Pelican Crossing
23 Sweep 800-970 Hz at 50 Hz 01001 Low Freq Buzz
24 Sweep 2400-2850 Hz at 50 Hz 01000 High Freq Buzz
25 3 970Hz pulses 0.5on/0.5off, 1.5 off 00111
26 3 2850Hz pulses 0.5on/0.5off, 1.5 off 00110
27 Int 3100 Hz 0.32s on / 0.68s off 00101
28 Spare/CustomerTone
00100
29 Spare/CustomerTone 00011
30 Spare/CustomerTone 00010
31 Spare/CustomerTone 00001
32 Spare/CustomerTone 00000
*
*
*
* DB1P Tone 4 is acceptable for Public mode use. DB1P Tones 14 & 19 are acceptable for
Private mode use. DB1HP Tones 4 & 14 are acceptable for Public mode use.
DB1HP Tone 19 is acceptable for Private mode use

© Eaton MEDC Ltd 2017 07/17
3. OPERATION
3.1 The unit is initiated directly from the power source.
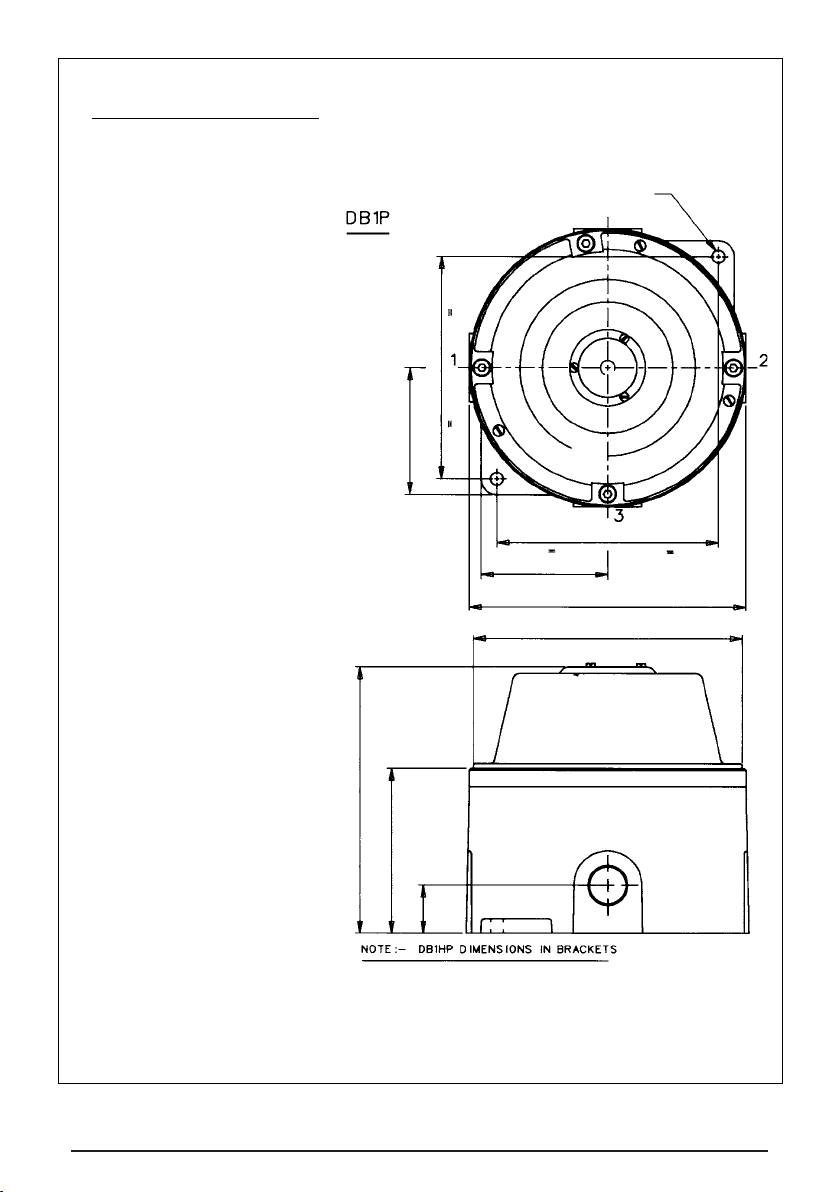
The DB1P & DB1HP units include two 5-way DIL switches to select any two
tones from the list. Use SW2 to select tone 1 & SW1 to select tone 2.
3.2 Single Stage Alarm (d.c. version only)
To operate as a single stage alarm, set the appropriate tone using SW1 and
connect input wires to TB1 (+ve) (red) and TB5 (–ve) (blue). Loop in and loop
out is then TB2 and TB6.
To operate in supervisory mode, reverse the voltage between TB1 and TB5
(such that TB1 is -ve and TB5 +ve).
Note that there is a diode mounted on the PCB which will inhibit the operation
of the sounder in the supervisory (reverse voltage) mode.
3.3 Two Stage alarm (d.c. version only)
To operate as a two stage alarm, set the required tones using SW2 for tone 1
and SW1 for tone 2.
3.3.1 Reverse Polarity Set Up
Connect input wires to TB1 (+ve) (red) and TB3 (–ve) (black), tone 1
will sound. Reverse the voltage so that TB3 is +ve and TB1 is –ve, tone
2 will sound.
3.3.2 Common +ve Set Up
Connect input wires to TB1 (+ve) and separate –ve’s to TB3 and TB5.
When TB3 is –ve tone 1 will sound, when TB5 is –ve tone 2 will sound.
3.4 Single Stage Alarm (a.c. version)
When the unit is powered with a.c. only a single stage alarm is available.
Tones should be selected using SW1. Connect input wires between TB1 and
TB3.
Note: In all set ups, loop in and loop out is facilitated by TB2, TB4 and TB6 as
appropriate.
4. MAINTENANCE
During the working life of the unit, little or no maintenance is required. However,
if abnormal or unusual environmental conditions occur due to plant damage or
accident etc., then visual inspection is recommended.
If a fault should occur, it is recommended that the unit be returned to MEDC for
repair. All parts are replaceable.
If you have acquired a significant quantity of units, it is recommended that spares
are also made available. Please discuss your requirements with the Technical
Sales Engineers at MEDC.

07/17 © Eaton MEDC Ltd 2017
5. CERTIFICATION/APPROVALS
Please refer to marking on the unit for specific approval details.
s5,LISTEDFORUSEIN#LASS$IVISION'ROUPS#$USA (USL) Class 1, Zone 1, Groups IIA & IIB.
s5,3TANDARDS5,5,s3UITABLEFORHAZARDOUSLOCATIONlREALARMAPPLICATIONS6. CERTIFIEDTEMPERATURE
–25°C to +55°C
–13°F to +131°F
Introduction
The DB1H Sounder has been designed for use in potentially explosive atmospheres and harsh
environmental conditions. The marine grade alloy or stainless enclosures are for use offshore or
onshore, where light weight combined with corrosion resistance and strength is required.
The safety function of the Sounder is to provide a pre-determined audible warning sound when
required if the correct voltage is applied to the unit. The DC version of the Sounder is designed to
operate on a supply voltage tolerance of +/- 20%,
Under No fault (Normal) Operating conditions the DB1 Sounder will provide an audible warning
sound when required by the system.
Under fault conditions the failure mode of the Sounder is a failure to provide an audible warning
sound. For the failure rate associated with this failure mode please refer to the table below.
Assessment of Functional Safety
This Sounder is intended for use in a safety system conforming to the requirements of IEC61508.
UL has conducted a Failure Modes Effect and Diagnostic Analysis (FMEDA) of the DC version of DB1H
Sounder against the requirements of IEC 61508-2 using a Proof Test Interval of 8760hrs.
The results are shown below and are based on Route 1H
The Sounder is classed as a Type B device
7. FUNCTIONAL SAFETY - DB1H

© Eaton MEDC Ltd 2017 07/17
DB1H SOUNDER
Safety Function of DB1H Sounder:
To provide a pre-described audible warning sound when required’
Summary of Clauses
2/7.4.2 and 2/7.4.4
DB1H Sounder
Single Mode (1oo1)
DB1H Sounder
Redundant Mode (1oo2)
Verdict
HFT=0
HFT=1
Type B
Architectural constraints
Safe Failure Fraction (SFF)
65%
65%
SIL 1(1oo1)
SIL 2 (1oo2)
Random hardware
failures: [h-1 ]
!DD
!DU
6.45E+09
8.87E-08
6.45E+10
8.87E-09
Random hardware
failures: [h-1 ]
!SD
!SU
0.00E+00
1.59E-07
0.00E+00
1.59E-08
PFD @ PTI = 8760Hrs
MTTR = 8 Hrs
3.89E-04
3.89E-05
SIL 3(1oo1)
Average freq. of dangerous failure (high
demand-PFH)[h-1]
8.86E-08
8.86E-09
SIL 3(1oo1)
Hardware safety integrity
compliance
Route 1H
Systematic safety integrity
compliance
Route 1s
Systematic Capability
(SC1, SC2, SC3, SC4)
SC2
Hardware safety integrity achieved
Limited to: SIL 1 (1oo1) & SIL 2 (1oo2) due to SFF value.

Eaton MEDC Ltd, Unit B, Sutton Parkway, Oddicroft Lane,
Sutton in As field, United Kingdom NG17 5FB
Tel: +44 (0)1623 444444 Fax: +44 (0)1623 444531
Web: www.medc.com
MEDC Stock No:
TM107-ISS.D
07/17 © Eaton MEDC Ltd 2017
f
Conditions of Sa
fe
e
use
The following conditions apply to the installation, operation an
t
Failure to observe these may compromise the safe
ty
y
integrity of the
1.The user shall comply with therequirements given in thema
Manual and Technical manual) in regard to all relevant fun
use, installation, operation, maintenance, proof tests, maximu
etc;
2.
t
Selection of this equipment for use in safe
ty
y
functions and the
b
maintenance and repair shall only be carried out
y
y
competen
conditions and recommendations in the user documentation.
3. All information associated with any field failures of th
dependability management process (e.g., IEC 60300-3-2) an
4.
f
The unit should be tested at regular intervals to identi
fy
y
any
manual.
5. If the product is used in a redundant installation, both hard
it
integr
ty
y
for SIL 2 can be achieved. The installation must be s
common cause failures and independence from cascading fail
nd maintenance of the assessed equipment.
e assessed equipment:
anufacturer’s user documentation (This Safety
t
ctional safe
ty
y
aspects such as application of
um ratings, environmentalconditions, repair,
installation, configuration, overall validation,
r
nt personnel, obse
rv
v
ing all the manufacturer’s
his product should be collected under a
t
nd reported
to
o
the manufacturer.
t
malfunctions; in accordance with this safe
ty
y
t
it
t
dware safe
ty
y
integr
ty
y
and systematic safe
ty
y
such as to ensure sufficient protection against
lures.
This manual suits for next models
1
Table of contents
Other MEDC Horn manuals
Popular Horn manuals by other brands

Vixen Horns
Vixen Horns VXO8705/3114 installation guide

Bosch
Bosch LBC 3481 12 Installation and user instructions

Vixen Horns
Vixen Horns VXS-9075R installation guide

Federal Signal Corporation
Federal Signal Corporation Vibratone 350WBX installation manual

Vixen Horns
Vixen Horns VXH1168BX2 installation guide

Peavey
Peavey 640-2 Specifications