Miia MTV-C32DLEHD User manual

ENG Instruction manual
LEDTV
MIIAVISION
32” HD Ready
MIIA MTV-C32DLEHD


Select Input Source... .......... ...................................... ........... 17
Sockets on the back of your TV........................................... 9
Remote Control Instruction........ ........................................... 15
Setting up and using your TV ................................................ 6
What's included with your TV.............................................. 8
Basic menu operation........................................................... 17
Your Tv’s specification................................... ....................... 38
Important safety instructions................................................. 3
USB Multimedia p ayback formatl
...............................................
33
Basic installation ................................................................ 10
If you’re having problems..................................................... 36
Contents
Wall mount installation................................... ....................... 39
Attaching the stand................................... ............................ 40
2

3
Important safety instructions
Warning
Do not let your TV become wet(for example, by keeping it in a damp
room, leaving it outside or dripping water on it)
You must not put objects filled with water on your TV (including
vases of water).
.
2.Keep these instructions
in a safe place.
4.Do not put your TV near water.
5.Only clean your TV with a dry cloth.
3.Follow all the instructions.
6.Do not block the ventilation openings.
7.Do not put your TV near any heat source
(such as radiators or stoves), or near
equipment (including amplifiers) that
produce heat.
8.Your TV is either fitted with a polarised
plug or grounding-type plug. A polarised
plug has two blades with one wider than
the other. A grounding-type plug has
two blades and a third grounding prong.
The wide blade or the third prong is
provided for your safety. If the provided
plug does not fit into your outlet, ask an
electrician to replace your plug socket so
that it fits your TV plug.
9.Do not walk on, trap,pinch or damage the
power cord. Take care that the cord is not
pulled, especially at plug sockets and
where it comes out of the TV.
10.Only use attachments and accessories
(included with your TV)that we have
approved.
1.Read these instructions carefully.
1

4
Important safety instructions
11.Only use TV trolleys,stands,tripods or
tables that we approve. If you use a
trolley/table with your TV, be careful
when you move it.So that it doesn't tip
over.
12.Unplug your TV both power and
antenna during lightning storms or
when you won't be using it for a week
or more.
13.If your TV needs repairing, use a qualified service technician. If you damage your
TV, it will need to be serviced.
14.Be careful when you plug the power cord into a socket. Do not overload wall sockets.
They could damage your TV and could give you an electric shock or cause a fire.
Check your TV's power cord from time to time, and unplug your TV if the power
cord looks worn. Stop using it until you have had the power cord replaced by a
qualified technician.Do not twist, kink or pinch the power cord.
15.Disposing of your TV. The fluorescent lamp inside your TV has a small amount of
mercury in it. Phone your local council to find out where your nearest recycling centre
is located to ensure the TV is scrapped in compliance with UK & EU regulations.
Note
-If your TV is cold, there may be some small 'flickers' when you turn it on.This is
normal and there is nothing wrong with your TV.
-Avoid touching the LED screen with any object or holding your finger against it as
this may cause damage.
2
5
Important safety instructions
You will see these stickers on your TV.
This symbol means there are wires in your TV which are not insulated.
If you touch these wires, you may get an electric shock.
This symbol means you should read the servicing guide before you take
further action.
-You should not service your TV unless you are qualified to do so.
If your TV breaks down, contact a qualified TV engineer.
-Make sure you plug in your TV securely.
-If you use your TV to play video games or connect to your computer to
use as a screen, keep brightness and contrast at a low level. Images
with a high level of brightness or contrast may burn on to the
screen permanently.
How to clean your TV
1 Wipe the TV screen with a soft, dry cloth
2 Do not use solvent methyl benzene. Strong chemicals may damage your TV
screen.
3 Make sure you switch the TV off before you clean it.
3

6
Setting up and using your TV
1.Check the voltage shown on the serial number or rating label on your TV, and
make sure your TV is compatible with the voltage in your home. If you are not
sure about the voltage you have in your home, please contact your distributor
or an electrician.
2.Make sure you plug the power cable into the socket securely. If you have
problems plugging in your TV, please contact the shop you bought your
TV from to replace the power cable.
The plug is designed,o that .
If you have problems plugging in the socket properly, please
contact .
s it will only fit one way
the shop you bought your TV from
1.Do not overload power sockets or extension cords when you are setting up your
TV.If you overload the power sockets or extension cords, you could receive
an electric shock or cause a fire.
2.Do not place any objects on the power cord when you are setting up your TV.
Keep your TV screen away from any sharp objects such as screw drivers or
knives so that you don't scratch or damage the TV screen.Only use the
correct power cord when you set up your TV.
3.Make sure you turn off your TV when you are not using it.If you won't be using
your TV for a week or more, unplug both power and aerial connections.
4.The vents at the back of your TV are to let air cool the inside of your TV,so
it doesn't overheat. Please make sure the vents are not blocked.
5.Do not put your TV on a bed, sofa or carpet.This may block the vents.
6.Do not put your TV in an enclosed space, such as on a bookshelf or in a TV
cabinet.Doing this may block the vents.
7.Keep your TV away from direct sunlight.
8.Do not place your TV on an unsteady shelf or desk.The TV could fall and
injure you.
9.Do not put objects inside the TV (such as children's toys).Doing this could
give you an electric shock or damage the parts inside your TV.
When you must call a technician
If any of the following happens,unplug your TV and contact the shop
you bought your TV from or a qualified technician to repair your TV.
1.If the power cord or plug is damaged
2.If liquid gets into the screen
3.If your TV is damp or wet
4.If your TV is damaged
5.If the TV doesn't work properly.
The temperatures your TV will work in
Your TV will only work when the temperature is in the range of 0℃-40℃.
4

7
Setting up and using your TV
Safety notice
Your TV has a CE marking. This means your TV meets both the EMC directive
(89/336/EEC), (93/68/EEC) and the Low Voltage Directive (73/23/EEC) that the
European Community have issued.
When you need to throw your TV away
Please contact the shop that sold you your TV when you need to throw it away.
1.Do not throw your old TV away with your household waste.
2.You can also contact your local council to see if they can collect your old TV.
If you throw your TV away at a landfill site,dangerous chemicals from your TV
can leak into the ground and get into the food chain.
3.When you replace your TV with a new one, the shop who sold you your TV
are legally responsible for taking your old TV and throwing it away.
Do not try to repair your TV yourself. There is high voltage inside it and
you could receive an electric shock.
Warning ! This logo set on the product means that the recycling of this
apparatus comes within the framework of the Directive 2002/96/CE of January
27, 2003 concerning the Waste of Electrical and Electronic Equipment (WEEE).
This symbol means that used electrical and electronic products should not be
mixed with general household waste. There is a separate collection system for
these products.
If you want to dispose of this equipment, please do not use the ordinary dust bin !
-The presence of dangerous substances in the electrical and electronic equipments can
have potential consequences on the environment and human health in the cycle of
reprocessing this product.
-Therefore, at the end of its lifetime, this product shall not be disposed with other non-
recycled waste. Used electrical and electronic equipment must be treated separately and in
accordance with legislation that requires proper treatment, recovery and recycling of used
electrical and electronic equipment.
-Local authorities and resellers have set special procedures for the purpose of collecting
and recycling this product (please contact your local authority for further details). You have
the obligation to use the selective waste collection systems put in place by your local
authority.
-If your used electrical or electronic equipment has batteries or accumulators, please
dispose of these separately beforehand according to local requirements.
-By disposing.of this product correctly you will help ensure that the waste undergoes the
necessary treatment, recovery and recycling and thus prevent potential negative effects on
the environment and human health which could otherwise arise due to inappropriate waste
handling.
This unit complies with European Council Directive 2006 / 95
CE (Electromagnetic Compatibility & Low Voltage Directives)
END OF LIFE DISPOSAL
5
8
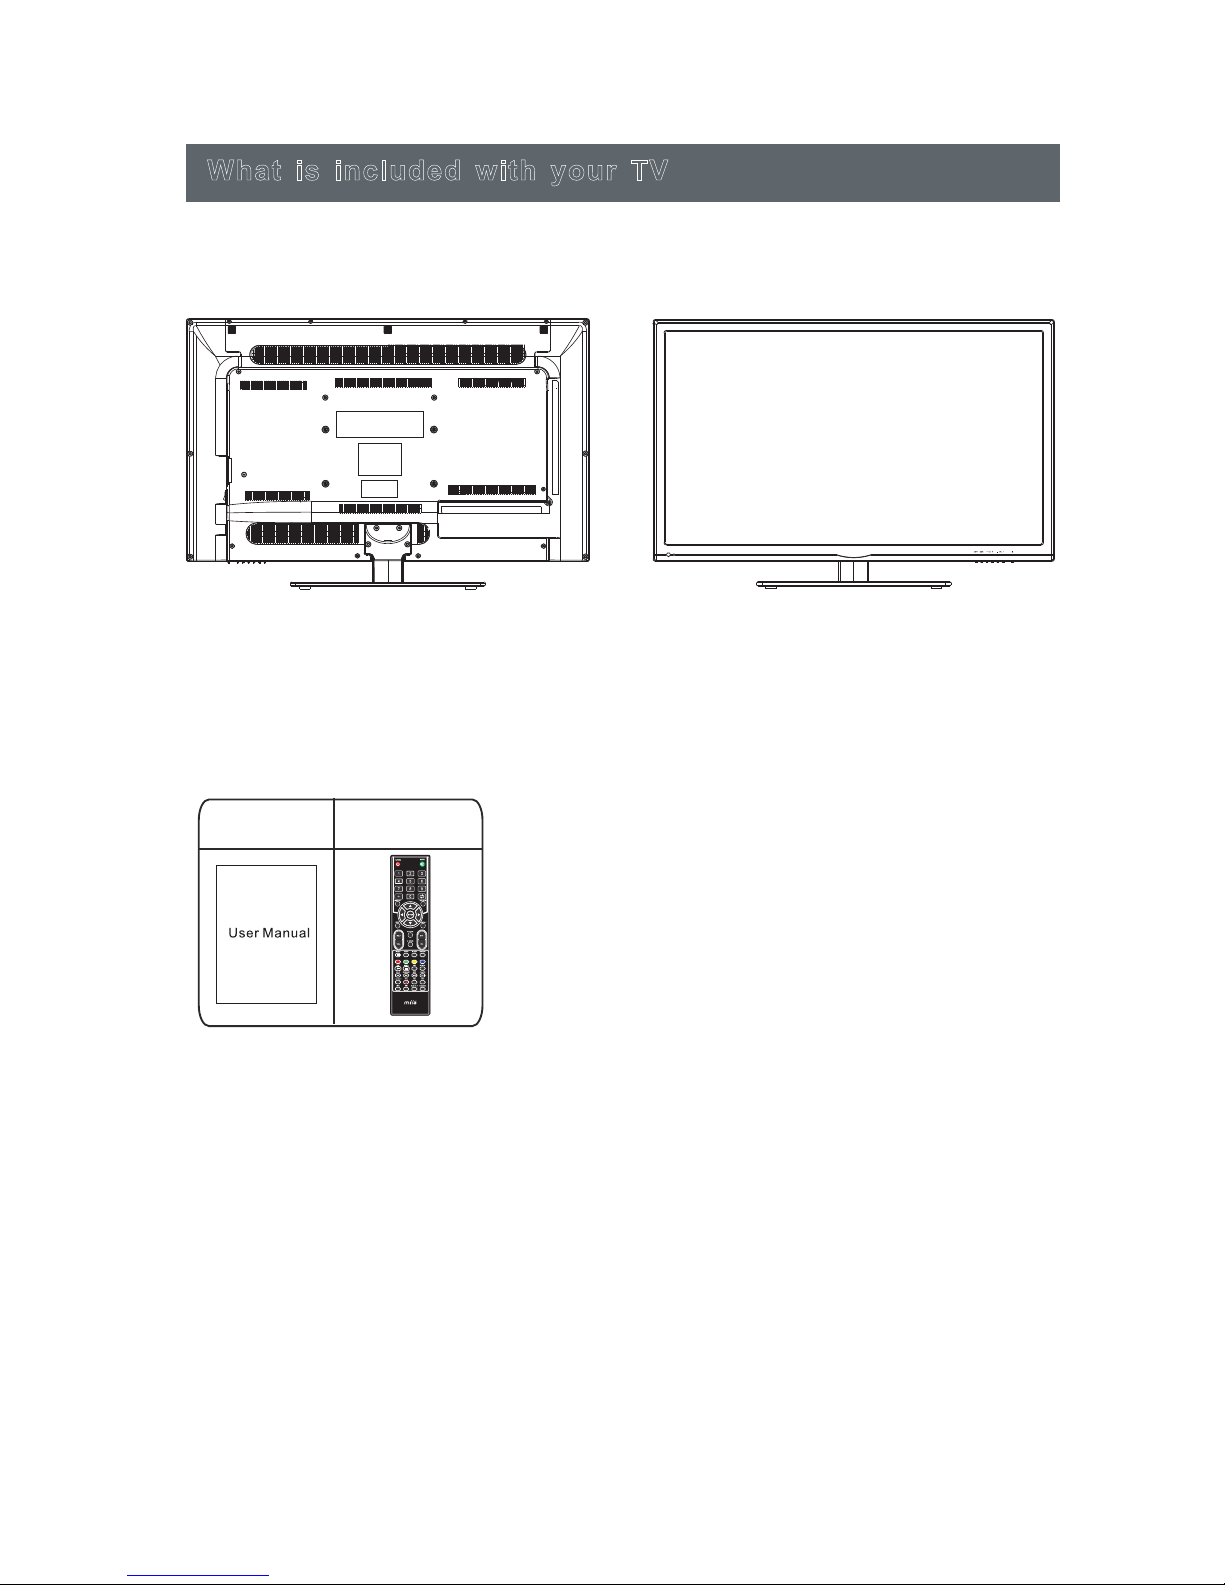
What your TV should look like
What is included with your TV
How to use your remote control
1.Take the back cover off your TV remote and put two AAA batteries into the remote
control. Make sure the + and - symbols on your batteries match the diagram.
2.Replace the batteries. So they are facing the right way.If you won't be using the
remote control for a long time,take the batteries out.Use your remote control
carefully.Do not drop.Keep the remote control away from water, direct sunlight
and hot surfaces.
What is included with your TV
User guide Remote control
6
9
S o c k e ts o n th e ba c k o f y o ur T V
1.Press “VOL+”or “VOL-”to increase
or decrease the volume.
2.Press “CH+”or “CH-”to scan
through channels.
3.Press “MENU”to bring up the main
menu on the screen.
4.Press “SOURCE”to select the input
source.
5.Press “POWER ”button to turn
standby mode on or off.
6.REMOTE SENSOR: Infrared sensor
for the remote control.
7. POWER INDICATOR:Show red in
standby mode, show green or blue
when your TV is switched on.
7
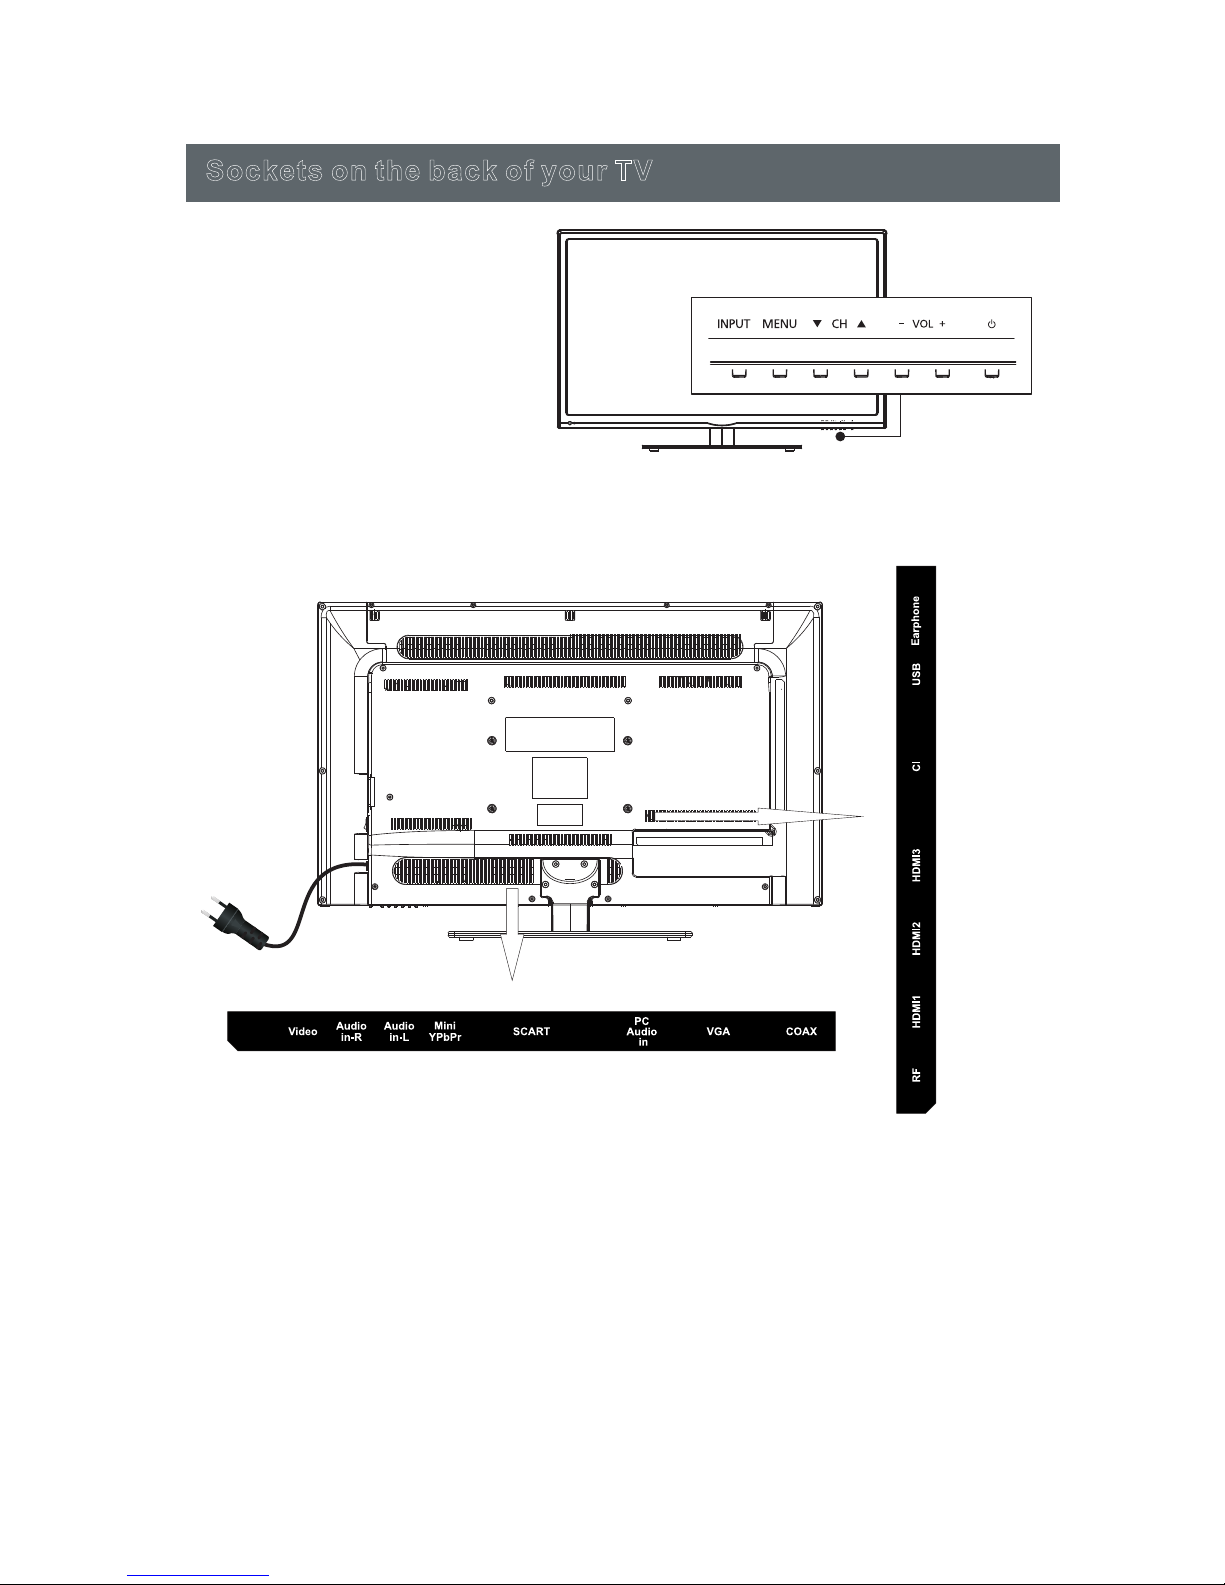
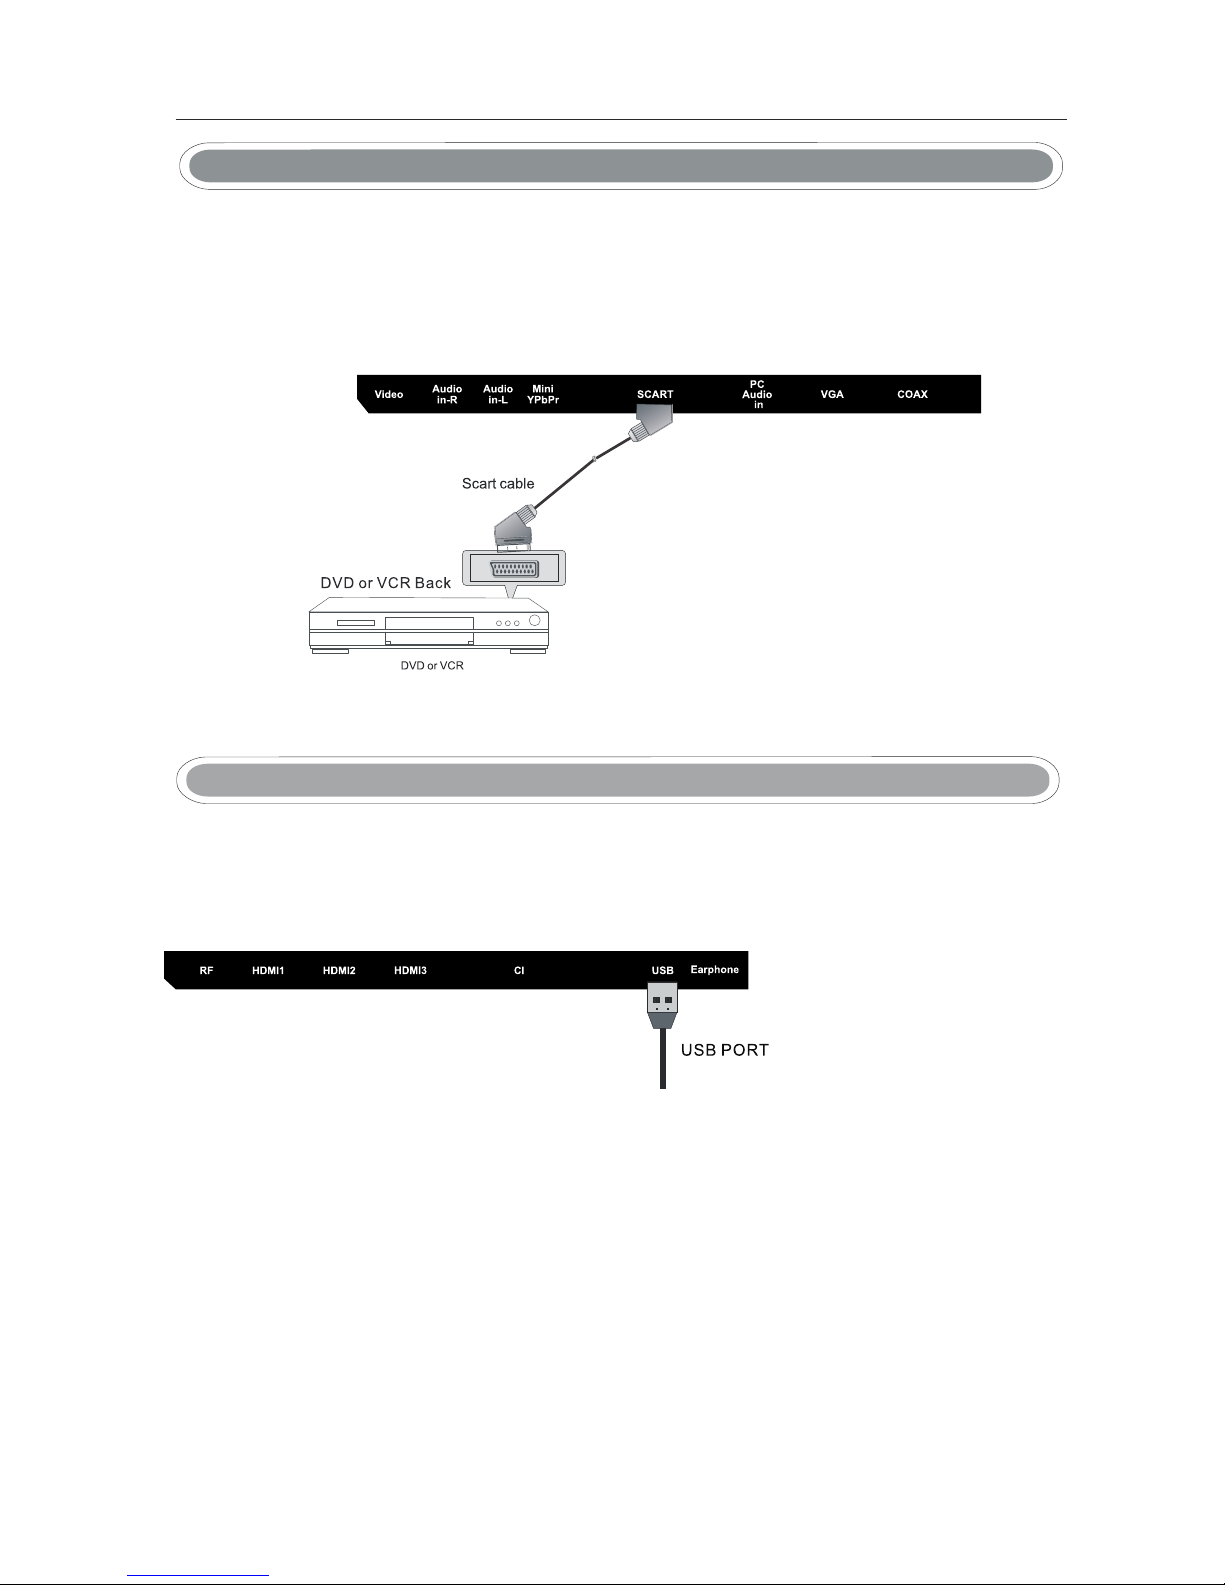
Video:Connect the Video output jack of DVD or VCR.
Audio in R/L: Connect the Video/YPbPrAUDIO output jack of DVD.
SCART: Connect the SCART jack of VCR or DVD
PC Audio in: Connect the Audio output jack of PC.
VGA:
RF : Connect the antenna.
Mini YPbPr: Connect the YPbPr output jack of DVD or VCR.
Headphone: Connect the earphone.
HDMI1/2/3: Connect the HDMI output jack of DVD.
CI: Connect to the CI card.
USB: Connect to portable usb device.
COAX: Coax output.
Connect a computer to these jacks.
S o c k e ts o n th e ba c k o f y o ur T V
Remote Sensor
Power Indicator
1.Press “VOL+”or “VOL-”to increase
or decrease the volume.
2.Press “CH+”or “CH-”to scan
through channels.
3.Press “MENU”to bring up the main
menu on the screen.
4.Press “SOURCE”to select the input
source.
5.Press “STANDBY”button to turn
standby mode on or off.
6.REMOTE SENSOR: Infrared sensor
for the remote control.
7. POWER INDICATOR:Show red in
standby mode, show green or blue
when your TV is switched on.
7
VOL+
VOL --
CH CH +MENU SOURCE STANDBY

10
8
Power Cord Connection
Antennas Connection
- Connect the power cord correctly as shown.
- Press the STANDBY switch of your LED TV to switch the unit on. The power indicator on the front panel
lights up in green or blue.
To ensure good picture and sound,TV antenna system needs to be installed. The antenna system as
shown can be sourced from TV equipment shops, which will provide service for correct installation
and connection. After installation, insert the 75-OHM antenna plug into the antenna jack as shown.
BASIC INSTALLATION
11
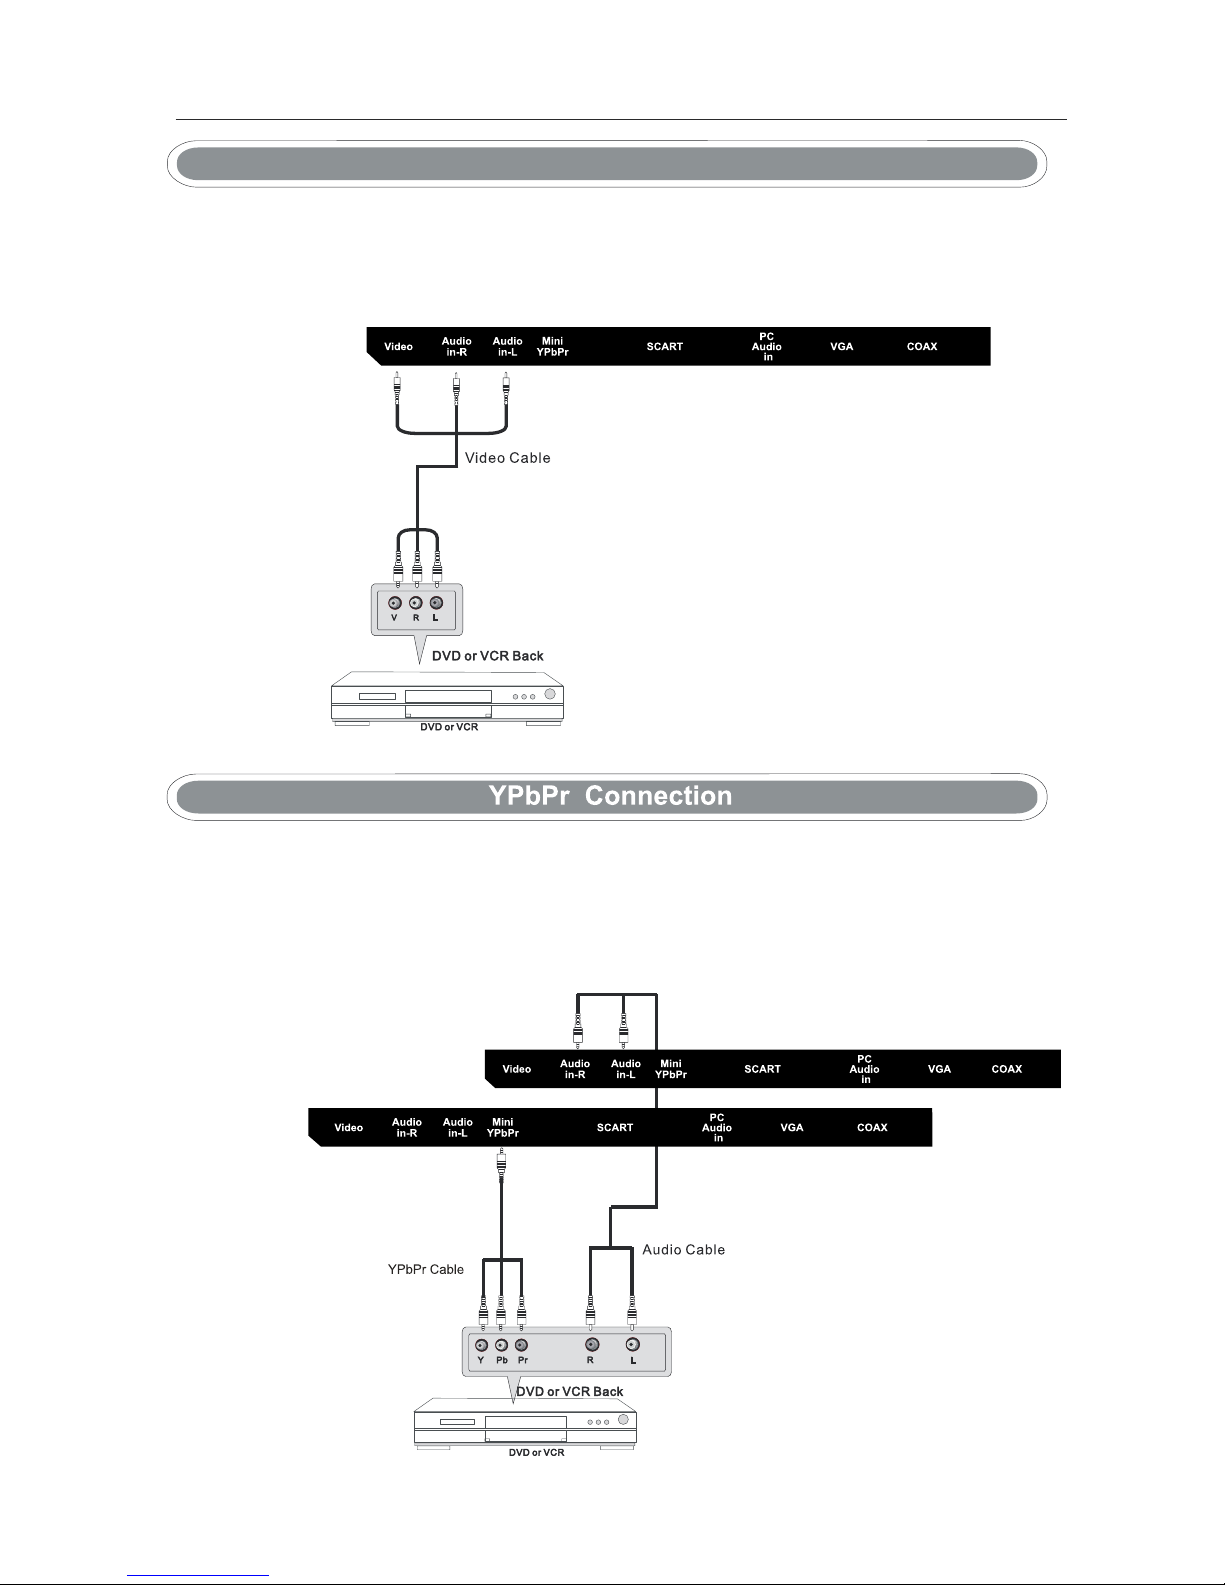
AV Connection
9
Connect the VIDEO and AUDIO output jack of the DVD or VCR to the AV IN jacks on the set using
the RCA cable (Yellow [video], White and RED [left & Right audio]).
Select the AV input source using the SOURCE button on the remote control.
Connect the YPbPr/YCbCr output of the DVD or VCR to the YPbPr input on the set.The picture
quality is improved compared to connecting a regular VCR to the video input. Connect the Audio output of
the DVD or VCR to the Audio input jacks on the set using the RCA cable.(3.5mm plug-2 X RCA plug)
Match the jacks colours: Y is green, Pb is blue, Pr is red, Audio left is white and Audio right in red.
Select YPbPr input source using the SOURCE button on the remote control.

12
10
Connect the RGB output of the PC to the VGA jack on the set. Connect the AUDIO output of the PC to the PC
AUDIO jack on the set. Select the PC input source using button on the remote control.
SOURCE
HDMI connection allows the user to transfer both audio and video control signals through one cable only.
These signals are transferred in digital.
VGA(PC) Connection
13
11
Connect the SCART connector on the external video device to the SCART connector on the LED TV
using a SCART cable.
SCART Connection
USB: Connect to portable usb device.
MEDIA Connection

14
12
Headphone Connection
-You can connect a headphone to your TV if you wish to watch program without
disturbing people around you.
-Insert some standard headphone with a 3.5mm jack plug into the 3.5mm jack on the
back of the TV (see diagram).
NOTE:
1.HEADPHONE VOLUME WARNNING.
Connect headphones with the volume set low and increase it if required.
Prolonged listening through some headphones at high volume settings can result in
hearing damage.
2.You will not receive the sound from the TV when you connect headphones to the system.
Head
phone
WARNING

13
Remote control instruction
POWER
MUTE Press MUTE to turn off the sound on your TV.
Press MUTE again to put the sound back on your
TV.
Number buttons
Press 0~9 button to select a TV channel.
-/-- Press this button to go back to the channel you
were previously watching.
Returns to the previous channel.
Press this button to switch your TV on or put it
into standby.
AUDIO Switches audio output from L-R and Mono-Stereo.
DISPLAY To switch off the screen when listening to radio.
ENTER Enter and confirm button.
Allows you to navigate the on-screen menus and
adjust the system settings to your preference.
MENU To display OSD menu.
EXIT To exit all menus.
l/ll
VOL+/VOL- Press the VOL buttons to increase/decrease the
sound level.
AUTO To auto adjust the screen.
ASPECT To chang the aspect of your TV.
SOURCE To display the input/source menu.
PMODE Scrolls through picture mode options.
SMODE Scrolls through sound mode options.
SLEEP Press repeatedly to cycle through the
sleep options.
TEXT To enter Teletext mode.
INDEX To display the index page.
MIX TV and TXT picture are mixed together
in transparent background.
REVEAL Teletext mode-To reveal or hide the
hidden words.
HOLD Teletext mode-Hold current page which
is displayed.
SUBPAGE Sub coded page access.
SIZE To switch the screen between the
different picture formats.
CANCEL To cancel the display.
TIMESHIFT In DTV mode,press to execute the
time shift function.
CH+/CH- Press the CH buttons to go through the channel list.
COLOR BUTTONS
For navigating as prompted on
screen.
15

14
EPG Opens the 8 Day TV Guide(Digital TV model).
SUBTITLE To switch the dialogue at the bottom of the
screen(on/off).
TV/RADIO Switch to Digital TV and switch between TV and
radio in Digital TV mode.
FAV Displays Favourites list.
REC To Record what is currently on
television.
FAV- Press to decrease your favourite
program.
FAV+ Press to increase your favourite
program.
To play/pause.
To stop the playback.
To play in fast rewind mode.
To play in fast forward mode.
To restart the current chapter.
To advance forward to the next
chapter.
Only operates when
a compatible USB
device is connected.
Remote control instruction
16

Basic Menu Operation
Press SOURCE button on the remote control to display the input source list
▼ / ▲
.
Press button to select the input source you want to watch.
Press OK button to enter the input source.
Press EXIT button to quit.
Select Input Source
15
SOURCE
SOURCE:Exit
ATV
AV
PC
YPbPr
HDMI1
USB
DTV
HDMI2
HDMI3
SCART
17
16
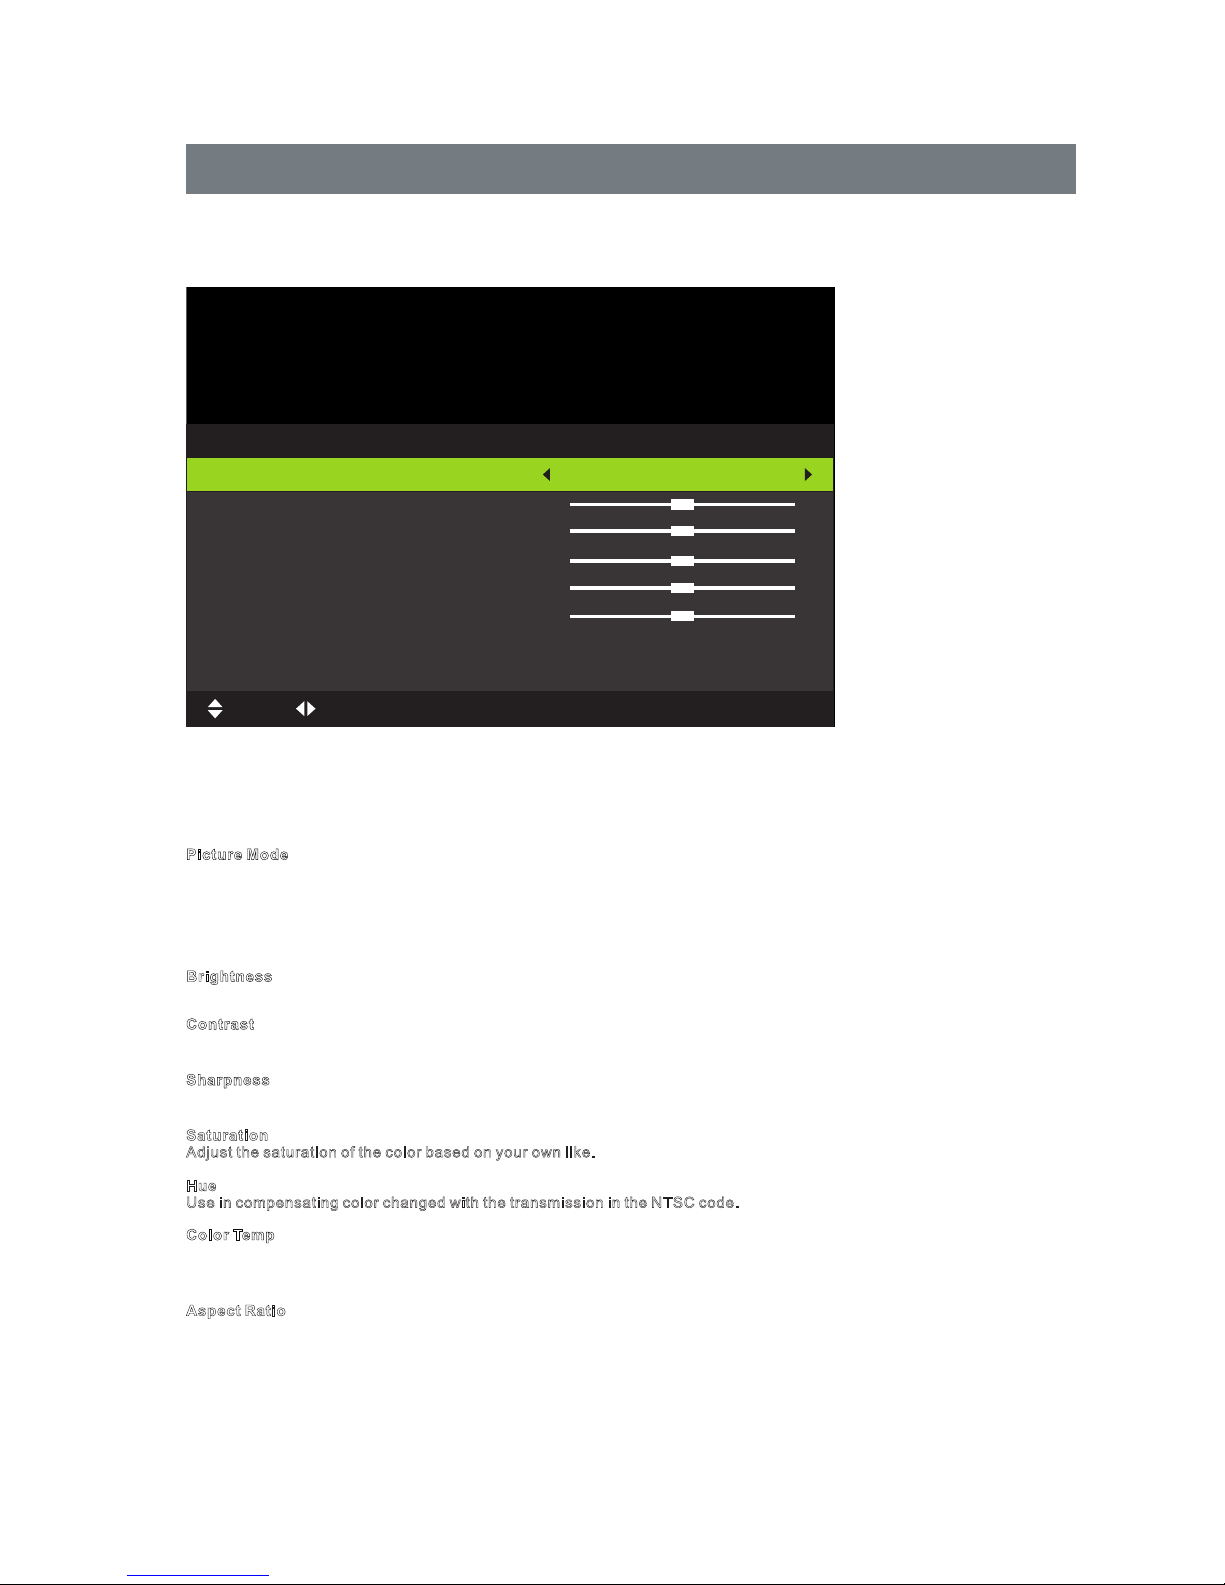
Picture Menu
Press MENU button to display the main menu.
Press ◄ / ► button to select PICTURE in the main menu,it will highlight the first option.
Picture
Picture Mode
Brightness
Contrast
Sharpness
Saturation
Hue
Color Temp
Aspect Ratio
Standard
Standard
Full
Brightness
Press ▼ / ▲ button to select Picture Mode, then press OK button to enter sub-menu.Press ▼ / ▲ button to select.
(Available Picture mode: Dynamic, Standard,Mild,Personal).
You can change the value of contrast, brightness, color and sharpness when the picture is in Personal mode.
TIPS: You can press PMODE button on the remote control to change the Picture Mode directly.
Picture Mode
Press ▼ / ▲ button to select Brightness,then press OK button to enter sub-menu.Press ◄ / ► button to adjust.
Contrast
Press ▼ / ▲ button to select Contrast,then press OK button to enter sub-menu.Press ◄ / ► button to adjust.
Press ▼ / ▲ button to select Sharpness,then press ◄ / ► button to adjust.
Sharpness
Press ▼ / ▲ button to select Color Temperature,then press ◄ / ► button to select. (Available Color Temperature:
Standard,Cool,Warm).
Color Temp
3. After finishing your adjustment, Press MENU button to return back to the previous menu.
1. Press ▼ / ▲ button to select the option that you want to adjust in the PICTURE menu.
2. Press ◄ / ► button to adjust.
Saturation
Adjust the saturation of the color based on your own like.
Hue
Use in compensating color changed with the transmission in the NTSC code.
Press ▼ / ▲ button to select ,then press ◄ / ► button to select. (Available Aspect Ratio:Full,Zoom1,Zoom2,4:3).Aspect Ratio
Aspect Ratio
50
50
50
50
0
Move Adjust MENU:Return EXIT:Exit
18

17
Advanced Settings
NR
MPEG NR
Dynamic Contrast
Medium
Advanced Settings
Medium
Off
Move Adjust MENU:Return EXIT:Exit
19
This manual suits for next models
4
Table of contents


